1
Precautions regarding Warranty
This product was jointly developed and manufactured by Mitsubishi and CONTEC.
For a warranty and specifications, pay attention to the following remarks.
Note that there are some precautions regarding warranty and specifications of the product.
<Warranty>
A warranty term without
charge
Onerous repair term after
discontinuation of production
Q10WCPU-W1
12 months after the delivery or
18 months after the production
MELSEC-Q series
36 months after the delivery or
42 months after the production
6 years
7 years
- It may take some time to respond to the problem or repair the product depending on the condition and timing.
1
Safety Precautions
(Read the following carefully before using this product)
For the use of this product, read this manual and relative manuals introduced in this document carefully.
Then take enough care of the safety and keep the right procedures.
These safety precautions are limited to this product. For programmable controller CPU systems, refer to
the manual of the corresponding CPU module.
This “Safety Precausions” classify the level of precautions into “
Warning” and “
Caution”.
Warning
“Warning” indicates that dangerous situations will lead to death or
serious injury if the right procedures are not followed.
Caution
“Caution” indicates that dangerous situations will lead to light injury or
the loss of property if the right procedures are not followed.
The items mentioned in “
Caution” also can cause serious accidents according to the situation.
The mentioned items are all important. You must follow them.
Keep this manual carefully at hand in order to read at any time and have it available for the end user.
2
Handling precautions
WARNING
-
Never use this product in locations where there is flammable gas and corrosive gas. It may lead to explosion,
fire, electric shock and breakdown.
-
The operating product may reach a high temperature. Never touch its surface. It may lead to burns.
-
Never touch this product with wet hands. It may lead to electric shock.
-
As this product contains precision electronic components, do not use or store it in a place subject to shock or
vibration. Doing so may cause malfunction, heat generation, fault, or damage.
-
Do not modify the product. Mitsubishi will bear no responsibility for any problems, etc., resulting from
modifying the product.
-
Do not use or store the product in a hot or cold place, or in a place that is subject to severe temperature
changes. Doing so may cause malfunction, heat generation, fault, or damage.
-
Do not use or store the product in a place subject to direct sunlight or near a heating device, such as a stove.
And do not use or store the product near equipment generating a strong magnetic field or radio waves. Doing
so may cause malfunction, heat generation, fault, or damage.
-
Some products have to be set up before they can be used normally. Be sure to check whether the product is
such before use. Set the switches and jumpers only as specified, or the product may develop trouble.
-
When the power is ON, don’t change any DIP switches except for SW-2 of DIP switch 1. If not, the product
may develop abnormal conditions such as the hangup of OS, system crash and irregular operation.
-
You can set SW-1 of DIP switch 1 to ON only when power is OFF. If SW-1 is ON when power is ON, it does
not work in order. You should check that SW-1 is OFF before turning power ON.
-
You should wait for 5 minutes after power OFF till the next power ON operation..
-
The monitor connected to this product may not be able to show screen in order if power of the monitor was
turned ON at an incorrect time. Turn ON power of a monitor before turning ON power of this product.
-
When using some USB devices, the current may flow to this product reversely via a conneted cable when
power of this product is OFF. In this case, you may not be able to boot up this product because +5V power is
kept to ON. When this problem happens, remove the USB device, turn ON power of this product and then,
connect the USB device again. (If you want to use the USB device as a boot device, connect it by the time
that device detenction starts.)
-
Keep the inside of a module away from foreign objects such as chips or wire scraps. It may lead to fire,
breakdown and irregular operations.
-
Do not use or store this product where any chemical atmosphere and objects can touch the product.
-
Do not use or store this product where excessive moisture or a lot of dust exists. It is very dangerous if you
use the product where there is high humidity, liquid objects or conductive dust. When you have to use the
product under such conditions, set the product in the protected structure against dust such as the control panel
with dust protection.
-
If you notice abnormal odor or overheating, please disconnect the power cable immediately.
-
After you become aware of breakdown or abnormal conditions such as an abnormal smell or excessive
heading, first turn the power OFF. Then make contact with the store which provided the product.
-
Do not open the product casing. Mitsubishi will disclaim any responsibility for products whose casing has
been opened.
CAUTION
3
-
Do not modify the product. Mitsubishi will bear no responsibility for any problems, etc., resulting from
modifying the product.
-
To clean this product, gently wipe it with a soft cloth soaked with water or a neutral detergent. Do not use
benzene, paint thinner or other volatile solvents as they can cause the coating to discolor or peel off.
-
The specifications of this product are subject to change without notice because of function addition and
quality improvement. Even when using the product continuously, read the user's manual and check the
contents.
-
If you move or transfer the product, make sure to provide this manual with the product.
-
Regardless of the foregoing statements, Mitsubishi is not liable for any damages whatsoever (including
damages for loss of business profits) arising out of the use or inability to use this Mitsubishi product or the
information contained herein.
-
When disposing of a used battery, follow the disposal procedures stipulated under the relevant laws and
municipal ordinances.
Design Precautions
WARNING
-
Provide this product with external safety circuits so that the entire system is protected even if the external
power supply malfunctions or this product breaks down. If not, incorrect output or incorrect operations
may lead to accidents.
(1) Configure those circuits outside this product that include an emergency stop circuit, a protection
circuit, an interlock circuit with contrary operations such as normal / reverse rotations, and an interlock
circuit for preventing a machine from breaking beyond the upper or lower positioning limit.
(2) This product stops calculations and turns all outputs off upon detection of the following states.
- The overcurrent or overvoltage protector of the power supply module has been actuated.
- The self-diagnostic feature of this product has detected an error such as a watchdog timer error. If
I/O control transparent to this product causes an error, all of the outputs may be turned on. Provide this
product with an external fail-safe circuit or mechanism so that the machine operates on the safe side in
that case.
(3) Depending on the fault of a relay or transistor in an output module, the output may remain on or off.
For the output signals which can result in serious accidents, provide external monitor circuits.
-
If an overcurrent continues to flow to the output for an extended period of time due to a rating error or
short-circuited load, the output module may smoke or burn. Provide an external safety circuit such as a fuse.
-
Configure the circuit containing this product so that the external power supply is turned on after this product
is turned on. Turning on the external power supply before this product may result in an output error or
malfunction, possibly causing an accident
-
When you want to know the operating condition of each station when the network has had a communication
error refer to manuals about the network. In this case, wrong output or wrong operation may cause accidents.
-
Any control line or communication cable should be neither bundled with nor routed adjacent to the main
circuit or power line. The control line and communication cable should be at least 100mm away from the
main circuit and power line. Poor wiring conditions result in malfunctions caused by noise.
CAUTION
4
-
When the output module controls components such as the lamp load, heater, and solenoid valve, a large
current (about 10 times the normal value) may flow at the OFF-to-ON transition of the output. Take
appropriate measures, for example, by replacing it with a module of a higher rated current.
-
The period after a programmable controller CPU module turned on or got reset till a programmable controller
CPU module attains the "RUN" condition is not fixed. This period will change according to the system
structure, parameter settings, the size of programs and so on. Design the entire system to be protected even if
the period till a programmable controller CPU module attains "RUN" would change.
Installation precautions
WARNING
-
Use this product in the environment specified in this manual. Using this product in the environment not
satisfying all the specifications can cause an electric shock, fire, malfunction, product damage, and/or product
degradation.
-
Mount this product on the base unit with the module fixing hook at the bottom of this product fitted in the
fixing slot in the base unit. Failure to mount this product correctly can allow this product to malfunction or fall.
Before attempting to use this product in a place subject to considerable vibration or shock, use the module
fixing screw to fasten this product securely to the base unit. Module fixing screw must be tightened within the
specified tightening torque range. Tightening the screw loosely can allow this product to fall, cause a short
circuit, or malfunction. Tightening the screw excessively can break the screw or module, allow this product to
fall, a short circuit, or malfunction.
-
When connecting an extension cable, plug it securely into the relevant connector on the base unit or the
Module. Check the connection after plugging it in to prevent an imperfect contact which can cause input and
output errors.
-
Before attaching or detaching this product, be sure to turn the external power supply off for all phases, or this
product may be damaged.
-
Never directly touch any conductive part or electronic component of this product. Doing so may cause the
Module to malfunction or fail.
CAUTION
-
Before mounting or unmounting this product or any other product, be sure to turn the external power supply
off for all phases. Failure to turn it off for all phases may cause product damage. The exchange of modules
under online (power-on) conditions is possible only when the system is built with the programmable
controller CPU modules supporting the online module exchange or the target module is MELSECNET/H
remote I/O station. But the modules supporting the exchange under online (power-on) conditions have
limitations and each module respectively has the right procedure of its exchange. For details, refer to the
pages of online module exchange described on “QCPU User's Manual(Hardware Design, Maintenance and
Inspection)” and the manuals of the modules supporting online module exchange.
-
Do not touch directly conductive area and electric components of the module. It may lead to irregular
operations and breakdown of the module.
-
When you use motion CPU modules or motion modules, make sure that the combination of modules is
correct after turning power on. If the combination is irregular, the product may get damaged. For details, refer
to user's manual of motion CPU modules.
5
Wiring precautions
WARNING
-
Before mounting or wiring this product or any other product, be sure to turn the external power supply off for
all phases. Failure to turn it off for all phases may cause an electric shock, product damage, or malfunction.
-
After wiring, you should install the terminal cover packed with the product before you turn power on and
start operations. If not, you may get an electric shock.
CAUTION
-
Be sure to ground the FG and LG terminals by at least Class D Grounding (former Class3 Grounding)
exclusive for programmable controller CPU. Failure to do so may cause an electric shock or malfunction.
-
Be careful not to let foreign matter such as chips and wire tailings enter into this product. Foreign matter
caught in this product may cause a fire, fault, or malfunction.
-
Wire each product to the module correctly after checking the rated voltage and pin assignments of the
product. Connecting a power supply not matching the rating or miswiring may cause a fire or fault.
-
Tighten each terminal screw within the specified tightening torque range. Tightening the terminal screw
loosely may result in a short circuit or malfunction. Tightening the terminal screw excessively can break the
screw or the Module, also resulting in a short circuit or malfunction.
-
When you connect external components to this product, connect them after the installation.
-
The cables connected to this product must be either enclosed in ducts or fixed with clamps. Doing neither
allows the cables to hang loose, move, or be pulled inadvertently, resulting in this product and/or cables
becoming damaged or this product malfunctioning due to an imperfect contact in the cable connection.
-
When disconnecting each cable from this product, do not hold the line to pull. Unplug the cable after
loosening the screws fastening the cable end to the connector in this product. Pulling the cable connected to
this product may break this product and/or cable or cause this product to malfunction due to an imperfect
contact in the cable connection.
-
Do not connect the outputs of two or more power modules in parallel. Doing so heats up the power modules,
possibly causing a fire or fault.
-
The connectors for external connection must be crimped, welded with pressure, or soldered correctly with the
relevant tool. For the crimping and pressure welding tools, refer to the input/output module user’s manual.
An imperfect connection can cause a short circuit, fire, or malfunction.
-
For the cables connected to this product, wire them so that they do not interfere with the switches and the
LEDs of the product.
Power Supply and Maintenance Precautions
WARNING
-
Never touch any terminal with the Module powered, or it may malfunction.
-
Before cleaning this product or tightening up terminal screws, be sure to turn the external power supply off for
all phases. Failure to turn it off for all phases may either result in an electric shock or cause this product to fail
or malfunction. Tightening the screw loosely canallow this productto fall, cause a short circuit, or malfunction.
Tightening the screw excessively can break the screw or this product, allowing this product to fall, cause a
short circuit, or malfunction. Do not touch any terminal with this product powered on, or it may malfunction.
6
CAUTION
-
Read the manual thoroughly and check the entire system sufficiently for safety before performing online
operations during a machine run (in particular, for a program change, forced output, and operation status
change). An operation error can break the machine or cause an accident.
-
Do not disassemble or modify any module. Doing so may result in a fault, malfunction, injury, or fire.
-
Before attaching or detaching the Module, be sure to turn the external power supply off for all phases. Failure
to turn it off for all phases may cause the Module to fail or malfunction.
Disposal Precautions
CAUTION
-
When disposing of the product, treat it as industrial waste.
-
When disposing of a used battery, trash it separately under the relevant laws.
(For details of battery regulations of EU, refer to “Appendix 3 Disposal of Battery”)
Transport Precautions
CAUTION
-
When you transport batteries with lithium, you should treat them according to transport regulations.
(For details of transport regulations, refer to “Appendix 2 Battery”)
EMC Precautions
-
Regarding “EMC Instruction Class A Notice”
1. The ferrite core must be installed in each of the following cables so that this product may fit the
above-mentioned standard. Refer to the following for the model of ferrite core. (Equivalent goods are
also availabele.)
Port
Name
Maker
Turn
USB A,B,C,D,E
SERIAL
I/O
A-RGB
E04SR200935A
E04SR200935A
E04SR200935A
E04SR241331A
SEIWA
SEIWA
SEIWA
SEIWA
1
1
1
1
Image diagram
Ferrite core
Cable
[Turn: 1]
2. The shield of cables connected to USB and I/O port should be connected to FG nearby the main body.
7
CONDITIONS OF USE FOR THE PRODUCT
(1)
(2)
Mitsubishi programmable controller ("the PRODUCT") shall be used in conditions;
i) where any problem, fault or failure occurring in the PRODUCT, if any, shall not lead to any
major or serious accident; and
ii) where the backup and fail-safe function are systematically or automatically provided outside of
the PRODUCT for the case of any problem, fault or failure occurring in the PRODUCT.
The PRODUCT has been designed and manufactured for the purpose of being used in general
industries.
Mitsubishi shall habe no responsibility or liability (including, but not limited to any and all
responsibility or liability based on contract, warranty, tort, product liability) for any injury or death
to persons or loss or damage to property caused by the product that are operated or used in
application not intended or excluded by instructions, precautions, or warning contained in
Mitsubishi's user, instruction and/or safety manuars, technical bulletins and guidelines for the
product.
("Prohibited Application")
Prohibited Applications include, but not limited to, the use of the PRODUCT in;
- Nuclear Power Plants and any other power plants operated by Power companies, and/or any
other cases in which the public could be affected if any problem or fault occurs in the
PRODUCT.
- Railway companies or Public service purposes, and/or any other cases in which establishment
of a special quality assurance system is required by the Purchaser or End User.
- Aircraft or Aerospace, Medical applications, Train equipment, transport equipment such as
Elevator and Escalator, Incineration and Fuel devices, Vehicles, Manned transportation,
Equipment for Recreation and Amusement, and Safety devices, handling of Nuclear or
Hazardous Materials or Chemicals, Mining and Drilling, and/or other applications where there
is a significant risk of injury to the public or property.
8
Packing List
Thank you for purchasing this Mitsubishi product.
The product package contains the items listed below.
Check the contents of the product package.
If you discover any damaged or missing items, contact the distributor.
Contents
Q10WCPU-W1
Q10WCPU-W1
-J, -E
-CFJ, -CFE
Pcs.
Pcs.
The main body
1
1
CF card
0
Name
Fittings and screws to fix a CF card
1
*3
1set
1set *3
Connector cover for RGB
1
1
Connector cover for SERIAL
1
1
Connector cover for LAN
2
2
Connector cover for USB
5
5
Connector for terminal block
1
1
Royalty consent contract (OS)
1
1
Royalty consent contract (Recovery soft)
1
1
1
1
Product Guide
1
1
Notes on Windows®Embedded Standard
1
1
Precaution List
1
1
Setup Procedure
1
1
Recovery Procedure
1
1
Recovery Media
1
1
SW1PNC-WCPU-B *1*2
1
1
Fixing bandage
2
2
Royalty consent contract
(SW1PNC-WCPU-B)
*1: “MELSECWinCPU Module User's Manual (Hardware Design, Function Explanation)” and “MELSECWinCPU
Module Q-Bus Interface Driver User's Manual (Utility Operation, Programming)” are included in
SW1PNC-WCPU-B.
[File path: /Manual] For details, refer to “readme.txt” included in the left folder.
In order to read the above manuals, you should prepare a PC installed with Adobe® Reader®. MELSECWinCPU
module cannot be used as it is not possible to install Adobe® Reader® and therefore cannot be used to read
manuals..
User’s manual is sold separately. Purchase it separately.
Manual Name
MELSECWinCPU Module Q-Bus Interface Driver User's Manual
(Utility Operation, Programming)
MELSECWinCPU Module User's Manual
(Hardware Design, Function Explanation)
Manual No. (Type Code)
SH-081054ENG (13JZ67)
SH-081055ENG (13JZ68)
*2: SW1PNC-WCPU-B has been installed to the main body.
*3: It is attached to the main body. Do not turn on power of the product without a CF card.
9
Configuration
CAUTION
(1) When turning off the power of the standard base plane or the additional base plane, complete the
shutdown of OS before turning power off. If the power is turned off while the OS is working the, OS
may be out of order at the next and later boot.
In order to protect the modules from an unexpected power failure, we recommend to connect UPS to
your system.
(2) This document, in whole or in part, may not be reproduced without permission.
(3) This document is subject to change without notice at any time.
(4) While we are doing our best to ensure this document has no error, should you have any questions or
find any ommissions or similar, consult the distributor.
(5) Regardless of the foregoing statement, we assume no responsibility for any errors that may appear in
this document or for results obtained by the user as a result of using this product.
(6) Intel, Intel Atom, Intel Core and Celeron are registered trademarks of Intel Corporation. Microsoft
and Windows are trademarks of Microsoft Corporation. MELSEC, CC-Link are trademarks of
Mitsubishi Electric Corporation. Other brand and product names are trademarks of their respective
holder.
10
Table of Contents
Precautions regarding Warranty ......................................................................................................... 1
Safety Precautions .............................................................................................................................. 2
Handling precautions ................................................................................................................... 3
Design Precautions ...................................................................................................................... 4
Installation precautions................................................................................................................ 5
Wiring precautions....................................................................................................................... 6
Power Supply and Maintenance Precautions .............................................................................. 6
Disposal Precautions.................................................................................................................... 7
Transport Precautions .................................................................................................................. 7
EMC Precautions ......................................................................................................................... 7
CONDITIONS OF USE FOR THE PRODUCT..................................................................................... 8
Packing List ........................................................................................................................................ 9
Table of Contents.............................................................................................................................. 11
1.
Introduction
14
About the Product ............................................................................................................................. 14
Features ...................................................................................................................................... 14
Built-in OS ................................................................................................................................. 14
2.
System Reference
15
Specification ..................................................................................................................................... 15
External Dimensions......................................................................................................................... 17
3.
Hardware Setup
18
Before Using the Product for the First Time.................................................................................... 18
Installing the Module........................................................................................................................ 19
Uninstalling the Module ................................................................................................................... 20
Installing the fitting to fix a CF card ................................................................................................ 20
The hole to attach the binding tie ..................................................................................................... 21
4.
BIOS Setup
22
BIOS Setup ....................................................................................................................................... 22
Introduction....................................................................................................................................... 22
Starting Setup.................................................................................................................................... 22
Using Setup................................................................................................................................ 23
Getting Help............................................................................................................................... 23
In Case of Problems................................................................................................................... 23
A Final Note About Setup ......................................................................................................... 23
Main Menu........................................................................................................................................ 24
Setup Items ................................................................................................................................ 24
11
Standard CMOS Features ................................................................................................................. 26
Main Menu Selections ...................................................................................................................... 27
IDE Adapters.............................................................................................................................. 28
Advanced BIOS Features Setup ....................................................................................................... 29
CPU Feature...................................................................................................................................... 30
Hard Disk Boot Priority.................................................................................................................... 32
Virus Warning............................................................................................................................ 32
Advanced Chipset Features Setup .................................................................................................... 38
VGA Setting...................................................................................................................................... 41
Integrated Peripherals ....................................................................................................................... 42
OnChip IDE Device .......................................................................................................................... 43
On Chip Serial ATA Setting............................................................................................................. 44
Onboard Device ................................................................................................................................ 45
Super IO Device................................................................................................................................ 46
USB Device Setting .......................................................................................................................... 47
Power Management Setup ................................................................................................................ 49
PnP/PCI Configuration Setup ........................................................................................................... 53
IRQ n Resources ............................................................................................................................... 54
PC Health Status ............................................................................................................................... 58
Frequency/Voltage Control .............................................................................................................. 59
Defaults Menu................................................................................................................................... 60
Supervisor/User Password Setting.................................................................................................... 60
Exit Selecting .................................................................................................................................... 61
POST Messages ................................................................................................................................ 61
POST Beep........................................................................................................................................ 61
Position and Setting of CMOS, ROM clear switch .......................................................................... 61
5.
Each Component Function
62
Component Name ............................................................................................................................. 62
Each Component Function................................................................................................................ 64
CF card connector: CF-CARD .................................................................................................. 64
Built-in SSD ............................................................................................................................... 65
Giga bit-Ethernet: LAN A - B ................................................................................................... 66
LED Displays ............................................................................................................................. 67
Terminal block: I/O ................................................................................................................... 68
Serial Port Interface: SERIAL ................................................................................................... 70
CRT Interface: A-RGB .............................................................................................................. 71
USB Port .................................................................................................................................... 72
Control Switch ........................................................................................................................... 72
6.
Combination with the MELSEC-Q Series
75
Overview ........................................................................................................................................... 75
System Configuration ....................................................................................................................... 75
12
Access Forms .................................................................................................................................... 81
Multiple CPU Configuration ............................................................................................................ 82
CPU Configuration Diagrams.................................................................................................... 84
Notes ................................................................................................................................................. 85
7.
Reset Specifications
87
Reset Specifications.......................................................................................................................... 87
Reset Procedure of a MELSECWinCPU module and All the Modules on a Bus .................... 88
Reset Procedure of Bus Interface Driver and All the Modules on a Bus............................................... 89
8.
Troubleshooting
90
Tips for Better Troubleshooting ....................................................................................................... 90
This product Won't Start Normally ........................................................................................... 91
This product Starts with a BIOS Error displayed...................................................................... 92
The OS Won't Start Normally ................................................................................................... 93
It hangs-up at the time (after OS starting) of operation ............................................................ 94
BIOS Error ................................................................................................................................. 95
Necessary Information on your Inquiries.......................................................................................... 97
9.
List of Options and Recommended Parts
98
List of Options .................................................................................................................................. 98
List of Recommended Parts.............................................................................................................. 98
10.
Appendix
99
Appendix 1. Resources ..................................................................................................................... 99
Memory Map ............................................................................................................................. 99
I/O port address........................................................................................................................ 100
Interrupt Level List .................................................................................................................. 101
Appendix 2. Battery........................................................................................................................ 102
Appendix 3. Disposal of Battery .................................................................................................... 102
Appendix 4. EMC directive............................................................................................................ 104
Appendix 5. Backup of built-in SSD.............................................................................................. 104
Backup procedure .................................................................................................................... 104
Rewrite procedure from the CF card for backup to built-in SSD for OS................................................ 106
REVISIONS.................................................................................................................................... 107
WARRANTY.................................................................................................................................. 108
13
1 Introduction
1. Introduction
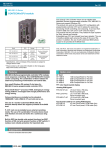
About the Product
This product is the controller which can be installed with Mitsubishi General programmable controller
CPU, MELSEC-Q Series and supports Windows OS.
This product can work as the multiple CPU configuration with programmable controller CPU and it
realizes the seam less processing of both controlling and computing. It can boot from a built-in SSD and
a CF card in a CF card slot (Type I).
This product has two LAN ports. They can be used to build systems for Web, Internet and Intranet.
Embedded-type CPU and chipset have been adopted. The use of readily available parts ensures the ease
of the use of the product. In addition, the use of self-customized BIOS allows support to be provided at
the BIOS level.
Features
-
MELSEC-Q Series programmable controller CPU modules cover sequence controlling. This
MELSECWinCPU module covers computing. The combination of them realizes the seamless
processing of information and control data.
-
Very small Windows OS system (2-slot size of a MELSEC-Q series programmable controller CPU)
-
Adopts Intel® AtomTM processor N450, belonging to energy saving platform. It manages both
enough performance and energy saving.( or has low power consumption while maintaining adequate
performance.)
-
Various interfaces are installed as the standard. 1000BASE-T LAN, USB2.0, CF card slot and so on.
-
The use of Contec-customized BIOS (mfd. By Phoenix-Award) allows the support provided at the
BIOS level.
-
A CF card can be installed as an external storage device. The use of it is preferable if it works where
shock and vibration exist and is ideal for long periods of continuous operation.
-
Built-in SSD has double write protect functions (an EWF function of OS and write protect function
of DIP switch). It provides more reliable protection for important data.
Built-in OS
-
14
Windows® Embedded Standard 2009
2 System Reference
2. System Reference
Specification
Table 2.1 Functional Specification (1/2)
Item
Specifications
CPU
Intel® Atom™ Processor N450 1.66GHz
Chipset
Intel® ICH8M
Memory
L1 Cache
Instruction 32KB + Data 24KB
L2 Cache
512KB
Main memory 1GB (3.3V 200-pin DDR2 SO-DIMM DDR667Socket x 1)
Video
Controller
N450 built-in
Video RAM
main memory shared
CRT I/F
Analog-RGB 15-pin HD-SUB connector
Resolution
1,400 x 1,050 @60Hz (16 million colors)
Serial I/F
LAN
RS-232C-compliant: 1ch (9-pin D-SUB connector) baudrate: 50 - 115200bps
I/F
1000BASE-T/100BASE-TX/10BASE-T
RJ-45 connector × 2
Controller
CFcard slot
Intel 82574L
CF CARD Type I (Only for the memory card of IDE connection) *1
Indication: access LED (green) × 1 *2, -CFJ, -CFE models have a CFcard 4GB.
Built-in SSD
*3
Built-in flash drive 4GB
USB I/F
USB2.0-complicant 5ch (front 3ch, bottom 2ch)
Transfer rate: 480Mbps
Supply power: +5V each channel 0.5A max. *4
Watch dog timer
2ch Time-up period: system WDT 20msec - 2sec, user WDT 10msec - 10sec
General I/O
Terminal block [1, 2]
Terminal block [3]
*5, *6
Terminal block [4]
Input for shutdown (current drive input)
Output to notify shutdown completion
(open collector output)
Output to nofity the start of watch dog timer
(open collector output)
RTC/CMOS
Lithium battery backup life: 10 years or more (when no power input, at 25°C)
The real-time clock is accurate within ±3 minutes (at 25°C) per month
Indication
RDY (green), B.RUN (green), ERR. (red), USER (red), BAT.(orange),
EXIT (green), CF/SSD (green)
Control
Reset PUSH switch, DIP switch 4-pole, DIP switch 6-pole, 3-position toggle switch
Supported OS
Windows® Embedded Standard 2009
*1: When power is on, you can not push in / pull out a CF card.
Memory card is supported but other purposes are not supported.
*2: Access LED shows the access of both a CF card and built-in SSD.
*3: Built-in SSD is used as OS space. SSD has rewritable life (1 million times).
For details, refer to “Built-in SSD” of “Chapter 5 Each Component Function”
*4: Current capacity shows the maximum value the connector supports.
But the actual value is limited because the total current cannot exceed the capacity of the power supply module.
Therefore the actual available value may be less than 0.5A.
*5: General I/O is not evaluated by UL.
*6: When you want to use it in noisy environments, we recommend you to use the following noise filter.
Name
Noise filter for general I/O
Type
NAC-06-472
Maker
Mfd. By COSEL
15
2 System Reference
Table 2.1 Functional Specification (2/2)
Item
Specifications
The number of base unit slots this module occupies 2 slots
Physical dimensions [mm]
55.2(W) × 115.0(D) × 98.0(H) (Excluding protrusions)
DC5V internal current consumption
3.0A (Max.)
(This does not include the current consumption by any
peripheral devices (such as the CF Card and USB device))
Depending on the power supply module
Acceptable momentary power failure time
Weight
Q10WCPU-W1-E
440g
Q10WCPU-W1-CFE
450g (Including CF card, Fittings and screws to fix a CF card)
Table 2.2 Installation Environment Conditions
Item
Specifications
Surrounding air temperature
0 to 55°C
Surrounding storage temperature
-25 to 75°C
Surrounding operating humidity
5 to 95%RH (No condensation)
Surrounding storage humidity
5 to 95%RH (No condensation)
Vibration resistance
Confor
ming to
JIS B
3502
IEC611
31-2
With intermittent vibration
Frequency
Acceleration Amplitude
5 ≤ f < 8.4Hz
none
3.5mm
8.4 ≤ f < 150Hz
9.8m/s2
none
Tested 10
times
(for 80 minutes)
in each of the
X, Y, and Z
directions
With continuous vibration
Frequency
Acceleration Amplitude
5 ≤ f < 8.4Hz
none
8.4 ≤ f < 150Hz 4.9m/s2
Shock resistance
Conforming to JIS B 3502, IEC61131-2
(147m/s2, 3 times in each of 3 direction)
Operating ambiance
No corrosive gas
Operating altitude
0 to 2000m *3
Installation location
Overvoltage category
Equipment category
Class I
*3
none
II or less
2 or less
*2
none
Inside the control panel
*1
Pollution degree *2
*1
1.75mm
The overvoltage category of a device indicates which distributor in the range from public distribution network to.
Machinery the device is assumed to be connected to. Category II applies to devices to which power is supplied from
fixed facilities. The surge voltage of those devices is 2500V whose rated voltage is 300V.
The index indicating the degree to which conductive substances are generated in the operating environment.
Pollution level 2 indicates the environment that generates only nonconductive pollutants while allowing accidental
condensation to cause temporary conduction.
The module may fail and cannot be used in an environment in which the air is compressed to over the atmospheric
pressure generated at an altitude of around 0m.
CAUTION
When a commercial peripheral device (such as a CF Card and USB device) is installed, satisfy the installation
environment conditions specified for that device or those for the module, whichever are harder.
16
2 System Reference
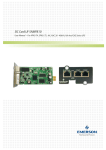
External Dimensions
Fiture 2.1 External dimensions
17
3 Hardware Setup
3. Hardware Setup
Before Using the Product for the First Time
Follow the next steps to set up this product:
This product works attached to the MELSEC-Q series base unit. MELSEC-Q series power supply
module is also necessary in addition to the base unit.
For their specifications and the methods of installation and wiring, refer to manuals of each modules.
(When using MELSEC products and MELSOFT products and you refer to their manuals and HELP,
replace the description “PC CPU” with the description “MELSECWinCPU”.)
STEP1
By referring to the information in this chapter, install, connect and set this product.
STEP2
Connect cables.
Connect the cables of necessary external devices, such as a keyboard and a display, to this
product using appropriate cables.
STEP3
Turn on the power.
After verifying that you have correctly followed steps 1 and 2, turn on the power.
If you find any abnormality after turning on the power, turn it off and check to see if the
setup has been performed properly.
STEP4
Set up BIOS.
By referring to Chapter 4, set up BIOS. This setup requires a keyboard and a display.
* Before using this product, be sure to execute "LOAD SETUP DEFAULTS" to initialize
the BIOS settings to their default values.
(See Chapter 4, "Main Menu.")
Note that this product occupies two slots in the base unit.
CAUTION
-
Before installing or uninstalling this product, be sure to turn the power off.
-
Installing or uninstalling this product while the power is on can cause a fault or malfunction.
-
Be sure to connect a keyboard and a mouse to it before turning the power on for the first time.
18
3 Hardware Setup
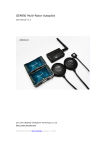
Installing the Module
-
For the environment and the position to install this product, refer to “QCPU User's
Manual(Hardware Design, Maintenance and Inspection)”.
-
Before installing this product, remove the transparent protective sheet from the rear panel (which
comes into contact with the base unit).
-
Fit the module fixing hook in the module fixing slot in the base unit, then push the module in the
direction of the arrow to mount the module on the base unit.
Fiture 3.1 Installing the Module 1
CAUTION
Be sure to turn off the power to this product before installing it.
- To use this product in a place subject to much vibration or shock, use two screws to fasten it to the
base unit as illustrated below.
Module fixing screws: M3 × 12 (Prepared by the user)
Tighten the screws within the following torque range :
Tightening torque range
36 - 48N cm
Figure3.2 Installing the Module 2
19
3 Hardware Setup
Uninstalling the Module
-
If this product has been fastened with module fixing screws, remove them first (1).
While pressing the protrusions (2) on top of this product, pull this product toward you by the upper
side (3). Lift this product to remove the module fixing hook from the module fixing slot (4).
Figure 3.3 Uninstalling the Module
CAUTION
Be sure to turn off the power to this product before uninstalling it. If the OS is still up and running
when you attempt to turn the power off, shut down the OS before turning the power off.
Installing the fitting to fix a CF card
After the insertion of a CF card, install the fitting to fix a CF card as follows.
Figure 3.4 Installing the fitting to fix a CF card
20
3 Hardware Setup
The hole to attach the binding tie
The binding tie can be installed as follows in order to keep USB cables from falling out.
[A recommended binding tie: RSG-100 V0 (Kitagawa Industries)]
Figure 3.5 The hole to attach the binding tie
21
4 BIOS Setup
4. BIOS Setup
BIOS Setup
BIOS Setup allows you to make various settings upon startup. When you use the Module for the first
time, be sure to execute this program. Once you have executed the program, the settings you made are
backed up to be retained.
Introduction
This chapter discusses Award’s Setup program built into the FLASH ROM BIOS. The Setup program
allows users to modify the basic system configuration. This special information is then stored in
battery-backed RAM so that it retains the Setup information when the power is turned off.
The rest of this chapter is intended to guide you through the process of configuring your system using
Setup.
Starting Setup
The Award BIOS is immediately activated when you first power on the computer. The BIOS reads the
system information contained in the CMOS and begins the process of checking out the system and
configuring it. When it finishes, the BIOS will seek an operating system on one of the disks and then
launch and turn control over to the operating system.
While the BIOS is in control, the Setup program can be activated in one of two ways:
- By pressing <Del> immediately after switching the system on, or
- By pressing the <Del> key when the following message appears briefly at the bottom of the screen
during the POST (Power On Self-Test).
Press DEL to enter SETUP.
If the message disappears before you respond and you still wish to enter Setup, restart the system to try
again by turning it OFF then ON or pressing the "RESET" button on the system case. You may also
restart by simultaneously pressing <Ctrl>+ <Alt>+<Del> keys. If you do not press the keys at the correct
time and the system does not boot, an error message will be displayed and you will again be asked to.
Press F1 to continue, DEL to enter SETUP
22
4 BIOS Setup
Using Setup
In general, you use the arrow keys to highlight items, press <Enter> to select, use the PageUp and
PageDown keys to change entries, press <F1> for help and press <Esc> to quit. The following table
provides more detail about how to navigate in the Setup program using the keyboard.
Table 4.1. Using Setup
Key
Function
Up Arrow
Move to the previous item
Down Arrow
Move to the next item
Left Arrow
Move to the item on the left (menu bar)
Right Arrow
Move to the item on the right (menu bar)
Move Enter
Move to the item you desired
PgUp key
Increase the numeric value or make changes
PgDn key
Decrease the numeric value or make changes
+ key
Increase the numeric value or make changes
- key
Decrease the numeric value or make changes
Main Menu :
Esc key
Quit and not save changes into CMOS
Status Page Setup Menu and Option Page Setup Menu :
Exit current page and return to Main Menu
F1 key
General help on Setup navigation keys
F5 key
Load previous values from CMOS
F6 key
Load the fail-safe defaults from BIOS default table
F7 key
Load the optimized defaults
F10 key
Save all the CMOS changes and exit
Getting Help
Press F1 to pop up a small help window that describes the appropriate keys to use and the possible
selections for the highlighted item. To exit the Help Window press <Esc> or the F1 key again.
In Case of Problems
If, after making and saving system changes with Setup, you discover that your computer no longer is able to
boot, the AwardBIOS supports an override to the CMOS settings which resets your system to its defaults.
The best advice is to only alter settings which you thoroughly understand. To this end, we strongly
recommend that you avoid making any changes to the chipset defaults. These defaults have been
carefully chosen by both Award and your systems manufacturer to provide the absolute maximum
performance and reliability. Even a seemingly small change to the chipset setup has the potential for
causing you to use the override.
A Final Note About Setup
The information in this chapter is subject to change without notice.
23
4 BIOS Setup
Main Menu
Once you enter the Award BIOS CMOS Setup Utility, the Main Menu will appear on the screen. The
Main Menu allows you to select from several setup functions and two exit choices. Use the arrow keys to
select among the items and press <Enter> to accept and enter the sub-menu.
Note that a brief description of each highlighted selection appears at the bottom of the screen.
Figure 4.1 Main Menu
Setup Items
The main menu includes the following main setup categories.
Standard CMOS Features
Use this menu for basic system configuration.
Advanced BIOS Features
Use this menu to set the Advanced Features available on your system.
Advanced Chipset Features
Use this menu to change the values in the chipset registers and optimize your system's performance.
Integrated Peripherals
Use this menu to specify your settings for integrated peripherals.
24
4 BIOS Setup
Power Management Setup
Use this menu to specify your settings for power management.
PnP / PCI Configuration
Use this menu to specify your settings for PnP / PCI.
PC Health Status
Use this menu to show the environmental status of your system.
Frequency/Voltage Control
Use this menu to set the frequency and the voltage of system.
Load Fail-Safe Defaults
Use this menu to load the BIOS default values for the minimal/stable performance for your system to
operate.
Load Optimized Defaults
Use this menu to load the BIOS default values that are factory settings for optimal performance system
operations. While Award has designed the custom BIOS to maximize performance, the factory has the
right to change these defaults to meet their needs.
Supervisor Password
Use this menu to set Supervisor Passwords.
User Password
Use this menu to set User Passwords.
Save & Exit Setup
Save CMOS value changes to CMOS and exit setup.
Exit Without Save
Abandon all CMOS value changes and exit setup.
25
4 BIOS Setup
Standard CMOS Features
The items in Standard CMOS Setup Menu are divided into 10 categories. Each category includes zero,
one or more than one setup items. Use the arrow keys to highlight the item and then use the <PgUp> or
<PgDn> keys to select the value you want in each item.
Figure 4.2 Standard CMOS Features
26
4 BIOS Setup
Main Menu Selections
This table shows the selections that you can make on the Main Menu.
Table 4.2 Main Menu Selections
Item
Options
Description
Date
Month DD YYYY
Set the system date. Note that the ‘Day’
automatically changes when you set the
date
Time
HH: MM: SS
Set the system time
IDE Channel 0 Master
Options are in its sub menu
Press <Enter> to enter the sub menu of
detailed options
IDE Channel 0 Slave
Options are in its sub menu
Press <Enter> to enter the sub menu of
detailed options
IDE Channel 1 Master
Options are in its sub menu
Press <Enter> to enter the sub menu of
detailed options
Video
EGA/VGA
CGA 40
CGA 80
MONO
Select the default video device
Halt On
All Errors
No Errors
All, But Keyboard
Select the situation in which you want the
BIOS to stop the POST process and notify
you
Base Memory
Displays the amount of conventional
memory automatically.
Displays the amount of conventional
memory detected during boot up
Extended Memory
Displays the amount of extended
memory automatically.
Displays the amount of extended memory
detected during boot up
Total Memory
Displays the amount of total memory
automatically.
Displays the total memory available in the
system
27
4 BIOS Setup
IDE Adapters
The IDE adapters control the hard disk. Use a separate sub menu to configure each hard disk.
Use the legend keys to navigate through this menu and exit to the main menu. Use Table 4.3 to configure
the hard disk.
Table 4.3 IDE Adapters configurations
Item
Options
Description
IDE HDD Auto-Detection
Press Enter
Press Enter to auto-detect the hard disk on this channel.
If detection is successful, it fills the remaining fields on
this menu.
IDE Channel 0/1
Master/Slave
None
Auto
Manual
Selects the type of fixed disk. "User Type" will let you
select the number of cylinders, heads, etc. Selecting
“Manual” lets you set the re-maining fields on this
screen.
Note: PRECOMP=65535 means NONE!
Access Mode
CHS
LBA
Large
Auto
Choose the access mode for this hard disk.
Capacity
Automatically shows the
capaticy of HDD.
Disk drive capacity (Approximated). Note that this size
is usually slightly greater than the size of a formatted
disk given by a disk checking program.
The following options are selectable only if the ‘IDE Channel 0/2 Master/Slave’ item is set to ‘Manual’ and “Acces
Mode” item is set to “CHS”.
Cylinder
Head
Min = 0
Max = 65535
Min = 0
Max = 255
Set the number of cylinders for this hard disk.
Set the number of heads for this hard disk.
Precomp
Min = 0
Max = 65535
**** Warning:
Setting a value of 65535 means no hard disk.
Landing Zone
Min = 0
Max = 65535
****
Sector
Min = 0
Max = 255
Number of sectors per track
28
4 BIOS Setup
Advanced BIOS Features Setup
This section allows you to configure your system for basic operation. You have the opportunity to select
the system’s default speed, boot-up sequence, keyboard operation, shadowing and security.
Figure 4.3 Advanced BIOS Features Setup
29
4 BIOS Setup
CPU Feature
Press <Enter> to configure the settings relevant to CPU Feature.
Figure 4.4 CPU Feature
Table 4.4 CPU Features select
Description
PPM Mode
Select PPM Mode.
When using OS which supports ACPI, select “Native
Mode”. When using elder OS such as Windows 98 and Me,
select “SMM Mode”.
30
Choice
4 BIOS Setup
Description
Choice
Limit CPUID MaxVal
Select Disabled / Enabled of Limit CPUID Maxval.
For older OS such as Windows 98 and Me, select “Enabled”.
If not, the maximum value of CPUID can not be hundled.
C1E Function
Select C1E Function.
CPU C State Capability
Select CPU C State Capability.
Selecting any values other than “Disabled” can reduce the
power consumption when CPU idles.
Execute Disable Bit
Select Enabled / Disabled of Execute Disable Bit.
Selecting “Disabled” makes XD function flag to be 0 by
force.
31
4 BIOS Setup
Hard Disk Boot Priority
With the field, there is the option to choose, aside from the hard disks connected, “Bootable add-in
Cards” which refers to other external device.
Figure 4.5 Hard Disk Boot Priority
Virus Warning
When enabled, you receive a warning message if a program (specifically, a virus) attempts to write to the
boot sector or the partition table of the hard disk drive. You should then run an anti-virus program. Keep
in mind that this feature protects only the boot sector, not the entire hard drive.
CAUTION
Many disk diagnostic programs that access the boot sector table can trigger the virus warning
message. If you plan to run such a program, we recommend that you first disable the virus warning.
Enabled
Activates automatically when the system boots up causing a warning message to appear when
anything attempts to access the boot sector or hard disk partition table.
Disabled
No warning message will appear when anything attempts to access the boot sector or hard disk
partition table.
32
4 BIOS Setup
Table 4.5 Advance BIOS Feature select
Description
Choice
CPU L3 Cache
Select Disabled / Enabled of CPU L3 Cache.
Selecting “Enabled” makes the speed of memory access
higher.
Hyper-Threading Technology
Select Disabled / Enabled of Hyper-Threading Technology.
Quiet Post
Select Disabled / Enabled of Quiet Post.
Selecting “Enabled” makes the self-test of a memory and
some devices simpler. Therefore the wake-up time becomes
shorter.
If selecting “Disabled”, the self-test will not be simplified.
Quick Power On Self Test
Select Disabled / Enabled of Quick Power On SelfTest.
Selecting “Enabled” makes POST (the self-test when
turning power on) simpler. Therefore the wake-up time
becomes shorter. But we recommend selecting
“Disabled”. Because POST will not be processed for all
the system if not.
If some troubles happen on POST, specify them in order to
avoid the loss of data while working.
33
4 BIOS Setup
Description
USB Device Wait
Select USB Device Wait.
This menu sets the BIOS waiting time till the access for
USB devices starts.
If you can not boot the system in order because of the USB
devices which need the long time to start, use this function.
(The boot-time of system will be as long as the time you set)
First Boot Device
Select First Boot Device.
BIOS try to load operating system from devices according
to the order specified by this item.
Second Boot Device
Select Second Boot Device.
BIOS tries to load operating system from devices according
to the order specified by this item.
Third Boot Device
Select Third Boot Device.
BIOS tries to load operating system from devices according
to the order specified by this item.
34
Choice
4 BIOS Setup
Description
Choice
Boot Other Device
Select Disabled / Enabled of Boot Other Device.
If selecting “Enabled”, BIOS try to load operating system
from other devices.
Boot Up NumLock Status
Select Boot Up NumLock Status.
It controls the condition of <NumLock> key on the start of
the system.
Gate A20 Option
Select Gate A20 Option. It selects how to specify address
for the memory which is larger then 1MB (extended
memory). Sellecting “Normal”, the gate A20 is controlled by
the pin of keyboard controller. Sellecting “Fast”, the gate
A20 is controlled by the system chipset. For OS/2 and
Windows, selecting “Fast” can make the speed of the
system higher.
Typematic Rate Setting
Select Typematic Rate Setting.
Selecting “Disabled”, the speed of typing is decided by
the keyboard controller of the system.
Selecting “Enabled”, you become able to select following 2
items (“Typematic Rate” and “Typematic Delay”)
Typematic Rate (Chars/Sec)
Select Typematic Rate.
You can select the input speed of characters when you keep
one key pushed.
If the item “Typematic Rate Setting” is set to “Enabled”,
you become able to set this item.
35
4 BIOS Setup
Description
Choice
Typematic Delay (Msec)
Select Typematic Delay.
You can select the waiting time for continuous typing.
If the item “Typematic Rate Setting” is set to “Enabled”,
you become able to set this item.
Security Option
Select Security Option when the security setting is
enabled.
Selecting “Setup”, system will boot up but the access to the
setup will be denied unless you input the correct password
to its prompt.
Selecting “System”, system will not boot up and the access
to the setup will be denied unless you input the correct
password to its prompt.
Note: To disable security, select PASSWORD SETTING on the Main Menu and then you will be asked to enter
password. Do not type anything and just press <Enter>, it will disable security. Once the security is disabled, the
system will boot and you can enter Setup freely.
APIC Mode
You can not change this item.
Advanced Programmable Interrupt Controller is fixed to
“Enabled”.
MPS Version Control For OS
Select MPS Version Control For OS.
Select the version of multi-processor platform.
Selecting “1.4”, the system get the support for
multi-PCI-bus configuration and the extended
configuration table for the future extensibility
36
4 BIOS Setup
Description
Choice
BEEP Voice
Select whether or not BEEP sounds when the system boots
up.
WDT Protect
Select Enabled / Disabled of WDT Protect.
Selecting “Enabled”, WDT watches the system if the
connected devices would lose its control or the boot of BIOS
would stop because of unexpected factors such as accidental
noise.
When the boot of BIOS stops, the reset will be processed
and the system reboots.
Post Code Show
Select Enabled / Disabled of Post Code Show
Selecting “Enabled”, the top-right area of the screen shows
Post Code when BIOS is booting.
But the display of Post Code will start after Graphic Device
is initialized and the system is able to show images.
CF Backup
Selecting this option allows you to launch a tool for creating
the backup of CF card and restoring it. This can be used to
---
backup your current environment as it is. For details,
please refer to the explanation below (*1).
*1
About the CF Backup Feature
To use the CF Backup feature, a separately-available CF card for backup is required. The CF card for backup must be larger capacity
than built-in SSD. Using the CF card that is not our optional parts can be the cause of unidentified problems and it must be ensured
that the CF card works with your system without problem before using this feature.
Also, before performing backup, read the licensing terms of your operating system carefully so that the backup is carried out within
the scope of given license.
For the detailed procecure of CF Backup Feature, refer to “Appendix 5 Backup of built-in SSD”.
37
4 BIOS Setup
Advanced Chipset Features Setup
This section allows you to configure the system based on the specific features of the installed chipset.
This chipset manages bus speeds and access to system memory resources, such as DRAM and the
external cache. It must be stated that these items should never need to be altered. The default settings
have been chosen because they provide the best operating conditions for your system. The only time you
might consider making any changes would be if you discovered that data was being lost while using your
system.
Figure 4.6 Advanced Chipset Features Setup
Table 4.6 Advance Chipset Feature select
Description
DRAM Timing Selectable
Select DRAM Timing Selectable.
This item should be different values according to the
parameter of the installed memory chip (DRAM).
Do not change the value of factory settings unless you have
installed new memory whose speed is different from the
original DRAM.
38
Choice
4 BIOS Setup
Description
Choice
CAS Latency Time
Select CAS Latency Time.
Select the number of clock in CAS waiting time.
When Synchronous DRAM is installed, the number of clock
in CAS waiting time is different according to DRAM timing.
Do not change the default value of factory settings.
DRAM RAS# to CAS# Delay
Select DRAM RAS# to CAS# Delay.
Select the timing delay between CAS and RAS strobe signal
which are used when DRAM is read, writed or updated.
When setting it to high speed, the performance gets higher.
When setting it to low speed, the performance gets more
reliable.
It is applied only when synchronous DRAM is installed to
the system.
Do not change the default value of factory settings.
DRAM RAS# Precharge
Select DRAM RAS# Precharge.
Select the number of clock needed to charge RAS till DRAM
is refreshed.
If this value is not enough, the update may become
incomplete. In this case, DRAM can not hold its data.
Do not change the default value of factory settings.
Precharge delay (tRAS)
Select Precharge delay (tRAS).
Select the number of DRAM clock for the precharge delay
time.
Do not change the default value of factory settings.
39
4 BIOS Setup
Description
System Memory Frequency
Select System Memory Frequency.
Select the frequency of main memory.
Do not change the default value of factory settings.
System BIOS Cacheable
Select Disabled / Enabled of System BIOS Cacheable.
Selecting “Enabled” allows caching of the system BIOS
ROM at F0000h-FFFFFh, resulting in better system
performance. However, if any program writes to this
memory area, a system error may happen.
Do not change the default value of factory settings.
Memory Hole At 15M-16M
Select Disabled / Enabled of Memory Hole At 15M – 16M.
Do not change the default value of factory settings.
40
Choice
4 BIOS Setup
VGA Setting
The field under the On-Chip VGA Setting and their defaults settings are:
Table 4.7 VGA Setting select
Description
Choice
On-Chip Frame Buffer Size
Select the size of writing buffer between CPU and PCI.
DVMT Mode
Select Disabled / Enabled of DVMT (Dynamic Video
Memory Technology) Mode.
Total GFX Memory
Select Total GFX Memory.
Select the total memory size of graphics.
41
4 BIOS Setup
Integrated Peripherals
This section sets configurations for your hard disk and other integrated peripherals. The first screen
shows four main items for user to select. Once an item is selected, a submenu appears. Details follow.
Figure 4.7 Integrated Peripherals
42
4 BIOS Setup
OnChip IDE Device
Figure 4.8 On Chip IDE Device
43
4 BIOS Setup
On Chip Serial ATA Setting
Table 4.8 On Chip Serial ATA Setting select
Description
SATA Mode
Select SATA Mode.
Only “IDE” is supported.
On-Chip Serial ATA
Select On-Chip Serial ATA.
Selecting “Disabled”, SATA controller becomes disabled.
Selecting “Enabled”, SATA works in the legacy mode.
44
Choice
4 BIOS Setup
Onboard Device
Figure 4.9 Onboard Device
Table 4.9 Onboard Device select
Description
Choice
Onboard LAN A
Select Disabled / Enabled of Onboard LAN A.
Onboard LAN B
Select Disabled / Enabled of Onboard LAN B.
45
4 BIOS Setup
Super IO Device
Figure 4.10 SuperIO Device
Table 4.10 Super I/O device select
Description
Onboard Serial Port
Select Onboard Serial Port.
Select the address and the IRQ to use of a serial port.
46
Choice
4 BIOS Setup
USB Device Setting
Figure 4.11 USB Device Setting
Table 4.11 USB Device Setting select
Description
Choice
USB 1.0 Controller
Select Disabled / Enabled of USB 1.0 Controller.
Normally select “Enable”.
USB 2.0 Controller
Select Disabled / Enabled of USB 2.0 Controller.
Normally select “Enable”.
47
4 BIOS Setup
Description
USB Operation Mode
Select USB Operation Mode.
USB Keyboard Function
Select Disabled / Enabled of USB Keyboard Function.
If you use a USB keyboard on the OS which does not
support USB, select “Enabled”.
For the OS which supports USB, select “Disabled”.
USB Storage Function
Select Disabled / Enabled of USB Storage Function.
When using USB storages, select “Enabled”.
48
Choice
4 BIOS Setup
Power Management Setup
The Power Management Setup allows you to configure you system to most effectively save energy while
operating in a manner consistent with your own style of computer use.
Figure 4.12 Power Management Setup
49
4 BIOS Setup
Table 4.12 Power Management setup select
Description
Choice
ACPI Function
ACPI Function cannot be changed. Only “Enabled” is
supported.
Note: ACPI (Advanced Configuration and Power Interface) is a power management specification that makes hardware
status information available to the operating system. ACPI enables a computer to turn its peripherals on and off for
improved power management. It also allows the computer to be turned on and off by external devices, so that mouse
or keyboard activity wakes up the computer.
ACPI Suspend Type
ACPI Suspend Type can not be changed.
Only “S1 (POS)” is supported.
Power Management
Select how to set the Power Management function.
User Define:
You can set values for each mode individually. The
selectable range is between 1 minute and 1 hour when it is
enabled.
Min Saving:
Minimum power management is processed. (Suspend mode
= 1 hour)
Max Saving:
Maximum power management is processed. (Suspend mode
= 1 minute)
50
4 BIOS Setup
Description
Choice
Video Off Method
Select the power management method of video in the
standby mode.
Blank Screen:
Turns the screen off.
V/H SYNC+ Blank:
Turns V/H SYNC and display signals off.
DPMS:
Controls it accorging to DPMS. The connected display
should support DPMS.
Video Off In Suspend
Selecting “Yes”, a video becomes off in the standby mode.
Suspend Type
Select Suspend type. The option is “Stop Grant” and
“PwrOn Suspend”.
Suspend Mode
If no power management event happen between the
specified period, CPU clock stops and a video signal
becomes the suspended condition.
When any power management events are detected, the
system wakes up from the suspended condition.
Reload Global Timer Events
Selecting “Enabled”, the global timer of the standby mode restarts following the respective event carried out by
registered devices.
51
4 BIOS Setup
Description
Com Port
Select Disable / Enabled of COM port.
HPET Support
Select Disable / Enabled of HPET (High Precision Event
Timer) Support.
HPET Mode
Select HPET (High Precision Event Timer) Mode. Normally
select the proper value according to OS you use.
52
Choice
4 BIOS Setup
PnP/PCI Configuration Setup
This section describes configuring the PCI bus system. PCI, or Personal Computer Interconnect, is a
system which allows I/O devices to operate at speeds nearing the speed the CPU itself uses when
communicating with its own special components. This section covers some very technical items and it is
strongly recommended that only experienced users should make any changes to the default settings.
Figure 4.13 PnP/PCI Configuration Setup
Table 4.13 PCI PnP/PCI Configuration Setup select
Description
Choice
Reset Configuration Data
Select Disabled / Enabled of Reset Configuration Data.
Normally select “Disabled”.
If a fatal conflict happens and the operating system cannot
boot after installing new addon and reconstructing system,
select “Enabled”. ESCD (Extended System Configuration
Data) will be reset after the setup.
53
4 BIOS Setup
Description
Choice
Resource Controlled By
Select Resource Controlled By.
The Award Plug and Play BIOS can automatically configure
all the boot and Plug and Play compatible devices. If you
select “Auto(ESCD)”, all the interrupt request (IRQ) and
DMA assignment fields disappear, as the BIOS
automatically assigns them
IRQ n Resources
You can select “IRQ Resources” if you set “Resouces Controlled By” to “Manual” in “PnP/PCI Configuration
Setup”. Selecting “IRQ Resources”, the sub-menu will be shown. For details, refer to the following.
If you want to control resources manually, assign each system interruption to one of the following device types.
PCI Device:
The device which is compliant with Plug-and-Play standard and designed to
support PCI or ISA bus architecture.
Reserved:
The device which is not compliant with Plug-and-Play standard and require the
specific IRQ assignment.
Option: PCI Device, Reserved
Figure 4.14 IRQ n Resources
54
4 BIOS Setup
Table 4.14 PCI PnP/PCI Configuration Setup select
Description
Choice
INT Pin 1 Assignment
Select INT Pin 1 Assgnment
Devices(s) using this INT:
Network Controller
- Bus 1 Dev 0 Func 0
Display Controller
- Bus 0 Dev 2 Func 0
USB 1.0/1.1 UHCI Controller
- Bus 0 Dev 26 Func 0
INT Pin 2 Assignment
Select INT Pin2 Assignment
Devices(s) using this INT:
Network Controller
- Bus 2 Dev 0 Func 0
INT Pin 3 Assignment
Select INT Pin 3 Assignment
Devices(s) using this INT:
USB 1.0/1.1 UHCI Controller
- Bus 0 Dev 29 Func 2
USB 2.0 EHCI Controller
- Bus 0 Dev 26 Func 7
55
4 BIOS Setup
Description
INT Pin 4 Assignment
Select INT Pin 4 Assignment
Devices(s) using this INT:
IDE Controller
- Bus 0 Dev 31 Func 2
USB 1.0/1.1 UHCI Controller
- Bus 0 Dev 29 Func 1
SMBus Controller
- Bus 0 Dev 31 Func 3
INT Pin 5 Assignment
Select INT Pin 5 Assignment
Devices(s) using this INT:
- Reserved
INT Pin 6 Assignment
Select INT Pin 6 Assingment
Devices(s) using this INT:
USB 1.0/1.1 UHCI Controller
- Bus 0 Dev 26 Func 1
56
Choice
4 BIOS Setup
Description
Choice
INT Pin 7 Assignment
Select INT Pin 7 Assingment.
Devices(s) using this INT:
- Reserved
INT Pin 8 Assignment
Select INT Pin 8 Assignment.
Devices(s) using this INT:
USB 1.0/1.1 UHCI Controller
- Bus 0 Dev 29 Func 0
USB 2.0 EHCI Controller
- Bus 0 Dev 29 Func 7
57
4 BIOS Setup
PC Health Status
The BIOS shows the PC health status in this window.
Figure 4.15 PC Health Status
Table4.15 PC Health Status
Description
CPU THRM-Throttling
When the temperature exceeds the value set in “CPU
Waning Temperature” below, the throttling is activated in
selected percentages to restrain the heat generation from
CPU. Note that the operation in Windows is not supported.
CPU Warning Temperature
Select CPU Warning Temperature.
You can select the threshold temperature of CPU
temperature warning.
If it exceeds the specified temperature, a beep will sound as
a warning.
58
Choice
4 BIOS Setup
Frequency/Voltage Control
Figure 4.16 Frequency/Voltage Control
Table 4.16 Frequency/Voltage Control Selections
Description
Choice
Spread Spectrum
Select Disabled / Enabled of Spread Spectrum.
When the system clock generator pulses, the extreme
values of the pulse generate excess EMI. Selecting
“Enabled” changes the extreme values from spikes to flat
curves, thus reducing EMI. This benefit may in some cases
be outweighed by problems with timing-critical devices.
59
4 BIOS Setup
Defaults Menu
Selecting “Defaults” from the main menu shows you two options which are described below
Load Fail-Safe Defaults
When you press <Enter> on this item you get a confirmation dialog box with a message similar to:
Load Fail-Safe Defaults (Y/N) ? N
Pressing “Y” loads the BIOS default values for the most stable, minimal-performance system operations.
Load Optimized Defaults
When you press <Enter> on this item you get a confirmation dialog box with a message similar to:
Load setup Defaults (Y/N) ? N
Pressing “Y” loads the default values that are factory settings for optimal performance system
operations.
Supervisor/User Password Setting
You can set either supervisor or user password, or both of them. The differences between them are:
SUPERVISOR PASSWORD: can enter and change the options of the setup menus.
USER PASSWORD: just can only enter but do not have the right to change the options of the setup
menus. When you select this function, the following message will appear at the center of the screen to
assist you in creating a password.
ENTER PASSWORD:
Type the password, up to eight characters in length, and press <Enter>. The password typed now will
clear any previously entered password from CMOS memory. You will be asked to confirm the password.
Type the password again and press <Enter>. You may also press <Esc> to abort the selection and not
enter a password.
To disable a password, just press <Enter> when you are prompted to enter the password. A message will
confirm that the password will be disabled. Once the password is disabled, the system will boot and you
can enter Setup freely.
PASSWORD DISABLED:
When a password has been enabled, you will be prompted to enter it every time you try to enter Setup.
This prevents an unauthorized person from changing any part of your system configuration.
Additionally, when a password is enabled, you can also require the BIOS to request a password every
time your system is rebooted. This would prevent unauthorized use of your computer.
You determine when the password is required within the BIOS Features Setup Menu and its Security
option. If the Security option is set to “System”, the password will be required both at boot and at entry
to Setup. If set to “Setup”, prompting only occurs when trying to enter Setup.
60
4 BIOS Setup
Exit Selecting
Save & Exit Setup
Pressing <Enter> on this item asks for confirmation:
Save to CMOS and EXIT (Y/N)? Y
Pressing “Y” stores the selections made in the menus in CMOS – a special section of memory that stays on
after you turn your system off. The next time you boot your computer, the BIOS configures your system
according to the Setup selections stored in CMOS. After saving the values the system is restarted again.
Exit Without Saving
Pressing <Enter> on this item asks for confirmation:
Quit without saving (Y/N)? Y
This allows you to exit Setup without storing in CMOS any change. The previous selections remain in
effect. This exits the Setup utility and restarts your computer.
POST Messages
During the Power On Self-Test (POST), if the BIOS detects an error requiring you to fix something ,
it will either sound a beep code or display a message.
If a message is displayed, it will be accompanied by:
PRESS F1 TO CONTINUE, CTRL-ALT-ESC OR DEL TO ENTER SETUP
POST Beep
Currently there are two kinds of beep codes in BIOS. This code indicates that a video error has occurred
and the BIOS cannot initialize the video screen to display any additional information. This beep code
consists of a single long beep followed by two short beeps. The other code indicates that your DRAM
error has occurred. This beep code consists of a single long beep repeatedly.
Position and Setting of CMOS, ROM clear switch
If an unexpected activation failure occurs due to the BIOS setting, the CMOS/ROM clear jumper can be
set in order to disable the BIOS setting and start up the system.
In the normal operation, leave the CMOS/ROM clear jumper to the factory setting (both: OFF).
(1) First turn power off of the main body. Then set CMOS clear switch (DIP switch 1 – SW1) to ON.
After 10 seconds, set it to OFF again.
(2) Set ROM clear switch (DIP switch 1 – SW2) to ON.
(3) Turn power on of the main body and start the system. After the system wakes up, start the BIOS
setup and set proper values to it.
(4) After the settings, set ROM clear swich (DIP switch1 – SW2) to OFF again and save the settings.
Then reboot the system.
61
5 Each Component Function
5. Each Component Function
Component Name
Front
Bottom
Figure 5.1 Component Name
62
5 Each Component Function
Table 5.1 Each Component Function
Name
Function
CF-CARD
CF card slot (only for a CF card with IDE connection)
LAN A
Ethernet 1000BASE-T/100BASE-TX/10BASE-T RJ-45 connector
LAN B
Ethernet 1000BASE-T/100BASE-TX/10BASE-T RJ-45 connector
RDY LED
Indicates hardware ready
B.RUN LED
Indicates the running of bus interface driver
ERR. LED
Indicates system error
USER LED
Indicates user error
BAT. LED
Indicates battery alarm
EXIT LED
Indicates shutdown (power off) or hardware reset
I/O
I/O terminal for shutdown, WDT output terminal
SERIAL
Serial port connector (9-pin D-SUB, male)
A-RGB
CRT connector (15-pin HD-SUB, female)
USB
USB port connector × 5
RESET
Push switch for hardware reset
3-position toggle switch
Control switch for bus interface driver
DIP switch 1
Switch for CMOS clear, ROM clear, SSD Enable and SSD write protect
DIP switch 2
Switch to select the reset method
CF/SSD LED
Indicates the access of SSD or a CF card
63
5 Each Component Function
Each Component Function
CF card connector: CF-CARD
A CF card connector supports a CF card (Type I: memory card only).
Table 5.2 CF card connector
Connector used
50
26
25
1
Pin No.
Signal name
26
N.C.
I/O
27
DD11
I/O
DD4
I/O
28
DD12
I/O
4
DD5
I/O
29
DD13
I/O
5
DD6
I/O
30
DD14
I/O
6
DD7
I/O
31
DD15
I/O
7
CS0-
Output
32
CD3-
Output
8
GND
33
N.C.
9
GND
34
DIOR-
Output
10
GND
35
DIOW-
Output
11
GND
36
+5V
12
GND
37
INTRQ
13
+5V
38
+5V
14
GND
39
CSEL-
15
GND
40
N.C.
16
GND
41
RESET-
Output
17
GND
42
IOCHRDY
Input
18
DA2
Output
43
DDRQ
Input
19
DA1
Output
44
DDACK-
Output
20
DA0
Output
45
DACT-
Output
21
DD0
I/O
46
DALE
Output
22
DD1
I/O
47
DD8
I/O
23
DD2
I/O
48
DD9
I/O
24
N.C.
49
DD10
I/O
50
GND
Pin No.
Signal name
1
GND
2
DD3
3
25
64
50-pin header type (1.27mm pitch)
N.C.
Direction
Direction
Input
Output
5 Each Component Function
CAUTION
-
The CF card connector does not support hot plugging. The card should not be inserted or removed
with the power supply ON. You should not insert or remove the card or come into contact with it
while the power is on Doing so may cause this product to malfunction or fail..
Before you insert/remove the CF card, make sure that the power is switched off and the access LED
is turned off.
-
We have evaluated the operation of a CF card using the specific CF card listed on “Chapter 9 List of
Options and Recommended Parts”. The operation of other CF cards (such as commercial ones)
cannot be guaranteed.
Built-in SSD
The product contains a SSD which has a capacity of 4GB. The built-in SSD is used for OS. SSD has the
rewritable life (1 million times). Therefore a CF card is recommended for the data which will be
rewritten frequently to be stored.
Write protect function
This product has two types of write protect function.
-
EWF function of Windows® Embedded Standard 2009 : the function by software
-
Write protect of DIP switch: the function by hardware
The write protect by EWF is sufficiently effective. The combination of it and the DIP switch provides
further reliable protect for writing. However, the DIP switch must be used in conjunction with EWF. If
you set the DIP switch for write protect to ON without setting EWF to Enabled, OS will not boot.
Refer to following procedures for the setting.
[How to set the DIP switch for write protect from OFF to ON]
(1) First start up Windows, then make sure the condition of EWF from command prompt. If it is
Disabled, set it to Enabled. *1
(2) Shutdown Windows. Then turn power off.
(3) Set the 4th switch of DIP switch 1 to ON.
[How to set the DIP switch for write protect from ON to OFF]
(1) Turn power off.
(2) Set the 4th switch of DIP switch 1 to OFF.
(3) If you want to turn EWF off, start up Windows, set EWF to Disabled from command prompt, then
reboot OS. *1
*1: In order to know how to set EWF, refer to “Notes on Windows®Embedded Standard”, which is packed with this product.
SSD Enable switch
The 3rd swich of DIP switch 1 can change the condition of built-in SSD to Enabled / Disabled. Set this
swich to ON if your application or system requires it or you want to make SSD unrecognizable to the OS
and BIOS.
65
5 Each Component Function
Giga bit-Ethernet: LAN A - B
This product is equipped with 2 ports for giga bit.
- Network type
: 1000BASE-T/100BASE-TX/10BASE-T
- Transmission speed
: 1000M/100M/10M bps
- Max. network path length
: 100m/segment
- Controller
: Intel 82574L
Table 5.3 1st Ethernet Connector
PIN#
LAN
Transmit
LED
8
Link
LED
1
Function
100BASE-TX
1000BASE-T
1
TX+
TRD+(0)
2
TX-
TRD-(0)
3
RX+
TRD+(1)
4
N.C.
TRD+(2)
5
N.C.
TRD-(2)
6
RX-
TRD-(1)
7
N.C.
TRD+(3)
8
N.C.
TRD-(3)
LEDs for display of network statuses:
Right LED
Left LED
LAN drivers
Installed
66
: Link LED
Normal connection
Operation
: Operation LED
10M
100M
1000M
: Green ON
: Green Blinking
: Off
: Green
: Orange
5 Each Component Function
LED Displays
Table 5.4 LED Displays
Abbreviat
ion
RDY
Name
H/W
READY
Color
Green
Status
On
The hardware is all set to go.
Off
The hardware is not ready or a system WDT error has occurred.
Blink
A reset by the reset switch has been accepted.
The hardware is reset two seconds after the LED starts blinking.
On
B.RUN
ERR.
USER
BAT.
BUS
I/F
DRIVER
RUN
Green
Off
The bus interface driver is running.
(User applications have been enabled for bus access.)
The bus interface driver has been suspended.
(The Y output is off. User applications have been disabled for bus access.)
The bus interface driver has accepted a reset generated either by setting
Blink the toggle switch to B.RST or by resetting module No. 1 in the multiple CPU
configuration. *1
SYSTEM
ERROR
Red
USER
ERROR
Red
On
A system error has occurred without stopping the output.
Off
This product is in the normal state.
Blink A system error has occurred while stopping the output.
BATTERY
Orange
ALARM
EXIT
EXIT
Green
CF/SSD
CF/SSD
ACCESS
Green
*1
Definition
On
A user error has occurred.
Off
This product is in the normal state.
On
This product has caused an internal battery error.
Off
This product is in the normal state.
On
The shutdown and hardware reset procedure has been completed.
Off
The shutdown and hardware reset procedure has not been completed.
On
Access is being made to IDE (built-in SSD/a CF card)
Off
Access is not being made to IDE (built-in SSD/a CF card).
*2
When the B.RUN LED is blinking, do not reset again the bus interface driver by setting the toggle switch to B.RST
or resetting module No. 1 in the multiple CPU configuration.
*2
When the shutdown of OS is completed, nothing is displayed on a CRT screen but it becomes a black screen.
67
5 Each Component Function
Terminal block: I/O
Connect it using the terminal block connector packed with this product
Table 5.5 Terminal Block
Pin
Signal
Connection method
1
Shutdown input (+)
Refer to figure 5.2
2
Shutdown input (-)
input circuit
3
Shutdown complete output
Refer to figure 5.3
4
Watch dog timer start output
output circuit
5
Common terminal for Pin 3,4
CAUTION
-
-
-
Shutdown input /output is supported by Windows® Embedded Standard 2009 only.
If ON-period of shutdown input is longer than 5 seconds, the forced shutdown will run. It is not a
normal shutdown. After this procedure, OS may not boot up in order.
(*) In general, do not use the forced shutdown.
(*) When you want to shutdown the OS (Windows® Embedded Standard 2009) using the shutdown
input, the ON-period should be within the range 0.7sec – 3sec.
If you want to reboot the module after the normal shutdown or the forced shutdown (the condition
that the shutdown complete output of this module is ON and EXIT LED of MELSECWinCPU
module lights), you should turn power off -> on or send a signal to the shutdown input (ON-period :
0.7sec – 3sec) again.
(*) If the reset button of a MELSECWinCPU module is pushed, you can not reboot the module.
If the shutdown input is ON, a MELSECWinCPU module can not start up.
When you are booting up Windows, do not shut it down. The shutdown procedure may not be done
in the correct order.
Specification
[Common]
Item
Available wire range
Specification
Single wire: 24 to 16AWG
Twisted wire: 24 to 16AWG
The standard length of peeled wire
Recommended tool to control
buttons
Terminal block tightening torque
A minus driver (diameter: 3mm, edge width: 2.6mm)
Wire type
Use 60/75˚C Copper Conductor Only
(*) Use a rod terminal as needed
68
10mm
0.2 - 0.3Nm
5 Each Component Function
[Input part]
Item
Specification
Input specification
Current drive input insulated by photocoupler
Input resistence
3.3kΩ
Input protect circuit
With diode to protect circuit from reversed input
Input response time
less than 100μsec
External circuit power
DC12 - 24V (±10%)
Normal shutdown
Input ON time: 0.7sec - 3sec
Forced shutdown
Input ON time: more than 5sec
1
(External Circuit)
3 .3 k Ω
External Power Supply
(DC12V - 24V)
Input Contact
2
Figure 5.2 Input Circuit
[Output part]
Item
Specification
Output specification
Output condition
Rest voltage of output
ON
Rating output
Output response time
Open collector output insulated by photocoupler
(1) Shutdown complete output becomes ON when the
shutdown has finished
(2) Watch dog timer start output becomes OFF when
timeup has come
Less than 1.3V ( output current ≤ 50mA),
Less than 1.5V ( output current ≤ 100mA)
Max. DC30V 100mA
Less than 300μsec
(External Circuit)
load
3, 4
External Power Supply
(Ma x.DC30V)
2 S D 7 80A
4 . 7k Ω
5
Figure 5.3 Output Circuit
69
5 Each Component Function
Serial Port Interface: SERIAL
This product has one RS-232C-compliant serial port connector. You can set it to COM1 – 4 or unused on
BIOS setup (refer to “Chapter 4 BIOS Setup”).
Table 5.6 SERIAL 1 I/O address, Interruption
COM
I/O address
Interrup
tion
1
03F8H-03FFH
2
02F8H -02FFH
3
03E8H -03EFH
4
02E8H -02EFH
IRQ 3
IRQ 4
IRQ 5
IRQ 7
IRQ 9
IRQ 10
IRQ 11
IRQ 15
The default setting of BIOS is as follows.
Serial port: COM1(03F8H-03FFH),IRQ4
Table 5.7 Serial Connector
Connector used
9-pin D-SUB male connector
1
5
No.4-40UNC
Inch screw
6
9
Pin No.
Signal name
Meaning
Direction
1
DCD
Data carrier detect
Input
2
RXD
Receive data from equipment
Input
3
TXD
Transmit data to equipment
Output
4
DTR
Data terminal ready
Output
5
GND
Signal ground
None
6
DSR
Data set ready
Input
7
RTS
Request to send
Output
8
CTS
Clear to send
Input
9
RI
Ring indicator
Input
70
5 Each Component Function
CRT Interface: A-RGB
It has a connector [A-RGB] for CRT connection.
Table 5.8 RGB connector
Connector used 15-pin HD-SUB female connector
5
1
15
11
10
6
Pin No.
Signal name
Pin No.
Signal name
1
RED
9
N.C.
2
GREEN
10
GND
3
BLUE
11
N.C.
4
N.C.
12
DDC Data
5
GND
13
HSYNC
6
GND
14
VSYNC
7
GND
15
DDC CLK
8
GND
None
In order to know which LCD can connect to it, refer to “Chapter 9 List of Options and Recommended
Parts”.
Display driver
Installed
CAUTION
-
Connected displays should be compliant with the VESA standard.
-
The display may show nothing according to the type of connected monitor after the install of VGA
driver. In the case, press <Ctrl>, <Alt> and <F1> keys at the same time.
-
When the analog display is used, Windows MS-DOS may not be properly be displayed in full-screen
mode.
This is because the frequency and resolution of Windows and MS-DOS (full-screen display) are the
same due to the screen settings while the display parameters are different.
For display, as only one parameter can be stored for one frequency or resolution, only either of
Windows or MS-DOS screen can be displayed properly.
In this case, change the resolution or display frequency of Windows so that it is not the same as for
the MS-DOS display.
71
5 Each Component Function
USB Port
It has 5ch of USB 2.0 interface [USB].
Figure 5.9 USB connector
4
1
Pin No.
Signal name
1
Vcc (+5V)
2
DATA-
3
DATA+
4
GND
Maximum power supply
The power capacity which each channel of USB connectors can supply is as follows. But the actual
power capacity to supply is limited by the requirement that the current comsumption of the total system
can not exceed the capacity of the power supply module. Therefore actual available capacity cannot
necessarily be equal to the maximum power capacity to supply.
The maximum power capacity to supply: 5V 0.5A (Max.) / channel
CAUTION
-
When selecting USB devices, take inrush current into consideration.
Control Switch
Reset switch
Name
Reset switch
Switch Type
Push switch
Definition
Hardware reset switch
Pushing over 1 second make the product reset.
CAUTION
Use a control switch only when the product is showing no response because of abnormal behaviour
etc. If you use it on normal operations (when OS is working), the system may crash without a
shutdown procedure. Then the OS may not work properly after restart.
72
5 Each Component Function
3-positions toggle switch
Figure 5.5 Factory Default of 3-position toggle switch
Name
Switch type
Definition
Bus interface driver control switch *1
B.RST (Bus interface driver RESET):
Holding the toggle switch at the B.RST position for two seconds resets the
MELSEC-Q Series modules under control of this product and the bus interface as
Toggle switch
3-position
toggle switch
well.
Use this switch to reset only the MELSEC-Q Series modules instead of causing a
hardware reset of the entire system including this product.
B.STOP (Bus interface driver STOP):
Stops of the operation of the bus interface driver, prevents user applications from
issuing access to the modules on the bus, and turns the Y output (*2) off. Module
diagnostic utilities (such as forced Y output and buffer memory batch-monitor) can be
executed.
B.RUN (Bus interface driver RUN):
Makes the bus interface driver active, allowing user applications to access modules on
the bus.
*1 The bus interface driver allows this product to access various MELSEC-Q Series modules such as the programmable
controller CPU, I/O, and intelligent function modules.
*2 The MELSEC-Q Series sequence program places "Y" at the beginning of the output number of each output module.
The Y output signifies the output to an output module.
Examples of using the toggle switch for the single-CPU configuration with this product alone
Operation expected
Stop user application access to the
modules on the bus
Action to take
1) Set the toggle switch to B.STOP
Restart user application access to the 1) Set the toggle switch to B.RUN
modules on the bus
Resets the modules on the bus and
recover from the reset
1) Set the toggle switch to B.RUN.
2) Hold the toggle switch at the B.RST position for two seconds,
then release the switch.
3) Set the toggle switch to B.RUN.
4) Execute the user application.
73
5 Each Component Function
DIP switch 1
ON
1 2 3 4
Figure 5.6 Factory Default of DIP switch 1
No.
Name
Switch type
1
SW-1
*1*2
CMOS clear switch (factory setting : OFF)
Refer to “Chapter 4 Position and Setting of CMOS, ROM clear switch”
2
SW-2
ROM clear switch (factory setting : OFF)
Refer to “Chapter 4 Position and Setting of CMOS, ROM clear switch”
3
SW-3 *1
SSD Enable switch (factory setting : OFF)
4-poles sliding
dip switch
4
Definition
SW-4 *1
ON: It sets built-in SSD to Disabled
OFF: It sets built-in SSD to Enabled
Refer to “Chapter 5 Built-in SSD“.
SSD write protect switch (factory setting: OFF)
This switch controls the write protect function of built-in SSD.
ON: It forbids built-in SSD to be writed in.
OFF: It permits built-in SSD to be writtten in.
Refer to “Chapter 5 Built-in SSD“.
*1: When changing SW-1, 3, 4 of DIP switches, check that power of the product is OFF. While power is ON, don’t change
DIP switches.
*2: You change set SW-1 to ON only when power of the product is OFF. If power of the product is ON and SW-1 is ON, it
does not work in order. Before turning ON power of the product, be sure to check that SW-1 is OFF.
DIP Switch 2
ON
12 3 4 5 6
Figure 5.6. Factory Default of DIP switch 2
No
Name
1
SW-1
Reserved (Factory default: OFF)
2
SW-2
Reserved (Factory default: OFF)
3
SW-3
Reserved (Factory default: OFF)
4
SW-4
Reserved (Factory default: OFF)
5
SW-5
6
*1
SW-6
Switch type
6-bit slide
DIP switch
Definition
Reset method select switch (Factory default: OFF)
When this product is module No.2 - 4 in the multiple CPU system *1
OFF: Setting the RESET/L.CLR switch on module No.1 (programmable controller CPU) to RESET
resets the bus interface driver without resetting this product. *2
ON: Setting the RESET/L.CLR switch on module No.1 (programmable controller CPU) to RESET resets
this product.*3
Reserved (Factory default: OFF)
*2
Before making changes to DIP switch settings, turn off the power to this product. Do not touch any DIP switch
setting with the Module powered.
Usually, leave SW-5 set to OFF. If you set SW-5 to ON, the reset operation on Module No.1 resets this product as well.
If the OS is still up and running at that time, the reset causes the OS to abort without executing the legitimate
shutdown procedure. Note that this may prevent the OS from running normally when restarted.
*3
Only when Windows® Embedded Standard 2009, turning on SW-5 becomes effective.
74
6 Combination with the MELSEC-Q Series
6. Combination with the MELSEC-Q Series
Overview
This product can communicate with the MELSEC-Q Series programmable controller CPU module,
intelligent function module and I/O module at high speed by connecting the buses using the MELSEC-Q
Series bus module.
Please refer to the manual of QCPU used for details regarding restrictions.
Note that the bus interface driver is used for communication with the various modules in the MELSEC-Q
Series, including the programmable controller CPU.
For details on each MELSEC-Q Series module and the bus interface driver, refer to the relevant manuals.
System Configuration
This product can be combined with MELSEC-Q Series modules as shown below.
75
6 Combination with the MELSEC-Q Series
Supported Modules *1
Classification
Base unit
Power supply module *6 *7
AC input module
Model name
Q33B, Q35B, Q38B, Q312B, Q38DB, Q312DB, Q63B, Q65B, Q68B, Q612B
Q61P, Q63P, Q64PN, Q61P-D
Q-series modules are available.
For details, refer to the manual of each module.
DC input module
DC/AC input module
High-speed input module
QX40H, QX70H, QX80H, QX90H
Contact output module
TRIAC output module
Transistor output module
DC input transistor
Q-series modules are available.
For details, refer to the manual of each module.
output mixing module
A-D conversion module
Q64AD *2, Q68ADV *2, Q68ADI
D-A conversion module
Q62DAN, Q64DAN, Q68DAVN, Q68DAIN
Analog I/O module
Q64AD2DA
*2
Loadcell input module
Q61LD
High-speed counter module
QD62, QD62D, QD62E, QD63P6, QD64D2
Positioning module *5
QD75P1 *2, QD75P2 *2, QD75P4 *2, QD75D1 *2, QD75D2 *2, QD75D4 *2,
QD70P4 *2, QD70P8 *2, QD75M1, QD75M2, QD75M4, QD75MH1, QD75MH2,
QD75MH4, QD74MH8, QD74MH16, QD72P3C3, QD70D4, QD70D8
Temperature control module *2
Q64TCTT, Q64TCRT, Q64TCTTBW, Q64TCRTBW
Temperature-digital conversion
module
Q64TD
Temperature input module
Q64RD *2
Pulse input module with insulated
channels
QD60P8-G
A-D conversion module with
insulated channels
Q68AD-G, Q64AD-GH, Q62AD-DGH
D-A conversion module with
insulated channels
Q66DA-G, Q62DA-FG
*2,
Q64TDV-GH, Q64RD-G, Q68RD3-G, Q68TD-G-H01, Q68TD-G-H02
Distributor with insulated channels Q66AD-DG
Loop control module
Q62HLC
Interrupt module
QI60, QX40H*3, QX70H*3, QX80H*3, QX90H*3
MELSECNET/H module *4 *5
QJ71LP21-25, QJ71LP21S-25, QJ71LP21G, QJ71BR11
CC-Link module *5
QJ61BT11N
CC-Link/LT module
QJ61CL12
FL-net(OPCN-2) module *5
QJ71FL71-T, QJ71FL71-B5, QJ71FL71-B2 *2,
QJ71FL71-T-F01, QJ71FL71-B5-F01, QJ71FL71-B2-F01
AS-i master module
*2
,QJ71LP21GE
*2
*2
QJ71AS92
*2
Serial communication module *5
QJ71C24N, QJ71C24N-R2, QJ71C24N-R4
DeviceNet module
QJ71DN91
*1:
MELSEC-Q Series units are manufactured by Mitsubishi Electric Corporation.
*2:
Use the product with later function than version B.
*3:
It is the case where you turn off the function switch (SW2) and change it to an interrupt unit.
*4:
Following MELSECNET/H unit is not available.
Classification
Model name
MELSECNET/H remote I/O station
QJ72LP25-25, QJ72LP25G, QJ72BR15, QJ72LP25GE
MELSECNET/H (twist bus type)
QJ71NT11B
*5:
Some functions have limitation. Refer to “Note on using I/O unit and intelligent function unit”.
*6:
Take care so that total current consumption of the whole system would not exceed DC5V reted output current of a power supply unit.
*7:
Q10WCPU-W1 series are to be powered by limited Voltage/Current (LVLC) circuit of Listed Power Supplies.
76
6 Combination with the MELSEC-Q Series
CAUTION
If you operate the system whose total current consumption exceeds DC5V rated output current, there
is a case where system reset occurs and a file will be damaged during operation of
MELSECWinCPU.
Note on using I/O module and intelligent function module
(1) Note on using MELSECNET/H module
MELSECNET/H module under the control of MELSECWinCPU module has following limitation.
(a) It does not support Remote I/O network.
Only PLC to PLC network is available.
(b) It can not be used as a relay station of forwarding function between data links or rooting
forwarding.
If you use forwarding function between data links or rooting forwarding, select
MELSECNET/H module under the control of programmable controller CPU as a relay station.
(c) MELSECNET/H special commands are not available.
(d) SEND/RECV function is not available.
(e) Interrupt sequence program startup is not available.
(f) Network diagnosis (test) function is not available.
(g) Network easy doubling function is not available.
(You can not set network classification to “MNET/H standby station”.)
(h) When it accesses other staions on doubling CPUs, it can not specify the chain.
Only its own chain can be accessed (where a station number is specified).
(i) “Debug mode” is not available.
(2) Note on using CC-Link module
CC-Link module under the control of MELSECWinCPU module has following limitation.
(a) The parameter for CC-link which is set on SWnD5C-J61P (n is later than 0) is not available.
In order to set the parameter, use a CC-Link utility provided by SW1PNC-WCPU-B.
(b) CC-Link special commands are not available.
(c) Interrupt sequence program startup is not available.
(d) CC-Link automatic startup is not available.
(e) It does not support remote I/O network mode.
(f) It can not be set as a master station (doubling function).
(g) Standby master function is not available.
(3) Note on using positioning module
You cannot use the parameter set on GX Configurator-QP on a positioning module under the
control of MELSECWinCPU module.
You should use bus interface function (QBF_ToBuF) and write each parameter in the buffer
memory of a positioning module.
77
6 Combination with the MELSEC-Q Series
(4) Note on using serial communication module
Only the communication by the protocols with no procedure is suppored on a serial communication
module under the control of MELSECWinCPU module.
(a) Following function is not available.
- MC protocol and bi-directional protocol are not available.
- Serial communication module special commands are not available.
- Watch function for programmable controller CPU is not available.
- Modem function is not available.
(b) When using interrupt program, follow the procedure below.
- Select interrupt event No. on <<System Setting>> tab of MELSECWinCPU setting utility.
- Write “1” in the buffer memory (address : 2010H/2110H) of a serial communication module.
- In your program, make the procedures where it receives the interrupt event using
QBF_WaitUnitEvent function and runs the proper process.
(5) Note on using FL-net module
FL-net module under the control of MELSECWinCPU module has following limitation.
- In your program, make the procedures where it receives the interrupt event using
QBF_WaitUnitEvent function and runs the proper process.
- Automatic refresh function is not available.
(6) Note on using GX Configurator
By using MELSECWinCPU setting utility, you can read the default setting of the parameters of an
intelligent function module from the project file of GX Developer.
If using GX Works2, first save the project as GX Developer format and read it.
For the note on available project files of GX Developer, refer to followings.
- MELSECWinCPU Module Q-Bus Interface Driver User's Manual (Utility Operation, Programming)
78
6 Combination with the MELSEC-Q Series
Notes on I/O No. assignment
MELSECWinCPU module occupies 2 slots. Therefore the right 1 slot of occupied 2 slots would be
treated as a blank slot. Don’t set I/O assignment to the right 1 slot. (Default settings occupy “Blank”,
“16 points” and I/O No. of the right slot neighboring a MELSECWinCPU module becomes “0010H”).
You can use I/O No. from “0000H” for the right slot neighboring a MELSECWinCPU module by
setting “0 points” to the right 1 slot of 2 slots occupied by MELSECWinCPU module.
(1) Slot conditions after I/O assignment
Slots after I/O assignment settings would work according to the specification of the mounted
module.
(a) If you set less points than ones of mounted I/O module.
The actual available points of mounted I/O module would get less.
For example, if you set “16 points” for the input module with “32 points”, you can not use
descending 16 points.
(b) If you set less points than ones of mounted intelligent function module.
Intelligent function module assignment error (error code: 2100, SP.UNITLAY ERR.) would
happen.
(c) If you set more points than ones of mounted I/O module.
You can not use the points exceeding the specified points of a mounted I/O module.
(d) If you set different type from a mounted module.
You should set the same type to I/O assignment setting as the actual mounted module. If not, it
would work out of order.
If you use an intelligent function module, you should set the same I/O point No. adding to
above.
For results when the different type from the actual mounted module was set to an I/O
assignment setting, refer to followings.
The list of results when I/O assignment was different from the mounted module
A mounted module
The type set to I/O assignment
setting
Input module
High-speed input module
Output module
I/O mixing module
Intelligent / Interruption
Input module
High-speed input module
I/O mixing module
Output
Output module
I/O mixing module
Intelligent function module
Interruption module
Blank slot
Input / High-speed input
Input / High-speed input
Output / I/O mixing
Input / High-speed input
Output / I/O mixing
Intelligent / Interruption
All modules
Blank
Other combination
Result
Intelligent function module assignment error happens.
(Error code: 2100, S P.UNITLAY ERR.)
Works as input / high-speed / I/O mixing module.
(according to the actual type of the mounted module)
Works as output / I/O mixing module.
(according to the actual type of the mounted module)
Intellligent function module assignment error happens.
(Error code: 2100, S P.UNIT LAY ERR.)
Treated as a blank slot.
(All points becomes OFF.)
Treated as a blank slot.
(All points becomes OFF.)
No errors happen but not work in order.
(e) The last I/O No.
On I/O assignment settings, make sure that the last I/O No. becomes less than 0FFFH.
If you set I/O assignment so that the last I/O No. exceeds 0FFFH, intelligent function module
assignment error (error code: 2124, SP.UNIT LAY ERR.) happens.
79
6 Combination with the MELSEC-Q Series
(2) Notes when a MELSECWinCPU module automatically assigns the first XY.
If the first XY was not set to an I/O assignment setting, a MELSECWinCPU module automatically
assigns the first XY.
Therefore the first XY setting of each slot may conflict with the one which MELSECWinCPU module
assigned in the following cases (a) and (b).
(a) On the first XY setting, you have swapped the front I/O No. with the rear one.
(b) There exist both the slot which you assign the first XY to and the slot which you did not do so
(the slot MELSECWinCPU module automatically assigns).
Refer to the example of the clash of the first XY as follows.
Take care enough not to cause the clash of the first XY of each slot.
If the clash happens, intelligent function module assignment error (error code: 2107, SP.UNIT
LAY ERR.) follows.
80
6 Combination with the MELSEC-Q Series
Access Forms
The Module can access various modules in the following forms.
(1) Access another programmable controller CPU in the local system.
(2) Access the I/O module or intelligent function module in the local system.
(3) Access a programmable controller CPU via the MELSECNET/H module.
(4) Access a remote I/O, remote device, intelligent device, or programmable controller CPU via the
CC-Link module.
81
6 Combination with the MELSEC-Q Series
Multiple CPU Configuration
Multiple CPU Configuration Including this product
This product supports both of the single-CPU configuration with the Module as only one CPU and the
multiple CPU configuration with this product combined with other CPUs.
The maximum number of this product to be installed is only one.
Combination of CPUs
-
Main base unit (Q3□B)
Module No.1
Basic model QCPU
High performance model
QCPU / Process CPU
Q00UCPU
Q01UCPU
Q02UCPU
Q03UDCPU
Q04UDHCPU
Q06UDHCPU
Q10UDHCPU
Q13UDHCPU
Q20UDHCPU
Universal
model
Q26UDHCPU
QCPU
Q03UDECPU
Q04UDEHCPU
Q06UDEHCPU
Q10UDEHCPU
Q13UDEHCPU
Q20UDEHCPU
Q26UDEHCPU
Q50UDEHCPU
Q100UDEHCPU
High
performance
model
QCPU
-
Number in which CPU module since Module
Universal model QCPU
Q00UCPU
Q03UDCPU
Q01UCPU
Q04UDHCPU
Q02UCPU
Q06UDHCPU
Q10UDHCPU
Q13UDHCPU
Q20UDHCPU
Q26UDHCPU
Q03UDECPU
Process CPU
Q04UDEHCPU
Q06UDEHCPU
Q10UDEHCPU
Q13UDEHCPU
Q20UDEHCPU
Q26UDEHCPU
Q50UDEHCPU
Q100UDEHCPU
-
No.2 can be installed
Motion CPU
Q172CPUN
Q172DCPU
Q173CPUN
Q173DCPU
Q172CPUN-T
Q173CPUN-T
Q172HCPU
Q173HCPU
Q172HCPU-T
Q173HCPU-T
Maximum
number of
MELSEC modules to be
installed
WinCPU
module (Module No.1
is contained.)
1
-
1
3
3
-
3
3
3
-
1
4
-
-
-
-
1
-
1
3
3
-
3
3
-
-
1
4
- : The combination is impossible.
82
6 Combination with the MELSEC-Q Series
-
Multiple CPU high speed main base unit (Q3□DB)
Module No.1
Basic model QCPU
High performance model
QCPU / Process CPU
Q00UCPU
Q01UCPU
Q02UCPU
Q03UDCPU
Q04UDHCPU
Q06UDHCPU
Q10UDHCPU
Q13UDHCPU
Q20UDHCPU
Universal
Q26UDHCPU
model QCPU
Q03UDECPU
Q04UDEHCPU
Q06UDEHCPU
Q10UDEHCPU
Q13UDEHCPU
Q20UDEHCPU
Q26UDEHCPU
Q50UDEHCPU
Q100UDEHCPU
Number in which CPU module since Module No.2 can be installed
Universal model QCPU
Motion CPU
Q00UCPU
Q03UDCPU
Q172CPUN
Q172DCPU
Q01UCPU
Q04UDHCPU
Q173CPUN
Q173DCPU
Q02UCPU
Q06UDHCPU
Q172CPUN-T
Q10UDHCPU
Q173CPUN-T
Q13UDHCPU
Q172HCPU
Q20UDHCPU
Q173HCPU
Q26UDHCPU
Q172HCPU-T
High
Process
Q03UDECPU
Q173HCPU-T
performance
CPU
model QCPU
Q04UDEHCPU
Q06UDEHCPU
Q10UDEHCPU
Q13UDEHCPU
Q20UDEHCPU
Q26UDEHCPU
Q50UDEHCPU
Q100UDEHCPU
-
Maximum
number of
MELSEC modules to be
installed
WinCPU
(Module No.1
module
is contained.)
1
2
3
-
3
3
-
-
1
4
-
-
-
-
-
-
1
2
3
-
3
3
-
3
1
4
- : The combination is impossible.
CAUTION
1) This product cannot be Module No.1 in the multiple CPU configuration. The multiple CPU
configuration requires a programmable controller CPU.
2) For the multiple CPU configuration, place this product at the right end of a series of CPUs.
3) Although a total of up to three programmable controller CPUs and motion CPUs can be installed, the
number of modules installable is restricted by the power capacity of the power supply module
(Q61P). See “Restriction by Power Capacity” in “Notes” for details.
83
6 Combination with the MELSEC-Q Series
CPU Configuration Diagrams
- Single-CPU configuration with this product as only one CPU
Module No.1
···This product
- Multiple CPU configuration with this product in combination with programmable controller CPUs
Maximum configuration with this product and three programmable controller CPUs
Modules No.1 - 3 ···Programmable controller CPU
Module No. 4
···This product
- Multiple CPU configuration with this module in combination with a programmable controller CPU
and motion CPUs
Module No.1
···Programmable controller CPU
Modules No.2 - 3 ···Motion CPU
Module No.4
···This product
CAUTION
The total number of programmable controller CPUs and motion CPUs installable is restricted by the
power capacity of the Q Series power supply module (Q61P).
When a large number of I/O modules and intelligent function modules are used, the equivalent restriction
applies to them in the same way. For details, see “Restriction by Power Capacity” in “Notes”.
84
6 Combination with the MELSEC-Q Series
Notes
Maximum Number of modules Installed and Maximum Number of I/O Channels
- When installing single-CPU configuration
Refer to the maximum mountable number and the maximum I/O number as follows.
Example of system
expansion
Maximum number of
stages added
Maximum number of I/O
modules installed
7 stages
64 modules
Maximum number of I/O
channels
4,096 channels
Maximum number of
MELSECNET/H modules
installed
4 modules
Maximum number of
CC-Link modules installed
8 modules
Maximum number of
interrupt modules
installed
Maximum number of other
intelligent function
modules installed
Notes
1 module
64 modules
(1) Up to seven expansion base units can be added.
(2) The total length of extension cables must be 13.2 m.
(3) When using an extension cable, do not bundle it or route it near any main circuit
(high voltage, large current) line.
(4) Set the expansion stage numbers in ascending order without number duplication.
(5) Connect each extension cable from the extension cable connector OUT on one base unit
to the extension cable connector IN on the expansion base unit at the next stage.
(6) Installing 65 modules or more results in an error.
85
6 Combination with the MELSEC-Q Series
- When installing Multiple-CPU configuration
Refer to “QCPU User’s Manual (Multiple CPU System)”.
Restriction by Power Capacity
The current consumption of this product is the total value of one of the main body and ones of peripheral
devices. Take care that the summation of the current consumption of this product and ones of other modules
should not exceed the power capacity of your Q series power module.
(For the actual current consumption values of modules, refer to their manuals.)
- Multiple CPU configuration with a CF card
As the Q61P cannot be used if the total current consumption of the modules exceeds 6A, consider using
the Q64PN (power capacity = 5VDC/8.5A) instead.
Number of CPU modules
Programmable
controller CPU
Motion CPU
Q25HCPU
Q173CPUN
(0.64A)
(1.25A)
This product
Main base
unit
Total current
Q312B
consumption
(A)
Q10WCPU-W1
CF-1GB-B
(3.10A) *1
(0.087A)
Remaining current
capacity
(A)
Q61P
(6A)
Judgement
0
0
1
1
3.187
2.813
Ο
1
0
1
1
3.827
2.173
Ο
2
0
1
1
4.467
1.533
Ο
3
0
1
1
5.107
0.893
Δ
1
1
1
1
5.007
0.923
Δ
2
1
1
1
5.717
0.283
1
2
1
1
6.907
- 0.907
Δ
×
*2
The remaining current capacity is used as a criterion.
Ο: 1A to less than 3A: The system can grow.
Δ: 0A to less than 1A: The configuration is acceptable but not expandable.
×: Less than 0A: The configuration is not acceptable.
*1
Excluding the consumption current in the USB peripherals.
*2
The system can be configured by using a Q64PN instead.
- Configuration with many I/O modules and intelligent function modules
If the total current consumption by the modules on the main base unit, including this product and
peripheral devices, exceeds the power capacity used, move I/O modules and intelligent function
modules to an expansion module. The total current consumption by the modules on each base unit
must not exceed the power capacity. If the system configuration is short of power capacity even with
one expansion base unit added, add more than one expansion base unit.
86
7 Reset Specifications
7. Reset Specifications
This product has following kind of a reset.
The range to be reset depends on system configuration and the condition of DIP swiches.
Reset Specifications
Single-CPU
configuration
Reset type
Reset by power OFF to ON
(1st station)
SW-5 of DIP switch 2 is
OFF
SW-5 of DIP switch 2 is
ON *1
○
○
○
A MELSECWinCPU
module and all the
modules on a bus will
be reset.
Reset by OS rebooting
○
A MELSECWinCPU
module and all the
modules on a bus will
be reset.
Reset of 1st station
(Only on multiple
configuration)
CPU
Reset by a toggle switch
Multiple CPU configuration (Modules No.2 - 4)
-
A MELSECWinCPU
module and all the
modules on a bus will be
reset.
After the completion of
shutdown, the main
station becomes CPU
DOWN condition and
other stations detect
multiple CPU DOWN
error.
A MELSECWinCPU
module and all the
modules on a bus will be
reset.
After the completion of
shutdown, the main
module becomes CPU
DOWN condition and
other stations detect
multiple CPU DOWN
error.
○
A MELSECWinCPU
module and all the
modules on a bus will be
reset.
After the reboot of OS, the
main station and the
others detect multiple
CPU DOWN error. Then
you should reset the 1st
station.
After the reboot of OS,
other stations detect
multiple CPU DOWN
error. Then you should
reset the 1 st station.
○
Bus interface driver and
all the modules on a bus
will be reset.
○
A MELSECWinCPU
module and all the
modules on a bus will be
reset.
○
×
×
Bus interface driver
and all the modules on
a bus will be reset.
On multiple CPU
configuration, you cannot
reset even if you set a
toggle switch to B.RST.
On multiple CPU
configuration, you cannot
reset even if you set a
toggle switch to B.RST.
○: Available ×: Unavailable -: No combination
*1
The reset of the 1st station forces a MELSECWinCPU module and all the modules on a bus reset. Then a
MELSECWinCPU module becomes the condition without any power. If OS is working, it means that you finished
the system without shutdown procedure and OS may not work in order after the next reboot.
87
7 Reset Specifications
Reset Procedure of a MELSECWinCPU module and All the
Modules on a Bus
Reset by Recycling the Power Supply
(1) Shut down the OS on the screen (or set the shutdown command input to ON).
(2) Check that the EXIT LED on this product comes on
(or that the shutdown completion output is turned ON).
(3) Turn the power off.
(4) Turn the power back on.
Restarting the OS (DIP switch 2 with SW-5 set to OFF)
(1) Shut down the OS on the screen, then restart it.
(2) In the multiple CPU configuration, reset CPU Module No.1 after the completion of OS boot up.
Reset of Module No.1 (programmable controller CPU) (DIP switch 2 with SW-5 set to ON)
(1) Reset the switch on Module No.1.
CAUTION
-
-
-
88
Be sure to give ON time of a shutdown directions input as a range of 0.7sec - 3sec.
If 3 or more secs are turned on, re-starting of a MELSECWinCPU module will become impossible.
(The time of a re-injection of a power supply is included.) When this operation is performed and
re-starting of a MELSECWinCPU module becomes impossible, you can re-start the
MELSECWinCPU module by setting the shutdown command input to OFF, and then inputting the
shutdown command again (ON time: 0.7sec - 3sec) in the state of the power turned ON.(The
MELSECWinCPU module cannot be re-stated simply by setting the shutdown command input to
OFF and turning the power ON again.)
The EXIT LED comes on only when you shut down Windows or hardware reset.
If you reset this product or restart the OS in the multiple CPU configuration, other CPUs detect a
multiple CPU down error.
While a MELSECWinCPU module is doing a shutdown procedure (EXIT LED is lighting), the
condition of the main station becomes resetting or CPU DOWN.
If you reset the 1st station while SW-5 of DIP switch 2 is ON using multiple CPU configuration, a
MELSECWinCPU module will also be reset and becomes the condition without any power. If you
did so while OS is working, it means that you finished the system without a shutdown procedure and
OS may not work in order after the next reboot.
After you turn off power supply to this product, wait for more than 5 seconds till the next power ON.
7 Reset Specifications
Reset Procedure of Bus Interface Driver and All the Modules on a Bus
Single-CPU configuration with this product as only one CPU Module
(1) Stop the user application.
(2) Set the toggle switch to B.RST (hold the switch at the B.RST position for two seconds, then release
it).
(3) Set the toggle switch to B.RUN.
(4) Execute the user application.
Multiple CPU configuration (DIP switch 2 with SW-5 set to OFF)
(1) Stop the user application.
(2) Reset CPU Module No.1.
(3) Execute the user application.
CAUTION
In the multiple CPU configuration, reset the bus interface driver by resetting CPU Module No.1
(programmable controller CPU). Setting the toggle switch to B.RST without resetting the CPU
Module No.1, results in a multiple CPU down error on another CPU module.
89
8 Troubleshooting
8. Troubleshooting
Tips for Better Troubleshooting
Key points for establishing a fastersystem is to minimize the number of problems developing and, once
a problem has developed, identifying the cause as soon as possible.
You should perform troubleshooting with the following three basic points in mind.
(1) Check visually
Check the following items:
1)
Behavior of external devices
2)
Existence or absence of power supply
3)
Wiring state (connection cable)
4)
LED indication (Power indicator LED)
After checking the Module for items 1) - 4), connect the Module to external devices and check the
behavior of the user program.
(2) Identify the problem
Take the following steps to observe how the symptom changes:
1)
Change the input state to check whether the correct change can be read by the test program.
2)
Turning the output on and off repeatedly to check whether the state of the external device
changes correctly.
(3) Narrow the range down
Check the results of (1) and (2) above to locate the fault in one of the following options:
90
1)
This program side or external device side
2)
This program or any other Module
3)
Connection cable
4)
User program
8 Troubleshooting
This product Won't Start Normally
91
8 Troubleshooting
This product Starts with a BIOS Error displayed
92
8 Troubleshooting
The OS Won't Start Normally
93
8 Troubleshooting
It hangs-up at the time (after OS starting) of operation
94
8 Troubleshooting
BIOS Error
One or more of the following messages may be displayed if the BIOS detects an error during the POST.
If the items not described below apperar frequently, the product should be repaired.
CMOS battery has failed
CMOS battery is no longer functional. It should be replaced.
Refer to “Appendix 2 Battery” about the exchange of a battery.
Error encountered initializing hard drive
CF card or SSD cannot be initialized. If you installed a CF card, check if it is installed properly.
Error initializing hard disk controller
Cannot initialize a controller.
Keyboard error or no keyboard present
Cannot initialize the keyboard. Make sure the keyboard is attached correctly and no keys are being
pressed during the boot.
If you are purposely configuring the system without a keyboard, set the error halt condition in Setup to
HALT ON ALL, BUT KEYBOARD or NO ERRORS. This will cause the BIOS to ignore the missing
keyboard and continue the boot.
Memory address error at···
Indicates a memory address error at a specific location.
Press a key to REBOOT
This will be displayed at the bottom of the screen when an error occurs that requires you to reboot.
Press F1 to disable NMI, F2 to REBOOT
BIOS detects a Non-maskable Interrupt (NMI) condition during boot.
System halted, (CTRL-ALT-DEL) to REBOOT···
Indicates the system should be rebooted. Press and hold down the <Ctrl>+ <Alt>+<Del> keys.
95
8 Troubleshooting
Hard disk(s) fail (80)
HDD reset failed. If you installed a CF card, check if it is installed properly.
Hard disk(s) fail (40)
HDD controller diagnostics failed.
Hard disk(s) fail (20)
HDD initialization error. If you installed a CF card, check if it is installed properly.
Hard disk(s) fail (08)
Sector Verify failed. If you installed a CF card, check if it is installed properly.
Keyboard error or no keyboard present
Cannot initialize the keyboard. Make sure the keyboard is attached correctly and no keys are being
pressed during the boot.
BIOS ROM checksum error – System halted
The check sum of ROM address F0000H-FFFFFH is wrong.
Memory test fail
A BIOS error has occurred in an onboard memory test.
96
8 Troubleshooting
Necessary Information on your Inquiries
If you would like to make an inquiry for us after judging the breakdown of this product or from other reasons, you
have to tell us following status and situation.
Information of a problem
Q1. Information of the product
Product name
Seial No.
.
Q2. What happens as the problelm
□ No screen appears even if turning power ON □ LED does not light
□Peripheral devices cannot be recognized □I/O function cannot work □ Communication cannot work
.
□ Ohters:
Q3. Situations before the problem happended
□ Installed software □ Added peripheral devices □ External factors (thunder, water or oil hazard, etc.)
□ None
Q4. Solutions after the problem happended
□ Changed it to a compatible product and got normal operation
□ Checked it under isolated construnction and judged that it would have problem
□ Others:
.
Q5. Confirmation results by diagnosis program, sample program, etc.
Result:
Q6. Usage status
Purchase date (approximate)
Month:
Year:
.
Purchase number:
Q7. The date when the problem happened and repeatability
The date when the problem happened Day:
Month:
Year:
.
times /
hours) □Sometimes (
times /
Frequency: □ Always □Quite frequently (
The condition to happen: If there exist any special conditions to cause the problem
Pcs.
hours)
.
Q8. Usage environment and operating time
□ Inside the control panel in a factory or similar conditions □ Outdoors
□ 8 hours / day works □ 24 hours / day works
□ Others:
.
97
9 List of Options and Recommended Parts
9. List of Options and Recommended Parts
List of Options
Type
Name
Model Name
Maker
CompactFlash 1GB
CF-1GB-B
CONTEC CO., LTD.
CF card
CompactFlash 2GB
CF-2GB-B
CONTEC CO., LTD.
(FIX DISK types)
CompactFlash 4GB
CF-4GB-B
CONTEC CO., LTD.
CompactFlash 8GB
CF-8GB-B
CONTEC CO., LTD.
FPD-H21XT-AC
CONTEC CO., LTD.
FPD-L21ST-AC
CONTEC CO., LTD.
FPD-M21VT-AC
CONTEC CO., LTD.
RS-232C cable (2m)
IPC-CBL3-2
CONTEC CO., LTD.
RS-232C cable (5m)
IPC-CBL3-5
CONTEC CO., LTD.
15 inch (1024 × 768 dots)
TFT
color
liquid-crystal
display
(Analog RGB types)
Panel mounted type
12.1 inch (800 × 600 dots)
Panel mounted type
10.4 inch (640 × 480 dots)
Panel mounted type
Touchpanel cable
List of Recommended Parts
Name
Model Name
Maker
USB keyboard
ANB-00035
Microsoft®
USB mouse
D1T-00007
Microsoft®
USB HUB
UPort 404
MOXA
98
10 Appendix
10. Appendix
Appendix 1. Resources
Memory Map
FFFFFF
Extended memory
(D0000000H - FFFFFFFFH
is reserved by the system)
100000
FFFFF
E8000
Extended system BIOS
(96KB)
E7FFF
System BIOS
E0000
(32KB)
E0000
D0000
Expansion area
(64KB)
CFFFF
Video memory and VBIOS
(192KB)
A0000
9FFFF
Conventional memory
(640KB)
00000
Figure 10.1 Memory map
99
10 Appendix
I/O port address
Table 10.1 I/O port address
100
Address
Size
Description
0000H - 000FH
16 bytes
DMA controller
0010H - 001FH
16 bytes
Reserved
0020H - 0021H
2 bytes
PIC interrupt controller
0022H - 003FH
30 bytes
Reserved
0040H - 0043H
4 bytes
System timer 1
0044H - 005FH
24 bytes
Reserved
0060H
1 byte
Keyboard controller
0061H
1 byte
NMI, speaker controller
0062H - 0063H
2 bytes
Reserved
0064H
1 byte
Keyboard controller
0070H - 0073H
4 bytes
RTC real time clock
0074H - 007FH
12 bytes
Reserved
0080H - 0090H
17 bytes
DMA page register
00A0H - 00A1H
2 bytes
Interrupt controller 2
00B2H - 00B3H
2 bytes
Reserved
00C0H - 00DEH
31 bytes
DMA controller 2
00E0H - 00EFH
16 bytes
Reserved
00F0H - 00FFH
16 bytes
Arithmetic processor for numerical values
0170H - 0177H
8 bytes
Secondary IDE controller
01F0H - 01F7H
8 bytes
Primary IDE controller
0200H - 0207H
8 bytes
Reserved
0330H - 0331H
2 bytes
Reserved
0376H - 0377H
2 bytes
Secondary IDE
0120H - 0127H
8 bytes
Reserved
0274H - 0277H
4 bytes
Reserved (ISA PnP)
0290H - 029FH
16 bytes
Hardware monitor
0388H - 038DH
6 bytes
Reserved
03B0H - 03BBH
12 bytes
Video (Monochrome)
03C0H - 03DFH
32 bytes
Video (VGA)
03F6 H
1 byte
Primary IDE
03F8H - 03FFH
8 bytes
COM1
04D0H - 04D1H
2 bytes
Interrupt setting register (Edge/level triggered PIC)
0530H - 0537H
8 bytes
Reserved (Windows Sound System)
0CF8H - 0CFFH
4 bytes
PCI configuration register
0CF9H
1 byte
Turbo and reset control register
D000H -FFFFH
12287 bytes
Reserved
0440H - 044FH
16 byte
Reserved
0800H - 080FH
16 byte
Reserved
4000H - 400FH
16 byte
Reserved
1000H - 107FH
128 byte
Reserved
1180H - 11BFH
64 byte
Reserved
10 Appendix
Interrupt Level List
Table 10.2 Hardware Interrupt Levels (Factory Settings)
Type
8259
NMI
Priority
High
Description
Vector
-I/O CH CK or WDT
02H
IRQ0
MASTER
↑
Timer 0
08H
IRQ1
”
⏐
Keyboard
09H
IRQ2
”
⏐
Interrupt controller 2 (slave)
0AH
IRQ8
SLAVE
⏐
Real-time clock
70H
IRQ9
”
⏐
System reserved
71H
IRQ10
”
⏐
System reserved
72H
IRQ11
”
⏐
System reserved
73H
IRQ12
”
⏐
System reserved
74H
IRQ13
”
⏐
Co-processor
75H
IRQ14
”
⏐
IDE
76H
IRQ15
”
⏐
System reserved
77H
IRQ3
MASTER
⏐
System reserved
0BH
IRQ4
”
⏐
Serial port 1(COM1)
0CH
IRQ5
”
⏐
System reserved
0DH
IRQ6
”
↓
System reserved
0EH
IRQ7
”
Low
System reserved
0FH
(*) The interruption list is one when APIC is not used.
APIC is used on Windows, so the interruption of PCI devices is assigned behind IRQ16.
101
10 Appendix
Appendix 2. Battery
Battery Specification
This product uses the following battery.
- Type
- Model
- Maker
- Nominal voltage
- Nominal capacity
- Lithium content
-
-
: Lithium primary battery
: BR-1/2AA
: Panasonic
: 3V
: 1000mAh
: 1g or less
CAUTION
You should treat it according to exportation regulations when you export the product with the battery
including lithium.
When we ship it, we packaged it according to exportation regulations. But if you export it after
re-packaging or unpacking, you should export it according to IATA Dangerous Goods Regulations,
IMDG Code and other exportation regulations of each contries.
For details, consult your transporter.
We charge for battery exchange. Consult a nearby branch or an agency.
Appendix 3. Disposal of Battery
Remove of battery
Remove the battery as folows
(1) Remove screws and take the case off.
(2) Cut the tie binding the battery and remove the battery
102
10 Appendix
Disposal of battery
When dumping the product, treat it as an industrial waste.
When disposing of a battery, separate it according to regional laws of your area.
CAUTION
EU has a separate collection system for used batteries. Dispose it correctly at a collection / recycle
center in your area.
Mitsubishi programmable controller CPU shows a following symbol mark on the battery or the
package of the product including a battery.
Note: This symbol mark is valid in EU only.
This symbol mark is listed on the 20th clause “Information for an end user” of directive 2006/66/EC of the European parliament
and of the council and on the attached document II.
The symbol mark above indicates that the battery should be dumped separately from normal wastes.
Exportation of Battery
According to directive 2006/66/EC of the European parliament and of the council, you should keep the
following procedures when selling or exporting a battery or the product with a battery.
- The indication of the symbol mark on a battery, a product or a package.
- Description about the symbol mark in the product guide.
(1) The indication of the symbol mark.
If you sell or export the battery or the product with the battery which does not display the symbol
mark to EU after 2008/09/26, indicate the symbol mark of “Appendix 3 Disposal of Battery” on the
main body of a product or on its package.
(2) Addition of the explanation to a product guide
When you export the product with our sequencer to EU after 2008/09/26 and you attach the product
guide of our programmable controller CPU to it, attach the latest product guide which has the
explanation of the symbol mark of a battery.
When you don’t attach the product guide of our programmable controller CPU or an attached
product guide is an older one which doesn’t have the explanation of the symbol mark, newly
describe the explanation of the symbol mark on the product guide of each product.
CAUTION
The battery and the product with a battery produced before the enforcement of directive 2006/66/EC
are also come under the directive.
103
10 Appendix
Appendix 4. EMC directive
If you want to apply EMC directive and low voltage derective to MELSECWinCPU system, refer to
QCPU User's Manual (Hardware Design, Maintenance and Inspection).
Appendix 5. Backup of built-in SSD
This section shows how to use the backup function of the BIOS of MELSECWinCPU.
This function supports data backup and rewrite from MELSECWinCPU built-in SSD for OS or from a
CF card to another CF card.
Refer to all devices to be used for backup as follows.
Table 10.3 List of Devices
No.
Device
1
The main body of MELSECWinCPU
2
Display
3
USB keyboard
4
*1
CF card
Comment
*1
Used to reserve backup data.
The capacity of the CF card for backup data should be larger than one of built-in SSD.
Backup will be done by copying physical sectors. Note that the number of physical sectors of each
drive may be different even if the capacity of SSD is equal to one of a CF card,
Backup procedure
How to backup the data of build-in SSD for OS to another CF card
(1) Connect a display and a keyboard to MELSECWinCPU. Then insert a CF card to the slot.
(2) Turn power on and the system boots up. The message ”Press DEL to enter SETUP” will be shown at
the left-bottom corner of the screen. Then press <Del> key and BIOS setup menu will be shown.
104
10 Appendix
(3) Select ”Advanced BIOS Features” -> ”CF Backup”. Then press ENTER key.
(4) Following message will be shown. Press Y key.
DISK BACKUP
Start BACKUP(Y/N) *If (N) Reboot.
(5) Connected drives will be shown as follows. Select built-in SSD for OS as “Source Disk”.
In the following figure, “4GB NANDrive” (SSD) and “MITSUBISHI ELECRIC” (CF card) are
connected. For backup, press A key and select SSD as “Source Disk”.
Now Connect Disk.
Select Source Disk.
A:4GB NANDRIVE
B: MITSUBISHI ELECTRIC
105
10 Appendix
(6) Next select the CF card for backup (A or B key) as “Destination Disk”. In the following figure, only
B is selectable as “Destination Disk”.
Now Connect Disk
Select Destination Disk.
B: MITSUBISHI ELECTRIC
(7) Next the following message will be shown. If you want to verify data when copying, press Y key.
Need Verify(Y/N)
(8) Copy procesure will start.
DISK BACKUP
0000AB00/006CFD00 Sectors
(9) The following message will be shown after copy procedure has finished. Press alphabet key A-Z and
reboot the system.
BACKUP finish, Press any key reboot.
(10) When the screen of BIOS appears in rebooting, turn the power off. That finishes the backup
procedure.
(*) You cannot boot the OS using the CF card for backup.
Rewrite procedure from the CF card for backup to built-in SSD for OS
For previous procedure, rewrite procedure will be done by selecting the CF card for backup as “Source
Disk” and built-in SSD for OS as “Destination Disk”.
Other procedures are the same as the backup.
106
10 Appendix
REVISIONS
*The manual number is given on the bottom left of the back cover.
Print date
December 2011
*Manual number
SH(NA)-081055ENG-A
Revision
First edition
Japanese manual version SH-081044-B
This manual confers no industrial property rights or any rights of any other kind, nor does it confer any patent licenses.
Mitsubishi Electric Corporation cannot be held responsible for any problems involving industrial property rights which may occur as
a result of using the contents noted in this manual.
2011 MITSUBISHI ELECTRIC CORPORATION
107
WARRANTY
Please confirm the following product warranty details before using this product.
1. Gratis Warranty Term and Gratis Warranty Range
If any faults or defects (hereinafter "Failure") found to be the responsibility of Mitsubishi occurs
during use of the product within the gratis warranty term, the product shall be repaired at no cost via
the sales representative or Mitsubishi Service Company.
However, if repairs are required onsite at domestic or overseas location, expenses to send an engineer
will be solely at the customer’s discretion. Mitsubishi shall not be held responsible for any
re-commissioning, maintenance, or testing on-site that involves replacement of the failed module.
[Gratis Warranty Term]
The gratis warranty term of the product shall be for one year after the date of purchase or delivery to
a designated place.
Note that after manufacture and shipment from Mitsubishi, the maximum distribution period shall be
six (6) months, and the longest gratis warranty term after manufacturing shall be eighteen (18)
months. The gratis warranty term of repair parts shall not exceed the gratis warranty term before
repairs.
[Gratis Warranty Range]
(1) The range shall be limited to normal use within the usage state, usage methods and usage
environment, etc., which follow the conditions and precautions, etc., given in the instruction
manual, user's manual and caution labels on the product.
(2) Even within the gratis warranty term, repairs shall be charged for in the following cases.
1. Failure occurring from inappropriate storage or handling, carelessness or negligence by the user.
Failure caused by the user's hardware or software design.
2. Failure caused by unapproved modifications, etc., to the product by the user.
3. When the Mitsubishi product is assembled into a user's device, failure that could have been
avoided if functions or structures, judged as necessary in the legal safety measures the user's
device is subject to or as necessary by industry standards, had been provided.
4. Failure that could have been avoided if consumable parts (battery, backlight, fuse, etc.)
designated in the instruction manual had been correctly serviced or replaced.
5. Failure caused by external irresistible forces such as fires or abnormal voltages, and failure
caused by force majeure such as earthquakes, lightning, wind and water damage.
6. Failure caused by reasons unpredictable by scientific technology standards at time of shipment
from Mitsubishi.
7. Any other failure found not to be the responsibility of Mitsubishi or that admitted not to be so by
the user.
108
2. Onerous repair term after discontinuation of production
(1) Mitsubishi shall accept onerous product repairs for six (6) years after production of the product is
discontinued.
Discontinuation of production shall be notified with Mitsubishi Technical Bulletins, etc.
(2) Product supply (including repair parts) is not available after production is discontinued.
3. Overseas service
Overseas, repairs shall be accepted by Mitsubishi's local overseas FA Center. Note that the repair
conditions at each FA Center may differ.
4. Exclusion of loss in opportunity and secondary loss from warranty liability
Regardless of the gratis warranty term, Mitsubishi shall not be liable for compensation of damages
caused by any cause found not to be the responsibility of Mitsubishi, loss in opportunity, lost profits
incurred to the user by failures of Mitsubishi products, special damages and secondary damages
whether foreseeable or not , compensation for accidents, and compensation for damages to products
other than Mitsubishi products, replacement by the user, maintenance of on-site equipment, start-up
test run and other tasks.
5. Changes in product specifications
The specifications given in the catalogs, manuals or technical documents are subject to change
without prior notice.
6. After service
When you request the investigation of failure, make sure that we may be unable to investigate some
parts of the product.
The major difference of after service from MELSEC-Q series, etc.
(1) The warranty period is 1 year after we deliveried it or 18 monthes after the production, whichever
come first.
(2) The repairable period after the end of mass production is 6 years after the end.
(3) The support may take long times according to the content and the timing of your requests.
That’s all
109