1
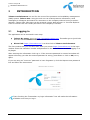
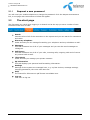
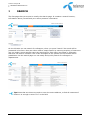
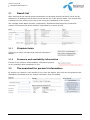
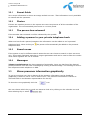
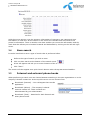
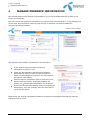
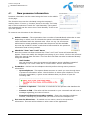
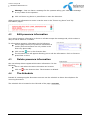
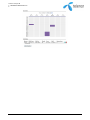
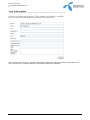
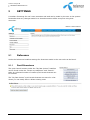
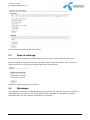
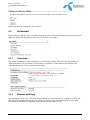
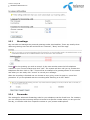
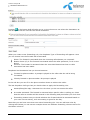
Telenor Sverige AB
TELENOR SVERIGE AB 2010
User manual
Telenor One Informera
Telenor Sverige AB
TELENOR SVERIGE AB 2010
Index
1
WELCOME TO TELENOR ONE INFORMERA ........................................................................................ 4
2
INTRODUCTION ................................................................................................................................................ 5
2.1
LOGGING IN ...................................................................................................................................................... 5
2.1.1
Request a new password ................................................................................................................ 6
2.2
THE START PAGE .............................................................................................................................................. 6
2.2.1
Organization trees ............................................................................................................................. 7
3
SEARCH ................................................................................................................................................................. 8
3.1
RESULT LIST ..................................................................................................................................................... 9
3.1.1
Clickable fields .................................................................................................................................... 9
3.1.2
Presence and availability information ........................................................................................ 9
3.2
THE SEARCHED FOR PERSON’S INFORMATION ............................................................................................... 9
3.2.1
Secret fields ....................................................................................................................................... 10
3.2.2
Photos................................................................................................................................................... 10
3.2.3
The person has voicemail ............................................................................................................. 10
3.2.4
Adding a person to your private telephone book ................................................................ 10
3.2.5
Search areas ...................................................................................................................................... 10
3.2.6
Messages ............................................................................................................................................. 10
3.3
SHOW PRESENCE INFORMATION GRAPHICALLY ............................................................................................ 10
3.4
SAVE SEARCH ................................................................................................................................................. 11
3.5
INTERNAL AND EXTERNAL PHONE BOOKS ..................................................................................................... 11
4
MANAGE PRESENCE INFORMATION ................................................................................................... 12
4.1
NEW PRESENCE INFORMATION ...................................................................................................................... 13
4.2
EDIT PRESENCE INFORMATION ...................................................................................................................... 14
4.3
DELETE PRESENCE INFORMATION ................................................................................................................. 14
4.4
THE SCHEDULE ............................................................................................................................................... 14
4.4.1
New schedule booking ................................................................................................................... 16
4.4.2
Edit schedule booking .................................................................................................................... 17
4.4.3
Delete a schedule booking ........................................................................................................... 17
4.5
FAST DIVERSIONS .......................................................................................................................................... 17
5
MESSAGES ......................................................................................................................................................... 19
5.1.1
Grouping according to date.......................................................................................................... 19
5.2
SYMBOLS......................................................................................................................................................... 19
5.2.1
Save ...................................................................................................................................................... 19
5.2.2
Delete a message ............................................................................................................................ 20
5.2.3
Add a contact .................................................................................................................................... 20
5.2.4
Search using an external service ............................................................................................... 20
5.2.5
Play the message via the telephone ......................................................................................... 20
5.2.6
Play the messages via the Internet browser ......................................................................... 20
5.2.7
Forward a message ......................................................................................................................... 20
2
Telenor Sverige AB
TELENOR SVERIGE AB 2010
6
CALLS.................................................................................................................................................................... 21
7
MY PHONEBOOK ............................................................................................................................................. 22
7.1
MANAGE PRIVATE CONTACTS IN THE ORGANIZATION.................................................................................. 22
7.2
PERSONAL CONTACTS .................................................................................................................................... 23
7.2.1
New personal contact ..................................................................................................................... 23
7.2.2
Edit a personal contact .................................................................................................................. 23
7.2.3
Delete a personal contact ............................................................................................................. 23
8
MY INFORMATION ........................................................................................................................................ 24
8.1
9
SUGGEST CHANGE .......................................................................................................................................... 24
SETTINGS ........................................................................................................................................................... 26
9.1
REFERENCE ..................................................................................................................................................... 26
9.1.1
Fast Diversions ................................................................................................................................. 26
9.1.2
New quick launch button diversion ........................................................................................... 27
9.1.3
Edit a quick launch button for diversion ................................................................................. 27
9.1.4
Delete a quick launch button for diversion ............................................................................ 27
9.1.5
Default settings for diversions .................................................................................................... 28
9.1.6
Edit your default settings .............................................................................................................. 28
9.1.7
Change the extension you want to divert .............................................................................. 28
9.2
LANGUAGE AND WEB SETTINGS .................................................................................................................... 28
9.3
SEARCH SETTINGS ......................................................................................................................................... 29
9.4
MESSAGES ...................................................................................................................................................... 29
9.5
VOICEMAIL ...................................................................................................................................................... 30
9.5.1
Overview ............................................................................................................................................. 30
9.5.2
Answer settings ................................................................................................................................ 30
9.5.3
Greetings ............................................................................................................................................. 31
9.5.4
Forwards .............................................................................................................................................. 31
9.5.5
Notifications ....................................................................................................................................... 33
9.5.6
User interface .................................................................................................................................... 33
9.5.7
Change PIN code for voicemail ................................................................................................... 33
9.6
TIPS ................................................................................................................................................................. 33
9.6.1
Add a new tip .................................................................................................................................... 33
9.6.2
Edit tips ................................................................................................................................................ 34
9.6.3
Delete a tip ......................................................................................................................................... 34
9.7
TIMEZONE ....................................................................................................................................................... 34
10
HELP ................................................................................................................................................................. 36
11
LOG OUT ......................................................................................................................................................... 37
3
Telenor Sverige AB
TELENOR SVERIGE AB 2010
1
WELCOME TO TELENOR ONE INFORMERA
This manual describes how to use Telenor One Informera. The manual starts off describing
the different parts of the program followed by a short tutorial of the system. The application
can be accessed in two ways:
Telenor My pages: Log in to http://minasidor.telenor.se/. Thereafter go to Quick links
and click on the Telenor One Informera link.
Direct Link: https://one.telenor.se/ is a direct link to Telenor One Informera.
Note that the web interface is optimized for a screen resolution of 768x1024. If you have a
lower resolution the interface may change and make it harder to see all the necessary
information. The screen resolution is usually changed by right-clicking the mouse on the
desktop and selecting Settings.
4
Telenor Sverige AB
TELENOR SVERIGE AB 2010
2
INTRODUCTION
Telenor One Informera is a tool for the users of the presence and availability management
(PAM) system. Telenor One. Using the tool one can create presence information, send
messages to colleagues and search for extensions in the company without having to ask an
operator, Telenor One Informera can be accessed using a Web browser i.e. Internet Explorer.
A link to Telenor One can usually be found in the company’s intranet.
2.1
Logging in
The application can be accessed in two ways:
Telenor My pages: Log in to http://minasidor.telenor.se/. Thereafter go to Quick links
and click on the Telenor One Informera link.
Direct Link: https://one.telenor.se/ is a direct link to Telenor One Informera.
The first window that you are faced with when you access https://one.telenor.se/ is the login
window. Enter the extension number and password in the same manner as when logging in to
My Pages.
After entering the information click Log in. If the incorrect password is entered a window will
appear informing you that the entered password is wrong, press Enter or click on OK, to try
again.
If you are using an “incorrect” password or have forgotten it, click the Request new password
link and follow the instructions.
Tips! Checking the “Remember my login information” box will make the information
available next time you log in.
5
Telenor Sverige AB
TELENOR SVERIGE AB 2010
2.1.1
Request a new password
You will need your mobile telephone to change the password. Click the Request new Password
link, a new page with instructions to follow will appear.
2.2
The start page
The first page you reach when logging in is Search and at the top you see a number of man
functions in the form of tabs:
Search
Contains a list of all of the extensions in the system and you can search for extensions
and name.
Divert my telephone
Under this tab you can manage forwarding your telephone and any schedules as well.
Messages
This tab contains a list of all of your messages and you can also send messages to
colleagues.
Call history
This tab contains a list of all of your calls, incoming calls, outgoing calls and of course
any missed calls as well.
Phonebook
Under this tab you manage your private contacts
My information
This tab displays your personal and forwarding information.
Settings
Settings for the system are managed here, e.g. my fast choices, message settings,
changing passwords, the voice mail inbox etc.
Help
The manual for Informera in pdf-format is available here.
Log out
Click here to log out.
6
Telenor Sverige AB
TELENOR SVERIGE AB 2010
2.2.1
Organization trees
Other than the functions described above there is a button on the left side below the
Organization tree headline that allow you to browse the organization tree. When you click on
Browse tree it will look something like the picture below.
Clicking on a department in an organization will initiate a search so that one can easily see all
its members.
7
Telenor Sverige AB
TELENOR SVERIGE AB 2010
3
SEARCH
The first page that you access is usually the Search page. It contains a search function,
information about yourself and your active presence information.
On the left side one can search for colleagues, when you press “search” the result will be
presented in list form. One can either make a simple search by entering anything of interest or
one can make a more specific search by searching for first name, last name or extension.
Searches can also be combine. One of the strengths of the system are the flexible search
possibilities. On the search page one can easily and quickly search for colleagues or
departments.
Tips! Note that one does not need to enter the entire address, to find all instances of
Fredric it is enough to write “Fre” in the field.
8
Telenor Sverige AB
TELENOR SVERIGE AB 2010
3.1
Result list
After entering all the desired search parameters and pressing Search the search result will be
displayed in a catalogue like structure much like the one in the picture below. The content that
is displayed in the search result view is set during the installation of the system.
The example shows Name and title, organisation, department and the person’s extension
number. If someone has active presence information it is shown as well.
3.1.1
Clickable fields
Clicking on a name will make that person’s information
appear.
3.1.2
Presence and availability information
If there is any presence and availability information present
on any extension that is displayed in red.
3.2
The searched for person’s information
By clicking on a person a view similar to one’s own will appear. Here one can find presence and
availability information and any further information that is available.
9
Telenor Sverige AB
TELENOR SVERIGE AB 2010
3.2.1
Secret fields
Your secret information is shown as orange striked-out text . That information is only available
to oneself and the operators.
3.2.2
Photos
If there are member pictures in the system one can view pictures of all the members of the
organization. The recommended picture size is 110*100 pixels.
3.2.3
The person has voicemail
If the member has voicemail it will be indicated by this symbol:
3.2.4
Adding a person to your private telephone book
When one has found a person/extension the information can be added to one’s personal
telephone book. When clicking on
telephone book.
3.2.5
the person will automatically be added to the personal
Search areas
If the system is set for different search areas the user can choose to search in their own area
only. This greatly facilitates searches in large organisations and can be used to filter the results
when other registers are not of interest.
3.2.6
Messages
Telenor One Informera also has messaging functionality. Once one has found the desired
person/extension one can send a message by clicking on Send message. The message is sent to
the recipients mobile telephone vi SMS.
3.3
Show presence information graphically
To get an overview over who is absent all the presence information can be displayed
graphically in what we call a “who-is-where-view”. The presence information is shown as
coloured fields in a schematic representation for the day.
To show the view graphically click the
icon.
One can choose which day or week one wants to look at by clicking on the calendar icon and
then selecting day or week.
10
Telenor Sverige AB
TELENOR SVERIGE AB 2010
Hold the mouse pointer over the presence information of interest to see reason and time
information in clear text. All the names in the screen are clickable and are linked to the
person’s information. There is another view that enables you to see the information week by
week that also allows you to browse forwards and backwards by clicking on the left and right
arrow.
3.4
Save search
It can be beneficial to save a type of search that is performed often.
Perform the type of search you wish to save.
Click on Save search at the bottom of the search result.
A box will appear and ask you to enter thename of the search.
Click “Save”.
The search will then appear as a quick-launch button under the My fast choices headline.
3.5
Internal and external phone books
When performing a search one can choose between searching in the own organization or in the
company’s shared contact list. At the top left corner one can choose from:
Phonebook (Internal) – Your colleagues that use this
application.
Phonebook (Others) – The company’s shared
external contact list. These contacts are
administrated by you administrator.
Phonebook (Total) – Searches for both Internal and
other phone books.
11
Telenor Sverige AB
TELENOR SVERIGE AB 2010
4
MANAGE PRESENCE INFORMATION
One should always enter presence information if one is not available and this is done in the
Divert my phone tab.
One can create new presence information by entering new information for it or by pressing one
of the quick launch buttons under My fast choices. A schedule can also be added for
reoccurring PAM-information.
The presence information is presented in several ways:
In the search results the active presence
information is shown in red.
Under the My information tab the active presence
information is shown in bold red letters within a
frame. In parenthesis one can see who has created
the specific information.
Future presence information that is not active yet is
shown under the Future diversions headline. By
clicking on
future PAM-information will be shown.
If there are several overlapping instances of presence
information, only one message with the final time of
return will be shown.
When there are several overlapping instances of presence information the IVR will read the
date and time of return.
12
Telenor Sverige AB
TELENOR SVERIGE AB 2010
4.1
New presence information
Presence information can be crated using the form in the middle
of the page.
The diversion time can be calculated using the company’s
working hours. If one e.g. chooses ”Gone for the day” on Friday
and no active selection is made for “Until Saturday” the system
will automatically set the return time “Until Monday” if this is set
up in the system
To create a new diversion do the following:
Select a reason – The organization has a number of standardized codes that it uses.
Depending on which code is selected the system calculates the default
value associated with the selected code. Lunch can e.g. be 45 minutes
while Gone for the day probably means that the person will be available
the next day at 08.00. Select a code that is best suited for the presence
information that is being created.
Check the “from” and “until” times.
Once the reason has been selected the “from” and “until” times will automatically
appear. These can readily be changed to anything of your choice. Click on the lists and
select the desired date and time. The from and until date can also be selected directly
using the calendar.
o
Until further
One can choose to have the presence information active indefinite instead of
selecting a “to” time. Check the in “Until further” box for that function.
Forward to – Select how the telephone should perform during active presence
information.
o
Open telephone - This option allows someone to reach you even though there
is presence information active. Check the box to select open telephone. In the
diversion registration, a green arrow indicates that you phone is open for
incoming calls.
o
Connect to operator - The caller is connected to an operator that handles the
call.
o
Connect to IVR – The caller will be connected to your voicemail and will hear a
message regarding your time of return.
o
Forwarded/diverted to another number - Enter the complete telephone
number, including any prefixes that you wish to divert the telephone to.
Free text for diversions – If needed one can enter a text for the presence
information. This text will be shown to other users of the application.
13
Telenor Sverige AB
TELENOR SVERIGE AB 2010
Message – One can leave a message for the operator taking your calls. This message
is only visible for the operator.
Click on Divert my phone or press Enter to save the diversion.
When presence information is active it can be seen in the “Divert my phone” and “My
information pages”.
4.2
Edit presence information
Your active presence information is shown in all tabs except the message tab, which makes it
easy to edit or delete it if needed.
To edit existing presence information do the following:
Go to a page where your presence information is
visible.(Future diversions are only visible in the
Divert my phone tab).
Click on this
icon in the diversion box.
The diversion form will appear allowing you to edit the information. Click on Divert or
press Enter to save.
4.3
Delete presence information
One can always delete registered diversion information. Do the
following:
Go to a tab where the active diversion can be seen.
Click on
4.4
in the diversion box. The diversion is deleted.
The Schedule
Instead of creating singular diversions one can use the schedule to divert the telephone for
recurring diversions.
The schedule link is located on the left side of the page.
14
Telenor Sverige AB
TELENOR SVERIGE AB 2010
15
Telenor Sverige AB
TELENOR SVERIGE AB 2010
4.4.1
New schedule booking
To create a new booking in the schedule, do the following:
Click on the Add schedule button.
A form for entering the necessary information will appear:
o
Reason - Click on the down arrow in the drop down-list to see all the reasons
available. Select a suitable reason by clicking on it.
o
From - Select the day the booking should start. Click on the down arrow in the
drop down-list to select the desired day. Enter the time in the hh:mm format.
o
Until - Select the day the booking is to end. Click on the down arrow in the drop
down-list to select the desired day. Enter the time in the hh:mm format.
o
Weeks - Select whether the booking is to be active all, odd or even weeks. Click
on the down arrow in the drop down-list to select the desired option.
Select action for a diverted telephone
16
o
Open telephone - This option allows the telephone to ring even though there is
diversion information active. Check the box to activate this option.
o
Connect to operator - The caller is diverted to an operator that handles the
call.
o
Description – Enter an optional description for the booking.
o
Enter a valid time period - If the booking is valid during a limited time one
can enter a start and end date.
Telenor Sverige AB
TELENOR SVERIGE AB 2010
o
Enter the “from” and “to” time as year, month and day.
E.g.
Tick the “Until further” box if the schedule is to be valid indefinitely.
Click on “Add new” to save the booking.
4.4.2
Edit schedule booking
To edit an existing schedule, do the following:
Go to Schedule under Divert my telephone.
In the list at the bottom of the page, click on
to change.
to the right of the booking you want
Make the desired changes and click on Save.
4.4.3
Delete a schedule booking
To delete a scheduled booking do the following:
Go to Schedule under Divert my telephone.
In the list at the bottom of the page, click on
to delete.
4.5
to the right of the booking you want
Fast diversions
The easiest way to forward your telephone, using presence information that is used often, is
via my fast choices. All one needs to do is to click on one of the quick launch buttons, e.g.
Lunch 1h, to forward the telephone for 1h from the time the button is clicked. The presence
information will become inactive and the phone will be opened once the designated hour is up.
17
Telenor Sverige AB
TELENOR SVERIGE AB 2010
Quick launch buttons for diversions that are used often can be created by the user and they
are easily available under “My fast choices”. The diversions become active the second that the
button in question is clicked.
Mouse over the desired button and a short description of what the button means as well as the
time of return will be shown. The time of return text is shown directly if the return time is the
same day.
18
Telenor Sverige AB
TELENOR SVERIGE AB 2010
5
MESSAGES
Under the Message tab the interface for your voice mail inbox can be found. Here one can
listen to messages, delete them and send a message to a colleague.
When a new message is received the Message tab will become red. New messages are
indicated with bold letters and can be marked as read after you have received the message.
SMS can also easily be sent from this page.
5.1.1
Grouping according to date
Messages are shown in full length and are grouped after the date they were sent. Click on
to show or hide the groups.
5.2
or
Symbols
There are a number of buttons and functions to manage a message:
5.2.1
Play the message in my telephone.
Forward it to another person
Saved messages
Delete a message
Add a contact
Search using an external service
Play the messages in the Internet
browser
The message is saved
Save
A message can be saved and is automatically protected from deletion by the system. Click on
to save the message in question.
19
Telenor Sverige AB
TELENOR SVERIGE AB 2010
5.2.2
Click the
5.2.3
Delete a message
icon to delete the message.
Add a contact
To create a contact from the information in a message click
to access the form for adding
contacts. The telephone number is copied automatically and only the other information must
be entered.
5.2.4
Search using an external service
To use an external service to search for the person that has left a message click
5.2.5
.
Play the message via the telephone
To play the message using the telephone click the
icon. You will then be prompted to enter
the number you are currently at so that the system can call you. If the system has already
called you up you can continue clicking on other messages and they will be played
automatically in the telephone.
5.2.6
Play the messages via the Internet browser
To play a voice message in the Internet browser click on the
icon. The Internet browser has
different ways of playing sound files, for some browsers this could take a few seconds.
5.2.7
Forward a message
One can send voice messages to colleagues that use Telenor One, one can also write a short
comment for the messages that will be shown to the recipient.
To send the message click the
icon and enter the telephone number to the person you are
sending to (a compete telephone number) and the comment text can be change if desired. To
send the message click on Forward.
20
Telenor Sverige AB
TELENOR SVERIGE AB 2010
6
CALLS
Under the Call history tab all your calls can be found. All the calls you have made as well as all
the calls made to you by others can be found here. Click on the call type to see a list of the
calls made.
Answered – The calls to your telephone that have been answered.
Not Answered – Calls where your telephone has been busy or you have been unable
to answer.
Outgoing - Calls that you have made yourself.
All – All calls i.e. answered, unanswered and outgoing.
One can see information concerning the call:
If the call was incoming or outgoing.
If the call is missed, answered or ongoing at the moment.
The number of the caller or recipient of the call.
The name of the caller in case the system recognizes the number, otherwise there will
be an icon
that will allow you to search for the number in an external service.
The time the call was made.
The duration of the call.
Calls can be deleted from the call history by clicking
21
Telenor Sverige AB
TELENOR SVERIGE AB 2010
7
MY PHONEBOOK
Under the Phonebook tab personal contacts can be added and managed in categories.
My contacts consist of contacts that the user adds himself and are sorted in alphabetical order.
By clicking on the name of a contact, all available information about that contact will be
shown. The private contacts are only visible to the user and he can create and categorize them
himself.
7.1
Manage private contacts in the organization
One can also add contacts as favourites in the organization. They will then be listed under
personal contacts.
Once one has searched and found a person/extension click on
the private contact list as a favourite.
22
which will add the person to
Telenor Sverige AB
TELENOR SVERIGE AB 2010
7.2
Personal contacts
Under the Phonebook the user can handle personal contacts that are only visible to him.
7.2.1
New personal contact
To create a new private contact do the following:
Go to the Phonebook tab and select “Add new contact”.
A form with a number of information fields for the
contact will then appear.
o
A picture can be added to all personal contacts.
Click on the “Browse” button to upload a picture
from your computer. A window will appear that
will let you browse to the location of the desired
picture and after selecting it press “Open”.
Select the desired category by selecting one in the
drop-down list.
Click”Save”.
7.2.2
Edit a personal contact
To change the name of a private contact under Phonebook, do the following:
In the list of private contacts, click on
edited.
to the right of the contact that is going to be
In the form that appears select and edit the desired information
o
If the category of the contact needs to be changed, follow the steps for creating
a new private contact.
If the picture needs to be edited, click on the Delete picture button and follow the
steps for creating a new private contact.
Click on Save.
o
7.2.3
Delete a personal contact
To delete a private contact in the list of private contacts, click
corresponding contact.
23
to the right of the
Telenor Sverige AB
TELENOR SVERIGE AB 2010
8
MY INFORMATION
Under the My information tab all the detailed information about the user is located. For the
operator it is of great importance that the information available is correct and up to date. This
means that the user should check his information from time to time to make sure they are
always up to date.
If any data that you have no privileges for to edit is inaccurate click on the “Suggest changes”
button to make the operator aware of it or the Edit optional information to change personal
information that you govern over yourself.
Any presence information can be seen here and one can edit it or delete any irregularities.
8.1
Suggest change
If one notices that the personal information is incorrect or out of date one can, by clicking the
“Suggest changes” button, send a message to the person in charge of entering personal
information in the system. Your extension number will automatically be added to the message.
Do the following:
Go to the “My information” page and click the “Suggest changes” button.
Edit the fields that need to be updated.
Click on Save.
24
Telenor Sverige AB
TELENOR SVERIGE AB 2010
The changes are sent to an operator that has privileges to edit the personal information. The
user will receive a message when his information has been updated.
25
Telenor Sverige AB
TELENOR SVERIGE AB 2010
9
SETTINGS
A number of settings for one’s own extension and web can be made by the user in the system.
Remember that any changes made for a shared extension affect everyone using that
extension.
9.1
Reference
Under the Reference headline settings for diversions made in the user web can be found.
9.1.1
Fast Diversions
The quick launch buttons under the ”My fast choices” headline
can be found under the ”Divert my telephone” and ”Search”
tabs. An unlimited number of custom quick launch buttons can
be created.
The “My fast choices” quick launch buttons are stored in a list
where you can easily edit or delete existing ones.
26
Telenor Sverige AB
TELENOR SVERIGE AB 2010
9.1.2
New quick launch button diversion
To create a quick launch button for a diversion, do the following:
Click on “Add new fast diversion button”.
A form will appear where the information for the quick launch button for diversion is
entered.
o
Reason
Select one by clicking on a reason in the list.
o
From
Select the time the scheduled event begins – based on when you click the
button.
o
Length
Select for how long the diversion information is to be active. Alternatively enter
a time of return.
o
Return at
Enter the time of return according to hh:mm.
o
Transfer to
Choose if your telephone is to be open or closed during the time period that the
diversion information is active, or if the caller is to be connected to an operator,
DND or a specific number..
o
Button caption
Enter the text that is to appear on the button.
o
Text (visible in the web)
Enter the text that is to appear on your presence information.
Click “Save “to save the button.
Tips! The quick launch buttons under my fast choices are not activated until the button is
pressed. This means that it cannot be used for scheduled events and similar.
9.1.3
Edit a quick launch button for diversion
To edit a saved “My fast choices” diversion, do the following:
Click on
to the right of the quick launch buttons for forwarding you want to change.
Make changes in the form and click on “Save”. The change is saved.
9.1.4
Delete a quick launch button for diversion
To delete a saved “My fast choices” diversion, click
deleted.
27
. The fields in the same row will be
Telenor Sverige AB
TELENOR SVERIGE AB 2010
9.1.5
Default settings for diversions
The default settings for how your extension is going to be diverted when presence information
is created. The options that can be selected are the operator, the IVR, DND or to divert to a
specific telephone number.
9.1.6
Edit your default settings
Click on the desired option and then click ”Save”.
9.1.7
Change the extension you want to divert
Choose if the diversion should affect both the primary and secondary extensions. This is
e.g.used if one has an office and mobile telephone and will alow you to choose if any
diversions shoudl affect both or just one of the telephones. If this option is changed all existing
diversions will be affected the next time this extension is opened or closed.
This feature is an extra option and if your company has chosen not to acquire it this feature
will not be available..
The options in the drop down list are:
9.2
Language and web settings
The setting for which tab will be default when logging in as well as the language setting for
Telenor One Informera, e.g. to set it to English can be found under this headline.
28
Telenor Sverige AB
TELENOR SVERIGE AB 2010
Select the desired options and click ”Save”.
9.3
Search settings
Under the search settings the default setting for the type of search used can be found.
One can choose to search for internal, external or both types of contacts. This is done by
checking the box in front of the desired option and clicking Save.
Select the desired option and click Save.
9.4
Messages
The settings for the type of message delivery system that the operator may use to send you
messages can be found here. For these options to be available one must have a mobile
telephone and an e-mail address registered in the system.
29
Telenor Sverige AB
TELENOR SVERIGE AB 2010
Select the desired options and click ”Save”..
9.5
Voicemail
All the settings that the user can make regarding their voicemail are located here. A menu with
different categories will appear once one has clicked “Voicemail”.
9.5.1
Overview
The overview displays all the information in an concise manner. One can click the headlines
under preferences to go directly to the setting in question. These settings will however be
described according to the main voicemail menu.
9.5.2
Answer settings
The settings for how your voice mail should handle an incoming call are located here. One can
also see the language settings for the voicemail. Select if the voicemail should be activated
and whether the absence message should be read to the caller or not.
30
Telenor Sverige AB
TELENOR SVERIGE AB 2010
9.5.3
Greetings
One can edit and manage the personal greetings under this headline. There are usually three
different greetings one can edit and those are “General”, “Busy” and “No reply”
Press
for the greeting you wish to record. In the next window enter the full telephone
number to your current location and click “Call”. The system will then call you up, answer the
telephone and then click on “Ok”. There will be an example of a greeting shown on the screen
and when you are ready click “record” to record your message.
After the recording is finished one can choose to save, play, record it again or, cancel the
procedure. If you are pleased with the recording after listening to it click “Save”.
9.5.4
Forwards
The settings for advanced forwarding rules for your telephone can be found here. For instance,
you can configure that incoming calls are diverted to a specific number when you are gone for
the day, or transfer calls from a specific number to your private mobile phone.
31
Telenor Sverige AB
TELENOR SVERIGE AB 2010
Pressing
or the button Add will take you to a view where one can select the destination as
well as type of call for how the call will be forwarded.
When you create a new forwarding rule, the dropdown Type of forwarding will apperar. Here
you can choose how the forward will be activated.
Direct: The forward is activated when the incoming calls ebnters you voicemail.
Button choice 6,7,8: The forward is activated when the caller presses 6,7 or 8 on the
phone.
Timeout: The forward is activated when the Voice Mail determines that no caller
interaction has been made.
Dropdown list Destination lets you choose between:
Forward to phonenumber: A prompt is played to the caller that the call is being
forwarded.
Silently forward to phonenumber: No prompt is played
In the edit box you can fill in the phone number where to redirect the caller.
The last dropdown Call type lets you decide when to apply the forwarding rule:
General/Busy/No reply: Activates the rule when you do not answer the caller.
A-number activated: The forward is activated when specific caller is calling you. Note
that the caller a-number will be entered in the following web panel after you click Save.
Forwarding reason:Lets you decide whether the forward should be activated based on
your own current activity, such as meeting or gone for the day.
Note that you can have more than one active forwarding rule. You can add new rules by
clicking Add. Below you can see an example where two different fowarding rules are active for
the Button choice 8.
32
Telenor Sverige AB
TELENOR SVERIGE AB 2010
9.5.5
Notifications
The settings for how you will receive notifications and how they will appear can be found under
this category.
9.5.6
User interface
The only thing that one selects here is whether one wants the system to read the long
descriptive menus or the short ones. Choose the preferred one and click “Save settings”.
9.5.7
Change PIN code for voicemail
The PIN code for your voice mail is changed here. Enter the current code, the new code,
confirm the new code once more and click “Change code” to change it.
9.6
Tips
Tips can be handled under this headline. Tips are designed to aid the operators in answering
the calls in the best possible manner. An example of a tip is: “Please connect the call to my
mobile phone if I am not available on my office telephone!”
Once can also put a time constraint on a tip and choose for it to be shown only certain days.
This page also contains saved tips.
9.6.1
Add a new tip
Do the following to a new tip:
33
Telenor Sverige AB
TELENOR SVERIGE AB 2010
Click on the “Add new tip” button.
Place the cursor in the text-field and enter the information that is going to be visible to
the operator.
If the tip is to have a time constraint, enter the starting and ending date. Clicking the
calendar icon will display a calendar from where a date can be selected.
If the tip should be valid only certain days of the week, select the days from the list.
Click “Save”.
9.6.2
Edit tips
To edit a tip do the following:
Click on the
icon to the right of the tip you want to edit.
Place the cursor in the text-field and edit the text.
Click “Save”.
9.6.3
Delete a tip
To delete a tip, click on the
9.7
button to the right of the tip you want to delete.
Timezone
Here you can set your current time zone, then click save. Timezones are considered when you
view colleagues in other timezones current availability an forwarding status, the time stamps
are translated to your time zone.
34
Telenor Sverige AB
TELENOR SVERIGE AB 2010
35
Telenor Sverige AB
TELENOR SVERIGE AB 2010
10
HELP
Under the ”Help” tab the manual for Telenor One Informera in Pdf-format can be found, click
on the icon representing the document to look at it on the screen.
36
Telenor Sverige AB
TELENOR SVERIGE AB 2010
11
LOG OUT
To log out of Informera click on the ”Log out” button located in the top right corner.
37