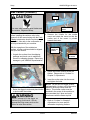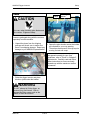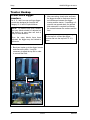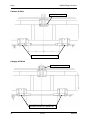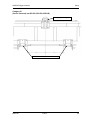
1
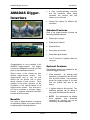
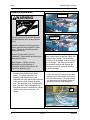
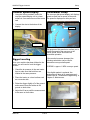
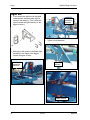
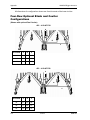
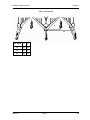
Digger-Inverters ADI-436, 438, 440; ADI-630, 636, 638, 640; ADI-830, 836, 840; ADI-836PT, 838PT, 840PT; ADI-1236PT MAN138 5th Edition, Beg. S/N 520000 Read this manual before using this product. Failure to follow the instructions and safety precautions in this manual can result in serious injury or death. July 2014 ©2014 Digger-Inverters are manufactured by AMADAS Industries. You can find us on the Web at: www.amadas.com or e-mail us at: [email protected] You can also contact us at: 757-539-0231 P.O. Box 1833 / Suffolk, VA 23439 (mailing) 1100 Holland Road / Suffolk, VA 23434 (shipping) P.O. Box 3687 / Albany, GA 31701 (mailing) 1701 South Slappey Blvd. / Albany, GA 31706 (shipping) Introduction AMADAS Digger-Inverters Table of Contents Welcome ................................................... ii 1. Safety ................................................... 1 SAFETY AT ALL TIMES! ....................... 2 Safety Practices..................................... 3 Additional Safety for this Machine ....... 10 Safety Decals ...................................... 11 Decal Locations .............................. 13 2. Setup .................................................. 15 READ FIRST! ...................................... 16 Setup Instructions ................................ 17 Fenders ........................................... 17 Vine Deflector Shields..................... 18 Inverter Rods .................................. 19 Vine Cutters (Coulters) ................... 22 Plows .............................................. 23 Conveyors ....................................... 25 Belts ........................................... 25 Scrapers ..................................... 25 Tractor Hookup .................................... 26 3-Point Hitch Digger-Inverters ........ 26 Optional Hitch ................................. 27 Installing the Optional Hitch ....... 27 Using the Optional Hitch ............ 27 Connect Hydraulics ......................... 30 Connect Speed Display .................. 31 Digger Leveling ............................... 31 Tachometer Setup .......................... 31 Light Kit................................................ 32 3. Adjustments....................................... 35 READ FIRST! ...................................... 36 Adjustments ......................................... 37 Conveyor Belts and Rods ............... 37 Scrapers ..................................... 37 Conveyor Pickup Height ................. 38 Fenders ........................................... 38 MAN138 7/18/14 i AMADAS Digger-Inverters Introduction Plows ...............................................39 Spacing .......................................39 Move Plow Shanks .....................41 Level Plows .................................42 Vine Cutters (Coulters) ....................43 Wheel Height ...................................44 4. Operation ............................................47 READ FIRST! .......................................48 Startup for 3-Point Hitch DiggerInverters ..............................................49 First Run ...............................................51 Checklist for 3-Point Hitch DiggerInverters...........................................52 Troubleshooting ...................................53 5. Maintenance .......................................55 READ FIRST! .......................................56 Maintenance Schedule .........................57 Bearings ..........................................58 Blades..............................................59 Conveyor Rods ................................60 Conveyor Belt Assemblies...............61 Conveyor Drive Chain .....................62 Conveyor Sprockets ........................62 Hydraulic Hoses ..............................63 Inverter Drive Chain .........................64 Inverter Rods ...................................64 Scrapers ..........................................65 Tires.................................................66 Vine Cutters (Coulters) ....................66 V-Inverter U-Joints...........................66 Tachometer Programming....................67 End of Season ......................................68 Appendix................................................ A-1 Four-Row Configurations ................... A-2 Six-Row Configurations ...................... A-4 Warranty .....................................Last Page ii 7/18/14 MAN138 Introduction AMADAS Digger-Inverters Welcome To AMADAS Industries MAN138 With origins dating back to 1963, AMADAS Industries and its predecessors have a long history of providing high quality, reliable, innovative equipment for the farming industry. AMADAS equipment is currently at work throughout the United States and in many other countries. This equipment includes machinery such as the Magnum Fource Peanut Combine, Reel Rain Traveler Irrigation System, Tree Bark Processing and Packaging Machinery, and the AMADAS Digger-Inverter, available in four-, six-, eight-, and twelve-row models. 7/18/14 iii AMADAS Digger-Inverters Introduction AMADAS DiggerInverters • A long, smooth-operating conveyor with low inclination, which allows increased soil removal with less chance of vine roll back. • Various foot options for different soil conditions. Standard Features Each of our digger-inverters includes the following standard features: ADI-4 Row V-Inverter ADI-6 Row Congratulations on your purchase of an AMADAS Digger-Inverter! Our diggerinverters are designed to provide you with years of low maintenance service. Photos shown in this manual are from different digger-inverter models. Your digger-inverter may or may not look exactly like the photos, due to minor design changes in later models. These changes do not affect operation, so the information in this manual applies to all digger-inverter models. Also note that if you have purchased a pull-type diggerinverter, a separate addendum has been included with this manual. Benefits Our series of digger-inverters is designed to significantly reduce your peanut loss by incorporating the following features: iv 7/18/14 • 29 bars per conveyor • Digital speed readout • Hydraulic drive • Heavy duty vine cutters • Swept back plow shanks • Four 5” and two 6” agitation idlers per conveyor. Optional Features The following options are available for the AMADAS digger-inverters: • Hitch extension. An optional hitch extension is available for the ADI-436, 438, and 440 models. This extension allows the digger-inverter to be used with row spaced dual tires on the tractor. • 6” agitator idlers for dirt removal. Two additional agitators can be added to any model for additional dirt removal. • NOTE! We recommend not adding more agitation than absolutely necessary as conveyor life can be reduced by increased agitation. MAN138 Introduction AMADAS Digger-Inverters Requirements Tractor requirements inverters are: • • • for the digger- 4-row digger-inverter: Category III or IIIN hitch or quick hitch; 25 gallons per minute hydraulic capacity minimum. 6-row digger-inverter: Category III or IVN hitch or quick hitch; 25 gallons per minute hydraulic capacity minimum. 8-row digger-inverter: Category III or IVN hitch or quick hitch. 25 gallons per minute hydraulic capacity minimum. MAN138 7/18/14 • 8-row pull-type digger-inverter: 2 5/16 ball hitch. 25 gallons per minute hydraulic capacity minimum. • 12-row pull-type digger-inverter: 2 5/16 ball hitch. 25 gallons per minute hydraulic capacity minimum. • For all models: The tractor must have a hydraulic connection that returns hydraulic fluid directly back to the tank. v AMADAS Digger-Inverters Introduction Specifications/Dimensions NOTE! The weight of the machine may vary due to the choice of plow patterns. Dimensions for the digger-inverters are in the chart below. MODEL NAME # OF ROWS ADI-4 4 ROW CONVEYOR WEIGHT HORSEPOWER WIDTHS WIDTH LBS SUGGESTED (IN) (IN) 36 ADI-6 6 ADI-8 8 4800 64 135+ 8 12 162 64 162 58 5000 68 170 64 162 30 7200 52 196 64 162 36 7500 232 64 162 38 7700 68 244 64 162 40 7900 68 255 64 162 30 8500 52 255 64 158 36 9000 303 64 144 40 9400 336 64 144 160+ 200+ 38 36 64 64 87 116 68 CAT III & Quick Hitch 3 CAT III & Quick Hitch 3 or 4N CAT III & Quick Hitch 3 or 4N 64 170+ 40 ADI-12PT OVERALL HEIGHT LENGTH HITCH WIDTH (IN) (IN) REQUIREMENTS (IN) 38 36 ADI-8PT # OF BARS 68 116 2 5/16 ball 68 200+ 64 174 447 open 312 folded 82 open 144 folded 265 2 5/16 ball NOTE: 8-36 and 8-40 diggers require a belly mounted coulter kit (70970). vi 7/18/14 MAN138 AMADAS Digger-Inverters Safety 1. Safety SAFETY AT ALL TIMES! ....................... 2 Safety Practices ..................................... 3 Additional Safety for this Machine ....... 10 Safety Decals ...................................... 11 Decal Locations ............................... 13 This symbol means: ATTENTION! BECOME ALERT! YOUR SAFETY IS INVOLVED! MAN138 07/18/14 1 Safety AMADAS Digger-Inverters SAFETY AT ALL TIMES! Look for the Safety Alert Symbol! You, the operator, can help avoid accidents or injury by observing the precautions in this section and insisting that others working for or with you also follow them. • Do NOT attempt to operate this equipment under the influence of drugs or alcohol, or prescription/over-thecounter drugs that may cause impairment. • This equipment is dangerous to children and persons unfamiliar with its operation. They should never be allowed to operate this machinery or remain in its vicinity while in operation. • Only a trained operator familiar with this machinery and trained in its operation should be allowed to operate this machine. Do NOT allow any person to operate or perform maintenance on this machine until he or she has read this manual and understands the safety precautions. • To prevent injury or death, use a tractor equipped with a Rollover Protective System (ROPS). • NEVER exceed a machine’s limits. If a machine’s ability to perform a job safely is in question, DO NOT USE THE MACHINE TO ATTEMPT THAT JOB. Shields • • Certain photographs or illustrations in this manual may show a safety shield removed. However, NEVER operate this machine without all shields correctly in place! If a shield must be removed to make a repair or adjustment, replace the shield prior to use. Safety Signal Words Used Three safety signal words are used on the machine and in this manual to indicate the degree or level of hazard seriousness. These three words are: DANGER Indicates an imminently hazardous situation that, if not avoided, will result in death or serious injury. This signal word is to be limited to the most extreme situations, typically for machine components that, for functional purposes, cannot be guarded. WARNING Indicates a potentially hazardous situation that, if not avoided, could result in death or serious injury, and includes hazards that are exposed when guards are removed. It may also be used to alert against unsafe practices. CAUTION Safety Decals 2 The Safety Alert Symbol indicates a potential safety hazard to personnel and that extra precaution must be taken. When you see this symbol on the machine, remain alert and carefully read the message that follows it. ALWAYS follow the recommended precautions and safe operating procedures accompanying this symbol. If you have any questions, please contact your dealer or the manufacturer. • Replace any CAUTION, WARNING, DANGER, or instruction safety decal that is not readable or is missing. • Do NOT paint over, remove, or deface any safety sign or warning decals. 07/18/14 Indicates a potentially hazardous situation that, if not avoided, may result in minor or moderate injury. It may also be used to alert against unsafe practices. MAN138 AMADAS Digger-Inverters Safety NOTE! This section covers general safety. Some items may not apply to this type of machine. Safety Practices Transport Machine Safely • Comply with state and local laws. • • Be familiar with tractor operations and follow all safety instructions in the tractor’s manual. Use following tow load weight ratios as guidelines: 20 MPH when weight is less than or equal to the weight of the tractor • Before moving away, always check immediate vicinity (e.g., for children). • NEVER exceed a maximum speed of 20 MPH. • NEVER tow a load more than double the weight of the tractor! • Always adapt ground speed to road or field conditions, making sure you have adequate control of steering and stopping. • Sudden braking can cause a towed load to swerve and upset. Reduce speed if towed load is not equipped with brakes. • Avoid sharp turns, holes, ditches, and obstructions which may cause the tractor to tip, particularly on hillsides. 10 MPH when weight is more than weight of the tractor Avoid Electrical Power Lines Use a Safety Chain • • Use a safety chain to help control machinery if it separates from the tractor drawbar. • Use a chain with strength rating equal to greater than the gross weight of the towed machine. • Attach the chain to the tractor drawbar support, allowing only enough slack in the chain for turning. • ALWAYS attach the machine properly to the tractor drawbar. Do NOT use a safety chain for towing. • Make sure all components are secured in the proper position before transporting machine (for example: basket bin lip extension, mower deck, off-loading conveyor, etc.). AVOID all lines, particularly low-hanging electrical cables, during transport. DANGER Contact with electrical lines will cause the operator to suffer severe electrical shock or possibly death. MAN138 07/18/14 3 Safety Model number NOTE! This section covers general safety. Some items may not apply to this type of machine. Avoid High Pressure Fluids CAUTION 4 • Use extreme care when working with hydraulic components and high pressure sprays. • Escaping fluid or spray under pressure can penetrate the skin, causing serious injury. • To avoid injury, relieve pressure before disconnecting hydraulic or other lines. • Tighten all connections before applying hydraulic or spray pressure. • Search hoses/connections for leaks with a piece of cardboard. • Take appropriate safety measures to protect hands, body, and face from high pressure fluids. • Always wear appropriate safety gear to protect hands, body and face from exposure to high pressure fluids. • Never try to block the flow or search for leaks of high pressure fluids with your hands even if wearing gloves. High pressure fluids can penetrate gloves as well as your skin. • Always avoid direct contact of any high pressure fluid low. • If an accident occurs, respond as follows: 07/18/14 o Seek medical treatment immediately. Any fluid injected into the skin must be surgically removed within a few hours or gangrene may result. o Alert the medical professionals that a fluid injection or high pressure spray injury has occurred. o Give information on the type of fluid or spray and time the accident occurred. If known, include the amount of fluid injected and/or the system injection pressure. o Surgery will most likely be required, so no food or drink for the affected person. Doctors unfamiliar with this type of injury should reference a knowledgeable medical source. Such information is available in English from Deere & Company Medical Department in Moline, Illinois, U.S.A., by calling 1-800-822-8262 or +1 309-7485636. VERY IMPORTANT!! Although in some cases there is little or no pain from an injection or high pressure spray accident, THIS IS A SERIOUS EVENT THAT MUST BE TREATED BY MEDICAL PROFESSIONALS!!! MAN138 AMADAS Digger-Inverters Safety NOTE! This section covers general safety. Some items may not apply to this type of machine. Work in Ventilated Area Engine exhaust fumes can cause sickness or death. • • If it is necessary to run an engine in an enclosed area, remove the exhaust fumes from the area with an exhaust pipe extension. If you do not have an exhaust pipe extension, open the doors and get outside air into the area. AMADAS DOES NOT RECOMMEND RUNNING ANY ENGINE IN AN ENLCOSED AREA EVEN WITH VENTILATION. Handle Fuel Safety – Avoid Fires • Handle fuel with care; it is highly flammable. • Do NOT refuel the machine while smoking or when near open flame or sparks. • ALWAYS stop engine before refueling machine. • Fill fuel tank outdoors. • Prevent fires by keeping machine clean of accumulated trash, grease, and debris. • ALWAYS clean up spilled fuel. Prepare for Emergencies Wear Protective Clothing • Be prepared if a fire starts. • • Keep a first aid kit and fire extinguisher handy. Wear close-fitting clothing and safety equipment appropriate to the job. • Operating equipment safely requires the full attention of the operator. Do NOT wear radio or music headphones while operating machine. • Keep emergency numbers for doctors, ambulance service, hospital, and fire department near your telephone. MAN138 07/18/14 5 Safety Model number NOTE! This section covers general safety. Some items may not apply to this type of machine. Handle Chemical Products Safely • Avoid Contact with Moving Parts Direct exposure to hazardous chemicals can cause serious injury. Potentially hazardous chemicals used with AMADAS equipment include such items as lubricants, coolants, paints, and adhesives. • Before you start any job using a hazardous chemical, check the MSDS so that you are aware of the risks and know how to proceed safely. Carefully follow all procedures, using only recommended equipment. • See your AMADAS dealer for MSDS on chemical products used with AMADAS equipment. • Wear close-fitting clothing to avoid entanglement with moving parts. • Keep hands, feet, and clothing away from power-driven parts. • Never clean, lubricate or adjust machine when it is running. Remove Accumulated Crop Debris • The buildup of chaff and crop debris near moving parts or heat sources is a hazard. • Check and clean these areas frequently. • Before performing any inspection or service, engage tractor’s parking brake, turn off engine, and remove key. • Understand the service procedure before doing work. Use proper tools and refer to the User Manual. Keep all parts in good condition and properly installed. • Fix any damage immediately; replace worn or broken parts. • Keep service area clean and dry. • • Lower machine to ground, engage parking brake, turn off engine, and remove key before performing maintenance. Keep the machine free of any buildup of grease, oil, or debris. • Allow time for the machine to cool completely. • Never lubricate, service, or adjust machine while it is moving. • Keep hands, feet, and clothing from powerdriven parts. • Securely support any machine elements that must be raised for service work. Practice Safe Maintenance • 6 07/18/14 MAN138 AMADAS Digger-Inverters Safety NOTE! This section covers general safety. Some items may not apply to this type of machine. Remove Paint/Protective Coating Before Welding Or Heating o Allow any fumes to disperse for at least 15 minutes before welding or heating. • Do NOT use a chlorinated solvent in areas where welding will take place. Hazardous fumes can be generated when paint or coatings are heated by welding, soldering, or by using a torch. • • Do all work in an area that is wellventilated to carry toxic fumes and dust away. Do all work outside or in a well-ventilated area. • • Dispose of paint/coatings and solvent properly. Remove paint/coatings before welding or heating: • Avoid potentially toxic fumes and dust. • o If you sand or grind paint, avoid breathing the dust. Wear an approved respirator. o If you use solvent or paint stripper, remove stripper with soap and water before welding. o Remove solvent or paint stripper containers and other flammable material from the area. Keep Riders off of Machine Avoid Using Heat Near Pressurized Fluid Lines • • Flammable spray can be generated by heating near pressurized fluid lines, resulting in severe burns to yourself and bystanders. Do NOT heat by welding, soldering, or using a torch near pressurized fluid lines or other flammable materials. Pressurized lines can accidentally burst when heat goes beyond the immediate flame area. MAN138 07/18/14 • Only allow the operator on the machine. Riders obstruct the operator’s view, which results in the machine being operated in an unsafe manner. • Riders are subject to injury such as being thrown off of the machine. • Children should NEVER be allowed on the machine. 7 Safety Model number NOTE! This section covers general safety. Some items may not apply to this type of machine. • Dispose Of Waste Properly Inquire about the proper way to recycle or dispose of waste from your local environmental or recycling center, FEMA, or from your AMADAS dealer. Improperly disposing of waste can threaten the environment and ecology. Potentially harmful waste includes items such as oil, fuel, coolant, brake fluid, filters, and batteries. • Use leak-proof containers when draining fluids. • Do NOT use food or beverage containers that may mislead someone into drinking from them. • Do NOT pour waste onto the ground, down a drain or into a water source. Support Machine Properly Service Drive Belts Safely • When servicing drive belts, always observe these precautions: • Always lower the attachment or implement to the ground before you work on the machine. If the work requires that the machine or attachment be lifted, provide secure support for them. If left in a raised position, hydraulically supported devices can settle or leak down. Do NOT support the machine on cinder blocks, hollow tiles, or props that may crumble under continuous load. • Do NOT work under a machine that is supported solely by a jack. • Follow all safety procedures in this manual for supporting the machine. • When implements or attachments are used with a machine, always follow safety precautions listed in the implement or attachment operator’s manual. 8 07/18/14 • Avoid serious injury from hand or arm entanglement. Never attempt to clean, check, or adjust belts while the machine is running. Always shut off the engine, set the parking brake and remove the key. • Do NOT attempt to clean belts with flammable cleaning solvents. MAN138 AMADAS Digger-Inverters Safety NOTE! This section covers general safety. Some items may not apply to this type of machine. Service Tires Safely Explosive separation of a tire and rim parts can cause serious injury or death. • Do NOT attempt to mount a tire unless you have the proper equipment and experience to perform the job. • Always maintain the correct tire pressure. • Do NOT inflate the tires above the recommended pressure. • Never weld or heat a wheel and tire assembly. The heat can cause an increase in air pressure resulting in a tire explosion. Welding can structurally weaken or deform the wheel. • When inflating the tires, use a clip-on chuck and extension hose long enough to allow you to stand to one side and NOT in front of over the tire assembly. Use a safety cage if available. • Check wheels for low pressure, cuts, bubbles, damaged rims, or missing lug bolts and nuts. NEVER fill a damaged tire or one that is missing lug bolts or nuts. Pay Close Attention to Notes Use Safety Lights and Devices • Throughout the manual, information that needs to be emphasized is set apart with either a "NOTE!" or "IMPORTANT!" heading. • Please be sure to carefully read this information, as it usually indicates a situation that could cause machine damage. Slow moving tractors, self-propelled equipment and towed implements or attachments can create hazards when driven on public roads. They are difficult to see, especially at night. • Whenever you drive on public roads, use flashing lights and turn signals according to local regulations. • To increase visibility, use the lights and devices provided with your machine. • Keep safety items in good condition. • Replace missing or damaged items. Maintain Your Machine • It is crucial you maintain your machine in proper working condition. • Perform all scheduled maintenance and repairs in a timely manner. • Do NOT perform unauthorized modifications to the machine as these could impair the function and/or safety of the machine and affect machine life. MAN138 07/18/14 9 Safety Model number Additional Safety for this Machine Operate the Machine Safely • • Keep hands, feet, and clothing away from moving parts. Do NOT allow anyone to stand on or inside the machine during operation. • Do NOT crawl underneath the machine while it is in operation. • Do NOT operate unless all shields are in place. Set Up and Maintain Machine Safely • Do NOT make any adjustments or attempt any maintenance while the digger is in operation or being towed. • Make sure the tractor is in park, turned off and the key removed from the ignition before attempting maintenance. Do NOT allow anyone to sit on the tractor. • Follow all safety warnings for working with hydraulics. Move or Pick Up Machine Safely • Do NOT attempt to lift the digger manually. The smallest digger weighs more than 4500 pounds. • Use only safe lifting methods, such as a tractor, to raise the machine. Handle Edges Safely • 10 Use care when handling plow blades and vine cutters. Edges are sharp. 07/18/14 MAN138 AMADAS Digger-Inverters Safety Safety Decals • Safety decals identify specific hazards, as well as general safety. A signal word ( DANGER, WARNING, or CAUTION) is included on • each decal to alert you to the severity of the hazard. Please note the following about the decals: • Keep them clean and legible. • Never remove a safety decal from the machine. • When you replace a part with a safety decal, also replace that decal. MAN138 07/18/14 For replacement AMADAS dealer. decals, call your Replacement safety decals are available free of charge. Safety decals used on this machine are shown on the following pages. Decal locations are also included. 11 Safety 9900 Self-Propelled Peanut Combine Decals 8182 8191 8189 8190 8547 12 07/18/14 MAN138 AMADAS Digger-Inverters Safety Decal Locations Due to the number and variety of machines covered by this manual, decal locations are not shown. MAN138 07/18/14 13 Safety 9900 Self-Propelled Peanut Combine NOTES 14 07/18/14 MAN138 AMADAS Digger-Inverters Setup 2. Setup READ FIRST! ......................................... 16 Setup Instructions .................................. 17 Fenders .............................................. 17 Vine Deflector Shields ........................ 18 Inverter Rods ...................................... 19 Vine Cutters (Coulters) ....................... 22 Plows .................................................. 23 Conveyors........................................... 25 Belts ................................................ 25 Scrapers .......................................... 25 Tractor Hookup ...................................... 26 3-Point Hitch Digger-Inverters ............ 26 Optional Hitch ..................................... 27 Installing Optional Hitch .................. 27 Using the Optional Hitch ................. 27 Connect Hydraulics............................. 30 Connect Speed Display ...................... 31 Digger Leveling ................................... 31 Tachometer Setup .............................. 31 Light Kit .................................................. 32 Pull-Type Diggers This chapter contains information for setting up a 3Point Hitch Digger-Inverter. For additional information on setting up a pull-type digger-inverter, see the AMADAS Pull-Type Digger-Inverters Supplement included with this manual. MAN138 7/18/14 15 Setup AMADAS Digger-Inverters READ FIRST! This chapter contains instructions for setting up your digger-inverter for operation. You may need to refer to Chapter 3, Adjustments, for additional information during the setup procedure. CAUTION Before you set up your digger-inverter for use, please make sure to: • Read Chapter 1, Safety, before beginning the setup procedure. • Read over this chapter and make sure you are familiar with setup instructions before beginning. • Make sure you have all necessary tools on hand. • Remove all packing materials. • Carefully inspect the digger-inverter and all associated parts and equipment. • Report any evidence of damage from shipping or handling to your AMADAS representative immediately. CAUTION Once the crop lifter/conditioner is attached to the tractor, make sure the tractor is in park, with the ignition turned off, and the key removed before any adjustments are made. WARNING Escaping hydraulic fluid under pressure can penetrate the skin, causing serious injury. Avoid the hazard by relieving pressure before disconnecting hydraulic or other lines. Tighten all connections before applying pressure. Search for leaks with a piece of cardboard. Protect hands and body from high pressure fluids. Use care when handling plow blades and vine cutters. Edges are sharp. 16 7/18/14 See Chapter 1, Safety, for more information on safe handling of hydraulics and for instructions in the event of a hydraulic injury. MAN138 AMADAS Digger-Inverters Setup Setup Instructions Fenders The digger-inverter is shipped with its fenders and vine deflector shields in the stored position. 3. Swing the fender into place as shown below. 4. Replace the top and bottom bolts. NOTE! The machines shown in photos may vary slightly from your machine, as different models are available. Unless otherwise noted, instructions are the same for all models. 5. Set the fenders to the desired angle and tighten all fasteners. To position the fenders: 1. Remove one bolt on the top and one bolt on the bottom. Remove this bolt Loosen this bolt 2. Loosen the other bolt as shown in the photo above. MAN138 7/18/14 17 Setup AMADAS Digger-Inverters Vine Deflector Shields Position the vine deflector shields after the fenders have been positioned. NOTE! The machines shown in photos may vary slightly from your machine, as different models are available. Unless otherwise noted, instructions are the same for all models. 4. Position the vine deflector shield as shown. Install additional bolt here Vine deflector shield To position the vine deflector shields: 1. Remove the bolts indicated in the photo. Remove these bolts 5. Install and tighten all of the bolts. Note that there is an additional bolt in the middle of the panel as shown in the photo. Vine deflector shield Slot 2. Remove the vine deflector shield. 3. Insert the top tab of the shield through the slot in the conveyor side frame as shown below. Tab on top of shield Slot in machine side 18 7/18/14 MAN138 AMADAS Digger-Inverters Setup Inverter Rods Inverter rods arrive lashed to the diggerinverter’s conveyor. Set rods as follows: 1. Before beginning, o o Refer to the drawings on the next page and use the applicable one to place the inverter rods correctly. Note that each conveyor section of your digger-inverter, whether 4- or 6row, should be configured as shown in the applicable drawing. Lowest number Highest number Begin placing the lowest numbered rod from the outside with the highest numbered rod on the inside 5. Properly position each rod as shown in the photos and drawings. NOTE! The decals located on the machine depicting rod spacing are shown on page 20. 6. Check rod spacing. Make sure rods are positioned evenly between rotor disks before tightening fasteners. 2. Unlash the rods. 3. Each rod is labeled; determine which rod is the lowest numbered. 4. Starting at the outside of each inverter section, place the rods in order into the center of the section, with the lowest numbered rod on the outside and the highest numbered rod on the inside. MAN138 7/18/14 19 Setup AMADAS Digger-Inverters Inverter rod spacing for 36, 38, & 40-inch Rotors 20 7/18/14 MAN138 AMADAS Digger-Inverters Setup Inverter rod spacing for 30” rods MAN138 7/18/14 21 Setup AMADAS Digger-Inverters Vine Cutters (Coulters) CAUTION Toolbar Coulter mount U-bolts Use care when handling plow blades and vine cutters. Edges are sharp. Before installing the coulters, refer to the Appendix of this manual along with the Parts Catalog to determine how the coulters should be placed. Also refer to the confirmation of the kit purchased with your machine. With the exception of the outside two coulters, all other coulters should be aligned with your row centers. 1. Unpack the coulters from the shipping package and check over to make sure there is no shipping damage. Report any damage to your AMADAS representative. 3. Remove the U-bolts for the coulter mount and rotate the mount so that the coulter end of the mount is pointed towards the tractor. Mount rotated into position Insert stem into mount 4. Space the coulter mounts across the toolbar. Please refer to “Coulters” in Chapter 3, Adjustments. 5. Insert the coulter stem into the mount and tighten the bolts. 2. Raise the digger-inverter and place blocks or jacks under the toolbar. WARNING Do NOT attempt to lift the digger, as serious injury could result. Use an appropriate lifting means such as the tractor to raise the machine. 22 NOTE! For the four-row digger-inverter equipped with a V-plow, one of the coulter stems is obviously shorter than the others. This shorter coulter must be installed in the center of the machine to accommodate the V-plow and avoid interference with the tractor top link. 6. Refer to “Coulters” in Chapter 3, Adjustments, for more specific information on placing coulters. 7/18/14 MAN138 AMADAS Digger-Inverters Setup Plows Toolbar CAUTION Plow support U-bolts Use care when handling plow blades and vine cutters. Edges are sharp. Plows are packaged along with the coulters separately from the machine. 1. Unpack the plows from the shipping package and check over to make sure there is no shipping damage. Report any damage to your AMADAS representative. 3. Space the plow shanks across the toolbar as indicated for your crop spacing. These have been preset, but may require moving for twin row crops. IMPORTANT! To make sure your plows are spaced correctly for your crop conditions, refer to “Plows” in Chapter 3, Adjustments. Carefully read and follow these instructions to ensure a cleanly plowed crop with the maximum number of peanuts. 2. Raise the digger-inverter and place blocks or jacks under the toolbar. WARNING Do NOT attempt to lift the digger, as serious injury could result. Use an appropriate lifting means such as the tractor to raise the machine. MAN138 7/18/14 23 Setup AMADAS Digger-Inverters Plows, Cont’d 4. For each plow, bolt the frog and blade assemblies to the bottom of the shank using the Grade 8, 5/8” bolts included from the factory. Refer to the drawing below. 5. Refer to “Level Plows” in Chapter 3, Adjustments, for information on making sure the plows are level. NOTE! The shank, blade, and frog assemblies are heavy and require two people to handle them. 24 7/18/14 MAN138 AMADAS Digger-Inverters Setup Conveyors Scrapers Belts Scrapers are located at the bottom of each conveyor belt. The conveyors are factory installed and belts are properly installed and tensioned. Before using the digger, however, check each belt to make sure the belts have not become loosened during shipping. • Make sure they are securely attached and kept free of debris. • As the scraper blades wear, it is important to adjust the placement of the scrapers to keep them close to the front idlers (1/16”) to prevent soil build up. Excessive build up on the front idlers will over-tension the conveyor belt and cause premature wear. • Note that an excessively worn blade may be flipped so that the other side can be used. Belts should have at least 2¼” of sag as shown in the photo. 2 ¼” See Chapter 3, Adjustments, “Scrapers” for more information. Scraper IMPORTANT! Proper belt tension is important to ensure that the conveyor operates at optimum performance. If belts are too loose, the conveyors will not operate as efficiently. If too tight, excessive wear may occur on the conveyor rods and drive sprockets. See Chapter 3, Adjustments, “Conveyor Belts and Rods” for information on how to adjust conveyor belts. MAN138 7/18/14 25 Setup AMADAS Digger-Inverters Tractor Hookup 3-Point Hitch DiggerInverters The 4-, 6-, and 8-row non pull-type diggerinverters are designed for use with the Category III, IV and IVN quick hitches. NOTE! On tractors with quick hitches, the sway blocks should be adjusted so that there is no more than one inch of sway in either direction. 2. After connecting, slowly raise and lower the digger-inverter to make sure there is no interference between the diggerinverter and the tractor. If operating a 4row with row-spaced duals, an optional hitch extension is required to eliminate the contact between the coulters and the tires. Once the sway blocks have been adjusted, the digger may be hitched to the tractor. NOTE! To find a good starting setting for the top link, connect the diggerinverter and turn the top link in 2 - 2½ turns. 1. Back your tractor up to the digger-inverter and connect the hitch. It may be necessary to adjust the top link in order to connect the hitch. Top link 26 7/18/14 MAN138 AMADAS Digger-Inverters Setup Optional Hitch An optional hitch is available for CAT III and CAT IVN hitches for 4-row digger-inverters. 5. Remove the nuts holding one of the lower hitch links. Remove all six nuts Installing Optional Hitch To install the optional hitch: 1. Remove the nuts holding the original top hitch link. Remove all four nuts 6. Remove the lower hitch link, leaving the U-bolts in position. 7. Install the new lower hitch link with the nuts that were removed in the position shown on the following pages. 8. Torque U-bolts to 200 ft-lbs, dry. 9. Repeat Steps 5-8 for the second lower hitch link. 2. Remove the upper hitch link, leaving the U-bolts in position. 3. Install the new upper link with the larger hole at the top. Use the nuts that were removed in Step 1. 4. Torque U-bolts to 200 ft-lbs, dry. MAN138 7/18/14 Using the Optional Hitch The manner in which the optional hitch is used depends on hitch category. Refer to the drawings on the next two pages for the correct way to set up the hitch points for each category. 27 Setup AMADAS Digger-Inverters Category III Hitch Use lower part of top link Use thinner end of pins in bottom links Category IVN Hitch Use upper part of top link Use thicker end of pins in bottom links 28 7/18/14 MAN138 AMADAS Digger-Inverters Setup Category IV (Can be used only on ADI-636, ADI-638, ADI-640) Use upper part of top link Use thicker end of pins in bottom links MAN138 7/18/14 29 Setup AMADAS Digger-Inverters Connect Hydraulics Pressure hose WARNING Return hose Escaping hydraulic fluid under pressure can penetrate the skin, causing serious injury. Avoid the hazard by relieving pressure before disconnecting hydraulic or other lines. Tighten all connections before applying pressure. NOTE! If your tractor is not equipped with a direct return to the tank valve, one needs to be installed. This should be similar to the procedure used for running an air planter. This reduces the heat in the hydraulic system and ensures the conveyor cannot be reversed, causing machine damage. Search for leaks with a piece of cardboard. Protect hands and body from high pressure fluids. See Chapter 1, Safety, for more information on safe handling of hydraulics and for instructions in the event of a hydraulic injury. 1. Connect the hydraulic hoses to the tractor. For proper operation, it is imperative that the pressure hose (indicated in the first photo) be connected to the tractor remote forward pressure port. The pressure hose is marked with tape. The return hose (indicated in the next photo) must be connected to a direct return to the reservoir and not to the remote. 30 2. Uncoil the conveyor speed sensor wire shown in the bottom photo and route to the cab of the tractor. Be sure to keep the wire away from hydraulic hoses or anything else that could damage it. 7/18/14 Wire MAN138 AMADAS Digger-Inverters Setup Connect Speed Display Tachometer Setup 1. Using the Velcro provided, mount the conveyor speed display unit to a clean surface in a convenient area of the tractor cab. The conveyor belt speed display unit displays speed as read from a sensor at the motor. The speed is displayed in miles per hour. 2. Connect the wire to the bottom of the display. Sensor Connect wire The purpose of this monitor is to allow you to match the speed of the conveyor to the tractor speed, which will ensure the smoothest operation. Digger Leveling Once your machine has been hitched to the tractor, you will need to level the diggerinverter. 1. Check the air pressure in the rear tractor tires to make sure that both tires are inflated to the same pressure. 2. Place the tractor on a level surface such as a concrete slab. If the monitor becomes damaged, the following calculation can be used to determine conveyor shaft speed. 32 RPMS = approx. 1 MPH conveyor speed If the digital readout is replaced, the tachometer will have to be reprogrammed. Please refer to “Tachometer Programming” in Chapter 5, Maintenance. 3. Raise the digger slightly off of the ground and measure from the toolbar to the ground on both sides. 4. Adjust the lift arms until the measurement is the same on both sides. MAN138 7/18/14 31 Setup AMADAS Digger-Inverters Light Kit 1. If you receive the light kit with the lights unassembled, assemble each light as shown in the drawing. (The U-bolts are used to attach the light assembly to the digger-inverter.) Attach light assembly to frame here 3. Tighten u-bolt fasteners. 2. Referring to the photos, install each light assembly to the frame of the diggerinverter using the U-bolts. Attach light assembly to frame here Tighten fasteners U-bolts installed 32 7/18/14 MAN138 AMADAS Digger-Inverters Setup Light Kit, Cont’d 4. Using ties, attach the electrical harness to the frame of the digger-inverter, routing both sides to the front of the diggerinverter. 5. Using a tie, attach the end of the harness to the hydraulic cables. 6. Attach the plug to an appropriate outlet in your tractor. Attach harness to frame at intervals Attach harness to cables (hydraulic lines) Plug Attach harness to frame at intervals MAN138 7/18/14 33 Setup AMADAS Digger-Inverters NOTES 34 7/18/14 MAN138 AMADAS Digger-Inverters Adjustments 3. Adjustments READ FIRST! ......................................... 36 Adjustments ........................................... 37 Conveyor Belts and Rods ................... 37 Scrapers .......................................... 37 Conveyor Pickup Height ..................... 38 Fenders .............................................. 38 Plows .................................................. 39 Spacing ........................................... 39 Move Plow Shanks.......................... 41 Level Plows ..................................... 42 Vine Cutters (Coulters) ....................... 43 Wheel Height ...................................... 44 Pull-Type Diggers For additional adjustment information for the pulltype digger-inverter, see the AMADAS Pull-Type Digger-Inverters Supplement included with this manual. MAN138 7/18/14 35 Adjustments AMADAS Digger-Inverters READ FIRST! This chapter lists the basic machine adjustments that can be made to your diggerinverter. Refer to these adjustments during your initial startup procedure to make sure your digger-inverter is adjusted for optimum performance in your crop conditions. After your digger-inverter is up and running, use this chapter to help with troubleshooting and to make sure your machine continues to perform efficiently. If you need to make changes to your diggerinverter that are not covered in this chapter and/or manual, please contact your AMADAS representative for additional assistance. Before you make adjustments to your diggerinverter, please make sure to: • Read Chapter 1, Safety, before beginning. • Pay careful attention to all safety signs on the machine and safety information in this manual. WARNING CAUTION Once the digger-inverter is attached to the tractor, make sure the tractor is in park, with the ignition turned off, and the key removed before any adjustments are made. WARNING Escaping hydraulic fluid under pressure can penetrate the skin, causing serious injury. Do NOT attempt to lift the digger, as serious injury could result. Use an appropriate lifting means such as the tractor to raise the machine. Avoid the hazard by relieving pressure before disconnecting hydraulic or other lines. Tighten all connections before applying pressure. CAUTION Search for leaks with a piece of cardboard. Protect hands and body from high pressure fluids. See Chapter 1, Safety, for more information on safe handling of hydraulics and for instructions in the event of a hydraulic injury. Use care when handling plow blades and vine cutters. Edges are sharp. 36 7/18/14 MAN138 AMADAS Digger-Inverters Adjustments Adjustments Conveyor Belts and Rods 1. Check the amount of conveyor belt sag. It should be at least 2 1/4” as shown in photo. 4. Re-tighten the bolts. 5. Lightly tighten the adjusting rod to lock it into position. 6. Repeat Steps 1-5 for the other side of the conveyor so that belt sag is equal on both sides. 7. Repeat Steps 1-6 for each conveyor on your machine. 2 ¼” IMPORTANT! Proper belt tension is important to ensure that the conveyor operates at optimum performance. If belts are too loose, the conveyors will not operate as efficiently. If too tight, excessive wear may occur on the conveyor rods and drive sprockets. 2. If the belt needs to be tightened or loosened, loosen the bolts indicated in the photo. Scrapers As the scraper blades wear, adjust placement to keep them close to the front idlers (1/16”) to prevent soil build up. Excessive build up on the front idlers will over-tension the conveyor belt and cause premature wear. Adjust scrapers by loosening fasteners and moving into position; make sure to retighten fasteners. Adjusting rod 3. To remove sag, turn the adjusting rod clockwise to tighten the belt assembly. To increase the sag, turn the adjuster rod counterclockwise to loosen the belt assembly. MAN138 7/18/14 Adjust scraper to 1/16” from idler 37 Adjustments AMADAS Digger-Inverters Conveyor Pickup Height Fenders 1. Adjust the conveyor pickup height by pulling down on the lifting lever and adjusting the chain shown in the top photo. The angle of each fender can be adjusted slightly to accommodate your field conditions. The photo shows the top of the fender when bolted to the machine. To adjust the fender: Lifting lever 1. Loosen both bolts but do not remove. Adjusting chain 2. Move the fender to the desired angle by moving the top bolt toward the left or right. 3. Retighten the bolts. Change fender angle NOTE! If an additional height adjustment is needed, shorten or lengthen the chain connecting the lifting lever to the conveyor as desired. 2. Repeat on the other side so that the chains are adjusted to the same point. NOTE! Due to the effort required to perform this task, we recommend that you use two people. 3. Adjust the turnbuckle screws on the conveyor chain until the tension of both chains are the same. Note that only one of the chains has a turnbuckle. Turnbuckle Screws 38 7/18/14 MAN138 AMADAS Digger-Inverters Adjustments Plows Spacing The digger-inverter has been built for 30”, 36”, 38” or 40” row spacing, depending on the model. For example, an ADI-638 was built for use in 38” spaced rows. When assembled, the plow spacing was set to accommodate single planted rows with approximately 10 inches from the row center to the inside of the plow shank. This may have been adjusted to accommodate transportation of the digger-inverter and must be checked and possibly adjusted to ensure proper operation. The plow spacing will also need to be adjusted to accommodate twin row peanuts or large vines with a wide spreading limb crop. The ultimate goal in plow spacing is to plow all good peanuts without sending nonproducing vine into the conveyor. The following procedure provides a good starting point for setting the plows, but it cannot replace good field observation. You may need to make additional adjustments after the initial operation or for changing field conditions. Refer to the diagram on page 40 to follow these instructions. Step 1 Find and mark the exact center of the lower toolbar. Step 3 Mark the placement of each plow as follows. Note that you will need to know your planting pattern and crop conditions before starting. NOTE! In 4-row machines, a center shank with a plow on either side is placed on the center of the toolbar for the middle two rows. The plows are longer and angled differently to accommodate these rows. The description below applies only to the outer plows for the 4-row. In a 6-row machine, each plow shank is placed as described below. • MAN138 o 36” row: 36 / 2 = 18” + 10” = 28” o 38” row: 38 / 2 = 19” + 10” = 29” • This dimension is the distance between the row center and inside of the plow shank. • Adjust the 10” to accommodate your vine size and limb conditions. For smaller vines, 7½” - 9” may be acceptable. Larger vines may require 11”. • For twin row peanuts, take one-half of the row centers, add one-half of the twin centers, and then add 9”. As with the single rows, you can vary the 9” measurement according to crop conditions. The range of adjustments will not be as high for all plow patterns. Step 2 From the center point, measure and mark the placement of the row middles (i.e., 36” or 38”, depending on your row spacing). For a four-row digger-inverter, there will be one mark on either side of the center. For a six-row machine, there will be two marks on either side of the center. These marks should fall at the center of the row middle coulters. If they do not, recheck measurements or adjust coulter placement. For single row peanuts, measure and mark on either side of the row middles one-half of the row centers plus 10”. The following are examples only; your calculations depend on your own row size and plow patterns: 7/18/14 36” row with 7” twins: 36 / 2 = 18” , 7 / 2 = 3 ½” 18” + 3 ½” + 9” = 30 ½” 39 Adjustments AMADAS Digger-Inverters Spacing, Cont’d 38” row with 9” twins: 38 / 2 = 19” , 9 / 2 = 4 ½” 19” + 4 ½” + 7 ½ ” = 31” 38” row with 7” twins: 38 / 2 = 19” , 7 / 2 = 3 ½” 19” + 3 ½” + 9” = 31 ½” Step 4 Move the plows shanks into place according to the instructions on the next page. Then follow the instructions for leveling the plows. 36” row with 9” twins: 36 / 2 = 18” , 9 / 2 = 4 ½” 18” + 4 ½” + 7 ½ ” = 30” Four-Row Center point Toolbar 18”+10” = 28” 36” Coulter Plow Row center 36” typical row spacing Tap root Row balk Six-Row 36” Center point Toolbar 28” 36” 28” 28” Coulter Plow 36” typical row spacing 40 7/18/14 MAN138 AMADAS Digger-Inverters Adjustments Move Plow Shanks U-bolts WARNING Do NOT attempt to lift the digger, as serious injury could result. Use an appropriate lifting means such as the tractor to raise the machine. Inside of shank 1. Raise and properly support (with blocks or jack stands) the front of the diggerinverter so that the plows clear the ground. 2. Loosen the four nuts holding the plow shank U-bolts. 4. Tighten the plow shank U-bolts and leveling screws so that the shank is square with the frame. Nuts U-bolts 3. Move the plow assembly until the inside of the shank (the side closest to the center of the machine) is aligned with your mark. NOTE! Plow assemblies are heavy. You may require assistance moving them. Leveling screw 5. If not square, loosen the plow shank mounting U-bolts and adjust the leveling screws until the plow shank is perpendicular to the toolbar. Retighten the nuts and screws. 6. Repeat Steps 1-5 for the remaining plows. NOTE! Square the U-bolts with the toolbar before tightening to help prevent the shank position from changing after the U-bolts are tightened. MAN138 7/18/14 41 Adjustments AMADAS Digger-Inverters Level Plows 4. Correct most inconsistencies by loosening the shank U-bolts and adjusting the leveling screw to move the blade tips up or down. WARNING Do NOT attempt to lift the digger, as serious injury could result. Use an appropriate lifting means such as the tractor to raise the machine. Loosen u-bolts first CAUTION Leveling screw Use care when handling plow blades and vine cutters. Edges are sharp. 5. When finished, re-tighten all fasteners. 1. Raise and support (with blocks or jack stands) the front of the digger so the plows clear the ground. 2. From the side of the digger, look across the back tips of the digger blades and make sure they are level across the width of the digger. Check plow tips 3. Run a string across the lower side frame members of the digger. Measure from the string line and check tip heights. 42 7/18/14 MAN138 AMADAS Digger-Inverters Adjustments Vine Cutters (Coulters) WARNING Do NOT attempt to lift the digger, as serious injury could result. Use an appropriate lifting means such as the tractor to raise the machine. CAUTION 3. Install the outside coulter so that the blade is slightly outside the point of its corresponding plow. You may need to field adjust this coulter slightly in either direction depending on the amount of limb crop and vine size. Use care when handling plow blades and vine cutters. Edges are sharp. Before adjusting the vine cutters, refer to the Appendix of this manual along with the Parts Catalog to determine how the coulters should be placed. Also refer to the confirmation of the kit purchased with your machine. 4. Adjust the height of each coulter to your crop conditions by loosening the set screws and shifting the coulter stem up or down. Generally, lower the coulters for softer ground, weedy conditions, or heavy vines. Raise the coulters for harder ground or smaller vines. With the exception of the outside two coulters, all other coulters should be aligned with your row centers. 1. Raise or lower stem Loosen set screws Install a coulter in the center of the digger. 2. Measure from that coulter and install the remaining coulters one row width apart. For dual coulter assemblies, center the coulter stem to the mark. NOTE! Failure of the coulters to cut vines completely may lead to increased loss and/or poor inversion. MAN138 7/18/14 43 Adjustments AMADAS Digger-Inverters Wheel Height 4. On each side of the wheel, remove the axle cotter pins and loosen the castle nuts. WARNING Do NOT attempt to lift the digger, as serious injury could result. Use an appropriate lifting means such as the tractor to raise the machine. Cotter pin NOTE! For most conditions, wheels should be in the highest position as set at the factory. After making sure everyone is clear of the digger-inverter and the tractor, start the tractor and raise the digger-inverter so that the wheels clear the ground by 6-8”. 1. Place jack stands or blocks under the digger-inverter and lower the machine onto them. Bolts in highest position Castle nut 5. Rotate the wheel assembly into the desired position, then replace and tighten the upper bolts. 2. Shut the tractor off, place in PARK, and remove the key. NOTE! There are two sets of bolt holes. One set raises the wheel; the other lowers it. CAUTION Make sure the tractor is in park, with the ignition turned off, and the key removed before any adjustments are made. 3. Remove the four bolts on either side as shown in the photo. Remove bolts on both wheel supports 44 Rotate wheel assembly counterclockwise to lower wheel height 6. Tighten the axle castle nuts and replace the cotter pins. There should be no side to side movement in the wheel assembly when completed. 7/18/14 MAN138 AMADAS Digger-Inverters Adjustments Wheel Height, Cont’d 7. Make sure all wheels are adjusted and tightened into the same position. Failure to do so can cause damage to the diggerinverter. 8. Check tire air pressure (32 PSI) and adjust as needed. 9. 10. After all wheels are in place and all fasteners tightened, restart the tractor and raise the digger-inverter. NOTES! Wheels should be raised up when the digger-inverter is transported. However, during operation, the wheels should never spin freely but always touch the ground with some weight. Pull-type digger wheels have two heights and adjustments. Run these wheels at 45 PSI. 11. Remove the blocks or jack stands and lower the digger-inverter to the ground. All wheels should be contacting the ground the same amount. MAN138 7/18/14 45 Adjustments AMADAS Digger-Inverters NOTES 46 7/18/14 MAN138 AMADAS Digger-Inverters Operation 4. Operation READ FIRST! ......................................... 48 Performance Checks .......................... 48 Startup for 3-Point Hitch Digger-Inverters ............................................................... 49 First Run ................................................. 51 Checklist for 3-Point Hitch DiggerInverters .............................................. 52 Troubleshooting ..................................... 53 Pull-Type Diggers This chapter covers operating instructions for 3Point Hitch Digger-Inverters. For operating information for a pull-type digger-inverter, see the AMADAS Pull-Type Digger-Inverters Supplement included with this manual. MAN138 7/18/14 47 Operation AMADAS Digger-Inverters READ FIRST! CAUTION This chapter contains instructions for starting up your machine and using it the first time. Before you start your digger-inverter, please make sure to: • Read Chapter 1, Safety, before beginning. • Pay careful attention to all safety signs on the machine and safety information in this manual. Make sure the tractor is in park, the engine turned off, and the key removed before making any adjustments or performance checks. Do NOT allow anyone to sit on the tractor. WARNING CAUTION Escaping hydraulic fluid under pressure can penetrate the skin, causing serious injury. Avoid the hazard by relieving pressure before disconnecting hydraulic or other lines. Tighten all connections before applying pressure. Use care when handling plow blades and vine cutters. Edges are sharp. Performance Checks Search for leaks with a piece of cardboard. Protect hands and body from high pressure fluids. This section also includes a checklist for making sure your digger-inverter is running properly. See Chapter 1, Safety, for more information on safe handling of hydraulics and for instructions in the event of a hydraulic injury. Please review each item in the checklist. Doing so will not only ensure that your machine is running properly, it will help you achieve the optimum performance from your digger-inverter. If adjustments are needed, refer to Chapter 3, Adjustments, for specific instructions. 48 7/18/14 MAN138 AMADAS Digger-Inverters Operation Startup for 3-Point Hitch Digger-Inverters Pickup pins It is important that you go through the startup procedure and check the operation of the digger-inverter. You will need a helper to assist you. 1. Clear everyone from around the diggerinverter. Conveyor belt 2. Start the tractor and raise the diggerinverter slightly off of the ground. 3. Slowly raise the hydraulic flow until 1 MPH is displayed. 4. Have your helper observe the conveyor. It should be running smoothly and tracking in a straight path. If not, make any adjustments needed. The next two photos show the conveyor belt correctly tracking on the conveyor shaft. 5. Have your helper observe the inverter rotor(s). They should run smoothly without noise or hesitation. If not, correct as needed. CAUTION Make sure the tractor is in park, the engine turned off, and the key removed before making any adjustment. 6. Slowly increase the flow until the speed at which you will be running the tractor is displayed (for example, if you plan to run the tractor at 3 MPH, increase to 3 MPH). 7. After setting the hydraulic flow, stop the conveyor and lower the digger-inverter back to the ground. Shut off the tractor. Conveyor belt MAN138 8. Observe the height of the conveyor pickup. The pickup pins on the rods should be about three inches off the ground. If not, adjust as needed. 7/18/14 49 Operation AMADAS Digger-Inverters Startup for 3-Point Hitch Digger-Inverters 9. Verify that the gauge wheels are in their highest position as shown below. If not, adjust as needed. NOTE! If you shorten the top link several rounds and the digger still does not take ground, you may need to flip the blades so that the bevel is up. This is extremely rare and will only be necessary in extremely hard ground. 15. Once the plows do take ground, observe how deeply the plow is in the ground. Typically, you will need (4”-6”) of the shank in the ground to dig properly. If you have less shank in the ground than this amount, shorten the top link. If you have more shank than this in the ground, lengthen the top link. After adjusting the top link, retest until the depth is set. NOTE! Digging at deep depths may require setting the gauge wheels in the lowest position. NOTE! A good initial top link setting is 2 2½ turns in from where the digger can be easily hitched on flat ground. 10. Once these checks have been performed, have everyone clear away from the digger-inverter. Start the tractor and raise the digger-inverter. 11. Move to a flat, level soil area where no peanuts are present. 12. Start the conveyor and verify the speed setting. 16. After proper plow depth has been set, observe the relation of the conveyor pickup pins to the ground. With the conveyor height properly adjusted, the rods should be raking the ground but not the sub-soil. Adjust as needed. 17. Once initial start-up is completed, proceed with the “First Run” section. 13. Lower the digger-inverter and pull forward a few feet, then stop. The plows should take ground immediately. 14. If the plows do not “take ground”, shorten the top link. 50 7/18/14 MAN138 AMADAS Digger-Inverters Operation First Run After you have completed the startup and performed any necessary adjustments, perform your first run as follows: 8. Leaving the digger-inverter still in the ground, get down from your tractor and perform the checks indicated in the Checklists beginning on the next page. 1. Pick a starting speed between 2 ½ and 3 MPH. CAUTION 2. Choose the appropriate gear in the tractor and set the hydraulic flow to minimum. Make sure the tractor is in park, the engine turned off, and the key removed before making checks. 3. Engage the conveyor and adjust the hydraulic flow to match the tractor speed. 4. Select a row and line the tractor up appropriately. Make sure the diggerinverter is run in row groups that correspond with planting. 5. Start the digger-inverter and pull forward until the plows are just behind the first peanut plant in the row. 9. If you experience problems not listed in the Checklist, refer to the “Troubleshooting” section beginning on page 53. 10. Once you are satisfied with the first run results, you are ready to dig. 6. Lower the digger-inverter and pull forward. 7. Go approximately 50 feet and then stop all functions. MAN138 7/18/14 51 Operation AMADAS Digger-Inverters Checklist for 3-Point Hitch Digger-Inverters Make sure the peanut plants are inverted. Inspect the tap roots. The plow should have cut below the peanuts but not low enough to include the entire tap root with fibers and dirt. If too much of the root has been included, lengthen the top link so that the plows are raised up higher. If peanuts have been cut off, shorten the top link so the plows cut deeper into the soil. If vines are small and conditions poor (e.g., dry and spindly) you may need to dig deeper than normal to help insure good inversion. Inspect the wheels. There should be obvious tracks in the soil. If a deep furrow or rut has been dug, raise the wheels. If there are no tracks or only faint marks, lower the wheels. Make sure all tap roots have been laid in a uniform line. They should be lying within 30 degrees of vertical. Make sure peanut plants are transferring from plow to conveyor smoothly. It may be necessary to adjust conveyor height and/or speed, or the vine guide rods to ensure this. The tap root cut length should be consistent across the width of the digger. If not, the digger is not running level. Check the gauge wheel position, tire pressure, rear tractor tire pressure, or adjust the lift arms to correct the problem. A bent plow or one that is not level can also cause this problem if only one row is affected. 52 7/18/14 MAN138 AMADAS Digger-Inverters Operation Troubleshooting Problem Monitor not working correctly Cause Remedy Display shows 0.0 The monitor is not receiving information. Inspect the pickup clearance from the sprocket. The clearance should be no more than 3/16”. If greater, adjust the clearance and retry. If still not working, inspect wire for frayed or damaged connections or wires. Repair or replace as needed. If this does not work, you need to replace the pickup. Display blank The monitor is not functioning. Replace the battery. If this does not solve the problem, the display may be damaged and need to be replaced. Monitor not programmed correctly Reprogram monitor. Refer to monitor programming instructions in Chapter 5, Maintenance. The digger is not cutting deeply enough into the soil. Shorten the top link of the tractor so that the blades dig more deeply into the soil. Flip blades in hard soil. Blades are worn or dull. Replace the blades. The digger is cutting too deeply into the soil. Lengthen the top link of the tractor so that the blades dig less deeply into the soil. Conveyor speed too slow for ground speed. Adjust conveyor speed to meet tractor ground speed. Not enough agitation for crop conditions. May require adding optional 6” agitator idlers or additional pair of agitation idlers. Refer to Parts Catalog for part information. Conveyor speed too slow for ground speed. Adjust conveyor speed to meet tractor ground speed. Soil conditions are too wet. Wait until soil is drier. Conveyor is too low. Raise conveyor. Monitor reading seems incorrect for conveyor speed Peanuts still in ground behind digger Excessive dirt in peanut windrow Conveyor stalls excessively during operation MAN138 7/18/14 53 Operation Problem Peanuts are lost behind plow share but before windrow Inverted plants are sporadic or not placed uniformly Vine wrapped around shanks cause dragging 54 AMADAS Digger-Inverters Cause Remedy Conveyor speed is too fast for ground speed. Adjust either conveyor or ground speed so that they match. Conveyor is too high. Lower conveyor. Blades are dull or dragging. Adjust or replace blades as needed. Vine guide rods are too high, causing bunching or too low, allowing plants to pass under the conveyor. Adjust as needed. Conveyor speed and tractor ground speed are not matched. Adjust either conveyor or ground speed so that they match. Inverter rods are out of adjustment. Make adjustments as necessary to the inverter rods. Vines not flowing freely up conveyor or pushing soil. Adjust digger depth, conveyor height, or vine guide rods. Vines not transferring to inverter rotor properly. Adjust conveyor and/or ground speed or move position of inverter forward or to the rear. Coulters not cutting. Lower coulters. Coulter not properly positioned to shanks. Reposition coulters. 7/18/14 MAN138 AMADAS Digger-Inverter Maintenance 5. Maintenance READ FIRST! ......................................... 56 Maintenance Schedule ........................... 57 Bearings ............................................. 58 Blades ................................................. 59 Conveyor Rods ................................... 60 Conveyor Belt Assemblies .................. 61 Conveyor Drive Chain......................... 62 Conveyor Sprockets ........................... 62 Hydraulic Hoses.................................. 63 Inverter Drive Chain ............................ 64 Inverter Rods ...................................... 64 Scrapers ............................................. 65 Tires .................................................... 66 Vine Cutters (Coulters) ....................... 66 V-Inverter U-Joints .............................. 66 Tachometer Programming...................... 67 End of Season ........................................ 68 Pull-Type Diggers For additional maintenance information for a pulltype digger-inverter, see the AMADAS Pull-Type Digger-Inverters Supplement included with this manual. MAN138 7/18/14 55 Maintenance AMADAS Digger-Inverter READ FIRST! We strongly recommend that you perform regular maintenance on your digger-inverter to help ensure safe and efficient operation. The recommended schedule is on the following page. Each item on the schedule is described in more detail in this chapter. If you need to replace any machine parts, please refer to your Parts Catalog for part numbers and contact your AMADAS dealer. CAUTION Note that some photos show the machine with shields removed for maintenance or instructional purposes. NEVER operate the machine without replacing all shields. WARNING Before you begin maintenance on your digger-inverter, please make sure to: • Read Chapter 1, Safety, before beginning. • Pay careful attention to all safety signs on the machine and safety information/ recommendations in this manual. CAUTION Escaping hydraulic fluid under pressure can penetrate the skin, causing serious injury. Avoid the hazard by relieving pressure before disconnecting hydraulic or other lines. Tighten all connections before applying pressure. Make sure the tractor is in park, the engine turned off, and the key removed before any maintenance is performed. Do NOT allow anyone to sit on the tractor. CAUTION Search for leaks with a piece of cardboard. Protect hands and body from high pressure fluids. See Chapter 1, Safety, for more information on safe handling of hydraulics and for instructions in the event of a hydraulic injury. WARNING Do NOT attempt to lift the digger, as serious injury could result. Use an appropriate lifting means such as the tractor to raise the machine. Use care when handling plow blades and vine cutters. Edges are sharp. 56 7/18/14 MAN138 AMADAS Digger-Inverter Maintenance Maintenance Schedule INTERVAL ITEM ACTION Daily Weekly or 50 hours Bearings Lubricate (2 pumps grease) Blades Replace Conveyor Belt Assembly Inspect the condition, tension, and tracking X Conveyor Drive Chain Inspect for wear, proper tension, and damage X Conveyor Rods Inspect for damage X Conveyor Sprockets Inspect for wear and/or damage Hydraulic Hoses Inspect for leaks and damage X Inverter Drive Chains Inspect for wear, damage, and proper tension X Inverter Rods Inspect for proper adjustment X Tires Check pressure (32 PSI) X V Inverter UJoints (if equipped) Lubricate (2 to 3 pumps grease) X Vine Cutters (Coulters) Inspect for damage; lubricate the pivot Vine Cutter Bearings Repack Vine Cutter Bearings Lubricate (2 to 3 pumps grease) Wheel Bearings Repack Yearly X X X X X X X Grease Ball Hitch X Grease Tongue Pivots X Grease Digger Wing Pivots X MAN138 As Required 7/18/14 57 Maintenance AMADAS Digger-Inverter Bearings CAUTION Make sure the tractor is in park, the engine turned off, and the key removed before any maintenance is performed Lower conveyor grease fitting Upper and lower conveyor bearings need to be inspected and lubricated weekly. Use 2-3 pumps of a commercial-grade grease in each grease fitting. Upper conveyor grease fitting 58 7/18/14 MAN138 AMADAS Digger-Inverter Maintenance Blades Generally, whenever blade edges appear dull, frayed, or curled, they will need to be replaced. The photo shows a new plow blade and how a correctly installed blade should lie levelly on a flat surface, with the beveled portion of the blade face down. CAUTION Use care when handling plow blades and vine cutters. Edges are sharp. In extremely hard ground conditions where the plows will not take the ground, you may need to change the plows so that the beveled portion is face up. CAUTION Make sure the tractor is in park, the engine turned off, and the key removed before any maintenance is performed Blade level with ground Plow blades need to be inspected daily for wear. Your soil conditions will determine how often blades will need to be replaced. Also, check all fasteners. Make sure they are all in place and properly tightened. MAN138 7/18/14 59 Maintenance AMADAS Digger-Inverter Conveyor Rods CAUTION Make sure the tractor is in park, the engine turned off, and the key removed before any maintenance is performed Inspect all rods Inspect conveyor rods daily for damage. Check for bent pins or rods. Repair or replace as needed. See your AMADAS dealer for replacement parts. NOTE! Individual rods can be replaced with a bolt-on plate. Contact your AMADAS dealer for information on these parts. 60 7/18/14 Inspect pins MAN138 AMADAS Digger-Inverter Maintenance Conveyor Belt Assemblies IMPORTANT! Proper belt tension is important to ensure that the conveyor operates at optimum performance. If belts are too loose, the conveyors will not operate as efficiently. If too tight, excessive wear may occur on the conveyor rods and drive sprockets. CAUTION Make sure the tractor is in park, the engine turned off, and the key removed before any maintenance is performed Inspect the conveyor belts’ tension and tracking daily. The belts should have approximately 2¼” of sag as shown in the bottom photo. See Chapter 3, Adjustments, “Conveyor Belt and Rod” for information on how to adjust conveyor belts. 2¼” MAN138 7/18/14 61 Maintenance AMADAS Digger-Inverter Conveyor Sprockets CAUTION Inspect conveyor sprockets daily for signs of wear. Repair or replace as needed. Inspect sprockets Make sure the tractor is in park, the engine turned off, and the key removed before any maintenance is performed Conveyor Drive Chain Inspect the conveyor drive chain daily for signs of wear. Make sure the chain is properly aligned and with the correct amount of tension. Repair or replace a damaged chain as needed. Conveyor drive chain CAUTION Replace all shields before operating the digger-inverter. 62 7/18/14 MAN138 AMADAS Digger-Inverter Maintenance Hydraulic Hoses Inspect hoses daily for leaks and tears. Make sure connections are tightened. Repair or replace as needed. CAUTION Make sure the tractor is in park, the engine turned off, and the key removed before any maintenance is performed WARNING Escaping hydraulic fluid under pressure can penetrate the skin, causing serious injury. Avoid the hazard by relieving pressure before disconnecting hydraulic or other lines. Tighten all connections before applying pressure. Search for leaks with a piece of cardboard. Protect hands and body from high pressure fluids. See Chapter 1, Safety, for more information on safe handling of hydraulics and for instructions in the event of a hydraulic injury. MAN138 7/18/14 63 Maintenance AMADAS Digger-Inverter CAUTION CAUTION Replace all shields before operating the digger-inverter. Make sure the tractor is in park, the engine turned off, and the key removed before any maintenance is performed Inverter Drive Chain Inspect the inverter drive chains daily for signs of wear. Make sure the chains are properly aligned and have the correct amount of tension. Inverter Rods Inspect inverter rods daily for visible damage. Adjust rods if out of alignment. Replace or repair rods as needed. Detailed drawings for adjusting inverter rods are in Chapter 2, Setup. Repair or replace a damaged chain as needed. Inverter chain 64 7/18/14 MAN138 AMADAS Digger-Inverter Maintenance Scrapers As the scraper blades wear, it is important to adjust the placement of the scrapers to keep them close to the front idlers (1/16”) to prevent soil build up. Excessive build up on the front idlers will over-tension the conveyor belt and cause premature wear. CAUTION Make sure the tractor is in park, the engine turned off, and the key removed before any maintenance is performed Scrapers are located at the bottom of each conveyor belt. Make sure each scraper is securely in place as shown in the photos. Keep scrapers free from debris to ensure proper conveyor operation. 1/16” Scraper Adjust as the scraper wears out MAN138 7/18/14 65 Maintenance AMADAS Digger-Inverter Lubricate the pivot as needed. Make sure all fasteners are in place and tightened. CAUTION Lubricate the coulter wheel bearings weekly with 2-3 pumps of commercial grade grease. Make sure the tractor is in park, the engine turned off, and the key removed before any maintenance is performed Tires Coulter grease point Check wheel and wing tires pressures weekly. Tires should be inflated to 32 PSI. Pivot point V-Inverter U-Joints If your digger-inverter is equipped with a Vtype of inverter, inspect the U-joints for damage weekly. Lubricate weekly or every 50 hours. Use 2-3 pumps of commercial grade grease in each joint. Vine Cutters (Coulters) CAUTION Grease fitting Use care when handling plow blades and vine cutters. Edges are sharp. If the digger-inverter is equipped with vine cutters, inspect the assemblies for wear or damage. Repair or replace as necessary. 66 7/18/14 MAN138 AMADAS Digger-Inverter Maintenance Tachometer Programming The tachometer for your machine has been fully programmed at the factory. However, if you have a replacement tachometer, program the new tachometer using the instructions for the 16395 with the instructions included. Instructions can also be found on the AMADAS website as follows: 4. Select Tach Programming Instructions for Diggers/Irrigators (Form 0366; Part #16395) 1. Go to www.amadas.com IMPORTANT! Do NOT program your tachometer UNLESS you have received a replacement from AMADAS Industries. Tachometers on new machines are fully programmed at the factory and attempting to re-program them may cause errors. 2. From the AMADAS home page, select Product Catalogs and Manuals 3. From the Product Catalogs and Manuals page, select Technical Bulletins MAN138 7/18/14 67 Maintenance AMADAS Digger-Inverter End of Season Perform the following maintenance at the end of each season to make sure your diggerinverter is properly stored for winter. 1. Remove wheel assemblies and repack the bearings before storing. 2. Loosen the tension of the conveyor belt assembly. 68 3. If equipped with vine cutters, remove the assemblies and repack the wheel bearings before storing. 4. Clean and lightly oil all drive chains. 5. Apply a coat of oil to the cylinder rods, or store with all cylinders retracted. 7/18/14 MAN138 AMADAS Digger-Inverters Appendix Appendix Four-Row Configurations ....................... A-2 Six-Row Configurations.......................... A-4 MAN138 7/14/14 A-1 Appendix AMADAS Digger-Inverters All dimensions for configurations shown are from the center of the lower tool bar. Four-Row Optional Blade and Coulter Configurations (Shown with optional Dual Coulter) ADI – 4 Kit #70754 A B C Row Width A B C 36” 8” 36” 64” 38” 9” 38” 67” 40” 10” 40” 70” ADI – 4 Kit #70760 A B C Row Width A B C 36” 8” 36” 64” 38” 9” 38” 67” 40” 10” 40” 70” A-2 7/14/14 MAN138 AMADAS Digger-Inverters Appendix ADI – 4 Kit #70755 A B Row Width A B 36” 36” 64” 38” 38” 67” 40” 40” 70” MAN138 7/14/14 A-3 Appendix AMADAS Digger-Inverters Six-Row Optional Blade and Coulter Configurations ADI – 6 Kit #70757 A B C D E Row Width A B C D E 30” 25” 30” 35” 60” 85” 36” 28” 36” 44” 72” 100” 38 29” 38” 45” 76” 106” 40” 30” 40” 50” 80” 110” ADI – 6 Kit #70758 A B C D E Row Width A B C D E 30” 25” 30” 35” 60” 85” 36” 28” 36” 44” 72” 100” 38 29” 38” 45” 76” 106” 40” 30” 40” 50” 80” 110” A-4 7/14/14 MAN138 AMADAS Digger-Inverters Appendix ADI – 6 Kit #70767 / 70768 A B C D E Row Width A B C D E 30” 25” 30” 35” 60” 85” 36” 28” 36” 44” 72” 100” 38 29” 38” 45” 76” 106” 40” 30” 40” 50” 80” 110” MAN138 7/14/14 A-5 Appendix AMADAS Digger-Inverters NOTES A-6 7/14/14 MAN138