1
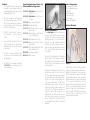
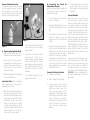
Other Available
LF00698U
LF00856U
LF00901U
LF00906U
LF00929U
LF00957U
LF00958U
LF00961U
LF00984U
LF00995U
LF00997U
LF00999U
LF01008U
LF01012U
LF01019U
LF01020U
LF01025U
LF01026U
LF01027U
LF01028U
LF01036U
LF01053U
LF01054U
LF01062U
LF01063U
LF01064U
LF01068U
LF01069U
LF01070U
LF01082U
LF01083U
LF01084U
LF01087U
LF01094U
LF01095U
LF01108U
LF03000U
LF03601U
LF03602U
LF03603U
LF03609U
Adult Injectable Arm (White)
Female Catheterization
Prostate Examination
Ostomy Care
Surgical Bandaging
Enema Administration
Pediatric Injectable Arm
Intramuscular Injection
Breast Examination
Arterial Puncture Arm
Adult Injectable Arm (Black)
Pediatric Injectable Head
Intradermal Injection Arm
Heart Catheterization (TPN)
Ear Examination
Supplementary Ear Set
Male Cath-Ed I
Female Cath-Ed II
Peritoneal Dialysis
Suture Practice Arm
Spinal Injection
Cross-Sectional Anatomy,
Torso, Head
Cross-Sectional Anatomy,
Head
Pelvic, Normal & Abnormal
Stump Bandaging, Upper
Stump Bandaging, Lower
Brachial Plexus
Cervical Effacement
Birthing Station
Cricothyrotomy
Tracheostomy Care
Sigmoidoscopic
Examination
Central Venous Cannulation
Cross Sectional
Anatomy — Laminated
Blood Pressure Arm
Intraosseous Infusion
Simulator
CPARLENE® Series
Adult Airway Management
Trainer
Adult Airway Management
on Manikin
Adult Airway Management
Head Only
Child Airway Management
Trainer
Simulators
LF03610U Child Airway Management
Trainer Head Only
LF03611U Child Defibrillation Chest
Skin
LF03612U Child IV Arm
LF03613U Child Blood Pressure Arm
LF03614U Child Intraosseous Infusion/
Femoral Access Leg Only
LF03615U Complete Child CRiSis™
Update Kit
LF03616U Child CRiSis™ Manikin
LF03617U Deluxe Child CRiSis™
Manikin with Arrhythmia Tutor
LF03620U PALS Update Kit
LF03621U Infant Airway Management
Trainer Head Only
LF03622U Intraosseous Infusion Right
Leg
LF03623U Infant Airway Management
Trainer
LF03626U Child Femoral Access
Injection Pad Replacement
LF03627U Child CRiSis™ Replacement
Lung Set
LF03628U Child CRiSis™ Replacement
Stomach
LF03629U Child IV Arm Replacement
Skin and Veins
LF03630U Child Arrhythmia Tutor
LF03631U Child Airway Management
Trainer Replacement
Headskin
LF03632U Child Intraosseous Infusion/
Femoral Access Leg on a
Stand
LF03633U Child Airway Management
Trainer with Torso
LF03650U CRiSis™ Manikin
LF03651U ALS Update Kit
LF03675U BLS Manikin — 10 Pack
LF03676U BLS Manikin — 5 Pack
LF03677U BLS Manikin — Single
LF04001U GERi™ Nursing Manikin
LF04020U KERi™ Nursing Manikin
LF04021U KERi™ Basic Manikin
LF04022U KERi™ Advanced Manikin
LF04030U GERi™ Advanced Manikin
LF04040U GERi™ Basic Manikin
ADVANCED INJECTION HAND
LF01139U & LF01146U
INSTRUCTION MANUAL
Fort Atkinson
901 Janesville Avenue, P.O. Box 901
Fort Atkinson, Wisconsin 53538-0901
(920) 563-2446
www.eNASCO.com • E-Mail [email protected]
COPYRIGHT © NASCO 1999 PRINTED IN U.S.A. NP 104-99
Products by NASCO
Cautions
1. This synthetic blood is specially formulated to be compatible with the
self-sealing veins and plastics used in
manufacturing the arm.
2. DO NOT use dull or burred needles
as these will cause leaks in the system. Burred needles will cause permanent damage. Use smaller needles (20- to 25-gauge).
3. DO NOT allow “blood” to dry on
the simulator — it may stain the
hand.
LF00845U Life/form® Arterial Blood,
1 quart
LF00846U Life/form® Arterial Blood,
1 gallon
LF01099U Vein Tubing Sealant Kit
LF01130U Fluid Supply Bag
LF01139U Advanced Injection Hand
(White Skin)
LF01140U White Replacement Skin &
Vein Installation Kit
LF01141U Replacement Vein Only
4. Use only 500cc of infusion fluid as a
larger amount will also increase the
pressure of the venous system, resulting in leaks.
LF01146U Advanced Injection Hand
(Black Skin)
5. DO NOT clean the simulator with
solvents or corrosive material as they
will damage it.
SB29863U Fluid Supply Stand
6. The NASCO Vein Tubing Sealant Kit
(LF01099U) will extend the useful
life of the tubing.
List of Components
3cc syringe with needle
12cc syringe with needle
2 IV bags
Needle (butterfly)
2 pinch clamps
2 small towels
Infusion set (butterfly)
Supplies/Replacement Parts for
the Injectable Training Hand
LF01147U Black Replacement Skin and
Vein Installation Kit
W09919U REN Cleaner
Internal Structure
About the Simulator…
The Life/form ® Advanced Injection
Hand Simulator duplicates the human
condition as closely as modern plastics
technology allows — it is almost the real
thing. Its care and treatment should be
the same as with a patient; abuse or
rough handling will damage the simulator — just as it would cause pain or injury
to a patient.
This unit is the simulation of the entire
human hand from the wrist to the fingertips. Externally the skin texture is realistic
to the touch and the fingertips actually
have fingerprints.
Although this hand will provide you long
trouble-free usage, the skin and veins
can be readily replaced when needed.
The outer skin is easily peeled off revealing the “core” and veins providing, literally, a brand new hand. The life of the
replaceable skin and veins will be prolonged by utilizing smaller needle sizes
(such as 20- to 25-gauge). However, if
instruction with larger needle sizes is
required, this can be done; the skin and
veins will merely need to be replaced
sooner. Replacement Skin and Vein Kits
are available through NASCO (see list of
supplies).
Figure 1
Internally the vascular structure (rubber
tubing) includes injectable metacarpal,
digital, and thumb veins. The venous system is constructed of special self-sealing
rubber tubing with the lumen being the
approximate size of a human vein (Figure
1). The vascular structure has an inlet
tube and an outlet tube below the wrist
and it is via these tubes that the venous
system is filled. Thus, the techniques of
blood drawing and starting intravenous
infusions may be practiced on the
Advanced Injection Hand.
General Instructions for Use
The Advanced Injection Hand comes with
all of the supplies necessary to perform
most procedures. (To perform intravenous infusions the user must supply
their own IV set and bag of solution.)
B. Preparing the Hand for
Intravenous Infusions
(At this point you will need to supply an IV
set and bag of solution. Hook them up
and have them ready.)
A
B
1. To hook up the hand, refer back to
steps 1-5 in section A.
2. Insert the butterfly needle into a vein.
Flashback will indicate proper insertion.
Figure 3
Figure 2
A. Preparing the Synthetic Blood
1. Add 1 pint of distilled water to the
synthetic blood concentrate (Figure 2).
2. Hang one of the bags (bag A)
approximately 28" above the level of
the hand, making sure the clamp on
the IV tubing is closed. Pour the
blood into the bag.
3. Attach the fitting end of the IV tubing
to one of the wrist tubes.
Important Note: Before completing
step 4, bag B must lie at hand level or
below with the cap closed.
4. With the other wrist tube attached to
the empty IV bag (bag B), flush the
vascular system with synthetic blood
by opening the clamp of the filled IV
bag (bag A). (Figure 3) Allow some
blood to pass through the system
until the outlet wrist tube to bag B
runs free of bubbles. When the outlet
tubing to bag B runs clear of bubbles, close the clamp on bag B.
5. The venous system is now full of
“blood” and pressurized. Be sure to
leave the clamp on the inlet tubing
(bag A) opened.
6. The hand is now ready to practice
drawing blood. “Blood” can be
drawn anywhere along the pathway
of the vein (see Figure 1). Distilled
water should be used to prepare the
sites. Synthetic blood will actually be
aspirated once the vein is properly
punctured.
7. Small diameter needles (20- to 25gauge) should be used.
3. If a flashback is observed, close the
clamp on IV bag A. You are now
ready to set up for the intravenous
infusion.
4. Hang the IV solution bottle and connect the IV set to the butterfly needle
already in the vein. With the clamp
on bag A closed, open the clamp on
bag B. Proof of the proper procedure
is evidenced by the flow of the infusion fluid from the solution bag.
Control the flow from the solution
bag by adjusting the roller clamp on
the tubing of the IV set.
Causes for Failure in Function
A. Forgotten closed clamp.
B. Kinks in tubing of the fluid bags.
C. Tubing pinched shut by constant
pressure of clamps. Lumen remains
pinched occasionally even if the
clamp is loosened. Slide clamp to
new position and with fingers manipulate tubing at pinched site to restore
lumen. In heavy use, slide clamp to
new position on tubing from time to
time to prevent the “permanent
pinch” caused by constant clamp
pressure.
D. If these measures do not unclog the
venous system, try using a large
(50cc) syringe to force fluid through
the tubing.
Care of Simulator
After each class use, close the clamps,
disconnect bags, and return synthetic
blood to storage container. Reconnect
one IV bag to the system. Fill the bag with
tap water and flush the venous system,
allowing the open end to drain into a sink
or basin. When the system runs clean,
close the clamp and remove the IV bag.
Excess water may be removed from the
hand by raising the hand, lowering the
wrist, and draining it into a sink or basin.
Wash the outside of the hand with Ivory®
liquid detergent and water. Always
remove the pinch clamps from the wrist
tubing and drain excess water from veins
before storing.
Ordinary stains can be removed by washing the hand with soap and warm water.
Newsprint, similar printed paper or ink
will permanently stain the simulator if
prolonged contact occurs. Stubborn
stains may be removed with REN Cleaner
(W09919U), simply by dispensing it on
the area and wiping with a soft cloth or
paper towel.
Other Available
LF00698U
LF00856U
LF00901U
LF00906U
LF00929U
LF00957U
LF00958U
LF00961U
LF00984U
LF00995U
LF00997U
LF00999U
LF01008U
LF01012U
LF01019U
LF01020U
LF01025U
LF01026U
LF01027U
LF01028U
LF01036U
LF01053U
LF01054U
LF01062U
LF01063U
LF01064U
LF01068U
LF01069U
LF01070U
LF01082U
LF01083U
LF01084U
LF01087U
LF01094U
LF01095U
LF01108U
LF03000U
LF03601U
LF03602U
LF03603U
LF03609U
Adult Injectable Arm (White)
Female Catheterization
Prostate Examination
Ostomy Care
Surgical Bandaging
Enema Administration
Pediatric Injectable Arm
Intramuscular Injection
Breast Examination
Arterial Puncture Arm
Adult Injectable Arm (Black)
Pediatric Injectable Head
Intradermal Injection Arm
Heart Catheterization (TPN)
Ear Examination
Supplementary Ear Set
Male Cath-Ed I
Female Cath-Ed II
Peritoneal Dialysis
Suture Practice Arm
Spinal Injection
Cross-Sectional Anatomy,
Torso, Head
Cross-Sectional Anatomy,
Head
Pelvic, Normal & Abnormal
Stump Bandaging, Upper
Stump Bandaging, Lower
Brachial Plexus
Cervical Effacement
Birthing Station
Cricothyrotomy
Tracheostomy Care
Sigmoidoscopic
Examination
Central Venous Cannulation
Cross Sectional
Anatomy — Laminated
Blood Pressure Arm
Intraosseous Infusion
Simulator
CPARLENE® Series
Adult Airway Management
Trainer
Adult Airway Management
on Manikin
Adult Airway Management
Head Only
Child Airway Management
Trainer
Simulators
LF03610U Child Airway Management
Trainer Head Only
LF03611U Child Defibrillation Chest
Skin
LF03612U Child IV Arm
LF03613U Child Blood Pressure Arm
LF03614U Child Intraosseous Infusion/
Femoral Access Leg Only
LF03615U Complete Child CRiSis™
Update Kit
LF03616U Child CRiSis™ Manikin
LF03617U Deluxe Child CRiSis™
Manikin with Arrhythmia Tutor
LF03620U PALS Update Kit
LF03621U Infant Airway Management
Trainer Head Only
LF03622U Intraosseous Infusion Right
Leg
LF03623U Infant Airway Management
Trainer
LF03626U Child Femoral Access
Injection Pad Replacement
LF03627U Child CRiSis™ Replacement
Lung Set
LF03628U Child CRiSis™ Replacement
Stomach
LF03629U Child IV Arm Replacement
Skin and Veins
LF03630U Child Arrhythmia Tutor
LF03631U Child Airway Management
Trainer Replacement
Headskin
LF03632U Child Intraosseous Infusion/
Femoral Access Leg on a
Stand
LF03633U Child Airway Management
Trainer with Torso
LF03650U CRiSis™ Manikin
LF03651U ALS Update Kit
LF03675U BLS Manikin — 10 Pack
LF03676U BLS Manikin — 5 Pack
LF03677U BLS Manikin — Single
LF04001U GERi™ Nursing Manikin
LF04020U KERi™ Nursing Manikin
LF04021U KERi™ Basic Manikin
LF04022U KERi™ Advanced Manikin
LF04030U GERi™ Advanced Manikin
LF04040U GERi™ Basic Manikin
ADVANCED INJECTION HAND
LF01139U & LF01146U
INSTRUCTION MANUAL
Fort Atkinson
901 Janesville Avenue, P.O. Box 901
Fort Atkinson, Wisconsin 53538-0901
(920) 563-2446
www.eNASCO.com • E-Mail [email protected]
COPYRIGHT © NASCO 1999 PRINTED IN U.S.A. NP 104-99
Products by NASCO