1
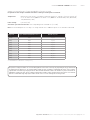
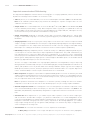
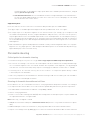
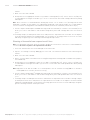
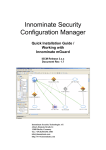
Bioruptor ®
Sonication System
USER MANUAL
Ve rs i o n 1 . 1
Bioruptor® Standard
(only available in the US)
Bioruptor® Standard for 1.5 ml tube holder, B01010001
Bioruptor® Standard for 1.5 & 15 ml tube holder, B01010002
Bioruptor® Standard for 0.65 ml tube holder, B01010003
Guarantee
Limited one year global warranty
Diagenode guarantees all products from any manufacturing defects as we rigorously test all
products to meet strict quality standards. Diagenode warrants that all standard components of
its instruments will be free of defects in materials and workmanship for a period of one (1) year
from the date that the warranty period begins, unless the original quotation or accompanying
documentation states a different warranty period. All warranty periods begin on the date of delivery
and apply only to the first purchaser of the product. If a manufacturing defect arises and a valid
claim is received within the warranty period, Diagenode, at its discretion, will repair or replace the
product in accordance with the warranty terms and conditions stated herein. In case of repair or
replacement of a product under warranty, Diagenode will cover the expenses to return the repaired
or replacement product.
This warranty covers only manufacturing defects and does not cover any damage caused by misuse,
lack of compliance to recommendations stated in the manual, neglect, accidents, abrasion, or
exposure to extreme temperatures, chemical solvents, or acids. We strongly recommend that
maintenance or repairs of Diagenode’s products are performed by our approved Diagenode service
center. Improper or incorrectly performed maintenance or repairs will void the warranty.
Technical Assistance & Ordering Information
Diagenode s.a. BELGIUM | EUROPE
Diagenode Inc. USA | NORTH AMERICA
Avenue de l’hôpital,1
400 Morris Avenue, Suite #101
Tour GIGA, 3rd Floor
Denville, NJ 07834 - USA
4000 Liège - Belgium
Tel: +1 862 209-4680
Tel: +32 4 364 20 50
Fax: +1 862 209-4681
Fax: +32 4 364 20 51
[email protected]
[email protected]
[email protected]
[email protected]
For a complete listing of Diagenode’s international distributors, visit:
http://www.diagenode.com/en/support/distributors.php
For the rest of the world, please contact Diagenode s.a.
DIAGENODE BIORUPTOR® STANDARD USER MANUAL
PAGE 3
Contents
Critical Steps for Maintenance and Efficient Shearing . . . . . . . . . . . . . . . . . . . . . . . . . . . . . . . . . . . . . 4
Introduction. . . . . . . . . . . . . . . . . . . . . . . . . . . . . . . . . . . . . . . . . . . . . . . . . . . . . . . . . . . . . . . . . . . . . . . . . . 5
Bioruptor ® Technical Specifications . . . . . . . . . . . . . . . . . . . . . . . . . . . . . . . . . . . . . . . . . . . . . . . . . . . . . 6
Getting to Know Your Bioruptor ® System. . . . . . . . . . . . . . . . . . . . . . . . . . . . . . . . . . . . . . . . . . . . . . . . .
Bioruptor® Components Overview . . . . . . . . . . . . . . . . . . . . . . . . . . . . . . . . . . . . . . . . . . . . . . . . . . . .
Sonication bath. . . . . . . . . . . . . . . . . . . . . . . . . . . . . . . . . . . . . . . . . . . . . . . . . . . . . . . . . . . . . . . . . . . .
Motorized lid. . . . . . . . . . . . . . . . . . . . . . . . . . . . . . . . . . . . . . . . . . . . . . . . . . . . . . . . . . . . . . . . . . . . . .
7
7
7
8
Metallic soundproof box. . . . . . . . . . . . . . . . . . . . . . . . . . . . . . . . . . . . . . . . . . . . . . . . . . . . . . . . . . . . 9
Power Supply Adapter. . . . . . . . . . . . . . . . . . . . . . . . . . . . . . . . . . . . . . . . . . . . . . . . . . . . . . . . . . . . . . 9
Tube holders. . . . . . . . . . . . . . . . . . . . . . . . . . . . . . . . . . . . . . . . . . . . . . . . . . . . . . . . . . . . . . . . . . . . . . 9
Equipment Installation . . . . . . . . . . . . . . . . . . . . . . . . . . . . . . . . . . . . . . . . . . . . . . . . . . . . . . . . . . . . . . . 10
Installation overview . . . . . . . . . . . . . . . . . . . . . . . . . . . . . . . . . . . . . . . . . . . . . . . . . . . . . . . . . . . . . . 10
Installing the Bioruptor® Standard. . . . . . . . . . . . . . . . . . . . . . . . . . . . . . . . . . . . . . . . . . . . . . . . . . . 12
Controlling the Sonication. . . . . . . . . . . . . . . . . . . . . . . . . . . . . . . . . . . . . . . . . . . . . . . . . . . . . . . . . . . . 13
Tube Holders & Tubes . . . . . . . . . . . . . . . . . . . . . . . . . . . . . . . . . . . . . . . . . . . . . . . . . . . . . . . . . . . . . . . . 15
Standard protocols. . . . . . . . . . . . . . . . . . . . . . . . . . . . . . . . . . . . . . . . . . . . . . . . . . . . . . . . . . . . . . . . . . .
DNA Shearing. . . . . . . . . . . . . . . . . . . . . . . . . . . . . . . . . . . . . . . . . . . . . . . . . . . . . . . . . . . . . . . . . . . .
Chromatin Shearing. . . . . . . . . . . . . . . . . . . . . . . . . . . . . . . . . . . . . . . . . . . . . . . . . . . . . . . . . . . . . . .
Bacteria Cell Disruption . . . . . . . . . . . . . . . . . . . . . . . . . . . . . . . . . . . . . . . . . . . . . . . . . . . . . . . . . . .
16
16
19
21
Troubleshooting. . . . . . . . . . . . . . . . . . . . . . . . . . . . . . . . . . . . . . . . . . . . . . . . . . . . . . . . . . . . . . . . . . . . . 23
Ordering Information. . . . . . . . . . . . . . . . . . . . . . . . . . . . . . . . . . . . . . . . . . . . . . . . . . . . . . . . . Back Cover
Diagenode Inc. North America / Phone: +1 862 209-4680 // Fax: +1 862 209-4681 // Mail: [email protected]
PAGE 4
DIAGENODE BIORUPTOR® STANDARD USER MANUAL
Critical Steps for Maintenance and
Efficient Shearing
General warnings
Bior
upto
r
• DO NOT turn on the instrument without water.
• DO NOT tilt the sonication bath. To change the water, use either the plastic pump or a beaker.
Water level (sonication bath)
•The sonication bath must be filled with distilled water only to the fill line (do not use deionized water). Fill line
replacement stickers can be obtained by contacting Diagenode. Change water at least once per week.
Water temperature (sonication bath)
•Optimal water temperature for sonication is 4°C. Sample temperature should not exceed 10°C.
•Methods to maintain the temperature.
- Ice - add small amounts of crushed ice (no more than 0.5 cm) to the bath every 10 min.
- Water Cooler (Old Cat. No. BioAcc-Cool; New Cat. No. B02010002, 230V; B02010003, 115V; B02010004, 100V) the flow rate of the circulating water cooler cannot exceed 500 ml per min for optimal sonication.
Magnetic Ultrasound Emitter Maintenance
•The ultrasound waves are created from a series of magnets that are attached to the sonication bath. This system is
very sensitive to the heat generated during a run.
•Do not exceed 1 hour of total sonication per run. It is critical that the machine is allowed to cool at least 20 min
between runs. Damage resulting from non compliance to manual instructions will void the warranty and shorten the
lifespan of the machine.
•Ultrasound emitters can be damaged by tilting or jarring the machine. Exercise care if moving sonication bath.
Validated tubes for the Bioruptor® Standard
• DNA shearing: 0.5 ml Bioruptor® Microtubes (Old Cat. No. WA-004-0500; New Cat. No. C30010013, Format: 500 pc).
• Chromatin Shearing: 1.5 ml TPX microtubes (Old Cat. No. M-50050 or M-50001; New Cat. No. C30010010, Format: 50
or 100 pc) and 15 ml TPX tubes (Old Cat. No. M-UN-15; New Cat. No. 30010009, Format: 50 pc). Other tubes might be
used but will require additional optimization. Once a brand of tube is optimized, switching brands may result in changes
in sonication efficiency.
Fitting 0.5 ml or 1.5 ml tubes in the corresponding tube holder
1.Place the tubes on the corresponding tube holder (0.5/0.65 ml tube holder - Old Cat. No. UCD-pack 0.5; New Cat. No.
B01200010 or 1.5 ml tube holder - Old Cat. No. UCD-pack 1.5; New Cat. No. B01200011). Never leave empty spaces
in the tube holder. Fill the empty spaces with tubes containing the same volume of water. Screw the lid on the tube
holder without over-tightening the lid.
2.Carefully place the tube holder on the holding plate.
3.During sonication, samples must remain at the bottom of the tube. If needed, briefly centrifuge samples during
sonication after pausing the run.
Fitting of 15 or 50 ml tubes in the corresponding tube holder
1. Loosen both the blue and the black top prior to placing the metallic reflecting bar in the tube.
2.First tighten the blue ring then the black top. This will ensure the O-ring is properly placed in the tube.
Europe Diagenode sa / CHU - Tour GIGA - B34 - 3e étage // Avenue de l’Hôpital, 1 // 4000 Liège (Sart Tilman) // Belgium // Phone: (+32) 4 364 20 50 // Mail: [email protected]
DIAGENODE BIORUPTOR® STANDARD USER MANUAL
PAGE 5
Introduction
Diagenode’s Bioruptor® Standard uses a gentle method of sonication
to retain the integrity of DNA and/or biological complexes, including
chromatin, protein-protein binding, protein-DNA complexes and other
biochemical and biological assay systems. The Bioruptor® Sonication
System uses a sonication bath to generate indirect sonication waves, which
emanate from an ultrasound element below the water tank. Because the
system is gentler than other sonicators, the Bioruptor® produces better
and more consistent results than with harsher sonication methods. Up to
12 closed tubes can be sonicated in parallel and the continuous rotation
of tubes allows even distribution of the energy for efficient sonication.
The Bioruptor® enables automation of sonication, guaranteeing higher
reproducibility of results.
Ultrasound
Transducer
Fig 1. Propagation in 0.5 ml tubes and 1.5 ml tubes
The effect of ultrasound on biological samples.
The Bioruptor® sonication system uses ultrasound to create focused
mechanical stress to lyse cells or shear DNA or chromatin. Ultrasound
waves pass through the sample expanding and contracting the liquid.
During expansion, negative pressures pull the molecules away from
one another to form a cavity or bubble. This process is called cavitation.
The bubble continues to absorb energy until it can no longer sustain
itself and implodes. This produces intense focused shearing forces,
that disperse and break biomolecules. The fragmentation of DNA takes
place as a consequence of this mechanical stress or shear.
Ultrasound
Transducer
Fig 2. Propagation in 15 ml & 50 ml tubes
With the Bioruptor®, the entire volume of water present in the sonication bath is exposed to ultrasound, allowing all the
samples to be efficiently sonicated (Figure 1). For larger tubes (15 ml or 50 ml), the transfer of the ultrasound to the
tubes is facilitated by a metallic bar in contact with the sample. This metallic bar is not a probe (no corrosion problems)
but “reflects” the ultrasound originated from the sonication bath and improves the sample sonication efficiency by a
patented resonance system (Figure 2).
Noise level measurements & precautions
CEE noise data is not applicable to the Bioruptor’s ultrasound emitter as no tests have been conducted on similar devices
to date. See listed noise levels (as measured in the Accredited Acoustics Laboratory) and precautions for the Bioruptor®:
Leq = noise level in dBA = 78.4 dB
Lmax = dB Peak = 87.6 dB
1. Exposure limit value
The exposure limit value is the maximum amount of noise an employee may be exposed to on any single day (8 hours).
Exposure beyond this limit presents a high risk to the user.
LEXPOSURE, 8h = 87 dB(A)
PPEAK = 200 Pa (140 dB(C) referring to 20 μPa)
Diagenode Inc. North America / Phone: +1 862 209-4680 // Fax: +1 862 209-4681 // Mail: [email protected]
PAGE 6
DIAGENODE BIORUPTOR® STANDARD USER MANUAL
2. Upper exposure Action value
The exposure action value is the upper daily limit of noise exposure. Exposure beyond this value requires employers to
take action to limit user exposure.
LEXPOSURE, 8h = 85 dB(A)
PPEAK = 140 Pa (137 dB(C) referring to 20 μPa)
3. Lower exposure action value
LEXPOSURE, 8h = 80 dB(A)
PPEAK = 112 Pa (135 dB(C) referring to 20 μPa)
Use of Bioruptor® by pregnant women
Exposure to 20-60 kHz sound waves has not been shown to be harmful to human health. However, we would recommend
avoiding unnecessary exposure. Diagenode recommends that pregnant women should not be exposed to 20-60 kHz wave
lengths for a long period of time.
Bioruptor® Technical Specifications
Bioruptor®
Power Supply
115 V/ 4.2A (US) // 230V/2.1A (EU), 50/60 HZ
Control unit dimensions
350(W) x 260(D) x 165(H) mm
Sonication unit dimensions (sonication bath)
175(W) x 160(D) x 265(H) mm
Soundproof box dimensions
350(W) x 350(D) x 500(H) mm
Sonication bath volume
750 ml
Timer
Digital
Possibility to control water flow via connector kit for water cooler
Interval Timer
Yes
0-99 sec.
Total Weight
30 Kg
Tube holder
Available for 0.5 - 1.5 - 10 - 15 & 50 ml tubes
Number of samples to be processed simultaneously
0.5 ml tubes – 12
1.5 ml tubes - 6
10 ml tubes - 6
15 ml tubes - 6
50 ml tubes - 3
Europe Diagenode sa / CHU - Tour GIGA - B34 - 3e étage // Avenue de l’Hôpital, 1 // 4000 Liège (Sart Tilman) // Belgium // Phone: (+32) 4 364 20 50 // Mail: [email protected]
DIAGENODE BIORUPTOR® STANDARD USER MANUAL
PAGE 7
Getting to Know Your Bioruptor® Standard
Bioruptor® Components Overview
Control Unit
Sonication bath
Power Cable
Control Unit Cable
Motorized lid
Tube holder example
Soundproof Box
Power Supply Adaptor
Sonication bath
The sonication bath is a critical component of the instrument. The generators below the tank
produce ultrasonic waves which are then transferred through water. The sonication bath
requires special handling and care as described below.
Handling
The sonication bath must remain upright at all times, especially when moved. Tilting the
sonication bath or handling roughly may damage the ultrasound emitter component,
resulting in a substantial drop in sonication efficiency. If transportation of the apparatus is
required after initial set-up, it is imperative to keep the tank at a right angle to the ground during the transport at all
times.
Water level and quality
The level of the water has been optimized and should always reach the red line (sticker on the wall of the tank). Use only
distilled water to fill the tank. Do not use deionized water. Replacement stickers can be obtained from Diagenode.
Water temperature
The water in the sonication bath must be kept at 4°C. Ultrasonic waves produced by the Bioruptor® generate heat. Drop
off in efficiency will occur above 10°C. To ensure preservation of the samples and to prevent damage to the instrument,
it is necessary to start the sonication process with cold water and to keep it at 4°C during the sonication process.
Diagenode Inc. North America / Phone: +1 862 209-4680 // Fax: +1 862 209-4681 // Mail: [email protected]
PAGE 8
DIAGENODE BIORUPTOR® STANDARD USER MANUAL
Manual temperature control
•A “precooling” of the sonication bath tank 15 min before starting the first round of sonication is advised. This prevents
the water from heating too quickly due to thermal inertia (i.e. when the tank and the ultrasound generating elements
are stored at room temperature). To precool, simply add crushed ice and then fill with cold water up to the indicated
level (red line on the water level sticker).
•Every 10 min replace crushed ice. The ice floating in the water should not exceed 0.5 cm and the total water level
(water & ice) should be exactly at the indicated water level.
- Fill entirely a 250 ml beaker with crushed ice
- Pour ice carefully into your sonication bath (which is already filled with to the red fill line)
- Remove approximately 130 ml of water (without ice)
- Carefully adjust water level to the indicated mark (red line) by removing or adding water using a pipette
Automatic temperature control
The Water Cooler (Old Cat. No. BioAcc-Cool; New Cat. No. B02010002, 230V; B02010003, 115V; B02010004, 100V) can
be used in combination with the Standard Connector Kit (continuous valve) to guarantee the automatic temperature
control of the sonication bath during the entire sonication process (Figure 3). The water flow shouldn’t exceed 500 ml/
min to allow optimal resonance. The Water Cooler features two pumps and produces a regular water flow to maintain a
constant water level in the tank.
Water Cooler
Sonication Bath
Control unit
Fig 3. Setup of the Bioruptor® Standard in combination with the Water Cooler.
(Note: The water cooler must be located below the Bioruptor®)
Note: You may permanently install the Bioruptor® in a cold room, though this is not sufficient to avoid the temperature
increase during sonication. The cold room would only eliminate the need for the “precooling” step described above.
Motorized Lid
The motorized lid, along with the blue or white gear plate accessory, keeps the sample tubes in constant rotation and
ensures optimal position in the sonication bath during sonication. When in motion, do not
hamper the rotation of the blue or white gear plate. Avoid the immersion of the motor into the
water. Do not heat the blue or white plastic as it will warp.
Europe Diagenode sa / CHU - Tour GIGA - B34 - 3e étage // Avenue de l’Hôpital, 1 // 4000 Liège (Sart Tilman) // Belgium // Phone: (+32) 4 364 20 50 // Mail: [email protected]
DIAGENODE BIORUPTOR® STANDARD USER MANUAL
PAGE 9
Metallic Soundproof Box
This metallic soundproof box absorbs more than 30 dBA generated by the ultrasonic sonication bath (Figure 4).
Sound pressure
level (dBA)
79 dBA
100
80
46 dBA
60
40
20
0
Soundproof Box
Bioruptor® without
soundproof box
Bioruptor® with
soundproof box
Fig 4. Sound pressure of the Bioruptor® without and with metallic
soundproof box has been measured in a soundproof room.
Power Supply Adapter
This unit provides the instrument with several signals used at the different stages
during operation. The power supply adapter is the heaviest part of the apparatus and
needs particular handling caution.
The power supply adapter is switched on with the power button located on the back.
Power Supply Adapter
Tube Holders
Several sizes of tubes can be used with the Bioruptor® Standard. The minimum and maximum sample volume to be used
with each container is given in the table below. The 0.5 ml and 1.5 ml tubes can be simply closed and installed in the
rotor. For the sonication of larger volumes (10 ml, 15 ml and 50 ml tubes), a stopper with a metallic bar has to be used
to reflect sound waves to produce a better resonance efficiency.
Tube Size
Tube Holders
Minimum
Maximum
0.5 ml
50 µl
100 µl
1.5 ml
100 µl
300 µl
10 ml
500 µl
2 ml
15 ml
500 µl
2 ml
50 ml
3 ml
20 ml
Diagenode Inc. North America / Phone: +1 862 209-4680 // Fax: +1 862 209-4681 // Mail: [email protected]
PAGE 10
DIAGENODE BIORUPTOR® STANDARD USER MANUAL
Equipment Installation
The following pages contain information on installing your Bioruptor® Standard model. This equipment must only be installed
by personnel after reading this section. Consider all hazards even though no particular hazards have been identified during
installation. Before starting installation work, turn the main switch off (back side of the control unit) and secure the unit
against being re-energized. No special tools are required. Three (3) square meters are needed to set-up the Bioruptor®.
Devices are designed to be safe under the following conditions:
•Indoor use
•Power plug must be grounded
•Altitude up to 2,000 meters
•POLLUTION DEGREE 2 (Normally only non-conductive
pollution occurs. However, occasionally a temporary
conductivity caused by condensation is expected)
•Operating external temperature 0°C to 25°C
•Maximum relative humidity 80%
•Never install this equipment in a place where
environmental conditions and warnings mentioned
above are infringed
•Transient overvoltage typically present on the
MAINS supply
•Degree of protection: IP20
Installation overview
Flexible 1
format
1 Flexible format
Fits into current workflow
with standard tubes.
Scales with flexible sample
volume.
0.5/0.65 & 1.5 ml
tube adaptor
10 ml, 15 ml
tube adaptor
50 ml
tube adaptor
Water Cooler
Motorized lid
Rotation 2
5
Cooling
Metallic soundproof box
Flexible 3
control
Start button
Water
Level meter
Digital timer
Power cord
Power cord
Power button
Output selector switch
Stop button
Sonication bath
4 Gentle ultrasound
2 Rotation
Prevents contamination with
closed tubes.
Continuous rotation through
sonication bath guarantees
equal distribution of energy.
3 Flexible control
Easy to program.
Power range effectively
disrupts samples.
4 Gentle ultrasound
Gentle ultrasound method
preserves sample.
5 Cooling
Cooling system maintains
integrity of sensitive
samples.
Fig 5. Schematic installation overview of the Bioruptor® Standard in combination with the Water Cooler.
Europe Diagenode sa / CHU - Tour GIGA - B34 - 3e étage // Avenue de l’Hôpital, 1 // 4000 Liège (Sart Tilman) // Belgium // Phone: (+32) 4 364 20 50 // Mail: [email protected]
DIAGENODE BIORUPTOR® STANDARD USER MANUAL
PAGE 11
Power Supply Adapter
The power supply adapter must be plugged into the power grid. An IEC lead is provided.
IMPORTANT WARNING: Ensure that your power inlet (behind the power supply adapter) shows the right voltage
corresponding to your area. Otherwise, switch it using a narrow blade screwdriver.
Attaching Cables
When connecting cables, always be sure pins are
properly aligned. Note the indexing pins on the control
unit cables for precise mating alignment.
Keep dot facing up.
Once plugged in, secure
by turning 90° clockwise
until a click is heard.
Diagenode Inc. North America / Phone: +1 862 209-4680 // Fax: +1 862 209-4681 // Mail: [email protected]
PAGE 12
DIAGENODE BIORUPTOR® STANDARD USER MANUAL
Installing the Bioruptor® Standard
1. Open the boxes and unpack all components.
2. Place sonication bath in
front of the soundproof
box.
3.Remove the rubber cap (upper left hole marked machine cable) from the back of the
soundproof box and feed the control unit cable through the hole. The fitting will secure
the cable to the sound-proof box. Turn the front section counterclockwise to seal.
Be sure there is enough slack in the cable.
4.Plug the control unit cable 5.Place the motor lid on the top of the sonication bath and
6.Place the sonication bath into
into the sonication bath.
connect it. Make sure that the cable of the motor lid is
the soundproof box.
connected as shown in the image (triangles have to match).
7.Fill the sonication bath up to the red fill line with
distilled water only. Do not use deionized water!
8.Connect the power supply adapter to the control unit
with the power cable.
9. Place the control unit on
top of the soundproof box.
Plug the power cable into
the outlet and switch on the
power switch on the back
of the control unit.
Now, you are ready to start !
Europe Diagenode sa / CHU - Tour GIGA - B34 - 3e étage // Avenue de l’Hôpital, 1 // 4000 Liège (Sart Tilman) // Belgium // Phone: (+32) 4 364 20 50 // Mail: [email protected]
DIAGENODE BIORUPTOR® STANDARD USER MANUAL
PAGE 13
Controlling the Sonication
Digital Timer:
Allows the user to easily program
the sonication of samples (ON/OFF
pulse time & total time). See use of
digital timer in next section below.
Stop Button:
Ends sonication
Intensity Setting Button:
Adjusts intensity of the
ultrasonic waves generated
Intensity Level Meter:
Indicates the sonication
intensity
Start Button:
Begins sonication
Power Switch: Turns
Bioruptor on and off
CYCLE NUMBER, TIME ON and TIME OFF and SONICATION INTENSITY are the parameters controlling the sonication.
First press + or - depending on the value to be modified. The five flashing black squares move up or down. Once you
have selected the parameter to be modified, press OK again. The five flashing black squares disappear and 2 digits
start flashing. The digits can be changed by pressing + or -. To select and save the correct number, press OK to
confirm or ESC to escape without saving the change.
IMPORTANT NOTE: Minimum time of the OFF cycle: 30 seconds.
Digital Timer
After the introductory message, the control screen shows the main sonication parameters in the first three lines (CYCLE
Number, Time ON, Time OFF) and summary of actions in the last line (see example below).
CYCLE Num :
10
Time ON :
30sec
Time OFF :
30sec
Press OK = Modify
BIORUPTOR RUNNING
*****************
CYCLE Num :
04/10
ON
Bath 1
OFF
TIME
ON
TIME
OFF
CYCLE
Cycle number reached
(4 cycles in this example)
START
The display shows cycle 4 of 10.
Bioruptor® NGS will sonicate as shown.
Buttons and their functions
Button A: Pause / restart after pausing
Button B: Press and hold this button during sonication to display T1 (total on time per cycle) and T2 (total off time per cycle).
ESC: Cancels previous selection
OK: Validate selection
- : Decrease selected parameter/move down
+ : Increase selected parameter/move up
Once all parameters are selected and confirmed, press START.
Once the run is started, “BIORUPTOR RUNNING” is displayed on the control screen.
Diagenode Inc. North America / Phone: +1 862 209-4680 // Fax: +1 862 209-4681 // Mail: [email protected]
PAGE 14
DIAGENODE BIORUPTOR® STANDARD USER MANUAL
Overheat Shutdown
The ultrasound source is sensitive to high temperatures which means that increases in temperature diminish the
sonication efficiency and can damage the device. The production of ultrasound generates heat which is transferred into
the sonication bath. To avoid excessive overheating of the ultrasound source, the Bioruptor® Standard (Cat. No. ) contains
a temperature sensor. We recommend that the water in the sonication bath remains between 4˚C–10˚C (39°F—50°F)
for optimum sonication.
Note: The sensor does not measure the water temperature inside the ultrasound bath where the samples are submerged.
Once a critical limit is reached a warning is displayed on the control screen. Depending on the situation, different screens
pop up as described below:
1. If START is pressed and the instrument stops after a couple of seconds showing the following screen blinking, the
instrument could not start a new run due to the ultrasound source’s temperature.
Machine too hot
to start a new run
See Manual
Causes:
• Instrument has been used several times in a row recently without breaks
• Instrument is stored in a place exposed to direct sun
• Room temperature is too hot
What to do:
• Store the instrument in another place if the current one does not meet the installation
specific requirements
• Allow for longer breaks between uses
• Place crushed ice in sonication bath to help the cool ultrasound source
2. During a run, if the instrument stops and the following screen pops up, the critical temperature has been reached.
To protect the ultrasound source from damage, the instrument has stopped and is standing by to be restarted
after the ultrasound source has cooled.
RISK OF DAMAGE
Machine stoped at
Cycls XX/XX
See Manual
Causes:
• Instrument has been running too long without breaks
What to do:
• Store the instrument in another place if the current one does not meet the installation
specific requirements
• Allow for longer breaks between uses
• Place crushed ice in sonication bath to help to cool down the ultrasound source
3. If the warning message appears at the bottom of the BIORUPTOR RUNNING screen (see below), it means that the
critical temperature is about to be reached.
BIORUPTOR RUNNING
*****************
CYCLE Num : xx/xx
WARNING gets hot
Causes:
• Instrument has been running too long without breaks
What to do:
• Reduce the number of consecutive cycles or split protocols into two runs separated by
a break
• Keep cold water in the sonication bath while running to help keep the ultrasound
source at low temperature
Europe Diagenode sa / CHU - Tour GIGA - B34 - 3e étage // Avenue de l’Hôpital, 1 // 4000 Liège (Sart Tilman) // Belgium // Phone: (+32) 4 364 20 50 // Mail: [email protected]
DIAGENODE BIORUPTOR® STANDARD USER MANUAL
PAGE 15
Tube holders & tubes
Tube holders - Available for 0.5/0.65 ml, 1.5 ml, 10 ml, 15 ml, and 50 ml
To use adaptor tube unit, remove the lower part of the microtube holder by turning counterclockwise. Then place
microtubes in the unit. Attach the lower part to the upper part of the adaptor. To guarantee homogeneity of chromatin
shearing, the tube holders should always be completely filled with tubes. To ensure reproducibility, always use the same
brand of tubes.
• The 2 ml polypropylene tubes (thin-walled) should not be used with the Bioruptor®. 1.5 ml tubes in TPX plastic that
provide better ultrasound transfer rates and more efficient sonication are available from Diagenode (see price list).
These tubes should be used for chromatin shearing, not DNA shearing.
• Any 0.5 ml or 1.5ml tube can be used for chromatin sheraring although shearing efficiency is increased by using the
hard plastic tubes (TPX hard plastic) available from Diagenode. See catalog numbers on price list.
• For DNA shearing only 0.5 ml Bioruptor® Microtubes (Old Cat. No. WA-004-0500; New Cat. No. C30010013, Format:
500 pc) can be used.
• The complete adaptor (including O-ring) can be sterilized in the autoclave. After more than 20 autoclave sterilizations,
the O-ring might need to be replaced (see price list for spare parts).
0.5/0.65 ml tube holder
(Old Cat. No. UCD-pack 0.5;
New Cat. No. B01200010)
1.5 ml tube holder
(Old Cat. No. UCD-pack 1.5;
New Cat. No. B01200011)
10 ml tube holder
(Old Cat. No. UCD-pack 10;
New Cat. No. B01200012)
15 ml tube holder (Old Cat. No. UCD-pack 15; New Cat. No. B01200013)
The tube holders for 15 ml tubes are available for Falcon & Corning tubes. If you use another
brand of tubes, use the one which fits in the holder the best. When using the 15 ml tubes,
do not forget to insert the aluminium ring to ensure an optimal position of the tube during
sonication.
50 ml tube holder (Old Cat. No. UCD-pack 50; New Cat. No. B01200014)
The tube holders for 50 ml tubes are available for Falcon tubes (blue) and for Corning tubes
(orange). If you use another brand of tubes, use the one which fits in the holder the best.
Note: The quality of the 50 ml Corning tube: “hard” plastic (polyethylene-ref Corning 430304)
can be used as well as “soft” plastic (Polypropylene, ref. Corning 430290 ) but you should
stick to one kind as transfer of ultrasonic waves is different for the different tube types (hard
plastic is more efficient).
Diagenode Inc. North America / Phone: +1 862 209-4680 // Fax: +1 862 209-4681 // Mail: [email protected]
PAGE 16
DIAGENODE BIORUPTOR® STANDARD USER MANUAL
Holding Plates (included with any tube holder)
The holding plate for 10 ml and 15 ml tubes can accommodate up to
6 tubes. For 50 ml tubes, the sample holding plate can accommodate
up to 3 tubes. The holding plates should always be completely filled to
guarantee homogeneity of shearing.
O rings (for 10ml, 15ml, 50ml tube holders)
By removing the black knob, it is possible to replace the O-ring. The complete tube holder chip
(including O-ring) can be sterilized in the autoclave. After more than 20 autoclave sterilizations
the O-ring might need to be replaced (visit www.diagenode.com).
Standard protocols
DNA shearing
or DNA shearing we highly recommend to use the tube holder for 0.5/0.65 ml tubes (Old Cat. No. UCDF
pack 0.5; New Cat. No. B01200010) and the corresponding Bioruptor® 0.5 ml Microtubes for DNA Shearing
(Old Cat. No. WA-004-0500; New Cat. No. C30010013, Format: 500 pc).
0.5/0.65 ml tube holder
(Old Cat. No. UCD-pack 0.5;
New Cat. No. B01200010)
0.5 ml Bioruptor®
Microtubes
(Old Cat. No. WA-004-0500;
New Cat. No. C30010013,
Format: 500 pc)
To use the tube holder, remove the lower part by turning counterclockwise. Then place microtubes into the unit. Attach
the lower part to the upper part of the adaptor. To guarantee homogeneity of DNA shearing, the tube holders should
always be completely filled with tubes. Never leave empty spaces in the tube holder. Fill the empty spaces with tubes
containing the same volume of distilled water.
Operating conditions
Sample volume:
100 µl
Tubes:
0.5 ml Bioruptor® Microtubes (Old Cat. No. WA-004-0500; New Cat. No. C30010013, Format: 500 pc)
Tube holder:
0.5/0.65 ml tube holder (Old Cat. No. UCD-pack 0.5; New Cat. No. B01200010) for 12 x 0.5 ml tubes
Sonication buffer:
TE (10 mM Tris, 1mM EDTA), pH 7.5 - 8.0
DNA concentration: 0.001-0.02 µg/µl (0.01 μg/μl recommended)
Europe Diagenode sa / CHU - Tour GIGA - B34 - 3e étage // Avenue de l’Hôpital, 1 // 4000 Liège (Sart Tilman) // Belgium // Phone: (+32) 4 364 20 50 // Mail: [email protected]
DIAGENODE BIORUPTOR® STANDARD USER MANUAL
PAGE 17
Samples are vortexed (10-15 sec) and centrifuged (10 sec) before shearing.
For optimal results samples should be stored on ice during 10-15 min prior to sonication.
Temperature:Maintain at 4°C by using ice chilled water and small amounts of crushed ice (no more than 0.5 cm)
or use the Water Cooler (Old Cat. No. BioAcc-Cool; New Cat. No. B02010002, 230V; B02010003,
115V; B02010004, 100V)
Power setting:
L position (Low)
Sonication cycle and sonication time: varies depending on desired DNA size (see table)
Note: Recommended protocols are subject to change without notice. Additional protocols are available on demand.
Target size
Cycle conditions (On/Off times in sec.)
Number of cycles
1250 bp
15/90
2 cycles
950 bp
15/90
4 cycles
750 bp
30/90
3 cycles
550 bp
30/90
5 cycles
400 bp
30/90
6 cycles
350 bp
30/90
8 cycles
300 bp
30/90
10 cycles
250 bp
30/90
15 cycles
200 bp
30/90
30 cycles
150 bp
30/30
70 cycles
*recommended to use a lab timer to set time precisely
The protocol settings listed above are recommended guidelines and actual results may vary depending on the type and amount
of starting material, purity level, concentration and/or sample viscosity. It is highly recommended that a time course response
experiment be carried out (e.g. varying the time of “ON” and “OFF” durations as well as the number of cycles) to determine the
appropriate treatment for your specific sample. Starting material with a smaller sample volume and a greater concentration
than the recommended range may require a different time course to ensure homogenous shearing results.
Diagenode Inc. North America / Phone: +1 862 209-4680 // Fax: +1 862 209-4681 // Mail: [email protected]
PAGE 18
DIAGENODE BIORUPTOR® STANDARD USER MANUAL
Important comments about DNA shearing
The Diagenode ACT (Adaptative Cavitation Transfer technology) process is highly reproducible, however attention must
be paid to the following treatment attributes to ensure best results:
•Tubes: At present, the recommended tube vessels are the 0.5 ml Bioruptor® Microtubes (Old Cat. No. WA-004-0500;
New Cat. No. C30010013, Format: 500 pc). Pay attention not to damage the cap when closing the tubes since this
could alter sonication results.
•Sample volume: The recommended volume of the 0.5 ml Bioruptor® Microtubes (Old Cat. No. WA-004-0500; New
Cat. No. C30010013, Format: 500 pc) is 100 μl. When using lower volumes (e.g. 50 µl), less reproducible results may
be observed due to an alteration of the ultrasonic waves distribution in the sample fluid; thus, reducing the efficiency
of sonication which may result in broader size distribution or larger peaks.
•Sample concentration: Diagenode recommends using a DNA concentration ranging between 1 and 20 ng/µl
(10 ng/µl recommended). Using larger concentration (e.g. 50-100 ng/µl) may result in broader peaks or variable peak
distribution.
•Sample preparation: Sample viscosity may have a major impact on sonication results. Careful resuspension of DNA
sample is strongly recommended before sonication processing. Multiple pipetting and gentle vortexing followed by a
short centrifugation to recover sample volume at the bottom of the tube is therefore strongly recommended. Storing
DNA samples on ice during 10-15 min before sonication has also been shown to improve reproducibility.
•DNA Qualtity: DNA quality and quantity must be considered carefully since bad quality and quantity DNA may have
several impacts on sonication and next-gen sequencing downstream applications. First, DNA contamination (e.g.
from superfluous nucleic acids such as RNA, small nucleic acid fragments, excess proteins, or other contaminating
materials) may interfere with DNA measurement method leading to incorrect DNA quantitation thus. Also contaminating
RNA in genomic DNA preparation might generate a biased fragment distribution profile on microfluidics-based
platform (e.g. Agilent Bioanalyzer) or alter sonication effiency.
Therefore it is highly recommended to use only high quality DNA when sonicating DNA for next-gen sequencing
library preparation. The DNA sample to be processed should be highly pure, having an OD260/280 ratio of between 1.8
and 2.0, and should be as intact as possible. DNA extracted using standard techniques (e.g. Proteinase K digested,
double phenol/chloform extraction, ethanol precipitated, treatment with RNase-DNase free enzymatic digestion to
remove contaminant RNA) or commercial spin-column based kits are recommended.
•Water temperature: Propagation of ultrasound in a liquid unavoidably produces heat that can ultimately alter DNA
sample (e.g. by thermal denaturation). To ensure the best preservation of the sample, it is recommended to start the
sonication process with cold water in the sonication bath. During sonication, especially when doing long sonication
runs, the temperature must also be controlled.
Note: The permanent installation of the Bioruptor® in a cold room is possible, although not sufficient to avoid the
temperature increase due to sonication. This location would only replace the “pre-cooling” step described above.
•Automatic temperature control: A recirculating water cooler is used to guarantee the automatic temperature control
of the sonication bath during the whole sonication process. This water cooler (Old Cat. No. BioAcc-Cool; New Cat. No.
B02010002, 230V; B02010003, 115V; B02010004, 100V) produces a regular water flow with a constant water level in the
tank.
•Sonication time: Minor adjustments in cycle number may be made to optimize results for various sample types
and concentrations. The table above listing the cycle parameters and numbers is a recommended guideline. Actual
results may vary depending on the amount and type of starting material, concentration, viscosity and/or plastic tubes.
Diagenode recommends setting up a time dose response experiment for determining appropriate cycle number.
Larger length starting material (e.g. total genomic DNA) and higher concentration may require a longer dose to
ensure a homogeneous shearing result.
•Sonication bath: The sonication sonication bath is a critical component of the Bioruptor®.
1. Water purity: Contaminants such as algae and particules may alter the ultrasonic waves propagation,
Europe Diagenode sa / CHU - Tour GIGA - B34 - 3e étage // Avenue de l’Hôpital, 1 // 4000 Liège (Sart Tilman) // Belgium // Phone: (+32) 4 364 20 50 // Mail: [email protected]
DIAGENODE BIORUPTOR® STANDARD USER MANUAL
PAGE 19
resulting in broader size distribution or larger peaks. Bath water should be pure distilled water, changed
regularly (at least once per week).
2. Sonication bath maintenance: The sonication bath metal surface is fragile and requires a careful maintenance.
Use only soft sponge and distilled water to remove traces. Never use scratch scrub sponge since this would
alter the ultrasonic wave emitter surface.
Supplementary Data
Please note that there are three main sources of variation in both peak base-pair size and distribution:
1)The physical process of DNA fragmentation might not be entirely random in AT- or GC- rich regions.
2)The analytical process to determine fragment size has inherent variances (for example, gel electrophoresis and
microfluidics-based platform). Therefore, fragment distributions and peak values, even from technical replicates,
may not appear identical. If the sheared DNA sample will be resin or column purified or concentrated prior to analysis,
please remember to take out an aliquot for use as control prior to that step. Column purification and concentration of
the sheared DNA will generate a biased fragment distribution profile due to the inherent greater loss of the smaller
DNA fragments.
3)RNA contamination in genomic DNA preparation should be carefully removed using RNase-DNase free enzymatic
digestion since they might generate a biased fragment distribution profile on microfluidics-based platform (e.g.
Agilent Bioanalyzer) or alter sonication effiency.
Chromatin shearing
Critical points for chromatin shearing
•Chromatin shearing efficiency varies on cell type. Each cell type might need additional protocol optimization.
•The extent of cross-linking is critical for the efficient disruption of fixed cells and also affects DNA yield and average
size of chromatin fragments. Over-cross-linked chromatin will not produce small fragments, even by prolonged
sonication. Fix cells for 8-10 min at RT, always stop the reaction by glycine and wash 2-3 times with ice cold PBS.
•Cell density affects the sonication efficiency. Do not use too dense cell suspension. Optimal density is about
1-3x10^6/100 µl of sonication buffer.
•SDS is a key component of sonication buffer for chromatin shearing. Include 0.7-1% of SDS in your sonication buffer.
•Fresh methanol free formaldehyde for fixation.
Shearing of chromatin from adherent cell lines
For the adherent cells, we recommend to first harvest cells by trypsinization and perform chromatin cross-linking in
a cell suspension rather than on dishes as it results in a better reproducibility and consistency between experiments.
1.Discard medium to remove dead cells and wash cells by adding cold PBS.
2.Harvest cells by trypsinization.
3.Transfer cells in a tube containing 10 ml PBS (RT) and centrifuge 5 min at 1.300 rpm. Keep the cell pellet and discard
the supernatant. Wash the cells again in PBS.
Note: At this step, cells might be counted.
4.Add PBS to a final volume of 500 μl for a maximum of 10x10^6 cells (for more cells, perform the fixation in a separate
tube).
5. Add formaldehyde to a final concentration of 1%, mix gently and incubate for 8-10 min at RT with rotation.
6.Stop the cross-linking reaction by adding glycine to a final concentration 0.125 M and incubate for 5 min at RT with
Diagenode Inc. North America / Phone: +1 862 209-4680 // Fax: +1 862 209-4681 // Mail: [email protected]
PAGE 20
DIAGENODE BIORUPTOR® STANDARD USER MANUAL
rotation.
7. Wash cells 3 times with cold PBS
8.Resuspend cells in an appropriate volume of a Lysis buffer containing SDS (0.7-1%). 1x10^6 -3x10^6 cells/300 µl are
recommended for shearing in 1.5 ml tubes. Lyse cells on ice for 5-10 min. Vortex and centrifuge tubes before putting
in Bioruptor®.
Note: Nuclei isolation is recommended when working with 3x10^6 cells to 10x10^6 cells. (Shearing ChIP kit from
Diagenode is available for this purpose, kch-redmod-100). Diagenode 1.5 ml TPX microtubes are recommended for
efficient chromatin shearing (Old Cat. No. M-50050 or M-50001; New Cat. No. C30010010, Format: 50 or 100 pc).
9.Sonicate samples with Bioruptor® Standard with refrigerated sonication bath (or crashed ice sonication bath) for 1020-30 cycles of 30 sec ON and 30 sec OFF at HIGH setting. Briefly vortex and centrifuge tubes after each run of 10
cycles.
10.Centrifuge samples at 14000 rpm for 5 min at 4°C and transfer the supernatant into a new tube. Use an aliquot of
sheared chromatin (equivalent of 100.000-500.000 cells) for analysis of shearing: perform a reversal of cross-links
and analyze on agarose gel. The remaining chromatin might be kept at -80°C.
Shearing of chromatin from suspension cell lines
Note: Cells growing in suspension culture are known to be difficult to shear. Nuclei extraction is recommended before
sonication. Do not use very dense cell suspension for sonication.
1. Cross-link chromatin with 1% fresh formaldehyde for 8-10 min at RT
2.Stop the cross-linking reaction by adding glycine to the final concentration 0.125 M for 5 min at RT with gentle
rotation.
3. Wash cells 3 times with cold PBS.
4.Extract cell nuclei and use isolated nuclei for shearing (Shearing ChIP kit from Diagenode is available for this purpose,
kch-redmod-100).
5.Resuspend nuclei in an appropriate volume of Lysis buffer containing SDS (1%). 1x10^6 – 3x10^6 cells/300 µl are
recommended for shearing in 1.5 ml tubes. Lyse nuclei on ice for 5-10 min. Vortex and spin down tubes before putting
in Bioruptor®.
Note: Diagenode 1.5 ml TPX microtubes are recommended for efficient chromatin shearing (Old Cat. No. M-50050 or
M-50001; New Cat. No. C30010010, Format: 50 or 1000 pc).
6.Sonicate samples with Bioruptor® Standard with refrigerated sonication bath (or crashed ice sonication bath) for 1020-30 cycles of 30 sec ON and 30 sec OFF at HIGH setting. Briefly vortex and spin down tubes after each run of 10
cycles.
7.Centrifuge samples at 14000 rpm for 5 min at 4°C and transfer the supernatant into a new tube. Centrifuge samples
at 14000 rpm for 5 min at 4°C and transfer the supernatant into a new tube. Use an aliquot of sheared chromatin
(equivalent of 100.000-500.000 cells) for analysis of shearing: perform a reversal of cross-links and analyze in agarose
gel. The remaining chromatin can be kept at -80°C.
Europe Diagenode sa / CHU - Tour GIGA - B34 - 3e étage // Avenue de l’Hôpital, 1 // 4000 Liège (Sart Tilman) // Belgium // Phone: (+32) 4 364 20 50 // Mail: [email protected]
DIAGENODE BIORUPTOR® STANDARD USER MANUAL
PAGE 21
Bacterial Cell Disruption
For cell lysis, we highly recommend using 1.5 ml TPX microtubes (Cat. No. M-50050) or 10 ml tubes (Old Cat. No. AS100; New Cat. No. C30010012, Format: 100 pc or 500 pc) and the corresponding tube holders Old Cat. No. UCD-pack
1.5; New Cat. No. B01200010) and UCD-pack10). To guarantee homogeneity of sonication, the tube holders should
always be completely filled with tubes.
Operating conditions:
Tubes: 1.5 ml TPX microtubes or 10 ml tubes
Tube holder: 1
.5 ml tube holder (Old Cat. No. UCD-pack 1.5; New Cat. No. B01200010) or 10 ml tubes holder (Old Cat. No.
UCD-pack 10; New Cat. No. B01200012) with reflecting bar
Sample volume: 300 µl for 1.5 ml TPX microtubes
2 ml for 10 ml tubes
Sonication buffer: PBS with protease inhibitor cocktail
Temperature: Maintain at 4°C by using the Water Cooler (Old Cat. No. BioAcc-Cool; New Cat. No. B02010002, 230V;
B02010003, 115V; B02010004, 100V) or by using crushed ice
Power setting: H position (High)
Sonication cycle: 30 sec ON, 30 sec OFF
Total sonication time: 10 min for Bioruptor® Standard
Note: Please note that additional optimization might be required depending on the bacterial strain and growth phase.
Gram-positive bacteria are more resistant to sonication than Gram-negative bacteria because of the rigid cell wall.
Cells in log phase are less resistant than cells in stationary phase. In order to preserve protein structure and activity,
avoid a long sonication.
Protocol:
1. Collect cells by centrifugation at 1000 g for 10 min at 4°C
2. Wash twice with cold PBS.
3. Resuspend cells in cold PBS to OD600 3.0.
4. Transfer cell suspension to sonication tubes. For optimal efficiency, use the recommended sample volume.
5. Sonicate at High Power for 10 min (Bioruptor® Standard)
6. Centrifuge at 15.000 rpm for 15 min at 4°C.
7. Separate the soluble fraction (supernatant) from the insoluble (pellet).
8. The pellet can be used for extraction of insoluble proteins with a denaturating buffer of choice.
Diagenode Inc. North America / Phone: +1 862 209-4680 // Fax: +1 862 209-4681 // Mail: [email protected]
PAGE 22
DIAGENODE BIORUPTOR® STANDARD USER MANUAL
Efficient cell disruption with Bioruptor®
Cell suspensions were sonicated for different periods of time ranging from 5 to 20 min. Two types of tubes were tested:
Diagenode’s 1.5 ml TPX tubes (Old Cat. No. M-50050 or M-50001; New Cat. No. C30010010, Format: 50 or 100 pc) and 10 ml tubes
(Old Cat. No. AS-100; New Cat. No. C30010012, Format: 100 pc or 500 pc). The efficiency of cell disruption was initially
determined by measuring optical density at 600 nm. The results indicated that the number of intact cells decreases
rapidly with increasing sonication time. After only 5 min of sonication, a significant number of cells were disrupted (Fig.1).
Similar results were observed using the Live/Dead BacLight kit (data not shown) which allows the quantification of live
cells with intact membranes and discrimination from cells with damaged membranes. Thus, efficient cell disruption is
observed after 5-10 min of sonication.
Figure 1: Effect of sonication on cell disruption
The number of intact cells after sonication was determined by measuring optical density at 600 nm. Optical density of
the cell culture before sonication (0 min) is arbitrarily set to 100%.
Sheared DNA is released during bacterial sonication
The disruption of bacterial cells by sonication releases DNA with maximum recovery after only 5 min of treatment (Fig.2,
A). The released DNA is fragmented with fragment size dependent on sonication time (Fig.2, B).
A.
B.
M 0 min
5 min
10 min 15 min 20 min
Figure 2 : Effect of sonication on DNA release
Figure A: The DNA concentration in each sample after sonication was quantified with the DNA BR assay kit (Invitrogen)
Figure B: An aliquot of each sample before (0 min) and after sonication was run in a 1.5% agarose gel stained with
SybrSafe and visualized in UV light. Lane M represents a 100 bp ladder.
Europe Diagenode sa / CHU - Tour GIGA - B34 - 3e étage // Avenue de l’Hôpital, 1 // 4000 Liège (Sart Tilman) // Belgium // Phone: (+32) 4 364 20 50 // Mail: [email protected]
DIAGENODE BIORUPTOR® STANDARD USER MANUAL
PAGE 23
Troubleshooting
Bioruptor: Chromatin Shearing FAQs
Critical Steps
Fixation
Questions
Answers
Comments
What is the formaldehyde
final concentration
1%
Correct formaldehyde concentration
in fixation is critical.
How long is the fixation
step?
Fix for 10 min (with a time course
when needed)
It is possible to fix for as little as 5 min
(depending on your protein of interest
for subsequent ChIP assays).
What is the temperature to
use for fixation?
Fix at room temperature
Fixation can be performed at 4°C, RT,
and 37°C. Make sure you perform the
fixation step at the right temperature.
Are the washes after
fixation important?
Wash the fixed cells properly.
Make sure you get rid of ALL the
formaldehyde. Use glycine to stop
the fixation.
Cell lysis
How can I achieve
complete cell disruption?
Do not use too many cells in the
cell lysis buffer. Lyse about 5x 10e6
cells/1 ml
The HighCell # ChIP kit is compatible
with cell numbers up to 10 million
cells in small volumes.
Number of cells/
shearing buffer
volume
What is the amount of
cells per shearing trial to
use?
1x 10e6–10x 10e6cells/ 300 µl
3x 10⁶–30x 106 cells/ 1 ml
Do not use a too high cell
concentration.
Shearing buffer
What is the key buffer
component?
Include detergent in buffer
Quality and quantity of detergent is
important.
Shearing step
How long is the shearing?
Perform a time course for chromatin
shearing
It is possible to shear from 5-30 min.
If 30’, interrupt sonication after every
10 min and centrifuge tubes briefly
before proceeding with the remaining
time.
What is the optimal cycle?
30 seconds “ON” + 30 seconds “OFF”
What is the best
temperature for shearing?
4°C
Make sure sonication bath is kept
cool. Once optimal conditions are
reached, use for all assays to assure
reproducibility.
What is the best volume/
tube for shearing?
1.5 ml per 15 ml tube
200 µl per 1.5 ml tube
Do not use a too big sample volume
What kind of gel should
I use to determine size
accuracy?
Check disrupted material on a 1%
agarose gel (10 µl/lane). Run the gel
slowly
Reverse cross-link from DNA after
phenol/chloroform extraction before
loading on gel.
What do smears indicate?
Gel electrophoresis of cross-linked
samples often gives smears on gel.
Also take several pictures of the gel
to assure image quality.
To obtain clearer image with accurate
fragment size, reversion of the
cross-linking is advised.
How much DNA should
I load and is RNAse
treatment necessary?
The migration of large quantities of
DNA on agarose gel can lead to poor
quality pictures which do not reflect
the real DNA fragmentation.
Do not load too much on a gel. Do not
load more than 5 µg/lane.
Also treat the sample with RNAse.
What should my running
buffer concentration be?
1X TAE or TBE is preferred to 0.5X
TAE which can lead to smears on gel.
Will using an old gel cause
problems?
Use a freshly prepared gel and fresh
buffer.
Checking for
high-quality shearing
on an agarose gel
Do not reuse an old gel.
Diagenode Inc. North America / Phone: +1 862 209-4680 // Fax: +1 862 209-4681 // Mail: [email protected]
Ordering information
Description
Cat. No.
Description
Bioruptor® Models
Tube Holders
0.5/0.65 ml tube holder for
Bioruptor® Standard, Bioruptor®
Plus
Old Cat. No. UCD-pack 0.5;
New Cat. No. B01200010)
B01010002
1.5 ml tube holder for Bioruptor®
Standard & Bioruptor® Plus
Old Cat. No. UCD-pack 1.5;
New Cat. No. B01200010
B01010003
10 ml tube holder for Bioruptor®
Standard & Bioruptor® Plus
Old Cat. No. UCD-pack 10;
New Cat. No. B01200012
15 ml tube holder for Bioruptor®
Standard & Bioruptor® Plus
Old Cat. No. UCD-pack 15;
New Cat. No. B01200013
50 ml tube holder for Bioruptor®
Standard & Bioruptor® Plus
Old Cat. No. UCD-pack 50;
New Cat. No. B01200014
Bioruptor® Standard
for 1.5 ml tube holder
B01010001
Bioruptor® Standard
for 1.5 & 15 ml tube holder
Bioruptor® Standard
for 0.65 ml tube holder
Cooling System
Water Cooler including
continuous valve for Bioruptor®
Cat. No.
Old Cat. No. BioAcc-Cool;
New Cat. No. B02010002, 230V;
B02010003, 115V; B02010004,
100V
Consumables
1.5 ml TPX Microtubes
Old Cat. No. M-50050 or M-50001;
New Cat. No. C30010010,
Format: 50 or 100 pc
1.5 ml TPX Microtubes
Old Cat. No. M-50050 or M-50001;
New Cat. No. C30010010,
Format: 50 or 100 pc
15 ml TPX Microtubes
Old Cat. No. M-UN-15;
New Cat. No. 30010010,
Format: 50 pc or 1000 pc
0.5 ml Bioruptor® Microtubes for
DNA Shearing
Old Cat. No. WA-004-0500;
New Cat. No. C30010013,
Format: 500 pc
DIAGENODE HEADQUARTES
Diagenode sa. BELGIUM | EUROPE
Tel: +32 4 364 20 50
Fax: +32 4 364 20 51
[email protected]
[email protected]
Diagenode Inc. USA | NORTH AMERICA
Tel: +1 862 209-4680
Fax: +1 862 209-4681
[email protected]
[email protected]
For a complete listing of Diagenode’s international distributors, visit: http://www.diagenode.com/en/support/distributors.php
For the rest of the world, please contact Diagenode s.a.
© 2010 Diagenode, Inc. All rights reserved. Bioruptor® is a registered trademark of Diagenode.
The content of this document cannot be reproduced without prior permission of the authors. Bioruptor and IP-Star are registered trademarks of Diagenode, Inc.
MA-BR-PLUS_23_05_13