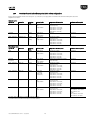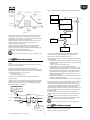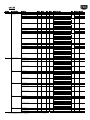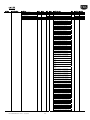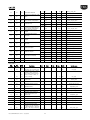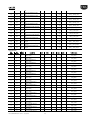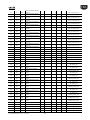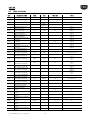
1
Chiller Core
Application for the management of chillers and heat pumps
Code FLCOR_CH0E
User manual
Integrated Control Solutions & Energy Savings
+030xxxxxxxx Chiller Core – rel 1.0 – 12/05/2009
1
+03022xxxx Chiller Core – rel 1.0 – 24/04/2009
2
IMPORTANT
legislation, in no case will CAREL, its employees or subsidiaries be liable for any lost
earnings or sales, losses of data and information, costs of replacement goods or
services, damage to things or people, downtime or any direct, indirect, incidental,
actual, punitive, exemplary, special or consequential damage of any kind
whatsoever, whether contractual, extra-contractual or due to negligence, or any
other liabilities deriving from the installation, use or impossibility to use the
product, even if CAREL or its subsidiaries are warned of the possibility of such
damage.
CAREL bases the development of its products on decades of experience in HVAC,
on the continuous investments in technological innovations to products,
procedures and strict quality processes with in-circuit and functional testing on
100% of its products, and on the most innovative production technology available
on the market. CAREL and its subsidiaries nonetheless cannot guarantee that all the
aspects of the product and the software included with the product respond to the
requirements of the final application, despite the product being developed
according to start-of-the-art techniques. The customer (manufacturer, developer or
installer of the final equipment) accepts all liability and risk relating to the
configuration of the product in order to reach the expected results in relation to the
specific final installation and/or equipment.
DISPOSAL
CAREL may, based on specific agreements, acts as a consultant for the positive
commissioning of the final unit/application, however in no case does it accept
liability for the correct operation of the final equipment/system.
The CAREL product is a state-of-the-art product, whose operation is specified in the
technical documentation supplied with the product or can be downloaded, even
prior to purchase, from the website www.CAREL.com.
Each CAREL product, in relation to its advanced level of technology, requires
setup/configuration/programming/commissioning to be able to operate in the best
possible way for the specific application. The failure to complete such operations,
which are required/indicated in the user manual, may cause the final product to
malfunction; CAREL accepts no liability in such cases.
Only qualified personnel may install or carry out technical service on the product.
The customer must only use the product in the manner described in the
documentation relating to the product.
In addition to observing any further warnings described in this manual, the
following warnings must be heeded for all CAREL products:
• Prevent the electronic circuits from getting wet. Rain, humidity and all types of
liquids or condensate contain corrosive minerals that may damage the
electronic circuits. In any case, the product should be used or stored in
environments that comply with the temperature and humidity limits specified in
the manual.
• Do not install the device in particularly hot environments. Too high
temperatures may reduce the life of electronic devices, damage them and
deform or melt the plastic parts. In any case, the product should be used or
stored in environments that comply with the temperature and humidity limits
specified in the manual.
• Do not attempt to open the device in any way other than described in the
manual.
• Do not drop, hit or shake the device, as the internal circuits and mechanisms
may be irreparably damaged.
• Do not use corrosive chemicals, solvents or aggressive detergents to clean the
device.
• Do not use the product for applications other than those specified in the
technical manual.
INFORMATION FOR USERS ON THE CORRECT HANDLING OF
WASTE ELECTRICAL AND ELECTRONIC EQUIPMENT (WEEE)
In reference to European Union directive 2002/96/EC issued on 27 January 2003
and the related national legislation, please note that:
• WEEE cannot be disposed of as municipal waste and such waste must be
collected and disposed of separately;
• the public or private waste collection systems defined by local legislation must
be used. In addition, the equipment can be returned to the distributor at the
end of its working life when buying new equipment;
• the equipment may contain hazardous substances: the improper use or
incorrect disposal of such may have negative effects on human health and on
the environment;
• the symbol (crossed-out wheeled bin) shown on the product or on the
packaging and on the instruction sheet indicates that the equipment has been
introduced onto the market after 13 August 2005 and that it must be disposed
of separately;
• in the event of illegal disposal of electrical and electronic waste, the penalties
are specified by local waste disposal legislation.
All of the above suggestions likewise apply to the controllers, serial boards,
programming keys or any other accessory in the CAREL product portfolio.
CAREL adopts a policy of continual development. Consequently, CAREL reserves
the right to make changes and improvements to any product described in this
document without prior warning.
The technical specifications shown in the manual may be changed without prior
warning
The liability of CAREL in relation to its products is specified in the CAREL general
contract conditions, available on the website www.CAREL.com and/or by specific
agreements with customers; specifically, to the extent where allowed by applicable
KEY TO THE ICONS
NOTE: to bring attention to a very important subject; in particular,
regarding the practical use of the various functions of the product.
IMPORTANT: to bring critical issues regarding the use of the Blast
Chiller to the attention of the user.
TUTORIAL: some simple examples to accompany the user in
configuring the most common settings.
+0300010EN Chiller Core – rel 1.0 – 13/07/2009
+0300010EN Chiller Core – rel 1.0 – 13/07/2009
4
CONTENTS
1.
6.1
6.2
6.3
6.4
6.5
6.6
INTRODUCTION ......................................................................................................................................................................................................................7
Main features .....................................................................................................................................................................................................................7
Components and accessories ........................................................................................................................................................................................8
I/O configurations - types of unit ..................................................................................................................................................................................9
HARDWARE FEATURES AND INSTALLATION.................................................................................................................................................................16
Features of the pCO board...........................................................................................................................................................................................16
START UP.................................................................................................................................................................................................................................17
pCO Manager...................................................................................................................................................................................................................17
SmartKey...........................................................................................................................................................................................................................18
Commissioning................................................................................................................................................................................................................18
USER INTERFACE ...................................................................................................................................................................................................................20
Graphic terminal..............................................................................................................................................................................................................20
Display ...............................................................................................................................................................................................................................20
DESCRIPTION OF THE MENUS..........................................................................................................................................................................................22
FUNCTIONS............................................................................................................................................................................................................................23
Management of analogue inputs ................................................................................................................................................................................23
Management of digital inputs ......................................................................................................................................................................................23
Management of digital outputs ...................................................................................................................................................................................23
Management of analogue outputs .............................................................................................................................................................................24
Test inputs and outputs.................................................................................................................................................................................................24
Circuit and compressor management........................................................................................................................................................................24
6.7
Alarm prevention .................................................................................................................................................................................................28
6.8
Circuit and compressor rotation........................................................................................................................................................................28
6.9
Pump-down ............................................................................................................................................................................................................29
6.10
Start compressor...................................................................................................................................................................................................29
6.11
6.12
Compressor management .................................................................................................................................................................................29
Control set point..............................................................................................................................................................................................................29
6.13
Set point compensation .....................................................................................................................................................................................30
6.14
Unit On-Off............................................................................................................................................................................................................30
6.15
Temperature control...............................................................................................................................................................................31
6.16
Evaporator pumps..............................................................................................................................................................................................32
6.17
Condenser pumps..............................................................................................................................................................................................32
6.18
6.19
Condenser fans ...................................................................................................................................................................................................33
Defrost ...............................................................................................................................................................................................................................34
1.1
1.2
1.3
2.
2.1
3.
3.1
3.2
3.3
4.
4.1
4.2
5.
6.
6.20
Clock and time bands............................................................................................................................................................................................35
6.21 Date format setting.........................................................................................................................................................................................................36
6.22 Cooling/heating...............................................................................................................................................................................................................36
6.23 Modifying the Carel defaults ........................................................................................................................................................................................36
6.24 Changing the unit of measure .....................................................................................................................................................................................37
6.25 Modifying the user defaults..........................................................................................................................................................................................38
6.26 Manual device management........................................................................................................................................................................................38
7.
TABLE OF PARAMETERS ......................................................................................................................................................................................................39
8.
VARIABLES SENT TO THE SUPERVISOR...........................................................................................................................................................................69
8.1
Supervisor parameters table.........................................................................................................................................................................................69
9.
ALARMS ...................................................................................................................................................................................................................................83
9.1
Evaporator antifreeze .....................................................................................................................................................................................................83
9.2
Condenser antifreeze.....................................................................................................................................................................................................83
9.3
High pressure: alarm and prention ...................................................................................................................................................................84
+0300010EN Chiller Core – rel 1.0 – 13/07/2009
5
9.4
9.5
9.6
9.7
Low pressure: alarm and prevention ................................................................................................................................................................84
Manual/automatic alarm reset.....................................................................................................................................................................................85
Alarm log...........................................................................................................................................................................................................................86
Table of alarms ................................................................................................................................................................................................................87
+0300010EN Chiller Core – rel 1.0 – 13/07/2009
6
1. INTRODUCTION
1.1 Main features
Tool for developers - Chiller Core is the exclusive new application that includes all the essential functions for managing the operation of chillers-heat pumps; it is a tool
designed for 1tool developers who need a solid base to start creating custom applications.
Easy to customise - Chiller Core is arranged into modules, meaning the code is easy to follow and edit. Each function of Chiller Core is readily customisable according to
needs.
Ideal for field tests - thanks to its extreme flexibility, Chiller Core is the ideal tool for checking the operation of chillers during testing and service.
Usability and display - ChillerCore, developed in line with the new CAREL usability standards, assists the manufacturer in the configuration of the installation. The menubased system (available on the pGD1 terminal) allows the application to be configured as a tool for instant diagnostics. All this is possible by the immediately accessible
overview screens and the commissioning tool.
Quick menus - information on the status of the chiller is accessible directly from the main menu, without needing to access the submenus. Configuration, active function and
operating temperature information are arranged in loops of screens, scrolled by pressing the DOWN button from the main screen.
User manual - this manual, as well as describing the features and the operation of the application, guides the developer in understanding and editing the source code.
List of functions:
Main features*
Up to 3 hermetic compressors per circuit
Up to 4 circuits
1-4 evaporator circuits
1-2 condenser units
Hardware
pCO3 medium and large
pCOxs (with 512KB RAM)
PGD1
Unit configuration
Air/water chiller – heat pump
Water/water chiller – heat pump
Languages
Italian
English
Chinese
Unit of measure
Temperature: °C, °F
Pressure: bar, psi (all pressure values are also expressed as temperatures)
Date format selectable between: dd/mm/yy, mm/dd/yy, yy.mm.dd
Control
P, PI, PID on water inlet temperature
Dead zone on water outlet temperature
Compressor rotation*
FIFO
LIFO
By time
Fixed (the order of activation and deactivation can be set)
Possibility to choose to distribute capacity between circuits
Scheduling by calendar
For each time band, the following can be managed: unit on-off and 2 different control set points for CH and HP
4 daily time bands
3 special periods (e.g.: store closing times)
6 special days (e.g.: holidays)
Set point
Up to 2 set points for chiller operation and 2 for heat pump (scheduler)
Compensation based on outside temperature
Evaporator pumps
1-2 pumps
Management of attempts to recover water flow with 1 and 2 pumps
Rotation by time or to replace faulty pump (e.g.: overload, no flow)
Anti-blocking management on extended inactivity
Condenser pumps
Same functions as for the evaporator pumps
Condenser control
1-2 condenser units
Speed modulation based on high pressure
Defrost
Individual
Separate
Prevention
High pressure
Low pressure
Antifreeze
Alarms
Automatic and manual management
Log from application
Log from Bios
Supervisor protocol
Carel
Modbus
* The compressor rotation module includes other functions not mentioned here, such as: up to 4 compressors per circuit, management of up to 3 capacity steps per
compressor, management of compressors with inverter, order of activation between compressors and capacity steps, fixed rotation with compressors of different capacities,
etc.…
+0300010EN Chiller Core – rel 1.0 – 13/07/2009
7
1.2 Components and accessories
Chiller Core is optimised for the pCO3 medium/Large and pCOxs (as long as the latter feature 512KB of RAM).
pLAN
pGD1
pLAN adr=32
pCO3 / pCOxs
pCO3
pLAN adr=1
Circuit 1
pLAN adr=2
Circuit 2
Circuit 3
Circuit 4
Fig 1.a
pLAN address 1 = Master
pLAN address 2 = Slave
The unit is configured from the Master board, and consequently the various user interface menus can only be accessed if the terminal is communicating with the board set to
address 1.
If the terminal is communicating with a board whose address is other than 1, the following screen is displayed:
Fig 1.b
+0300010EN Chiller Core – rel 1.0 – 13/07/2009
8
1.3 I/O configurations - types of unit
1.3.1
pCOxs air/water and water/water
Air/water
Water/water
CH
CH/HP
CH or HP
Analogue
inputs
B1
1 circ. 2 comp. 1 evap. 1 cond.
High press. circ. 1
1 circ. 2 comp. 1 evap. 1 cond.
High press. circ. 1
1 circ. 2 comp. 1 evap. 1 cond.
High press. circ. 1
B2
Outside temp. / Low press. circ. 1
Low press. circ. 1
B3
Control water outlet temp.
Control water outlet temp.
Outside temp. / Low press. circ. 1
Control water outlet temp. /
Evaporator outlet temp. (if control is on the water inlet temp.
and HP unit)
B4
Control water inlet temp.
Control water inlet temp.
Control water inlet temp. / Evaporator outlet temp. (if control
is on the water outlet temp. and HP unit)
High press. circ. 1
Evaporator water flow
Remote on-off
High press. circ. 1
Evaporator water flow
Remote on-off
Condenser water flow
Low press. circ. 1
Digital inputs
ID1
ID2
ID3
ID4
ID5
Low press. circ. 1
High press. circ. 1
Evaporator water flow
Remote on-off
Cool/heat changeover
Low press. circ. 1
ID6
Serious alarm
Serious alarm
Serious alarm
Digital outputs
NO1
NO2
NO3
NO4
Evaporator pump
Compressor 1 circuit 1
Antifreeze heater
Compressor 2 circuit 1
Evaporator pump
Compressor 1 circuit 1
Antifreeze heater
4-way valve circuit 1
Evaporator pump
Compressor 1 circuit 1
Antifreeze heater
Compressor 2 circuit 1
NO5
Serious alarm
Compressor 2 circ. 1 / Serious alarm
Serious alarm
Condenser fan
(e.g.: inverter)
Condenser fan
(e.g.: inverter)
Condenser pump
(Used as On-Off:
Off= 0V
On= 10V)
Condenser fan
(e.g.: MCHRTF)
Condenser fan
(e.g.: MCHRTF)
Analogue
outputs
Y1 (0-10V)
Y2 (0-10V)
Y3 (PWM)
+0300010EN Chiller Core – rel 1.0 – 13/07/2009
9
1.3.2
pCO3 Medium CH/HP - air/water
1-4 circ. 1-8 comp. 1 evap. 1-2 cond.
Analogue
inputs
Master
1-4 circ. 1-8 comp. 2-4 evap. 1-2 cond.
Slave
Master
Slave
B1
High press. circ. 1
High press. circ. 3
High press. circ. 1
High press. circ. 3
B2
Low press. circ. 1
Low press. circ. 3
Outside temp./
Low press. circ. 1
Low press. circ. 3
B3
Control water outlet temp.
Control water outlet temp.
B4
B5
Control water inlet temp.
Control water inlet temp.
Evap. 1 water outlet temp.
Evap. 3 water outlet temp.
B6
High press. circ. 2
High press. circ. 4
High press. circ. 2
High press. circ. 4
B7
Low press. circ. 2
Low press. circ. 4
Low press. circ. 2
Low press. circ. 4
B8
Outside temp.
Evap. 2 water outlet temp.
Evap. 4 water outlet temp.
Digital inputs
ID1
High press. circ. 1
High press. circ. 3
High press. circ. 1
High press. circ. 3
ID2
Low press. circ. 1
Low press. circ. 3
Low press. circ. 1
Low press. circ. 3
ID3
Remote on-off
Remote on-off
ID4
Cool/heat changeover
Cool/heat changeover
ID5
Evaporator water flow
ID6
Comp. 1 overload circ. 1
Comp 1 overload circ. 3
Evaporator water flow
Comp. 1 overload circ. 1
Comp 1 overload circ. 3
ID7
Comp. 2 overload circ. 1
Comp 2 overload circ. 3
Comp. 2 overload circ. 1
Comp 2 overload circ. 3
ID8
Serious alarm
ID9
High press. circ. 2
High press. circ. 4
High press. circ. 2
High press. circ. 4
ID10
Low press. circ. 2
Low press. circ. 4
Low press. circ. 2
Low press. circ. 4
ID11
Comp. 1 overload circ. 2
Comp. 1 overload circ. 4
Comp. 1 overload circ. 2
Comp. 1 overload circ. 4
ID12
Comp. 2 overload circ. 2
Comp. 2 overload circ. 4
Comp. 2 overload circ. 2
Comp. 2 overload circ. 4
ID13
Evap. pump 1 overload
Evap. pump 2 overload
Evap. pump 1 overload
Evap. pump 2 overload
NO1
Compressor 1 circuit 1
Compressor 1 circuit 3
Compressor 1 circuit 1
Compressor 1 circuit 3
NO2
Compressor 2 circuit 1
Compressor 2 circuit 3
Compressor 2 circuit 1
Compressor 2 circuit 3
NO3
Compressor 1 circuit 2
Compressor 1 circuit 4
Compressor 1 circuit 2
Compressor 1 circuit 4
NO4
Compressor 2 circuit 2
Compressor 2 circuit 4
Compressor 2 circuit 2
Compressor 2 circuit 4
NO5
Cond. fan unit 1
Cond. fan unit 1
NO6
Cond. fan unit 2
Cond. fan unit 2
NO7
Antifreeze heater
Antifreeze heater
NO8
Serious alarm
NO9
Evaporator pump 1
Evaporator pump 2
Evaporator pump 1
Evaporator pump 2
NO10
Liquid solenoid 1
Liquid solenoid 3
Liquid solenoid 1
Liquid solenoid 3
NO11
Liquid solenoid 2
Liquid solenoid 4
Liquid solenoid 2
Liquid solenoid 4
NO12
4-way valve circuit 1
4-way valve circuit 3
4-way valve circuit 1
4-way valve circuit 3
NO13
4-way valve circuit 2
4-way valve circuit 4
4-way valve circuit 2
4-way valve circuit 4
Serious alarm
ID14
Digital outputs
Serious alarm
Analogue
outputs.
Y1 (0-10V)
Cond. fan unit 1
Cond. fan unit 1
Y2 (0-10V)
Cond. fan unit 2
Cond. fan unit 2
Y3 (0-10V)
Y3 (0-10V)
+0300010EN Chiller Core – rel 1.0 – 13/07/2009
10
1.3.3
pCO3 Medium CH/HP – water/water
1-4 circ. 1-8 comp. 1 evap. 1 cond. with slave board only
Analogue inputs
B1
B2
B3
B4
Master
Slave
High press. circ. 1
Low press. circ. 1
Evap. water outlet temp.
Evap. water inlet temp.
Cond. water outlet temp.
(used for condenser antifreeze on units with reversible refrigerant
circuit)
B5
B6
B7
B8
Cond. water inlet temp.
(used for control on units with reversible water circuit in heat pump
operation)
High press. circ. 2
Low press. circ. 2
Outside temp.
Digital inputs
ID1
ID2
ID3
ID4
ID5
ID6
ID7
ID8
ID9
ID10
ID11
ID12
ID13
ID14
High press. circ. 1
Low press. circ. 1
Remote on-off
Cool/heat changeover
Evaporator water flow
Comp. 1 overload circ. 1
Comp. 2 overload circ. 1
Serious alarm
High press. circ. 2
Low press. circ. 2
Comp. 1 overload circ. 2
Comp. 2 overload circ. 2
Evap. pump 1 overload
Condenser water flow
Digital outputs
NO1
NO2
NO3
NO4
NO5
NO6
NO7
NO8
NO9
NO10
NO11
NO12
NO13
Compressor 1 circuit 1
Compressor 2 circuit 1
Compressor 1 circuit 2
Compressor 2 circuit 2
Condenser pump 1
Condenser pump 2
Antifreeze heater
Serious alarm
Evaporator pump 1
Liquid solenoid 1
Liquid solenoid 2
4-way valve circuit 1
4-way valve circuit 2
High press. circ. 4
Low press. circ. 4
High press. circ. 3
Low press. circ. 3
Comp. 1 overload circ. 3
Comp. 2 overload circ. 3
High press. circ. 4
Low press. circ. 4
Comp. 1 overload circ. 4
Comp. 2 overload circ. 4
Evaporator pump 2 overload
Compressor 1 circuit 3
Compressor 2 circuit 3
Compressor 1 circuit 4
Compressor 2 circuit 4
Evaporator pump 2
Liquid solenoid 3
Liquid solenoid 4
4-way valve circuit 3
4-way valve circuit 4
Analogue outputs
Y1 (0-10V)
Y2 (0-10V)
Y3 (0-10V)
Y4 (0-10V)
+0300010EN Chiller Core – rel 1.0 – 13/07/2009
High press. circ. 3
Low press. circ. 3
11
1.3.4
pCO3 Large CH/HP - air/water
1-4 circ. 1-12 comp. 2-4 evap. 1-2 cond.
Analogue inputs
B1
B2
B3
B4
B5
B6
B7
B8
B9
B10
Digital inputs
ID1
ID2
ID3
ID4
ID5
ID6
ID7
ID8
ID9
ID10
ID11
ID12
ID13
ID14
ID15
ID16
ID17
ID18
Digital outputs
NO1
NO2
NO3
NO4
NO5
NO6
NO7
NO8
NO9
NO10
NO11
NO12
NO13
NO14
NO15
NO16
NO17
NO18
Master
Slave
High press. circ. 1
Low press. circ. 1
Control water outlet temp.
Control water inlet temp.
Evap. 1 water outlet temp.
High press. circ. 2
Low press. circ. 2
Evap. 2 water outlet temp.
Outside temp.
High press. circ. 3
Low press. circ. 3
High press. circ. 1
Low press. circ. 1
Remote on-off
Cool/heat changeover
Evaporator water flow
Comp. 1 overload circ. 1
Comp. 2 overload circ. 1
Serious alarm
High press. circ. 2
Low press. circ. 2
Comp. 1 overload circ. 2
Comp. 2 overload circ. 2
Evap. pump 1 overload
Evap. pump 2 overload
Comp. 3 overload circ. 1
Comp. 3 overload circ. 2
High press. circ. 3
LP3
Compressor 1 circuit 1
Compressor 2 circuit 1
Compressor 1 circuit 2
Compressor 2 circuit 2
Cond. fan unit 1
Cond. fan unit 2
Antifreeze heater
Serious alarm
Evaporator pump 1
Liquid solenoid 1
Liquid solenoid 2
4-way valve circuit 1
4-way valve circuit 2
Compressor 3 circuit 1
Compressor 3 circuit 2
Evaporator pump 2
Compressor 1 circuit 3
Compressor 2 circuit 3
Compressor 1 circuit 4
Compressor 2 circuit 4
Evap. 3 water outlet temp.
High press. circ. 4
Low press. circ. 4
Evap. 4 water outlet temp.
Comp. 1 overload circ. 3
Comp. 2 overload circ. 3
High press. circ. 4
Low press. circ. 4
Comp. 1 overload circ. 4
Comp. 2 overload circ. 4
Comp. 3 overload circ. 3
Comp. 3 overload circ. 4
Liquid solenoid 3
Liquid solenoid 4
4-way valve circuit 3
4-way valve circuit 4
Compressor 3 circuit 3
Compressor 3 circuit 4
Analogue outputs
Y1 (0-10V)
Cond. fan unit 1 (e.g.: inverter)
Y2 (0-10V)
Cond. fan unit 2 (i.e.: Inverter)
Y3 (0-10V)
Y4 (0-10V)
Y5 (0-10V)
+0300010EN Chiller Core – rel 1.0 – 13/07/2009
12
Y6 (0-10V)
1.3.5
pCO3 Large CH/HP - water/water
1-4 circ. 1-12 comp. 2-4 evap. 1-2 cond.
Analogue inputs
B1
B2
Master
Slave
B4
B5
B6
B7
B8
B9
High press. circ. 1
Low press. circ. 1
Control evaporator water outlet temp. /
Generic temp. (inlet or outlet) for control
(on units with 2 evap. 2 cond. and reversible refrigerant circuit)
Control evaporator water inlet temp. /
Condenser 2 water outlet temp.
(on units with 2 evap. 2 cond. and reversible refrigerant circuit)
Evaporator 1 water outlet temp.
High press. circ. 2
Low press. circ. 2
Evaporator 2 water outlet temp.
Outside temp.
B10
Condenser 1 water outlet temp.
(on units with reversible refrigerant circuit) /
Condenser water inlet temp.
(on units with reversible water circuit during heat pump operation)
B3
Digital inputs
ID1
ID2
ID3
ID4
ID5
ID6
ID7
ID8
ID9
ID10
ID11
ID12
ID13
ID14
ID15
ID16
ID17
ID18
Digital outputs
NO1
NO2
NO3
NO4
NO5
NO6
NO7
NO8
NO9
NO10
NO11
NO12
NO13
NO14
NO15
NO16
NO17
NO18
High press. circ. 3
Low press. circ. 3
Condenser 4 water outlet temp.
(on units with reversible refrigerant circuit)
Evaporator 3 water outlet temp.
High press. circ. 4
Low press. circ. 4
Evaporator 4 water outlet temp.
Condenser 3 water outlet temp.
(on units with reversible refrigerant circuit)
High press. circ. 1
Low press. circ. 1
Remote on-off
Cool/heat changeover
Evaporator water flow
Comp. 1 overload circ. 1
Comp. 2 overload circ. 1
Serious alarm
High press. circ. 2
Low press. circ. 2
Comp. 1 overload circ. 2
Comp. 2 overload circ. 2
Evaporator pump 1 overload
Evaporator pump 2 overload
Comp. 3 overload circ. 1
Comp. 3 overload circ. 2
Condenser water flow
High press. circ. 3
LP3
Compressor 1 circuit 1
Compressor 2 circuit 1
Compressor 1 circuit 2
Compressor 2 circuit 2
Condenser pump 1
Condenser pump 2
Antifreeze heater
Serious alarm
Evaporator pump 1
Liquid solenoid 1
Liquid solenoid 2
4-way valve circuit 1
4-way valve circuit 2
Compressor 3 circuit 1
Compressor 3 circuit 2
Evaporator pump 2
Compressor 1 circuit 3
Compressor 2 circuit 3
Compressor 1 circuit 4
Compressor 2 circuit 4
+0300010EN Chiller Core – rel 1.0 – 13/07/2009
Comp. 1 overload circ. 3
Comp. 2 overload circ. 3
High press. circ. 4
Low press. circ. 4
Comp. 1 overload circ. 4
Comp. 2 overload circ. 4
Comp. 3 overload circ. 3
Comp. 3 overload circ. 4
Liquid solenoid 3
Liquid solenoid 4
4-way valve circuit 3
4-way valve circuit 4
Compressor 3 circuit 3
Compressor 3 circuit 4
13
Analogue outputs
Y1 (0-10V)
Y2 (0-10V)
Y3 (0-10V)
Y4 (0-10V)
Y5 (0-10V)
Y6 (0-10V)
+0300010EN Chiller Core – rel 1.0 – 13/07/2009
14
1.3.6
Overview of control and antifreeze probes in the various configurations
Based on the unit configuration and the size of board (pCOxs – pCO3 medium – pCO3 Large), below is an overview of the control and antifreeze probes used on the
evaporator and condenser.
Air/water units
Type of unit
Reversible
Control probe
Evaporator antifreeze probe
Condenser antifreeze probe
-
Operating
mode
Cooling
Chiller
Evap. inlet B4
or
Evap. outlet B3
Not required
Heat pump
-
Heating
Chiller / Heat pump
Refrigerant side
Cooling
or
Heating
Evap. inlet B4
or
Evap. outlet B3
Evap. inlet B4
or
Evap. outlet B3
Control evap. outlet B3
or (not on pCOxs)
Evap. outlet circ. 1 B5 master,
Evap. outlet circ. 2 B8 master,
Evap. outlet circ. 3 B5 slave,
Evap. outlet circ. 4 B8 slave.
Not used
Control evap. outlet B3
or (not on pCOxs)
Evap. outlet circ. 1 B5 master,
Evap. outlet circ. 2 B8 master,
Evap. outlet circ. 3 B5 slave,
Evap. outlet circ. 4 B8 slave.
Not required
Type of unit
Reversible
Control probe
Evaporator antifreeze probe *
Condenser antifreeze probe**
Chiller
-
Operating
mode
Cooling
Evap. inlet B4
or
Evap. outlet B3
Not required
Heat pump
(only pCOxs)
-
Heating
Chiller / Heat pump
Water side
Cooling
Cond. inlet B4
or
Cond. outlet B3
Evap. inlet B4
or
Evap. outlet B3
Control evap. outlet B3
or (not on pCOxs)
Evap. outlet circ. 1 B5 master,
Evap. outlet circ. 2 B8 master,
Evap. outlet circ. 3 B5 slave,
Evap. outlet circ. 4 B8 slave.
Depends on the control probe selected:
Evap. outlet B3/B4
Not required
Chiller / Heat pump
Water side
Heating
Cond. inlet
--- (PCOXS),
B5(PCO3M),
B10(PCO3L)
Chiller / Heat pump
Refrigerant side
Cooling
Evap. inlet B4
or
Evap. outlet B3
Chiller / Heat pump
Refrigerant side
Heating
Cond. inlet B4
or
Cond. outlet B3
Control evap. outlet B3
or (not on pCOxs)
Evap. outlet circ. 1 B5 master,
Evap. outlet circ. 2 B8 master,
Evap. outlet circ. 3 B5 slave,
Evap. outlet circ. 4 B8 slave.
Control evap. outlet B3
or (not on pCOxs)
Evap. outlet circ. 1 B5 master,
Evap. outlet circ. 2 B8 master,
Evap. outlet circ. 3 B5 slave,
Evap. outlet circ. 4 B8 slave.
Control evap. outlet B3
or (not on pCOxs)
Evap. outlet circ. 1 B5 master,
Evap. outlet circ. 2 B8 master,
Evap. outlet circ. 3 B5 slave,
Evap. outlet circ. 4 B8 slave.
Control evap. outlet B3
or (not on pCOxs)
Evap. outlet circ. 1 B5 master,
Evap. outlet circ. 2 B8 master,
Evap. outlet circ. 3 B5 slave,
Evap. outlet circ. 4 B8 slave.
Not required
Water/water units
* for further details see the table in the chapter on “Evaporator antifreeze”.
** for further details see the table in the chapter on “Condenser antifreeze”.
+0300010EN Chiller Core – rel 1.0 – 13/07/2009
15
Not required
Not required
Not required
PCOM: Cond. out. temp B5*
PCOL:
Cond. outlet circ. 1 B10 master*
Cond. outlet circ. 2 B4
master*
Cond. outlet circ. 3 B10 slave*
Cond. outlet circ. 4 B4 slave*
2. HARDWARE FEATURES AND INSTALLATION
2.1 Features of the pCO board
pCO3
Features of the pCO platform that the application is installed on:
Key
1
2
3
4
5
Description
3
pCO Medium, Large controller
pDG1 panel or wall mounting + telephone cable
Serial card for BMS
Temperature sensors
Pressure sensors
Code
PCO3000*L0 / PCO3000*M0
PGD1000**0 + S90CONN00*
Depends on the supervisor connected
TSC1500030, NTC*****00
SPKT00***0
pCOxs
Important: this software requires a pCOxs with 512KB of RAM, as the application features user atoms developed in C.
If attempting to download application to a pCO1 or pCOxs with less than 512KB of RAM, pCOLoad blocks the upload of the *.blx file. If the application is still downloaded
(e.g.: using Winload), the BIOS shows an error screen and the application will not run: I/O board fault 01.
Key
1
2
3
4
5
6
6
Description
xs
pCO controller
pDG1 panel or wall mounting + telephone cable
Serial card for BMS
Temperature sensors
Pressure sensors
Clock card
Clock card + memory for the BIOS log
+0300010EN Chiller Core – rel 1.0 – 13/07/2009
Code
PCO1000CX0
PGD1000**0 + S90CONN00*
Depends on the supervisor connected
TSC1500030, NTC*****00
SPKT00***0
PCO100CLK0
PCO100CEF0
16
3. START UP
The following systems can be used to update and install the Chiller Core
application on the pCO board:
•
pCO Manager;
•
SmartKey programming key.
Chiller CORE is already configured for the virtualisation of all the inputs and
outputs, both digital and analogue. Consequently, all inputs and outputs can be
overridden using the commissioning tool.
The configuration functions available on the commissioning tool allow the
designer to decide which variables will be monitored/logged/plotted or
monitored by event, to organise the variables into categories, and to choose the
set of configuration parameters.
3.1 pCO Manager
Note: Winload cannot be used to download Chiller Core to a pCO
controller, as Winload cannot manage the user atom *.blx file.
Support files
Following development of the application, 1tool generates various files during
compilation; these include two that are required for commissioning:
All CAREL pCO sistema series 16 bit controllers (see the pCO sistema manual)
can update their software from a PC.
CAREL provides a program called pCOLoad and a serial converter with RS485
output (code CVSTDUTLF0) to be connected to the pCO. The special driver,
released by CAREL, also needs to be installed on the PC.
The program is included in the installation of the complete “1Tool” program
suite or as part of the pCO Manager program, downloadable separately from
http://ksa.CAREL.com under “download Æ support Æ software utilities”.
The installation includes both the program and the user manual. The pCO
controller can be connected directly to the PC via the RS485 serial port used for
the “pLAN” connection or via the BMS serial port using the RS485 serial card
(optional) for the “supervisor” connection.
<applicationName>.2CF (descriptive of variables)
<applicationName>.2CD (descriptive of categories and access profiles)
As well as these files, the <applicationName>.DEV file that contains the predefined set of unit parameters can also be managed.
When the commissioning procedure is complete, or for configuration or
monitoring, the user can generate the following files:
<applicationName>.2CW (descriptive of categories, access profiles, monitoring
groups)
<CommissioningLogFileName>.CSV (commissioning log file, containing the data
on the variables recorded during monitoring)
For the configuration phase of the commissioning procedure, the following files
must be available: .2CF, 2CD and where necessary .DEVELOPMENT, which can
be imported and exported.
For the monitoring phase, as well as the files mentioned above, the .2CW file
with the definition of the working environment may be required. The
commissioning log file is an output file only.
Connection modes
Each controller has three serial ports (0, 1 and 2), each with its own default
protocol:
Fig. 3.a
Updating the BOOT is generally NOT RECOMMENDED by CAREL; during
production CAREL always loads the BOOT required for the correct operation of
the unit. Only in very special cases will CAREL ask the user to update the BOOT.
The BIOS can only be loaded via the pLAN serial connection.
Note: Minimum versions for downloading Chiller Core:
- pCO3-pCO1-pCOxs 4.20
- Supernode 4.30
When updating the application and the BIOS, the pCO operating mode switches
to low level. In this special mode, the logged data cannot be downloaded to the
PC nor can the application be loaded in compressed format. To return the unit
to normal communication mode, reset the pCO board.
If uploading the BOOT or BIOS files only, the other application files then need to
be uploaded again.
The consequences of interruption to the upload procedure depend on the
instant this occurs. In any case, the upload needs to be repeated. If pCOLoad
cannot connect to the pCO, a Smart Key must be used to download the BIOS
and any other operating application (e.g.: pCO functional test). This refreshes
the pCO memory, allowing connection to pCOLoad.
Default protocol
Description
Serial 0
pLAN
Serial 1
BMS
Connection to terminal and pLAN
network
Connection to supervisor
Serial 2
FieldBus
Connection to field devices
There are two modes for commencing local communication between pCO
Manager and the controller:
1) Activate the WinLoad protocol on the required port
2) On BMS and FieldBus only, irrespective of the protocol set on the pCO,
simply connect pCO Manager and from “Connection settings” select
SearchDevice = Auto (BMS or FB). In this case it will take around 15-20
seconds to go online.
Memory limits
The periodical monitoring of the application variables is limited to a maximum
of 250 WORDS, freely selectable from the entire memory available to the
application. The virtualisation of application variables is limited to a maximum of
50 WORDS, selectable from the entire memory available to the application.
There are no address limits for “one-shot” read/write of individual variables: all
memory addresses reserved for the application in all types of memory available
on the pCO can be used: X memory, T memory, P memory, E memory.
3.1.1 Commissioning Tool
Commissioning tool is configuration and real-time monitoring software used to
check the operation of an application installed on a pCO, for commissioning,
debugging and maintenance.
Note: for further details on installing and updating the software on the
pCO controller, see the online help for the pCO Manager program.
This tool can be used to set the configuration parameters, set the values of
volatile and permanent variables, save the trend in the main values of the unit to
a file, manually manage the unit I/Os using a simulation file and monitor/restore
the alarms on the unit where the device is installed.
+0300010EN Chiller Core – rel 1.0 – 13/07/2009
Port
17
3.2 SmartKey
The SMARTKEY programming key can clone the contents of one pCO and then
download the data to another identical pCO via the terminal telephone
connector (the pLAN must be disconnected). This function is obviously available
for all pCO controllers. In addition to this mode, the key can transfer the data
logged on a series of pCO devices and download them to the PC.
From the PC, using the SMARTKEY PROGRAMMER, the key can be configured to
run certain operations: retrieve logs, program applications, program BIOS, etc.
The SMARTKEY PROGRAMMER is installed together with pCO Manager.
For further details see the online help for the SMARTKEY PROGRAMMER
program and the SMARTKEY instruction sheet.
Fig. 3.d
If the address field is set to 0, the terminal communicates with the pCO board
using the Local terminal protocol and the “I/O Board address” field disappears,
as it no longer has any meaning.
As stated, Chiller Core is optimised to operate with terminal address 32. An
3
xs
automatic procedure configures the master pCO (with address 1) or the pCO
for communication with this terminal. The procedure starts when the
3
xs
pCO /pCO controller with address other than 0 detects communication with a
device over the pLAN (terminal or other pCO). The procedure is only run once
and can only be repeated after powering up the pCO.
The pCO3 with the address set to 2 (slave) does not communicate with the
terminal.
Important: if during operation the terminal detects inactivity on the pCO
board it is connected to, the display is cancelled and a message similar to the
one shown below is displayed.
Fig. 3.b
Note: for further details on installing and updating the software on the
pCO controller, see the online help for the pCO Manager program.
3.3 Commissioning
3
xs
When starting the pCO /pCO board that the application has been installed on, a
screen is displayed to choose the program interface language.
Press ENTER to choose the required language.
Fig. 3.g
Note: If no option is selected within the time defined by the
corresponding parameter (in the service menu), the current language selected is
used.
If the terminal detects inactivity of the entire pLAN network, that is, it does not
receive any messages from the network for 10 seconds consecutively, the
display is cancelled completely and the following message is shown:
3.3.1
Setting the terminal address
The address of the terminal can be set in the range from 0 to 32; addresses between 1
and 32 are used by the pLAN protocol, while address 0 identifies the Local terminal
protocol, used for point-to-point connections and to configure the pCO controller. The
default address is 32, which corresponds to the address optimised for the Chiller Core
application. The address of the terminal can only be set after having powered the
,
and
terminal via RJ12 connector. To access configuration mode press
together for at least 5 seconds; the terminal will display a screen similar to the one
shown below, with the cursor flashing in the top left corner:
Fig. 3.h
3.3.2
To complete the installation procedure, set the pLAN address of the pCO board;
3
xs
the pCO /pCO controllers do not have dipswitches for setting the pLAN network
address: the pLAN address can be set from any pGD1 terminal.
1. Set address 0 on the terminal (see the previous sections for details on
how to select the address).
2. Power down the pCO.
3. Disconnect any pLAN connections to other controllers from the pCO.
4. Connect the terminal to the pCO.
5. Power up the pCO, pressing the UP and ALARM buttons together on the
terminal. After a few seconds, the pCO runs the start-up sequence and
the display shows a screen similar to the following:
.
Fig. 3.c
To modify the address of the terminal (“Display address setting”) carry out the
following operations in sequence.
1.
once: the cursor will move to the “Display address
Press
setting” field.
2.
Select the desired value using
3.
and
, and confirm by
pressing
again
If the value selected is different from the value saved, the following
screen will be displayed and the new value will be saved to the
permanent memory on the display.
+0300010EN Chiller Core – rel 1.0 – 13/07/2009
*
Setting the pCO board address
18
Fig. 3.i
6.
7.
From the moment when the screen is displayed, wait 10 seconds
and then release the buttons.
The pCO interrupts the start-up sequence and shows a
configuration screen similar to the following:
Fig. 3.l
Then change the pLAN address using the
8.
and
buttons on the terminal.
Confirm the address by pressing
: the pCO completes the
start-up sequence and uses the address specified.
Important: if the settings have not been made correctly, the text and
the images on the display will be shown in an incorrect and unorderly manner.
+0300010EN Chiller Core – rel 1.0 – 13/07/2009
19
4. USER INTERFACE
Compressor forced off
4.1 Graphic terminal
Compressor limited
Compressor alarm
The Chiller Core user interface is the pGD1 terminal, in the wall or panel
mounted versions, or if necessary using the “built-in” terminal installed directly
on the pCO3 board (pCOxs does not support the PGD1 built-in display).
(flash)
Compressor starting, awaiting the safety times
(flash)
Compressor stopping, awaiting the safety times
5- Indicates access to the quick menu using DOWN
Fig. 4.a
This terminal, illustrated in the figure above, features six buttons, with following
meanings:
- Alarm
- Prg
- Esc
- Up
- Down
- Enter
1…4
display the list of active alarms.
enter the main menu tree.
return to then higher lever screen.
scroll a list upwards or increase the value shown on the
display.
scroll a list downwards or decrease the value shown on the
display.
enter the selected submenu or confirm the set value.
4.2 Display
The following figure shows an example of the main screen, highlighting the
fields and icons used:
Fig. 4.c
6- Number of circuit
7- High and low pressure expressed (with conversion to temperature)
8- Status of the compressors
Off
Start
On
Step 2
Step 3
Step 4
Forced off
Limit step 1
Limit step 2
Limit step 3
Off alarm
Off wait 180s
Compressor off
Comp. starting *
Compressor on
Compressor in step 2 *
Compressor in step 3 *
Compressor in step 4 *
Compressor forced off
Compressor limited to step 1 *
Compressor limited to step 2 *
Compressor limited to step 3 *
Compressor alarm
Compressor called but can’t start due to safety times +
countdown
On wait 60s
Compressor can’t stop due to safety times + countdown
Manual mode
Compressor in manual operation
On pump-down
Compressor on for pump-down
* These states are not used by Chiller Core, being typical of other types of
compressor such as screw compressors.
Fig. 4.b
1- Date and time
2- Current operating mode
Cooling mode
Heating mode
Individual defrost in progress
Separate defrost in progress
3- Main temperature measured by control probe
4- Status of the compressors in the circuits
9- Current condensing pressure set point
10- Condenser fan status
11- Current unit operating set point (considers scheduling by calendar and
compensation)
Compressor off
Compressor on
+0300010EN Chiller Core – rel 1.0 – 13/07/2009
20
12- Control temperature
13- Number of capacity steps required by the temperature controller in relation
to the total number available on the unit
Note: The number of screens and the information on the quick menu
depend on the configuration of the unit: number of circuits, number of
compressors per circuit and type of condenser control.
+0300010EN Chiller Core – rel 1.0 – 13/07/2009
21
5. DESCRIPTION OF THE MENUS
To access these
branches, enter
password PW2
To access these
branches, enter
password PW1
Main menu – Tree of functions
Irrespective of the current screen displayed, pressing Prg accesses the main menu, as shown below
Fig. 5.a
Note: To ensure safe operation of the unit, switch the unit off when
setting the parameters in:
•H. Manufacturer Æ a. Configuration (all screens)
•H. Manufacturer Æ c. Manufacturer parameters (screen Hc03 only, to
change the unit of measure)
Fig 5.c
If attempting to set the parameters on these screens, a warning will be shown
on the last row. Example:
Therefore, it is the first screen (01) in the “Temperature control” (c) submenu
under the “Parameters service” (f) menu, which in turn is under the “Service”
(G) item on the main menu.
Fig 5.b
All the screens are identified by an index displayed in the field at the top right.
The index is unique and is made up of the codes of the level 1, 2 and 3 menus
that the screen belongs to. When there is more than one screen in the same
submenu, these are identified by a progressive number.
For example, the following screen is identified by the index Gfc01:
+0300010EN Chiller Core – rel 1.0 – 13/07/2009
22
6. FUNCTIONS
6.1 Management of analogue inputs
6.2 Management of digital inputs
Below is a flow chart detailing management of the analogue inputs:
Below is a flow chart detailing management of the digital inputs:
Config. probe type &
limits from man. menu
Read inputs
atom DIN
Read inputs
atom AIN_CONF
I/O Test from man. menu
I/O Test from
manufacturer menu
Virtualisation by atom
Virt_Din
Commissioning
Virtualisation by atom
Virt_Ain
Commissioning
BMS
Display I/O menu
Commissioning
Enable probes based on
type of pCO
Logic from man. menu
NO/NC
Conversion on limits,
check broken probe,
offset etc
Associate values->function based on pCO
(e.g.: Din1_Value -> Din_HP_Circ1)
Convert unit of measure
°C/°F & bar/psi
Various
func.
Associate values->function based on pCO
(e.g.: Probe1_Value -> Ain_High_Press_Circ1)
pLAN
Fig 6.2.a
Convert pressure to
temperature
6.3 Management of digital outputs
Below is a flow chart detailing management of the digital outputs:
Various
func.
Alarm log
Disp. I/O
loop
BMS
pLAN
Commissio
ning
Device management
algorithm
Fig 6.1.a
Associate values->function based on pCO
(e.g.: Comp1_Circ1 -> Dout_1)
BMS
Probe
Type
Limits
UOM
Offset
Alarm
delay
HP
0-1V
0-10V
0-20mA
4-20mA
0-5V
0-1V
0-10V
0-20mA
4-20mA
0-5V
NTC
-999.9 to 999.9
Default 0 to
34.5bar
barg/
psig
-9.9 to 9.9
10s
-999.9 to 999.9
Default 0 to
34.5bar
barg/
psig
-9.9 to 9.9
10s
-999.9/999.9
°C/°F
-9.9 to 9.9
10s
LP
Temp.
I/O Test from man. menu
Virtualisation by atom
Virt_Din
Commissioning
Logic from man. menu
NO/NC
Write dig. outputs
atom DOUT
Display I/O loop
Fig. 6.3.c
+0300010EN Chiller Core – rel 1.0 – 13/07/2009
23
Commissioning
6.4 Management of analogue outputs
Below is a flow chart detailing management of the digital outputs:
Device management
algorithm
Fig. 6.5.c
Associate values->function based on pCO
(e.g.: Mod_Cond_Fan_Group1 -> Aout1_Value)
BMS
45-
Number and description of the digital input
Override
Example of testing a digital output:
I/O Test from man. menu
Virtualisation by atom
Virt_Din
Commissioning
Set par. for PWM
manage. (Hb50)
Commissioning
Display I/O loop
Fig. 6.5.d
67-
Write analogue out. atom
Aout_Conf
Number and description of the digital input
Override
Example of testing an analogue output:
Fig 6.4.d
6.5 Test inputs and outputs
Under the Manufacturer menu Æ Test Inputs/Outputs, all the inputs and
outputs on the pCO*, both digital and analogue, can be tested. The diagrams
shown in the previous chapters, describing the management of the inputs and
outputs, also include the “I/O Test from manufacturer menu” block, used to
identify the effect of each of the functions.
Fig. 6.5.e
89-
Note: The test inputs and outputs procedure ignores all the safety
features on the various devices, and consequently must be performed with
special care!
As a result, when enabling the function the maximum time needs to be set, after
which the procedure is disabled automatically. These 2 parameters are included
in the first screen under the Hfxx loop:
6.6 Circuit and compressor
management
Chiller Core comes with a new family of macroblocks and modules for
managing the circuits, compressors and safety devices.
The underlying philosophy is that each of these only performs the function it
was created for, based on the requirements and the feedback from other
macroblocks/modules.
The system has been designed to be modular and expandable.
E.g.: The management of compressor start-up (direct, star-delta or partwinding)
has been separated from the macroblocks/modules for the management of
compressor operation. In this way, with a single macroblock for start-up,
different types of compressor can be controlled (scroll, piston, screw) replacing
or adding specific macroblocks and modules that manage the compressor safety
features, such as safety times, capacity steps, etc.
The page below provides an overview of the management
macroblocks/modules and the main interactions between them.
Fig. 6.5.a
Example of testing an analogue input used for a pressure probe:
Fig. 6.5.b
1-
23-
Type of probe selected for pressure probes. This cannot be set, and simply
describes the setting made in the I/O configuration menu.
As an analogue input is being tested, the override is performed by setting a
value from 0 to 1000, as occurs when reading the input
Override value used
Name of the probe being tested and the corresponding override pressure /
temperature value. This depends on the probe limits set in the I/O
configuration menu.
Example of testing a digital input:
+0300010EN Chiller Core – rel 1.0 – 13/07/2009
Number and description of the analogue output
Override, 0-1000
24
Fig 6.6.a
+0300010EN Chiller Core – rel 1.0 – 13/07/2009
25
Lst_Prevent_Circuit
Structure of the list
Address
0
1
2
3
Circuits
involved
1
2
3
0 to 32767
0 to 32767
0 to 32767
Values
4
4
1 and 2
(for antifreeze)
5
3 and 4
(for antifreeze)
6
All
(for antifreeze)
0 to 32767
0 to 32767
0 to 32767
0 to 32767
If a circuit is in conditions whereby the activation of a prevention function is required, Mod_Circuit_Prevent increases the value of the variable at the address in the list
corresponding to the circuit in question. If the condition persists, Mod_Circuit_Prevent keeps increasing the value after each set interval of time. Mod_Device_Rotation checks
whether the capacity of the circuit can be decreased and decides which device or capacity step to deactivate based on the rotation set.
Lst_Rotation_Dev
Structure of the list with multiple circuits
Address
0
1
2
Circuits
1
Comp.
1
2
3
Values
0-6
0-6
0-6
Structure of the list with just 1 circuit
Address
0
1
3
4
5
6
7
8
9
10
2
4
0-6
1
0-6
2
0-6
3
0-6
4
0-6
3
4
5
6
7
2
11
12
13
3
1
0-6
Circuit
2
0-6
14
15
3
0-6
4
0-6
4
3
0-6
4
0-6
1
0-6
2
0-6
8
9
10
11
12
13
14
15
9
0-6
10
0-6
11
0-6
12
0-6
13
0-6
14
0-6
15
0-6
16
0-6
1
Comp.
Values
1
0-6
2
0-6
3
0-6
4
0-6
5
0-6
6
0-6
7
0-6
8
0-6
Mod_Device_Rotation manages the rotation between the circuits and compressors and returns the request for each of the selected compressors to the output list,
Lst_Rotation_Dev. This gives rise to any pump-down calls, processed by PumpDown_Management, and the compressor capacity request, used by Comp_Scroll_Pistons.
Below is the meaning of the possible values for each address in the list:
Lst_Rotation_Dev
0
1
2
3
4
5
6
Description
Compressor off
Compressor on or compressor step 1 (e.g.: Compressor on at 25%)
Compressor step 2 (e.g.: Compressor on at 50%)
Compressor step 3 (e.g.: Compressor on at 75%)
Compressor step 4 (e.g.: Compressor on at 100%)
Compressor on with pump-down
Compressor off with pump-down
Lst_Dev_Status
Structure of the list with multiple circuits
0
1
2
1
Comp.
1
2
3
Values
0-14
0-14
0-14
4
0-14
1
0-14
2
0-14
3
0-14
4
0-14
1
0-14
2
0-14
3
0-14
4
0-14
1
0-14
Structure of the list with just 1 circuit
0
1
2
3
4
5
6
7
8
9
10
11
4
0-14
5
0-14
6
0-14
7
0-14
8
0-14
9
0-14
10
0-14
11
0-14
12
0-14
Address
Circuits
Addres
s
Circuit
Comp.
Values
3
4
5
6
7
8
9
2
10
11
12
13
14
15
2
0-14
3
0-14
4
0-14
12
13
14
15
13
0-14
14
0-14
15
0-14
16
0-14
3
4
1
1
0-14
2
0-14
3
0-14
+0300010EN Chiller Core – rel 1.0 – 13/07/2009
26
Mod_Device_Rotation, based on the feedback received on the operation of the compressors and management of compressor rotation, returns a list with the operating status
of the compressors.
Below are the meanings of the values possible for each address in the list and the corresponding display on the user interface:
Lst_Dev_Status
0. Compressor off
1. Compressor starting *
2. Compressor on or in step 1
3. Compressor in step 2*
4. Compressor in step 3*
5. Compressor in step 4*
6. Compressor forced off
Image on the main screen
Limit to step 1*
Limit to step 2*
Limit to step 3*
Off from alarm
7. Compressor limited to step 1 *
8. Compressor limited to step 2 *
9. Compressor limited to step 3 *
10. Compressor alarm
11. Compressor called but cannot start due to safety times
Status in the quick menu
Off
Start*
On
Step 2*
Step 3*
Step 4*
Forced off
(flashing)
12. Compressor cannot stop due to safety times
(flashing)
13. Compressor in manual operation
None, unit off
14. Compressor on for pump-down
* These states are not used by Chiller Core, being typical of other types of compressor, such as screw compressors.
Off wait 180s
On wait
60s
Manual mode
On for pump-down
State_CompX
PumpDown_Mng manages the pump down procedure in a circuit with a maximum 4 of compressors, when called.
PumpDown_Mng is called to activated pump-down on a specific compressor. The macroblock activates the compressor (pump-down on power-up) or keeps it running
(pump-down on shutdown), while however closing the liquid solenoid valve, so as to be able to empty the evaporator.
PumpDown_Mng is transparent, that is, it forwards the start and stop requests for the compressors not involved in the pump down procedure, while keeping management of
the liquid solenoid active.
Below are the meanings of the values of the output pin, State_Comp1-2-3-4:
State_CompX
0
1
Description
Compressor stop request
compressor start request
Comp_StartStop
Comp_StartStop manages the start of a generic compressor based on a start request.
Chiller Core only uses direct starting, however Comp_StartStop can manage star-delta and partwinding starting.
Comp_StartStop also manages the function for balancing the pressure before the compressor starts.
Below are the meanings of the values of the output pin, Comp_StartStop:
Comp_StartStop
0
1
2
3
Description
Compressor stop request
Compressor start request with balancing
Compressor starting
Compressor start request
Lst_Device_Available
Comp_Scroll_Piston manages scroll and reciprocating compressors: activation of capacity steps, safety times, compressor shutdown due to alarm, capacity limitation and
manual operation.
Based on current operation, Comp_Scroll_Piston assigns a value to the output, Device_Available:
Device_Available
0
Description
Compressor off
+0300010EN Chiller Core – rel 1.0 – 13/07/2009
27
1
Compressor starting*
2
Compressor on or in step 1
3
Compressor in step 2*
4
Compressor in step 3*
5
Compressor in step 4*
6
Compressor forced off
Compressor limited to step 1*
7
Compressor limited to step 2*
8
Compressor limited to step 3*
9
10
Compressor alarm
11
Compressor called but cannot start due to safety times
12
Compressor cannot stop due to safety times
13
Compressor in manual operation
14
Compressor on for pump-down
* These states are not used by Chiller Core, being typical of other types of compressor, such as screw compressors.
In Chiller Core, the value of Device_Available is used as feedback for the Mod_Device_Rotation module. However, the Device_Available value for all the compressors must
be sent to a list, with the following structure :
Structure of the list with multiple circuits
Addresse
0
1
2
s
Circuits
1
Comp.
1
2
3
Values
0-14
0-14
0-14
Structure of the list with just 1 circuit
Addresse
0
1
2
s
Circuit
Comp.
1
2
3
Values
0-14
0-14
0-14
6.7
3
4
5
6
7
8
9
4
0-14
1
0-14
3
4
0-14
10
11
12
13
2
0-14
3
0-14
4
0-14
1
0-14
2
0-14
3
0-14
4
0-14
1
0-14
4
5
6
7
8
9
10
11
5
0-14
6
0-14
7
0-14
8
0-14
9
0-14
10
0-14
11
0-14
12
0-14
2
14
15
2
0-14
3
0-14
4
0-14
12
13
14
15
13
0-14
14
0-14
15
0-14
16
0-14
3
4
1
Alarm prevention
6.8
Circuit and compressor
rotation
Chiller Core includes the Mod_Circuit_Prevent module, which manages the
prevention of the following alarms:
- High pressure
- Low pressure
- Antifreeze
Chiller Core uses the Mod_Device_Rotation module for rotating the circuits and
compressors.
This module, unlike all the others, contains several user atoms developed in C.
For this reason, the pCO running the software must have 512KB of RAM
available, which is normal for the pCO3 platform, but not for the pCOxs, whose
code must be PCO1000CX0.
Below are some of the features of the module:
- Up to 4 circuits with a maximum of 4 compressors per circuit*; Chiller Core
can manage a maximum of 4 circuits and 3 compressors per circuit.
- Up to 16 compressors in just 1 circuit*
- Up to 3 capacity steps per compressor*
- Possibility to balance the capacity between circuits
- Capacity step activation order CssCss or CCssss
- FIFO rotation
- LIFO rotation
- Rotation based on compressor operating hours
- Fixed rotation even on compressors with different capacities*
- One Compressor controlled by inverter
- Forced start-up of all the compressors in a circuit
- Forced rotation between the compressors in a circuit
- Compressor requests based on feedback on device status
- Reduction in capacity for prevention on circuit-pair of circuits or unit
- Pump-down: indicates which compressor requires pump-down when
starting and/or stopping the circuit
- Double line of devices (typically used on compressor racks)*
For each of these, the module requests the shutdown of the compressors in the
circuit in question, and sends a warning to the alarm menu (screens included in
the module). One module can work in synch with any other three modules,
providing support for up to four refrigerant circuits. The stop requests are sent to
a single list that can be controlled by the Mod_Device_Rotation module, which
handles the function for deciding which compressor to stop.
In antifreeze, conditions the module may request the shutdown of the
compressors in one circuit, a pair of circuits or all the circuits. This means that all
the possible combinations of refrigerant-water circuits can be managed.
Note: The description of each prevention function is shown in the
following chapters:
- Evaporator antifreeze
- Condenser antifreeze
- High pressure: alarm and prevention
- Low pressure: alarm and prevention
Note: For details on the format of the list, see the chapter on Circuit and
compressor management, under Lst_Prevent_Circuit
* Chiller Core does not exploit all of the features of the module, and manages a
maximum of 4 circuits with 3 compressors without capacity steps, all with the
same capacity and without controlling the inverter.
For details, see the on-line documents on the Circuit_Prevent module
Note: For details on the format of the lists see chapter 6.5
+0300010EN Chiller Core – rel 1.0 – 13/07/2009
28
For details, see the on-line documents on the Mod_Device_Rotation
module
6.9
6.11
Compressor management
Chiller Core manages scroll compressors. The actual activation of the
compressors is managed by the Comp_Scroll_Pistons macroblock, which in
response to a request, manages the activation and deactivation of a scroll
compressor, as well as the capacity steps, if configured.
Even if this function is included, Chiller Core does not manage compressors with
capacity steps. The developer needs to modify the software to support these
types of compressors.
Pump-down
Chiller Core can manage 3 types of pump-down (Ha07):
- When the circuit starts
- When the circuit stops
- When the circuit starts and stops
The Mod_Device_Rotation module indicates the circuit and compressor used
for the pump down procedure, while the actual procedure itself is managed by
the PumpDown_Mng macroblock.
As the pump-down procedure applies to the circuit, Chiller Core features 4
PumpDown_Mng macroblocks, that is, one for each circuit.
If any type of pump-down is enabled, when requested by
Mod_Device_Rotation, PumpDown_Mng activates the circuit with the liquid
solenoid valve closed and the compressor involved in pump-down running. This
status continues until a low pressure value is measured by the transducer
(threshold Gfc14) or the pressure switch, or for a maximum settable time
(Gfc14) with a consequent alarm signal.
Comp_Scroll_Pistons manages all the typical safety times of a scroll or piston
compressor, such as:
- Minimum on time;
- Minimum off time;
- Minimum time between consecutive starts.
These can be set in the manufacturer menu on screen Hc06.
Comp_Scroll_Pistons does not manage the logic of the compressor alarms, but
rather provides an input pin that receives all the alarms that shutdown the
compressor. In the event of faults, Comp_Scroll_Pistons immediately stops the
compressor, even if the minimum on time has not yet elapsed.
There are some in which the compressor must be forced off or operated at a
specific capacity level. Comp_Scroll_Pistons has an input pin called
Admitted_Max_Power that is limits compressor capacity.
In Chiller Core, as the compressor is either on or off, there are no capacity limits,
but rather the compressor is forced off in the following cases:
Note: The Mod_Device_Rotation module decides independently when
pump-down is required, however needs feedback on when the procedure is
completed. This information is available from Lst_Device_Available. When
Mod_Device_Rotation detects switching from status 14 (compressor on for
pump-down) to any other status, the pump-down request is terminated.
When pump-down is requested the circuit may already have the required low
pressure conditions, therefore the procedure will not be performed. In this case,
however, Mod_Device_Rotation needs to be informed that the procedure has
been completed, therefore for one program cycle pump-down is signalled as
being in progress, even if the compressor is stopped immediately.
- Compressor disabled manually (Gg02, Gg03, Gg04, Gg05)
- Transients for reversing the cycle in normal operation
- Transients for reversing the cycle when starting and ending the defrost
procedure
Comp_Scroll_Pistons can be used to manage the compressor manually (Gg06,
Gg07, Gg08, Gg09). During manual operation, the compressor alarms are
monitored. The safety times, described previously, are ignored.
Note: With the pCOxs the pump down procedure is not available, as the
liquid solenoid valve is not controlled.
For details, see the on-line documents on the Comp_Scroll_Pistons
macroblock
Note: For details see the description of State_CompX in chapter 6.5
6.12 Control set point
For details, see the on-line documents on the PumpDown_Mng
macroblock
6.10
Chiller Core manages units that can operate in both cooling and heating mode.
Each mode uses its own control water temperature set point, settable in the
Set point menu. The screen for setting the set point will displayed
depending on the unit configuration, chiller, heat pump or chiller-heat pump.
Start compressor
If even just one time band is enabled, then 2 separate set points can be set for
each operating mode. The time bands define which of the set points will be
used for temperature control.
Chiller Core only manages compressors with direct starting.
Despite this, the software includes the Comp_StartStop macroblock, which
manages the following types of starting:
- Direct
- Star/delta
- Partwinding
In the Temperature control menu, the minimum and maximum limits can be set
for the cooling (Gfc11) and heating (Gfc12) set point. These are obviously
affected by the setting of the unit of measure °C/°F.
Below are the screens available the set point menu:
Comp_StartStop also manages the balancing of the suction and discharge
pressure before the compressor starts, so as to reduce the load on the
compressor when starting. This function is not used in Chiller Core.
Note: For star/delta or partwinding starting, Comp_StartStop directly
manages the digital outputs, and in fact requires information on the digital
output channels involved. Make sure then that the same outputs are not written
to at the same time in other parts of the application (typically on the sheet
dedicated to digital outputs).
Fig. 6.13.a
Note: Comp_StartStop does not manage the compressor alarms directly.
Therefore, it needs to know whether the compressor can start or stop. In Chiller
Core, this feedback comes directly from the Comp_Scroll_Piston macroblock.
For details, see the on-line documents on the Comp_StartStop
macroblock
+0300010EN Chiller Core – rel 1.0 – 13/07/2009
Fig. 6.13.b
29
6.14
Unit On-Off
The unit can be switched On-Off from the
On-Off menu.
The function is found on the OnOff_CoolHeat_Scheduler page and managed by
the Mod_OnOff_Unit_Status module.
The logical sequence of operations is as follows:
Fig. 6.13.c
On-Off from On-Off menu
1- Current set point used for temperature control. This considers the time
band in progress and set point compensation. The same parameter is also
displayed in the quick menu, on screen M06 (see chapter 4.1, Graphic
terminal)
On-Off from dig. in.
2- Cooling set point 1, settable by the user;
On-Off from time bands
3- Cooling set point 2, settable by the user. Can only be set if at least 1 time
band is enabled
On-Off from supervisor
4- Heating set point 1, settable by the user;
5- Heating set point 2, settable by the user. Can only be set if at least 1 time
band is enabled
On-Off from alarm
Fig. 6.15.a
6.13
Set point compensation
Consequently alarms have the highest priority.
Chiller Core manages the compensation of the control set point using the
Setpoint_Compensation macroblock.
If the user needs to create additional unit states, the Mod_OnOff_Unit_Status
module provides 3 pins, Custom_On_1/2/3, which have no effect on the actual
on-off status but rather only on the unit operating status typically shown on the
user interface.
Compensation can be enabled (Ha13) only if the outside temperature sensor
(Hb07) used for the compensation function is enabled.
The logical sequence of operations is as follows:
Setpoint from Setpoint menu
Time bands
Compensation
Operating mode: Cool o heat
Current control set point
Fig. 6.15.b
Fig. 6.14.a
The Setpoint_Compensation strategy page shows the logic applied:
The unit off status is shown on the main screen on the last 2 rows of the PGD1.
Below are 2 examples:
If the unit is Off and there is no active shutdown alarm, the first screen will be:
Fig. 6.15.c
Fig. 6.14.b
If the unit is On yet forced off by a shutdown alarm, then the screen will be:
The compensation configuration parameters are found in the Temperature
control menu: Gfc15 for cooling, Gfc16 for heating.
For the operating logic of the compensation function and the
corresponding macroblocks, see the on-line documents on
Setpoint_Compensation
+0300010EN Chiller Core – rel 1.0 – 13/07/2009
Fig. 6.15.d
30
For details, see the on-line documents on the Mod_OnOff_Unit_Status
macroblock
6.15
Temperature control
Two types of temperature control are featured:
Control probe
Water inlet temperature
Water outlet temperature
Type of control
Proportional (P, PI, PID)
Dead zone
Both types of control return a value between 0 and 1000, corresponding to the
temperature control request to be satisfied in order to reach the control set
point.
This value is sent to the Mod_Device_Rotation module, which sorts the requests
and calls the activation or deactivation of the compressors in the various circuits
configured.
Fig. 6.16.b
And in heating mode:
6.15.1 Proportional
Control is managed by the Mod_Temp_Reg module.
The module processes the value of the water inlet temperature (see the table in
chapter 1.3.6) and, based on the type of control selected (Gfc03 and Gfc04)
proportional, proportional-integral or proportional-integral-differential (P, PI
,PID), returns one value from 0 to 1000 for heating and another for cooling,
corresponding to the temperature control request to be satisfied in order to
reach the control set point.
Heating mode
Cooling mode
1000
Fig. 6.16.c
0
Reg_Probe
Diff_Reg_Neg
NZ_Reg_Neg NZ_Reg_Pos
Diff_Reg_Pos
Setpoint_Reg
The rate of increase/decrease (that is, the slope of the line) within the bands
depends on a further parameter calculated by Mod_Neutral_Zone_Temp,
which is the time taken to reach the maximum (100%, if increasing) or
minimum (0%, if decreasing) capacity required.
The following figure shows the function that calculates this time in cooling
mode:
Fig. 6.16.a
An input pin is used to select the operating mode between:
1- Heating
2- Cooling
3- Automatic
In Chiller Core, automatic mode is not used.
With this type of control, when the water inlet temperature reaches the set
point, all the compressors are off (in accordance with the safety times and the
integral and derivative action). All the compressors will be on when reaching set
point + dead zone + differential (in accordance with the alarms and safety
times).
For details, see the on-line documents on the Mod_Temp_reg module
Fig. 6.16.d
And in heating mode:
6.15.2 Dead zone
Control is performed by the Mod_Neutral_Zone_Temp module.
The module processes the value of the water outlet temperature (see table in
chapter 1.3.6) and returns a value from 0 to 1000 corresponding to the
temperature control request to be satisfied in order to reach the control set
point.
The following figure describes the function that returns the capacity required in
cooling mode:
+0300010EN Chiller Core – rel 1.0 – 13/07/2009
31
Below is a diagram that represents operation with just one pump configured:
Unit on
Pump on
Delay enable temp.
control
NOT OK
OK
Flow alarm delay form
pump start
NOT OK
OK
Check flow switch
status
Fig. 6.16.e
In cooling mode, with dead zone control, the compressors are called to start
when the water outlet temperature is higher than the dead zone set point +
differential (capacity increase zone). The start request increases faster the higher
the temperature, as can be seen in the diagrams above.
When the temperature is between the dead zone (neutral zone) set point +/differential, the request remains unchanged and thus the number of
compressors operating remains unvaried.
When the temperature is lower than the dead zone set point - differential
(capacity decrease zone), the request descends and consequently the
compressors are gradually stopped. The request decreases faster the lower the
temperature, as can be seen in the diagrams above.
In heating mode, the control diagram is exactly the opposite.
Flow alarm
OK
AND
Poss. compressor
starts
Fig. 6.17.a
For details, see the on-line documents on the Mod_Neutral_Zone_Temp
module.
6.16
NOT OK
It should be noted that temperature control is not enabled until stable flow
conditions are measured after the flow alarm delay at pump start. This
guarantees that no compressors start until there is flow.
Up to two evaporator pumps can be enabled (Ha08). Mod_Pumps includes the
following functions:
- With two pumps, manual or automatic changeover between the pumps to
equally divide the workload and operating hours on each pump. Automatic
changeover occurs:
1) When a certain time period elapses (Gfc19).
2) With pump overload or no flow on one of the two pumps.
- Management of pump overload. Fault signal and immediate shutdown of
the pump. Management of changeover when a second pump is installed
- Management of the flow switch that monitors the circulation of fluid in the
system. Management of changeover when a second pump is installed.
- Attempts to recover flow: the maximum number of attempts can be set
(Ha08) to recover water flow.
- Management of anti-blocking, with occasional activation of the pump when
the system is off for long periods (Ha09)
- Management of antifreeze with activation of the pump to circulate the fluid
Evaporator pumps
Chiller Core manages up to two evaporator pumps using the Mod_Pumps
module.
These are used in both air/water and water/water units (Ha01), the only thing
that changes is the start/stop request.
The evaporator pump starts when the unit starts. The exception is for
water/water units with reversible water circuit when the unit is operating in heat
pump mode, and the pump is on the condenser side. In this case, the settings
for the condenser pump on screen Gfc20 are used:
- Always on with unit on
- On if at least one compressor is on.
A delay can be set (Gfc17) from when the pump starts before enabling
temperature control.
In addition, a time can be set (Gfc17) that the pump operates for after the last
compressor stops (see the note at the end of the paragraph). If when the unit is
shutdown the compressors have all been off for at least the pump off delay
time, then the pump stops immediately.
If a number of attempts is set to recover flow, and only one pump is configured,
when no flow is measured the pump is stopped and the warning signal is
activated. The pump will automatically start again after 90 seconds (constant,
connected to pin in the module), and if flow is measured after the delay from
start-up the warning is automatically cancelled and the pump continues
operating, otherwise the number of warnings is increased on the screen and the
procedure starts again, until reaching the maximum number of attempts, when
the alarm is signalled.
If on the other hand 2 pumps are configured, the pumps are activated
alternately until the maximum number of attempts is reached for each pump.
Thermoregulation forced off.
The compr. start to switch off
one by one respecting the
loaddown time
On-Off Unit
Note: Irrespective of the shutdown delay set, if there at least one
compressor is running, the pump is always on. Only after the last compressor
stops can the pump can be shut down, after the shutdown delay.
Compressor
Pump
For details, see the on-line documents on the Mod_Pumps module.
Off delay
time
Delay time
between pomp
on and
compressor on
+0300010EN Chiller Core – rel 1.0 – 13/07/2009
Off delay
time
6.17
In this case the pump
can switch off
immediately
Condenser pumps
Chiller Core manages up to two condenser pumps using the Mod_Pumps
module, in the same way as for the evaporator pumps.
These are only used on water/water units (Ha01).
32
Irrespective of the type of condenser (individual or separate), there is always just
one group of condenser pumps, which may feature one or two pumps.
Condenser
circuit 1
The pumps can be set (Gfc20) to start:
- Always with unit on
- If at least one compressor is on.
The exception is for units with reversible water circuit when the unit is operating
in heat pump mode, and the pump is on the evaporator side and therefore
must always be operating when the unit is on.
Condenser
circuit 2
Fan 1
Fan 2
Comp.
Circ.1
A delay can be set to shut down the pump after the last compressor stops.
Chiller Core does not manage the for the condenser pump overload.
Comp.
Circ.2
Fig. 6.19.a
Mod_Pumps features the following functions:
- With two pumps, manual or automatic changeover between the pumps to
equally divide the workload and operating hours on each pump. Automatic
changeover occurs:
1) When a certain time period elapses ( (Gfc22).
2) With no flow on one of the two pumps.
- Management of the flow switch that monitors the circulation of fluid in the
system. Management of changeover when a second pump is installed.
- Attempts to recover flow: the maximum number of attempts can be set
(Ha10) to recover water flow.
- Management of anti-blocking, with occasional activation of the pump when
the system is off for long periods (Ha11)
- Management of the condenser antifreeze with activation of the pump to
circulate the fluid
2 circuits and separate condenser control
Condenser
circuit 1
Condenser
circuit 2
Fan 1
Comp.
Circ.1
Fan 2
Comp.
Circ.2
Fig. 6.19.b
If a number of attempts is set to recover flow, and only one pump is configured,
when no flow is measured the pump is stopped and the warning signal is
activated. The pump will automatically start again after 90 seconds (constant,
connected to pin in the module), and if flow is measured after the delay from
start-up the warning is automatically cancelled and the pump continues
operating, otherwise the number of warnings is increased on the screen and the
procedure starts again, until reaching the maximum number of attempts, when
the alarm is signalled.
If on the other hand 2 pumps are configured, the pumps are activated
alternately until the maximum number of attempts is reached for each pump.
The groups of fan are controlled using 2 Condenser_Fan macroblocks. The first
of the two is used two in the case of individual condenser control, and both in
the case of separate control.
Irrespective of the unit configuration and the type of condenser control, fan
management is always performed by the master board.
6.18.1 Fan management
As mentioned, the groups of fan are controlled using 2 Condenser_Fan
macroblocks.
The minimum and maximum speed of the fan groups can be set on screen
Gfc26.
For details, see the on-line documents on the Mod_Pumps module.
Control depends on whether the unit is operating in cooling or heating mode.
6.18
Condenser fans
Cooling mode:
Control is modulating and is performed on the high pressure value. In the
service menu (Gfc23), the control set point and differential can be set in barg,
associated with the corresponding temperature value:
Condenser control can be set as individual or separate in the manufacturer
menu (Ha04). Below is a table that summarises the probes used to control the
fans in each unit configuration:
Circuits
Type of
cond.
1
2
Individual
Individual
2
Separate
3
Individual
4
4
Individual
Separate
Fan control probes
Chiller
HP circ. 1
The higher HP between
circ. 1 and circ. 2
Fan 1: HP circ. 1
Fan 2: HP circ. 2
The higher HP between
circ. 1, circ. 2, circ. 3
The higher HP between
circ. 1, circ. 2, circ. 3, circ. 4
Fan 1: The higher HP between
circ. 1 and circ. 2
Fan 2: The higher HP between
circ. 3 and circ. 4
Heat pump
LP circ. 1
The lower LP between
circ. 1 and circ. 2
Fan 1: LP circ. 1
Fan 2: LP circ. 2
The lower LP between
circ. 1, circ. 2, circ. 3
The lower LP between
circ. 1, circ. 2, circ. 3, circ. 4
Fan 1: The lower LP between
circ. 1 and circ. 2
Fan 2: The lower LP between
circ. 3 and circ. 4
Fig. 6.19.c
The control diagram is shown below:
Fan speed
100% speed
Max. speed
Example:
2 circuits and individual condenser control
Min. speed
1.0bar
Chiller mode
Setpoint
Default (barg)
12.0
13.0
Chiller mode
Differential
0.5bar
Thres HP
Prevent
16.0 16.5 17.0
Fig. 6.19.d
+0300010EN Chiller Core – rel 1.0 – 13/07/2009
33
3.0bar
18.0
20.0
High
press.
6.19 Defrost
In the graph some of the offsets are expressed with a numeric value, indicating
that they cannot be modified on the display, but rather set with constants in the
strategy.
The graph shows the fan activated at 100% with a fixed offset of 3.0barg in
relation to the high pressure prevention threshold. If the high pressure
prevention function is disabled, then the offset refers to the high pressure alarm
threshold (Gfc33 default 23.0barg).
During heat pump operation on air/water units, the outside coil works as an
evaporator. If the outside temperature is low, ice may form the coil same,
consequently reducing the efficiency of the unit. In this case, the defrost function
should be activated.
Activation of the defrost depends on the value read by the reference probe
(pressure transducer, low pressure side) and a delay set (Gfc28) from when the
activation threshold (Gfc27) is exceeded, as shown in the following figure:
Heating mode:
Control is modulating and is performed on the low pressure value. In the service
menu (Gfc24), the control set point and differential can be set in barg,
associated with the corresponding temperature value:
Fig. 6.19.e
The control diagram is shown below:
Fig. 6.20.a
Fan speed
100% speed
Max. speed
Min. speed
3.0bar
Heat pump mode
1.0 bar
Differential
Heat pump mode
Setpoint
0.5bar
Thres LP
Prevent
2.0
4.0
4.5 5.0
9.0
13.0
14.0
Fig. 6.20.b
Low press.
Default (bar)
Fig. 6.19.f
In the graph some of the offsets are expressed with a numeric value, indicating
that they cannot be modified on the display, but rather set with constants in the
strategy.
The graph shows the fan activated at 100% with a fixed offset of 3.0barg in
relation to the low pressure prevention threshold. If the prevention of low
pressure was disabled, then the offset refers to the low pressure alarm threshold
(Gfc30 default 1.5barg).
Fig. 6.20.c
The defrost ends when the reference probe (pressure transducer, high pressure
side) value exceeds the end defrost threshold (Gfc27) ; in any case, the defrost
must last a minimum time.
If the high pressure value exceeds the end defrost threshold before the
minimum time has elapsed, then the condenser fans are enabled and start
operating in chiller mode so as to prevent the unit from shutting down due to
high pressure.
6.18.2 Speed-up and force fans on when circuit starts
Whenever the group of fans is started, the fans are activated with the maximum
output set for a certain time, so as to overcome the initial inertia and decrease
the peak time. The macroblock provides a pin for setting the speed-up time, in
Chiller Core this is done in the service menu, screen Gfc25 (point 1 Fig. 6.19.g).
If equal to zero, speed-up is not performed.
In addition, the fans can be activated at the maximum output set when the first
compressor in the circuit starts yet with control pressure would not be sufficient
alone to justify the fan being activated. The time can be set in the service menu
on screen Gfc25 (point 2 Fig. 6.19.g). If equal to zero, the function is disabled.
In the event of simultaneous defrosts on different circuits, one circuit may reach
the end defrost threshold before the other circuits, in which case the
compressors in that circuit are stopped and the 4-way valves are maintained in
the chiller position, until all the circuits reach the end defrost threshold. When
the last circuit has reached the end defrost threshold, then the dripping
procedure starts, with the active compressors remaining on (those that are off
remain off) and the condenser fans operating at 100%.
Alternatively, a fixed defrost duration can be set; in this case, just one reference
probe is required, to determine the activation of the function:
Fig. 6.19.g
For details, see the on-line documents on the Condenser_Fan
macroblock
+0300010EN Chiller Core – rel 1.0 – 13/07/2009
34
pCOxs features an optional clock card. If the clock card is fitted (see the codes in
chapter 2.1), the clock needs to be enabled from the manufacturer menu. Only
if the clock is enabled can the date and time be displayed on the main screen,
the time bands managed, the calendar programmed and the date and time
recorded in the alarm log.
If the clock, both inside the pCO3 and the optional card enabled, malfunctions,
an alarm is generated. The alarm appears even if the pCOxs has the clock
enabled but the card is not fitted:
Fig. 6.20.d
Fig. 6.21.a
The defrost function involves the reversing of the circuit operating cycle.
During defrost, the condenser fans are forced OFF to assist defrosting, except for
the case described previously.
Chiller Core does not use the clock memory, P memory, but rather an alarm is
activated if there are problems reading/writing the parameters:
The “dripping” function can also be set, which involves operating the fans at
100% for a certain time (Gfc29) after the end of the defrost. If the dripping time
is zero, then this phase is not performed.
A time can be set (Gfc29) to reverse the cycle at the start and end of the defrost
procedure. If the time is set to zero, then the cycle is reversed “on the go”, with
the compressors on. If the time is greater than zero, then the compressors are
switched off for the set time and the cycle is reversed half way through the time.
A minimum time can be set (Gfc29) between the end of one defrost and the
start of the next.
Fig. 6.21.b
The following figure shows how the various components in circuit and the
defrost phases are managed:
The time, date, time bands, closing periods and holidays are set from the main
Defrost req.
C.
Reverse
cycle
Time bands menu. The following screens are displayed in sequence:
•
•
•
•
Comp.
Fans
½ Delay
Reverse cycle
The time bands and calendar are programmed using the Mod_Scheduler
module (see corresponding documents).
The following figure details the function:
½ Delay
Dripping time
Delay reverce
cicle in defrost
defrost
dripping
Time and date setting
Four daily time bands
Special periods, up to a max. of three
Holidays/special dates, up to a max. of six
Delay reverce
cicle in defrost
C
l
o
c
k
Reverse cycle
Fig. 6.20.e
Daily bands
Closing
periods
Special dates
Fig. 6.20.f
For each daily time band, special period, special date, the set point or unit off
time can be set:
Cooling
Off
Cooling set 1
Cooling set 2
Note: during defrost, the compressor safety times are ignored. Likewise,
the pump-down function settings are also ignored.
Heating
Off
Heating set 1
Heating set 2
Off: The unit is switched off
Set 1: the unit is on and the temperature control uses set point 1
Set 2: th the unit is on and the temperature control uses set point 2. Set point 1
Clock and time bands
and Set point 2 are set in the B.
3
pCO is fitted with an internal clock with backup battery that stores the time and
date for all the associated functions.
+0300010EN Chiller Core – rel 1.0 – 13/07/2009
On-Off
Setp.
Fig. 6.21.c
If there are multiple condensing circuits, the following defrost modes are
managed (Ha12):
• Individual defrost: if one circuit requires defrosting, the entire unit goes into
defrost mode. The circuits that do not require defrosting reverse the cycle yet
the compressors remain off.
• Separate defrost: the first circuit that requires defrosting goes into defrost
mode. The other circuits remain in heat pump mode and cannot call a
defrost until the defrost in progress ends.
6.20
Priority:
- Daily bands (low)
- Spec. period
- Special dates (high)
35
Setpoint menu. The setting screens are:
6.21 Date format setting
Three different types of date format can be set (Hc02):
1- Day/Month/year: dd/mm/yy
2- Month/Day/year: mm/dd/yy
3- Year/Month/Day: yy/mm/dd
Clock
Date format
(Hc02)
Main screen
Fig. 6.21.d
Change date &
time (C01)
10- Day. If “---“ then the daily time bands are disabled
11- The settings for the current day can be copied to another day
12- Time band start time. The band ends when the following band starts.
Alarm log (E01)
Example:
Band 1 starts at 8:30 and ends at 22:00
Band 2 starts at 22:00 and ends at 23:00
Band 3 starts at 23:00 and ends at 8:30
The software activates the bands in increasing order.
If “---“the band is disabled
13- Settings used when the unit is in cooling mode
14- Settings used when the unit is in heating mode
Fig. 6.22.a
6.22 Cooling/heating
Chiller Core manages chiller and chiller-heat pump units; pCOxs cannot manage
the reversing valve, and consequently on chiller or heat pump units can be
controlled.
The diagram below provides an overview of the types of operation managed:
Unit type:
CH/HP (Ha01)
Enable
change from
dig. in.
(Gfc01)
Change from display (Gc01).
Possible only if change from
dig. in. is NOT enabled
Change from BMS.
Possible only if change from
dig. in. is NOT enabled
Fig. 6.21.e
15161718-
Change from dig. in.
Possible only if change from
dig. in. is enabled
Special period start date
Special period end date
Settings used when the unit is in cooling mode
Settings used when the unit is in heating mode
Unit type:
CH
(Ha01)
or
Cool / Heat
Unit type:
HP (pCOxs
only)
(Ha01)
4-way valves
Set point
Time bands
Compensation
Temp. control
Condenser con.
Fig. 6.21.f
Defrost
19- Special day
20- Settings used when the unit is in cooling mode
21- Settings used when the unit is in heating mode
Fig. 6.23.a
Below is the procedure applied when changing mode:
1- Request change mode
2- All compressors immediately shutdown. The unit remains on.
3- Wait “Cool/heat change delay” (Gfc01)
4- Reverse 4-way valve
5- Change set point, temperature control, bands etc.
6- Wait “Cool/heat change delay” (Gfc01)
7- Compressors re-enabled
Priority:
The daily time bands have the lowest priority, while the special periods have
medium priority and the special days have highest priority.
Example:
- Heating mode
- Daily time band: from 8:30 to 22:00 Æ SET1
- Special period: from 24/12 to 06/01 Æ OFF
- Special day: 02/01 Æ SET1
In this case, from 24/12 to 06/01 the time bands will be ignored and the unit
will be off due to the special period setting, except for on the special day 02/01
when the unit will switch on and use set point 1
6.23 Modifying the Carel defaults
The default values are assigned to the variables using a function available on the
HW_SW_Check and Default page.
For details, see the on-line documents on the Mod_Scheduler module.
When the default procedure is activated, the pCO* buffer memory is completely
cancelled and then the default value are assigned to the parameters.
+0300010EN Chiller Core – rel 1.0 – 13/07/2009
36
At the end of the default installation procedure, the “Initialisation completed
Switch unit off to confirm data” screen is displayed. The user can only switch the
pCO* off and on again to ensure the variables are loaded into X memory.
When:
- The unit of measure is changed and
- ENTER is pressed
6.23.1 How to add a default
To manage the default parameters, the following functions are used:
- Move_IT_En_10: for integer or analogue variables;
- Move_BT_En_10: for digital variables.
To assign the default values, the variables need to be connected to the pins on
the Move_IT_En_10 or Move_BT_En_10 macroblock. If necessary, add other
macroblocks, making sure they are inside the “VK_Default” Jump.
Below is an extract of the code:
Enter
NO:
Go back without changing the unit
of measure
YES:
Go back and change the
unit of measure
Fig. 6.25.a
The unit of measure can only be changed when the unit is off. If the unit is on,
when pressing ENTER on the screen, the last row shows the message “ >>Turn
unit off<<”.
At the end of the conversion of the unit of measure, the “Initialisation completed
Switch unit off to confirm data” screen is displayed, in the same way as for the
installation of the default values. The user can then only switch the pCO* off and
on again.
The unit of measure can be changed from the supervisor. As the operation
requires special care, given that it returns the pressure and temperature
parameters to the default values, it must be accessed from the manufacturer
menu (Hc03).
Therefore, the parameter for setting the unit of measure from the supervisor
changes from read-only (R) to read/write (RW) as follows:
Change_UM_by_BMS: 0 Æ read-only;
Change_UM_by_BMS: 1 Æ read/write.
Fig. 6.24.a
For analogue parameters that are dependent on unit of measure, two defaults
need to be entered. For further details, see the chapter on “Changing the unit of
measure”.
6.23.2 How to change the default values
To modify the default values, simply change the value of the constant connected
to Move_IT_En_10 and Move_BT_En_10. For analogue parameters with two
units of measure, both default values need to be changed.
6.24.1
How to add new variables affected by the change in the unit
of measure
Probe readings from analogue inputs:
To convert the temperatures, the CEL_FAHR macroblock is used, where
“Unit_Meas_Type” pin is connected to the “Unit_Meas_Type” variable (see
Figure).
6.23.3 How to install the default values
There are three different ways to install the Carel default values on the pCO*:
1. From the manufacturer menu: in screen He02 the user can set the default
values and cancel the memory;
2. When first installing the application on the pCO*;
3. When updating the version of the application;
To convert the pressure, simply change the minimum and maximum probe
limits, managed as input pins on the Ain_Mng macroblock. The limits are
converted using the defaults, as explained above.
Nonetheless, for uniformity with the other analogue inputs, the BAR_PSI
macroblock is provided, where the “Unit_Meas_Type” pin is connected to the
constant 0, thus making it transparent.
6.24 Changing the unit of measure
The temperature and pressure units of measure can be changed:
Temperature: °C ÅÆ °F.
Pressure: barg ÅÆ psig
When changing unit of measure, the temperature and pressure settings are
restored to the default values. This means that there are two default values for
all the temperature and pressure parameters.
The parameters not affected by the change in unit of measure, such as the
number of circuits, number of compressors etc. keep their value.
The unit of measure can be changed in the manufacturer menu Æ
Manufacturer parameters, screen Hc03.
When the unit of measure is being changed, a screen is displayed to warn the
user that all the customised temperature and pressure settings will be
overwritten:
Fig. 6.25.b
+0300010EN Chiller Core – rel 1.0 – 13/07/2009
37
Parameters:
For each parameter added, the two defaults on the “Unit_Measurement_Mng”
strategy page need to be managed, one for the international units of measure
and the other for Imperial.
The new parameters and the corresponding defaults are appended to the
current ones. When necessary, add other Move_IT_En_10 macroblocks, making
sure they are inside the corresponding Jump.
Below is an extract of the code:
- Mod_S_Store_Dev_W: saves the values of the integer and analogue
variables.
- Mod_S_Store_Dev_B: saves the values of the digital variables.
To add new variables, these must be connected to the pins in the
Mod_S_Store_Dev_W or Mod_S_Store_Dev_B module. Add other
macroblocks is necessary. The “Store” and “Restore” pins are automatically
connected to the Mod_M_Store_Dev module. Below is an extract of the code:
Fig. 6.26.c
6.26 Manual device management
The devices can be controlled manually by the user, from the Service menu Æ
Manual management.
Below are the features of manual device operation:
Fig. 6.25.c
6.25 Modifying the user defaults
The user can customise the unit configuration, safe the configuration (He03)
and then use it again when required (Gfd03).
For each configuration saved, the date is recorded as a reference.
The defaults can only be restored when they have previously been saved,
otherwise the restore screen is disabled (Gfd03).
Safety times bypassed; all compressor alarms are
observed
-
Evaporator pump 1 - 2
4-way valve circuit X
The flow alarm is disabled;
Pump thermal overload alarm active.
The flow alarm is disabled;
Pump thermal overload alarm active.
-
Condenser fans 1 – 2
Speed-up is disabled
Antifreeze heater
-
Condenser pump 1 - 2
6.25.1 How to add new variables to the user defaults
The following modules/macroblocks are used to manage the user defaults:
- Mod_M_Store_Dev: Module only used once.
This manages the request to save and restore the default values. The
module features the screens used to save the defaults (manufacturer menu
Manual mode can only be activated when the unit is off. If the unit is on, when
pressing ENTER on the screen, the last row shows the message “ >>Turn unit
off<<”.
If the unit is switched on during manual mode, all the devices return to normal
operation
):
Fig. 6.26.a
):
Fig. 6.26.b
+0300010EN Chiller Core – rel 1.0 – 13/07/2009
Remarks
Liquid solenoid circuit X
After restoring the user defaults, is displayed the “Initialisation completed Switch
unit off to confirm data” screen is displayed, in the same way as for the
installation of the default values. The user can then only switch the pCO* off and
on again.
and then restore them (service menu
Device
Compressor X Circuit X
38
To access these
branches, enter
password PW2
To access these
branches, enter
password PW1
7. TABLE OF PARAMETERS
“Mask index”: indicates the unique the address of each screen, and consequently the settable parameters available on the screen; for example, with reference to the
tree of functions shown above, to reach the parameter with screen index (Mask index)
, proceed as follows:
Main menu Æ
Æ
and scroll the screens to number 5 (
(after having entered the corresponding password PW1) Æ
).
Below is the table of parameters that can be displayed on the terminal.
Mask index
Display description
Description
Default
UOM
Min
Max
Possible value descr.
Type
Read/Write
BMS index
A01
Unit address:
Actual state:
Address of the controller in a pLAN network
Unit status
0
0
-----
0
0
31
9
I
I
-----
-----
Change to:
Temporary variable for manage the OnOff
unit status
0
---
0
1
--0: --1: Unit On
2: OFFbyALR
3: OFFbyNET
4: OFFbyBMS
5: OFFbySCH
6: OFFbyDIN
7: OFFbyKEY
8: --9: OFF_CST1
10: OFF_CST2
11: OFF_CST3
12: OFF_CST4
0: SWITCH OFF
1: SWITCH ON
I
---
---
Current setpoint:
Cooling setpoint 1:
Current setpoint
Cooling temperature setpoint1
-999,9
Gfc11
Gfc11
Gfc11
Gfc11
999,9
Gfc11
Gfc11
Gfc11
Gfc11
-----------
R
R/W
33
29
Cooling temperature setpoint2
°C / °F
°C
°F
°C
°F
A
A
Cooling setpoint 2:
--12
53
12
53
A
R/W
30
B01
B02
+0300010EN Chiller Core – rel 1.0 – 13/07/2009
39
Mask index
B03
C01
Display description
Heating setpoint 1:
Description
Heating temperature setpoint1
Default
40
104
40
104
UOM
°C
°F
°C
°F
Min
Gfc12
Gfc12
Gfc12
Gfc12
Max
Gfc12
Gfc12
Gfc12
Gfc12
Possible value descr.
---------
Heating setpoint 2:
Heating temperature setpoint2
Day:
Week day calculation based on current date
0
---
0
7
Date format
1
---
0
2
Day:
New day
New month
New year
New hour
New minute
Scheduler settings
----------0
day
month
year
h
m
---
1
1
0
0
0
0
31
12
99
23
59
7
Copy to:
Day target for the scheduler copy
0
---
0
7
Start copy procedure
0
---
0
1
F1 Start hour
F1 Start minute
F1 Set Cool type
0
0
0
-------
0
0
0
24
59
3
F1 Set Heat Type
0
---
0
3
F2 Start hour
F2 Start minute
F2 Set Cool type
0
0
0
-------
0
0
0
24
59
3
F2 Set Heat Type
0
---
0
3
F3 Start Hour
F3 Start minute
F3 Set Cool type
0
0
0
-------
0
0
0
24
59
3
F3 Set Heat Type
0
---
0
3
F4 Start hour
F4 Start minute
F4 Set Cool Type
0
0
0
-------
0
0
0
24
59
3
F4 Set Heat Type
0
---
0
3
0: ***
1: Monday
2: Tuesday
3: Wednesday
4: Thursday
5: Friday
6: Saturday
7: Sunday
0: --1: dd/mm/yy
2: mm/dd/yy
3: yy.mm.dd
----------0: MONDAY
1: TUESDAY
2: WEDNESDAY
3: THURSDAY
4: FRIDAY
5: SATURDAY
6: SUNDAY
7: --0: MONDAY
1: TUESDAY
2: WEDNESDAY
3: THURSDAY
4: FRIDAY
5: SATURDAY
6: SUNDAY
7: ALL
0: NO
1: YES
0 - 23
0 - 59
0: --1: OFF
2: SET1
3: SET2
0: --1: OFF
2: SET1
3: SET2
0 - 23
0 - 59
0: --1: OFF
2: SET1
3: SET2
0: --1: OFF
2: SET1
3: SET2
0 - 23
0 - 59
0: --1: OFF
2: SET1
3: SET2
0: --1: OFF
2: SET1
3: SET2
0 - 23
0 - 59
0: --1: OFF
2: SET1
3: SET2
0: --1: OFF
2: SET1
Date:
Hour:
C02
1:
2:
3:
4:
+0300010EN Chiller Core – rel 1.0 – 13/07/2009
40
Type
A
Read/Write
R/W
BMS index
31
A
---
R/W
32
I
---
---
I
14
R/W
I
I
I
I
I
I
---
---
I
---
---
I
---
---
I
I
I
-------
-------
I
---
---
I
I
I
-------
-------
I
---
---
I
I
I
-------
-------
I
---
---
I
I
I
-------
-------
I
---
---
Mask index
Display description
Description
Default
UOM
Min
Max
C03
Period scheduler Start Stop
Cool Heat
Period 1 start day
Period 1 start month
Period 1 stop day
Period 1 stop month
Period 1 cool set type
0
0
0
0
0
-----------
0
0
0
0
0
31
12
31
12
3
Period 1 heat set type
0
---
0
3
Period 2 start day
Period 2 start month
Period 2 stop day
Period 2 stop month
Period 2 cool set type
0
0
0
0
0
-----------
0
0
0
0
0
31
12
31
12
3
Period 2 heat set type
0
---
0
3
Period 3 start day
Period 3 start month
Period 3 stop day
Period 3 stop month
Period 3 cool set type
0
0
0
0
0
-----------
0
0
0
0
0
31
12
31
12
3
Period 3 heat set type
0
---
0
3
Special day 1 day
Special day 1 month
Special day 1 cool type
0
0
0
-------
0
0
0
31
12
5
Special day 1 heat type
0
---
0
3
Special day 2 day
Special day 2 month
Special day 2 cool type
0
0
0
-------
0
0
0
31
12
5
Special day 2 heat type
0
---
0
3
Special day 3 day
Special day 3 month
Special day 3 cool type
0
0
0
-------
0
0
0
31
12
5
Special day 3 heat type
0
---
0
3
Special day 4 day
Special day 4 month
Special day 4 cool type
0
0
0
-------
0
0
0
31
12
5
Special day 4 heat type
0
---
0
3
Special day 5 day
Special day 5 month
Special day 5 cool type
0
0
0
-------
0
0
0
31
12
5
C04
Spec.days Cool Heat
SD1:
SD2:
SD3:
SD4:
SD5:
+0300010EN Chiller Core – rel 1.0 – 13/07/2009
41
Possible value descr.
3: SET2
--------0: --1: OFF
2: SET1
3: SET2
0: --1: OFF
2: SET1
3: SET2
--------0: --1: OFF
2: SET1
3: SET2
0: --1: OFF
2: SET1
3: SET2
--------0: --1: OFF
2: SET1
3: SET2
0: --1: OFF
2: SET1
3: SET2
0 - 31
0 - 12
0: --1: OFF
2: SET1
3: SET2
0: --1: OFF
2: SET1
3: SET2
0 - 31
0 - 12
0: --1: OFF
2: SET1
3: SET2
0: --1: OFF
2: SET1
3: SET2
0 - 31
0 - 12
0: --1: OFF
2: SET1
3: SET2
0: --1: OFF
2: SET1
3: SET2
0 - 31
0 - 12
0: --1: OFF
2: SET1
3: SET2
0: --1: OFF
2: SET1
3: SET2
0 - 31
0 - 12
0: ---
Type
Read/Write
BMS index
I
I
I
-----------
-----------
I
---
---
I
I
I
-----------
-----------
I
---
---
I
I
I
-----------
-----------
I
---
---
I
I
I
-------
-------
I
---
---
I
I
I
-------
-------
I
---
---
I
I
I
-------
-------
I
---
---
I
I
I
-------
-------
I
---
---
I
I
I
-------
-------
Mask index
Display description
SD6:
D01
Master analog input
B1= High press.circ.1:
B2= Low press.circ.1:
D02
D03
D04
D05
Master analog input
B1= High press.circ.1:
B2= External temp.:
Master analog input
B3= Outlet water evap.
temp.:
B4= Inlet water evap. temp.:
Master analog input
B3= Evaporator water
temp.:
B4= Out.cond.2 temp.:
Master analog input
B5= Out.evap.1 temp.:
Description
Default
UOM
Min
Max
Special day 5 heat type
0
---
0
3
Special day 6 day
Special day 6 month
Special day 6 cool type
0
0
0
-------
0
0
0
31
12
5
Special day 6 heat type
0
-------
---------
0
-------
3
-------
Possible value descr.
1: OFF
2: SET1
3: SET2
0: --1: OFF
2: SET1
3: SET2
0 - 31
0 - 12
0: --1: OFF
2: SET1
3: SET2
0: --1: OFF
2: SET1
3: SET2
Type
Read/Write
BMS index
I
---
---
I
I
I
-------
-------
I
-------
---
---
High pressure circuit 1
High pressure circuit 1 converted to
temperature
Low pressure circuit 1
Low pressure circuit 1 converted to
temperature
High pressure circuit 1
High pressure circuit 1 converted to
temperature
External temperature
Outlet water evaporator temperature
-----
barg /psig
°C/°F
-999,9
-999,9
999,9
999,9
-----
A
A
R
R
1
2
-----
barg /psig
°C/°F
-999,9
-999,9
999,9
999,9
-----
A
A
R
R
9
10
-----
barg /psig
°C/°F
-999,9
-999,9
999,9
999,9
-----
A
A
R
R
1
2
-----
°C/°F
°C/°F
-999,9
-999,9
999,9
999,9
-----
A
A
R
R
28
18
Inlet water evaporator temperature
Evaporator water temperature
-----
°C/°F
°C/°F
-999,9
-999,9
999,9
999,9
-----
A
A
R
R
17
18
Outlet water condenser 2 temperature
Outlet water evaporator 1 temperature
-----
°C/°F
°C/°F
-999,9
-999,9
999,9
999,9
-----
A
A
R
R
24
19
D06
Master analog input
B5= Inlet cond.reg. temp.
Inlet water condenser temperature
---
°C/°F
-999,9
999,9
---
A
R
27
D07
Master analog input
B5= Out.cond.1 temp.:
Outlet water condenser 1 temperature
---
°C/°F
-999,9
999,9
---
A
R
23
D08
Master analog input
B6= High press.circ.2:
High pressure circuit 2
High pressure circuit 2 converted to
temperature
Low pressure circuit 2
Low pressure circuit 2 converted to
temperature
Outlet water evaporator 2 temperature
-----
barg /psig
°C/°F
-999,9
-999,9
999,9
999,9
-----
A
A
R
R
3
4
-----
barg /psig
°C/°F
-999,9
-999,9
999,9
999,9
-----
A
A
R
R
11
12
---
°C/°F
-999,9
999,9
---
A
R
20
B7= Low press.circ.2:
D09
Master analog input
B8= Out.evap.2 temp.:
D10
Master analog input
B8= External temp.:
External temperature
---
°C/°F
-999,9
999,9
---
A
R
28
D11
Master analog input
B9= External temp.:
External temperature
---
°C/°F
-999,9
999,9
---
A
R
28
D12
Master analog input
B10= Inlet water cond.
temp.
Master analog input
B10= Out.cond.1 temp.:
Inlet water condenser temperature
---
°C/°F
-999,9
999,9
---
A
R
27
Outlet water condenser 1 temperature
---
°C/°F
-999,9
999,9
---
A
R
23
Master analog input
B1= High press.circ.3:
High pressure circuit 3
High pressure circuit 3 converted to
temperature
Low pressure circuit 3
Low pressure circuit 3 converted to
temperature
Outlet water condenser 4 temperature
-----
barg /psig
°C/°F
-999,9
-999,9
999,9
999,9
-----
A
A
R
R
5
6
-----
barg /psig
°C/°F
-999,9
-999,9
999,9
999,9
-----
A
A
R
R
13
14
---
°C/°F
-999,9
999,9
---
A
R
16
Outlet water evaporator 2 temperature (if
unit 4 circuit 2 evaporator)
---
°C/°F
-999,9
999,9
---
A
R
20
Outlet water evaporator 3 temperature (all
other cases)
High pressure circuit 4
High pressure circuit 4 converted to
temperature
Low pressure circuit 4
Low pressure circuit 4 converted to
temperature
Outlet water evaporator 4 temperature
---
°C/°F
-999,9
999,9
---
A
R
21
-----
barg /psig
°C/°F
-999,9
-999,9
999,9
999,9
-----
A
A
R
R
7
8
-----
barg /psig
°C/°F
-999,9
-999,9
999,9
999,9
-----
A
A
R
R
15
16
---
°C/°F
-999,9
999,9
---
A
R
22
---
°C/°F
0
1
---
A
R
24
A
R
25
D
R
1
D13
D14
B2= Low press.circ.3:
D15
Slave analog input
B4= Out.cond.4 temp.:
D16
Slave analog input
B5= Out.evap. 2 temp.:
or
B5= Out.evap. 3 temp.:
D17
Master analog input
B6= High press.circ.4:
B7= Low press.circ.4:
D18
Slave analog input
B8= Out.evap.4 temp.:
D19
Slave analog input
B10= Out.cond. 2 temp.:
or
B10= Out.cond. 3 temp.:
D20
Master digital input
01= High press.circ.1:
Outlet water condensator 2 temperature (if
unit 4 circuit 2 evaporator)
Outlet water condensator 3 temperature (all
other cases)
Digital input 1: High pressure circuit 1
+0300010EN Chiller Core – rel 1.0 – 13/07/2009
0
---
0
42
1
0: Close
1: Open
Mask index
Display description
02= Evap.water flow:
Description
Digital input 2: Evaporator water flow
Default
0
UOM
---
Min
0
Max
1
D21
Master digital input
01= High press.circ.1:
Digital input 1: High pressure circuit 1
0
---
0
1
02= Low press.circ.1:
Digital input 2: Low pressure circuit 1
0
---
0
1
D22
Master digital input
03= Remote On-Off:
Digital input 3: Remote On-Off
0
---
0
1
D23
Master digital input
03= Remote On-Off:
Digital input 3: Remote On-Off
0
---
0
1
04= Cond.water flow:
Digital input 4: condenser water flow
0
---
0
1
Master digital input
03= Remote On-Off:
Digital input 3: Remote On-Off
0
---
0
1
04= Cooling/Heating:
Digital input 4: Change cooling-heating mode
0
---
0
1
Master digital input
05= Low press.circ.1:
Digital input 5: Low pressure circuit 1
0
---
0
1
06= Serious alarm:
Digital input 6: Serious alarm
0
---
0
1
Master digital input
05= Evap.water flow:
Digital input 5: Evaporator water flow
0
---
0
1
06= Ovrl.cmp.1 circ.1:
Digital input 6: Overload compressor 1 circuit
1
0
---
0
1
Master digital input
07= Ovrl.cmp.2 circ.1:
Digital input 6: Overload compressor 2 circuit
1
0
---
0
1
08= Serious alarm:
Digital input 8: Serious alarm
0
---
0
1
Master digital input
09= High press.circ.2:
Digital input 9: High pressure circuit 2
0
---
0
1
10= Low press.circ.2:
Digital input 10: Low pressure circuit 2
0
---
0
1
Master digital input
11= Ovrl.cmp.1 circ.2:
Digital input 11: Overload compressor 1
circuit 2
0
---
0
1
12= Ovrl.cmp.2 circ.2:
Digital input 12: Overload compressor 2
circuit 2
0
---
0
1
D30
Master digital input
13= Ovrl.evap.pump 1:
Digital input 13: Overload evaporator pump
1
0
---
0
1
D31
Master digital input
13= Ovrl.evap.pump 1:
Digital input 13: Overload evaporator pump
1
0
---
0
1
14= Cond.water flow:
Digital input 14: Condenser water flow
0
---
0
1
Master digital input
13= Ovrl.evap.pump 1:
Digital input 13: Overload evaporator pump
1
0
---
0
1
14= Ovrl.evap.pump 2:
Digital input 14: Overload evaporator pump
2
0
---
0
1
Master digital input
15= Ovrl.cmp.3 circ.1:
Digital input 15: Overload compressor 3
circuit 1
0
---
0
1
16= Ovrl.cmp.3 circ.2:
Digital input 16: Overload compressor 3
circuit 2
0
---
0
1
D34
Master digital input
17= Cond.water flow:
Digital input 17: Condenser water flow
0
---
0
1
D35
Slave digital input
01= High press.circ.3:
Digital input 1: High pressure circuit 3
0
---
0
1
02= Low press.circ.3:
Digital input 2: Low pressure circuit 3
0
---
0
1
Slave digital input
06= Ovrl.cmp.1 circ.3:
Digital input 6: Overload compressor 1 circuit
3
0
---
0
1
07= Ovrl.cmp.2 circ.3:
Digital input 7: Overload compressor 2 circuit
3
0
---
0
1
Slave digital input
09= High press.circ.4:
Digital input 9: High pressure circuit 4
0
---
0
1
10= Low press.circ.4:
Digital input 10: Low pressure circuit 4
0
---
0
1
Slave digital input
11= Ovrl.cmp.1 circ.4:
Digital input 11: Overload compressor 1
circuit 4
0
---
0
1
12= Ovrl.cmp.2 circ.4:
Digital input 12: Overload compressor 2
circuit 4
0
---
0
1
D39
Slave digital input
13= Ovrl.evap.pump 2:
Digital input 13: Overload evaporator pump
2
0
---
0
1
D40
Slave digital input
15= Ovrl.cmp.3 circ.3:
Digital input 15: Overload compressor 3
circuit 3
0
---
0
1
16= Ovrl.cmp.3 circ.4:
Digital input 16: Overload compressor 3
circuit 4
0
---
0
1
Master digital output
01= Evap.pump 1:
Digital output 1: Evaporator pump 1
0
---
0
1
02= Comp.1 circ.1:
Digital output 2: Compressor 1 circuit 1
0
---
0
1
Master digital output
01= Comp.1 circ.1:
Digital output 1: Compressor 1 circuit 1
0
---
0
1
D24
D25
D26
D27
D28
D29
D32
D33
D36
D37
D38
D41
D42
+0300010EN Chiller Core – rel 1.0 – 13/07/2009
43
Possible value descr.
0: Close
1: Open
0: Close
1: Open
0: Close
1: Open
0: Close
1: Open
0: Close
1: Open
0: Close
1: Open
0: Close
1: Open
0: Close
1: Open
0: Close
1: Open
0: Close
1: Open
0: Close
1: Open
0: Close
1: Open
0: Close
1: Open
0: Close
1: Open
0: Close
1: Open
0: Close
1: Open
0: Close
1: Open
0: Close
1: Open
0: Close
1: Open
0: Close
1: Open
0: Close
1: Open
0: Close
1: Open
0: Close
1: Open
0: Close
1: Open
0: Close
1: Open
0: Close
1: Open
0: Close
1: Open
0: Close
1: Open
0: Close
1: Open
0: Close
1: Open
0: Close
1: Open
0: Close
1: Open
0: Close
1: Open
0: Close
1: Open
0: Close
1: Open
0: Close
1: Open
0: Close
1: Open
0: Open
1: Close
0: Open
1: Close
0: Open
1: Close
Type
D
Read/Write
R
BMS index
2
D
R
1
D
R
2
D
R
3
D
R
3
D
R
4
D
R
3
D
R
4
D
R
5
D
R
6
D
R
5
D
R
6
D
R
6
D
R
8
D
R
9
D
R
10
D
R
11
D
R
12
D
R
13
D
R
13
D
R
14
D
R
13
D
R
14
D
R
15
D
R
16
D
R
17
D
R
34
D
R
35
D
R
36
D
R
37
D
R
38
D
R
39
D
R
40
D
R
41
D
R
42
D
R
43
D
R
44
D
R
18
D
R
19
D
R
18
Mask index
Display description
02= Comp.2 circ.1:
Description
Digital output 2: Compressor 2 circuit 1
Default
0
UOM
---
Min
0
Max
1
D43
Master digital output
03= Antifreeze heater:
Digital output 3: Antifreeze heater
0
---
0
1
04= Comp.2 circ.1:
Digital output 4: Compressor 2 circuit 1
0
---
0
1
Master digital output
03= Antifreeze heater:
Digital output 3: Antifreeze heater
0
---
0
1
04= 4Way valve circ.1:
Digital output 4: 4 way valve circuit 1
0
---
0
1
Master digital output
03= Comp.1 circ.2:
Digital output 3: Compressor 1 circuit 2
0
---
0
1
04= Comp.2 circ.2:
Digital output 4: Compressor 2 circuit 2
0
---
0
1
D46
Master digital output
05= Serious alarm:
Digital output 5: Serious alarm
0
---
0
1
D47
Master digital output
05= Serious alarm:
or
05= Comp.2 circ.1:
0
---
0
1
D48
Master digital output
05= Cond.fan group 1:
Digital output 5: Serious alarm (if pCOxs and
unit CH/HP and 1 comp.)
or
Digital output 5: Serious alarm (if pCOxs and
unit CH/HP and 2 comp.)
Digital output 5: Condenser fan group 1
0
---
0
1
06= Cond.fan group 2:
Digital output 6: Condenser fan group 2
0
---
0
1
Master digital output
05= Condensing pump 1:
Digital output 5: Condensing pump 1
0
---
0
1
06= Condensing pump 2:
Digital output 6: Condensing pump 2
0
---
0
1
Master digital output
07= Antifreeze heater:
Digital output 7: Antifreeze heater
0
---
0
1
08= Serious alarm:
Digital output 8: Serious alarm
0
---
0
1
D51
Master digital output
09= Evaporator pump 1:
Digital output 9: Evaporator pump 1
0
---
0
1
D52
Master digital output
10= Liquid solenoid 1:
Digital output 10: Liquid solenoid 1
0
---
0
1
11= Liquid solenoid 2:
Digital output 11: Liquid solenoid 2
0
---
0
1
Master digital output
12= 4Way valve circ.1:
Digital output 12: 4 way valve circuit 1
0
---
0
1
13= 4Way valve circ.2:
Digital output 13: 4 way valve circuit 2
0
---
0
1
Master digital output
14= Comp.3 circ.1:
Digital output 14: Compressor 3 circuit 1
0
---
0
1
15= Comp.3 circ.2:
Digital output 15: Compressor 3 circuit 2
0
---
0
1
D55
Master digital output
16= Evaporator pump 2:
Digital output 16: Evaporator pump 2
0
---
0
1
D56
Slave digital output
01= Comp.1 circ.3:
Digital output 1: Compressor 1 circuit 3
0
---
0
1
02= Comp.2 circ.3:
Digital output 2: Compressor 2 circuit 3
0
---
0
1
Slave digital output
03= Comp.1 circ.4:
Digital output 3: Compressor 1 circuit 4
0
---
0
1
04= Comp.2 circ.4:
Digital output 4: Compressor 2 circuit 4
0
---
0
1
D58
Slave digital output
09= Evaporator pump 2:
Digital output 9: Evaporator pump 2
0
---
0
1
D59
Slave digital output
10= Liquid solenoid 3:
Digital output 10: Liquid solenoid 3
0
---
0
1
11= Liquid solenoid 4:
Digital output 11: Liquid solenoid 4
0
---
0
1
Slave digital output
12= 4Way valve circ.3:
Digital output 12: 4 way valve circuit 3
0
---
0
1
13= 4Way valve circ.4:
Digital output 13: 4 way valve circuit 4
0
---
0
1
Slave digital output
14= Comp.3 circ.3:
Digital output 14: Compressor 3 circuit 3
0
---
0
1
15= Comp.3 circ.4:
Digital output 15: Compressor 3 circuit 4
0
---
0
1
Master analog output
Y1= Cond.fan group 1:
Analog output 1: Condenser fan 1 (0-10V)
0
---
0
Y3= Cond.fan group 1:
Master analog output
Y1= Condensing pump:
Analog output 3: Condenser fan 1 (PWM)
Analog output 1: Condensing pump (0-10V)
0
0
-----
Master analog output
Y1= Cond.fan group 1:
Analog output 1: Condenser fan 1 (0-10V)
0
Y2= Cond.fan group 2:
Analog output 2: Condenser fan 2 (0-10V)
0
D44
D45
D49
D50
D53
D54
D57
D60
D61
D62
D63
D64
+0300010EN Chiller Core – rel 1.0 – 13/07/2009
Possible value descr.
0: Open
1: Close
0: Open
1: Close
0: Open
1: Close
0: Open
1: Close
0: Open
1: Close
0: Open
1: Close
0: Open
1: Close
0: Open
1: Close
0: Open
1: Close
Type
D
Read/Write
R
BMS index
19
D
R
20
D
R
21
D
R
20
D
R
21
D
R
20
D
R
21
D
R
22
D
R
22
D
R
22
D
R
23
D
R
22
D
R
23
D
R
24
D
R
25
D
R
26
D
R
27
D
R
28
D
R
29
D
R
30
D
R
31
D
R
32
D
R
33
D
R
45
D
R
46
D
R
47
D
R
48
D
R
49
D
R
50
D
R
51
D
R
52
D
R
53
D
R
54
D
R
55
1000
0: Open
1: Close
0: Open
1: Close
0: Open
1: Close
0: Open
1: Close
0: Open
1: Close
0: Open
1: Close
0: Open
1: Close
0: Open
1: Close
0: Open
1: Close
0: Open
1: Close
0: Open
1: Close
0: Open
1: Close
0: Open
1: Close
0: Open
1: Close
0: Open
1: Close
0: Open
1: Close
0: Open
1: Close
0: Open
1: Close
0: Open
1: Close
0: Open
1: Close
0: Open
1: Close
0: Open
1: Close
0: Open
1: Close
0: Open
1: Close
0: Open
1: Close
---
I
R
92
0
0
1000
1000
-----
I
I
R
R
94
92
---
0
1000
---
I
R
92
---
0
1000
---
I
R
93
44
Mask index
E01
Display description
N°
Description
Progressive history number
Alarm happened hour
Alarm happened minute
Alarm happened day
Alarm happened month
Alarm happened year
Alarm code and description
+0300010EN Chiller Core – rel 1.0 – 13/07/2009
Default
0
0
0
UOM
-------
0
0
0
-------
Min
0
0
0
0
0
0
0
45
Max
100
23
59
31
12
99
999
Possible value descr.
------------0: No alarm
1: ALG01 Clock board fault or not connected
2: ALG02 Extended memory fault
3: ALR03 Serious alarm by DIN
4: ALO04 Slave offline
5: ALA05 High pressure circ.1 probe fault
6: ALA06 High pressure circ.2 probe fault
7: ALA07 High pressure circ.3 probe fault
8: ALA08 High pressure circ.4 probe fault
9: ALA09 Low pressure circ.1 probe fault
10: ALA10 Low pressure circ.2 probe fault
11: ALA11 Low pressure circ.3 probe fault
12: ALA12 Low pressure circ.4 probe fault
13: ALA13 Inlet water evap.temp. probe fault
14: ALA14 Inlet water cond.temp. probe fault
15: ALA15 Out.water evap.temp. probe fault
16: ALA16 Outlet evap.1 temp. probe fault
17: ALA17 Outlet evap.2 temp. probe fault
18: ALA18 Outlet evap.3 temp. probe fault
19: ALA19 Outlet evap.4 temp. probe fault
20: ALA20 Outlet cond.1 temp. probe fault
21: ALA21 Outlet cond.2 temp. probe fault
22: ALA22 Outlet cond.3 temp. probe fault
23: ALA23 Outlet cond.4 temp. probe fault
24: ALA24 Evaporator water temp. probe fault
25: ALA25 External temperature probe fault
26: ALT26 Compressor 1 circuit 1 Maintenace
warning
27: ALT26 Compressor 2 circuit 1 Maintenace
warning
28: ALT26 Compressor 3 circuit 1 Maintenace
warning
29: ALT26 Compressor 1 circuit 2 Maintenace
warning
30: ALT26 Compressor 2 circuit 2 Maintenace
warning
31: ALT26 Compressor 3 circuit 2 Maintenace
warning
32: ALT26 Compressor 1 circuit 3 Maintenace
warning
33: ALT26 Compressor 2 circuit 3 Maintenace
warning
34: ALT26 Compressor 3 circuit 3 Maintenace
warning
35: ALT26 Compressor 1 circuit 4 Maintenace
warning
36: ALT26 Compressor 2 circuit 4 Maintenace
warning
37: ALT26 Compressor 3 circuit 4 Maintenace
warning
38: ALT27 Condenser fan group 1 Maintenace
warning
39: ALT27 Condenser fan group 2 Maintenace
warning
40: ALT28 Condenser pump 1 Maintenace warning
41: ALT28 Condenser pump 2 Maintenace warning
42: ALT29 Evaporator pump 1 Maintenace warning
43: ALT29 Evaporator pump 2 Maintenace warning
44: ALC30 Compressor 1 circuit 1 overload alarm
45: ALC30 Compressor 2 circuit 1 overload alarm
46: ALC30 Compressor 3 circuit 1 overload alarm
47: ALC30 Compressor 1 circuit 2 overload alarm
48: ALC30 Compressor 2 circuit 2 overload alarm
49: ALC30 Compressor 3 circuit 2 overload alarm
50: ALC30 Compressor 1 circuit 3 overload alarm
51: ALC30 Compressor 2 circuit 3 overload alarm
52: ALC30 Compressor 3 circuit 3 overload alarm
53: ALC30 Compressor 1 circuit 4 overload alarm
54: ALC30 Compressor 2 circuit 4 overload alarm
55: ALC30 Compressor 3 circuit 4 overload alarm
56: ALW31 Force off comps.circ.1 by antifreeze
57: ALW31 Force off comps.circ.2 by antifreeze
58: ALW31 Force off comps.circ.3 by antifreeze
59: ALW31 Force off comps.circ.4 by antifreeze
60: ALW32 Stop defrost circ.1 by maximum time
61: ALW32 Stop defrost circ.2 by maximum time
62: ALW32 Stop defrost circ.3 by maximum time
63: ALW32 Stop defrost circ.4 by maximum time
Type
I
I
I
I
I
I
Read/Write
---------------
BMS index
---------------
Mask index
Display description
or In.evap.:
or In.cond.:
or Out.evap.:
Out.evap.:
or
In.evap.:
Description
Default
UOM
Min
Max
Type
Read/Write
BMS index
999,9
Possible value descr.
64: ALW33 Stop pump-down circ.1 by maximum
time
65: ALW33 Stop pump-down circ.2 by maximum
time
66: ALW33 Stop pump-down circ.3 by maximum
time
67: ALW33 Stop pump-down circ.4 by maximum
time
68: ALB34 Circuit 1 LP alarm by pressostat
69: ALB34 Circuit 2 LP alarm by pressostat
70: ALB34 Circuit 3 LP alarm by pressostat
71: ALB34 Circuit 4 LP alarm by pressostat
72: ALB35 Circuit 1 LP alarm by transducer
73: ALB35 Circuit 2 LP alarm by transducer
74: ALB35 Circuit 3 LP alarm by transducer
75: ALB35 Circuit 4 LP alarm by transducer
76: ALB36 Circuit 1 HP alarm by pressostat
77: ALB36 Circuit 2 HP alarm by pressostat
78: ALB36 Circuit 3 HP alarm by pressostat
79: ALB36 Circuit 4 HP alarm by pressostat
80: ALB37 Circuit 1 HP alarm by transducer
81: ALB37 Circuit 2 HP alarm by transducer
82: ALB37 Circuit 3 HP alarm by transducer
83: ALB37 Circuit 4 HP alarm by transducer
84: ALB48 Circuit 1 antifreeze alarm
85: ALB48 Circuit 2 antifreeze alarm
86: ALB48 Circuit 3 antifreeze alarm
87: ALB48 Circuit 4 antifreeze alarm
88: ALB49 Circuit 1 and 2 antifreeze alarm
89: ALB49 Circuit 3 and 4 antifreeze alarm
90: ALU50 Unit antifreeze alarm
91: ALB51 Circ.1 high pressure prevent warning
92: ALB51 Circ.1 low pressure prevent warning
93: ALB51 Circ.1 antifreeze prevent warning
94: ALB52 Circ.2 high pressure prevent warning
95: ALB52 Circ.2 low pressure prevent warning
96: ALB52 Circ.2 antifreeze prevent warning
97: ALB53 Circ.3 high pressure prevent warning
98: ALB53 Circ.3 low pressure prevent warning
99: ALB53 Circ.3 antifreeze prevent warning
100: ALB54 Circ.4 high pressure prevent warning
101: ALB54 Circ.4 low pressure prevent warning
102: ALB54 Circ.4 antifreeze prevent warning
103: ALB55 Circ1 and 2 antifreeze prevent warning
104: ALB55 Circ3 and 4 antifreeze prevent warning
105: ALB56 Unit antifreeze prevent warning
106: ALP38 Evaporator Pump 1 flow warning
107: ALP39 Evaporator Pump 2 flow warning
108: ALP40 Evaporator Pump 1 flow alarm
109: ALP41 Evaporator Pump 2 flow alarm
110: ALP42 Evaporator Pump 1 overload alarm
111: ALP43 Evaporator Pump 2 overload alarm
112: ALP44 Condenser pump 1 flow warning
113: ALP45 Condenser pump 2 flow warning
114: ALP46 Condenser pump 1 flow alarm
115: ALP47 Condenser pump 2 flow alarm
---
Value of probe used for the
thermoregulation:
or Inlet avaporator temperature
or Inlet condenser temperature
or Outlet evaporator temperature
Outler evaporator temperature
or
Inlet evaporator temperature
---
°C/°F
0
A
---
---
---
°C/°F
0
999,9
---
A
---
---
---
I
---
-----
-----
---
---
---
I
D
-----
-----
F01
Unit address:
pLAN status
Address of the controller in a pLAN network
The picture show the status of the devices
connected via pLAN
0
0
-----
0
---
31
---
Ga01
Language: ENGLISH
ENTER to change
Show the current language and give the
information to change language
0
---
0
1
Show mask time:
Disable language mask at
start-up:
Countdown to jump into main mask
Disable the change language mask at start-up
0
0
s
---
0
0
999
1
Show mask time: s
Starting value of countdown, time of
permanence on change language mask
60
s
0
999
--0: NO
1: YES
---
Carel Industries S.r.l
Code: Chiller_Core
Ver.:
Chiller Core software version
---
---
0
9,99
---
I
---
---
Manual code:
Bios:
Chiller Core manual code
Bios version and date
0
0
-----
-----
-----
-----
--I
-----
-----
Ga02
Information
Gb01
+0300010EN Chiller Core – rel 1.0 – 13/07/2009
46
I
Mask index
Gb02
Gb03
Cooling/Heating
Gc01
Working hours
Gd01
Display description
Boot:
pCO type:
Description
Boot version and date
Type of pCO controller
Default
0
0
UOM
-----
Min
--0
Max
--8
Type of the controller
0
---
0
17
Total flash:
Ram:
Built-In type:
Indicates the size of the flash
Indicates the size of the RAM
Dispaly built-in type
0
0
0
KB
KB
---
0
0
0
9999
9999
9
Main cycle:
cycle/s
Unit:
Main program cycle time
number of cycle per second
Unit type
0
0
1
s
-----
0
0
0
99,9
9999
2
Physical circuit type
0
---
0
1
Gas type:
Refrigerant type
0
---
0
13
Circuits:
Compr.per circ.:
Evaporators:
Condensation:
Circuit number
Compressor number per circuit
Evaporators number
Condensing type
0
0
0
0
---------
0
0
0
0
4
3
4
1
Unit mode:
Temporary variable for manage unit working
mode
0
---
0
1
Unit working mode
0
---
0
1
Evaporator pump 1 working hour-high part
Evaporator pump 1 working hour-low part
Evaporator pump 2 working hour-high part
Evaporator pump 2 working hour-low part
Compressor 1 circuit 1 working hour-high
part
Compressor 1 circuit 1 working hour-low part
Compressor 2 circuit 1 working hour-high
part
Compressor 2 circuit 1 working hour-low part
Compressor 3 circuit 1 working hour-high
part
Compressor 3 circuit 1 working hour-low part
Compressor 1 circuit 2 working hour-high
part
0
0
0
0
0
h
h
h
h
h
0
0
0
0
0
999
999
999
999
999
-----------
0
0
h
h
0
0
999
999
0
0
h
h
0
0
0
0
h
h
0
0
Evaporator pump 1:
Evaporator pump 2:
Gd02
Circuit 1
Compressor 1:
Compressor 2:
Compressor 3:
Gd03
Circuit 2
Compressor 1:
+0300010EN Chiller Core – rel 1.0 – 13/07/2009
47
Possible value descr.
--0: pCO2
1: pCO1
2: pCO2
3: pCOC
4: pCOXS
5: pCOOEM
6: --7: pCO3
8: Snode
0: --1: --2: --3: --4: --5: --6: --7: --8: --9: --10: Large
11: Medium
12: Small
13: XL N.O.
14: --15: --16: --17: XL N.C.
----0: None
1: --2: PGD0
3: PGD1
----0: CH
1: CH/HP
2: HP
0:Air/Water
1: Water/Water
0: R22
1: R134a
2: R404a
3: R407c
4: R410a
5: R507
6: R290
7: R600
8: R600a
9: R717
10: R744
11: R728
12: R1270
13: R417a
------0: Single
1: Separated
Type
I
I
Read/Write
-----
BMS index
-----
I
---
---
I
I
I
-------
-------
A
I
I
----R/W
----1
D
R/W
56
I
R/W
2
I
I
I
D
R/W
R/W
R/W
R/W
3
4
5
58
I
R/W
62
I
I
I
I
I
-----------
-----------
-----
I
I
-----
-----
999
999
-----
I
I
-----
-----
999
999
-----
I
I
-----
-----
0: COOLING
1: HEATING
0: Cooling
1: Heating
D
Mask index
Display description
Description
Compressor 1 circuit 2 working hour-low part
Compressor 2 circuit 2 working hour-high
part
Compressor 2 circuit 2 working hour-low part
Compressor 3 circuit 2 working hour-high
part
Compressor 3 circuit 2 working hour-low part
Compressor 1 circuit 3 working hour-high
part
Compressor 1 circuit 3 working hour-low part
Compressor 2 circuit 3 working hour-high
part
Compressor 2 circuit 3 working hour-low part
Compressor 3 circuit 3 working hour-high
part
Compressor 3 circuit 3 working hour-low part
Compressor 1 circuit 4 working hour-high
part
Compressor 1 circuit 4 working hour-low part
Compressor 2 circuit 4 working hour-high
part
Compressor 2 circuit 4 working hour-low part
Compressor 3 circuit 4 working hour-high
part
Compressor 3 circuit 4 working hour-low part
Condenser fan 1 working hour-high part
Condenser fan 1 working hour-low part
Condenser fan 2 working hour-high part
Condenser fan 2 working hour-low part
Evaporator pump 1 working hour-high part
Evaporator pump 1 working hour-low part
Condenser pump 2 working hour-high part
Condenser pump 2 working hour-low part
Default
0
0
UOM
h
h
Min
0
0
Max
999
999
Possible value descr.
-----
Type
I
I
Read/Write
-----
BMS index
-----
0
0
h
h
0
0
999
999
-----
I
I
-----
-----
0
0
h
h
0
0
999
999
-----
I
I
-----
-----
0
0
h
h
0
0
999
999
-----
I
I
-----
-----
0
0
h
h
0
0
999
999
-----
I
I
-----
-----
0
0
h
h
0
0
999
999
-----
I
I
-----
-----
0
0
h
h
0
0
999
999
-----
I
I
-----
-----
0
0
h
h
0
0
999
999
-----
I
I
-----
-----
0
0
0
0
0
0
0
0
0
h
h
h
h
h
h
h
h
h
0
0
0
0
0
0
0
0
0
999
999
999
999
999
999
999
999
999
-------------------
I
I
I
I
I
I
I
I
I
-------------------
-------------------
Supervisor system
Protocol:
Protocol type
0
---
0
2
I
---
---
Speed:
Baud rate
4
---
0
4
I
---
---
Ident:
Address of the controller in a supervisory
system network n.1
0
---
0
207
0: CAREL
1: MODBUS
2: WINLOAD
0: 1200
1: 2400
2: 4800
3: 9600
4: 19200
---
I
---
---
Evaporator pump 1
Thres.:
Max operate hours of evaporator pump 1
10
X1000h
0
99
---
I
---
---
Reset:
Reset evaporator pump 1 hour counter
0
---
0
1
D
---
---
Evaporator pump 2
Thres.:
Max operate hours of evaporator pump 2
10
X1000h
0
99
0: N
1: Y
---
I
---
---
Reset:
Reset evaporator pump 2 hour counter
0
---
0
1
D
---
---
Compressor 1 circuit 1
Thres.:
Max operate hours of compressor 1 circuit 1
10
X1000h
0
99
I
---
---
Reset:
Reset compressor 1 circuit 1 hour counter
0
---
0
1
D
---
---
Compressor 2 circuit 1
Thres.:
Max operate hours of compressor 2 circuit 1
10
X1000h
0
99
I
---
---
Reset:
Reset compressor 2 circuit 1 hour counter
0
---
0
1
D
---
---
Compressor 3 circuit 1
Thres.:
Max operate hours of compressor 3 circuit 1
10
X1000h
0
99
I
---
---
Reset:
Reset compressor 3 circuit 1 hour counter
0
---
0
1
D
---
---
Compressor 1 circuit 2
Thres.:
Max operate hours of compressor 1 circuit 2
10
X1000h
0
99
I
---
---
Reset:
Reset compressor 1 circuit 2 hour counter
0
---
0
1
D
---
---
Compressor 2 circuit 2
Thres.:
Max operate hours of compressor 2 circuit 2
10
X1000h
0
99
I
---
---
Reset:
Reset compressor 2 circuit 2 hour counter
0
---
0
1
D
---
---
Compressor 3 circuit 2
Thres.:
Max operate hours of compressor 3 circuit 2
10
X1000h
0
99
I
---
---
Reset:
Reset compressor 3 circuit 2 hour counter
0
---
0
1
D
---
---
Compressor 1 circuit 3
Thres.:
Max operate hours of compressor 1 circuit 3
10
X1000h
0
99
I
---
---
Reset:
Reset compressor 3 circuit 1 hour counter
0
---
0
1
D
---
---
Compressor 2 circuit 3
Thres.:
Max operate hours of compressor 2 circuit 3
10
X1000h
0
99
I
---
---
Compressor 2:
Compressor 3:
Gd04
Circuit 3
Compressor 1:
Compressor 2:
Compressor 3:
Gd05
Circuit 4
Compressor 1:
Compressor 2:
Compressor 3:
Gd06
Condenser fan
Group 1:
Group 2:
Gd07
Condenser pump 1:
Condenser pump 2:
BMS Config.
Ge01
Working hour set
Gfa01
Gfa02
Gfa03
Gfa04
Gfa05
Gfa06
+0300010EN Chiller Core – rel 1.0 – 13/07/2009
48
0: N
1: Y
--0: N
1: Y
--0: N
1: Y
--0: N
1: Y
--0: N
1: Y
--0: N
1: Y
--0: N
1: Y
--0: N
1: Y
---
Mask index
Display description
Reset:
Description
Reset compressor 2 circuit 3 hour counter
Default
0
UOM
---
Min
0
Max
1
Gfa07
Compressor 3 circuit 3
Thres.:
Max operate hours of compressor 3 circuit 3
10
X1000h
0
99
Reset:
Reset compressor 3 circuit 3 hour counter
0
---
0
1
Compressor 1 circuit 4
Thres.:
Max operate hours of compressor 1 circuit 4
10
X1000h
0
99
Reset:
Reset compressor 1 circuit 4 hour counter
0
---
0
1
Compressor 2 circuit 4
Thres.:
Max operate hours of compressor 2 circuit 4
10
X1000h
0
99
Reset:
Reset compressor 2 circuit 4 hour counter
0
---
0
1
Compressor 3 circuit 4
Thres.:
Max operate hours of compressor 3 circuit 4
10
X1000h
0
99
Reset:
Reset compressor 3 circuit 4 hour counter
0
---
0
1
Condenser fan group 1
Thres.:
Max operate hours of condenser fan 1
10
X1000h
0
99
Reset:
Reset condenser fan 1 hour counter
0
---
0
1
Condenser fan group 2
Thres.:
Max operate hours of condenser fan 2
10
X1000h
0
99
Reset:
Reset condenser fan 2 hour counter
0
---
0
1
Condenser pump 1
Thres.:
Max operate hours of condenser pump 1
10
X1000h
0
99
Reset:
Reset condenser pump 1 hour counter
0
---
0
1
Condenser pump 2
Thres.:
Max operate hours of condenser pump 2
10
X1000h
0
Reset:
Reset condenser pump 2 hour counter
0
---
-----
Master probe adjust.
B01:
Probe 1 offset
0
Val:
B02:
Val:
B03:
Val:
B04:
Val:
B05:
Val:
Master probe adjust.
B06:
Probe 1 value
Probe 2 offset
Probe 2 value
Probe 3 offset
Probe 3 value
Probe 4 offset
Probe 4 value
Probe5 offset
Probe 5 value
Probe 6 offset
Val:
B07:
Val:
B08:
Val:
B09:
Val:
B10:
Val:
Slave probe adjust.
B01:
Gfa08
Gfa09
Gfa10
Gfa11
Probe adjustment
Gfb01
Gfb02
Gfb03
Gfb04
Thermoregulation
Gfc01
Possible value descr.
0: N
1: Y
--0: N
1: Y
--0: N
1: Y
--0: N
1: Y
--0: N
1: Y
--0: N
1: Y
--0: N
1: Y
---
Type
D
Read/Write
---
BMS index
---
I
---
---
D
---
---
I
---
---
D
---
---
I
---
---
D
---
---
I
---
---
D
---
---
I
---
---
D
---
---
I
---
---
D
---
---
I
---
---
D
---
---
99
0: N
1: Y
---
I
---
---
0
---
1
---
0: N
1: Y
D
---
-----
-----
---
-9,9
9,9
---
A
---
---
0
0
0
0
0
0
0
0
0
0
---------------------
-999,9
-9,9
-999,9
-9,9
-999,9
-9,9
-999,9
-9,9
-999,9
-9,9
999,9
9,9
999,9
9,9
999,9
9,9
999,9
9,9
999,9
9,9
---------------------
I
A
I
A
I
A
I
A
I
A
---------------------
---------------------
Probe 6 value
Probe 7 offset
Probe 7 value
Probe 8 offset
Probe 8 value
Probe 9 offset
Probe 9 value
Probe 10 offset
Probe 10 value
Probe 1 offset of slave
0
0
0
0
0
0
0
0
0
0
---------------------
-999,9
-9,9
-999,9
-9,9
-999,9
-9,9
-999,9
-9,9
-999,9
-9,9
999,9
9,9
999,9
9,9
999,9
9,9
999,9
9,9
999,9
9,9
---------------------
I
A
I
A
I
A
I
A
I
A
---------------------
---------------------
Val:
B02:
Val:
B04:
Val:
B05:
Val:
Slave probe adjust.
B06:
Probe 1 value of slave
Probe 2 offset of slave
Probe 2 value of slave
Probe 4 offset of slave
Probe 4 value of slave
Probe 5 offset of slave
Probe 5 value of slave
Probe 6 offset of slave
0
0
0
0
0
0
0
0
-----------------
-999,9
-9,9
-999,9
-9,9
-999,9
-9,9
-999,9
-9,9
999,9
9,9
999,9
9,9
999,9
9,9
999,9
9,9
-----------------
I
A
I
A
I
A
I
A
-----------------
-----------------
Val:
B07:
Val:
B08:
Val:
B10:
Val:
Probe 6 value of slave
Probe 7 offset of slave
Probe 7 value of slave
Probe 8 offset of slave
Probe 8 value of slave
Probe 10 offset of slave
Probe 10 value of slave
0
0
0
0
0
0
0
---------------
-999,9
-9,9
-999,9
-9,9
-999,9
-9,9
-999,9
999,9
9,9
999,9
9,9
999,9
9,9
999,9
---------------
I
A
I
A
I
A
I
---------------
---------------
Cooling/Heating
Change cooling/heating
delay:
Enable cooling/heating
digital input:
Cool/Heat change delay time
60
s
0
999
---
I
R/W
50
Enable cool/heat change by DIN
0
---
0
1
0: NO
1: YES
D
---
---
+0300010EN Chiller Core – rel 1.0 – 13/07/2009
49
Mask index
Gfc02
Display description
Enable switch-off unit by
display:
Description
Enable switch-off unit by keyboard
Default
0
UOM
---
Min
1
Max
1
Gfc03
Regulation temperature
probe:
Regulation temperature probe
0
---
0
1
Gfc04
Temperature regulation
Reg.type:
Regulation type
0
---
0
2
Cooling T.Der
Cooling T.Int
Heating T.Der
Heating T.Int
Temperature regulation
Cooling mode
Differential:
Dead band:
Cooling derivative time
Cooling integration time
Heating derivative time
Heating integration time
Cooling differential
0
300
0
300
2
3
--------°C
°F
0
0
0
0
0
0
Regulation dead band in positive mode
Temperature regulation
Heating mode
Differential:
Dead band:
Heating differential
0
0
4
7
°C
°F
°C
°F
Regulation dead band in negative mode
0
Neutral zone
NZ diff.:
Regulation of differential in neutral zone
Activ.diff.:
Regulation differential for devices activation
Deact.diff.:
Regulation differential for devices
deactivation
Neutral zone
En.force off power:
Enable force require to 0 during NZ
regulation when the regulation temperature
is lower a threshold
When regulation value pass this threshold
power decreasae immediately to 0
Gfc05
Gfc06
Gfc07
Gfc08
Threshold force off
compressor:
999
999
999
999
60.0
108.0
Possible value descr.
0: NO
1: YES
0: INLET
1: OUTLET
0: PROPORTIONAL
1: PROP.+INT.
2: PID
-------------
Type
D
Read/Write
R/W
BMS index
68
D
R/W
69
I
R/W
51
I
I
I
I
A
A
R/W
R/W
R/W
R/W
---
52
53
54
55
---
0
0
0
0
60.0
108.0
60.0
108.0
---------
A
A
A
A
---
---
---
---
2
3
9
16
4
7
0
°C
°F
°C
°F
°C
°F
°C
°F
---
0
0
0
0
0
0
0
0
0
60.0
108.0
60.0
108.0
60.0
108.0
60.0
108.0
1
----------------0: NO
1: YES
A
A
A
A
A
A
A
A
D
---
---
---
---
---
---
---
---
R/W
70
°C
°F
s
-99,9
-148.0
0
99,9
211,8
9999
-------
A
A
I
---
---
R/W
56
Neutral zone
Load min.time:
Minimum time for loading
0
32
120
Gfc10
Load max.time:
Neutral zone
Unload min.time:
Maximum time for loading
Minimum time for unloading
600
120
s
s
0
0
9999
9999
-----
I
I
R/W
R/W
57
58
Gfc11
Unload max.time:
Setpoint limit cooling
Minimum:
Maximum time for unloading
Setpoint minimum limit in cooling mode
---
Setpoint maximum limit in cooling mode
---
---
Compressors
Load up time:
Time between comp.load
10
I
A
A
A
A
A
A
A
A
I
---
Maximum:
---------------------
---
Setpoint minimum limit in cooling mode
9999
99.9
211.8
99.9
211.8
99.9
211.8
99.9
211.8
999
---
Setpoint limit heating
Minimum:
0
-99.9
-147.8
-99.9
-147.8
-99.9
-147.8
-99.9
-147.8
0
59
---
Setpoint maximum limit in cooling mode
s
°C
°F
°C
°F
°C
°F
°C
°F
s
R/W
---
Maximum:
600
-----------
R/W
60
Load down time:
Pump-Down
Maximum time:
Time between comp.download
Maximum pump down time
10
60
s
s
0
0
999
999
-----
I
I
R/W
R/W
61
63
End thr.:
Pump down end threshold
59
Cool compensation external differential
R/W
60
Heating compensation
Max.set.:
Max.setpoint of heating compensation
---
---
Ext.set.:
Heat compensation external setpoint
R/W
61
Ext.diff.:
Heat compensation external differential
R/W
62
Evaporator pump
Delay time between pump
on and compressors on:
Off delay time:
Evaporator pump water flow
check
Alarm delay from pump
start-up:
Alarm running delay:
Evaporator pump
Rotation time:
Delay between evap.pump on and comp.on
A
A
A
A
A
A
A
A
A
A
A
A
A
A
I
R/W
Ext.diff.:
-------------------------------
---
Cool compensation external setpoint
999,9
999,9
99.9
211.8
99.9
211.8
60.0
108.0
99.9
211.8
99.9
211.8
60.0
108.0
999
---
Ext.set.:
-999,9
-999,9
-99.9
-147.8
-99.9
-147.8
0
0
-99.9
-147.8
-99.9
-147.8
0
0
0
65
Max.setpoint of cooling compensation
barg
psig
°C
°F
°C
°F
°C
°F
°C
°F
°C
°F
°C
°F
s
R/W
Cooling compensation
Max.set.:
2
29
5
41
25
77
10
18
-5
23
0
32
10
18
25
R/W
64
Evap.pump off delay time
Evap.pumps flow alarm startup delay time
10
20
s
s
0
0
999
999
-----
I
I
R/W
R/W
65
66
Evap.pumps flow alarm running delay time
Evap.pumps rotation time
5
100
s
h
1
0
999
999
-----
I
I
R/W
R/W
67
68
--0: UNIT ON
1: COMPRESSORS REQUIRED
-----
I
D
R/W
R/W
69
71
I
I
R/W
R/W
70
71
Gfc09
Gfc12
Gfc13
Gfc14
Gfc15
Gfc16
Gfc17
Gfc18
Gfc19
Gfc20
Overwork time:
Condenser pump Pump on
if:
Evap.pumps overwork time
Pump on if
5
0
s
---
0
0
999
1
Gfc21
Off delay time:
Condenser pump water flow
check
Alarm delay from pump
Cond.pump off delay time
Cond.pumps flow alarm startup delay time
10
20
s
s
0
0
999
999
+0300010EN Chiller Core – rel 1.0 – 13/07/2009
50
Mask index
Gfc22
Display description
start-up:
Description
Default
UOM
Min
Max
Possible value descr.
Type
Read/Write
BMS index
Alarm running delay:
Condenser pump Rotation
time:
Overwork time:
Condenser fan Chiller mode
Setpoint:
Cond.pumps flow alarm running delay time
Cond.pumps rotation time
5
100
s
h
1
0
999
999
-----
I
I
R/W
R/W
72
73
Cond.pumps overwork time
Condenser fan setpoint in chiller mode
s
barg
psig
°C
°F
barg
psig
°C
°F
barg
psig
°C
°F
barg
psig
°C
°F
s
0
0
0
0
0
0
0
0
0
0
0
0
0
0
0
0
0
0
999
99.9
1448.6
999,9
999,9
99.9
1448.6
999,9
999,9
99.9
1448.6
999,9
999,9
99.9
1448.6
999,9
999,9
99
-------------------------------------
I
A
A
A
A
A
A
A
A
A
A
A
A
A
A
A
A
I
R/W
R/W
74
34
R
35
R/W
55
R
56
R/W
36
R
37
R/W
57
R
58
R/W
75
Condenser fan
Speed up time:
Condenser fans speed-up time
5
13
188
13
55
3
43
13
23
13
188
13
55
3
43
13
23
10
Gfc26
Start-up circuit force time:
Condenser fan
Minimum speed:
Condenser fan force time at circuit start up
Condenser fan minimum speed
60
3.5
s
V
0
0
99
99,9
-----
I
A
R/W
R/W
76
66
Gfc27
Maximum speed:
Defrost
Start setp.:
Condenser fan maximum speed
Defrost start setpoint
-------------
A
A
A
A
A
I
64
Defrost startup delay
99,9
99.9
211.8
99.9
211.8
9999
R/W
Defrost
Startup delay: s
0
-99.9
-147.8
-99.9
-147.8
1
67
63
Defrost end setpoint
%
°C
°F
°C
°F
s
R/W
R/W
End setp.:
7.5
2
35
28
82
1800
R/W
77
Minimum time:
Maximum time:
Defrost
Interval time:
Defrost minimum time
Defrost maximum time
Interval time between 2 defrost procedure
0
5
0
min
min
min
0
1
0
9999
999
999
-------
I
I
I
R/W
R/W
R/W
78
79
80
Dripping time: s
Reverse circ.time at startend defr.:
Low pressure alarm
Threshold:
Dripping time
Reverse circuit time during start-end defrost
30
30
s
s
0
0
999
999
-----
I
I
R/W
---
81
---
Low pressure alarm threshold
-----------
A
A
A
A
I
46
Low pressure alarm startup delay
99.9
1448.6
60.0
870.2
999
R/W
Low pressure alarm
Startup delay:
0
0
0
0
0
45
Low pressure alarm differential
barg
psig
barg
psig
s
R/W
Differential:
1,5
21
0,5
7
40
R/W
82
Running delay:
LP alarm reset type
By pressostat:
Low pressure alarm running delay
LP by pressostat reset type
0
1
s
---
0
0
999
1
I
D
R/W
R/W
83
72
By transducer:
LP by transducer reset type
0
---
0
1
D
R/W
73
High pressure alarm
Threshold:
High pressure alarm threshold
A
R/W
42
Prevent automatic increase time
99.9
1448.6
60.0
870.2
999
41
Circuit prevent
Automatic increase time:
0
0
0
0
0
R/W
High pressure alarm differential
barg
psig
barg
psig
s
A
Differential:
23
333
2
29
10
--0: SEMIAUTOMATIC
1: MANUAL
0: SEMIAUTOMATIC
1: MANUAL
-----------
I
R/W
84
Count prevent number
time:
Time period to check if the prevent number
reach the maximum number of prevent
condition happened
High pressure prevent threshold
60
min
0
100
---
I
R/W
85
20
290
2
29
3
barg
psig
barg
psig
---
0
0
0
0
0
99.9
1448.6
60.0
870.2
5
-----------
A
R/W
39
A
R/W
40
I
R/W
86
5
2
29
2
29
3
s
barg
psig
barg
psig
---
0
0
0
0
0
0
999
99.9
1448.6
60.0
870.2
5
-------------
I
A
R/W
R/W
87
43
A
R/W
44
I
R/W
88
5
6
42
1
1,8
3
s
°C
°F
°C
°F
---
0
-99.9
-147.8
0
0
0
999
99.9
211.8
60.0
108
5
-------------
I
A
A
A
A
I
R/W
R/W
89
47
R/W
48
---
---
Gfc23
Condenser fan setpoint for CH mode
converted to temperature
Differential:
Condenser fan differential in chiller mode
Condenser fan diffrential for CH mode
converted to temperature
Gfc24
Condenser fan Heat pump
mode Setpoint:
Condenser fan setpoint in heatpump mode
Condenser fan setpoint for HP mode
converted to temperature
Differential:
Condenser fan differential in heatpump
mode
Condenser fan differential for HP mode
converted to temperature
Gfc25
Gfc28
Gfc29
Gfc30
Gfc31
Gfc32
Gfc33
Gfc34
Gfc35
Gfc36
Gfc37
Gfc38
Gfc39
Gfc40
High pressure prevent
Threshold:
Differential:
High pressure prevent differential
High pressure prevent
Max prevent number:
High pressure prevent number
Warning delay:
Low pressure prevent
Threshold:
High pressure prevent delay
Low pressure prevent threshold
Differential:
Low pressure prevent differential
Low pressure prevent
Max prevent number:
Low pressure prevent number
Warning delay:
Antifreeze prevent
Threshold:
Low pressure prevent delay
Antifreeze prevent threshold
Differential:
Antifreeze prevent differential
Antifreeze prevent
Max prevent number:
Antifreeze prevent number
+0300010EN Chiller Core – rel 1.0 – 13/07/2009
51
Mask index
Display description
Warning delay:
User DEV/Change PW1
Gfd01
Insert new service password
(PW1):
Gfd02
Delete data logger:
Description
Antifreeze prevent delay
Default
5
UOM
s
Min
0
Max
999
Possible value descr.
---
Type
I
Read/Write
---
BMS index
---
New service password
1234
---
0
9999
---
I
---
---
Erase history alarm data logger
NO
---
0
1
D
---
---
Gfd03
Load unit configuration:
Load the unit configuration saved by
manufacturer
NO
---
0
1
D
---
---
Last saving
Last saving date: Day
Last saving date: Month
Last saving date: Year
-------
day
month
year
0
0
0
31
12
99
0: NO
1: YES
0: NO
1: YES
-------
I
I
I
-------
-------
Manual management
Gg01
Defrost:
Force defrost procedure
0
---
0
1
D
---
---
Gg02
Disable compressors
Comp.1 circ.1:
Disable comp.1 circ.1 by user
0
---
0
1
D
---
---
Comp.2 circ.1:
Disable comp.2 circ.1 by user
0
---
0
1
D
---
---
Comp.3 circ.1:
Disable comp.3 circ.1 by user
0
---
0
1
D
---
---
Disable compressors
Comp.1 circ.2:
Disable comp.1 circ.2 by user
0
---
0
1
D
---
---
Comp.2 circ.2:
Disable comp.2 circ.2 by user
0
---
0
1
D
---
---
Comp.3 circ.2:
Disable comp.3 circ.2 by user
0
---
0
1
D
---
---
Disable compressors
Comp.1 circ.3:
Disable comp.1 circ.3 by user
0
---
0
1
D
---
---
Comp.2 circ.3:
Disable comp.2 circ.3 by user
0
---
0
1
D
---
---
Comp.3 circ.3:
Disable comp.3 circ.3 by user
0
---
0
1
D
---
---
Disable compressors
Comp.1 circ.4:
Disable comp.1 circ.4 by user
0
---
0
1
D
---
---
Comp.2 circ.4:
Disable comp.2 circ.4 by user
0
---
0
1
D
---
---
Comp.3 circ.4:
Disable comp.3 circ.4 by user
0
---
0
1
D
---
---
Work in manual mode
Comp.1 circ.1:
Enable comp.1 circ.1 works in manual mode
0
---
0
1
D
---
---
Comp.2 circ.1:
Enable comp.2 circ.1 works in manual mode
0
---
0
1
D
---
---
Comp.3 circ.1:
Enable comp.3 circ.1 works in manual mode
0
---
0
1
D
---
---
Liq.sol.circ.1:
Liquid solenoid valve circ.1 works in manual
mode
0
---
0
1
D
---
---
Work in manual mode
Comp.1 circ.2:
Enable comp.1 circ.2 works in manual mode
0
---
0
1
D
---
---
Comp.2 circ.2:
Enable comp.2 circ.2 works in manual mode
0
---
0
1
D
---
---
Comp.3 circ.2:
Enable comp.3 circ.2 works in manual mode
0
---
0
1
D
---
---
Liq.sol.circ.2:
Liquid solenoid valve circ.2 works in manual
mode
0
---
0
1
D
---
---
Work in manual mode
Comp.1 circ.3:
Enable comp.1 circ.3 works in manual mode
0
---
0
1
D
---
---
Comp.2 circ.3:
Enable comp.2 circ.3 works in manual mode
0
---
0
1
D
---
---
Comp.3 circ.3:
Enable comp.3 circ.3 works in manual mode
0
---
0
1
D
---
---
Liq.sol.circ.3:
Liquid solenoid valve circ.3 works in manual
mode
0
---
0
1
D
---
---
Work in manual mode
Comp.1 circ.4:
Enable comp.1 circ.4 works in manual mode
0
---
0
1
D
---
---
Comp.2 circ.4:
Enable comp.2 circ.4 works in manual mode
0
---
0
1
D
---
---
Comp.3 circ.4:
Enable comp.3 circ.4 works in manual mode
0
---
0
1
D
---
---
Liq.sol.circ.4:
Liquid solenoid valve circ.4 works in manual
mode
0
---
0
1
D
---
---
Work in manual mode
Evaporator pump1:
Evaporator pump1 works in manual mode
0
---
0
1
D
---
---
Evaporator pump2:
Evaporator pump2 works in manual mode
0
---
0
1
D
---
---
Work in manual mode
Condensing pump1:
Condensing pump1 works in manual mode
0
---
0
1
D
---
---
Condensing pump2:
Condensing pump2 works in manual mode
0
---
0
1
D
---
---
Work in manual mode
4way valve circ.1:
4way valve circ.1 works in manual mode
0
---
0
1
D
---
---
Gg03
Gg04
Gg05
Gg06
Gg07
Gg08
Gg09
Gg10
Gg11
Gg12
+0300010EN Chiller Core – rel 1.0 – 13/07/2009
52
0: NO
1: YES
0: NO
1: YES
0: NO
1: YES
0: NO
1: YES
0: NO
1: YES
0: NO
1: YES
0: NO
1: YES
0: NO
1: YES
0: NO
1: YES
0: NO
1: YES
0: NO
1: YES
0: NO
1: YES
0: NO
1: YES
0: NO
1: YES
0: NO
1: YES
0: NO
1: YES
0: NO
1: YES
0: NO
1: YES
0: NO
1: YES
0: NO
1: YES
0: NO
1: YES
0: NO
1: YES
0: NO
1: YES
0: NO
1: YES
0: NO
1: YES
0: NO
1: YES
0: NO
1: YES
0: NO
1: YES
0: NO
1: YES
0: NO
1: YES
0: NO
1: YES
0: NO
1: YES
0: NO
1: YES
0: NO
1: YES
Mask index
Display description
4way valve circ.2:
Description
4way valve circ.2 works in manual mode
Default
0
UOM
---
Min
0
Max
1
Gg13
Work in manual mode
4way valve circ.3:
4way valve circ.3 works in manual mode
0
---
0
1
4way valve circ.4:
4way valve circ.4 works in manual mode
0
---
0
1
0
%
0
0
0
%
---
0
0
Gg14
Work in manual mode
Condenser fan 1:
Condenser fan 2:
Work in manual mode
Antifreeze heater:
Gg15
Antifreeze heater works in manual mode
100
Possible value descr.
0: NO
1: YES
0: NO
1: YES
0: NO
1: YES
---
100
1
0: NO
Type
D
Read/Write
---
BMS index
---
D
---
---
D
---
---
I
---
---
I
D
-----
-----
D
R/W
56
I
R/W
1
D
R/W
57
I
R/W
2
I
I
R/W
R/W
3
4
I
D
R/W
R/W
5
58
D
R/W
58
I
R/W
6
D
R/W
59
D
---
---
I
R/W
7
I
R/W
8
I
R/W
9
I
R/W
10
D
R/W
60
I
R/W
11
I
R/W
12
D
R/W
61
D
R/W
62
D
R/W
63
D
---
---
D
R/W
64
1: YES
Ha01
Unit type:
Physical circuit type
0
---
0
1
Unit type
1
---
0
2
Reverse cycle type:
Reverse cycle type
0
---
0
1
Refrigerant type:
Refrigerant type
4
---
0
13
Circuit number:
Compressor number per
circuit:
Evaporator number:
Condensation type:
Circuit number
Compressor number per circuit
1
2
-----
1
1
4
3
Evaporator number
Condensing type (show if not possible to set
the condensation type)
1
0
-----
1
0
4
1
Condensing type (show if possible to set the
condensation type)
0
---
0
1
Devices rotation type:
Type of rotation
1
---
1
4
Equalized circuits power:
Sequence activation compressors:
0
---
0
1
Device power different size:
Enable different size power devices
0
---
0
1
Device unload sequence:
Sequence of load unloader
0
---
1
2
Ha07
Pump-Down type:
PumpDown type
0
---
0
3
Ha08
Evaporator pumps
Number of pumps:
Number of evaporator pump
1
---
1
2
Warnings limit max for flow
lack:
Evaporator pumps
Enable antiblock:
Warnings limit evaporator pump
5
---
0
5
Enable antiblock evaporator pump
0
---
0
1
Condenser pumps
Number of pumps:
Number of condensator pump
1
---
1
2
Warnings limit max for flow
lack:
Condenser pumps
Enable antiblock:
Warnings limit condensator pump
5
---
0
5
Enable antiblock condensator pump
0
---
0
1
Ha12
Defrost type:
Defrost type
0
---
0
1
Ha13
Enable compensat.:
Enable setpoint compensation
0
---
0
1
Conv. Press->Temp.:
Dew/Bubble point selection
0
---
0
1
Clock board:
Enable clock for pCO* without clock device
on board
0
---
0
1
Ha02
Ha03
Ha04
Ha05
Ha06
Ha09
Ha10
Ha11
Ha14
I/O Configuration
+0300010EN Chiller Core – rel 1.0 – 13/07/2009
53
0: AIR/WATER
1: WATER/WATER
0: CHILLER ONLY
1: CHILLER/HEATPUMP
2: HEATPUMP ONLY
0: WATER
1: GAS
0: R22
1: R134a
2: R404a
3: R407c
4: R410a
5: R507
6: R290
7: R600
8: R600a
9: R717
10: R744
11: R728
12: R1270
13: R417a
------0: Single
1: Separated
0: SINGLE
1: SEPARATED
0: -----1: FIFO
2: LIFO
3: TIME
4: CUSTOM
0: PACKED
1: EQUALIZED
0: NO
1: YES
0: -------1: CCpppppp
2: CpppCppp
0: DISABLE
1: AT COMP.POWER OFF
2: AT COMP.POWER ON
3: AT COMP.POWER ON-OFF
---
0: NO
1: YES
---
0: NO
1: YES
0: SEPARATED
1: SIMULTANEOUS
0: NO
1: YES
0: DEW POINT
1: BUBBLE POINT
0: Disabled
1: Enabled
Mask index
Hb01
Hb02
Hb03
Hb04
Display description
Probe config.
En.high press.probe:
Description
Enable high pressure probes
Default
1
UOM
---
Min
0
Max
1
Type:
High pressure probe type
6
---
0
6
0-20mA/4-20mA:
HP 0-20mA/4-20mA selection
1
---
0
1
Probe config.
En.high press.probe:
Enable high pressure probes
1
---
0
1
Type:
High pressure probe type
6
---
0
6
0-20mA/4-20mA:
HP 0-20mA/4-20mA selection
1
---
0
1
Probe config.
High pressure probe
Minimum:
Maximum:
HP probe min limit
0
0
barg
psig
0
0
99,9
1448,6
HP probe max limit
barg
psig
---
0
0
0
99,9
1448,6
1
---
---
D
---
---
I
---
---
D
---
---
A
---
---
---
A
---
---
0: N
1: Y
0: NTC
1: PT1000
2: 0-1V
3: 0-10V
4: 0-20mA/4-20mA
5: ON-OFF
6: 0-5V
0: 0-20mA
1: 4-20mA
---
D
---
---
I
---
---
D
---
---
A
---
---
0
6
0-20mA/4-20mA:
LP 0-20mA/4-20mA selection
1
---
0
1
Probe config.
Low pressure probe
Minimum:
Maximum:
LP probe min limit
0
0
barg
psig
0
0
99,9
1448,6
LP probe max limit
barg
psig
---
0
0
0
99,9
1448,6
1
---
A
---
---
0: N
1: Y
D
---
---
0: N
1: Y
0: N
1: Y
D
---
---
D
---
---
0: N
1: Y
0: N
1: Y
D
---
---
D
---
---
0: NORMAL CLOSE
1: NORMAL OPEN
0: NORMAL CLOSE
1: NORMAL OPEN
0: NORMAL CLOSE
1: NORMAL OPEN
0: NORMAL CLOSE
1: NORMAL OPEN
0: NORMAL CLOSE
1: NORMAL OPEN
0: NORMAL CLOSE
1: NORMAL OPEN
0: NORMAL CLOSE
1: NORMAL OPEN
0: NORMAL CLOSE
1: NORMAL OPEN
0: NORMAL CLOSE
1: NORMAL OPEN
0: NORMAL CLOSE
1: NORMAL OPEN
0: NORMAL CLOSE
1: NORMAL OPEN
0: NORMAL CLOSE
1: NORMAL OPEN
0: NORMAL CLOSE
1: NORMAL OPEN
D
---
---
D
---
---
D
---
---
D
---
---
D
---
---
D
---
---
D
---
---
D
---
---
D
---
---
D
---
---
D
---
---
D
---
---
D
---
---
1
Probe config.
Enable outlet water
condenser probe:
Enable inlet water
condenser probe:
Enable outlet water cond.temp.probes
1
---
0
1
Enable inlet water cond.reg.temp.probe
1
---
0
1
Probe config.
Enable external temperature
probe:
Master DIN logic
01= High press.circ.1:
Enable external temp.probe
1
---
0
1
DIN1 logic
0
---
0
1
02= Evap.water flow:
DIN2 logic
0
---
0
1
Master DIN logic
01= High press.circ.1:
DIN1 logic
0
---
0
1
02= Low press.circ.1:
DIN2 logic
0
---
0
1
Hb10
Master DIN logic
03= Remote On-Off:
DIN3 logic
0
---
0
1
Hb11
Master DIN logic
03= Remote On-Off:
DIN3 logic
0
---
0
1
04= Cond.water flow:
DIN4 logic
0
---
0
1
Master DIN logic
03= Remote On-Off:
DIN3 logic
0
---
0
1
04= Cooling/Heating:
DIN4 logic
0
---
0
1
Master DIN logic
05= Low press.circ.1:
DIN5 logic
0
---
0
1
06= Serious alarm:
DIN6 logic
0
---
0
1
Master DIN logic
05= Evap.water flow:
DIN5 logic
0
---
0
1
06= Ovrl.cmp.1 circ.1:
DIN6 logic
0
---
0
1
Hb14
D
---
0
Hb13
---
6
---
Hb12
---
Low pressure probe type
1
Hb09
I
Type:
Enable inlet water evap.reg.temp.probe
Hb08
BMS index
---
Enable low pressure probes
Enable outlet water evap.reg.temp.probe
Hb07
Read/Write
---
Probe config.
En.low press.probe:
Probe config.
Enable outlet water
evaporator probe:
Enable inlet water
evaporator probe:
Hb06
Type
D
34,5
514,8
1
34,5
514,8
1
Hb05
Possible value descr.
0: N
1: Y
0: NTC
1: PT1000
2: 0-1V
3: 0-10V
4: 0-20mA/4-20mA
5: ON-OFF
6: 0-5V
0: 0-20mA
1: 4-20mA
0: N
1: Y
0: NTC
1: PT1000
2: 0-1V
3: 0-10V
4: 0-20mA/4-20mA
5: ON-OFF
6: 0-5V
0: 0-20mA
1: 4-20mA
---
+0300010EN Chiller Core – rel 1.0 – 13/07/2009
54
Mask index
Hb15
Display description
Master DIN logic
07= Ovrl.cmp.2 circ.1:
Description
DIN7 logic
Default
0
UOM
---
Min
0
Max
1
08= Serious alarm:
DIN8 logic
0
---
0
1
Master DIN logic
09= High press.circ.2:
DIN9 logic
0
---
0
1
10= Low press.circ.2:
DIN10 logic
0
---
0
1
Master DIN logic
11= Ovrl.cmp.1 circ.2:
DIN11 logic
0
---
0
1
12= Ovrl.cmp.2 circ.2:
DIN12 logic
0
---
0
1
Hb18
Master DIN logic
13= Ovrl.evap.pump 1:
DIN13 logic
0
---
0
1
Hb19
Master DIN logic
13= Ovrl.evap.pump 1:
DIN13 logic
0
---
0
1
14= Cond.water flow:
DIN14 logic
0
---
0
1
Master DIN logic
13= Ovrl.evap.pump 1:
DIN13 logic
0
---
0
1
14= Ovrl.evap.pump 2:
DIN14 logic
0
---
0
1
Master DIN logic
15= Ovrl.cmp.3 circ.1:
DIN15 logic
0
---
0
1
16= Ovrl.cmp.3 circ.2:
DIN16 logic
0
---
0
1
Hb22
Master DIN logic
17= Cond.water flow:
DIN17 logic
0
---
0
1
Hb23
Slave DIN logic
01= High press.circ.3:
DIN1 logic of slave board
0
---
0
1
02= Low press.circ.3:
DIN2 logic of slave board
0
---
0
1
Slave DIN logic
06= Ovrl.cmp.1 circ.3:
DIN6 logic of slave board
0
---
0
1
07= Ovrl.cmp.2 circ.3:
DIN7 logic of slave board
0
---
0
1
Slave DIN logic
09= High press.circ.4:
DIN9 logic of slave board
0
---
0
1
10= Low press.circ.4:
DIN10 logic of slave board
0
---
0
1
Slave DIN logic
11= Ovrl.cmp.1 circ.4:
DIN11 logic of slave board
0
---
0
1
12= Ovrl.cmp.2 circ.4:
DIN12 logic of slave board
0
---
0
1
Hb27
Slave DIN logic
13= Ovrl.evap.pump 2:
DIN13 logic of slave board
0
---
0
1
Hb28
Slave DIN logic
15= Ovrl.cmp.3 circ.3:
DIN15 logic of slave board
0
---
0
1
16= Ovrl.cmp.3 circ.4:
DIN16 logic of slave board
0
---
0
1
Master DOUT logic
01= Evap.pump 1:
DOUT1 logic
0
---
0
1
02= Comp.1 circ.1:
DOUT2 logic
0
---
0
1
Master DOUT logic
01= Comp.1 circ.1:
DOUT1 logic
0
---
0
1
02= Comp.2 circ.1:
DOUT2 logic
0
---
0
1
Master DOUT logic
03= Antifreeze heater:
DOUT3 logic
0
---
0
1
04= Comp.2 circ.1:
DOUT4 logic
0
---
0
1
Master DOUT logic
03= Antifreeze heater:
DOUT3 logic
0
---
0
1
04= 4Way valve circ.1:
DOUT4 logic
0
---
0
1
Master DOUT logic
03= Comp.1 circ.2:
DOUT3 logic
0
---
0
1
04= Comp.2 circ.2:
DOUT4 logic
0
---
0
1
Master DOUT logic
05= Serious alarm:
DOUT5 logic
0
---
0
1
Master DOUT logic
05= Serious alarm:
DOUT5 logic
0
---
0
1
Master DOUT logic
05= Cond.fan group 1:
or
05= Comp.2 circ.1:
DOUT5 logic
0
---
0
1
Hb16
Hb17
Hb20
Hb21
Hb24
Hb25
Hb26
Hb29
Hb30
Hb31
Hb32
Hb33
Hb34
Hb36
+0300010EN Chiller Core – rel 1.0 – 13/07/2009
55
Possible value descr.
0: NORMAL CLOSE
1: NORMAL OPEN
0: NORMAL CLOSE
1: NORMAL OPEN
0: NORMAL CLOSE
1: NORMAL OPEN
0: NORMAL CLOSE
1: NORMAL OPEN
0: NORMAL CLOSE
1: NORMAL OPEN
0: NORMAL CLOSE
1: NORMAL OPEN
0: NORMAL CLOSE
1: NORMAL OPEN
0: NORMAL CLOSE
1: NORMAL OPEN
0: NORMAL CLOSE
1: NORMAL OPEN
0: NORMAL CLOSE
1: NORMAL OPEN
0: NORMAL CLOSE
1: NORMAL OPEN
0: NORMAL CLOSE
1: NORMAL OPEN
0: NORMAL CLOSE
1: NORMAL OPEN
0: NORMAL CLOSE
1: NORMAL OPEN
0: NORMAL CLOSE
1: NORMAL OPEN
0: NORMAL CLOSE
1: NORMAL OPEN
0: NORMAL CLOSE
1: NORMAL OPEN
0: NORMAL CLOSE
1: NORMAL OPEN
0: NORMAL CLOSE
1: NORMAL OPEN
0: NORMAL CLOSE
1: NORMAL OPEN
0: NORMAL CLOSE
1: NORMAL OPEN
0: NORMAL CLOSE
1: NORMAL OPEN
0: NORMAL CLOSE
1: NORMAL OPEN
0: NORMAL CLOSE
1: NORMAL OPEN
0: NORMAL CLOSE
1: NORMAL OPEN
0: NORMAL OPEN
1: NORMAL CLOSE
0: NORMAL OPEN
1: NORMAL CLOSE
0: NORMAL OPEN
1: NORMAL CLOSE
0: NORMAL OPEN
1: NORMAL CLOSE
0: NORMAL OPEN
1: NORMAL CLOSE
0: NORMAL OPEN
1: NORMAL CLOSE
0: NORMAL OPEN
1: NORMAL CLOSE
0: NORMAL OPEN
1: NORMAL CLOSE
0: NORMAL OPEN
1: NORMAL CLOSE
0: NORMAL OPEN
1: NORMAL CLOSE
0: NORMAL OPEN
1: NORMAL CLOSE
0: NORMAL OPEN
1: NORMAL CLOSE
0: NORMAL OPEN
1: NORMAL CLOSE
Type
D
Read/Write
---
BMS index
---
D
---
---
D
---
---
D
---
---
D
---
---
D
---
---
D
---
---
D
---
---
D
---
---
D
---
---
D
---
---
D
---
---
D
---
---
D
---
---
D
---
---
D
---
---
D
---
---
D
---
---
D
---
---
D
---
---
D
---
---
D
---
---
D
---
---
D
---
---
D
---
---
D
---
---
D
---
---
D
---
---
D
---
---
D
---
---
D
---
---
D
---
---
D
---
---
D
---
---
D
---
---
D
---
---
D
---
---
D
---
---
Mask index
Display description
06= Cond.fan group 2:
Description
DOUT6 logic
Default
0
UOM
---
Min
0
Max
1
Hb37
Master DOUT logic
05= Condensing pump 1:
DOUT5 logic
0
---
0
1
06= Condensing pump 2:
DOUT6 logic
0
---
0
1
Master DOUT logic
07= Antifreeze heater:
DOUT7 logic
0
---
0
1
08= Serious alarm:
DOUT8 logic
0
---
0
1
Hb39
Master DOUT logic
09= Evaporator pump 1:
DOUT9 logic
0
---
0
1
Hb40
Master DOUT logic
10= Liquid solenoid 1:
DOUT10 logic
0
---
0
1
11= Liquid solenoid 2:
DOUT11 logic
0
---
0
1
Master DOUT logic
12= 4Way valve circ.1:
DOUT12 logic
0
---
0
1
13= 4Way valve circ.2:
DOUT13 logic
0
---
0
1
Master DOUT logic
14= Comp.3 circ.1:
DOUT14 logic
0
---
0
1
15= Comp.3 circ.2:
DOUT15 logic
0
---
0
1
Hb43
Master DOUT logic
16= Evaporator pump 2:
DOUT16 logic
0
---
0
1
Hb44
Slave DOUT logic
01= Comp.1 circ.3:
DOUT1 logic of slave board
0
---
0
1
02= Comp.2 circ.3:
DOUT2 logic of slave board
0
---
0
1
Slave DOUT logic
03= Comp.1 circ.4:
DOUT3 logic of slave board
0
---
0
1
04= Comp.2 circ.4:
DOUT4 logic of slave board
0
---
0
1
Hb46
Slave DOUT logic
09= Evaporator pump 2:
DOUT9 logic of slave board
0
---
0
1
Hb47
Slave DOUT logic
10= Liquid solenoid 3:
DOUT10 logic of slave board
0
---
0
1
11= Liquid solenoid 4:
DOUT11 logic of slave board
0
---
0
1
Slave DOUT logic
12= 4Way valve circ.3:
DOUT12 logic of slave board
0
---
0
1
13= 4Way valve circ.4:
DOUT13 logic of slave board
0
---
0
1
Slave DOUT logic
14= Comp.3 circ.3:
DOUT14 logic of slave board
0
---
0
1
15= Comp.3 circ.4:
DOUT15 logic of slave board
0
---
0
1
PWM Configuration
Triac min:
PWM triac minimum value
0,7
%
0
Triac max:
Triac wave:
PWM triac maximum value
PWM triac wave
9,2
0,2
%
ms
Enable unit OnOff
By supervisor:
Enable unit OnOff by supervisor:
0
By digit input:
Enable unit OnOff by digital input:
Hc02
Date format:
Hc03
Hb38
Hb41
Hb42
Hb45
Hb48
Hb49
Hb50
Factory settings
Hc01
Hc04
999
Possible value descr.
0: NORMAL OPEN
1: NORMAL CLOSE
0: NORMAL OPEN
1: NORMAL CLOSE
0: NORMAL OPEN
1: NORMAL CLOSE
0: NORMAL OPEN
1: NORMAL CLOSE
0: NORMAL OPEN
1: NORMAL CLOSE
0: NORMAL OPEN
1: NORMAL CLOSE
0: NORMAL OPEN
1: NORMAL CLOSE
0: NORMAL OPEN
1: NORMAL CLOSE
0: NORMAL OPEN
1: NORMAL CLOSE
0: NORMAL OPEN
1: NORMAL CLOSE
0: NORMAL OPEN
1: NORMAL CLOSE
0: NORMAL OPEN
1: NORMAL CLOSE
0: NORMAL OPEN
1: NORMAL CLOSE
0: NORMAL OPEN
1: NORMAL CLOSE
0: NORMAL OPEN
1: NORMAL CLOSE
0: NORMAL OPEN
1: NORMAL CLOSE
0: NORMAL OPEN
1: NORMAL CLOSE
0: NORMAL OPEN
1: NORMAL CLOSE
0: NORMAL OPEN
1: NORMAL CLOSE
0: NORMAL OPEN
1: NORMAL CLOSE
0: NORMAL OPEN
1: NORMAL CLOSE
0: NORMAL OPEN
1: NORMAL CLOSE
0: NORMAL OPEN
1: NORMAL CLOSE
0: NORMAL OPEN
1: NORMAL CLOSE
---
0
0
999
999
---
0
1
0
---
0
1
Date format
1
---
1
3
Unit measurement type:
UM changed in interface
1
---
1
2
Enable change unit
measurement by BMS:
Enable change unit of measure by BMS
0
---
0
1
Custom rotation
ON order
0:higher ÷ 15:lower
Custom rotation ON sequence: weight Dev1
Circ1 (0: High; 15: Low)
Custom rotation ON sequence: weight Dev2
Circ1 (0: High; 15: Low)
Custom rotation ON sequence: weight Dev3
Circ1 (0: High; 15: Low)
Custom rotation ON sequence: weight Dev4
Circ1 (0: High; 15: Low)
Custom rotation ON sequence: weight Dev1
Circ2 or Dev5 Circ1 (0: High; 15: Low)
Custom rotation ON sequence: weight Dev2
Circ2 or Dev6 Circ1 (0: High; 15: Low)
Custom rotation ON sequence: weight Dev3
Circ2 or Dev7 Circ1 (0: High; 15: Low)
Custom rotation ON sequence: weight Dev4
Circ2 or Dev8 Circ1 (0: High; 15: Low)
0
---
0
0
---
0
0
+0300010EN Chiller Core – rel 1.0 – 13/07/2009
Type
D
Read/Write
---
BMS index
---
D
---
---
D
---
---
D
---
---
D
---
---
D
---
---
D
---
---
D
---
---
D
---
---
D
---
---
D
---
---
D
---
---
D
---
---
D
---
---
D
---
---
D
---
---
D
---
---
D
---
---
D
---
---
D
---
---
D
---
---
D
---
---
D
---
---
D
---
---
I
---
---
-----
I
A
-----
-----
D
---
---
D
---
---
I
R
14
I
---
---
D
---
---
15
0: NO
1: YES
0: NO
1: YES
0: --1: dd/mm/yy
2: mm/dd/yy
3: yy.mm.dd
0: --1: STANDARD(ßC - barg)
2: ANGLO-SAXON(ßF - psig)
0: NO
1: YES
---
I
R/W
15
0
15
---
I
R/W
16
---
0
15
---
I
R/W
17
---
0
15
---
I
R/W
18
0
---
0
15
---
I
R/W
19
0
---
0
15
---
I
R/W
20
0
---
0
15
---
I
R/W
21
0
---
0
15
---
I
R/W
22
56
Mask index
Hc05
Description
Custom rotation ON sequence: weight Dev1
Circ3 or Dev9 Circ1 (0: High; 15: Low)
Custom rotation ON sequence: weight Dev2
Circ3 or Dev10 Circ1 (0: High; 15: Low)
Custom rotation ON sequence: weight Dev3
Circ3 or Dev11 Circ1 (0: High; 15: Low)
Custom rotation ON sequence: weight Dev4
Circ3 or Dev12 Circ1 (0: High; 15: Low)
Custom rotation ON sequence: weight Dev1
Circ4 or Dev13 Circ1 (0: High; 15: Low)
Custom rotation ON sequence: weight Dev2
Circ4 or Dev14 Circ1 (0: High; 15: Low)
Custom rotation ON sequence: weight Dev3
Circ4 or Dev15 Circ1 (0: High; 15: Low)
Custom rotation ON sequence: weight Dev4
Circ4 or Dev16 Circ1 (0: High; 15: Low)
Custom rotation OFF sequence: weight Dev1
Circ1 (0: High; 15: Low)
Custom rotation OFF sequence: weight Dev2
Circ1 (0: High; 15: Low)
Custom rotation OFF sequence: weight Dev3
Circ1 (0: High; 15: Low)
Custom rotation OFF sequence: weight Dev4
Circ1 (0: High; 15: Low)
Custom rotation OFF sequence: weight Dev1
Circ2 or Dev5 Circ1 (0: High; 15: Low)
Custom rotation OFF sequence: weight Dev2
Circ2 or Dev6 Circ1 (0: High; 15: Low)
Custom rotation OFF sequence: weight Dev3
Circ2 or Dev7 Circ1 (0: High; 15: Low)
Custom rotation OFF sequence: weight Dev4
Circ2 or Dev8 Circ1 (0: High; 15: Low)
Custom rotation OFF sequence: weight Dev1
Circ3 or Dev9 Circ1 (0: High; 15: Low)
Custom rotation OFF sequence: weight Dev2
Circ3 or Dev10 Circ1 (0: High; 15: Low)
Custom rotation OFF sequence: weight Dev3
Circ3 or Dev11 Circ1 (0: High; 15: Low)
Custom rotation OFF sequence: weight Dev4
Circ3 or Dev12 Circ1 (0: High; 15: Low)
Custom rotation OFF sequence: weight Dev1
Circ4 or Dev13 Circ1 (0: High; 15: Low)
Custom rotation OFF sequence: weight Dev2
Circ4 or Dev14 Circ1 (0: High; 15: Low)
Custom rotation OFF sequence: weight Dev3
Circ4 or Dev15 Circ1 (0: High; 15: Low)
Custom rotation OFF sequence: weight Dev4
Circ4 or Dev16 Circ1 (0: High; 15: Low)
Compressors min ON time
Compressors min OFF time
Min start time between same compressor
Default
0
UOM
---
Min
0
Max
15
Possible value descr.
---
Type
I
Read/Write
R/W
BMS index
23
0
---
0
15
---
I
R/W
24
0
---
0
15
---
I
R/W
25
0
---
0
15
---
I
R/W
26
0
---
0
15
---
I
R/W
27
0
---
0
15
---
I
R/W
28
0
---
0
15
---
I
R/W
29
0
---
0
15
---
I
R/W
30
0
---
0
15
---
I
R/W
31
0
---
0
15
---
I
R/W
32
0
---
0
15
---
I
R/W
33
0
---
0
15
---
I
R/W
34
0
---
0
15
---
I
R/W
35
0
---
0
15
---
I
R/W
36
0
---
0
15
---
I
R/W
37
0
---
0
15
---
I
R/W
38
0
---
0
15
---
I
R/W
39
0
---
0
15
---
I
R/W
40
0
---
0
15
---
I
R/W
41
0
---
0
15
---
I
R/W
42
0
---
0
15
---
I
R/W
43
0
---
0
15
---
I
R/W
44
0
---
0
15
---
I
R/W
45
0
---
0
15
---
I
R/W
46
60
360
450
s
s
s
0
0
0
999
999
999
---
I
I
I
R/W
R/W
R/W
47
48
49
Enable high pressure prevent
1
---
0
1
D
R/W
65
Low pressure:
Enable low pressure prevent
1
---
0
1
D
R/W
66
Antifreeze:
Enable antifreeze prevent
1
---
0
1
D
R/W
67
Antifreeze alarm Threshold:
Freeze alarm setpoint
R/W
49
Differential:
Heater differential
R/W
50
Antifreeze force off
compressors
Offset from antifreeze
threshold:
Differential:
Force off comps.offset by antifreeze
A
A
A
A
A
A
A
A
A
A
54
Heater threshold
9,9
17,8
60
108
9,9
17,8
60
108
60
108
R/W
Antifreeze heater Setpoint:
-99,9
-17,8
0
0
-99,9
-17,8
0
0
0
0
53
Freeze alarm differential
°C
°F
°C
°F
°C
°F
°C
°F
°C
°F
R/W
Differential:
3
37,4
1
1,8
5
41
1
1,8
1,5
34
0: NO
1: YES
0: NO
1: YES
0: NO
1: YES
---------------------
---
---
Force off comps.differential by antifreeze
1
33
°C
°F
0
0
60
108
-----
A
A
---
---
Insert new manufacture
password (PW2):
DEFAULT INSTALLATION
Erase user settings and
install global default value:
Save unit configuration:
Last saving:
New manufacturer password
1234
---
0
9999
---
I
---
---
Default require by manufacturer menu
0
---
0
1
0: NO
1: YES
I
---
---
Save current unit configuration
Last saving date: Day
Last saving date: Month
Last saving date: Year
0
-------
--day
month
year
0
0
0
0
1
31
12
99
---------
D
I
I
I
---------
---------
IO test config. Max test time:
Enable IO test:
I/O test maximum time
Enable physical input-output test
180
0
-----
0
0
999
1
I
D
-----
-----
Master AIN test
B1= -> 0-1000
Prove type description
0
---
0
9
--0: NO
1: YES
0: NTC
1: PT1000
2: 0-1V
I
---
---
Custom rotation
OFF order
0:higher ÷ 15:lower
Hc06
Compressors Min ON time:
Min OFF time:
Min time between same
comp.start:
Enable prevent High
pressure:
Hc07
Hc08
Hc09
Hc10
Initialization
Hd01
Hd02
Hd03
Input/Output Test
He01
He02
Display description
+0300010EN Chiller Core – rel 1.0 – 13/07/2009
57
Mask index
Display description
Description
Default
UOM
Min
Max
Force to:
Value to force the high pressure circuit 1
probe
High pressure circuit 1
High pressure circuit 1 converted to
temperature
Value to force the external temperature probe
0
---
0
0
0
barg/psig
°C/°F
0
External temperature:
Master AIN test
B2= -> 0-1000
External temperature
Prove type description
Force to:
Value to force the low pressure circuit 1
probe
Low pressure circuit 1
Low pressure circuit 1 converted to
temperature
Value to force the outlet water evaporator
temperature probe
High pressure circ.1:
->
He03
He04
Master AIN test
B2= NTC -> 0-1000
Force to:
Low pressure circ.1:
->
He05
He06
He07
He08
He09
He10
He11
He12
Master AIN test
B3= NTC -> 0-1000
Force to:
Read/Write
BMS index
I
---
---
-999,9
-999,9
999,9
999,9
-----
A
A
R
R
1
2
---
0
1000
---
I
---
---
0
0
°C/°F
---
-999,9
0
999,9
9
0
---
0
0
0
barg/psig
°C/°F
0
I
I
R
---
28
---
1000
0: NTC
1: PT1000
2: 0-1V
3: 0-10V
4: 0-20mA
5: On/Off
6: 0-5V
7: 4-20mA
---
I
---
---
-999,9
-999,9
999,9
999,9
-----
A
A
R
R
9
10
---
0
1000
---
I
---
---
Outlet water evap.
temperature:
Master AIN test
B3= NTC -> 0-1000 Force
to:
Evaporator water
temperature:
Master AIN test
B4= NTC -> 0-1000 Force
to:
Inlet water evap.
temperature:
Master AIN test
B4= NTC -> 0-1000 Force
to:
Outlet water cond.2
temperature:
Master AIN test
B5= NTC -> 0-1000 Force
to:
Outlet water evap.1
temperature:
Master AIN test
B5= NTC -> 0-1000 Force
to:
Inlet water cond.
temperature:
Master AIN test
B5= NTC -> 0-1000
Force to:
Outlet water evaporator temperature
0
°C/°F
-999,9
999,9
---
I
R
18
Value to force the evaporator water
temperature probe
0
---
0
1000
---
I
---
---
Evaporator water temperature
0
---
-999,9
999,9
---
I
R
18
Value to force the inlet water evaporator
temperature probe
0
---
0
1000
---
I
---
---
Inlet water evaporator temperature
0
°C/°F
-999,9
999,9
---
I
R
17
Value to force the outlet water condensator 2
temperature probe
0
---
0
1000
---
I
---
---
Outlet water condensator 2 temperature
0
°C/°F
-999,9
999,9
---
I
R
24
Value to force the outlet water evaporator 1
temperature probe
0
---
0
1000
---
I
---
---
Outlet water cond.1
temperature:
Master AIN test
B6= -> 0-1000
Outlet water condensator 1 temperature
0
°C/°F
-999,9
999,9
Prove type description
0
---
0
9
Force to:
Value to force the high pressure circuit 2
probe
High pressure circuit 2
High pressure circuit 2 converted to
temperature
Prove type description
0
---
0
0
0
barg/psig
°C/°F
-999,9
-999,9
0
---
0
9
0
---
0
0
0
barg/psig
°C/°F
-999,9
-999,9
High pressure circ.2:
->
He13
Type
1000
Possible value descr.
3: 0-10V
4: 0-20mA
5: On/Off
6: 0-5V
7: 4-20mA
---
Master AIN test
B7= -> 0-1000
Force to:
Low pressure circ.2:
->
Outlet water evaporator 1 temperature
0
°C/°F
-999,9
999,9
---
I
R
19
Value to force the inlet water condensator
temperature probe
0
---
0
1000
---
I
---
---
Inlet water condensator temperature
0
°C/°F
-999,9
999,9
---
I
R
27
Value to force the outlet water condensator 1
temperature probe
0
---
0
1000
---
I
---
---
I
R
23
0: NTC
1: PT1000
2: 0-1V
3: 0-10V
4: 0-20mA
5: On/Off
6: 0-5V
7: 4-20mA
I
---
---
1000
I
---
---
999,9
999,9
I
A
R
R
3
4
Value to force the low pressure circuit 2
probe
Low pressure circuit 2
Low pressure circuit 2 converted to
temperature
+0300010EN Chiller Core – rel 1.0 – 13/07/2009
58
I
---
---
1000
0: NTC
1: PT1000
2: 0-1V
3: 0-10V
4: 0-20mA
5: On/Off
6: 0-5V
7: 4-20mA
---
I
---
---
999,9
999,9
-----
I
A
R
R
11
12
Mask index
He14
He15
He16
He17
He18
He19
Display description
Master AIN test
B8= NTC -> 0-1000 Force
to:
Outlet water evap.2
temperature:
Master AIN test
B8= NTC -> 0-1000 Force
to:
External temperature:
Master AIN test
B9= NTC -> 0-1000 Force
to:
External temperature:
Master AIN test
B10= NTC -> 0-1000 Force
to:
Inlet water cond.
temperature:
Master AIN test
B10= NTC -> 0-1000 Force
to:
Outlet water cond.1
temperature:
Slave AIN test
B1= -> 0-1000
Description
Value to force the outlet water evaporator 2
temperature probe
Default
0
UOM
---
Min
0
Max
1000
Possible value descr.
---
Type
I
Read/Write
---
BMS index
---
Outlet water evaporator 2 temperature
0
°C/°F
-999,9
999,9
---
A
R
20
Value to force the external temperature probe
0
---
0
1000
---
I
---
---
External temperature
Value to force the external temperature probe
0
0
°C/°F
---
-999,9
0
999,9
1000
-----
A
I
R
---
28
---
External temperature
Value to force the inlet water condensator
temperature probe
0
0
°C/°F
---
-999,9
0
999,9
1000
-----
A
I
R
---
28
---
Force to:
High pressure circ.3:
->
He20
Slave AIN test
B2= -> 0-1000
Force to:
Low pressure circ.3:
->
He21
He22
He23
Slave AIN test
B4= NTC -> 0-1000 Force
to:
Outlet water cond.4
temperature:
Slave AIN test
B5= NTC -> 0-1000 Force
to:
Outlet water evap.
temperature:
Slave AIN test
B6= -> 0-1000
Force to:
High pressure circ.4:
->
He24
Slave AIN test
B7= -> 0-1000
Force to:
Low pressure circ.4:
->
He25
Slave AIN test
B8= NTC -> 0-1000 Force
to:
Inlet water condensator temperature
0
°C/°F
-999,9
999,9
---
A
R
27
Value to force the outlet water condensator 1
temperature probe
0
---
0
1000
---
I
---
---
A
R
23
0: NTC
1: PT1000
2: 0-1V
3: 0-10V
4: 0-20mA
5: On/Off
6: 0-5V
7: 4-20mA
I
---
---
Outlet water condensator 1 temperature
0
°C/°F
-999,9
999,9
Prove type description
0
---
0
9
Value to force the high pressure circuit 3
probe
High pressure circuit 3
High pressure circuit 3 converted to
temperature
Prove type description
0
---
0
1000
I
---
---
0
0
barg/psig
°C/°F
-999,9
-999,9
999,9
999,9
A
A
R
R
5
6
0
---
0
9
0
---
0
0
0
barg/psig
°C/°F
0
---
Value to force the low pressure circuit 3
probe
Low pressure circuit 3
Low pressure circuit 3 converted to
temperature
Value to force the outlet water condensator 4
temperature probe
I
---
---
1000
0: NTC
1: PT1000
2: 0-1V
3: 0-10V
4: 0-20mA
5: On/Off
6: 0-5V
7: 4-20mA
---
I
---
---
-999,9
-999,9
999,9
999,9
-----
A
A
R
R
13
14
0
1000
---
I
---
---
Outlet water condensator 4 temperature
0
°C/°F
-999,9
999,9
---
A
R
26
Value to force the outlet water evaporator
temperature probe
0
---
0
1000
---
I
---
---
Outlet water evaporator temperature
0
°C/°F
-999,9
999,9
A
R
18
Prove type description
0
---
0
9
I
---
---
Value to force the high pressure circuit 4
probe
High pressure circuit 4
High pressure circuit 4 converted to
temperature
Prove type description
0
---
0
1000
I
---
---
0
0
°C/°F
°C/°F
-999,9
-999,9
999,9
999,9
A
A
R
R
7
8
0
---
0
9
0
---
0
0
0
°C/°F
°C/°F
0
---
Value to force the low pressure circuit 4
probe
Low pressure circuit 4
Low pressure circuit 4 converted to
temperature
Value to force the outlet water evaporator 4
temperature probe
+0300010EN Chiller Core – rel 1.0 – 13/07/2009
59
0: NTC
1: PT1000
2: 0-1V
3: 0-10V
4: 0-20mA
5: On/Off
6: 0-5V
7: 4-20mA
I
---
---
1000
0: NTC
1: PT1000
2: 0-1V
3: 0-10V
4: 0-20mA
5: On/Off
6: 0-5V
7: 4-20mA
---
I
---
---
-999,9
-999,9
999,9
999,9
-----
A
A
R
R
15
16
0
1000
---
I
---
---
Mask index
Description
Outlet water evaporator 4 temperature
Default
0
UOM
°C/°F
Min
-999,9
Max
999,9
Possible value descr.
---
Type
A
Read/Write
R
BMS index
22
Value to force the outlet water condensator
temperature probe
0
---
0
1000
---
I
---
---
Outlet water condensator 2 temperature (if
unit 4 circuit 2 evaporator)
Outlet water evaporator 3 temperature (all
other cases)
Test DIN 1 master board
0
°C/°F
-999,9
999,9
A
R
24
0
°C/°F
-999,9
999,9
A
R
25
0
---
0
1
D
R
1
02= Evap.water flow:
Test DIN 2 master board
0
---
0
1
D
R
2
Master DIN test
01= High press.circ.1:
Test DIN 1 master board
0
---
0
1
D
R
1
02= Low press.circ.1:
Test DIN 2 master board
0
---
0
1
D
R
2
He29
Master DIN test
03= Remote On-Off:
Test DIN 3 master board
0
---
0
1
D
R
3
He30
Master DIN test
03= Remote On-Off:
Test DIN 3 master board
0
---
0
1
D
R
3
04= Cond.water flow:
Test DIN 4 master board
0
---
0
1
D
R
4
Master DIN test
03= Remote On-Off:
Test DIN 3 master board
0
---
0
1
D
R
3
04= Cooling/Heating:
Test DIN 4 master board
0
---
0
1
D
R
4
Master DIN test
05= Low press.circ.1:
Test DIN 5 master board
0
---
0
1
D
R
5
06= Serious alarm:
Test DIN 6 master board
0
---
0
1
D
R
6
Master DIN test
05= Evap.water flow:
Test DIN 5 master board
0
---
0
1
D
R
5
06= Ovrl.cmp.1 circ.1:
Test DIN 6 master board
0
---
0
1
D
R
6
Master DIN test
07= Ovrl.cmp.2 circ.1:
Test DIN 7 master board
0
---
0
1
D
R
7
08= Serious alarm:
Test DIN 8 master board
0
---
0
1
D
R
8
Master DIN test
09= High press.circ.2:
Test DIN 9 master board
0
---
0
1
D
R
9
10= Low press.circ.2:
Test DIN 10 master board
0
---
0
1
D
R
10
Master DIN test
11= Ovrl.cmp.1 circ.2:
Test DIN 11 master board
0
---
0
1
D
R
11
12= Ovrl.cmp.2 circ.2:
Test DIN 12 master board
0
---
0
1
D
R
12
He37
Master DIN test
13= Ovrl.evap.pump 1:
Test DIN 13 master board
0
---
0
1
D
R
13
He38
Master DIN test
13= Ovrl.evap.pump 1:
Test DIN 13 master board
0
---
0
1
D
R
13
14= Cond.water flow:
Test DIN 14 master board
0
---
0
1
D
R
14
Master DIN test
13= Ovrl.evap.pump 1:
Test DIN 13 master board
0
---
0
1
D
R
13
14= Ovrl.evap.pump 2:
Test DIN 14 master board
0
---
0
1
D
R
14
Master DIN test
15= Ovrl.cmp.3 circ.1:
Test DIN 15 master board
0
---
0
1
D
R
15
16= Ovrl.cmp.3 circ.2:
Test DIN 16 master board
0
---
0
1
D
R
16
He41
Master DIN test
17= Cond.water flow:
Test DIN 17 master board
0
---
0
1
D
R
17
He42
Slave DIN test
01= High press.circ.3:
Test DIN 1 slave board
0
---
0
1
D
---
---
02= Low press.circ.3:
Test DIN 2 slave board
0
---
0
1
D
---
---
Slave DIN test
06= Ovrl.cmp.1 circ.3:
Test DIN 6 slave board
0
---
0
1
D
---
---
07= Ovrl.cmp.2 circ.3:
Test DIN 7 slave board
0
---
0
1
D
---
---
Slave DIN test
09= High press.circ.4:
Test DIN 9 slave board
0
---
0
1
D
---
---
10= Low press.circ.4:
Test DIN 10 slave board
0
---
0
1
D
---
---
Slave DIN test
11= Ovrl.cmp.1 circ.4:
Test DIN 11 slave board
0
---
0
1
D
---
---
12= Ovrl.cmp.2 circ.4:
Test DIN 12 slave board
0
---
0
1
D
---
---
Slave DIN test
13= Ovrl.evap.pump 2:
Test DIN 13 slave board
0
---
0
1
D
---
---
He26
He27
He28
He31
He32
He33
He34
He35
He36
He39
He40
He43
He44
He45
He46
Display description
Outlet water evap.4
temperature:
Slave AIN test
B10= NTC -> 0-1000 Force
to:
Outlet water cond.
Temperature:
Master DIN test
01= High press.circ.1:
+0300010EN Chiller Core – rel 1.0 – 13/07/2009
60
0: CLOSE
1: OPEN
0: CLOSE
1: OPEN
0: CLOSE
1: OPEN
0: CLOSE
1: OPEN
0: CLOSE
1: OPEN
0: CLOSE
1: OPEN
0: CLOSE
1: OPEN
0: CLOSE
1: OPEN
0: CLOSE
1: OPEN
0: CLOSE
1: OPEN
0: CLOSE
1: OPEN
0: CLOSE
1: OPEN
0: CLOSE
1: OPEN
0: CLOSE
1: OPEN
0: CLOSE
1: OPEN
0: CLOSE
1: OPEN
0: CLOSE
1: OPEN
0: CLOSE
1: OPEN
0: CLOSE
1: OPEN
0: CLOSE
1: OPEN
0: CLOSE
1: OPEN
0: CLOSE
1: OPEN
0: CLOSE
1: OPEN
0: CLOSE
1: OPEN
0: CLOSE
1: OPEN
0: CLOSE
1: OPEN
0: CLOSE
1: OPEN
0: CLOSE
1: OPEN
0: CLOSE
1: OPEN
0: CLOSE
1: OPEN
0: CLOSE
1: OPEN
0: CLOSE
1: OPEN
0: CLOSE
1: OPEN
0: CLOSE
1: OPEN
0: CLOSE
1: OPEN
0: CLOSE
1: OPEN
Mask index
He47
He48
He49
He50
He51
He52
He53
Display description
Slave DIN test
15= Ovrl.cmp.3 circ.3:
Description
Test DIN 15 slave board
Default
0
UOM
---
Min
0
Max
1
16= Ovrl.cmp.3 circ.4:
Test DIN 16 slave board
0
---
0
1
Master DOUT test
01= Evap.pump 1:
Test DOUT 1 master board
0
---
0
1
02= Comp.1 circ.1:
Test DOUT 2 master board
0
---
0
1
Master DOUT test
01= Comp.1 circ.1:
Test DOUT 1 master board
0
---
0
1
02= Comp.2 circ.1:
Test DOUT 2 master board
0
---
0
1
Master DOUT test
03= Antifreeze heater:
Test DOUT 3 master board
0
---
0
1
04= Comp.2 circ.1:
Test DOUT 4 master board
0
---
0
1
Master DOUT test
03= Antifreeze heater:
Test DOUT 3 master board
0
---
0
1
04= 4Way valve circ.1:
Test DOUT 4 master board
0
---
0
1
Master DOUT test
03= Comp.1 circ.2:
Test DOUT 3 master board
0
---
0
1
04= Comp.2 circ.2:
Test DOUT 4 master board
0
---
0
1
Master DOUT test
05= Serious alarm:
Test DOUT 5 master board
0
---
0
1
0
---
0
1
Master DOUT test
05= Serious alarm:
or
Comp.2 circ.1:
He55
Master DOUT test
05= Cond.fan group 1:
Test DOUT 5 master board
0
---
0
1
06= Cond.fan group 2:
Test DOUT 6 master board
0
---
0
1
Master DOUT test
05= Condensing pump 1:
Test DOUT 5 master board
0
---
0
1
06= Condensing pump 2:
Test DOUT 6 master board
0
---
0
1
Master DOUT test
07= Antifreeze heater:
Test DOUT 7 master board
0
---
0
1
08= Serious alarm:
Test DOUT 8 master board
0
---
0
1
He58
Master DOUT test
09= Evaporator pump 1:
Test DOUT 9 master board
0
---
0
1
He59
Master DOUT test
10= Liquid solenoid 1:
Test DOUT 10 master board
0
---
0
1
11= Liquid solenoid 2:
Test DOUT 11 master board
0
---
0
1
Master DOUT test
12= 4Way valve circ.1:
Test DOUT 12 master board
0
---
0
1
13= 4Way valve circ.2:
Test DOUT 13 master board
0
---
0
1
Master DOUT test
14= Comp.3 circ.1:
Test DOUT 14 master board
0
---
0
1
15= Comp.3 circ.2:
Test DOUT 15 master board
0
---
0
1
He62
Master DOUT test
16= Evaporator pump 2:
Test DOUT 16 master board
0
---
0
1
He63
Slave DOUT test
01= Comp.1 circ.3:
Test DOUT 1 slave board
0
---
0
1
02= Comp.2 circ.3:
Test DOUT 2 slave board
0
---
0
1
Slave DOUT test
03= Comp.1 circ.4:
Test DOUT 3 slave board
0
---
0
1
04= Comp.2 circ.4:
Test DOUT 4 slave board
0
---
0
1
He65
Slave DOUT test
09= Evaporator pump 2:
Test DOUT 9 slave board
0
---
0
1
He66
Slave DOUT test
10= Liquid solenoid 3:
Test DOUT 10 slave board
0
---
0
1
11= Liquid solenoid 4:
Test DOUT 11 slave board
0
---
0
1
Slave DOUT test
12= 4Way valve circ.3:
Test DOUT 12 slave board
0
---
0
1
13= 4Way valve circ.4:
Test DOUT 13 slave board
0
---
0
1
Slave DOUT test
Test DOUT 14 slave board
0
---
0
1
He56
He57
He60
He61
He64
He67
He68
+0300010EN Chiller Core – rel 1.0 – 13/07/2009
61
Possible value descr.
0: CLOSE
1: OPEN
0: CLOSE
1: OPEN
0: OPEN
1: CLOSE
0: OPEN
1: CLOSE
0: OPEN
1: CLOSE
0: OPEN
1: CLOSE
0: OPEN
1: CLOSE
0: OPEN
1: CLOSE
0: OPEN
1: CLOSE
0: OPEN
1: CLOSE
0: OPEN
1: CLOSE
0: OPEN
1: CLOSE
0: OPEN
1: CLOSE
0: OPEN
1: CLOSE
0: OPEN
1: CLOSE
0: OPEN
1: CLOSE
0: OPEN
1: CLOSE
0: OPEN
1: CLOSE
0: OPEN
1: CLOSE
0: OPEN
1: CLOSE
0: OPEN
1: CLOSE
0: OPEN
1: CLOSE
0: OPEN
1: CLOSE
0: OPEN
1: CLOSE
0: OPEN
1: CLOSE
0: OPEN
1: CLOSE
0: OPEN
1: CLOSE
0: OPEN
1: CLOSE
0: OPEN
1: CLOSE
0: OPEN
1: CLOSE
0: OPEN
1: CLOSE
0: OPEN
1: CLOSE
0: OPEN
1: CLOSE
0: OPEN
1: CLOSE
0: OPEN
1: CLOSE
0: OPEN
1: CLOSE
0: OPEN
1: CLOSE
0: OPEN
Type
D
Read/Write
---
BMS index
---
D
---
---
D
R
18
D
R
19
D
R
18
D
R
19
D
R
20
D
R
21
D
R
20
D
R
21
D
R
20
D
R
21
D
R
22
D
R
---
D
R
22
D
R
23
D
R
22
D
R
23
D
R
24
D
R
25
D
R
26
D
R
27
D
R
28
D
R
29
D
R
30
D
R
31
D
R
32
D
R
33
D
---
---
D
---
---
D
---
---
D
---
---
D
---
---
D
---
---
D
---
---
D
---
---
D
---
---
D
---
---
Mask index
Display description
14= Comp.3 circ.3:
15= Comp.3 circ.4:
Description
Default
UOM
Min
Max
Test DOUT 15 slave board
0
---
0
1
He69
Master AOUT test
Y1= Cond.fan group 1:
Test AOUT 1 master board
0
---
0
He70
Master AOUT test
Y1= Condensing pump:
Test AOUT 1 master board
0
---
He71
Master AOUT test
Y1= Cond.fan group 1:
Test AOUT 1 master board
0
Y2= Cond.fan group 2:
Test AOUT 2 master board
Quick menu
M01
HP1:
->
LP1:
->
Comp1:
Off waiting
Comp2:
Off waiting
Comp1:
Type
Read/Write
BMS index
D
---
---
1000
Possible value descr.
1: CLOSE
0: OPEN
1: CLOSE
---
I
R
92
0
1000
---
I
R
92
---
0
1000
---
I
R
92
0
--0
0
----barg/psig
°C/°F
0
--0
-999,9
1000
--999,9
999,9
-----
I
--A
A
R
--R
R
93
--1
2
0
0
barg/psig
°C/°F
0
-999,9
999,9
999,9
A
A
R
R
9
10
---
---
0
14
I
Compressor 1 circuit 1 minimum time off
count down time
Compressor 2 circuit 1 current status
---
s
0
999
-------------------------------------------------------------
-------------------------------------------------------------
---
---
0
14
Compressor 2 circuit 1 minimum time off
count down time
Compressor 3 circuit 1 current status
---
s
0
999
I
-------------------------------------------------------------
-------------------------------------------------------------
---
---
0
14
I
---
---
High pressure circuit 1
High pressure circuit 1 converted to
temperature
Low pressure circuit 1
Low pressure circuit 1 converted to
temperature
Compressor 1 circuit 1 current status
+0300010EN Chiller Core – rel 1.0 – 13/07/2009
62
0: Off
1: Start-up
1: Start-up
2: On
2: On
3: Stage 2
3: Stage 2
4: Stage 3
4: Stage 3
5: Stage 4
5: Stage 4
6: Force off
6: Force off
7: Limit to stage 1
7: Limit to stage 1
8: Limit to stage 2
8: Limit to stage 2
9: Limit to stage 3
9: Limit to stage 3
10: Off by alarm
10: Off by alarm
11: Off
11: Off
12: On waiting s
12: On waiting s
13: Manual mode
13: Manual mode
14: On by pump-down
14: On by pump-down
--0: Off
1: Start-up
1: Start-up
2: On
2: On
3: Stage 2
3: Stage 2
4: Stage 3
4: Stage 3
5: Stage 4
5: Stage 4
6: Force off
6: Force off
7: Limit to stage 1
7: Limit to stage 1
8: Limit to stage 2
8: Limit to stage 2
9: Limit to stage 3
9: Limit to stage 3
10: Off by alarm
10: Off by alarm
11: Off
11: Off
12: On waiting s
12: On waiting s
13: Manual mode
13: Manual mode
14: On by pump-down
14: On by pump-down
--0: Off
1: Start-up
I
I
Mask index
M02
Display description
Description
Default
UOM
Min
Max
Off waiting
Compressor 3 circuit 1 minimum time off
count down time
High pressure circuit 2
High pressure circuit 2converted to
temperature
Low pressure circuit 2
Low pressure circuit 2 converted to
temperature
Compressor 1 circuit 2 current status
---
s
0
999
0
0
barg/psig
°C/°F
0
-999,9
999,9
999,9
0
0
barg/psig
°C/°F
0
-999,9
999,9
999,9
---
---
0
14
Compressor 1 circuit 2 minimum time off
count down time
Compressor 2 circuit 2 current status
---
s
0
999
---
---
0
14
HP2:
->
LP2:
->
Comp1:
Off waiting
Comp2:
+0300010EN Chiller Core – rel 1.0 – 13/07/2009
63
Possible value descr.
1: Start-up
2: On
2: On
3: Stage 2
3: Stage 2
4: Stage 3
4: Stage 3
5: Stage 4
5: Stage 4
6: Force off
6: Force off
7: Limit to stage 1
7: Limit to stage 1
8: Limit to stage 2
8: Limit to stage 2
9: Limit to stage 3
9: Limit to stage 3
10: Off by alarm
10: Off by alarm
11: Off
11: Off
12: On waiting s
12: On waiting s
13: Manual mode
13: Manual mode
14: On by pump-down
14: On by pump-down
-----
0: Off
1: Start-up
1: Start-up
2: On
2: On
3: Stage 2
3: Stage 2
4: Stage 3
4: Stage 3
5: Stage 4
5: Stage 4
6: Force off
6: Force off
7: Limit to stage 1
7: Limit to stage 1
8: Limit to stage 2
8: Limit to stage 2
9: Limit to stage 3
9: Limit to stage 3
10: Off by alarm
10: Off by alarm
11: Off
11: Off
12: On waiting s
12: On waiting s
13: Manual mode
13: Manual mode
14: On by pump-down
14: On by pump-down
--0: Off
1: Start-up
1: Start-up
2: On
2: On
3: Stage 2
3: Stage 2
4: Stage 3
4: Stage 3
5: Stage 4
5: Stage 4
6: Force off
6: Force off
7: Limit to stage 1
7: Limit to stage 1
Type
Read/Write
BMS index
I
---
---
A
A
R
R
1
2
A
A
R
R
9
10
I
-------------------------------------------------------------
-------------------------------------------------------------
-------------------------------
-------------------------------
I
I
Mask index
Display description
Description
Default
UOM
Min
Max
Off waiting
Compressor 2 circuit 2 minimum time off
count down time
Compressor 3 circuit 2 current status
---
s
0
999
---
---
0
14
Compressor 3 circuit 2 minimum time off
count down time
High pressure circuit 3
High pressure circuit 3 converted to
temperature
Low pressure circuit 3
Low pressure circuit 3 converted to
temperature
Compressor 1 circuit 3 current status
---
s
0
999
0
0
barg/psig
°C/°F
0
-999,9
999,9
999,9
0
0
barg/psig
°C/°F
0
-999,9
999,9
999,9
---
---
0
14
Comp1:
Off waiting
M03
HP3:
->
LP3:
->
Comp1:
+0300010EN Chiller Core – rel 1.0 – 13/07/2009
64
Possible value descr.
8: Limit to stage 2
8: Limit to stage 2
9: Limit to stage 3
9: Limit to stage 3
10: Off by alarm
10: Off by alarm
11: Off
11: Off
12: On waiting s
12: On waiting s
13: Manual mode
13: Manual mode
14: On by pump-down
14: On by pump-down
--0: Off
1: Start-up
1: Start-up
2: On
2: On
3: Stage 2
3: Stage 2
4: Stage 3
4: Stage 3
5: Stage 4
5: Stage 4
6: Force off
6: Force off
7: Limit to stage 1
7: Limit to stage 1
8: Limit to stage 2
8: Limit to stage 2
9: Limit to stage 3
9: Limit to stage 3
10: Off by alarm
10: Off by alarm
11: Off
11: Off
12: On waiting s
12: On waiting s
13: Manual mode
13: Manual mode
14: On by pump-down
14: On by pump-down
-----
0: Off
1: Start-up
1: Start-up
2: On
2: On
3: Stage 2
3: Stage 2
4: Stage 3
4: Stage 3
5: Stage 4
5: Stage 4
6: Force off
6: Force off
7: Limit to stage 1
7: Limit to stage 1
8: Limit to stage 2
8: Limit to stage 2
9: Limit to stage 3
9: Limit to stage 3
10: Off by alarm
10: Off by alarm
11: Off
11: Off
12: On waiting s
12: On waiting s
13: Manual mode
13: Manual mode
14: On by pump-down
Type
I
Read/Write
-------------------------------
BMS index
-------------------------------
I
---
---
I
---
---
A
A
R
R
1
2
A
A
R
R
9
10
I
---------------------------------------------------------
---------------------------------------------------------
Mask index
Display description
Description
Default
UOM
Min
Max
Off waiting
Compressor 1 circuit 3 minimum time off
count down time
Compressor 2 circuit 3 current status
---
s
0
999
---
---
0
14
Compressor 2 circuit 3 minimum time off
count down time
Compressor 3 circuit 3 current status
---
s
0
999
---
---
0
14
Compressor 3 circuit 3 minimum time off
count down time
High pressure circuit 4
High pressure circuit 4 converted to
temperature
Low pressure circuit 4
Low pressure circuit 4 converted to
temperature
Compressor 1 circuit 4 current status
---
s
0
999
0
0
barg/psig
°C/°F
0
-999,9
999,9
999,9
0
0
barg/psig
°C/°F
0
-999,9
999,9
999,9
---
---
0
14
Comp2:
Off waiting
Comp1:
Off waiting
M04
HP4:
->
LP4:
->
Comp1:
+0300010EN Chiller Core – rel 1.0 – 13/07/2009
65
Possible value descr.
14: On by pump-down
--0: Off
1: Start-up
1: Start-up
2: On
2: On
3: Stage 2
3: Stage 2
4: Stage 3
4: Stage 3
5: Stage 4
5: Stage 4
6: Force off
6: Force off
7: Limit to stage 1
7: Limit to stage 1
8: Limit to stage 2
8: Limit to stage 2
9: Limit to stage 3
9: Limit to stage 3
10: Off by alarm
10: Off by alarm
11: Off
11: Off
12: On waiting s
12: On waiting s
13: Manual mode
13: Manual mode
14: On by pump-down
14: On by pump-down
-----
0: Off
1: Start-up
1: Start-up
2: On
2: On
3: Stage 2
3: Stage 2
4: Stage 3
4: Stage 3
5: Stage 4
Type
Read/Write
-----
BMS index
-----
I
-------------------------------------------------------------
-------------------------------------------------------------
I
---
---
I
---
---
A
A
R
R
1
2
A
A
R
R
9
10
I
---------------------
---------------------
I
I
Mask index
Display description
Description
Default
UOM
Min
Max
Off waiting
Compressor 1 circuit 4 minimum time off
count down time
Compressor 2 circuit 4 current status
---
s
0
999
---
---
0
14
Compressor 2 circuit 4 minimum time off
count down time
Compressor 3 circuit 4 current status
---
s
0
999
---
---
0
14
Comp2:
Off waiting
Comp1:
+0300010EN Chiller Core – rel 1.0 – 13/07/2009
66
Possible value descr.
5: Stage 4
6: Force off
6: Force off
7: Limit to stage 1
7: Limit to stage 1
8: Limit to stage 2
8: Limit to stage 2
9: Limit to stage 3
9: Limit to stage 3
10: Off by alarm
10: Off by alarm
11: Off
11: Off
12: On waiting s
12: On waiting s
13: Manual mode
13: Manual mode
14: On by pump-down
14: On by pump-down
--0: Off
1: Start-up
1: Start-up
2: On
2: On
3: Stage 2
3: Stage 2
4: Stage 3
4: Stage 3
5: Stage 4
5: Stage 4
6: Force off
6: Force off
7: Limit to stage 1
7: Limit to stage 1
8: Limit to stage 2
8: Limit to stage 2
9: Limit to stage 3
9: Limit to stage 3
10: Off by alarm
10: Off by alarm
11: Off
11: Off
12: On waiting s
12: On waiting s
13: Manual mode
13: Manual mode
14: On by pump-down
14: On by pump-down
--0: Off
1: Start-up
1: Start-up
2: On
2: On
3: Stage 2
3: Stage 2
4: Stage 3
4: Stage 3
5: Stage 4
5: Stage 4
6: Force off
6: Force off
7: Limit to stage 1
7: Limit to stage 1
8: Limit to stage 2
8: Limit to stage 2
9: Limit to stage 3
9: Limit to stage 3
10: Off by alarm
10: Off by alarm
11: Off
11: Off
12: On waiting s
12: On waiting s
13: Manual mode
13: Manual mode
14: On by pump-down
Type
Read/Write
-----------------------------------------
BMS index
-----------------------------------------
I
-------------------------------------------------------------
-------------------------------------------------------------
I
---
---
I
I
Mask index
Display description
Description
Default
UOM
Min
Max
Off waiting
Compressor 3 circuit 4 minimum time off
count down time
Current condenser fan setpoint (CH mode)
Current condenser fan setpoint (HP mode)
Condenser fan group 1
Condenser fan group 2
Current setpoint
---
s
0
999
0
0
0
0
0
0
0
0
barg/psig
barg/psig
%
%
°C/°F
°C/°F
-------
0
0
0
0
-999,9
-999,9
0
0
0
999,9
999,9
100
100
999,9
999,9
99
99
1
0
---
0
1
0
---
0
1
Current day
Current month
Current year
Current hour
Current minute
Regulation temperature probe
1
1
0
0
0
---
------h
--°C/°F
1
1
0
0
0
-999,9
31
12
99
23
59
999,9
In.Evap.:
or
Out.Eva.:
main probe of the unit
---
°C/°F
-999,9
999,9
C1:
Compressor 1 circuit 1 status
0
---
0
9
Compressor 2 circuit 1 status
0
---
0
9
M05
Cond.fan set:
M06
Condenser fan 1:
Condenser fan 2:
Current set:
Regul.temp.:
Steps required:
MANUAL_MNG
Defrost:
m_End_Default
INITIALIZATION COMPLETE
switch off and back on
m_Main
In.Evap.:
or
Out.Eva.:
or
In.Cond.:
C2:
C3:
Steps required
Total steps number
Compressor 3 circuit 1 status
0
---
0
9
Compressor 1 circuit 2 status
0
---
0
9
Compressor 2 circuit 2 status
0
---
0
9
Compressor 3 circuit 2 status
0
---
0
9
Compressor 1 circuit 3 status
0
---
0
9
+0300010EN Chiller Core – rel 1.0 – 13/07/2009
67
Possible value descr.
14: On by pump-down
---
Type
Read/Write
BMS index
I
---
---
A
A
I
I
A
A
I
I
D
D
R
R
R
R
R
-------------
34
36
92
93
33
-------------
D
---
---
---
---
---
I
I
I
I
I
A
---
---
---
A
---
---
I
---
---
I
---
---
I
---
---
I
---
---
I
---
---
I
---
---
I
---
---
-----------
0: NO
1: YES
0: ---
1: -> Master controller
0: --1: -> Slave controller
---
Compressor ON
Compressor OFF
Compressor forced off
Compressor limited
Compressor in alarm
(lampeggiante): Comp. wait for switch on
(lampeggiante): Comp. wait for switch off
Compressor ON
Compressor OFF
Compressor forced off
Compressor limited
Compressor in alarm
(lampeggiante): Comp. wait for switch on
(lampeggiante): Comp. wait for switch off
Compressor ON
Compressor OFF
Compressor forced off
Compressor limited
Compressor in alarm
(lampeggiante): Comp. wait for switch on
(lampeggiante): Comp. wait for switch off
Compressor ON
Compressor OFF
Compressor forced off
Compressor limited
Compressor in alarm
(lampeggiante): Comp. wait for switch on
(lampeggiante): Comp. wait for switch off
Compressor ON
Compressor OFF
Compressor forced off
Compressor limited
Compressor in alarm
(lampeggiante): Comp. wait for switch on
(lampeggiante): Comp. wait for switch off
Compressor ON
Compressor OFF
Compressor forced off
Compressor limited
Compressor in alarm
(lampeggiante): Comp. wait for switch on
(lampeggiante): Comp. wait for switch off
Compressor ON
Compressor OFF
Compressor forced off
Compressor limited
Compressor in alarm
(lampeggiante): Comp. wait for switch on
Mask index
Display description
C4:
Description
Default
UOM
Min
Max
Compressor 2 circuit 3 status
0
---
0
9
Compressor 3 circuit 3 status
0
---
0
9
Compressor 1 circuit 4 status
0
---
0
9
Possible value descr.
(lampeggiante): Comp. wait for switch off
Compressor ON
Compressor OFF
Compressor forced off
Compressor limited
Compressor in alarm
(lampeggiante): Comp. wait for switch on
(lampeggiante): Comp. wait for switch off
Compressor ON
Compressor OFF
Compressor forced off
Compressor limited
Compressor in alarm
(lampeggiante): Comp. wait for switch on
(lampeggiante): Comp. wait for switch off
Compressor ON
Type
Read/Write
BMS index
I
---
---
I
---
---
I
---
---
I
---
---
I
---
---
Compressor OFF
Compressor forced off
Compressor limited
Compressor in alarm
(lampeggiante): Comp. wait for switch on
(lampeggiante): Comp. wait for switch off
Compressor 2 circuit 4 status
0
---
0
9
Compressor 3 circuit 4 status
0
---
0
9
Unit off by
Unit status
---
---
0
8
Manufacturer
password
Insert manufacturer
password(PW2):
0
---
0
Service password
Insert service password
(PW1):
0
---
Unit of measure
confirm
PAY ATTENTION
Current temperature and
press.parameters will be
overwritten with default
values
Go ahead:
Manufacturer password PW2: if the password
inserted is wrong then the message
"Password wrong!" appear
Service password PW1: if the password
inserted is wrong then the message
"Password wrong!" appear
Warning mask: it appear when the unit of
measure changed, in order to advise the user
that all the current temperature and
press.parameters will be overwritten with
default values
0
---
I
---
---
9999
Compressor ON
Compressor OFF
Compressor forced off
Compressor limited
Compressor in alarm
(lampeggiante): Comp. wait for switch on
(lampeggiante): Comp. wait for switch off
Compressor ON
Compressor OFF
Compressor forced off
Compressor limited
Compressor in alarm
(lampeggiante): Comp. wait for switch on
(lampeggiante): Comp. wait for switch off
0: --2: alarm
3: net
4: supervisor
5: scheduler
6: digit input
7: keyboard
8: manual mode
---
I
---
---
0
9999
---
I
---
---
0
1
0: NO
D
---
---
1: YES
+0300010EN Chiller Core – rel 1.0 – 13/07/2009
68
8. VARIABLES SENT TO THE SUPERVISOR
Chiller Core can be connected to various supervisory systems, using the following BMS communication protocols: Carel and Modbus.
A BMS serial port serial port is used for the connection.
The various connection protocols are managed using the following optional cards:
•
Carel RS485: code PCOS004850 (see Fig. 8.a)
•
Modbus RS485: code PCOS004850 (see Fig. 8.a)
3
The following figure shows the connection diagram of the BMS serial card to the pCO .
Fig. 8.a
The table below shows the variables sent to the supervisor.
Table of variables sent to the supervisor, with corresponding addresses.
8.1 Supervisor parameters table
Analog variables
Ind.
Ind.
CAREL
Modbus
1
2
3
4
5
6
7
8
Mask
Index
Description
Def.
UOM
Min
Max
R/W
Variable name
1
M01,
D02,
He02
High pressure circuit1
---
barg/psig
-3276,8
3276,7 R/W
Ain_High_Press_Circ1
2
M01,
D02,
He02
High pressure circuit 1 converted
to temperature
---
°C/°F
-3276,8
3276,7 R
High_Press_Circ1_Conv
3
M02,
He12,
D08
High pressure circuit2
---
barg/psig
-3276,8
3276,7 R
Ain_High_Press_Circ2
4
M02,
He12,
D08
High pressure circuit 2 converted
to temperature
---
°C/°F
-3276,8
3276,7 R
High_Press_Circ2_Conv
5
M03,
He19,
D14
High pressure circuit3
---
barg/psig
-3276,8
3276,7 R
Ain_High_Press_Circ3
6
M03,
He19,
D14
High pressure circuit 3 converted
to temperature
---
°C/°F
-3276,8
3276,7 R
High_Press_Circ3_Conv
7
M04,
He24,
D18
High pressure circuit4
---
barg/psig
-3276,8
3276,7 R
Ain_High_Press_Circ4
8
M04,
He24,
D18
High pressure circuit 4 converted
to temperature
---
°C/°F
-3276,8
3276,7 R
High_Press_Circ4_Conv
+0300010EN Chiller Core – rel 1.0 – 13/07/2009
69
9
9
M01,
He04,
D01
Low pressure circuit1
10
M01,
He04,
D01
barg/psig
-3276,8
3276,7 R
Ain_Low_Press_Circ1
Low pressure circuit 1 converted to
temperature
---
°C/°F
-3276,8
3276,7 R
Low_Press_Circ1_Conv
11
M02,
He13,
D08
Low pressure circuit2
barg/psig
-3276,8
3276,7 R
Ain_Low_Press_Circ2
12
M02,
He13,
D08
Low pressure circuit 2 converted to
temperature
---
°C/°F
-3276,8
3276,7 R
Low_Press_Circ2_Conv
13
M03,
He20,
D14
Low pressure circuit3
barg/psig
-3276,8
3276,7 R
Ain_Low_Press_Circ3
14
M03,
He20,
D14
Low pressure circuit 3 converted to
temperature
---
°C/°F
-3276,8
3276,7 R
Low_Press_Circ3_Conv
15
M04,
D18,
He25
Low pressure circuit4
barg/psig
-3276,8
3276,7 R
Ain_Low_Press_Circ4
16
M04,
D18,
He25
Low pressure circuit 4 converted to
temperature
---
°C/°F
-3276,8
3276,7 R
Low_Press_Circ4_Conv
17
D03,
D04,
He07
Inlet water evaporator temp.
---
°C/°F
-3276,8
3276,7 R
Ain_In_Temp_Evap
18
18
D03,
He05,
He23
Outlet water evaporator temp.
---
°C/°F
-3276,8
3276,7 R
Ain_Out_Temp_Evap
19
19
D05,
He09
Outlet water evap.1 temp.
---
°C/°F
-3276,8
3276,7 R
Ain_Out_Temp_Evap1
20
20
D09,
D16,
He14
Outlet water evap.2 temp.
---
°C/°F
-3276,8
3276,7 R
Ain_Out_Temp_Evap2
21
21
D17
Outlet water evap.3 temp.
---
°C/°F
-3276,8
3276,7 R
Ain_Out_Temp_Evap3
22
D19,
He26
Outlet water evap.4 temp.
---
°C/°F
-3276,8
3276,7 R
Ain_Out_Temp_Evap4
23
D07,
D13,
He18,
He11
Outlet water cond.1 temp.
---
°C/°F
-3276,8
3276,7 R
Ain_Out_Temp_Cond1
24
D04,
D19,
He08,
He27
Outlet water cond.2 temp.
---
°C/°F
-3276,8
3276,7 R
Ain_Out_Temp_Cond2
25
D20,
He27
Outlet water cond.3 temp.
---
°C/°F
-3276,8
3276,7 R
Ain_Out_Temp_Cond3
26
D16,
He22
Outlet water cond.4 temp.
---
°C/°F
-3276,8
3276,7 R
Ain_Out_Temp_Cond4
27
D06,
D12,
He10,
He17
Inlet water condenser temp.
---
°C/°F
-3276,8
3276,7 R
Ain_In_Temp_Cond
28
D02,
D10,
D11,
He03,
He15,
He16
External temperature
---
°C/°F
-3276,8
3276,7 R
Ain_Temp_Ext
10
11
12
13
14
15
16
17
22
23
24
25
26
27
28
+0300010EN Chiller Core – rel 1.0 – 13/07/2009
---
---
---
---
70
29
30
31
32
29
30
31
B02
B02
B03
33
33
M06,
B01
Current setpoint
34
34
Gfc23,
M05
Condenser fan setpoint in chiller
mode
36
36
Gfc23
Gfc24,
M05
Gfc11
53,0 °F
Gfc11
Gfc11
12,0 °C
Gfc11
Gfc11
53,0 °F
Gfc11
Gfc11
40,0 °C
Gfc12
Gfc12
104,0 °F
Gfc12
Gfc12
40,0 °C
Gfc12
Gfc12
104,0 °F
Gfc12
Gfc12
Heating temperature setpoint1
B03
35
Gfc11
Cooling temperature setpoint2
32
35
12,0 °C
Cooling temperature setpoint1
Heating temperature setpoint2
Condenser fan setpoint for CH
mode converted to temperature
---
°C/°F
-999,9
13,0 barg
0
188,0 psig
0
---
°C
---
°F
Condenser fan setpoint in
heatpump mode
R/W
Cooling_Temp_Set1
R/W
Cooling_Temp_Set2
R/W
Heating_Temp_Set1
R/W
Heating_Temp_Set2
999,9 R
Current_Temp_Set
999,9 R/W
Fan_Press_Set_CH
1448,6
0
999,9 R
Fan_Press_Set_CH_Conv
0
999,9 R/W
Fan_Press_Set_HP
°C/°F
0
999,9 R
Fan_Press_Set_HP_Conv
barg/psig
0
999,9 R
Fan_Setpoint
0
999,9 R/W
HP_Prev_Press_Thr
0
870,2 R/W
HP_Prev_Press_Diff
0
999,9 R/W
HP_Al_Press_Thr
0
999,9 R/W
HP_Al_Press_Diff
0
999,9 R/W
LP_Prev_Press_Thr
0
870,2 R/W
LP_Prev_Press_Diff
0
999,9 R/W
LP_Al_Press_Thr
0
999,9 R/W
LP_Al_Press_Diff
0
999,9 R/W
Antifreeze_Prev_Temp_Thr
0
108 R/W
Antifreeze_Prev_Temp_Diff
-999,9
999,9 R/W
Heater_Temp_Set
0
108 R/W
Heater_Temp_Diff
0
999,9 R/W
ForceOff_Comp_Temp_Offset
0
999,9 R/W
ForceOff_Comp_Temp_Diff
-999,9
999,9 R/W
Freeze_Al_Temp_Set
13,0 barg
188,5 psig
37
37
Gfc24
Condenser fan setpoint for HP
mode converted to temperature
---
38
38
M05
Current condenser fan setpoint
---
39
39
Gfc35
High pressure prevent threshold
20,0 barg
290,1 psig
40
40
Gfc35
High pressure prevent differential
2,0 barg
29,0 psig
41
41
Gfc33
High pressure alarm threshold
23,0 barg
333,6 psig
42
42
Gfc33
High pressure alarm differential
2,0 barg
29,0 psig
43
43
Gfc37
Low pressure prevent threshold
2,0 barg
29,0 psig
44
44
Gfc37
Low pressure prevent differential
2,0 barg
29,0 psig
45
45
Gfc30
Low pressure alarm threshold
1,5 barg
21,8 psig
46
46
Gfc30
Low pressure alarm differential
0,5 barg
7,3 psig
47
47
Gfc39
Antifreeze prevent threshold
6,0 °C
42,8 °F
48
48
Gfc39
Antifreeze prevent differential
1,0 °C
1,8 °F
49
49
Hc09
Heater threshold
5,0 °C
41,0 °F
50
50
1,0 °C
Hc09
Heater differential
Hc10
Force off comps.offset by
antifreeze
1,5 °C
Hc10
Force off comps.differential by
antifreeze
1,0 °C
1,8 °F
51
51
2,7 °F
52
52
1,8 °F
53
53
Hc08
Freeze alarm setpoint
3,0 °C
37,4 °F
+0300010EN Chiller Core – rel 1.0 – 13/07/2009
71
54
54
Hc08
Freeze alarm differential
Gfc23
Condenser fan differential in chiller
mode
1,0 °C
0
108 R/W
0
999,9 R/W
Freeze_Al_Temp_Diff
1,8 °F
55
55
3,0 barg
Fan_Press_Diff_CH
43,5 psig
56
57
56
57
Gfc23
Gfc24
Condenser fan diffrential for CH
mode converted to temperature
Condenser fan differential in
heatpump mode
---
°C/°F
0
999,9 R
Fan_Press_Diff_CH_Conv
0
999,9 R/W
Fan_Press_Diff_HP
0
999,9 R
Fan_Press_Diff_HP_Conv
-999,9
999,9 R/W
Ext_Temp_Set_Cool
-999,9
999,9 R/W
Ext_Temp_Diff_Cool
-999,9
999,9 R/W
Ext_Temp_Set_Heat
-999,9
999,9 R/W
Ext_Temp_Diff_Heat
0
999,9 R/W
Defr_Start_Temp_Set
0
999,9 R/W
Defr_End_Temp_Set
-999,9
999,9 R/W
End_PD_Press_Thr
4,0 barg
58,0 psig
58
58
Gfc24
59
59
Gfc15
Condenser fan differential for HP
mode converted to temperature
Cool compensation external
setpoint
---
°C/°F
25,0 °C
77,0 °F
60
60
Gfc15
Cool compensation external
differential
10,0 °C
18,0 °F
61
61
Gfc16
Heat compensation external
setpoint
0,0 °C
Gfc16
Heat compensation external
differential
10,0 °C
32,0 °F
62
62
18,0 °F
63
63
Gfc27
Defrost start setpoint
2,0 °C
35,6 °F
64
64
Gfc27
Defrost end setpoint
28,0 °C
82,4 °F
2,0 barg
65
65
Gfc14
Pump down end threshold
66
66
Gfc26
Condenser fan minimum speed
3,5 V
0
99,9 R/W
Cond_Fan_Min_Speed
67
67
Gfc26
Condenser fan maximum speed
7,5 V
0
100 R/W
Cond_Fan_Max_Speed
29,0 psig
Integer variables
Ind.
Ind.
CAREL
Modbus
Mask
Index
1
209
Ha01,
Gb03
2
210
3
Description
Def.
UOM
Min
Max
R/W
Variable name
1 ---
0
2 R/W
Unit_Type
Ha02,
Gb03
Unit type (0: CH; 1: CH/HP; 2: HP)
Refrigerant type (0: R22; 1: R134a;
2: R404a; 3: R407c; 4: R410a; 5:
R507; 6: R290; 7: R600; 8: R600a;
9: R717; 10: R744; 11: R728; 11:
R1270; 12: R417a)
4 ---
0
13 R/W
Gas_Type
211
Ha03,
Gb03
Circuit number
1 ---
1
4 R/W
Circuits_Num
4
212
Ha03,
Gb03
Compressor number per circuit
2 ---
1
3 R/W
Comps_Num_Per_Circ
5
213
Ha04,
Gb03
Evaporator number
1 ---
1
4 R/W
Evaporators_Num
6
214
Ha05
Type of rotation
1 ---
-32768
32767 R/W
Rotation_type
7
215
Ha06
0 ---
-32768
32767 R/W
Devices_Unload_Sequence
8
216
Ha07
Sequence of load unloader
PumpDown type(0:Disable;1:At
power off;2:At power on;3:At
power on-off)
0 ---
0
3 R/W
9
217
Ha08
Number of evaporator pumps
5 ---
1
2 R/W
10
218
Ha08
Warnings limit evaporator pump
0 ---
-32768
32767 R/W
11
219
Ha10
Number of condensator pumps
1 ---
1
2 R/W
12
220
Ha10
0 ---
-32768
32767 R/W
13
221
Ha12
Warnings limit condensator pump
Comps.behavior when defrost
start/end (0: not OFF compressor;
1: OFF comp.at start; 2: OFF comp.
at end; 3: OFF comp. at start/end)
0 ---
0
3 R/W
+0300010EN Chiller Core – rel 1.0 – 13/07/2009
72
PumpDown_Type
N_Pumps
N_Warnings
N_Pumps
N_Warnings
Defr_Comp_Type
14
222
Hc02
15
223
Hc04
16
224
Hc04
17
225
Hc04
18
226
Hc04
19
227
Hc04
20
228
Hc04
21
229
Hc04
22
230
Hc04
23
231
Hc04
24
232
Hc04
25
233
Hc04
26
234
Hc04
27
235
Hc04
28
236
Hc04
29
237
Hc04
30
238
Hc04
31
239
Hc05
32
240
Hc05
33
241
Hc05
34
242
Hc05
35
243
Hc05
36
244
Hc05
37
245
Hc05
Date format (1: dd/mm/yy; 2:
mm/dd/yy; 3: yy.mm.dd)
Custom rotation ON sequence:
weight Dev1 Circ1 (0: High; 15:
Low)
Custom rotation ON sequence:
weight Dev2 Circ1 (0: High; 15:
Low)
Custom rotation ON sequence:
weight Dev3 Circ1 (0: High; 15:
Low)
Custom rotation ON sequence:
weight Dev4 Circ1 (0: High; 15:
Low)
Custom rotation ON sequence:
weight Dev1 Circ2 or Dev5 Circ1
(0: High; 15: Low)
Custom rotation ON sequence:
weight Dev2 Circ2 or Dev6 Circ1
(0: High; 15: Low)
Custom rotation ON sequence:
weight Dev3 Circ2 or Dev7 Circ1
(0: High; 15: Low)
Custom rotation ON sequence:
weight Dev4 Circ2 or Dev8 Circ1
(0: High; 15: Low)
Custom rotation ON sequence:
weight Dev1 Circ3 or Dev9 Circ1
(0: High; 15: Low)
Custom rotation ON sequence:
weight Dev2 Circ3 or Dev10 Circ1
(0: High; 15: Low)
Custom rotation ON sequence:
weight Dev3 Circ3 or Dev11 Circ1
(0: High; 15: Low)
Custom rotation ON sequence:
weight Dev4 Circ3 or Dev12 Circ1
(0: High; 15: Low)
Custom rotation ON sequence:
weight Dev1 Circ4 or Dev13 Circ1
(0: High; 15: Low)
Custom rotation ON sequence:
weight Dev2 Circ4 or Dev14 Circ1
(0: High; 15: Low)
Custom rotation ON sequence:
weight Dev3 Circ4 or Dev15 Circ1
(0: High; 15: Low)
Custom rotation ON sequence:
weight Dev4 Circ4 or Dev16 Circ1
(0: High; 15: Low)
Custom rotation OFF sequence:
weight Dev1 Circ1 (0: High; 15:
Low)
Custom rotation OFF sequence:
weight Dev2 Circ1 (0: High; 15:
Low)
Custom rotation OFF sequence:
weight Dev3 Circ1 (0: High; 15:
Low)
Custom rotation OFF sequence:
weight Dev4 Circ1 (0: High; 15:
Low)
Custom rotation OFF sequence:
weight Dev1 Circ2 or Dev5 Circ1
(0: High; 15: Low)
Custom rotation OFF sequence:
weight Dev2 Circ2 or Dev6 Circ1
(0: High; 15: Low)
Custom rotation OFF sequence:
weight Dev3 Circ2 or Dev7 Circ1
(0: High; 15: Low)
Hc05
Custom rotation OFF sequence:
weight Dev4 Circ2 or Dev8 Circ1
38
246
+0300010EN Chiller Core – rel 1.0 – 13/07/2009
0 ---
1
3 R/W
0 ---
-32768
32767 R/W
Custom_rot_On_Ind0
0 ---
-32768
32767 R/W
Custom_rot_On_Ind1
0 ---
-32768
32767 R/W
Custom_rot_On_Ind2
0 ---
-32768
32767 R/W
Custom_rot_On_Ind3
0 ---
-32768
32767 R/W
Custom_rot_On_Ind4
0 ---
-32768
32767 R/W
Custom_rot_On_Ind5
0 ---
-32768
32767 R/W
Custom_rot_On_Ind6
0 ---
-32768
32767 R/W
Custom_rot_On_Ind7
0 ---
-32768
32767 R/W
Custom_rot_On_Ind8
0 ---
-32768
32767 R/W
Custom_rot_On_Ind9
0 ---
-32768
32767 R/W
Custom_rot_On_Ind10
0 ---
-32768
32767 R/W
Custom_rot_On_Ind11
0 ---
-32768
32767 R/W
Custom_rot_On_Ind12
0 ---
-32768
32767 R/W
Custom_rot_On_Ind13
0 ---
-32768
32767 R/W
Custom_rot_On_Ind14
0 ---
-32768
32767 R/W
Custom_rot_On_Ind15
0 ---
-32768
32767 R/W
Custom_rot_Off_Ind0
0 ---
-32768
32767 R/W
Custom_rot_Off_Ind1
0 ---
-32768
32767 R/W
Custom_rot_Off_Ind2
0 ---
-32768
32767 R/W
Custom_rot_Off_Ind3
0 ---
-32768
32767 R/W
Custom_rot_Off_Ind4
0 ---
-32768
32767 R/W
Custom_rot_Off_Ind5
0 ---
-32768
32767 R/W
Custom_rot_Off_Ind6
0 ---
-32768
32767 R/W
Custom_rot_Off_Ind7
73
Date_Format
(0: High; 15: Low)
39
247
Hc05
40
248
Hc05
41
249
Hc05
42
250
Hc05
43
251
Hc05
44
252
Hc05
45
253
Hc05
46
254
Hc05
Custom rotation OFF sequence:
weight Dev1 Circ3 or Dev9 Circ1
(0: High; 15: Low)
Custom rotation OFF sequence:
weight Dev2 Circ3 or Dev10 Circ1
(0: High; 15: Low)
Custom rotation OFF sequence:
weight Dev3 Circ3 or Dev11 Circ1
(0: High; 15: Low)
Custom rotation OFF sequence:
weight Dev4 Circ3 or Dev12 Circ1
(0: High; 15: Low)
Custom rotation OFF sequence:
weight Dev1 Circ4 or Dev13 Circ1
(0: High; 15: Low)
Custom rotation OFF sequence:
weight Dev2 Circ4 or Dev14 Circ1
(0: High; 15: Low)
Custom rotation OFF sequence:
weight Dev3 Circ4 or Dev15 Circ1
(0: High; 15: Low)
Custom rotation OFF sequence:
weight Dev4 Circ4 or Dev16 Circ1
(0: High; 15: Low)
47
255
Hc06
Compressors min ON time
48
256
Hc06
49
257
Hc06
Compressors min OFF time
Min start time between same
compressor
50
258
Gfc01
Cool/Heat change delay time
Gfc04
Regulation type (0: proportional; 1:
prop.+ int.; 2: pid)
51
259
0 ---
-32768
32767 R/W
Custom_rot_Off_Ind8
0 ---
-32768
32767 R/W
Custom_rot_Off_Ind9
0 ---
-32768
32767 R/W
Custom_rot_Off_Ind10
0 ---
-32768
32767 R/W
Custom_rot_Off_Ind11
0 ---
-32768
32767 R/W
Custom_rot_Off_Ind12
0 ---
-32768
32767 R/W
Custom_rot_Off_Ind13
0 ---
-32768
32767 R/W
Custom_rot_Off_Ind14
0 ---
-32768
32767 R/W
Custom_rot_Off_Ind15
60 s
0
999 R/W
Comps_Min_Time_ON
360 s
0
999 R/W
Comps_Min_Time_OFF
450 s
0
999 R/W
Comps_Min_T_Start_Same
60 ---
0
999 R/W
Delay_C_H_Change
0 ---
-32768
32767 R/W
Regulation_Type
52
260
Gfc04
Cooling derivative time
300 ---
-32768
32767 R/W
Der_Time_Pos
53
261
Gfc04
Cooling integration time
300 ---
-32768
32767 R/W
Int_Time_Pos
54
262
Gfc04
Heating derivative time
300 ---
-32768
32767 R/W
Der_Time_Neg
55
263
Gfc04
Heating integration time
300 ---
-32768
32767 R/W
Int_Time_Neg
56
264
Gfc09
Minimum time for loading
120 s
0
9999 R/W
Min_Time_Load_NZ
57
265
Gfc09
Maximum time for loading
600 s
0
9999 R/W
Max_Time_Load_NZ
58
266
Gfc10
Minimum time for unloading
120 s
0
9999 R/W
Min_Time_Unload_NZ
59
267
Gfc10
Maximum time for unloading
600 s
0
9999 R/W
Max_Time_Unload_NZ
60
268
Gfc13
Time between comp.load
10 s
0
999 R/W
Load_Up_Time
61
269
Gfc13
10 s
0
999 R/W
Load_Down_Time
62
270
Gc01
Time between comp.download
Cooling/Heating change (0:
cooling; 1: heating)
0
1 R/W
Cool_Heat_KeyB
63
271
Gfc14
60 s
0
999 R/W
64
272
Gfc17
Maximum pump down time
Delay between evap.pump on and
comp.on
65
273
Gfc17
66
274
Gfc18
67
275
Gfc18
Evap.pump off delay time
Evap.pumps flow alarm startup
delay time
Evap.pumps flow alarm running
delay time
68
276
Gfc19
Evap.pumps rotation time
69
277
Gfc19
Evap.pumps overwork time
70
278
Gfc20
71
279
Gfc21
72
280
Gfc21
Cond.pump off delay time
Cond.pumps flow alarm startup
delay time
Cond.pumps flow alarm running
delay time
73
281
Gfc22
Cond.pumps rotation time
74
282
Gfc22
Cond.pumps overwork time
75
283
Gfc25
Cond.fans speed-up time
+0300010EN Chiller Core – rel 1.0 – 13/07/2009
0 ---
Max_PumpDown_Time
25 s
0
999 R/W
EPump_On_Delay
10 s
0
999 R/W
EPump_Off_Delay
20 s
0
999 R/W
EPump_Flow_Startup_Delay
5 s
1
999 R/W
EPump_Flow_Run_Delay
100 ---
0
999 R/W
EPump_Rot_Time
5 ---
0
999 R/W
EPump_Overwork_Time
10 s
0
999 R/W
CPump_Off_Delay
20 s
0
999 R/W
CPump_Flow_Startup_Delay
5 s
1
999 R/W
CPump_Flow_Run_Delay
100 ---
0
999 R/W
CPump_Rot_Time
5 ---
0
999 R/W
CPump_Overwork_Time
0
99 R/W
Speed_Up_Time
10 s
74
76
284
Gfc25
Liquid soleniod speed up time
60 s
0
99 R/W
Liq_Sol_Speed_Up_Time
77
285
Gfc28
Defrost startup delay
1800 ---
1
9999 R/W
Defr_Startup_Delay
78
286
Gfc28
Defrost minimum time
0 ---
0
999 R/W
Defr_Min_Time
79
287
Gfc28
Defrost maximum time
5 ---
1
999 R/W
Defr_Max_Time
80
288
Gfc29
Defrost interval time
0 min
0
999 R/W
Defr_Interval_Time
81
289
Gfc29
Dripping time
30 s
0
999 R/W
Dripping_Time
82
290
Gfc31
Low pressure alarm startup delay
40 s
0
999 R/W
LP_Start_Delay
83
291
Gfc31
Low pressure alarm running delay
0 s
0
999 R/W
LP_Run_Delay
84
292
Gfc34
Prevent automatic increase time
10 s
0
999 R/W
Time_Auto_Incr_Prev
85
293
Gfc34
Count prevent number time
60 min
0
100 R/W
Time_Count_Prev_Number
86
294
Gfc36
High pressure prevent number
3 ---
0
5 R/W
HP_Prev_Num
87
295
Gfc36
High pressure prevent delay
5 ---
0
999 R/W
HP_Prev_Delay
88
296
Gfc38
Low pressure prevent number
3 ---
0
5 R/W
LP_Prev_Num
89
297
Gfc38
Low pressure prevent delay
5 ---
0
999 R/W
90
298
Gfc40
Antifreeze prevent number
3 ---
0
5 R/W
Antifreeze_Prev_Num
91
299
Gfc40
Antifreeze prevent warning delay
5 ---
0
999 R/W
Antifreeze_Prev_Delay
92
300
D64
AOUT1 value of master board
0 ---
0
1000 R/W
Virt_Aout1_Value
93
301
D64
AOUT2 value of master board
0 ---
0
1000 R/W
Virt_Aout2_Value
94
302
D62
0 ---
0
1000 R/W
Virt_Aout3_Value
95
303
Gd01
0 ---
0
999 R
Hour_H_Evap_Pump1
96
304
Gd01
0 ---
0
999 R
Hour_L_Evap_Pump1
97
305
Gd01
0 ---
0
999 R
Hour_H_Evap_Pump2
98
306
Gd01
0 ---
0
999 R
Hour_L_Evap_Pump2
99
307
Gd02
0 ---
0
999 R
Hour_H_Comp1_Circ1
100
308
Gd02
0 ---
0
999 R
Hour_L_Comp1_Circ1
101
309
Gd02
0 ---
0
999 R
Hour_H_Comp2_Circ1
102
310
Gd02
0 ---
0
999 R
Hour_L_Comp2_Circ1
103
311
Gd02
0 ---
0
999 R
Hour_H_Comp3_Circ1
104
312
Gd02
0 ---
0
999 R
Hour_L_Comp3_Circ1
105
313
Gd03
0 ---
0
999 R
Hour_H_Comp1_Circ2
106
314
Gd03
0 ---
0
999 R
Hour_L_Comp1_Circ2
107
315
Gd03
0 ---
0
999 R
Hour_H_Comp2_Circ2
108
316
Gd03
0 ---
0
999 R
Hour_L_Comp2_Circ2
109
317
Gd03
0 ---
0
999 R
Hour_H_Comp3_Circ2
110
318
Gd03
0 ---
0
999 R
Hour_L_Comp3_Circ2
111
319
Gd04
0 ---
0
999 R
Hour_H_Comp1_Circ3
112
320
Gd04
0 ---
0
999 R
Hour_L_Comp1_Circ3
113
321
Gd04
0 ---
0
999 R
Hour_H_Comp2_Circ3
114
322
Gd04
0 ---
0
999 R
Hour_L_Comp2_Circ3
115
323
Gd04
0 ---
0
999 R
Hour_H_Comp3_Circ3
116
324
Gd04
AOUT3 value of master board
Evaporator pump1 working hourhigh part
Evaporator pump1 working hourlow part
Evaporator pump2 working hourhigh part
Evaporator pump2 working hourlow part
Comp1 circ1 working hour-high
part
Comp1 circ1 working hour-low
part
Comp2 circ1 working hour-high
part
Comp2 circ1 working hour-low
part
Comp3 circ1 working hour-high
part
Comp3 circ1 working hour-low
part
Comp1 circ2 working hour-high
part
Comp1 circ2 working hour-low
part
Comp2 circ2 working hour-high
part
Comp2 circ2 working hour-low
part
Comp3 circ2 working hour-high
part
Comp3 circ2 working hour-low
part
Comp1 circ3 working hour-high
part
Comp1 circ3 working hour-low
part
Comp2 circ3 working hour-high
part
Comp2 circ3 working hour-low
part
Comp3 circ3 working hour-high
part
Comp3 circ3 working hour-low
part
117
325
Gd05
Comp1 circ4 working hour-high
+0300010EN Chiller Core – rel 1.0 – 13/07/2009
LP_Prev_Delay
0 ---
0
999 R
Hour_L_Comp3_Circ3
0 ---
0
999 R
Hour_H_Comp1_Circ4
75
part
118
326
Gd05
119
327
Gd05
120
328
Gd05
121
329
Gd05
122
330
Gd05
123
331
Gd06
124
332
Gd06
125
333
Gd06
126
334
Gd06
127
335
Gd07
128
336
Gd07
129
337
Gd07
130
338
Gd07
Digital variables
Ind.
Ind.
CAREL
Modbus
Comp1 circ4 working hour-low
part
Comp2 circ4 working hour-high
part
Comp2 circ4 working hour-low
part
Comp3 circ4 working hour-high
part
Comp3 circ4 working hour-low
part
Condenser fan1 working hour-high
part
Condenser fan1 working hour-low
part
Condenser fan2 working hour-high
part
Condenser fan2 working hour-low
part
Condenser pump1 working hourhigh part
Condenser pump1 working hourlow part
Condenser pump2 working hourhigh part
Condenser pump2 working hourlow part
Mask
Index
Description
20
20
D45
DIN1 of master board (0Close;1-Open)
DIN2 of master board (0Close;1-Open)
DIN3 of master board (0Close;1-Open)
DIN4 of master board (0Close;1-Open)
DIN5 of master board (0Close;1-Open)
DIN6 of master board (0Close;1-Open)
DIN7 of master board (0Close;1-Open)
DIN8 of master board (0Close;1-Open)
DIN9 of master board (0Close;1-Open)
DIN10 of master board (0Close;1-Open)
DIN11 of master board (0Close;1-Open)
DIN12 of master board (0Close;1-Open)
DIN13 of master board (0Close;1-Open)
DIN14 of master board (0Close;1-Open)
DIN15 of master board (0Close;1-Open)
DIN16 of master board (0Close;1-Open)
DIN17 of master board (0Close;1-Open)
DOUT1 of master board (0Open;1-Close)
DOUT2 of master board (0Open;1-Close)
DOUT3 of master board (0Open;1-Close)
21
21
D45
DOUT4 of master board (0-
1
1
D21
2
2
D21
3
3
D24
4
4
D24
5
5
D26
6
6
D26
7
7
D27
8
8
D27
9
9
D28
10
10
D28
11
11
D29
12
12
D29
13
13
D32
14
14
D32
15
15
D33
16
16
D33
17
17
D34
18
18
D42
19
19
D42
+0300010EN Chiller Core – rel 1.0 – 13/07/2009
0 ---
0
999 R
Hour_L_Comp1_Circ4
0 ---
0
999 R
Hour_H_Comp2_Circ4
0 ---
0
999 R
Hour_L_Comp2_Circ4
0 ---
0
999 R
Hour_H_Comp3_Circ4
0 ---
0
999 R
Hour_L_Comp3_Circ4
0 ---
0
999 R
Hour_H_Cond_Fan1
0 ---
0
999 R
Hour_L_Cond_Fan1
0 ---
0
999 R
Hour_H_Cond_Fan2
0 ---
0
999 R
Hour_L_Cond_Fan2
0 ---
0
999 R
Hour_H_Cond_Pump1
0 ---
0
999 R
Hour_L_Cond_Pump1
0 ---
0
999 R
Hour_H_Cond_Pump2
0 ---
0
999 R
Hour_L_Cond_Pump2
Def.
UOM
Min
Max
R/W
Variable name
0 ---
0
1 R
Din1_Status
0 ---
0
1 R
Din2_Status
0 ---
0
1 R
Din3_Status
0 ---
0
1 R
Din4_Status
0 ---
0
1 R
Din5_Status
0 ---
0
1 R
Din6_Status
0 ---
0
1 R
Din7_Status
0 ---
0
1 R
Din8_Status
0 ---
0
1 R
Din9_Status
0 ---
0
1 R
Din10_Status
0 ---
0
1 R
Din11_Status
0 ---
0
1 R
Din12_Status
0 ---
0
1 R
Din13_Status
0 ---
0
1 R
Din14_Status
0 ---
0
1 R
Din15_Status
0 ---
0
1 R
Din16_Status
0 ---
0
1 R
Din17_Status
0 ---
0
1 R
Dout1_Value
0 ---
0
1 R
Dout2_Value
0 ---
0
1 R
Dout3_Value
0 ---
0
1 R
Dout4_Value
76
Open;1-Close)
22
22
D49
23
23
D49
24
24
D50
25
25
D50
26
26
D51
27
27
D52
28
28
D52
29
29
D53
30
30
D53
31
31
D54
32
32
D54
33
33
D55
34
34
D35
35
35
D35
36
36
D36
37
37
D36
38
38
D37
39
39
D37
40
40
D38
41
41
D38
42
42
D39
43
43
D40
44
44
D40
45
45
D56
46
46
D56
47
47
D57
48
48
D57
49
49
D58
50
50
D59
51
51
D59
52
52
D60
53
53
D60
54
54
D61
55
55
D61
DOUT5 of master board (0Open;1-Close)
DOUT6 of master board (0Open;1-Close)
DOUT7 of master board (0Open;1-Close)
DOUT8 of master board (0Open;1-Close)
DOUT9 of master board (0Open;1-Close)
DOUT10 of master board (0Open;1-Close)
DOUT11 of master board (0Open;1-Close)
DOUT12 of master board (0Open;1-Close)
DOUT13 of master board (0Open;1-Close)
DOUT14 of master board (0Open;1-Close)
DOUT15 of master board (0Open;1-Close)
DOUT16 of master board (0Open;1-Close)
DIN1 of slave board (0-Close;1Open)
DIN2 of slave board (0-Close;1Open)
DIN6 of slave board (0-Close;1Open)
DIN7 of slave board (0-Close;1Open)
DIN9 of slave board (0-Close;1Open)
DIN10 of slave board (0-Close;1Open)
DIN11 of slave board (0-Close;1Open)
DIN12 of slave board (0-Close;1Open)
DIN13 of slave board (0-Close;1Open)
DIN15 of slave board (0-Close;1Open)
DIN16 of slave board (0-Close;1Open)
DOUT1 of slave board (0Open;1-Close)
DOUT2 of slave board (0Open;1-Close)
DOUT3 of slave board (0Open;1-Close)
DOUT4 of slave board (0Open;1-Close)
DOUT9 of slave board (0Open;1-Close)
DOUT10 of slave board (0Open;1-Close)
DOUT11 of slave board (0Open;1-Close)
DOUT12 of slave board (0Open;1-Close)
DOUT13 of slave board (0Open;1-Close)
DOUT14 of slave board (0Open;1-Close)
DOUT15 of slave board (0Open;1-Close)
56
56
Ha01,
Gb03
57
57
Ha02
0 ---
0
1 R
Dout5_Value
0 ---
0
1 R
Dout6_Value
0 ---
0
1 R
Dout7_Value
0 ---
0
1 R
Dout8_Value
0 ---
0
1 R
Dout9_Value
0 ---
0
1 R
Dout10_Value
0 ---
0
1 R
Dout11_Value
0 ---
0
1 R
Dout12_Value
0 ---
0
1 R
Dout13_Value
0 ---
0
1 R
Dout14_Value
0 ---
0
1 R
Dout15_Value
0 ---
0
1 R
Dout16_Value
0 ---
0
1 R
Din1_Status_S
0 ---
0
1 R
Din2_Status_S
0 ---
0
1 R
Din6_Status_S
0 ---
0
1 R
Din7_Status_S
0 ---
0
1 R
Din9_Status_S
0 ---
0
1 R
Din10_Status_S
0 ---
0
1 R
Din11_Status_S
0 ---
0
1 R
Din12_Status_S
0 ---
0
1 R
Din13_Status_S
0 ---
0
1 R
Din15_Status_S
0 ---
0
1 R
Din16_Status_S
0 ---
0
1 R
Dout1_Value_S
0 ---
0
1 R
Dout2_Value_S
0 ---
0
1 R
Dout3_Value_S
0 ---
0
1 R
Dout4_Value_S
0 ---
0
1 R
Dout9_Value_S
0 ---
0
1 R
Dout10_Value_S
0 ---
0
1 R
Dout11_Value_S
0 ---
0
1 R
Dout12_Value_S
0 ---
0
1 R
Dout13_Value_S
0 ---
0
1 R
Dout14_Value_S
0 ---
0
1 R
Dout15_Value_S
Physical circuit type (AW/WW)
0 ---
0
1 R/W
Physical_Circ_Type
Reverse cycle type(0-Water;1-
0 ---
0
1 R/W
Reverse_Cycle_Type
+0300010EN Chiller Core – rel 1.0 – 13/07/2009
77
Gas)
58
58
Ha04,
Gb03
59
59
Ha05
60
60
Ha09
62
62
Ha12
63
63
Ha13
Condensing type (0-Single;1Separated)
Sequence activation
compressors (0: Packed, 1:
Equalized)
Enable antiblock evaporator
pump
Defrost type (0: Separated; 1:
Simultaneous)
0 ---
0
1 R/W
Cond_Type
0 ---
0
1 R/W
Equalized_Circ_Power
1 ---
0
1 R/W
En_Antiblock
0 ---
0
1 R/W
Defrost_Type
0 ---
0
1 R/W
En_Compensation
64
64
Ha14
Enable setpoint compensation
Enable clock for pCO* without
clock device on board (0:
Disabled; 1: Enabled)
65
65
Hc07
Enable high pressure prevent
66
66
Hc07
Enable low pressure prevent
1 ---
0
1 R/W
En_LP_Prev
67
67
Hc07
1 ---
0
1 R/W
En_Antifreeze_Prev
68
68
1 ---
0
1 R/W
En_Keyboard_Off
69
69
Gfc02
Gfc03,
Main
mask
Enable antifreeze prevent
Enable switch-off unit by
keyboard
0 ---
0
1 R/W
Reg_Temp_Probe
70
70
Gfc08
0 ---
0
1 R/W
En_Force_Off
71
71
Gfc20
Regulation temperature probe
(0: inlet; 1: outlet)
Enable force require to 0 during
NZ regulation when the
regulation temperature is lower a
threshold
Pump on if (0-Unit on; 1Compressors required)
0 ---
0
1 R/W
Pump_Work_Type
Gfc32
LP by pressostat reset type (0:
Semiautomatic; 1: Manual)
1 ---
0
1 R/W
Reset_Type_LP_Pressostat
0 ---
0
1 R/W
Reset_Type_LP_Transducer
1 ---
0
1 R/W
Superv_OnOff
0 ---
0
1 R
Comp1_Circ1
0 ---
0
1 R
Comp2_Circ1
0 ---
0
1 R
Comp3_Circ1
0 ---
0
1 R
Comp1_Circ2
0 ---
0
1 R
Comp2_Circ2
0 ---
0
1 R
Comp3_Circ2
0 ---
0
1 R
Comp1_Circ3
0 ---
0
1 R
Comp2_Circ3
0 ---
0
1 R
Comp3_Circ3
0 ---
0
1 R
Comp1_Circ4
0 ---
0
1 R
Comp2_Circ4
0 ---
0
1 R
Comp3_Circ4
0 ---
0
1 R/W
Unit_Meas_Type_BMS
0 ---
0
1 R/W
mAl_Clock
0 ---
0
1 R/W
mAl_Extd_Memory
0 ---
0
1 R
mAl_Serious_DIN
72
72
73
73
Gfc32
74
74
Hc01
75
75
---
76
76
---
77
77
---
78
78
---
79
79
---
80
80
---
81
81
---
82
82
---
83
83
---
84
84
---
85
85
---
86
86
---
87
87
Hc04
88
88
ALG01
89
89
ALG02
90
90
ALG03
LP by transducer reset type (0:
Semiautomatic; 1: Manual)
Supervisor (BMS) On-Off. Show
the state OFFbyBMS in main
mask (0: Off; 1: On)
Compressor1 circuit1 (0: Off; 1:
On)
Compressor2 circuit1 (0: Off; 1:
On)
Compressor3 circuit1 (0: Off; 1:
On)
Compressor1 circuit2 (0: Off; 1:
On)
Compressor2 circuit2 (0: Off; 1:
On)
Compressor3 circuit2 (0: Off; 1:
On)
Compressor1 circuit3 (0: Off; 1:
On)
Compressor2 circuit3 (0: Off; 1:
On)
Compressor3 circuit3 (0: Off; 1:
On)
Compressor1 circuit4 (0: Off; 1:
On)
Compressor2 circuit4 (0: Off; 1:
On)
Compressor3 circuit4 (0: Off; 1:
On)
Change UOM by BMS (0:
Standard (°C - barg/psig); Anglosaxon (°F - psig))
Specify if clock board doesn't
work or is absent (0: No alarm;
1: Alarm)
Specify if P-Memory expansion
doesn't work or is absent (0: No
alarm; 1: Alarm)
Serious alarm by DIN (0: No
alarm; 1: Alarm)
+0300010EN Chiller Core – rel 1.0 – 13/07/2009
0 ---
0
1 R/W
En_Clock_Board
1 ---
0
1 R/W
En_HP_Prev
78
91
91
ALO04
92
92
ALA05
93
93
ALA06
94
94
ALA07
95
95
ALA08
96
96
ALA09
97
97
ALA10
98
98
ALA11
99
99
ALA12
100
100
ALA13
101
101
ALA14
102
102
ALA15
103
103
ALA16
104
104
ALA17
105
105
ALA18
106
106
ALA19
107
107
ALA20
108
108
ALA21
109
109
ALA22
110
110
ALA23
111
111
ALA24
112
112
ALA25
113
113
ALT26
114
114
ALT26
115
115
ALT26
116
116
ALT26
Specify if slave offline (0: No
alarm; 1: Alarm)
Specify if high pressure probe
circuit1 fault or not connected
(0: No alarm; 1: Alarm)
Specify if high pressure probe
circuit2 fault or not connected
(0: No alarm; 1: Alarm)
Specify if high pressure probe
circuit3 fault or not connected
(0: No alarm; 1: Alarm)
Specify if high pressure probe
circuit4 fault or not connected
(0: No alarm; 1: Alarm)
Specify if low pressure probe
circuit1 fault or not connected
(0: No alarm; 1: Alarm)
Specify if low pressure probe
circuit2 fault or not connected
(0: No alarm; 1: Alarm)
Specify if low pressure probe
circuit3 fault or not connected
(0: No alarm; 1: Alarm)
Specify if low pressure probe
circuit4 fault or not connected
(0: No alarm; 1: Alarm)
Specify if evap.inlet probe fault
or not connected (0: No alarm;
1: Alarm)
Specify if cond.inlet probe fault
or not connected (0: No alarm;
1: Alarm)
Specify if evap.outlet probe fault
or not connected (0: No alarm;
1: Alarm)
Specify if evap1.outlet probe
fault or not connected (0: No
alarm; 1: Alarm)
Specify if evap2.outlet probe
fault or not connected (0: No
alarm; 1: Alarm)
Specify if evap3.outlet probe
fault or not connected (0: No
alarm; 1: Alarm)
Specify if evap4.outlet probe
fault or not connected (0: No
alarm; 1: Alarm)
Specify if cond1.outlet probe
fault or not connected (0: No
alarm; 1: Alarm)
Specify if cond2.outlet probe
fault or not connected (0: No
alarm; 1: Alarm)
Specify if cond3.outlet probe
fault or not connected (0: No
alarm; 1: Alarm)
Specify if cond4.outlet probe
fault or not connected (0: No
alarm; 1: Alarm)
Specify if evap.water temp.probe
fault or not connected (0: No
alarm; 1: Alarm)
Specify if external temp.probe
fault or not connected (0: No
alarm; 1: Alarm)
Comp1 circ1 maitenance
warning
Comp2 circ1 maitenance
warning
Comp3 circ1 maitenance
warning
Comp1 circ2 maitenance
warning
+0300010EN Chiller Core – rel 1.0 – 13/07/2009
0 ---
0
1 R
Al_Slave_Offline
0 ---
0
1 R
Al_Prb_HP1
0 ---
0
1 R
Al_Prb_HP2
0 ---
0
1 R
Al_Prb_HP3
0 ---
0
1 R
Al_Prb_HP4
0 ---
0
1 R
Al_Prb_LP1
0 ---
0
1 R
Al_Prb_LP2
0 ---
0
1 R
Al_Prb_LP3
0 ---
0
1 R
Al_Prb_LP4
0 ---
0
1 R
Al_Prb_In_Evap
1 ---
0
1 R
Al_Prb_In_Cond
0 ---
0
1 R
Al_Prb_Out_Evap
0 ---
0
1 R
Al_Prb_Out_Evap1
0 ---
0
1 R
Al_Prb_Out_Evap2
0 ---
0
1 R
Al_Prb_Out_Evap3
0 ---
0
1 R
Al_Prb_Out_Evap4
0 ---
0
1 R
Al_Prb_Out_Cond1
0 ---
0
1 R
Al_Prb_Out_Cond2
0 ---
0
1 R
Al_Prb_Out_Cond3
0 ---
0
1 R
Al_Prb_Out_Cond4
0 ---
0
1 R
Al_Prb_Evap_Reg
0 ---
0
1 R
Al_Prb_Ext_Temp
0 ---
0
1 R
mAl_Hour_Comp1_Circ1
0 ---
0
1 R
mAl_Hour_Comp2_Circ1
0 ---
0
1 R
mAl_Hour_Comp3_Circ1
0 ---
0
1 R
mAl_Hour_Comp1_Circ2
79
117
117
ALT26
118
118
ALT26
119
119
ALT26
120
120
ALT26
121
121
ALT26
122
122
ALT26
123
123
ALT26
124
124
ALT26
125
125
ALT27
126
126
ALT27
127
127
ALT28
128
128
ALT28
129
129
ALT29
130
130
ALT29
Comp2 circ2 maitenance
warning
Comp3 circ2 maitenance
warning
Comp1 circ3 maitenance
warning
Comp2 circ3 maitenance
warning
Comp3 circ3 maitenance
warning
Comp1 circ4 maitenance
warning
Comp2 circ4 maitenance
warning
Comp3 circ4 maitenance
warning
Condenser fan group1
maitenance warning
Condenser fan group2
maitenance warning
Condenser pump1 maitenance
warning
Condenser pump2 maitenance
warning
Evaporator pump1 maitenance
warning
Evaporator pump2 maitenance
warning
131
131
ALC30
132
132
ALC30
133
133
134
134
135
136
0 ---
0
1 R
mAl_Hour_Comp2_Circ2
0 ---
0
1 R
mAl_Hour_Comp3_Circ2
0 ---
0
1 R
mAl_Hour_Comp1_Circ3
0 ---
0
1 R
mAl_Hour_Comp2_Circ3
0 ---
0
1 R
mAl_Hour_Comp3_Circ3
0 ---
0
1 R
mAl_Hour_Comp1_Circ4
0 ---
0
1 R
mAl_Hour_Comp2_Circ4
0 ---
0
1 R
mAl_Hour_Comp3_Circ4
0 ---
0
1 R
mAl_Hour_Cond_Fan1
0 ---
0
1 R
mAl_Hour_Cond_Fan2
0 ---
0
1 R
mAl_Hour_Cond_Pump1
0 ---
0
1 R
mAl_Hour_Cond_Pump2
0 ---
0
1 R
mAl_Hour_Evap_Pump1
0 ---
0
1 R
mAl_Hour_Evap_Pump2
Overload Compressor 1 circuit 1
0 ---
0
1 R
mOvrl_Comp1_Circ1
Overload Compressor 2 circuit 1
0 ---
0
1 R
mOvrl_Comp2_Circ1
ALC30
Overload Compressor 3 circuit 1
0 ---
0
1 R
mOvrl_Comp3_Circ1
ALC30
Overload Compressor 1 circuit 2
0 ---
0
1 R
mOvrl_Comp1_Circ2
135
ALC30
Overload Compressor 2 circuit 2
0 ---
0
1 R
mOvrl_Comp2_Circ2
136
ALC30
Overload Compressor 3 circuit 2
0 ---
0
1 R
mOvrl_Comp3_Circ2
137
137
ALC30
Overload Compressor 1 circuit 3
0 ---
0
1 R
mOvrl_Comp1_Circ3
138
138
ALC30
Overload Compressor 2 circuit 3
0 ---
0
1 R
mOvrl_Comp2_Circ3
139
139
ALC30
Overload Compressor 3 circuit 3
0 ---
0
1 R
mOvrl_Comp3_Circ3
140
140
ALC30
Overload Compressor 1 circuit 4
0 ---
0
1 R
mOvrl_Comp1_Circ4
141
141
ALC30
Overload Compressor 2 circuit 4
0 ---
0
1 R
mOvrl_Comp2_Circ4
142
142
ALC30
0 ---
0
1 R
mOvrl_Comp3_Circ4
143
143
ALW31
0 ---
0
1 R
ForceOff_Circ1_Freeze
144
144
ALW31
0 ---
0
1 R
ForceOff_Circ2_Freeze
145
145
ALW31
0 ---
0
1 R
ForceOff_Circ3_Freeze
146
146
ALW31
0 ---
0
1 R
ForceOff_Circ4_Freeze
147
147
ALW32
0 ---
0
1 R
mDefrost_Warning_C1
148
148
ALW32
0 ---
0
1 R
mDefrost_Warning_C2
149
149
ALW32
0 ---
0
1 R
mDefrost_Warning_C3
150
150
ALW32
0 ---
0
1 R
mDefrost_Warning_C4
151
151
ALW33
0 ---
0
1 R
mPD_Warning_Circ1
152
152
ALW33
0 ---
0
1 R
mPD_Warning_Circ2
153
153
ALW33
0 ---
0
1 R
mPD_Warning_Circ3
154
154
ALW33
0 ---
0
1 R
mPD_Warning_Circ4
155
155
ALB34
0 ---
0
1 R
Gen_LP_Pressostat_Circ1
156
156
ALB34
Overload Compressor 3 circuit 4
Force off comp.circ.1 warning by
antifreeze
Force off comp.circ.2 warning by
antifreeze
Force off comp.circ.3 warning by
antifreeze
Force off comp.circ.4 warning by
antifreeze
Circuit 1 Warning Stop defrost by
max time
Circuit 2 Warning Stop defrost by
max time
Circuit 3 Warning Stop defrost by
max time
Circuit 4 Warning Stop defrost by
max time
Circuit 1 Warning Stop PD by
max time
Circuit 2 Warning Stop PD by
max time
Circuit 3 Warning Stop PD by
max time
Circuit 4 Warning Stop PD by
max time
Circuit 1 Low pressure alarm by
pressostat
Circuit 2 Low pressure alarm by
pressostat
0 ---
0
1 R
Gen_LP_Pressostat_Circ2
+0300010EN Chiller Core – rel 1.0 – 13/07/2009
80
157
157
ALB34
158
158
ALB34
159
159
ALB35
160
160
ALB35
161
161
ALB35
162
162
ALB35
163
163
ALB36
164
164
ALB36
165
165
ALB36
166
166
ALB36
167
167
ALB37
168
168
ALB37
169
169
ALB37
170
170
ALB37
Circuit 3 Low pressure alarm by
pressostat
Circuit 4 Low pressure alarm by
pressostat
Circuit 1 Low pressure alarm by
transducer
Circuit 2 Low pressure alarm by
transducer
Circuit 3 Low pressure alarm by
transducer
Circuit 4 Low pressure alarm by
transducer
Circuit 1 High pressure alarm by
prossostat
Circuit 2 High pressure alarm by
prossostat
Circuit 3 High pressure alarm by
prossostat
Circuit 4 High pressure alarm by
prossostat
Circuit 1 High pressure alarm by
transducer
Circuit 2 High pressure alarm by
transducer
Circuit 3 High pressure alarm by
transducer
Circuit 4 High pressure alarm by
transducer
171
171
ALB48
172
172
ALB48
173
173
174
174
175
176
0 ---
0
1 R
Gen_LP_Pressostat_Circ3
0 ---
0
1 R
Gen_LP_Pressostat_Circ4
0 ---
0
1 R
Gen_LP_Transducer_Circ1
0 ---
0
1 R
Gen_LP_Transducer_Circ2
0 ---
0
1 R
Gen_LP_Transducer_Circ3
0 ---
0
1 R
Gen_LP_Transducer_Circ4
0 ---
0
1 R
mAl_HP_Pressostat_Circ1
0 ---
0
1 R
mAl_HP_Pressostat_Circ2
0 ---
0
1 R
mAl_HP_Pressostat_Circ3
0 ---
0
1 R
mAl_HP_Pressostat_Circ4
0 ---
0
1 R
mAl_HP_Transducer_Circ1
0 ---
0
1 R
mAl_HP_Transducer_Circ2
0 ---
0
1 R
mAl_HP_Transducer_Circ3
0 ---
0
1 R
mAl_HP_Transducer_Circ4
Antifreeze alarm Circuit 1
0 ---
0
1 R
mAl_Freeze_Circ1
Antifreeze alarm Circuit 2
0 ---
0
1 R
mAl_Freeze_Circ2
ALB48
Antifreeze alarm Circuit 3
0 ---
0
1 R
mAl_Freeze_Circ3
ALB48
Antifreeze alarm Circuit 4
0 ---
0
1 R
mAl_Freeze_Circ4
175
ALB49
Circuit 1-2 Antifreeze alarm
0 ---
0
1 R
mAl_Freeze_Circ1_2
176
ALB49
Circuit 3-4 Antifreeze alarm
0 ---
0
1 R
mAl_Freeze_Circ3_4
177
177
ALU50
0 ---
0
1 R
mAl_Freeze_Unit
178
178
ALB51
0 ---
0
1 R
HP_Prevent_Circ1
179
179
ALB51
0 ---
0
1 R
LP_Prevent_Circ1
180
180
ALB51
0 ---
0
1 R
Antifreeze_Prevent_Circ1
181
181
ALB52
0 ---
0
1 R
HP_Prevent_Circ2
182
182
ALB52
0 ---
0
1 R
LP_Prevent_Circ2
183
183
ALB52
0 ---
0
1 R
Antifreeze_Prevent_Circ2
184
184
ALB53
0 ---
0
1 R
HP_Prevent_Circ3
185
185
ALB53
0 ---
0
1 R
LP_Prevent_Circ3
186
186
ALB53
0 ---
0
1 R
Antifreeze_Prevent_Circ3
187
187
ALB54
0 ---
0
1 R
HP_Prevent_Circ4
188
188
ALB54
0 ---
0
1 R
LP_Prevent_Circ4
189
189
ALB54
0 ---
0
1 R
Antifreeze_Prevent_Circ4
190
190
ALB55
0 ---
0
1 R
Antifreeze_Prev_Circ1_2
191
191
ALB55
Unit Antifreeze alarm
Circuit 1 Warning High pressure
prevent
Circuit 1 Warning Low pressure
prevent
Circuit 1 Warning Antifreeze
prevent
Circuit 2 Warning High pressure
prevent
Circuit 2 Warning Low pressure
prevent
Circuit 2 Warning Antifreeze
prevent
Circuit 3 Warning High pressure
prevent
Circuit 3 Warning Low pressure
prevent
Circuit 3 Warning Antifreeze
prevent
Circuit 4 Warning High pressure
prevent
Circuit 4 Warning Low pressure
prevent
Circuit 4 Warning Antifreeze
prevent
Circuit 1-2 Warning Antifreeze
prevent
Circuit 3-4 Warning Antifreeze
prevent
0 ---
0
1 R
Antifreeze_Prev_Circ3_4
192
192
ALU56
Unit antifreeze prevent warning
0 ---
0
1 R
Warning_Prev_Unit
193
193
ALP38
Evaporator Pump 1 flow warning
0 ---
0
1 R
Warning_EPump1
194
194
ALP39
Evaporator Pump 2 flow warning
0 ---
0
1 R
Warning_EPump2
195
195
ALP44
Condenser pump 1 flow warning
0 ---
0
1 R
Warning_CPump1
196
196
ALP45
Condenser pump 2 flow warning
0 ---
0
1 R
Warning_CPump2
+0300010EN Chiller Core – rel 1.0 – 13/07/2009
81
197
197
ALP40
Evaporator pump 1 flow alarm
0 ---
0
1 R
mAl_Flow_Pump_1
198
198
ALP41
Evaporator pump 2 flow alarm
0 ---
0
1 R
mAl_Flow_Pump_2
199
199
ALP42
Evaporator pump 1 overload
0 ---
0
1 R/W
200
200
ALP43
Evaporator pump 2 overload
0 ---
0
1 R/W
201
201
ALP46
Condenser pump 1 flow alarm
0 ---
0
1 R
mAl_Flow_Pump_1
202
202
ALP47
Condenser pump 2 flow alarm
0 ---
0
1 R
mAl_Flow_Pump_2
+0300010EN Chiller Core – rel 1.0 – 13/07/2009
82
mAl_Overload_1
mAl_Overload_2
9. ALARMS
9.1 Evaporator antifreeze
Threshold
Heater
9.1.1 Antifreeze alarm
Evaporator antifreeze control is always active, even when the unit is Off, in both
cooling and heating mode.
Antifreeze is a serious alarm therefore, depending on the ratio between
refrigerant circuits / number of evaporators, when activated either the entire
unit, the pair of circuits or the single circuit are shut down and the water
circulating pump is activated.
The summary table is shown below:
Circuits
No. of
evap.
Antifreeze probe used
Diff. Heater
A
Diff. alarm
1
Control water outlet temp.
Unit off
2
2
1
2
Control water outlet temp.
Evap. 1 water outlet temp.
Evap. 2 water outlet temp.
Unit off
Circuit 1 off
Circuit 2 off
3
3
1
3
Control water outlet temp.
Evap. 1 water outlet temp.
Evap. 2 water outlet temp.
Evap. 3 water outlet temp.
Unit off
Circuit 1 off
Circuit 2 off
Circuit 3 off
4
4
1
2
4
4
Control water outlet temp.
Evap. 1 water outlet temp.
Evap. 3 water outlet temp.
Evap. 1 water outlet temp.
Evap. 2 water outlet temp.
Evap. 3 water outlet temp.
Evap. 4 water outlet temp.
Unit off
Circuit 1 and 2 off
Circuit 3 and 4 off
Circuit 1 off
Circuit 2 off
Circuit 3 off
Circuit 4 off
Outlet water
temp.
Diff.
prevention
Threshold
alarm
Default (°C)
3.0
Threshold
prevent
2.0
4.5
5.0
5.5
6.0
7.0
Fig.9.1.a
A) Manufacturer parameters (Hc08)
Actions:
- Antifreeze alarm (ALB48 – ALB49 – ALU50)
- Unit off
- Pump forced on
B) Manufacturer parameters (Hc10)
Actions:
- Compressor shutdown alarm
- Compressors involved forced off (ALW31)
C) Manufacturer parameters (Hc09)
Actions:
- Heater activation
D) Temperature control parameters (Gfc39)
Actions:
- Active prevention warning (ALB51 - ALB52 - ALB53 - ALB54 - ALB55 –
ALU56)
- Progressive compressor shutdown
9.1.2 Antifreeze prevention
Antifreeze prevention is managed by the Mod_Circuit_Prevent module.
The prevention function needs to be enabled from the manufacturer menu on
screen Hc07. If enabled is the prevention set point and differential can be set in
the Temperature control menu on screen Gfc39, as well as the maximum
number of activations per hour and the prevention activation delay on screen
Gfc40.
When a prevention request is activated, the Mod_Circuit_Prevent module calls
(see chapter Circuit and compressor management - Lst_Prevent_Circuit and
chapter Alarm prevention) Mod_Device_Rotation to stop a compressor in the
circuit in question. If the prevention condition persists, after a settable time
(Gfc34) another deactivation request is sent. Mod_Device_Rotation decides
which compressor must be stopped based on the type of rotation selected. All
the compressors will be stopped except for 1.
If the prevention condition occurs more than a certain number of times in a set
time (Gfc34), the prevention request is no longer sent, and the unit continues
operating until all the compressors are deactivated (see the diagram)
9.2 Condenser antifreeze
The condenser antifreeze is only active on water/water chiller-heat pump units
with reversible refrigerant circuit, during operation in heating mode. On all other
types unit, antifreeze is only active on the evaporator.
Antifreeze is a serious alarm therefore, depending on the ratio between
refrigerant circuits / number of evaporators, and whether condenser control is
individual or separate, when activated either the entire unit, the pair of circuits or
the single circuit are shut down and the condenser water circulating pump is
activated.
The summary table is shown below:
Circuits
Note: For details on the format of the list, see the description of
Lst_Prevent_Circuit in chapter 6.5
For details, see the on-line documents on the Circuit_Prevent module.
9.1.3 Antifreeze heater
Chiller Core features a digital output for activating an antifreeze heater. The
activation set point and differential can be set in the manufacturer menu on
screen Hc09.
9.1.4 Interaction between antifreeze prevention alarm and heater
Below is the diagram highlighting the interactions between the actions that
Chiller Core performs to prevent the unit from shutting down due to an
antifreeze condition.
+0300010EN Chiller Core – rel 1.0 – 13/07/2009
D
Offset Force off
comp.
Action of the alarm
1
C
B
Diff. Force off
comp.
83
No. of
evap.
Type of
cond.
Antifreeze probe used
Action of the alarm
pCO3 Large
B10
pCO3 average
B5
Unit off
Individual
Separate
B10
B10
B4
B5
N.O.
N.O.
Unit off
Circuit 1 off
Circuit 2 off
1
3
Individual
Separate
B10
B10
B4
B10 slave
B5
N.O.
N.O.
N.O.
Unit off
Circuit 1 off
Circuit 2 off
Circuit 3 off
4
4
1
2
Individual
Separate
4
4
Separate
B10
B10
B10 slave
B10
B4
B10 slave
B4 slave
B5
N.O.
N.O.
N.O.
N.O.
N.O.
N.O.
Unit off
Circuit 1 and 2 off
Circuit 3 and 4 off
Circuit 1 off
Circuit 2 off
Circuit 3 off
Circuit 4 off
1
1
Individual
2
2
1
2
3
3
9.3
High pressure: alarm and
prention
Force cond.
fan to 100%
The high pressure alarm is managed by the Alarm_HighPressure_Adv
macroblock. The Compressor_Alarm pages features 2 of these macroblocks,
one for circuit 1-3, the other for circuit 2-4, depending on whether the software
recognises the board with address 1 (master) or address 2 (slave).
The alarm can be generated as follows:
1- By pressure switch, consequently by the status of the digital input
connected to the high pressure switch.
This refers to alarm ALB36, which is cumulative for all the circuits:
0.5bar
HP prevention:
some comp. forced
off
HP alarm by
trasducer
HP alarm by
pressostat
3.0bar
Diff.
Thres HP
Prevent
Default (barg)
16.5 17.0
18.0
20.0
21.0
Thres HP
by trasdu.
High
press.
23.0
Fig. 9.3c
For details, see the on-line documents on the Alarm_HighPressure_Adv
macroblock
9.4
Low pressure: alarm and
prevention
The low pressure alarm is managed by the Alarm_LowPressure_Adv
macroblock. The Compressor_Alarm pages features 2 of these macroblocks,
one for circuit 1-3, the other for circuit 2-4, depending on whether the software
recognises the board with address 1 (master) or address 2 (slave).
The alarm can be generated as follows:
1- By pressure switch, consequently by the status of the digital input
connected to the low pressure switch.
This refers to alarm ALB34, which is cumulative for all the circuits:
Fig. 9.3.a
In the figure it is assumed that the unit has 4 circuits and that circuit 1 has a
high pressure alarm from pressure switch.
2- Based on the pressure value, and consequently the value of an analogue
input, referring to a threshold and a differential (Gfc35).
This refers to alarm ALB37, which is cumulative for all the circuits:
Fig. 9.4.a
Fig. 9.3.b
In the figure it is assumed that the unit has 3 circuits and that circuit 1 has a
low pressure alarm from pressure switch
In the figure it is assumed that the unit has 3 circuits and that circuits 1 and 2
have a high pressure alarm from pressure probe.
2- By transducer, consequently based on the value of an analogue input,
referring to a threshold and a differential (Gfc30).
This refers to alarm ALB35, which is cumulative for all the circuits:
In Chiller Core, the alarm always has manual reset, however the macroblock
allows automatic reset to be defined independently for the alarm from pressure
switch and the alarm from transducer (see How to add a new alarm).
Chiller Core can perform a number of actions to prevent the high pressure
alarm:
1) Force condenser fans on at 100%. There is a fixed offset of 3.0barg in
relation to the high pressure prevention threshold. If the high pressure
prevention function is disabled, then the offset refers to the high pressure
alarm threshold (Gfc33 default 23.0barg).
For further details see the chapter on Condenser fans;
2) High pressure is prevented by the Mod_Circuit_Prevent module.
The prevention function needs to be enabled from the manufacturer menu
on screen Hc07. If enabled, both the prevention set point and differential
can be set in the temperature control menu on screen Gfc35 and the
maximum number of activations per hour and the prevention activation
delay can be set on screen Gfc36.
When a prevention request is activated, the Mod_Circuit_Prevent module
calls (see the chapter on Circuit and compressor management
Lst_Prevent_Circuit and the chapter on Alarm prevention)
Mod_Device_Rotation to stop a compressor in the circuit in question. If the
prevention condition persists, after a settable time (Gfc34) another
deactivation request is sent. Mod_Device_Rotation decides which
compressor must be stopped based on the type of rotation selected. All the
compressors will be stopped except for 1.
If the prevention condition occurs more than a certain number of times in
a set time (Gfc34), the prevention request is no longer sent, and the unit
continues operating until the high pressure alarm from probe is activated
(see diagram).
Fig. 9.4.b
In the figure it is assumed that the unit has 3 circuits and that circuit 2 has a
low pressure alarm from pressure probe.
The low pressure alarm can only occur if:
- At least 1 compressor is on in the circuit. The alarm can be manually reset
when all the compressors in the circuit are off.
- There is no pump-down procedure in progress
- After the delay (Gfc34) from the start of each compressor in the circuit.
Consequently, when a compressor starts in the circuit, the alarm is ignored
for this time. This is to prevent natural pressure drops in the refrigerant
circuit when the compressor starts from causing false low pressure alarms.
For both the low pressure alarm from pressure switch and from transducer, the
type of reset can be set in the temperature control menu (Gfc35):
semiautomatic or manual.
Semiautomatic: The number of alarm activations per hour are counted. If
activated more than 3 times in a hour, the alarm changes to manual reset. The
number of activations is set in the strategy (see the red squares in the following
figure), and consequently is not modifiable from the user interface.
Below is a diagram that shows the sequence of operations and the
corresponding defaults
+0300010EN Chiller Core – rel 1.0 – 13/07/2009
84
9.5.1 Behaviour of the alarm button and LED
The ALARM button can be pressed in two different contexts: no alarm active, or
at least one alarm active.
1- If no alarm is active, the following screen is displayed:
Fig. 9.5.a
This is the last screen in the loop and provides easy access to the alarm log by
pressing ENTER.
2- If at least one alarm is active, the alarm screen is displayed, the first screen in
order in the loop. At the bottom right there are two flashing arrows that indicate
the need to press UP or DOWN in order to scroll to any other alarms: Example
Fig. 9.4.c
The alarm is automatically reset 3 seconds - defined in the algorithm inside the
macroblock - after the compressors in the circuit have stopped.
Each alarm, even those with automatic reset, are recorded in the alarm log.
Only if the alarm changes to manual reset will the digital input corresponding to
the serious alarm relay be activated.
Manual: Once activated, the alarm can only be reset manually on the display.
9.4.1 Low pressure prevention
Low pressure is prevented by the Mod_Circuit_Prevent module.
The prevention function needs to be enabled from the manufacturer menu on
screen Hc07. If enabled, both the prevention set point and differential can be set
in the temperature control menu on screen Gfc37 and the maximum number of
activations per hour and the prevention activation delay can be set on screen
Gfc38.
When a prevention request is activated, the Mod_Circuit_Prevent module calls
(see the chapter on Circuit and compressor management Lst_Prevent_Circuit
and the chapter on Alarm prevention) Mod_Device_Rotation to stop a
compressor in the circuit in question. If the prevention condition persists, after a
settable time (Gfc34) another deactivation request is sent.
Mod_Device_Rotation decides which compressor must be stopped based on
the type of rotation selected. All the compressors will be stopped except for 1.
If the prevention condition occurs more than a certain number of times in a set
time (Gfc34), the prevention request is no longer sent, and the unit continues
operating until the low pressure alarm from probe is activated (see diagram).
Fig. 9.5.b
Scrolling the loop of alarms with the DOWN button ends at the last screen in
the loop, which has the following layout:
Fig. 9.5.c
The screen is the same as in case 1, except the message “No active alarms” is
not shown, and an up arrow indicates that this is the end of the loop of alarms.
In this case too, the alarm log can be accessed by pressing ENTER.
Below is a diagram that shows the sequence of operations and the
corresponding defaults
LP alarm by
trasducer
LP prevention:
some comp. forced
off
Diff.
Diff.
LP alarm by
pressostat
Thres LP
by trasdu.
Default (barg)
Thres LP
Prevent
1.5
2.0
As regards the red LED under the ALARM button, this may be:
- Off: no active alarms;
- Flashing: there is at least one active alarm and the display is showing a
screen that is not in the alarm loop;
- On: there is at least one active alarm and the display is showing a screen in
the alarm loop.
Low
press.
9.5.2 How to add a new alarm
Manual reset
To add a new alarm with manual reset, add an alarm screen to the ALARM loop,
associating the corresponding alarm memory and alarm status variables.
4.0
Fig. 9.4.d
For details, see the on-line documents on the Alarm_LowPressure_Adv
macroblock
Automatic reset
To add an alarm with automatic reset, enter a normal screen in the ALARM loop
and enter the alarm variable in the “EnableOn” screen property.
9.5 Manual/automatic alarm reset
For all types of alarms, automatic or manual reset, the “ReferToMask” screen
property must be added to the “m_Ref_Alarms” screen.
Alarm reset can be manual, automatic or semiautomatic:
- Manual reset: once the causes of the alarm have been resolved, first the
buzzer needs to be muted by pressing ALARM and then the actual alarm
cancelled by pressing ALARM again.
- Automatic reset: when the alarm condition ends the buzzer is automatically
muted and the alarm is reset.
- Semiautomatic: the number of activations in one hour is counted: if the
number of activations in one hour is less than the maximum number set,
reset is automatic, while over the limit reset is manual.
For management of the buzzer and the LED, activation and deactivation are
controlled manually by the MANUAL_BUZZER_ON and MANUAL_BUZZER_OFF
system variables.
The strategy features a special function dedicated to the Alarms_Mng page:
- For alarms with manual reset nothing is required, as the Global_Alarm
system variable is sufficient
- For alarms with automatic reset, simply add the new alarm variable with an
OR relationship with all the other alarms.
+0300010EN Chiller Core – rel 1.0 – 13/07/2009
85
1)
9.6 Alarm log
From the main menu, a special branch (E.
the alarm log screen.
Data logger) provides access to
In the current management, add the part of the atoms highlighted by the
red rectangle in the figure below and connect it to the rest of the algorithm,
in the same way as for the previous alarms.
Fig. 9.6.a
Fig. 9.6.d
The information shown on the screen relates to:
1. Index of the screen;
2. Chronological number of the event (indicates how “old” it is: NO001 is
the oldest alarm) + the time and date of the alarm;
3. Code of the alarm (see chap. 9.7 Table of alarms);
4. Short description of the alarm logged;
5. Inlet and output temperature values.
3)
4)
5)
6)
Note: A maximum of 50 alarms can be logged, above this limit, new
events overwrite the older ones, which are consequently deleted.
9.6.1 How to increase the maximum number of alarms logged and the
type of memory
Accessing the strategy page corresponding to task-A, as shown in the figure
below:
Follow the order of execution of the blocks indicated by the numbers in the
figure shown in point 2) EXACTLY.
Replace the alarm variable with the new alarm
Increase the number related to the Move_IX atom by 1: using the example
in the figure shown in point 2), this increases from 115 to 116.
On the log screen, add the description of the new alarm.
To do this, 3 special fields need to be edited:
1- sf_Alarm_History_Data_1: Alarm code
2- sf_Alarm_History_Data_2: Description, first row
3- sf_Alarm_History_Data_3: Description, second row
For each of these, the text needs to be entered for the value of the number
relating to the Move_IX atom (see point 5), therefore following the same
example, for the value 116.
The following figure shows an example of how to update the special field
sf_Alarm_History_Data_1.
Fig. 9.6.b
both the memory (default type T memory) and the maximum number of alarms
logged (default 100 events) can be defined. The following figure highlights
these two parameters.
Fig. 9.6.e
Fig. 9.6.c
Note: The log must be assigned to permanent memory, such as:
- T: Main permanent memory (non-volatile memory)
- P: Extended permanent memory (non-volatile memory)
- E: Non-volatile RAM embedded on the clock card, 52 bytes
On the pCO3 these are all always available, while on the pCOxs P and E
memory are only available if the optional clock + memory card is installed, code
PCO100CEF0.
When using memory, always check the limits of space and the allowable
number of writes.
E.g.: Chiller Core can support a maximum limit of 510alarms in T memory. This
limit decreases when new variables are added to T memory, or increases if
variables are deleted.
This means that if the amount of space in T memory needs to be increased, the
number of events to be stored in the log can be reduced.
9.6.2 How to add an alarm to the log
To add an alarm to the log, proceed as follows:
+0300010EN Chiller Core – rel 1.0 – 13/07/2009
86
9.7 Table of alarms
Code
Description on display
Reset
Delay
Alarm relay
Action
ALG01
Clock card broken or disconnected
Manual
NO
NO
NO
ALG02
Memory expansion damaged
Manual
NO
NO
NO
ALR03
Serious alarm from digital input
Manual
NO
YES
Unit OFF
Auto
Start 30s
Steady 20s
YES
Circ. 3-4 OFF
Auto
10s fixed
YES
Auto
10s fixed
YES
Auto
10s fixed
YES
Auto
10s fixed
YES
Auto
10s fixed
YES
Auto
10s fixed
YES
Auto
10s fixed
YES
Auto
10s fixed
YES
Auto
10s fixed
YES
Unit OFF
Auto
10s fixed
YES
Unit OFF (valid for WW in heat pump with
reversible water circuit)
Auto
10s fixed
YES
Unit OFF
ALO04
ALA05
ALA06
ALA07
ALA08
ALA09
ALA10
ALA11
ALA12
ALA13
ALA14
ALA15
Slave offline
High pressure probe circuit 1
broken or disconnected
High pressure probe circuit 2
broken or disconnected
High pressure probe circuit 3
broken or disconnected
High pressure probe circuit 4
broken or disconnected
Low pressure probe 1 broken or
disconnected
Low pressure probe 2 broken or
disconnected
Low pressure probe 3 broken or
disconnected
Low pressure probe 4 broken or
disconnected
Evap. water inlet temperature
probe broken or disconnected
Cond. water inlet temperature
probe broken or disconnected
Evap. water outlet temperature
probe broken or disconnected
Circ. 1
comp OFF
Circ. 2
comp OFF
Circ. 3
comp OFF
Circ. 4
comp OFF
Circ. 1
comp OFF
Circ. 2
comp OFF
Circ. 3
comp OFF
Circ. 4
comp OFF
Circ. 1/
Circ. 1-2
OFF
Circ. 2/
Circ. 3-4
OFF
Circ. 3
comp OFF
Circ. 4
comp OFF
Unit/Circ. 1/
Circ. 1-2
OFF
ALA16
Evap. 1 water outlet temperature
probe broken or disconnected
Auto
10s fixed
YES
ALA17
Evap. 2 water outlet temperature
probe broken or disconnected
Auto
10s fixed
YES
Auto
10s fixed
YES
Auto
10s fixed
YES
Auto
10s fixed
YES
Auto
10s fixed
YES
Circ. 2
Auto
10s fixed
YES
Circ. 3-4/Circ. 3 OFF
Auto
10s fixed
YES
Circ. 4 OFF
Auto
10s fixed
YES
Unit OFF
Auto
10s fixed
YES
NO
Manual
NO
NO
NO
Manual
NO
NO
NO
Manual
NO
NO
NO
Manual
NO
NO
NO
Manual
NO
NO
NO
Manual
NO
NO
NO
Manual
NO
NO
NO
Manual
NO
NO
NO
ALA18
ALA19
ALA20
ALA21
ALA22
ALA23
ALA24
ALA25
ALT26
ALT26
ALT26
ALT26
ALT26
ALT26
ALT26
ALT26
Evap. 3 water outlet temperature
probe broken or disconnected
Evap. 4 water outlet temperature
probe broken or disconnected
Cond. 1 water outlet temperature
probe broken or disconnected
Cond. 2 water outlet temperature
probe broken or disconnected
Cond. 3 water outlet temperature
probe broken or disconnected
Cond. 4 water outlet temperature
probe broken or disconnected
Evaporator water temperature
probe broken or disconnected
Outside temperature probe
broken or disconnected
Maintenance request, compressor
1 circuit 1
Maintenance request, compressor
2 circuit 1
Maintenance request, compressor
3 circuit 1
Maintenance request, compressor
1 circuit 2
Maintenance request, compressor
2 circuit 2
Maintenance request, compressor
3 circuit 2
Maintenance request, compressor
1 circuit 3
Maintenance request, compressor
2 circuit 3
+0300010EN Chiller Core – rel 1.0 – 13/07/2009
87
Code
ALT26
ALT26
ALT26
ALT26
ALT27
ALT27
ALT28
ALT28
ALT29
ALT29
Description on display
Maintenance request, compressor
3 circuit 3
Maintenance request, compressor
1 circuit 4
Maintenance request, compressor
2 circuit 4
Maintenance request, compressor
3 circuit 4
Maintenance request, condenser
fan group 1
Maintenance request, condenser
fan group 2
Maintenance request, condenser
pump 1
Maintenance request, condenser
pump 2
Maintenance request, evaporator
pump 1
Maintenance request, evaporator
pump 2
Reset
Delay
Alarm relay
Action
Manual
NO
NO
NO
Manual
NO
NO
NO
Manual
NO
NO
NO
Manual
NO
NO
NO
Manual
NO
NO
NO
Manual
NO
NO
NO
Manual
NO
NO
NO
Manual
NO
NO
NO
Manual
NO
NO
NO
Manual
NO
NO
NO
ALC30
Overload, compressor 1 circuit 1
Manual
NO
YES
Circ. 1 comp. 1 OFF
ALC30
Overload, compressor 2 circuit 1
Manual
NO
YES
Circ. 1 comp. 2 OFF
ALC30
Overload, compressor 3 circuit 1
Manual
NO
YES
Circ. 1 comp. 3 OFF
ALC30
Overload, compressor 1 circuit 2
Manual
NO
YES
Circ. 2 comp. 1 OFF
ALC30
Overload, compressor 2 circuit 2
Manual
NO
YES
Circ. 2 comp. 2 OFF
ALC30
Overload, compressor 3 circuit 2
Manual
NO
YES
Circ. 2 comp. 3 OFF
ALC30
Overload, compressor 1 circuit 3
Manual
NO
YES
Circ. 3 comp. 1 OFF
ALC30
Overload, compressor 2 circuit 3
Manual
NO
YES
Circ. 3 comp. 2 OFF
ALC30
Overload, compressor 3 circuit 3
Manual
NO
YES
Circ. 3 comp. 3 OFF
ALC30
Overload, compressor 1 circuit 4
Manual
NO
YES
Circ. 4 comp. 1 OFF
ALC30
Overload, compressor 2 circuit 4
Manual
NO
YES
Circ. 4 comp. 2 OFF
Overload, compressor 3 circuit 4
Manual
NO
YES
Circ. 4 comp. 3 OFF
Auto
NO
NO
Auto
NO
NO
Auto
NO
NO
Auto
NO
NO
Manual
NO
NO
NO
Manual
NO
NO
NO
Manual
NO
NO
NO
Manual
NO
NO
NO
Manual
NO
NO
NO
Manual
NO
NO
NO
Manual
NO
NO
NO
Manual
NO
NO
NO
If manual reset
Circ. 1
comp OFF
If manual reset
Circ. 2
comp OFF
ALC30
ALW31
ALW31
ALW31
ALW31
ALW32
ALW32
ALW32
ALW32
ALW33
ALW33
ALW33
ALW33
Compressors in circuit 1 forced off
for antifreeze
Compressors in circuit 2 forced off
for antifreeze
Compressors in circuit 3 forced off
for antifreeze
Compressors in circuit 4 forced off
for antifreeze
Circuit 1 End defrost by maximum
time
Circuit 2 End defrost by maximum
time
Circuit 3 End defrost by maximum
time
Circuit 4 End defrost by maximum
time
Circuit 1 End pump-down by
maximum time
Circuit 2 End pump-down by
maximum time
Circuit 3 End pump-down by
maximum time
Circuit 4 End pump-down by
maximum time
ALB34
Low pressure from pressure
switch circuit 1
Semiauto / Manual
ALB34
Low pressure from pressure
switch circuit 2
Semiauto / Manual
+0300010EN Chiller Core – rel 1.0 – 13/07/2009
Start
40s configurable
Steady
0s configurable
Start
40s configurable
Steady
0s configurable
88
Circ. 1
Comp OFF
Circ. 2
Comp OFF
Circ. 3
Comp OFF
Circ. 4
Comp OFF
Code
Description on display
Reset
ALB34
Low pressure from pressure
switch circuit 3
Semiauto / Manual
ALB34
Low pressure from pressure
switch circuit 4
Semiauto / Manual
ALB35
Low pressure from probe circuit 1
Semiauto / Manual
ALB35
Low pressure from probe circuit 2
Semiauto / Manual
ALB35
Low pressure from probe circuit 3
Semiauto / Manual
ALB35
Low pressure from probe circuit 4
Semiauto / Manual
ALB36
ALB36
ALB36
ALB36
High pressure from pressure
switch circuit 1
High pressure from pressure
switch circuit 2
High pressure from pressure
switch circuit 3
High pressure from pressure
switch circuit 4
Delay
Start
40s configurable
Steady
0s configurable
Start
40s configurable
Steady
0s configurable
Start
40s configurable
Steady
0s configurable
Start
40s configurable
Steady
0s configurable
Start
40s configurable
Steady
0s configurable
Start
40s configurable
Steady
0s configurable
Alarm relay
Action
If manual reset
Circ. 3
comp OFF
If manual reset
Circ. 4
comp OFF
If manual reset
Circ. 1
comp OFF
If manual reset
Circ. 2
comp OFF
If manual reset
Circ. 3
comp OFF
If manual reset
Circ. 4
comp OFF
Manual
NO
YES
Manual
NO
YES
Manual
NO
YES
Manual
NO
YES
Circ. 1
comp OFF
Circ. 2
comp OFF
Circ. 3
comp OFF
Circ. 4
comp OFF
Circ. 1
comp OFF
Circ. 2
comp OFF
Circ. 3
comp OFF
Circ. 4
comp OFF
ALB37
High pressure from probe circuit 1
Manual
NO
YES
ALB37
High pressure from probe circuit 2
Manual
NO
YES
ALB37
High pressure from probe circuit 3
Manual
NO
YES
ALB37
High pressure from probe circuit 4
Manual
NO
YES
Auto
20s configurable
NO
NO
Auto
20s configurable
NO
NO
ALP38
ALP39
No flow warning evaporator pump
1
No flow warning pump 2
evaporator
ALC40
No flow evaporator pump 1
Manual
NO
YES
Unit OFF/NO
ALC41
No flow pump 2 evaporator
Manual
NO
YES
Unit OFF/NO
ALC42
Evaporator pump 1 overload
Manual
NO
YES
Unit OFF/NO
Evaporator pump 2 overload
Manual
NO
YES
Unit OFF/NO
Auto
20s configurable
NO
NO
Auto
20s configurable
NO
NO
ALC43
ALC44
ALC45
No flow warning condenser pump
1
No flow warning condenser pump
2
ALC46
No flow condenser pump 1
Manual
NO
YES
Unit OFF/NO
ALC47
No flow condenser pump 2
Manual
NO
YES
Unit OFF/NO
ALC48
Antifreeze alarm circuit 1
Manual
NO
YES
ALC48
Antifreeze alarm circuit 2
Manual
NO
YES
ALC48
Antifreeze alarm circuit 3
Manual
NO
YES
ALC48
Antifreeze alarm circuit 4
Manual
NO
YES
ALC49
Antifreeze alarm circuits 1-2
Manual
NO
YES
ALC49
Antifreeze alarm circuits 3-4
Manual
NO
YES
ALC50
Unit antifreeze alarm
Manual
NO
YES
+0300010EN Chiller Core – rel 1.0 – 13/07/2009
89
Circ. 1
comp OFF
Circ. 2
comp OFF
Circ. 3
comp OFF
Circ. 4
comp OFF
Circ. 1-2
comp OFF
Circ. 3-4
comp OFF
Unit OFF
Code
ALC51
ALC51
ALC51
ALC52
ALC52
ALC52
ALC53
ALC53
ALC53
ALC54
ALC54
ALC54
ALC55
ALC55
ALC56
Description on display
High pressure prevention warning
circuit 1
Low pressure prevention warning
circuit 1
Antifreeze prevention warning
circuit 1
High pressure prevention warning
circuit 2
Low pressure prevention warning
circuit 2
Antifreeze prevention warning
circuit 2
High pressure prevention warning
circuit 3
Low pressure prevention warning
circuit 3
Antifreeze prevention warning
circuit 3
High pressure prevention warning
circuit 4
Low pressure prevention warning
circuit 4
Antifreeze prevention warning
circuit 4
Antifreeze prevention warning
circuits 1-2
Antifreeze prevention warning
circuits 3-4
Unit antifreeze prevention warning
Reset
Delay
Alarm relay
Auto
5s configurable
NO
Auto
5s configurable
NO
Auto
5s configurable
NO
Auto
5s configurable
NO
Auto
5s configurable
NO
Auto
5s configurable
NO
Auto
5s configurable
NO
Auto
5s configurable
NO
Auto
5s configurable
NO
Auto
5s configurable
NO
Auto
5s configurable
NO
Auto
5s configurable
NO
Decrease capacity circ. 4
Auto
5s configurable
NO
Decrease capacity circ. 1&2
Auto
5s configurable
NO
Decrease capacity circ. 3&4
Auto
5s configurable
NO
Decrease unit capacity
CAREL reserves the right to modify or change its products without prior warning.
+0300010EN Chiller Core – rel 1.0 – 13/07/2009
90
Action
Decrease capacity circ. 1
Decrease capacity circ. 1
Decrease capacity circ. 1
Decrease capacity circ. 2
Decrease capacity circ. 2
Decrease capacity circ. 2
Decrease capacity circ. 3
Decrease capacity circ. 3
Decrease capacity circ. 3
Decrease capacity circ. 4
Decrease capacity circ. 4
+0300010EN Chiller Core – rel 1.0 – 13/07/2009
91
+0300010EN Chiller Core – rel 1.0 – 13/07/2009
CAREL INDUSTRIES S.r.l.
Via dell’Industria, 11 - 35020 Brugine - Padova (Italy)
Tel. (+39) 049.9716611 Fax (+39) 049.9716600
http://www.carel.com - e-mail: [email protected]
+0300010EN Chiller Core – rel 1.0 – 13/07/2009
92