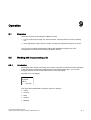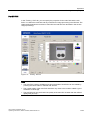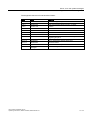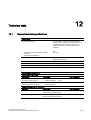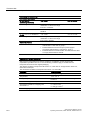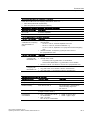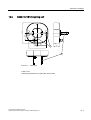
1
Operating Instructions Edition 02/2006
SIMATIC Sensors Image processing systems Vision Sensor SIMATIC VS120
SIMATIC VS120
Image Processing Systems
simatic
sensors
DOCUMENTATION
Introduction
1
Safety instructions
2
SIMATIC Sensors
Description
3
Image processing systems
Vision Sensor SIMATIC VS120
Image processing
4
Network and system
integration
5
Installation
6
Connecting
7
Commissioning
8
Operation
9
Operating Instructions
Edition 02/2006
A5E00757507-01
Process interfacing over an
automation system (PLC,
PC)
10
Alarm, error and system
messages
11
Technical data
12
Dimension drawings
13
Scope of
delivery/Spares/Accessories
14
Service & Support
15
Directives and declarations
16
Safety Guidelines
This manual contains notices you have to observe in order to ensure your personal safety, as well as to prevent
damage to property. The notices referring to your personal safety are highlighted in the manual by a safety alert
symbol, notices referring only to property damage have no safety alert symbol. These notices shown below are
graded according to the degree of danger.
Danger
indicates that death or severe personal injury will result if proper precautions are not taken.
Warning
indicates that death or severe personal injury may result if proper precautions are not taken.
Caution
with a safety alert symbol, indicates that minor personal injury can result if proper precautions are not taken.
Caution
without a safety alert symbol, indicates that property damage can result if proper precautions are not taken.
Notice
indicates that an unintended result or situation can occur if the corresponding information is not taken into
account.
If more than one degree of danger is present, the warning notice representing the highest degree of danger will
be used. A notice warning of injury to persons with a safety alert symbol may also include a warning relating to
property damage.
Qualified Personnel
The device/system may only be set up and used in conjunction with this documentation. Commissioning and
operation of a device/system may only be performed by qualified personnel. Within the context of the safety notes
in this documentation qualified persons are defined as persons who are authorized to commission, ground and
label devices, systems and circuits in accordance with established safety practices and standards.
Prescribed Usage
Note the following:
Warning
This device may only be used for the applications described in the catalog or the technical description and only in
connection with devices or components from other manufacturers which have been approved or recommended
by Siemens. Correct, reliable operation of the product requires proper transport, storage, positioning and
assembly as well as careful operation and maintenance.
Trademarks
All names identified by ® are registered trademarks of the Siemens AG. The remaining trademarks in this
publication may be trademarks whose use by third parties for their own purposes could violate the rights of the
owner.
Disclaimer of Liability
We have reviewed the contents of this publication to ensure consistency with the hardware and software
described. Since variance cannot be precluded entirely, we cannot guarantee full consistency. However, the
information in this publication is reviewed regularly and any necessary corrections are included in subsequent
editions.
Siemens AG
Automation and Drives
Postfach 48 48
90437 NÜRNBERG
GERMANY
Order No.: A5E00757507-01
Edition 02/2006
Copyright © Siemens AG 2006.
Technical data subject to change
Table of contents
1
Introduction............................................................................................................................................. 1-1
2
Safety instructions .................................................................................................................................. 2-1
3
Description.............................................................................................................................................. 3-1
4
5
3.1
Product description .................................................................................................................... 3-1
3.2
Performance features ................................................................................................................ 3-2
3.3
Function ..................................................................................................................................... 3-3
3.4
System components .................................................................................................................. 3-4
3.5
System requirements ................................................................................................................. 3-5
3.6
Design of the SIMATIC VS120 processing unit ......................................................................... 3-6
3.7
Design of the sensor head with LED ring flash.......................................................................... 3-8
Image processing ................................................................................................................................... 4-1
4.1
General information ................................................................................................................... 4-1
4.2
4.2.1
4.2.2
Shutter Speed and Brightness ................................................................................................... 4-2
Different exposures and brightnesses ....................................................................................... 4-2
Disturbing contours caused by shine......................................................................................... 4-3
4.3
4.3.1
4.3.2
Generating models and detecting orientation ............................................................................ 4-5
Setting for the Precision parameter ........................................................................................... 4-5
Measures for optimizing object recognition ............................................................................... 4-6
4.4
Quality of the measured values ................................................................................................. 4-7
4.5
Geometric distortion................................................................................................................... 4-8
4.6
4.6.1
4.6.2
Main ROI and sub-ROI .............................................................................................................. 4-8
Example: Main ROI and 3 sub-ROIs ......................................................................................... 4-9
Example of the influence of sub-ROIs on the quality value ..................................................... 4-10
4.7
Job parameter .......................................................................................................................... 4-13
4.8
Search parameter .................................................................................................................... 4-16
4.9
Model type parameter .............................................................................................................. 4-17
4.10
Model sets................................................................................................................................ 4-19
Network and system integration.............................................................................................................. 5-1
5.1
Overview .................................................................................................................................... 5-1
5.2
System configuration over digital I/O ......................................................................................... 5-2
5.3
PROFIBUS DP system configuration ........................................................................................ 5-3
5.4
PROFINET IO system configuration.......................................................................................... 5-4
5.5
System configuration with Ethernet or RS-232 over Com server .............................................. 5-5
Vision Sensor SIMATIC VS120
Operating Instructions, Edition 02/2006, A5E00757507-01
iii
Table of contents
6
7
8
9
10
iv
Installation .............................................................................................................................................. 6-1
6.1
Installing the SIMATIC VS120 processing unit .......................................................................... 6-1
6.2
Installing the sensor head with LED ring flash ........................................................................... 6-1
Connecting ............................................................................................................................................. 7-1
7.1
Guidelines on installation and avoiding electrical interference .................................................. 7-1
7.2
Guidelines on installation when using PROFIBUS DP or PROFINET IO.................................. 7-1
7.3
Connecting components ............................................................................................................ 7-2
Commissioning ....................................................................................................................................... 8-1
8.1
Prerequisites .............................................................................................................................. 8-1
8.2
Overview of the steps in commissioning.................................................................................... 8-2
8.3
Turn on the VS120 processing unit............................................................................................ 8-3
8.4
8.4.1
8.4.1.1
8.4.1.2
8.4.1.3
8.4.1.4
8.4.1.5
8.4.2
8.4.3
8.4.4
Establish an Ethernet connection between the processing unit and PG / PC ........................... 8-5
Select the connection variant..................................................................................................... 8-5
Connection variants ................................................................................................................... 8-5
Operating the VS120 processing unit as a DHCP server .......................................................... 8-6
Connecting the VS120 processing unit manually ...................................................................... 8-7
Integrating the VS120 processing unit as a DHCP client in a network...................................... 8-9
Integrating the VS120 processing unit as a device in a PROFINET IO network ..................... 8-10
Check whether a proxy server is being used ........................................................................... 8-12
Change the proxy configuration of your Internet Explorer ....................................................... 8-13
Check the connection............................................................................................................... 8-14
8.5
Start setup support over the Internet Explorer ......................................................................... 8-15
8.6
Adjust the sensor head using setup support............................................................................ 8-17
Operation................................................................................................................................................ 9-1
9.1
Overview .................................................................................................................................... 9-1
9.2
9.2.1
9.2.2
9.2.3
9.2.4
9.2.5
9.2.6
Working with the processing unit ............................................................................................... 9-1
Introduction ................................................................................................................................ 9-1
Adjust ......................................................................................................................................... 9-2
Connect ...................................................................................................................................... 9-2
RUN............................................................................................................................................ 9-9
Options ..................................................................................................................................... 9-15
Maintain.................................................................................................................................... 9-18
9.3
9.3.1
9.3.2
9.3.3
9.3.4
9.3.5
9.3.6
9.3.7
9.3.8
9.3.9
Working with setup support...................................................................................................... 9-19
Introduction .............................................................................................................................. 9-19
Adjust Sensor........................................................................................................................... 9-24
Connections ............................................................................................................................. 9-25
Train ......................................................................................................................................... 9-27
Processing................................................................................................................................ 9-33
Options ..................................................................................................................................... 9-37
Information ............................................................................................................................... 9-43
Maintain.................................................................................................................................... 9-49
Stop .......................................................................................................................................... 9-51
Process interfacing over an automation system (PLC, PC) .................................................................. 10-1
10.1
Integrating the PROFIBUS DP slave SIMATIC VS120 in HW Config ..................................... 10-1
10.2
Integrating the PROFINET IO device SIMATIC VS120 in HW Config..................................... 10-4
10.3
Control over the "DI/DO" I/O interface ..................................................................................... 10-7
Vision Sensor SIMATIC VS120
Operating Instructions, Edition 02/2006, A5E00757507-01
Table of contents
10.4
10.4.1
10.4.2
10.4.2.1
10.4.2.2
10.4.2.3
10.4.2.4
10.4.3
Control over PROFIBUS DP and PROFINET IO................................................................... 10-10
Principle of data transfer over PROFIBUS DP and PROFINET IO ....................................... 10-10
Assignments for PROFIBUS DP / PROFINET IO-relevant interfaces for the
processing unit ....................................................................................................................... 10-11
Control byte............................................................................................................................ 10-11
Status byte ............................................................................................................................. 10-12
User data interface "Send" VS120 processing unit >>> automation system......................... 10-12
User data interface "Receive" automation system >>> VS120 processing unit .................... 10-14
Programming data fragmentation .......................................................................................... 10-14
10.5
10.5.1
10.5.2
10.5.3
10.5.4
Function block FB1 ................................................................................................................ 10-16
Job ......................................................................................................................................... 10-16
Parameter .............................................................................................................................. 10-17
Operator control ..................................................................................................................... 10-19
Error information .................................................................................................................... 10-20
10.6
10.6.1
Sample programs................................................................................................................... 10-21
Example 1: Program for interfacing the SIMATIC VS120 processing unit with a
SIMATIC controller using FB1 ............................................................................................... 10-21
Example 2: Program for archiving diagnostic information on a PC/PG ................................. 10-23
10.6.2
11
12
13
14
15
16
Alarm, error and system messages ...................................................................................................... 11-1
11.1
Overview .................................................................................................................................. 11-1
11.2
Error messages and error handling ......................................................................................... 11-1
11.3
Diagnostics based on the "BF" LED ...................................................................................... 11-10
11.4
Slave diagnostics or /O device diagnostics ........................................................................... 11-11
Technical data ...................................................................................................................................... 12-1
12.1
General technical specifications .............................................................................................. 12-1
12.2
Technical specifications of SIMATIC VS120 ........................................................................... 12-5
12.3
Port assignment of the processing unit.................................................................................... 12-8
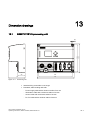
Dimension drawings ............................................................................................................................. 13-1
13.1
SIMATIC VS120 processing unit ............................................................................................. 13-1
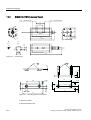
13.2
SIMATIC VS120 sensor head.................................................................................................. 13-2
13.3
SIMATIC VS120 lighting unit ................................................................................................... 13-3
Scope of delivery/Spares/Accessories.................................................................................................. 14-1
14.1
Components............................................................................................................................. 14-1
14.2
Full packages ........................................................................................................................... 14-2
14.3
Accessories.............................................................................................................................. 14-4
14.4
C-mount lens and inspection window size............................................................................... 14-5
Service & Support................................................................................................................................. 15-1
15.1
A&D Mall / Interactive Catalog (CA01) .................................................................................... 15-1
15.2
Service and support ................................................................................................................. 15-1
Directives and declarations................................................................................................................... 16-1
Glossary ..................................................................................................................................... Glossary-1
Index................................................................................................................................................ Index-1
Vision Sensor SIMATIC VS120
Operating Instructions, Edition 02/2006, A5E00757507-01
v
Table of contents
vi
Vision Sensor SIMATIC VS120
Operating Instructions, Edition 02/2006, A5E00757507-01
Introduction
1
Purpose of the manual
This manual contains all the information you require to install, commission and work with the
SIMATIC VS120 Vision Sensor System.
It is intended both for persons configuring and installing automated plants with image
processing systems and for service and maintenance technicians.
Scope of this manual
The manual is valid for all supplied versions of the SIMATIC VS120 Vision Sensor system
and the processing unit with order number (MLFB) 6GF1 018-2AA10.
Vision Sensor SIMATIC VS120
Operating Instructions, Edition 02/2006, A5E00757507-01
1-1
Introduction
1-2
Vision Sensor SIMATIC VS120
Operating Instructions, Edition 02/2006, A5E00757507-01
Safety instructions
2
Caution
Please observe the safety instructions on the back of the cover sheet of this documentation.
You should not make any expansions to your device unless you have read the relevant
safety instructions.
This device meets the relevant safety requirements in compliance with IEC, VDE, and EN. If
you have questions about the validity of the installation in the planned environment, please
contact your service representative.
Repairs
Only authorized personnel are permitted to repair the device.
Warning
Unauthorized opening of and improper repairs to the device may result in substantial
damage to equipment or risk of personal injury to the user.
System expansion
Only install system expansions intended for this device. If you install other upgrades, you
may damage the system or violate the safety requirements and regulations for radio
frequency interference suppression. Contact your technical support team or where you
purchased your device to find out which system expansion devices may safely be installed.
Caution
If you install or exchange system expansions and damage your device, the warranty
becomes void.
Vision Sensor SIMATIC VS120
Operating Instructions, Edition 02/2006, A5E00757507-01
2-1
Safety instructions
2-2
Vision Sensor SIMATIC VS120
Operating Instructions, Edition 02/2006, A5E00757507-01
Description
3.1
3.1
3
Product description
The SIMATIC VS120 Vision Sensor is used for the optical detection and testing of objects
with lighting from above. The SIMATIC VS120 Vision Sensor checks whether or not the
correct object is being tested, whether or not it is damaged and the position of the object.
The SIMATIC VS120 Vision Sensor returns the following recognition values during object
recognition:
• x coordinate
• y coordinate
• Angle
• Quality rating of the specimen, number of detected parts
This object recognition data is transferred to processing units in automation systems. The
data is processed in the processing units of the automation systems.
The SIMATIC VS120 Vision Sensor is suitable for:
• Recognition of parts in sorting tasks
• Determining the position for Pick & Place applications
• Checking the presence and position of objects in production
• Checking position in feed systems, for example with oscillating conveyors, workpiece
holder, conveyor belts, circulating systems, grasper units and robots.
• Quality control of specimens
Vision Sensor SIMATIC VS120
Operating Instructions, Edition 02/2006, A5E00757507-01
3-1
Description
3.2 Performance features
3.2
3.2
Performance features
• Overhead lighting head with LED ring flash
• Object recognition with object search and object test
• Commissioning using adjustment support on the PG / PC with installed Internet Explorer
• Up to 20 objects tested per second
• Up to 64 specimens can be stored
• Two digital outputs are available for sorting the specimens: OK, N_OK
• Fully Web-based user interface
• Extensive operator control and monitoring functions even in the processing mode
• Wide-ranging diagnostics and logging functions: Error image memory and event logging
• Firmware update using operator interface of the Web browser
• Control via Digital I/O, PROFIBUS DP and PROFINET IO
• Result output via:
– PROFIBUS DP
– PROFINET IO
– RS-232 port of an RS-232 Ethernet converter
– TCP/IP connection of the PC / PG
3-2
Vision Sensor SIMATIC VS120
Operating Instructions, Edition 02/2006, A5E00757507-01
Description
3.3 Function
3.3
3.3
Function
Testing correctness of individual characteristics of the specimen
64 models are available for the recognition of specimens. The SIMATIC VS120 checks
whether or not the individual characteristics of the specimens have the same shape as the in
the trained model.
When specifying the recognition and evaluation areas, avoid shiny surfaces on specimens.
Principle of edge recognition
To recognize image patterns, edges are used. These edges from the images are the
transitions from light to dark or vice versa. A model is created from the sum of the edges
extracted in the image and their arrangement.
Recognition and localization of parts
The SIMATIC VS120 scans specimens and determines the coordinates including the roll
angle and passes them to the control system such as S7, for example, via PROFIBUS DP.
Testing the completeness of a model
The SIMATIC VS120 also checks specimens for completeness. Deviations from the trained
model are detected and the quality values of the evaluation are displayed.
Sorting functions for models and model sets
Depending on the importance of the application, 15 model sets with 64 different models can
be assembled and saved for processing. The models are sorted according to the application
with a controller for processing with the SIMATIC VS120.
Vision Sensor SIMATIC VS120
Operating Instructions, Edition 02/2006, A5E00757507-01
3-3
Description
3.4 System components
3.4
3.4
System components
SIMATIC VS120 Vision Sensor full package comprising:
• Sensor
• Processing unit
• Lighting
• Cable
3*3&IRU
DGMXVWPHQWVXSSRUW
3URFHVVLQJXQLW
3RZHU
VXSSO\
5-(WKHUQHW
FDEOH
$XWRPDWLRQV\VWHP
3RZHUVXSSO\FDEOH
)XQFWLRQDOHDUWKLQJ
/LJKWLQJFDEOH
6HQVRUFDEOH
352),%86b'3
','2FDEOH
6HQVRUKHDG
/('ULQJIODVK
2EMHFW
3KRWRHOHFWULFEDUULHU
&RQYH\RUXQLW
&RQYH\RUXQLW
Figure 3-1
3-4
Example of a typical system configuration with conveyor system
Vision Sensor SIMATIC VS120
Operating Instructions, Edition 02/2006, A5E00757507-01
Description
3.5 System requirements
3.5
3.5
System requirements
You require the following hardware and software components for the SIMATIC VS120 Vision
Sensor system:
Hardware
• SIMATIC VS120 processing unit
• Sensor head with CCD sensor chip for detection of the object
• LED ring flash for SIMATIC VS with degree of protection IP65 (not included in every full
package), for optimum illumination of the object
• Cables:
– Power supply cable
– Lighting cable
– Sensor cable
– DI / DO cable
• Documentation package
– Operating Instructions (compact)
– Documentation CD
You also require the following:
• 24 V DC, 2 A power supply; (20.4...28.8 V DC, safety extra low voltage, SELV).
• PC / PG with the following configuration:
– At least 500 MHz clock frequency
– Graphics card with at least 65536 colors and a resolution of at least 1024 x 768 pixels
– Ethernet port with up to 100 Mbps (protocol: TCP/IP)
• Crossover RJ-45 Ethernet cable for connecting the processing unit and the PC / PG
Software
• Microsoft Windows XP Professional SP1 operating system with Internet Explorer 6.0 as of
SP1
• Microsoft Java VM or Sun Java VM version J2SE 1.4.2_06 or J2SE 5.0 (you will find
more detailed information on the Internet at the following address
http//:www.java.sun.com/J2SE)
Vision Sensor SIMATIC VS120
Operating Instructions, Edition 02/2006, A5E00757507-01
3-5
Description
3.6 Design of the SIMATIC VS120 processing unit
3.6
3.6
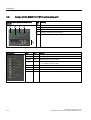
Design of the SIMATIC VS120 processing unit
VS120 processing unit (MLFB 6GF1 0182AA10)
Item
No.
Meaning
(1)
Status LEDs
(2)
LCD display
(3)
Keypad
(4)
Housing consisting of hood and base
(5)
Interfaces
Status LEDs
3-6
LEDs
Color
Meaning
SF
Red
General fault
POWER
Green
Power supply is turned on
TRAINED
Green
Selected model has been trained
READY
Green
•
•
OK
Green
Result good: Model was recognized
off = device startup or SIMATIC VS120 in Stop
on = SIMATIC VS120 in Run
-
Green
-
N_OK
Yellow
Result bad: Object was not recognized
BF
Red
Bus fault on PROFIBUS DP or PROFINET IO
Vision Sensor SIMATIC VS120
Operating Instructions, Edition 02/2006, A5E00757507-01
Description
3.6 Design of the SIMATIC VS120 processing unit
LCD display and keypad
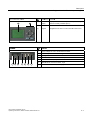
Designation Meaning
(1)
LCD
display
Displays menu commands (lines 1 to 3) and the keys
that are currently available (line 4)
(2)
Keypad
Navigation from menu to menu and within the menus
Item
No.
Meaning
(1)
Supply voltage 24 V DC, circular M12 connector
(2)
Functional ground with M5 screw-type connector
Interfaces
Item
No.
(3)
Lighting unit, circular M12 connector
(4)
Sensor head, HD D-sub connector, 26-pin
(5)
I/O, D-sub connector, 15-pin
(6)
PROFIBUS DP, D-sub connector, 9-pin
(7)
Ethernet / PROFINET IO; RJ-45 plug
Vision Sensor SIMATIC VS120
Operating Instructions, Edition 02/2006, A5E00757507-01
3-7
Description
3.7 Design of the sensor head with LED ring flash
3.7
3.7
Design of the sensor head with LED ring flash
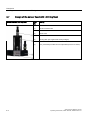
Sensor head with LED ring flash
3-8
Item
No.
Meaning
(1)
Circular connector M12
(2)
Sensor head
(3)
LED ring flash (not supplied with all full packages)
(4)
Lens, permanently installed and non-adjustable (fixed focus version)
Vision Sensor SIMATIC VS120
Operating Instructions, Edition 02/2006, A5E00757507-01
Image processing
4.1
4.1
4
General information
To form patterns that can be recognized, edges (transitions from light to dark or vice versa)
from the image are used. Although the algorithm extracts the edges automatically, the user
must make sure that the lighting is ideal for an image with good contrast; in other words, to
create models for recognition, it is essential to use the lighting correctly to achieve an image
with high contrast.
Note
The installation of suitable lighting often involves more time than all the other activities such
as securing the camera, connecting to the PLC, training, setting the correct triggers etc.
together. With metallic surfaces in particular, it is advisable to ask the advice of a lighting
expert due to the possible shine.
Part of object recognition is the recognition of the position of the object in the image.
The starting point is the midpoint of the image to which all coordinates relate. The top left
has the coordinates (-320; 240) and bottom right (320; -240).
If the object is not recognized, the position at the top left is output for x / y. The user should
always query whether or not this is an OK / N_OK evaluation and not rely on the x / y
positions!
Vision Sensor SIMATIC VS120
Operating Instructions, Edition 02/2006, A5E00757507-01
4-1
Image processing
4.2 Shutter Speed and Brightness
4.2
4.2
Shutter Speed and Brightness
Correct exposure time (shutter speed) influences the quality of the extracted edges. To
control the exposure time / brightness, you can use the parameters Shutter speed and
Brightness.
The shutter speed / brightness must be set to obtain the optimum contrast. The automatic
exposure control can help to achieve the optimum shutter speed setting.
Below, you will find examples of different shutter speeds and disturbing contours:
4.2.1
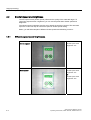
Different exposures and brightnesses
Correct exposure
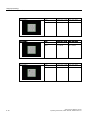
Shutter speed: 3800
Brightness: 357
Overexposure
Shutter speed: 6000
Brightness: 357
or
Shutter speed: 3800
Brightness: 500
4-2
Vision Sensor SIMATIC VS120
Operating Instructions, Edition 02/2006, A5E00757507-01
Image processing
4.2 Shutter Speed and Brightness
Underexposure
Shutter speed: 800
Brightness: 357
or
Shutter speed: 3800
Brightness: 93
4.2.2
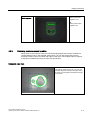
Disturbing contours caused by shine
Shiny areas on the surfaces of the part cause disturbing edges that must be avoided for a
representative model. In the example shown below, you can see clearly that even the
automatic shutter control can cause bad edges in this case. These edges make recognition
of the parts unreliable since they are often not reproducible.
Unwanted edge lines
In the trained model shown here, you can see
unwanted edge lines that reduce quality during
the search and recognition and therefore ought
to be avoided.
Vision Sensor SIMATIC VS120
Operating Instructions, Edition 02/2006, A5E00757507-01
4-3
Image processing
4.2 Shutter Speed and Brightness
Remedy by manual overexposure
This image was manually overexposed. The
contour is ideal and can be clearly recognized.
If this method cannot be used, the user can do the following:
• Use the erasure function on the edges of the model to enable optimally training for the
contour
• Correct the problem by setting the shutter speed offset for automatic exposure control
Other interference affecting object recognition
In addition to the previously mentioned interference, other factors can also have a negative
influence on the search for a pattern.
• Shadows (particularly caused by the depth of the objects)
• Non-uniform lighting
• Geometric distortion by the lens, particularly when the camera is not perpendicular to the
pattern
• Blurring due to motion if the shutter speed is too slow for moving parts
There are functions and parameters in the SIMATIC VS120 Vision Sensor to reduce the
negative effects of such interference in recognizing parts. They help to create optimal edges
from the image to generate patterns.
4-4
Vision Sensor SIMATIC VS120
Operating Instructions, Edition 02/2006, A5E00757507-01
Image processing
4.3 Generating models and detecting orientation
4.3
4.3
Generating models and detecting orientation
A model is created from the sum of the edges extracted in the image and their arrangement.
To ensure good processing quality, the contours of the model should lie within the ROI
(Region of Interest).
4.3.1
Setting for the Precision parameter
The precision setting is based on the size of the ROIs and recognizable changes in the
specimen. The search for a part in the image is "pyramidal". It starts with a coarse search at
low resolution and finishes with a fine search at high resolution. The Precision parameter
affects the coarse and fine search.
Coarse and fine search
The table shows the start and end values of the resolution during the search process with
the various levels of precision.
Precision level
Start value for the resolution
Width x Height (in pixels)
End value for the resolution
Width x Height (in pixels)
Fine1
320 x 240
640 x480
Fine2
160 x 120
640 x480
Fine3
80 x 60
640 x480
Medium1
80x60
320 x 240
Medium2
40x30
320 x 240
Coarse1
40x30
160 x 120
Coarse2
20x15
160 x 120
The precision for determining the position should be set as follows:
• "Fine" for the sub-pixel range
• "Medium" for +/-1 pixel and +/-1°
• "Coarse" for +/- 2 pixels and +/-1°
– The precision for determining the position still depends on the pattern size and the
number of edges found in it and may therefore deviate from the values shown above.
– The angle precision can be increased to < 1° with the "Angle Precision" parameter in
"Options - Extras tab".
Note
If the setting is "Fine1" and the model is large, the processing times may be several
seconds.
Vision Sensor SIMATIC VS120
Operating Instructions, Edition 02/2006, A5E00757507-01
4-5
Image processing
4.3 Generating models and detecting orientation
Note
If exposure is set to "Manual" and the user changes the precision in the adjustment
support (adjust sensor), the "shutter speed" exposure parameter is adjusted
automatically. Depending on the distance of the object to the camera, this can cause
inaccuracies.
Example for declaring the Precision parameter
A wall is hung full of A4 sheets on which various texts have been printed. An observer has
the task of finding a specific sheet among all the others.
Procedure:
• To accelerate the search, the observer stands at a considerable distance from the wall.
The distance from the wall selected by the observer depends on the criteria on which the
search is based, among other factors.
• The observer begins to presort all the sheets. If the observer is looking for a large rough
drawing, they will stand a long way away to be able to see all drawings at the same time.
In this case, the observer would select "Fine3".
• If the observer concentrates on details, such as text format or heading, he would move
closer. Since he is examining more details, the search takes correspondingly longer. In
this case, the observer would select Fine2 or Fine1.
• Once the observer has made a rough selection, he moves closer to the sheets and
investigates each sheet in detail. He now exactly compares individual words and image
details with a reference sheet. The observer no longer examines each sheet in detail
because he has already limited the selection.
The algorithm of the SIMATIC VS120 Vision Sensor works in much the same way as the
example described above.
4.3.2
Measures for optimizing object recognition
Problem: Object was not trained
If the object could not be trained, the reason may be that there were not enough contours in
the selected ROI.
Remedy
• Make sure that the ROI is selected correctly (position and size) and that the object is
within the ROI when training.
• If this problem still occurs, the object to be trained has too few contours. In this case, a
change in the setting of the precision towards greater precision might help, for example,
from Medium2 to Medium1 or to Fine1.
4-6
Vision Sensor SIMATIC VS120
Operating Instructions, Edition 02/2006, A5E00757507-01
Image processing
4.4 Quality of the measured values
• If these measures still do not lead to success, try the following for example:
– Select other lighting
– Specify other more detailed object regions in the ROI
– Enlarge the ROI or similar
• Another remedy is to change the brightness with high contrast in order to clearly detect
the change in the image.
4.4
4.4
Quality of the measured values
All the displayed measured values for imaging geometry of a read model are subject to the
following inaccuracies.
Processing precision
• for the position (x and y coordinates): up to ± 0.1 pixels
• for the angle (angle precision): up to ± 0,2°
The processing precision is influenced by the following factors:
• Lighting effects such as reflection and shadow
• Perspective distortion, such when the camera is too close to or at too oblique an angle to
the object
• Differences in the object, for example, dirty objects
• Variation in the trained background structure
Fluctuations in size
Fluctuations in size in the image up to ± 10 % are tolerated, if the specimens are the same
position as the trained pattern. These fluctuations can be caused by the following:
• Different distances between specimens and the lens caused by a different position on the
conveyor belt or workpiece holder
• Different pattern sizes in the specimen
Perspective distortion
• Perspective distortion in the recorded image are tolerated if the specimens have the
same orientation as the trained pattern.
• If there is perspective distortion and the orientation is different, no general statement is
possible. In this case, the shape of the specimens and the angle between the camera
level and pattern level are the factors that determine whether or not the specimens can
be recognized.
Vision Sensor SIMATIC VS120
Operating Instructions, Edition 02/2006, A5E00757507-01
4-7
Image processing
4.5 Geometric distortion
Relationship between resolution and pixel size
The following table shows which actual length corresponds to the side length of a pixel.
Remember that this value applies only for the specified image width. The sensor heads
6GF2 002-8DA (SIMATIC VS120 for large specimens) and 6GF2 002-8EA (SIMATIC VS120
for small specimens) were based on the maximum possible image widths.
4.5
4.5
Graphic
width
Resolution per pixel
at 640*480
Resolution per pixel
at 320*240
SIMATIC VS120
for large specimens
70 mm
70/640 = 0.11 mm / pixel
70/320 = 0,22 mm / pixel
SIMATIC VS120
for small specimens
40 mm
40/640 = 0,06 mm / pixel
40/320 = 0,13 mm / pixel
C/CS mount
12 mm
12/640 = 0.02 mm / pixel
12/320 = 0.04 mm / pixel
Geometric distortion
Geometric distortion caused by the lens is compensated. With sensor heads with fixed
lenses, the value of the distortion is set automatically and should no longer be changed. If
standard lenses with a C mount are used, the user can make the compensation manually by
changing the parameters.
4.6
4.6
Main ROI and sub-ROI
Processing with main ROIs is usually sufficient to evaluate the image. ROIs (Region of
Interest) are used to distinguish a part from the background better. The sub-ROI option
added to the main ROI allows certain details of patterns, which would otherwise be
indistinguishable in comparison to the total contour, to be weighted more heavily. Testing for
damage or completeness are examples of this.
This is, for example, the case if you have shiny areas or variable areas in the object. Using
sub-ROIs, you can concentrate the search and the evaluation on the important
characteristics and suppress irrelevant ones.
Procedure
1. Training of the main ROI concentrating on the invariable characteristics of the specimen
2. Select the "ROI: New" button the dialog "Training - ROI tab" of the adjustment support. A
rectangle or circle appears on the screen depending on the shape selected for the subROI.
3. Changing the size and position of the sub-ROI in the same way you define the main ROI
4-8
Vision Sensor SIMATIC VS120
Operating Instructions, Edition 02/2006, A5E00757507-01
Image processing
4.6 Main ROI and sub-ROI
4.6.1
Example: Main ROI and 3 sub-ROIs
Example: Main ROI and 3 sub-ROIs
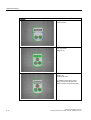
Task description: The task is to check whether the Siemens logo was printed completely.
In the image on the left, you can see
the edges marked for sub-ROI3. The
main ROI is the large window, while
sub-ROI1 encompasses "SIE" and
sub-ROI2 encompasses "ME".
Parameter assignment
Parameter name
Main ROI
Sub-ROI 1, 2 and 3
Task
Find (default)
Find (default)
scaling
Fixed
Fixed (default)
Precision
Fine3
Fine1
Model. type
Edges (default)
Edges (default)
• The sub-ROIs can be set with the precision Fine1 since the pattern windows are small.
This ensures that no details are lost.
• Fine3 should, however, be selected for the main ROI otherwise the processing time will
take too long. In this case, the selection of the precision (Fine1, Fine2 or Fine3) has no
effect on the quality value of the result.
Vision Sensor SIMATIC VS120
Operating Instructions, Edition 02/2006, A5E00757507-01
4-9
Image processing
4.6 Main ROI and sub-ROI
Example of recognition of a bad object
In this example, the "S“ and the "N“ are missing. If
only one ROI had been trained, the quality would
have been 87.2% (=quality of the main ROI).
Sub-ROI1: 60.6%
Sub-ROI2: 98.7%
Sub-ROI3: 42.0%
70% is selected as the quality limit for all ROIs and
an object is then evaluated as N_OK if a sub-ROI
falls below the quality limit.
4.6.2
Example of the influence of sub-ROIs on the quality value
Based on the example below, we will illustrate the effects on the quality value of a specimen
of using sub-ROIs.
Note
If features are allowed in the area enclosed by the ROI or sub-ROIs that you do not want to
be evaluated, select "Find" as the job in the "Options - Training tab" of the adjustment
support. Otherwise, select the value "Identify".
The example model appears as follows:
Note
If only one main ROI is used, the cumulative quality corresponds to the quality of the main
ROI.
If sub-ROI and main ROI are used, the cumulative quality is calculated from the average of
the sub-ROI qualities.
4-10
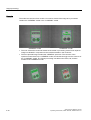
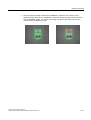
Vision Sensor SIMATIC VS120
Operating Instructions, Edition 02/2006, A5E00757507-01
Image processing
4.6 Main ROI and sub-ROI
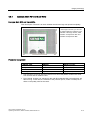
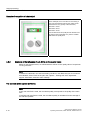
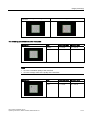
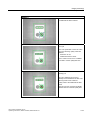
Without sub-ROIs, green rectangle means
main ROI.
With sub-ROIs, red rectangle means sub-ROIs
The following specimens must be evaluated:
Specimen 1:
Job:
Without sub-ROIs
With sub-ROIs
Identify
QC = 100 %
QA = 100 %
Find
QC = 100 %
QA = 100 %
Note
• QC is the cumulative quality of the main-ROI
• QA is the average value of the quality of the sub-ROIs
Specimen 2:
Vision Sensor SIMATIC VS120
Operating Instructions, Edition 02/2006, A5E00757507-01
Job:
Without sub-ROIs
With sub-ROIs
Identify
QC < 100 %
QA < 100 %
Find
QC = 100 %
QA = 100 %
4-11
Image processing
4.6 Main ROI and sub-ROI
Specimen 3:
Specimen 4:
Specimen 5:
4-12
Job:
Without sub-ROIs
With sub-ROIs
Identify
QC < 100 %
QA = 100 %
Find
QC = 100 %
QA = 100 %
Job:
Without sub-ROIs
With sub-ROIs
Identify
QC < 100 %
QA = 100 %
Find
QC < 100 %
QA = 100 %
Job:
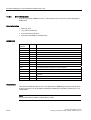
Without sub-ROIs
With sub-ROIs
Identify
QC < 100 %
QA < 100 %
Find
QC = 100 %
QA = 100 %
Vision Sensor SIMATIC VS120
Operating Instructions, Edition 02/2006, A5E00757507-01
Image processing
4.7 Job parameter
4.7
4.7
Job parameter
The Job parameter has the options "Find" and "Identify"
Find
If the "Find“ option is selected, additional edges of the specimen are not taken into
consideration.
Identify
If the "Identify" option is selected, additional edges of the detected specimen are taken into
consideration and compared with the edges of the reference model.
Example
Metal plate with three holes. If "Find" is set, the quality 100% will be output for a metal plate
with an additional hole. If "Identify" is set, the quality value will be lower because the
additional edges of the fourth hole do not have corresponding edges in the reference image.
Vision Sensor SIMATIC VS120
Operating Instructions, Edition 02/2006, A5E00757507-01
4-13
Image processing
4.7 Job parameter
Example 1
Trained sub-ROI
"Find" job. Result:
Quality 99.3%
"Identify" job.
Result: Quality 69%
The additional edges of the object
pattern that are not included in the
reference pattern can be clearly seen.
4-14
Vision Sensor SIMATIC VS120
Operating Instructions, Edition 02/2006, A5E00757507-01
Image processing
4.7 Job parameter
Example 2
An additional sub-ROI is trained:
"Find" job
If the "Job" parameter is set to the value
"Find", the following quality values are
obtained:
• Main ROI: 98.7%
• Additional sub-ROI: 90.5%
Even a value of 90.5% is too unreliable
to be able to set the quality limit here.
"Identify" job.
The "Job" parameter is now set to
"Identify" for the additional sub-ROI. The
following result is then achieved:
Quality value of the additional sub-ROI:
69.3%
Changes can now no longer be reliably
detected with an increased quality limit.
Vision Sensor SIMATIC VS120
Operating Instructions, Edition 02/2006, A5E00757507-01
4-15
Image processing
4.8 Search parameter
4.8
4.8
Search parameter
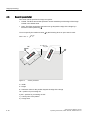
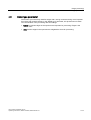
Two areas can be specified for image recognition.
• Limited: The ROIs around the specimen cannot extend beyond the edge of the image.
Limited is the default value.
• Open: The ROIs around the specimens can go beyond the edge of the image by a
maximum value specified by d
You must specify the maximum value d by the following when an open area is used:
dmax = 30% RI
E 2 +K 2
2.
1B2.
E
K
Figure 4-1
Search parameter
w = width
h = height
d = maximum value for the position beyond the edge of the image
OK = position for processing OK
N_OK = position for processing not OK
1) = center point of the pattern
2) = image area
4-16
Vision Sensor SIMATIC VS120
Operating Instructions, Edition 02/2006, A5E00757507-01
Image processing
4.9 Model type parameter
4.9
4.9
Model type parameter
The human eye instinctively classifies edges with a strong contrast as being more important
than those with a weak contrast. In the "Model type" parameter, this phenomenon is taken
into consideration in the processing with two settings:
• Edges if prominent edges of the specimen are important for processing. Edges is the
default value
• Area if all the edges in the specimen are weighted the same for processing.
Vision Sensor SIMATIC VS120
Operating Instructions, Edition 02/2006, A5E00757507-01
4-17
Image processing
4.9 Model type parameter
Example
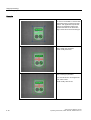
The cross in the middle is a contour with
significantly greater contrast than other
contours. If an application requires this
region to be weighted as being more
important than the rest for the search,
"Edge" should be set as the model type.
"Edge“ model type parameter
Result: Quality value 53%
"Area“ model type parameter
If you want all areas to be weighted the
same, select "Area".
Result: Quality value 76.5%
4-18
Vision Sensor SIMATIC VS120
Operating Instructions, Edition 02/2006, A5E00757507-01
Image processing
4.10 Model sets
4.10
4.10
Model sets
Features
• The model sets functions enables the SIMATIC VS120 Vision Sensor to classify (sort)
parts.
• Classification involves individual examination of the models in the model set.
Classification is considered successful if at least one of these models is evaluated as OK.
A model with the highest cumulative quality is determined from all the models evaluated
as OK. This evaluation result is generated as "Best".
• The number of models allowed in a model set depends on the complexity of the mode
and is limited by the storage capacity of the VS120 processing unit.
• Increasing the number of models in the model set, increases beyond proportion the
processing time by several seconds.
• Up to 40 trained models can be added to each model set.
• The option of integrating several models in a single model set can be enabled in Options
> Extras > Use Multimodel.
Note
Exposure Control Model Set
The settings for the model with the lowest model number always apply for setting the
exposure of a model set.
Note
Error messages
The following error messages can occur in processing mode for the model sets:
• One of the models in the model set has not yet been trained.
• A model set contains models with different precision (important in this respect: only
the precision value of the parameter counts, in other words, all models must be either
"Fine" or "Coarse").
• The model set contains too many models that are too large so that there is not enough
storage space.
Vision Sensor SIMATIC VS120
Operating Instructions, Edition 02/2006, A5E00757507-01
4-19
Image processing
4.10 Model sets
Example
The model set consists of two models. You need to decide if the image to be processed
contains the "SIEMENS" model or the "COMPANY" model.
"SIEMENS" model
"COMPANY" model
• The user selects this model set instead of the model in processing mode. Each captured
image is evaluated in comparison to the individual models in the model set.
• The first captured image contains the "SIEMENS" specimen. The contours of the
specimen match those in the "SIEMENS“ model, but deviate strongly from the contours of
the "COMPANY“ model. The VS120 processing unit delivers the result, OK, and the
number of the "SIEMENS“ model.
4-20
Vision Sensor SIMATIC VS120
Operating Instructions, Edition 02/2006, A5E00757507-01
Image processing
4.10 Model sets
• The next captured image contains the "COMPANY" specimen. The contours of the
specimen match those in the "COMPANY“ model, but deviate strongly from the contours
of the "SIEMENS“ model. The VS120 processing unit delivers the result, OK, and the
number of the "COMPANY“ model.
Vision Sensor SIMATIC VS120
Operating Instructions, Edition 02/2006, A5E00757507-01
4-21
Image processing
4.10 Model sets
4-22
Vision Sensor SIMATIC VS120
Operating Instructions, Edition 02/2006, A5E00757507-01
Network and system integration
5.1
5.1
5
Overview
The SIMATIC VS120 system can be configured as follows for the acquisition and processing
of recognition values:
• System configuration with digital I/O
• PROFIBUS DP environment
• PROFINET IO environment
• System configuration Ethernet (TCP / IP) or RS-232, for example, via Com server
Note
Other combinations of modes are permitted, for example, control via PROFIBUS DP and
result output via RS-232.
Vision Sensor SIMATIC VS120
Operating Instructions, Edition 02/2006, A5E00757507-01
5-1
Network and system integration
5.2 System configuration over digital I/O
5.2
5.2
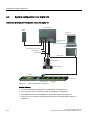
System configuration over digital I/O
Acquisition and output of recognition values via digital I/O
3URFHVVLQJXQLW
3RZHU
VXSSO\
3*3&IRU
DGMXVWPHQWVXSSRUW
5-(WKHUQHW
FDEOH
3RZHUVXSSO\FDEOH
$XWRPDWLRQV\VWHP
)XQFWLRQDOHDUWKLQJFDEOH
/LJKWLQJFDEOH
6HQVRUFDEOH
','2FDEOH
6HQVRUKHDG
/('ULQJIODVK
2EMHFW
3KRWRHOHFWULFEDUULHU
&RQYH\RUXQLW
&RQYH\RUXQLW
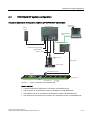
Figure 5-1
System configuration via digital I/O
System features:
• A PC/PG dedicated to adjustment is connected via the Ethernet port.
• The connection to an automation system is established via digital I/Os.
• The SIMATIC VS120 is controlled by the automation system via digital I/Os.
• The OK or N_OK results of the specimen are passed to the automation system via
digital I/Os.
5-2
Vision Sensor SIMATIC VS120
Operating Instructions, Edition 02/2006, A5E00757507-01
Network and system integration
5.3 PROFIBUS DP system configuration
5.3
5.3
PROFIBUS DP system configuration
Acquisition and output of recognition values in a PROFIBUS DP environment
3*3&IRU
VHWXSVXSSRUW
3URFHVVLQJXQLW
3RZHU
VXSSO\
352),%86b'3
5-(WKHUQHW
FDEOH
3RZHUVXSSO\FDEOH
)XQFWLRQDOHDUWKLQJFDEOH
/LJKWLQJFDEOH
$XWRPDWLRQV\VWHP
6HQVRUFDEOH
6HQVRUKHDG
','2FDEOH
/('ULQJIODVK
3KRWRHOHFWULFEDUULHU
2EMHFW
&RQYH\RUXQLW
&RQYH\RUXQLW
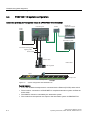
Figure 5-2
System configuration with PROFIBUS DP
System features:
• A PC/PG dedicated to adjustment is connected via the Ethernet port.
• The connection to an automation system is established via PROFIBUS DP.
• The SIMATIC VS120 is controlled by the automation system via PROFIBUS DP.
• The results from the specimen are output to the automation system via PROFIBUS DP.
Vision Sensor SIMATIC VS120
Operating Instructions, Edition 02/2006, A5E00757507-01
5-3
Network and system integration
5.4 PROFINET IO system configuration
5.4
5.4
PROFINET IO system configuration
Acquisition and output of recognition values in a PROFINET IO environment
3URFHVVLQJXQLW
3*3&IRU
DGMXVWPHQWVXSSRUW
6ZLWFK
3RZHU
VXSSO\
$XWRPDWLRQV\VWHP
3RZHUVXSSO\FDEOH
)XQFWLRQDOHDUWKLQJFDEOH
/LJKWLQJFDEOH
352),1(7,2
6HQVRUFDEOH
6HQVRUKHDG
','2FDEOH
/('ULQJIODVK
2EMHFW
3KRWRHOHFWULFEDUULHU
&RQYH\RUXQLW
&RQYH\RUXQLW
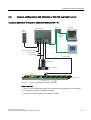
Figure 5-3
System configuration with PROFINET IO
System features:
• A PC / PG dedicated to adjustment is connected via the Ethernet (TCP/IP) and a switch.
• There is also a connection to a PROFINET IO compliant automation system via Ethernet
and a switch.
• The SIMATIC VS120 is controlled by the automation system.
• The results from the specimen are output to the automation system via PROFINET IO.
5-4
Vision Sensor SIMATIC VS120
Operating Instructions, Edition 02/2006, A5E00757507-01
Network and system integration
5.5 System configuration with Ethernet or RS-232 over Com server
5.5
5.5
System configuration with Ethernet or RS-232 over Com server
Acquisition and output of recognition values with Ethernet (TCP / IP)
6ZLWFK
3URFHVVLQJXQLW
3*3&IRU
DGMXVWPHQWVXSSRUW
3RZHU
VXSSO\
5-
(WKHUQHW
FDEOH
+0,
3RZHUVXSSO\FDEOH
)XQFWLRQDOHDUWKLQJFDEOH
/LJKWLQJFDEOH
6HQVRUFDEOH
','2FDEOH
6HQVRUKHDG
/('ULQJIODVK
2EMHFW
3KRWRHOHFWULFEDUULHU
&RQYH\RUXQLW
&RQYH\RUXQLW
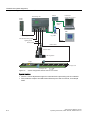
Figure 5-4
System configuration with Ethernet (TCP/IP)
System features:
• The PC / PG for adjustment support is connected to the processing unit via a network.
• The SIMATIC VS120 is controlled by the HMI.
• The results from the specimen are output to the HMI.
Vision Sensor SIMATIC VS120
Operating Instructions, Edition 02/2006, A5E00757507-01
5-5
Network and system integration
5.5 System configuration with Ethernet or RS-232 over Com server
6ZLWFK
3URFHVVLQJXQLW
3*3&IRU
DGMXVWPHQWVXSSRUW
3RZHU
VXSSO\
5-
(WKHUQHW
FDEOH
+0,
&RPVHUYHU
HJ:7
3RZHUVXSSO\FDEOH
)XQFWLRQDOHDUWKLQJFDEOH
/LJKWLQJFDEOH
56
6HQVRUFDEOH
','2FDEOH
6HQVRUKHDG
/('ULQJIODVK
2EMHFW
3KRWRHOHFWULFEDUULHU
&RQYH\RUXQLW
&RQYH\RUXQLW
Figure 5-5
System configuration with RS-232 via Com server
System features:
• The PC / PG for adjustment support is connected to the processing unit via a network.
• The results are output to the HMI via the RS-232 port of the Com server, for example
W&T.
5-6
Vision Sensor SIMATIC VS120
Operating Instructions, Edition 02/2006, A5E00757507-01
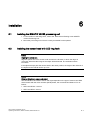
6
Installation
6.1
6.1
Installing the SIMATIC VS120 processing unit
1. For the location of the fixing holes, refer to the Dimensional Drawing of the SIMATIC
VS120 Processing Unit
2. Mount the processing unit so that it is easily accessible for the operator
6.2
6.2
Installing the sensor head with LED ring flash
Notice
Aligning the optical axis
Align the optical axis of the sensor head vertical to the direction in which the object is
conveyed. Otherwise the image of the object will be distorted. The evaluation will be
inaccurate.
If the objects always pass the sensor head in the same position, the angle of the mid axis of
the objects to the vertical can be up to 45°.
Notice
Distance D between sensor and object
The ideal distance D between sensor and object depends on the type of sensor head. With
sensor heads with the order numbers (MLFB) below, the recommended distance D is as
follows:
• 6GF2 002-8DA01: 100 mm
• 6GF2 002-8EA01: 90 mm
Vision Sensor SIMATIC VS120
Operating Instructions, Edition 02/2006, A5E00757507-01
6-1
Installation
6.2 Installing the sensor head with LED ring flash
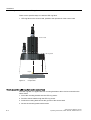
There are two possible ways to install the LED ring flash:
• LED ring flash on the sensor head, parallel to the optical axis of the sensor head
6HQVRUKHDG
'
/('ULQJIODVK
2EMHFW
&RQYH\RUXQLW
Figure 6-1
Components
How to mount the LED ring flash on the sensor head
The LED ring flash is supplied with two mounting brackets to allow it to be mounted on the
sensor head.
1. Screw the mounting bracket onto the LED ring sensor
2. Push the sensor head through the LED ring sensor
3. Guide the mounting brackets into the grooves of the sensor head
4. Secure the mounting bracket with screws.
6-2
Vision Sensor SIMATIC VS120
Operating Instructions, Edition 02/2006, A5E00757507-01
Installation
6.2 Installing the sensor head with LED ring flash
How to mount the sensor head
A mounting plate is supplied with the sensor head.
1. Insert the mounting plate in one of the grooves of the sensor head
2. Secure the sensor to your holder with a mounting plate
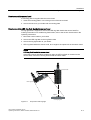
How to mount the LED ring flash beside the sensor head
No ring light flash is supplied to secure the LED ring flash beside the sensor head For
ordering information on a suitable ring flash holder, refer to the section Accessories in the
operating instructions.
1. Mount the sensor head on your holder
2. Secure the LED ring flash to the ring flash holder
3. Secure the ring light holder to your holder
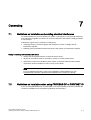
• LED ring flash beside the sensor head, at an angle to the optical axis of the sensor head
Notice
LED ring flash beside the sensor head
If the object causes interfering reflections when the LED ring flash is mounted on the
sensor head, mount the LED ring flash beside the sensor head.
6HQVRUKHDG
/('ULQJIODVK
2EMHFW
&RQYH\LQJXQLW
Figure 6-2
Components with ring light
Vision Sensor SIMATIC VS120
Operating Instructions, Edition 02/2006, A5E00757507-01
6-3
Installation
6.2 Installing the sensor head with LED ring flash
6-4
Vision Sensor SIMATIC VS120
Operating Instructions, Edition 02/2006, A5E00757507-01
7
Connecting
7.1
7.1
Guidelines on installation and avoiding electrical interference
To avoid interference, you must shield your system. Low-frequency (LF) and high-frequency
(HF) interference signals can result in an incorrect response if the system is badly grounded
or not shielded.
Interference signals can be caused, for example, by
• Switching relays or contactors (large, fast changes in current or voltage and HF
interference signals);
• Different ground potentials between two parts of the system (LF interference signals)
Using / installing interference-proof cable
• Always use the supplied cable to connect the sensor head.
• All plug-in connections must be secured by screws or a locking mechanism.
• Signal lines must not run parallel to power cables. A separate cable channel must be
used with a minimum clearance of 50 cm from power cables.
Note
For more detailed information, refer to the installation manual SIMATIC S7-300
Programmable Controller, Hardware and Installation in the section on "Wiring".
7.2
7.2
Guidelines on installation when using PROFIBUS DP or PROFINET IO
If you are using PROFIBUS DP or PROFINET I/O to control the device and/or to transfer the
results the installation and configuration guidelines must be kept to.
Vision Sensor SIMATIC VS120
Operating Instructions, Edition 02/2006, A5E00757507-01
7-1
Connecting
7.3 Connecting components
7.3
7.3
Connecting components
Connect the processing unit with the other components using the connectors on the front
panel.
The pinning of the connectors is described in the section: "Technical specifications" and with
the description of the supplied cable in section: "Scope of delivery/Spares/Accessories".
Caution
Do not connect or disconnect cables when the power supply is on.
Warning
Grounding the SIMATIC VS120 cancels the ungrounded configuration of the power unit.
Note
The DC load power supply must meet the following requirements:
Only a safe, isolated extra-low voltage of 24 V DC may be used as the load current supply.
Safe isolation can be implemented according to the requirements of:
- VDE 0100-410 / HD 384-4-41 S2 / IEC 60364-4-41 as protective extra low voltage with
safe isolation (PELV) or
- VDE 0805 / EN 60950 / IEC 60950 as safety extra-low voltage (SELV) or VDE 0106
Part 101.
The power supply chassis of the I/O and CPU must be connected to the power supply
chassis of the processing unit.
7-2
Vision Sensor SIMATIC VS120
Operating Instructions, Edition 02/2006, A5E00757507-01
Connecting
7.3 Connecting components
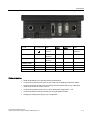
Figure 7-1
Locations of the connection element
Wiring
Connector label
Functional earth
Type
Number
of pins
Cable cross
section
Type
Screw-type
terminal
1
1.5 mm2
Stranded
conductor
Power supply
IN 24 V DC
Circular M12
connector
4
0.56 mm2
Pin
Lighting unit
LAMP
Circular M12
connector
4
0.23 mm2
Socket
Sensor head
(shielded cable)
SENSOR
HD D-sub
26
0.09 mm2
Socket
I/O
DI/DO
D-sub
15
0.14 mm2
Socket
PROFIBUS DP
DP
D-sub
9
-
Socket
Ethernet
ETHERNET
RJ45
8
-
Socket
Cable connection
• Read the guidelines on preventing electrical interference.
• Connect the processing unit to the sensor head and the lighting unit with the cables.
• Connect functional ground of the processing unit with chassis with a ring ∅ M5 and a
cable cross section of at least 1.5 mm2.
• Connect the processing unit to the 24 V DC load power supply with I = 2 A.
• Connect the PC/PG to the processing unit using an Ethernet cable.
• Arrange the cabling according to your configuration.
Vision Sensor SIMATIC VS120
Operating Instructions, Edition 02/2006, A5E00757507-01
7-3
Connecting
7.3 Connecting components
7-4
Vision Sensor SIMATIC VS120
Operating Instructions, Edition 02/2006, A5E00757507-01
Commissioning
8.1
8.1
8
Prerequisites
Notice
All activities are described based on the classic Windows Start menu.
If your Windows Start menu is not displayed in the classic style, change it as follows:
1. Right-click on the taskbar and select "Properties".
2. Change to the "Start Menu" tab and select the "Classic Start Menu" radio button.
3. Click "OK" to close the dialog box.
Requirements for commissioning:
• Administrator privileges
• Enabled JAVA JIT Compiler
Checking for administrator privileges
1. Click Start > Settings > Control Panel > Administrative Tools > Computer Management
2. Click on System > Local Users and Groups > Groups > Administrators
If you are included in the group of administrators, you have administrator privileges.
Otherwise contact your network administrator.
Vision Sensor SIMATIC VS120
Operating Instructions, Edition 02/2006, A5E00757507-01
8-1
Commissioning
8.2 Overview of the steps in commissioning
Enabling the JAVA JIT compiler
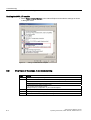
1. Select Tools > Internet Options in the Internet Explorer and make the settings as shown
in the figure below:
Figure 8-1
8.2
8.2
Settings for the Java JIT compiler
Overview of the steps in commissioning
Step
Activity
1
Turn on the VS120 processing unit
2
Establish an Ethernet connection between the VS120 processing unit and PG / PC:
2.1 Select the connection variant
2.2 Check if a proxy server is being used
2.3 If a proxy server is being used:
Change the proxy configuration of your Internet Explorer
8-2
3
Establish and check the connections
4
Start adjustment support over the Internet Explorer
5
Adjust the sensor head using adjustment support
Vision Sensor SIMATIC VS120
Operating Instructions, Edition 02/2006, A5E00757507-01
Commissioning
8.3 Turn on the VS120 processing unit
8.3
8.3
Turn on the VS120 processing unit
Initial commissioning:
Turn on the power supply of the VS120 processing unit for its initial commissioning. The
VS120 processing unit then performs a self-test:
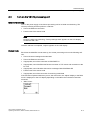
• Test of the Ethernet connection
• Function test of the sensor head
Note
During the initial commissioning, "Factory Settings Used" appears on the LCD display.
Confirm this with "OK.“
Once the self-test is completed, "Adjust" appears on the LCD display.
Normal mode:
Each time the SIMATIC VS120 starts up, the VS120 processing unit runs the following selftest:
• Test of the stored settings and model data
• Test of the Ethernet connection
• If appropriate, test of the connection to PROFINET IO
• If appropriate, test of the Ethernet RS-232 converter or TCP server and connection to the
PC / PG
• If appropriate, test of whether data can be exchanged with PROFIBUS DP
• Function test of the sensor head
• If appropriate, test of the connection for archiving model data
If the self-test completes without any errors, the main menu, the "Adjust" display or the RUN
menu is displayed on the LCD display depending on the status when the device was last
turned off.
• "Main" menu:
Vision Sensor SIMATIC VS120
Operating Instructions, Edition 02/2006, A5E00757507-01
8-3
Commissioning
8.3 Turn on the VS120 processing unit
• "Adjust" displayed on the LCD display:
• "RUN" menu:
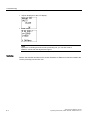
Note
Apart from controlling from the VS120 processing unit, you can also control
SIMATIC VS120 with the adjustment support.
Next step
Perform the activities described in the section Establish an Ethernet connection between the
VS120 processing unit and PC / PG.
8-4
Vision Sensor SIMATIC VS120
Operating Instructions, Edition 02/2006, A5E00757507-01
Commissioning
8.4 Establish an Ethernet connection between the processing unit and PG / PC
8.4
8.4
Establish an Ethernet connection between the processing unit and
PG / PC
8.4.1
Select the connection variant
8.4.1.1
Connection variants
You can connect the VS120 processing unit via a direct connection or via a network with a
PC / PG. In all cases, the TCP/IP Ethernet protocol is used for communication.
Direct connection
• Operating the VS120 processing unit as a DHCP server
• Connecting the VS120 processing unit manually
Connection over a network
• Integrating the VS120 processing unit as a DHCP client in a network
• Integrating the VS120 processing unit as a device in a PROFINET IO network
Notice
Operating the VS120 processing unit in a network can interfere with the communication
in your network if you make certain settings in the Connect > Ports > Ethernet > IP Mode
menu. You should therefore only connect the VS120 processing unit to the network after
you have completed configuration and checked your settings carefully.
Next step
Select one of the connection variants from the next sections.
Vision Sensor SIMATIC VS120
Operating Instructions, Edition 02/2006, A5E00757507-01
8-5
Commissioning
8.4 Establish an Ethernet connection between the processing unit and PG / PC
8.4.1.2
Operating the VS120 processing unit as a DHCP server
You want to do the following with the VS120 processing unit:
• Connect directly to the PC / PG
• Operate the VS120 processing unit as a DHCP server to assign the following addresses
of the processing unit automatically:
– IP address
– DNS server address
Notice
Under no circumstances connect the VS120 processing unit in this mode to an
existing DHCP server in the house network over a switch as you may disrupt the
operation of the house network. You can only implement an additional connection
from the PC to your previous network over a second network adapter in this PC.
Note
In this mode, you can connect up to four PCs to the VS120 processing unit via a
switch since a maximum of four IP addresses can be assigned automatically.
Procedure
1. Configure the VS120 processing unit as a DHCP server.
2. Configure your PC / PG as a DHCP client
3. Establish an Ethernet connection
Step 1: Configuring the VS120 processing unit as a DHCP server
1. After turning on the VS120 processing unit and after the self-test is completed, go to the
"Connect" menu and confirm with "OK".
2. Confirm the selected "Ports" menu command with "OK".
3. Change to the "Ethernet" menu and confirm with "OK"
4. Confirm the selected "IP Mode" menu command with "OK".
5. Select "DHCPSERV" and confirm with "OK"
8-6
Vision Sensor SIMATIC VS120
Operating Instructions, Edition 02/2006, A5E00757507-01
Commissioning
8.4 Establish an Ethernet connection between the processing unit and PG / PC
Step 2: Configure your PC / PG as a DHCP client
1. Click Start > Settings > Network and Dial-up Connections
2. In the "Network and Dial-up Connections" dialog, select your active local area connection
to the network
3. Select "Properties" in the context menu and select the "Internet Protocol (TCP/IP)" entry.
4. Click the "Properties" button
5. Select the "Obtain an IP address automatically" radio button
Step 3: Establish the Ethernet connection
1. Establish an Ethernet connection between the VS120 processing unit and PC / PG. Use
a network cable of the type "Ethernet RJ-45 (crossover)"
Note
Instead of the network cable of the type "Ethernet RJ-45 (crossover)", you can also use a
network cable of the type "Ethernet RJ-45" with a switch for the connection between the
VS120 processing unit and the PC / PG.
Next step
Perform the activities described in the section Check the connection.
8.4.1.3
Connecting the VS120 processing unit manually
You want to do the following with the VS120 processing unit:
• Connect directly to the PC / PG
• Configure manually to change the IP address of the VS120 processing unit or to assign
an address yourself
Requirements
The PC / PG has the following default network setting that it cannot/should not be modified:
In the "Internet Protocol (TCP/IP) Properties" dialog, the "Use the following IP address" radio
button is selected.
You can check the setting by following the steps described in the section "Procedure for
checking the IP setting of the PC / PG".
Procedure
1. Check the IP setting of the PC / PG
2. Configure the VS120 processing unit manually
3. Establish an Ethernet connection
Vision Sensor SIMATIC VS120
Operating Instructions, Edition 02/2006, A5E00757507-01
8-7
Commissioning
8.4 Establish an Ethernet connection between the processing unit and PG / PC
Step 1: Checking the IP setting of the PC / PG
1. Click Start > Settings > Network and Dial-up Connections
2. In the "Network and Dial-up Connections" dialog, select your active local area connection
to the network
3. Select "Properties" in the context menu and select the "Internet Protocol (TCP/IP)" entry.
4. Click the "Properties" button
5. Note down the displayed IP address and subnet mask of your PC / PG.
Step 2: Manual configuration of the VS120 processing unit
Notice
• The IP address of the VS120 processing unit must be in the same subnet as the IP
address of the PC.
• The default gateway is not necessary for a direct connection between the VS120
processing unit and a PC / PG
1. After turning on the VS120 processing unit and after the self-test is completed, go to the
"Connect" menu and confirm with "OK".
2. Confirm the selected "Ports" menu command with "OK".
3. Change to the "Ethernet" menu and confirm with "OK"
4. Confirm the selected "IP Mode" menu command with "OK".
5. Select "Manual" and confirm with "OK"
6. Change to the "IP Address" menu and confirm with "OK"
7. Now enter the IP address of the VS120 processing unit with the arrow keys and confirm
with "OK".
8. Change to the "IP Mask" menu and confirm with "OK"
9. Enter the subnet mask with the arrow keys and confirm with "OK"
Step 3: Establish the Ethernet connection
1. Establish an Ethernet connection between the VS120 processing unit and PC / PG. Use
a network cable of the type "Ethernet RJ-45 (crossover)"
Next step
Perform the activities described in the section Check the connection.
8-8
Vision Sensor SIMATIC VS120
Operating Instructions, Edition 02/2006, A5E00757507-01
Commissioning
8.4 Establish an Ethernet connection between the processing unit and PG / PC
8.4.1.4
Integrating the VS120 processing unit as a DHCP client in a network
You want to do the following with the VS120 processing unit:
• Connect to the PC / PG over your existing network
• Operate as a DHCP client because the IP address configurations are assigned to the
PCs in the existing network by a DHCP server
Notice
Depending on your network structure, it may be necessary to inform the DHCP server of
the MAC address, the unique device identifier of the VS120 processing unit. You can see
these in the Connect > Ports > Ethernet > MAC Info menu.
Note
If your network administrator can assign a DNS name (Domain Name Service) for the
VS120 processing unit, you can address the device by name in much the same way as
an intranet server.
Procedure
1. Configure the VS120 processing unit as a DHCP client
2. Configure your PC as a DHCP client
3. Establish an Ethernet connection
Step 1: Configuring the VS120 processing unit as a DHCP client
1. After turning on the VS120 processing unit and after the self-test is completed, go to the
"Connect" menu and confirm with "OK".
2. Confirm the selected "Ports" menu command with "OK".
3. Change to the "Ethernet" menu and confirm with "OK"
4. Confirm the selected "IP Mode" menu command with "OK".
5. Select "DHCP" and confirm with "OK"
Step 2: Configuring your PC as a DHCP client
1. Click Start > Settings > Network and Dial-up Connections
2. In the "Network and Dial-up Connections" dialog, select your active local area connection
to the network
3. Select "Properties" in the context menu and select the "Internet Protocol (TCP/IP)" entry.
4. Click the "Properties" button
5. Select the "Obtain an IP address automatically" radio button
Vision Sensor SIMATIC VS120
Operating Instructions, Edition 02/2006, A5E00757507-01
8-9
Commissioning
8.4 Establish an Ethernet connection between the processing unit and PG / PC
Step 3: Establish the Ethernet connection
1. Establish an Ethernet connection between your PC and your existing network. Use a
network cable of the type "Ethernet RJ-45"
2. Establish an Ethernet connection between the VS120 processing unit and your existing
network. Use a network cable of the type "Ethernet RJ-45"
Next step
Follow the steps described in the section Check whether a proxy server is being used.
8.4.1.5
Integrating the VS120 processing unit as a device in a PROFINET IO network
You want to do the following with the VS120 processing unit:
• Connect to the PC / PG over your existing PROFINET IO network
• Integrate the unit as a device in a PROFINET IO network because the IP configuration
will be assigned by the PROFINET IO controller
Notice
The IP configuration of the VS120 processing unit is set in STEP 7. It is not possible to
set the parameters on the VS120 processing unit.
Procedure
1. Configure the VS120 processing unit as a PROFINET IO device
2. Make the parameter settings for the IP configuration of the VS120 processing unit in
STEP 7.
3. Integrate your PC in the PROFINET IO network
4. Establish an Ethernet connection
Step 1: Configuring the VS120 processing unit as a PROFINET IO device
1. After turning on the VS120 processing unit and after the self-test is completed, go to the
"Connect" menu and confirm with "OK".
2. Confirm the selected "Ports" menu command with "OK".
3. Change to the "Ethernet" menu and confirm with "OK"
4. Confirm the selected "IP Mode" menu command with "OK".
5. Select "PNIO" and confirm with "OK"
Note
The VS120 processing reboots after the IP mode is changed to "PNIO".
8-10
Vision Sensor SIMATIC VS120
Operating Instructions, Edition 02/2006, A5E00757507-01
Commissioning
8.4 Establish an Ethernet connection between the processing unit and PG / PC
Step 2: Setting the parameters for the IP configuration of the VS120 processing unit in STEP 7
For a description, refer to the section: Integrating the PROFINET IO device SIMATIC VS120
in HW Config
Step 3: Integrating your PC in the PROFINET IO network
Notice
• The network attachment must not have an IP address that is already being used in your
network
• The IP address of the PC must be in the same subnet as the IP address of the VS120
processing unit. If necessary, the port configuration of the PC must be adapted
1. Click Start > Settings > Network and Dial-up Connections
2. In the "Network and Dial-up Connections" dialog, select the existing local area connection
to the network. This must have the status "Enabled".
3. Select "Properties" in the context menu and select the "Internet Protocol (TCP/IP)" entry.
4. Click the "Properties" button
5. Select the "Use the following IP address" radio button
6. Adapt the "IP address" and "Subnet mask" to your PROFINET IO network
Step 4: Establish the Ethernet connection
1. Establish an Ethernet connection between your PC and a switch in your existing
PROFINET IO network. Use a network cable of the type "Ethernet RJ-45"
2. Establish an Ethernet connection between the VS120 processing unit and your existing
network. Use a network cable of the type "Ethernet RJ-45"
Next step
Follow the steps described in the section Check whether a proxy server is being used.
Vision Sensor SIMATIC VS120
Operating Instructions, Edition 02/2006, A5E00757507-01
8-11
Commissioning
8.4 Establish an Ethernet connection between the processing unit and PG / PC
8.4.2
Check whether a proxy server is being used
If the VS120 processing unit is used in a network with proxy servers, the following problems
can occur:
• The address entered for the VS120 processing unit is not known to the Internet Explorer
• Error message when starting adjustment support
You should therefore check whether or not a proxy server is entered in the "Local Area
Network (LAN) Settings" dialog of the Internet Explorer.
Procedure
1. Start the Internet Explorer and select the menu command Tools > Internet Options...
2. Click on the "Connections" tab
3. Click on the "LAN Settings" button in the "Local Area Network (LAN) settings" group box.
4. If the "Use a proxy server" check box is selected in the "Proxy server" group box, a proxy
server is used and the "Advanced" button is enabled.
Result
A proxy server is used in the Internet Explorer if one of the following conditions is met:
• The "Use a proxy server for your LAN" check box is enabled in the "Proxy server" group
box
• The "Advanced" button is enabled.
Next step
• Follow the steps described in the section Change the proxy configuration of your Internet
Explorer only if a proxy server is used in the Internet Explorer
• If no proxy server is used in the Internet Explorer, skip to the steps described in the
section Check the connection
8-12
Vision Sensor SIMATIC VS120
Operating Instructions, Edition 02/2006, A5E00757507-01
Commissioning
8.4 Establish an Ethernet connection between the processing unit and PG / PC
8.4.3
Change the proxy configuration of your Internet Explorer
Change the proxy configuration of your Internet Explorer only if a proxy server is used in the
Internet Explorer.
Procedure
1. Start the Internet Explorer and select the menu command Options > Internet Options
2. Click on the "Connections" tab
3. Click on the "LAN Settings" button in the "Local Area Network (LAN) settings" group box.
4. In the next dialog "Local Area Network (LAN) Settings", clear all the check boxes and
confirm with OK
Figure 8-2
Settings for the local area network
As an alternative, if the "Use a proxy server for your LAN" check box needs to be
selected, click the "Advanced" button in the "Proxy server" area and enter the current IP
address of the VS120 processing unit in the "Exceptions" area in the "Proxy Settings"
dialog.
Note
You can also enter computer names in the "Exceptions" area. The computer name is
resolved into a static or dynamic IP address by the DNS server in the network.
Next step
Perform the activities described in the section Check the connection.
Vision Sensor SIMATIC VS120
Operating Instructions, Edition 02/2006, A5E00757507-01
8-13
Commissioning
8.4 Establish an Ethernet connection between the processing unit and PG / PC
8.4.4
Check the connection
Checking the connection tells you whether or not the configured Ethernet connection
between the PC and the VS120 processing unit is working.
You can only start adjustment support from your Internet Explorer and operate the VS120
processing unit from your PC after you have checked the connection.
Requirements
• The VS120 processing unit was either integrated in your existing network or connected
directly to a PC
• The network cable is connected to the VS120 processing unit
• The VS120 processing unit is connected to a 24 V DC power supply unit and is being
supplied with power
• The VS120 processing unit self-test is completed
Procedure
1. Make sure that the VS120 processing unit and PC are correctly connected to the existing
network or are connected together using an Ethernet crossover cable
2. After turning on the VS120 processing unit and after the self-test is completed, go to the
"Connect" menu and confirm with "OK".
3. Confirm the selected "Ports" menu command with "OK".
4. Change to the "Ethernet" menu and confirm with "OK"
5. Change to the "IP Address" menu and confirm with "OK"
6. Note down the IP address displayed on the VS120 processing unit
7. Open the command prompt on the PC with Start > Run and enter the program name
"cmd".
8. In the command prompt, enter the following:
ping <IP address or name of the VS120 processing unit>
Example: ping 192.168.0.42
9. Confirm your entry by pressing the enter key on the keyboard
Result
If the connection from the PC to the VS120 processing unit exists, 4 packets are first sent
from the PC to the processing unit as shown above and then 4 packets are returned from the
VS120 processing unit to the PC.
The reply from the VS120 processing unit appears on the PC, for example, as follows:
Reply from 192.168.0.2 bytes=32 time<10ms TTL=255
Reply from 192.168.0.2 bytes=32 time<10ms TTL=255
Reply from 192.168.0.2 bytes=32 time<10ms TTL=255
Reply from 192.168.0.2 bytes=32 time<10ms TTL=255
This is followed by the ping statistics for 192.168.0.2.
8-14
Vision Sensor SIMATIC VS120
Operating Instructions, Edition 02/2006, A5E00757507-01
Commissioning
8.5 Start setup support over the Internet Explorer
Next step
• If you receive a reply from the VS120 processing unit on the PC, follow the steps
described in the section Start adjustment support over the Internet Explorer
• If you do not receive a reply from the VS120 processing unit, repeat the steps described
in the section Establish connection and between VS120 processing unit and PG / PG
and/or contact your network administrator
8.5
8.5
Start setup support over the Internet Explorer
To be able to work with the adjustment support implemented on the VS120 processing unit,
establish a connection from the Internet Explorer to the adjustment support
Requirements
The section Establishing a connection between the VS120 processing unit and PC / PG was
completed successfully. As described in the section Check the connection, you have
established a confirmed connection from the VS120 processing unit to the PC / PG.
Procedure
1. Start the PC
2. Turn on the power supply of the VS120 processing unit. Once the self-test has
completed, go to "Adjust" in the LSD display
3. Press the OK button of the VS120 processing unit. The IP address appears on the LCD
display
4. Note down the IP address of the VS120 processing unit
5. Start the Internet Explorer
6. In the "IP address" input box, enter the IP address of the VS120 processing unit.
7. Press the enter key on the keypad
Vision Sensor SIMATIC VS120
Operating Instructions, Edition 02/2006, A5E00757507-01
8-15
Commissioning
8.5 Start setup support over the Internet Explorer
Result
The start page of the "Vision Sensor SIMATIC VS120" adjustment support appears in the
Internet Explorer. From here, you have access to all functions required to test the models.
Figure 8-3
Home
The adjustment support is started with "Adjust Sensor". The SIMATIC VS120 then
automatically blocks operator input at the VS120 processing unit. The LCD display of the
VS120 processing unit displays the message: "Settings controlled by Web".
Next step
Follow the steps described in the section Adjust the sensor head using adjustment support.
8-16
Vision Sensor SIMATIC VS120
Operating Instructions, Edition 02/2006, A5E00757507-01
Commissioning
8.6 Adjust the sensor head using setup support
8.6
8.6
Adjust the sensor head using setup support
Before you commission the "SIMATIC VS120 Vision Sensor", you must adjust the sensor
head correctly You do this with the "SIMATIC VS120 Vision Sensor" adjustment support that
is available in the Internet Explorer. The adjustment support shows you an image as seen by
the sensor head.
Note
Online Help
At the bottom right of each page of adjustment support, you will see a “Help” button with
which you can call up online help at any time. The relevant help text of the online help opens
depending on the currently open dialog.
Requirements
The Start Page of the "SIMATIC VS120 Vision Sensor" adjustment support was started over
the Internet Explorer
Procedure
1. On the start page of the adjustment support, click on "Sensor Adjustment". The
"Adjustment" user interface opens. The sensor head view is displayed and updated
several times per second.
Figure 8-4
Adjustment
Vision Sensor SIMATIC VS120
Operating Instructions, Edition 02/2006, A5E00757507-01
8-17
Commissioning
8.6 Adjust the sensor head using setup support
2. Position an object below the sensor head
3. Set the displayed image to that it is sharp by adjusting the distance between the end of
the sensor head and the model correctly
4. Secure the sensor head and then check the image sharpness again
5. Make sure that the triggering is exact and the content of the image has as much contrast
as possible
If necessary, correct the settings or use the automatic shutter mode. You can set the
following parameters:
– Exposure settings
– Trigger settings
– Precision
– Distortion
Notice
If Shutter is set to Auto, the model must remain fully in the image for at least 100 ms.
6. Click the "Apply" button to save the settings.
Note
If you have too many errors, clean the lens and diffuser with a lint-free cloth.
Result
You have successfully commissioned "SIMATIC VS120 Vision Sensor". You can now train
and process your models for your application. Refer to the section Operation for more
information.
8-18
Vision Sensor SIMATIC VS120
Operating Instructions, Edition 02/2006, A5E00757507-01
9
Operation
9.1
9.1
Overview
There are two ways of operating the SIMATIC VS120:
• From the VS120 processing unit, see the section: Working with the VS120 processing
unit
• Using adjustment support See the section Working with adjustment support on the PC
You can set and change all parameter settings with adjustment support on the PC.
Configuration on the VS120 processing unit itself is limited.
9.2
9.2.1
9.2
Working with the processing unit
Introduction
The display of the VS120 processing unit is used to show the coordinates and the orientation
of the test object currently being viewed and the associated quality value. You can also
navigate between the menus and make entries in the LCD display.
Example of an LCD display:
M 01 RUN N
X=−299.0
Y=0.0
↓
OK:Info
Five levels are implemented as selection menus or displays:
• Adjust
• Connect
• RUN
• Options
• Maintain
Vision Sensor SIMATIC VS120
Operating Instructions, Edition 02/2006, A5E00757507-01
9-1
Operation
9.2 Working with the processing unit
9.2.2
Adjust
"Adjust" display
The Adjust LCD display displays the current IP address.
9.2.3
Connect
"Connect" menu
The following schematics provide you with an overview of all the parameters of the SIMATIC
VS120 that can be set in the Connect menu.
9-2
Vision Sensor SIMATIC VS120
Operating Instructions, Edition 02/2006, A5E00757507-01
Operation
9.2 Working with the processing unit
Figure 9-1
Structure of the Connect menu
Vision Sensor SIMATIC VS120
Operating Instructions, Edition 02/2006, A5E00757507-01
9-3
Operation
9.2 Working with the processing unit
Figure 9-2
Structure of the Connect menu continued
"Connect" parameter menu
Parameters
Port
Path
Possible Values
Default
Meaning
Pulsetime
Ports>DI/DO
5 to 999
30
Pulse time of the digital outputs OK,
N_OK in ms on the DI/DO interface
Address
(not active if IP
Mode = PNIO)
Ports>DP
1 to 125
7
Address on PROFIBUS DP
Timeout
Ports>DP
100 to 2000
500
Handshake monitoring time in ms
Pulsetime
(not active if IP
Mode = PNIO)
Ports>DP
5 to 999
30
Pulse time of the digital outputs OK,
N_OK in ms when output is via
PROFIBUS DP
DevName
(only active if IP
Mode = PNIO)
Ports>PNIO
String (0 to 9, A to
Z, a to z, ".", "-").
The string must
match the
conventions of the
domain name
system.
VS120
Name of the device on PROFINET
Timeout
(only active if IP
Mode = PNIO)
Ports>PNIO
100 to 2000
500
Handshake monitoring time in ms
Pulsetime
(only active if IP
Mode = PNIO)
Ports>PNIO
5 to 999
30
Pulse time of the digital outputs OK,
N_OK in ms when output is via
PROFINET IO
(not active if IP
Mode = PNIO)
Note: PROFINET is not case sensitive
Note: For the pulse time, select a higher
value than for the update time of the
PROFINET IO system in HW Config.
IP mode
9-4
Ports>Ethernet
Assignment of the IP address to the
processing unit in the network.
Vision Sensor SIMATIC VS120
Operating Instructions, Edition 02/2006, A5E00757507-01
Operation
9.2 Working with the processing unit
Parameters
Port
Path
Possible Values
Default
Meaning
IP Address
Ports>Ethernet
xxx.xxx.xxx.xxx
192.168.0.42
IP address of the processing unit
(xxx = 0 to 255)
IP Mask
(not active if IP
Mode = DHCP)
Ports>Ethernet
xxx.xxx.xxx.xxx
(xxx = 0 to 255)
(An IP address consists of four numbers
separated by periods with each number
being in a range from 0 to 255.)
255.255.255.0
except:
0.0.0.0
For xxx.xxx.xxx.xxx, binary requires that
the left part be made up of ones without
a gap and the right part be made up of
zeros without a gap. Example:
11111111.10100000 is not permitted.
255.255.255.255
Gateway
(not active if IP
Mode = DHCP)
Ports>Ethernet
MAC Info
Ports>Ethernet
IP Address
xxx.xxx.xxx.xxx
The subnet mask indicates which part of
the IP address specifies the network and
which part specifies the VS120
processing unit:
192.168.0.255
IP address of the network node that can
establish connections outside of the
current subnet
Cannot be
modified
Device-dependent
The MAC address (Media Access
Control) is the hardware address of each
network device and is used to identify
the device uniquely in the network.
Ports>
TCP/RS232
xxx.xxx.xxx.xxx
192.168.0.43
IP address of the Ethernet RS-232
converter or of the PC/PG on which a
TCP server runs.
IP port
Ports>
TCP/RS232
1 to 65535
8000
IP port of the Ethernet RS-232 converter
or of the PC/PG on which a TCP server
runs.
Timeout
Ports>
TCP/RS232
0 to 3600
0
•
(xxx=0 to 255)
(xxx=0 to 255)
•
Vision Sensor SIMATIC VS120
Operating Instructions, Edition 02/2006, A5E00757507-01
0: There is no transfer of cyclic
monitoring frames to determine
whether the connection still exists
between the processing unit and the
Ethernet RS-232 converter or the
PC/PG on which a TCP server runs.
Otherwise: Time in seconds after
which a monitoring frame is sent to
determine whether the connection
still exists between the processing
unit and the Ethernet RS-232
converter or the PC/PG on which a
TCP server runs. The check is
implemented by sending the "Idling
string" ("IdleStr." menu) to the
recipient at the intervals set with the
parameter. If the check fails, an error
is output (only when the processing
unit is in RUN) and the connection is
reestablished.
9-5
Operation
9.2 Working with the processing unit
Parameters
Port
Path
Possible Values
Default
Meaning
IdleStr.
Ports>
TCP/RS232
Freely selectable
character string
\r\n
String to determine whether the
connection still exists between the
processing unit and the Ethernet RS-232
converter or the PC/PG on which a TCP
server runs. It is transferred cyclically.
Select this so that the recipient can
clearly distinguish it from the generated
results.
The string can be a maximum of 100
bytes.
IP Address
Ports>
Archive
xxx.xxx.xxx.xxx
192.168.0.45
IP address of the server for diagnostic
information
Port
Ports>
Archive
1 to 65535
8765
Corresponding port of this server
Timeout
Ports>
Archive
0 to 3600
10
•
(xxx=0 to 255)
•
Parameters
Integrate
Path
Possible Values
Source
Integrate>
Trigger
•
•
•
Edge
(only if Source=
TCP/RS-232)
Integrate>
Trigger
•
•
String
(only if Source=
TCP/RS-232)
Integrate>
Trigger
Debounce
Integrate>
Trigger
9-6
0: There is no transfer of cyclic
monitoring frames to check the
connection between processing unit
and server.
Otherwise: Time in seconds after
which a monitoring frame is sent to
check the connection between
processing unit and server. If the
server does not respond to this
frame within the monitoring time, an
error is output (only when the
processing unit is in RUN) and the
connection is reestablished.
Default
Meaning
DI/DO
DP or PNIO
TCP/RS-232
DI/DO
Here, you set the port over which the
trigger signal is sent to the processing
unit.
Rising
Falling
Rising
The function indicates whether the
trigger is on a rising or falling edge.
ASCII characters
T
If the string specified here is sent over
the RS-232 port of an RS-232 Ethernet
converter or a TCP server, the
processing unit generates a trigger
signal.
0 to 9999 ms
0 ms
The function indicates the period for
which triggers are ignored due to
debouncing.
Vision Sensor SIMATIC VS120
Operating Instructions, Edition 02/2006, A5E00757507-01
Operation
9.2 Working with the processing unit
Parameters
Integrate
Path
Possible Values
Delay
Integrate>
Trigger
•
•
DelaySrc
Integrate>
Trigger
•
•
•
Default
Meaning
0 to 9999 ms
0 ms
for normal
triggers
0 to 9999950
µs with a fast
trigger or if
DelaySrc is not
manual
This is where you enter the time by
which the trigger signal should be
delayed.
Manual
DP(S7) or
PNIO(S7)
DP or PNIO
Manual
Note:
• DP(S7) corresponds to
PROFIBUS DP with S7 format (big
endian format)
• DP corresponds to PROFIBUS DP
with Intel format (little endian format)
Note:
If DelaySrc is not manual, the values
received via DP / PNIO are displayed
here. They cannot be edited.
DP(S7) or
PNIO(S7)
(only if Control DP
or PNIO)
Integrate>
Trigger>
DelaySrc
-
-
The trigger delay is received through the
DP(S7) or PNIO(S7) user data interface
from the controller in S7 format.
DP or PNIO
(only if Control DP
or PNIO)
Integrate>
Trigger>
DelaySrc
-
-
The trigger delay is received by the
controller over the user data interface
DP or PNIO in Intel format.
Manual
Integrate>
Trigger>
DelaySrc
-
-
Editable values are used in the delay.
Output
Integrate
•
•
•
DP or PNIO
TCP/RS-232
None
None
This is where you enter the interface via
which the results are output.
OK/N_OK
Integrate
•
•
•
DP or PNIO
DI/DO
None
DI/DO
Here, you specify the interface over
which the result bits OK and N_OK are
output.
Control
Integrate
•
•
DP or PNIO
DI/DO
DI/DO
Here you specify the port for the DISA,
SEL0, SEL1, SEL2, SEL3, RES, IN_OP,
TRD, RDY signals.
DiagImage
Integrate
•
•
None
Archives
None
This is where you specify if the
diagnostic images should be sent to a
server.
DiagReport
Integrate
•
•
None
Archives
None
This is where you specify if the
diagnostic reports should be sent to a
server.
Vision Sensor SIMATIC VS120
Operating Instructions, Edition 02/2006, A5E00757507-01
9-7
Operation
9.2 Working with the processing unit
Parameters
Output
Path
Possible Values
Default
Meaning
Encoding
Output
•
•
Binary
ASCII
Binary
The results for the main ROI and subROI are sent as binary data or ASCII
strings through the output interface set
in Integrate>Output
Byte order
(only if Encoding =
Binary)
Output
•
•
S7
Intel
S7
Specifies the byte sequence for data
types greater than 8 bits.
S7 format:
Big endian (for a data type greater than
8 bits, the low byte is at the most
significant byte position.)
Intel format:
Little endian (for a data type greater than
8 bits, the low byte is at the least
significant byte position.)
Format (only if
Encoding = ASCII)
Output
•
•
CSV
Fix
CSV
This is where you enter the format for
your output data.
• CSV: Send in CSV format
• Fix: Send individual results with a
fixed length of 12 characters
Position
Output
•
•
Absolute
Trained
Absolute
This is where you specify the reference
point.
Absolute:
The position of all ROIs are output as
absolute in relation to the image center
Trained::
The position of the main ROI is output
relative to its position at training based
on the image center.
The position of the sub-ROI is output
relative to its position at training based
on the center of the main ROI.
Note:
This parameter only relates to the
results to be transferred and not to the
displayed results from the screen and
applets.
Sub-ROIs
9-8
Output
0 … 16
16
This is where you enter the number of
sub-ROIs that you wish to transfer.
Vision Sensor SIMATIC VS120
Operating Instructions, Edition 02/2006, A5E00757507-01
Operation
9.2 Working with the processing unit
9.2.4
RUN
RUN menu
The following table shows the menus of the RUN menu level.
Menu
Meaning
Model
Select the model number
Note:
May also be model set depending on the configuration.
STOP
Stop processing and change to the STOP menu level
QLimit
Enter the quality value for the evaluation as a percentage.
Note:
The display is only visible if you are not working with model sets.
Info
Information function
ResetStat
Resets all statistical information.
Vision Sensor SIMATIC VS120
Operating Instructions, Edition 02/2006, A5E00757507-01
9-9
Operation
9.2 Working with the processing unit
Structure of the Info display for a model from the RUN menu
STOP
Q−Limit
>Info
ESC ↓↑
OK
M 02 OK
=0
=0.000%
1/14 ↓
OK
OK
M 02 Angle
min=0.0
max=0.0
10/14 OK
OK
M 02 ROI Pos
cx=96
cy=94
11/14 OK
M 02 Curr.
Cycletime
=0ms
4/14 OK
M 02 ROI Dim
width=310
height=298
12/14 OK
M 02 Cycle
min=0.0ms
max=0.0ms
5/14 OK
DHCP−IP:
141.73.
11.117
13/14 ↑
M 02 WARN
=0
=0.000%
2/14 M 02 N_OK
=0
=0.000%
3/14 M 02 Trig.
Too Fast
=0
6/14 → OK
M 02 Trig.
Too Fast
=0.000%
6/14 ← OK
OK
Transient
Errors
=1
14/14 ↑
OK
M 02 Qual.
min=0.0%
max=0.0%
7/14 OK
M 02 X−Pos
min=0.0
max=0.0
8/14 OK
M 02 Y−Pos
min=0.0
max=0.0
9/14 OK
Figure 9-3
Info display for a model from the RUN menu
Note
"Transient Errors", the last menu command in the RUN menu, only appears when an error
occurs.
9-10
Vision Sensor SIMATIC VS120
Operating Instructions, Edition 02/2006, A5E00757507-01
Operation
9.2 Working with the processing unit
Sequence of tasks in the RUN menu for a model based on the example of a model with number 2:
Step
Display
Activity
1
STOP
Q−Limit
> Info
ESC
↓↑
Select "Info" on the processing unit at the "RUN" menu level using
the ⇓ and ⇑ arrow keys and press "OK". This opens the first Into
screen.
OK
2
M 02
=3226
=99.907%
1/14 ↓
Step
OK
OK
Display
Meaning
1
M 02
=3226
=99.907%
1/14 ↓
OK
OK
2
M 02 WARN
=6
=0.194%
2/14 Since the last processing start, the pattern search for model 2 was
performed successfully in 3226 image recordings. This
corresponds to 99.907% of all images processed since processing
last started.
6 examinations were below the warning limit since the last start of
processing. This corresponds to 0.194 % of all images processed
since processing last started.
OK
3
M 02 N_OK
=3
=0.093%
3/14 Using the arrow buttons ⇓ and ⇑, you can display further Info
screens. Pressing "OK" returns you to the highest hierarchy level
of the "RUN" menu.
3 specimens could not be identified as model 2 since processing
started. This corresponds to 0.093 % of all images processed
since processing last started.
OK
4
M 02 Curr.
Cycletime
=300ms
4/14 OK
The required processing time (cycle time) for the specimen
currently under examination is 300 ms.
M 02 Cycle
min=120ms
max=276ms
5/14 OK
Since the beginning of the statistical analysis for model 02, the
shortest evaluation time was 120 ms and the longest 276 ms.
5
Vision Sensor SIMATIC VS120
Operating Instructions, Edition 02/2006, A5E00757507-01
9-11
Operation
9.2 Working with the processing unit
Step
Display
Meaning
6
M 02 Trig.
Too Fast
=0.000%
6/14 ← OK
M 02 Qual.
min=85%
max=99%
7/14 OK
Since the beginning of the statistical analysis for the model 02, the
lowest quality value was 85% and the highest 99%.
M 02 X−Pos
min=−222
max=233
8/14 OK
Since the beginning of the statistical analysis for model 02, the
lowest x coordinate of the target rectangle was -222 and the
highest 233.
M 02 Y−Pos
min=−14
max=89
9/14 OK
Since the beginning of the statistical analysis for model 02, the
lowest y coordinate of the target rectangle was -14 and the highest
89.
7
8
9
10
M 02 Angle
min=−120.1
max=179.3
10/14 OK
11
.
Since the beginning of the statistical analysis for the model 02, the
lowest roll angel was -120.1° and the highest 179.3°.
M 02 ROI Pos
cx=−2
cy=4
11/14 OK
For model 02, the midpoint of the target rectangle has the following
coordinates: x=-2, y=4
M 02 ROI Dim
width=101
height=102
12/14 OK
For model 02, the target rectangle has the following dimensions:
Width=101, Height=102
12
9-12
Absolute and relative number of image
processing procedures during which the
next trigger signal came too fast
M 02 Trig.
Too Fast
=0
6/14 ← OK
Vision Sensor SIMATIC VS120
Operating Instructions, Edition 02/2006, A5E00757507-01
Operation
9.2 Working with the processing unit
Step
Display
Meaning
13
ManuelIP:
192.168.
0.42
13/14 OK
14
Transient
Errors
=1
14/14 ↑
OK
Vision Sensor SIMATIC VS120
Operating Instructions, Edition 02/2006, A5E00757507-01
Display of the IP address of the processing unit in the network.
Connection interrupted in the PROFIBUS DP or PROFINET IO
network.
9-13
Operation
9.2 Working with the processing unit
Structure of the Info display for a model set from the RUN menu
STOP
Q−Limit
>Info
ESC
OK
S 02
=3226
=99.907%
1/8
↓
OK
OK
S 02 WARN
=6
=0.194%
2/8
OK
S 02 N_OK
=3
=0.093%
3/8
OK
S 02 Curr.
Cycletime
=300ms
4/8
OK
S 02 Cycle
min=120ms
max=276ms
5/8
OK
S 02 Trig.
Too Fast
=0
6/9
→ OK
M 02 Trig.
Too Fast
=0.000%
6/9 ← OK
ManuelIP:
192.168.
0.42
7/8
OK
Transient
Errors
=1
8/8
↑
OK
Figure 9-4
RUN menu for a model set
Note
"Transient Errors", the last menu command in the RUN menu, only appears when an error
occurs.
9-14
Vision Sensor SIMATIC VS120
Operating Instructions, Edition 02/2006, A5E00757507-01
Operation
9.2 Working with the processing unit
9.2.5
Options
Options menu
The following schematics provide you with an overview of all the parameters of the SIMATIC
VS120 that can be set in the Options menu.
Figure 9-5
Structure of the options menu
Vision Sensor SIMATIC VS120
Operating Instructions, Edition 02/2006, A5E00757507-01
9-15
Operation
9.2 Working with the processing unit
Options parameter menu
Parameters
Light
Path
Possible Values
Type
Light
•
•
•
Parameters
Diagnostics
Path
Possible Values
Buffer
Diagnose>
Logging>
Images
•
•
IR
Red
Other
Ring
Stack
Default
Meaning
Red
Here, you enter the type of illumination
being used.
Default
Meaning
Ring
•
•
•
Type of image buffer:·
Ring: When the buffer contains 6
entries, entries 1,2 ... are overwritten.
Stack: When the buffer contains 6
entries, no further entries are made.
Reasons
Diagnose>
Logging>
Images
•
•
•
•
•
Trigger
N_OK
OK
WARN
Train
N_OK
This is where you specify what causes
an image to be saved.
Record
Diagnose>
Logging>
Images
•
•
Image
+/- 1 Image:
Image
•
Save Next
Diagnose>
Logging>
Images
•
•
On
Off
Off
•
On: The image belonging to the next
NOK event is saved permanently in
the EEPROM.
Buffer
Diagnose>
Logging>
Report
•
•
Ring
Stack
Ring
•
Ring: When the diagnostic buffer
contains 5000 entries, entries 1,2 ...
are overwritten.
Stack: When the diagnostic buffer
contains 5000 entries, no further
entries are made.
Diagnose>
Logging>
Report>
Permanent
•
•
Save Next
•
•
On
Off
Off
Image: If one or more of the causes
listed above occurs, the current
image is saved.
+/- 1 Image: Not only the current
image but also the previous and next
image are saved.
As soon as the function is enabled, as
many diagnostic entries as you specify
in “Entries” are saved in the EEPROM.
Existing entries are deleted when you
switch over to On. If the diagnostic
buffer in the EEPROM reaches the
number of permanently storable
diagnostic data records, no further
entries are made.
Note: Deleting takes several seconds.
Entries
9-16
Diagnose>
Logging>
Report>
Permanent
10 to 2000
2000
Number diagnostic data records that can
be stored on the EEPROM
Vision Sensor SIMATIC VS120
Operating Instructions, Edition 02/2006, A5E00757507-01
Operation
9.2 Working with the processing unit
Parameters
Diagnostics
Path
Possible Values
Default
Meaning
Clear
Diagnose>
Logging>
Report>
Permanent
-
-
Delete all the diagnostic entries stored
on the EEPROM
Timebase
Diagnose>
Logging
•
•
SNTP IP
Diagnose>
Logging
xxx.xxx.xxx.xxx
Diagnose>
Monitor
•
•
(only when
Timebase= SNTP)
Update
Note: Deleting takes several seconds.
PC
SNTP
PC
Here, you specify the source for the time
stamp of the diagnostic events.
192.168.0.44
IP address of the SNTP server
On
This is where you specify if diagnostic
images, reports and a current image is
to be displayed in processing mode.
• On: Display
• Off: Not displayed
(xxx=0 to 255)
On
Off
Vision Sensor SIMATIC VS120
Operating Instructions, Edition 02/2006, A5E00757507-01
9-17
Operation
9.2 Working with the processing unit
9.2.6
Maintain
Maintain menu
The following schematics provide you with an overview of all the parameters of the SIMATIC
VS120 that can be set in Maintain.
0DLQWDLQ
'HOHWH
)DFWRU\6
5HVWDUW
Figure 9-6
Structure of the Maintain menu
Maintain parameter menu
Parameters
Maintain
Path
Possible Values
Default
Meaning
Delete
Maintain>
Delete
Model 01 to model
64
01
This function deletes individual models
FactoryS
Maintain>
FactoryS
•
•
ESC
OK
-
This function resets the VS120
processing unit to the factory settings
and restarts it.
Restart
Maintain>
Restart
•
•
ESC
OK
-
This function restarts the VS120
processing unit.
9-18
Vision Sensor SIMATIC VS120
Operating Instructions, Edition 02/2006, A5E00757507-01
Operation
9.3 Working with setup support
9.3
9.3.1
9.3
Working with setup support
Introduction
Notice
Possible data loss!
The editing data is lost if the Internet Explorer or the input screens are turned off without first
saving the data because the application does not have session memory.
You should therefore always save your data to avoid losing it.
Note
Online Help
At the bottom right of each page of adjustment support, you will see a “Help” button with
which you can call up online help at any time. The relevant help text of the online help opens
depending on the currently open dialog.
Open the Start Page of the adjustment support in the Internet Explorer, refer to the section
"Commissioning using adjustment support on the PG / PC with installed Internet Explorer".
With “Adjust Sensor”, you display the user interface of the SIMATIC VS120.
Note
When you open adjustment support, the dialog that opens corresponds to the current
operating state of the VS120 processing unit. The appropriate job is activated depending on
the previous operating state of the VS120 processing unit.
Vision Sensor SIMATIC VS120
Operating Instructions, Edition 02/2006, A5E00757507-01
9-19
Operation
9.3 Working with setup support
If, for example, the VS120 processing unit is in Stop mode, the page below opens:
Figure 9-7
Stop
In the left part of the user interface, you will see the list of jobs in the form of buttons. You
activate the required job by clicking on the appropriate button. The corresponding dialog then
opens on the right of the user interface. At the same time, the text of the buttons becomes
bold and the font color changes to blue.
The SIMATIC VS120 Vision Sensor user interface based on the Web server, provides the
following dialog boxes for processing images:
9-20
Vision Sensor SIMATIC VS120
Operating Instructions, Edition 02/2006, A5E00757507-01
Operation
9.3 Working with setup support
Task
• Adjustment;
• Connections;
• Train;
• Run;
• Options;
• Info;
• Management;
• Stop
Traffic Light
Below the Job buttons, there is a traffic light with which you can see the operating status of
the VS120 processing unit at a glance. The traffic light can have the following states:
• Green: VS120 processing mode with results output
• Yellow: STOP including adjustment and training
• Red: Errors
Vision Sensor SIMATIC VS120
Operating Instructions, Edition 02/2006, A5E00757507-01
9-21
Operation
9.3 Working with setup support
Error display
If an error occurs, the traffic light changes to red and the corresponding error message, the
meaning of the error and ways to eliminate the error are displayed.
You acknowledge the error by clicking the "Acknowledge" button.
Figure 9-8
Error Message
Changing the language setting
At the bottom left, you will see a drop-down list box for language selection. You can change
the language setting for the entire user interface at any time.
9-22
Vision Sensor SIMATIC VS120
Operating Instructions, Edition 02/2006, A5E00757507-01
Operation
9.3 Working with setup support
User name
The currently logged on user, WEB for example, is shown at the upper right of the page. By
clicking on the user name, you open "Options - Security tab".
The following users are possible:
• WEB (default): General user who can execute tasks without explicitly logging on
• Service: Service technicians
• User1: Freely available
• Admin: Administrator
The "Admin" user assigns permissions for all users and changes their passwords.
Note
The "WEB" setting effectively means no user. It simply indicates that there is a connection
between the Web browser and the adjustment support.
Help
At the bottom right, you will see a “Help” button with which you can call up online help at any
time.
Vision Sensor SIMATIC VS120
Operating Instructions, Edition 02/2006, A5E00757507-01
9-23
Operation
9.3 Working with setup support
9.3.2
Adjust Sensor
In this dialog, you make the basic settings for processing the image.
Figure 9-9
Adjustment
Settings
This is where you enter the parameters for image capture and processing.
9-24
Vision Sensor SIMATIC VS120
Operating Instructions, Edition 02/2006, A5E00757507-01
Operation
9.3 Working with setup support
9.3.3
Connections
The Connections dialog is made up of the following three parts:
• Part 1/3: Interfaces
• Part 2/3: Integration
• Part 3/3: Version
Part 1/3: Interfaces
Here, you specify the communication ports and the parameters for the ports.
Figure 9-10
Connections - Ports tab
Vision Sensor SIMATIC VS120
Operating Instructions, Edition 02/2006, A5E00757507-01
9-25
Operation
9.3 Working with setup support
Part 2/3: Integration
This is where you specify the path over which signals are sent to the VS120 processing unit
and over which path the results are output.
Figure 9-11
9-26
Connections - Integration tab
Vision Sensor SIMATIC VS120
Operating Instructions, Edition 02/2006, A5E00757507-01
Operation
9.3 Working with setup support
Part 3/3: Version
This is where you specify the format for outputting the results through the interface set in the
Connections - Output selection menu of the "Connections - Integration tab".
Figure 9-12
9.3.4
Connections - Output tab
Train
When a model is transferred, the SIMATIC VS120 Vision Sensor learns the significant
characteristics (edges) of the model's main ROIs and Sub-ROIs for subsequent processing
of the specimen.
After selecting Training, five tabs appear:
• Selection
• ROI
• Edges
• Test
• Save
The easiest way to train a model is to work through the tabs one after the other. You can use
the Next and Back buttons to navigate between the tabs. You can, however, also select
specific tabs. If tabs are skipped, the defaults values will be set.
Vision Sensor SIMATIC VS120
Operating Instructions, Edition 02/2006, A5E00757507-01
9-27
Operation
9.3 Working with setup support
Part 1/5: Selection
You can set the parameters for models, images and manual trigger in the "Training Selection tab".
Figure 9-13
9-28
Training - Selection tab
Vision Sensor SIMATIC VS120
Operating Instructions, Edition 02/2006, A5E00757507-01
Operation
9.3 Working with setup support
Part 2/5: ROI
In the "Training - ROI" tab, you can specify the properties for the main ROI and the subROIs. You define the main ROI and any sub-ROIs for image processing in the ROI tab. The
relationships between the functions of main ROI and sub-ROI are described in the section
Image processing.
Figure 9-14
Training - ROI tab
Note
• The main ROI is always available and cannot be deleted. Sub-ROIs can be created by
pressing the "New" button or deleted with "Delete".
• The outside edges of the main ROI should be very close to the model to obtain a good
evaluation of the image.
• The sub-ROIs will only be found if the quality of the main ROI is better than the defined
quality limit (Q Limit).
Vision Sensor SIMATIC VS120
Operating Instructions, Edition 02/2006, A5E00757507-01
9-29
Operation
9.3 Working with setup support
Main ROI and sub-ROIs:
A main ROI is selected with the mouse for image processing. This main ROI indicates the
specimen in the exposure that should be analyzed. You can define up to 16 sub-ROIs for
this. These sub-ROIs define regions within the main ROI in greater detail. For evaluation, the
sub-ROIs can also be located outside the main ROI.
Changes to main and sub-ROIs:
• A ROI can be picked up by its edge and moved using drag-and-drop.
• When you click on it, square handles appear at the corners that allow you to change the
size.
• A round handle appears at the corners when you click on the ROI again. The ROI can be
rotated in this state.
• Using the "ROI shape" radio buttons, you can switch between a circle and a rectangular
form for the current ROI .
• The coordinates of the current ROI are displayed below the image: Position (x, y), Size
(width, height) and Angle.
• If you require more precise positioning, you can zoom the image to its original size using
the "Full size" check box.
Names and colors:
• In the "Name" text box, you can assign a name with a maximum of 8 characters to each
sub-ROI.
• The names of the defined ROIs are displayed in the selection list and can be selected by
clicking on them in the list or by clicking on them in the image.
• You can assign a color to each ROI in addition to the name to help you identify it in the
image. The ROI is then displayed with this color in the image and selection list.
• In this selection list and in the selection lists of the other tabs, the currently selected ROI
is shown as follows:
– Non-selected ROIs are dashed
– Selected ROIs are solid
– Selected and editable ROIs are solid and provided with marking points
9-30
Vision Sensor SIMATIC VS120
Operating Instructions, Edition 02/2006, A5E00757507-01
Operation
9.3 Working with setup support
Part 3/5: Edges
If you click on the Training - Edges tab, you start the editing of edges or retouching of
unnecessary image features.
Figure 9-15
Training - Edges tab
The edges found by the algorithm are outlined in the image Specific edges can now be
marked as unimportant for each ROI by erasing them with a brush. To do this, you select the
respective ROI in the selection list or by clicking on it in the image, and erasing the edge with
the brush.
On the left, you can see various brush thicknesses that can be selected by clicking on them.
The erasures made in the currently selected ROI can be removed with the "Reset" button.
Vision Sensor SIMATIC VS120
Operating Instructions, Edition 02/2006, A5E00757507-01
9-31
Operation
9.3 Working with setup support
Part 4/5: Test
You start the training program by clicking on the "Single-steps" or "Continuous" control
buttons in the Training - Test tab. The displays are for the most part identical to the Run
panel with the exceptions:
• Separate statistics are kept
• There is no output to the port
• Models are evaluated but not model sets.
Figure 9-16
9-32
Training - Test tab
Vision Sensor SIMATIC VS120
Operating Instructions, Edition 02/2006, A5E00757507-01
Operation
9.3 Working with setup support
Part 5/5: Save
You can save a trained model by opening the Training - Save tab. In the Number and Name
text boxes, enter the number and name (max. 8 characters) of the model you want to save.
Figure 9-17
9.3.5
Training - Save tab
Processing
The "Processing" panel is divided into two areas: You start processing a model or model set
with "Start" on the left. Statistics on the currently running process are also displayed in a
multiple-page area. This corresponds to the results shown in the Info - Statistics tab.
• The Q limit and warning limit can be increased or decreased using the Q Limit button for
optimizing the processing. The current value is shown beside the buttons and the
modified values can be stored on the controller with "Apply".
• On the right, you can see the most recently processed image. The results from the last
evaluation are also graphically displayed in this image. The results to be displayed can be
configured in drop-down lists and check boxes located next to and below the image.
• A table below the current image shows the result of the most recent evaluation. The
content of the table can be configured with a drop-down list next to the current image.
Vision Sensor SIMATIC VS120
Operating Instructions, Edition 02/2006, A5E00757507-01
9-33
Operation
9.3 Working with setup support
Select model / Select model set
This is where you enter the number of a previously trained model or model set that you want
to compare with a current specimen. The numbers of all previously trained models or model
sets are displayed in a drop-down list box.
Note
The "Model" drop-down list appears when the "Multimodel" drop-down list is set to "Use" in
the "Options - Extras" tab. This is equivalent to normal mode.
The "Model Set" drop-down list appears when the "Multimodel - Use" is set to "On" in the
"Options - Extras" tab . This is equivalent to classification mode.
Normal mode during test and recognition
Figure 9-18
9-34
Processing in normal mode
Vision Sensor SIMATIC VS120
Operating Instructions, Edition 02/2006, A5E00757507-01
Operation
9.3 Working with setup support
Features
• You can navigate through the processing results information using the
buttons.
• The ROI whose result should be displayed can be selected in normal mode under "Table
content ROI" on the right.
• The quality is displayed color-code based on the results.
• The ROIs are displayed in the color specified in the "Training - ROI tab"
Note
Edges are only shown if the "Show edges" check box is enabled.
• Color scheme for edges in processing mode:
– Blue: Edge lines that have been erased
– Green: Edges above the threshold value
– Red: Edges below the threshold value appear in red
Example of processing results for testing and recognition in normal mode
Figure 9-19
Info pages: Processing in normal mode
Vision Sensor SIMATIC VS120
Operating Instructions, Edition 02/2006, A5E00757507-01
9-35
Operation
9.3 Working with setup support
Classification mode for part recognition
Figure 9-20
Processing with classification mode
Features
• The processing mode with model sets provides you with evaluation results for the entire
model set.
• Information about the best model, the individual models and any sub-ROIs in the models
is also displayed.
• The quality is displayed color-code based on the results.
9-36
Vision Sensor SIMATIC VS120
Operating Instructions, Edition 02/2006, A5E00757507-01
Operation
9.3 Working with setup support
Example of processing results for part recognition with classification mode
Figure 9-21
9.3.6
Information pages for processing with classification
Options
You can change additional default settings for training models, user permissions, saving
information for diagnostic purposes and additional functions for image processing under
"Options". The optional settings have a direct affect on the tasks such as training and
evaluation.
The “Options” dialog is made up of the following four parts:
• Part 1/4: Training
• Part 2/4: Security
• Part 3/4: Diagnostics & Monitoring
• Part 4/4: Extras
Vision Sensor SIMATIC VS120
Operating Instructions, Edition 02/2006, A5E00757507-01
9-37
Operation
9.3 Working with setup support
Part 1/4 Training
You can make the settings for training the main ROI and sub-ROI in the "Options - Training
tab".
Figure 9-22
Options - Training tab
As default, the "Editable" check box is not selected. If you enable a check box, Precision for
example, you can change these parameters during training. Otherwise, the default values
here are used for training.
Note
The setting for the "Precision" depends on the setting for the precision in the "Adjustment".
9-38
Vision Sensor SIMATIC VS120
Operating Instructions, Edition 02/2006, A5E00757507-01
Operation
9.3 Working with setup support
Part 2/4: Security
By clicking on the user name or on Safety in Options, you open "Options - Security tab". You
can see all the currently assigned user permissions here.
Notice
In the Security tab, the administrator specifies which user is permitted to execute which
tasks and can, when necessary, change the passwords of the users. The permissions can
only be changed with administrator privileges.
Figure 9-23
Options - Security tab - user rights
Vision Sensor SIMATIC VS120
Operating Instructions, Edition 02/2006, A5E00757507-01
9-39
Operation
9.3 Working with setup support
Currently logged on user and adjustment support mode
By moving the mouse pointer on WEB, a popup field displays the permissions of the user.
The following icons can be displayed in the popup:
Red padlock with black R: Read-only mode, in other words, no operator input
possible because the adjustment support of another PC has control of the
processing unit.
Gray padlock: The logged on user has no permissions to change settings.
Red padlock with green D: DISA is active. Only the Service and User1 users can
take over control of the processing unit from the controller.
Green padlock with gray D: The currently logged on user has taken control of the
processing unit or the controller.
The processing mode is active. If you want to make changes, you must first
switch the processing unit to STOP.
Users can log on under their names with the appropriate password. Below the “User” table,
you can see which user is currently logged on.
User
• WEB (default): General user who can execute tasks without explicitly logging on
• Service: Service technicians
• User1: Freely available
• Admin: Administrator
The "Admin" user assigns permissions for all users and changes their passwords.
Note
The "WEB" setting effectively means no user. It simply indicates that there is a connection
between the Web browser and the adjustment support.
In the “Log on” box, you can change these permissions by selecting a user from the “User”
drop-down list box and logging on with the correct password.
9-40
Vision Sensor SIMATIC VS120
Operating Instructions, Edition 02/2006, A5E00757507-01
Operation
9.3 Working with setup support
"Change password ..." Button
The administrator can change the password of any user as follows:
• The "Admin" user logs on. The "Change password ..." button is enabled.
• The administrator selects the user whose password needs to be changed in the "User"
drop-down list box.
• Clicking the "Change password ..." button, opens a dialog in which the password of the
selected user can be changed.
Assigning Permissions
The "Admin" user is the only user who can assign permissions. To assign permissions,
select a user in the table and select the check boxes for the permissions you want to assign
to the user.
The rows of the table contain the possible tasks and the columns the possible users.
Note
If the DISA bit is set, in other words, when SIMATIC VS120 Vision Sensor is controlled by a
programmable controller, you must log on at the VS120 processing unit as follows:
1. Make sure that only one PC accesses the VS120 processing unit (red padlock with green
D).
2. Place the mouse pointer on the currently logged-on user (top right) and click. This brings
you to the "Options - Security" page.
3. Log on as a user such as "User1" or "Service") who is allowed to take control of the
SIMATIC VS120 Vision Sensor ("Take control" check box selected). Remember,
however, that logging on means intervention in the control of the SIMATIC VS120 Vision
Sensor by the programmable controller (only relevant for functions that require the DISA
bit, for example, change models).
Vision Sensor SIMATIC VS120
Operating Instructions, Edition 02/2006, A5E00757507-01
9-41
Operation
9.3 Working with setup support
Part 3/4: Diagn. & Monitoring
In Options - Diagnostics & Monitoring, you specify the information to be stored for diagnostic
purposes.
Figure 9-24
9-42
Options - Diagnostics & Monitoring tab
Vision Sensor SIMATIC VS120
Operating Instructions, Edition 02/2006, A5E00757507-01
Operation
9.3 Working with setup support
Part 4/4: Extras
You can specify the additional functions you want to use for image processing in the Options
- Extras tab.
Figure 9-25
9.3.7
Options - Extras tab
Information
The Information dialog consists of four parts:
• Part 1/4: Statistics
• Part 2/4: Model
• Part 3/4: Diagnostics
• Part 4/4: Device Info
Vision Sensor SIMATIC VS120
Operating Instructions, Edition 02/2006, A5E00757507-01
9-43
Operation
9.3 Working with setup support
Part 1/4: Statistics
This part of the dialog shows you the statistics for recognition with the currently active
models / model sets.
Normal mode for examination and recognition (default mode)
Figure 9-26
Information - Statistics tab in normal mode
You can clear the statistics with the “Reset statistics” button if you have management
permissions (see Options - Security tab). The statistics are reset automatically when you
change the model.
The list box contains the names of the main ROIs and sub-ROIs of the models. For each
main ROI and sub-ROI, you can display the results for OK, Warn and N_OK.
9-44
Vision Sensor SIMATIC VS120
Operating Instructions, Edition 02/2006, A5E00757507-01
Operation
9.3 Working with setup support
Part recognition with classification mode
Figure 9-27
Info - Statistics tab in classification mode
In contrast to normal mode, the following statistics results are displayed:
• No results for the sub-ROIs.
• The frequency of the models recognized with OK for the models included in the model
set.
Vision Sensor SIMATIC VS120
Operating Instructions, Edition 02/2006, A5E00757507-01
9-45
Operation
9.3 Working with setup support
Part 2/4: Model
This part of the dialog shows you all the existing information on the selected model.
Figure 9-28
9-46
Information - Model tab
Vision Sensor SIMATIC VS120
Operating Instructions, Edition 02/2006, A5E00757507-01
Operation
9.3 Working with setup support
Part 3/4: Diagnostics
In this part of the, you can display, delete and save and open diagnostics images and
diagnostics reports.
Figure 9-29
Information - Diagnostics tab
Note
The persistent data records option is enabled, when necessary, in the Options - Extras tab
Vision Sensor SIMATIC VS120
Operating Instructions, Edition 02/2006, A5E00757507-01
9-47
Operation
9.3 Working with setup support
Part 4/4: Device Info
This part of the dialog provides you with information on the processing unit, the firmware and
the sensor head.
Figure 9-30
9-48
Information - Device Information tab
Vision Sensor SIMATIC VS120
Operating Instructions, Edition 02/2006, A5E00757507-01
Operation
9.3 Working with setup support
9.3.8
Maintain
The Maintain dialog offers options for deleting, configuring, saving and restoring models and
resetting the SIMATIC VS120 to the original factory state. You can also perform any required
firmware update in the Maintain dialog.
Figure 9-31
Maintain
Note
When you load a model on the processing unit, the parameters saved with the model are
also loaded and therefore valid.
Vision Sensor SIMATIC VS120
Operating Instructions, Edition 02/2006, A5E00757507-01
9-49
Operation
9.3 Working with setup support
Firmware
The “Firmware update” button opens a Web page where you can update the firmware.
Note
If you control the SIMATIC VS120 from an automation system, make sure that the DISA bit
is not set during the firmware update. This prevents a programmable controller from
changing the VS120 processing unit to RUN.
Figure 9-32
9-50
Updating the firmware of the SIMATIC VS120
Vision Sensor SIMATIC VS120
Operating Instructions, Edition 02/2006, A5E00757507-01
Operation
9.3 Working with setup support
9.3.9
Stop
When you call this dialog, you change the VS120 processing unit to STOP mode.
Figure 9-33
Stop
Vision Sensor SIMATIC VS120
Operating Instructions, Edition 02/2006, A5E00757507-01
9-51
Operation
9.3 Working with setup support
9-52
Vision Sensor SIMATIC VS120
Operating Instructions, Edition 02/2006, A5E00757507-01
Process interfacing over an automation system
(PLC, PC)
10.1
10
Integrating the PROFIBUS DP slave SIMATIC VS120 in HW Config
Installing the GSD file (device master file)
The supplied GSD file SI0180ED.GSD contains the properties of the PROFIBUS DP slave
SIMATIC VS120.
If necessary, the file can be downloaded from the Internet at:
http://support.automation.siemens.com
Module catalog of HW Config
Notice
If you have a STEP 7 version earlier than V5.3 SP1, the SIMATIC VS120 Vision Sensor is
not yet included in the module catalog of HW Config. You will first need to add the GSD file
of the SIMATIC VS120 Vision Sensor with Extras > Install GSD Files.... The corresponding
graphics file VS1X0__N.DIB must also be in the same directory as the GSD file.
The SIMATIC VS120 Vision Sensor appears in the module catalog of HW Config (see
screenshot below):
• As of STEP 7 V5.3 SP1 in PROFIBUS DP \ Sensors \ VS100 \ VS120
• In STEP 7 earlier than V5.3 SP1 in PROFIBUS DP \ Additional Field Devices \ General \
Machine Vision
Vision Sensor SIMATIC VS120
Operating Instructions, Edition 02/2006, A5E00757507-01
10-1
Process interfacing over an automation system (PLC, PC)
10.1 Integrating the PROFIBUS DP slave SIMATIC VS120 in HW Config
Configuration example
Figure 10-1
Integrating the PROFIBUS DP device SIMATIC VS120 in HW Config
In the configuration example above, the control byte of the SIMATIC VS120 was set to
output address 0 and the status byte of the SIMATIC VS120 was set to input address 0 of
the CPU (DP master, slot 1). If these addresses are in the process image of OB1 (process
image partition "OB1 PI"), you can work here in OB1 with process image access (for
example "A I0.6" or "S Q0.1"). If this is not the case, you must work with direct I/O access
(for example "L PIB 0").
In the configuration example above, the start of the 16 word long consistent communication
area of the SIMATIC VS120 Vision Sensor was set to input address 1 and output address 1
(slot 2).
If these addresses are in the process image of OB1 (process image partition "OB1-PI"), you
can work in OB1 with process image access (for example "L IW 2", "T QB 1") without
violating the consistency.
10-2
Vision Sensor SIMATIC VS120
Operating Instructions, Edition 02/2006, A5E00757507-01
Process interfacing over an automation system (PLC, PC)
10.1 Integrating the PROFIBUS DP slave SIMATIC VS120 in HW Config
This applies only to CPUs that transfer consistent user data using the process image. If, on
the other hand, these addresses are not in the process image of OB1, you will need to
access the communication area of the SIMATIC VS120 using SFCs 14 "DPRD_DAT" and
15 "DPWR_DAT" to ensure consistency.
Notice
The consistent user data transfer per process image is supported by the following S7 CPUs:
• from the CPU 318 and S7-400 CPUs as of firmware version V3.0.0
• from all S7-300 CPUs with MMC
for all other S7-300 and S7-400 CPUs, installation of SFCs 14 "DPRD_DAT" and
15 "DPWR_DAT" is absolutely necessary.
Transmission rate of PROFIBUS DP
The SIMATIC VS120 Vision Sensor automatically detects the transmission rates of
PROFIBUS DP. Even if the transmission rate has changed, this is detected automatically.
The following values possible:
• 9.6 Kbps
• 19.2 Kbps
• 45.45 Kbps
• 93.75 Kbps
• 187.5 Kbps
• 500 Kbps
• 1.5 Mbps
• 3 Mbps
• 6 Mbps
• 12 Mbps
PROFIBUS DP address of the SIMATIC VS120 processing unit
The PROFIBUS DP address of the SIMATIC VS120 processing unit is set in the menu
Settings > Ports > DP Addr. of the processing unit. Possible values are 1 to 125.
Vision Sensor SIMATIC VS120
Operating Instructions, Edition 02/2006, A5E00757507-01
10-3
Process interfacing over an automation system (PLC, PC)
10.2 Integrating the PROFINET IO device SIMATIC VS120 in HW Config
10.2
10.2
Integrating the PROFINET IO device SIMATIC VS120 in HW Config
Installing the GSD file (device master file)
The supplied GSD file GSDML-V2.0-Siemens-002A-VS100-20060208.xml contains the
properties of the PROFINET IO device SIMATIC VS120.
If necessary, the file can be downloaded from the Internet at:
http://support.automation.siemens.com
Module catalog of HW Config
Notice
If you have a STEP 7 version earlier than V5.4, the SIMATIC VS120 Vision Sensor is not yet
included in the module catalog of HW Config. You will first need to add the GSD file of the
SIMATIC VS120 Vision Sensor with Extras > Install GSD Files.... The corresponding
graphics file VS100.bmp must also be in the same directory as the GSD file.
The SIMATIC VS120 Vision Sensor appears in the module catalog of HW Config (see
screenshot below):
• As of STEP 7 V5.4 in PROFINET IO \ Sensors \ VS100 \ VS120
Configuration example
Note
When installing a CPU 317-2 PN/DP, you have to select "Transmission medium/duplex"
"Automatic settings" in the individual network in the Properties window of the PROFINET I/O
system (slot X2) on the "Options" tab.
Caution
SIMATIC VS120 Vision Sensor does not support an update time less than 4 ms and cannot
be set to lower update times. If you configure with STEP 7 V5.3 + SP1, the minimum update
time for all PROFINET IO devices of the affected PROFINET system changes to 4 ms.
10-4
Vision Sensor SIMATIC VS120
Operating Instructions, Edition 02/2006, A5E00757507-01
Process interfacing over an automation system (PLC, PC)
10.2 Integrating the PROFINET IO device SIMATIC VS120 in HW Config
Figure 10-2
Integrating the PROFINET IO device SIMATIC VS120 in HW Config
In the configuration example above, the start of the 16 word long consistent communication
area of the SIMATIC VS120 Vision Sensor was set to input address 256 and output address
256 (slot 2). If these addresses are in the process image of OB1 (process image partition
"OB1-PI"), you can work in OB1 with process image access (for example "LIW 2", "TQB 1")
without violating the consistency. This applies only to CPUs that transfer consistent user
data using the process image, refer to the safety notice below.
If, on the other hand, these addresses are not in the process image of OB1, you will need to
access the communication area of the SIMATIC VS120 using SFCs 14 "DPRD_DAT" and
15 "DPWR_DAT" to ensure consistency.
Vision Sensor SIMATIC VS120
Operating Instructions, Edition 02/2006, A5E00757507-01
10-5
Process interfacing over an automation system (PLC, PC)
10.2 Integrating the PROFINET IO device SIMATIC VS120 in HW Config
Notice
The consistent user data transfer per process image is supported by the following S7 CPUs:
• from the CPU 318 and S7-400 CPUs as of firmware version V3.0.0
• from all S7-300 CPUs with MMC
for all other S7-300 and S7-400 CPUs, installation of SFCs 14 "DPRD_DAT" and
15 "DPWR_DAT" is absolutely necessary.
Transmission rate of PROFINET IO
The SIMATIC VS120 Vision Sensor automatically detects the transmission rates of
PROFINET IO. PROFINET IO is operated in 100 Mbps full duplex mode.
Assigning the device name
Follow the procedures below when entering the device name for the SIMATIC VS120
processing unit:
1. In HW Config, open the properties window of the SIMATIC VS120 Vision Sensor and
enter the device name there. When you are done, save and compile the hardware
configuration.
2. Inform the SIMATIC VS120 processing unit of the device name you just specified. This is
possible in three ways:
– In HW Config, select PLC > Ethernet > Edit Ethernet Node... and click the "Browse"
button. Following this, all the devices connected to the PNIO system will be displayed
(Caution: SIMATIC VS120 must be in "PNIO" IP mode otherwise it is not displayed!).
Select SIMATIC VS120 by its MAC address and identify it if needed with the "Flash"
button. If the identification is successfully, the "LINK" LED on the Ethernet connector
of the SIMATIC VS120 flashes. Enter the device name and confirm it by clicking on
the "Assign Name" button.
– Enter the device name directly in the SIMATIC VS120 processing unit with the menu
command Connect > Ports > PNIO > DevName).
– Assign and transfer the device name using the adjustment support: Connections Ports tab > PROFINET IO area > Device name parameter
10-6
Vision Sensor SIMATIC VS120
Operating Instructions, Edition 02/2006, A5E00757507-01
Process interfacing over an automation system (PLC, PC)
10.3 Control over the "DI/DO" I/O interface
10.3
10.3
Control over the "DI/DO" I/O interface
You will find the connector pin assignment of the I/O interface in the section Technical
specifications in Port assignment of the processing unit.
Control byte
Bit no.
Signal
Function
0
DISA
Disable: Disable manual keypad input, model selection via digital I/O
1
SEL0
Select 0: Model selection bit 0
2
SEL1
Select 1: Model selection bit 1
3
SEL2
Select 2: Model selection bit 2
4
SEL3
Select 3: Model selection bit 3
5
-
Not assigned
6
TRG
Trigger: Image recording and start of processing
7
RES
Reset: Reset error on positive-going edge
Note
• The SEL0, SEL1, SEL2, and SEL3 signals are effective only when DISA=1.
• The RES signal (bit no. 7) is effective regardless of the DISA signal (bit no. 0).
Status byte
Bit no.
Signal
Function
LEDs
0
IN_OP
In operation:
• 0 = error message is displayed
• 1 = SIMATIC VS120 functional, no errors
Group error
• SF on
• SF off
1
TRD
Trained:
• 0 = Model/model set cannot be run
• 1 = Model/model set can be run
TRAINED
2
RDY
Ready:
• 0 = Device startup or SIMATIC VS120 in Stop
• 1 = SIMATIC VS120 in processing mode (Run)
READY
3
OK
Model was recognized:
• 1 = OK during debounce pulse time
OK
4
-
Not assigned
-
5
N_OK
Model was not recognized
N_OK
1 = N_OK during debounce pulse time
Vision Sensor SIMATIC VS120
Operating Instructions, Edition 02/2006, A5E00757507-01
10-7
Process interfacing over an automation system (PLC, PC)
10.3 Control over the "DI/DO" I/O interface
Model selection
To select a model, apply the appropriate bit pattern to the inputs SEL0 to SEL3. You can
select models 1 to 15. If all the inputs of "Select" are set to 0, the last selected model is
retained.
6(/
6(/
6(/
6(/
',6$
5(6
75*
,1B23
75'
5'<
W
6WDUWRUFKDQJH
PRGHOVHOHFWLRQ
$SSO\
0RGHOVHOHFWLRQ
˂WPLQ
˂WPD[
Figure 10-3
Model selection
Legend:
*) Δt of the model at, for example, Δtmin = 150 ms (regardless of model/model set)
and Δtmax = depending on model/model set. This process may take a few minutes.
Note
Only 15 models can be selected. If there is a larger number of models, the selection must be
made using model sets.
10-8
Vision Sensor SIMATIC VS120
Operating Instructions, Edition 02/2006, A5E00757507-01
Process interfacing over an automation system (PLC, PC)
10.3 Control over the "DI/DO" I/O interface
Creating a bit pattern
Step
Input
1
DISA=1
TRG=0
RES=0
Preparing for model selection and model sets
SEL0=1
SEL1=1
SEL2=0
SEL3=1
Select model/model sets (based on example of
model 11)
2
Output
Description
DISA must have the value 1. No edge change is
required, however.
3
TRD=0
RDY=0
Model switchover starts after max. 150 ms
4
TRD=1
RDY=0
The model selection is confirmed after 150 ms.
Model 11 is selected.
5
TRD=1
RDY=1
The model changeover is completed after
approximately 150 ms to a few minutes
(depending on the model/model set).
Note
If the selected model has not been trained, TRD and RDY retain the value 0.
Vision Sensor SIMATIC VS120
Operating Instructions, Edition 02/2006, A5E00757507-01
10-9
Process interfacing over an automation system (PLC, PC)
10.4 Control over PROFIBUS DP and PROFINET IO
10.4
10.4.1
10.4
Control over PROFIBUS DP and PROFINET IO
Principle of data transfer over PROFIBUS DP and PROFINET IO
The following block diagram shows the relevant interfaces of the SIMATIC VS120
processing unit for data transmission over PROFIBUS DP and PROFINET I/O.
'30DVWHU,2&RQWUROOHU
6,0$7,&96SURFHVVLQJXQLW
&RQWUROE\WH
6WDWXVE\WH
8VHUGDWD
LQWHUIDFH
6HQG
E\WHV
8VHUGDWD
LQWHUIDFH
5HFHLYH
E\WHV
Figure 10-4
Data transfer over PROFIBUS DP and PROFINET IO
Note
Of the "Send" user data interface, bytes 0 to 31 are relevant, of the "Receive" user data
interface, only bytes 0 to 9 are relevant.
If these two user data interfaces are not located in the process image of OB1, you must use
SFC14 "DPRD_DAT" during the data transfer from the "Send" user data interface of the
SIMATIC VS120 processing unit to the PROFIBUS DP master to ensure data consistency.
In the opposite direction, SFC15 "DPWR_DAT" must be used for data transmission from the
PROFIBUS DP master to the "Receive" user data interface.
10-10
Vision Sensor SIMATIC VS120
Operating Instructions, Edition 02/2006, A5E00757507-01
Process interfacing over an automation system (PLC, PC)
10.4 Control over PROFIBUS DP and PROFINET IO
10.4.2
Assignments for PROFIBUS DP / PROFINET IO-relevant interfaces for the
processing unit
10.4.2.1
Control byte
Bit no.
Signal
Function
0
DISA
Disable: Disable manual keypad input, model selection via
PROFIBUS DP / PROFINET IO
1
SEL0
Select 0: Model selection bit 0
2
SEL1
Select 1: Model selection bit 1
3
SEL2
Select 2: Model selection bit 2
4
SEL3
Select 3: Model selection bit 3
5
-
Not assigned
6
TRG
Trigger: Image recording and start of processing
7
RES
Reset: Reset error on positive-going edge
Note
The TRG and RES signals (bits no.6 and 7) are effective regardless of the DISA signal
(bit no. 0).
Vision Sensor SIMATIC VS120
Operating Instructions, Edition 02/2006, A5E00757507-01
10-11
Process interfacing over an automation system (PLC, PC)
10.4 Control over PROFIBUS DP and PROFINET IO
10.4.2.2
Status byte
Bit no.
Signal
Function
0
IN_OP
In operation:
0 = SIMATIC VS120 starting up or error message is displayed.
1 = SIMATIC VS120 functional, no errors
1
TRD
Trained:
• 0 = Model/model set cannot be run.
• 1 = Model/model set can be run.
2
RDY
Ready:
• 0 = Device startup or SIMATIC VS120 in Stop
• 1 = SIMATIC VS120 in processing mode (Run)
3
OK
Object was recognized
• 1 = OK during debounce pulse time
4
-
Not assigned
5
N_OK
Object was not recognized
1 = N_OK during debounce pulse time
6
-
Reserved
7
-
Reserved
Note
The control byte is written and then read and evaluated in much the same way as shown in
the timing diagram in the section Control over the I/O interface "DI / DO".
10.4.2.3
10-12
User data interface "Send" VS120 processing unit >>> automation system
Byte no.
Data type Meaning
0
BYTE
Reserved
1
BYTE
Consecutive number of the data packet to be sent to the PROFIBUS
DP master
2+3
WORD
Net total length of the data to be transmitted in bytes in STEP 7 format
4
BYTE
Reserved
5
Byte
1. User data byte
…
…
…
31.
Byte
27. User data byte
Vision Sensor SIMATIC VS120
Operating Instructions, Edition 02/2006, A5E00757507-01
Process interfacing over an automation system (PLC, PC)
10.4 Control over PROFIBUS DP and PROFINET IO
User data structure
User data byte
Data type Meaning
User data block 1
1
BYTE
Total warning*)
• 0 = Warning limit exceeded
• 1 = Below warning limit
2
BYTE
Total result*)
• 0 = N_OK
• 1 = OK.
3
BYTE
Total quality value (relates to the total result with main ROI and all
sub-ROIs).
4 to 7
REAL
Main ROI: x position
8 to 11
REAL
Main ROI: y position
12 to 15
REAL
Main ROI: Angle
16
BYTE
Model number: Processed model of the selected model set.
17
BYTE
Main ROI quality
18
BYTE
Number of sub-ROIs: n
19
BYTE
Reserved
20 + 21
WORD
Reserved
22
BYTE
1. Sub-ROI:
• 0 = N_OK
• 1 =OK
• 3 = Below warning limit
23
BYTE
1. Sub-ROI quality values as percentage
24 to 27
REAL
1. Sub-ROI x position
User data block 2 ….
28 to 31
REAL
1. Sub-ROI y position
32 to 35
REAL
1. Sub-ROI angle
….
…
…
22 + n × 14
BYTE
nth sub-ROI results:
• 0 = N_OK
• 1 =OK
• 3 = Below warning limit
23 + n × 14
BYTE
nth sub-ROI quality values as percentage
24 + n × 14 to
27 + n × 14
REAL
nth sub-ROI x position
28 + n × 14 to
31 + n × 14
REAL
nth sub-ROI y position
32 + n × 14 to
35 + n × 14
REAL
nth sub-ROI angle
*)
Value relates to the total result with main ROI and all sub-ROIs
Vision Sensor SIMATIC VS120
Operating Instructions, Edition 02/2006, A5E00757507-01
10-13
Process interfacing over an automation system (PLC, PC)
10.4 Control over PROFIBUS DP and PROFINET IO
10.4.2.4
User data interface "Receive" automation system >>> VS120 processing unit
Byte no.
Data type Meaning
0
BYTE
1
BYTE
Consecutive number of the data packet received from the DP master
2
BYTE
Reserved
3
BYTE
Reserved
4
BYTE
Reserved
5
BYTE
Reserved
6 to 9
DINT
Delay time for hardware trigger delay*)
10 to 31
BYTE
Reserved
*)
10.4.3
Reserved
Delay time is the delay of the trigger signal by the specified time.
Programming data fragmentation
Note
You require a handshake procedure if you use a controller with a S7-CPU and the FB1
function block.
Handshaking
The following section introduces the handshake mechanism that ensures the consistency of
all the data sent from the processing unit to the PROFIBUS DP master or PROFINETI/O
controller regardless of any configured PROFIBUS DP or PROFINET IO consistency
mechanisms. This mechanism must be used with every transfer, even if only one block of
data is transferred.
Note
With handshakes, the data transfer must be constant at 32 bytes (inputs and outputs).
10-14
Vision Sensor SIMATIC VS120
Operating Instructions, Edition 02/2006, A5E00757507-01
Process interfacing over an automation system (PLC, PC)
10.4 Control over PROFIBUS DP and PROFINET IO
Procedure
Step
Activity in the user program of the DP master or I/O controller
1
Poll byte 1 of the "Send" user data interface. As long as this byte has the value 0, there
is no new data. If it has the value 1, go to step 2.
2
The value 1 in byte 1 of the “Send” user data interface means: The SIMATIC VS120
has started data transmission.
Read the net total length of the data to be transferred from bytes 2 and 3 of the "Send"
user data interface and the user data of the first data packet from bytes 5 to 31.
3
Acknowledge correct receipt of the first data packet by writing the value 1 in byte 1 of
the "Receive" user data interface.
The processing unit polls byte 1 of the "Receive" user data interface. As soon as it
reads the value 1, it fills bytes 5 to 31 of the "Send" user data interface with the user
data of the second data packet and enters the number of this data package (in this
case 2) in byte 1.
4
Poll byte 1 of the "Send" user data interface. As long as this still contains the number of
the previously transferred data packet (1), there is no new data. As soon as byte 1 has
the value 2 (number of the next data packet), go to step 5.
5
Read the user data of the second data packet from bytes 5 to 31.
6
Acknowledge correct receipt of the second data packet by writing the value 2 in byte 1
of the "Receive" user data interface.
...
...
Last - 4
Poll byte 1 of the "Send" user data interface. As long as this contains the number of the
last but one data packet, the data of the last data packet is not yet available. As soon
as byte 1 has the number of the last data packet, go to next step.
Last - 3
Read the user data of the last data packet from bytes 5 to 31.
Last - 2
Acknowledge receipt of the last data packet by writing the number of the last data
packet in byte 1 of the "Receive" user data interface.
The processing unit polls byte 1 of the "Receive" user data interface. As soon as it
reads the number of the last data packet, it writes the value 0 to bytes 2 and 3 of the
user data interface and also to byte 1. The value 0 in byte 1 signals the end of the
current data transfer to the PROFINET DP master.
Last - 1
Poll byte 1 of the "Send" user data interface. As soon as the value 0 is read, go to last
step.
Last
Acknowledge correct receipt of all data by writing the value 0 in byte 1 of the "Receive"
user data interface.
Response to problems, timeouts, and errors
The processing unit monitors the following:
• The time between the arrival of two acknowledgments from the DP master is monitored
for the time-out set in the Connect > Ports > DP > Timeout or Connect > Ports > PNIO >
Timeout menu.
• The correct sequence of the acknowledged data packets of the DP master or I/O
controller is monitored.
If an error occurs, the processing unit enters B#16#FF in byte 1 of the "Send" user data
interface and so aborts the current data transmission.
If an error occurs, writing B#16#FF to byte 1 of the "Receive" user data interface causes the
current data transmission to be aborted.
Vision Sensor SIMATIC VS120
Operating Instructions, Edition 02/2006, A5E00757507-01
10-15
Process interfacing over an automation system (PLC, PC)
10.5 Function block FB1
10.5
10.5
Function block FB1
To simplify operation of the functions of SIMATIC VS120 Vision Sensor, there is a function
block FB1 for IO operations.
In addition to the SIMATIC S7 system mechanisms for the integration of SIMATIC VS120
Vision Sensor in a PROFIBUS DP or PROFINET IO environment, FB1 simplifies the
software integration in control programs.
10.5.1
Job
Tasks of the function block FB1
• Selecting a model or model set
• Reading the result data and entering it in DB10
(DB10 is included in the documentation package)
• Operating the control and status interface (triggers, results bits,...)
• Transferring the delay time of the trigger
• Outputting error messages
Figure 10-5
Function block FB1
Tasks of data block DB10
DB10 is designed for the structured entry/storage of data from a main ROI and a maximum
of 16 sub-ROIs. The number of sub-ROIs is set in Connections - Output tab in adjustment
support
10-16
Vision Sensor SIMATIC VS120
Operating Instructions, Edition 02/2006, A5E00757507-01
Process interfacing over an automation system (PLC, PC)
10.5 Function block FB1
10.5.2
Parameter
Parameters
Declaration
Data
type
Description
LADDR_
CONTROL
INPUT
INT
Address of the control byte of the SIMATIC VS120
interface entered in Connection Controller.
This parameter must be interconnected!
LADDR_
STATUS
INPUT
INT
Address of the status byte of the SIMATIC VS120
interface entered in Connection Controller.
LADDR_
RECV
INPUT
INT
Start address of the "Send" user data interface of the
SIMATIC VS120 / "Receive“ of the PLC.
LADDR_
SEND
INPUT
INT
Start address of the "Receive" user data interface of
the SIMATIC VS120 / "Send" of the PLC.
MODEL
INPUT
BYTE
Model number ± 1 to ± 15
Note:
The DISA bit must be set in order to change models.
DISA
INPUT
BOOL
Disable: Disable manual keypad operation
RESET
INPUT
BOOL
Reset: Reset processing unit error or FB error.
Note:
Not dependent on the DISA bit.
TRG
INPUT
BOOL
Trigger: Image recording and start of processing
DELAY
INPUT
DINT
Delay time: Transfer of the trigger delay time to the
SIMATIC VS120 in µs.
(value range 0 - 9.999.999 µs).
Note:
The delay value is a multiple of 50 µs,
with rounding limit of 0 or 50 µs.
Fort example, 49 µs become 0 µs.
65 µs becomes 50 µs
RECV
INPUT
ANY
Receive: Receive range for the result values
Only the data block area and the BYTE data type are
allowed. These parameters must be interconnected
and the data block must be at least as large as the
maximum expected result.
IN_OP
OUTPUT
BOOL
In operation:
• 0 = error message is displayed
• 1 = SIMATIC VS120 functional, no errors
TRD
OUTPUT
BOOL
Trained:
• 0 = Model/model set cannot be run
• 1 = Model/model set can be run
RDY
OUTPUT
BOOL
Ready:
• 0 = Device startup or SIMATIC VS120 in Stop
• 1 = SIMATIC VS120 in processing mode (Run)
OK
OUTPUT
BOOL
Object was recognized
N_OK
OUTPUT
BOOL
Object was not recognized
1 = OK during debounce pulse time
1 = N_OK during debounce pulse time
Vision Sensor SIMATIC VS120
Operating Instructions, Edition 02/2006, A5E00757507-01
10-17
Process interfacing over an automation system (PLC, PC)
10.5 Function block FB1
Parameters
Declaration
Data
type
Description
NDR
OUTPUT
BOOL
New Data Received: Receive new data
Note:
This parameter is available for only one CPU cycle.
10-18
ERROR
OUTPUT
BOOL
An error has occurred.
ERRCODE
OUTPUT
WORD
The system outputs a return value with error code if an
error occurs while it executes the function:
• W#16#0000: No error
• W#16#1xyz: FB1 internal fault
• W#16#2xyz: Processing unit error
• W#16#8xyz: Error messages of internal SFCs
MODEL_OUT
OUTPUT
BYTE
Number of the currently selected model
LENGTH
OUTPUT
INT
Length of the result in bytes
Vision Sensor SIMATIC VS120
Operating Instructions, Edition 02/2006, A5E00757507-01
Process interfacing over an automation system (PLC, PC)
10.5 Function block FB1
10.5.3
Operator control
Model selection
• The DISA bit must be set to 1 in order to select a model.
• The desire model number is set at the FB1 MODEL input.
• The model change is completed when the TRD and RDY bits change from FALSE to
TRUE. In this case, the applied model number is applied to the MODEL_OUT output.
• As long as no model has been transferred, the value 0 is output at the MODEL_OUT
output.
• The MODEL_OUT output changes to 0 as soon as the DISA bit is reset.
• If MODEL = 0, the last selected model is retained. 0 is output at the MODEL_OUT output.
Reset
• When errors are reset, the SIMATIC VS120 module errors (IN_OP = 0) and the FB1
transmission errors are reset.
Triggering
• Image processing with the SIMATIC VS120 can be triggered with the trigger input at FB1.
• In mixed operation "control over PROFIBUS DP and triggering over DI/DO", the trigger
signal can be connected directly to the VS120 processing unit. In this case, the TRG FB1
parameter remains free.
Transferring the delay time
• The time value for hardware trigger delay is set at the FB1 DELAY parameter. With the
Delay time parameter, you can specify the value for hardware-based triggering.
Reading and transferring result data
• FB1 is always ready to receive.
• Following an OK or N_OK evaluation, the result data is output
• The data are valid if the NDR bit changes from 0 to 1.
• The number of sub-ROIs to be transferred is set in the "Connections - Output tab" of the
adjustment support.
Vision Sensor SIMATIC VS120
Operating Instructions, Edition 02/2006, A5E00757507-01
10-19
Process interfacing over an automation system (PLC, PC)
10.5 Function block FB1
10.5.4
Error information
If an error occurred, ERROR is set to 1. The precise cause of the error is then displayed in
ERRCODE.
Error Information
• 0000: No error
• 1xyz: FB1 internal fault
• 2xyz: Processing unit error
• 8xyz: Error messages of internal SFCs
ERRCODE
ERRCODE
(W#16#)
ERROR
Explanation
0000
0
No error
1001
1
Illegal model number (Model parameter) Values 1 to 15 are permissible.
1002
1
Receive area not permitted. Only the BYTE data type is allowed.
1003
1
Data area not permitted. Only data blocks are permitted.
1004
1
The receive area does not exist (data block does not exist).
1005
1
The receive area is too short.
1006
1
The receive area is write-protected.
1007
1
The delay value is outside the permitted range of 0 to 9,999,999 μs.
2001
1
The selected model number has not been trained.
80xx
1
Transfer of SFC14 and SFC15 error messages.
8090
1
You have not configured any module for the logical base address
specified.
80A0
1
The system has detected an IO access error.
80C0
1
System error at external PROFIBUS DP interface.
Module fault
The VS120 module fault (IN_OP=0) is not applied to the ERROR group error bit since when
turning on and off, it is not possible to determine whether the controller is starting up or is in
a fault status.
Note
It is recommended to always evaluate the IN_OP bit.
10-20
Vision Sensor SIMATIC VS120
Operating Instructions, Edition 02/2006, A5E00757507-01
Process interfacing over an automation system (PLC, PC)
10.6 Sample programs
10.6
10.6
Sample programs
We have written the following example programs for you:
• Example 1: Program for interfacing the SIMATIC VS120 processing unit with a SIMATIC
controller using FB1
• Example 2: Program for archiving diagnostic information on a PC/PG
10.6.1
Example 1: Program for interfacing the SIMATIC VS120 processing unit with a
SIMATIC controller using FB1
Note
The program described here is also available on the documentation CD of the
documentation package in Examples\SIMATIC.
Figure 10-6
Example program FB1
Vision Sensor SIMATIC VS120
Operating Instructions, Edition 02/2006, A5E00757507-01
10-21
Process interfacing over an automation system (PLC, PC)
10.6 Sample programs
Legend:
Parameters used
Parameters of FB1
Meaning
RESET_BUTTON
RESET
Reset button to acknowledge errors
LASERPROXIMITY_SWITCH
TRG
Light barrier for triggering
P#DB10.
DBX1.0
BYTE 245
RECV
Receive range for the result values
VS120:IN_OP
IN_OP
SIMATIC VS120 functional, no errors
PROCESS_RELEASE
RDY
SIMATIC VS120 in processing mode (Run)
RESULT_OK
OK
Model was recognized
RESULT_NOT_OK
N_OK
Object was not recognized
DATA_VALID
NDR
Receive new data
ERROR_ALERT
ERROR
An error has occurred.
Including FB1 in a STEP 7 program
In the supplied STEP 7 program, the FC1 function contains an example for outputting the
result data.
Process interfacing
The SIMATIC VS120 processing unit is connected over PROFIBUS DP or PROFINET IO to
a programmable controller. If a photoelectric barrier or a proximity switch is used for
triggering, the trigger signals must be read by a digital input module. The received data is
stored in data block DB10 in bytes 1 to 245.
10-22
Vision Sensor SIMATIC VS120
Operating Instructions, Edition 02/2006, A5E00757507-01
Process interfacing over an automation system (PLC, PC)
10.6 Sample programs
10.6.2
Example 2: Program for archiving diagnostic information on a PC/PG
Note
The program described here is also available on the documentation CD of the
documentation package in Examples\Diagnostics.
With the "archivedemo.exe" example, you can archive diagnostic data records in the form of
csv files (can be read, for example, with Excel) and diagnostic images as bitmaps on a PC.
In addition to the diagnostic images, a text file is transferred that contains details of the
image.
Process interfacing
The PC / PG is connected to the VS120 processing unit via Ethernet for archiving the
records and/or the diagnostic images.
Adjustment support
Make the following settings in adjustment support:
• Connections - Interfaces tab dialog:
In "Archive", enter the IP address and the port of the PC/PG on which you want to archive
the diagnostic information.
• Connections - Integration tab dialog:
In “Diagnostic transfer”, select what you want to archive.
Only diagnostic data records, only diagnostic images or both
Example program
• Under "Connection", set the IP configuration of the Ethernet interface of your PC through
which you want to communication with the VS120 processing unit. The settings must be
identical to the values that you have set on the VS120 processing unit under
"Connections - Interfaces tab" - Archive or with Connect ->Ports - > Archive.
• Enter the maximum size of a csv file in “Options”. If the current csv file exceeds this size,
the example program creates a new csv file. In the “Timeout” input box, you can also
specify the time in seconds after which the example program stops itself if it has not
received a response from the VS120 processing unit during this time. This allows you to
check whether the connection to the VS120 processing unit is still established
• In “Output”, you specify the folders in which the diagnostic images and the csv files will be
stored.
• Once you have clicked the “Start” button, the program waits for the connection to be
established by the VS120 processing unit. The transfer of the diagnostic data begins after
the connection has been established.
• The file names have the following structure:
– csv files: diagrecs_<date>_<time>.csv
– Bitmaps: diagimg_<date>_<time>.bmp
– Details of the image: diagimg_<date>_<time>.txt
Vision Sensor SIMATIC VS120
Operating Instructions, Edition 02/2006, A5E00757507-01
10-23
Process interfacing over an automation system (PLC, PC)
10.6 Sample programs
10-24
Vision Sensor SIMATIC VS120
Operating Instructions, Edition 02/2006, A5E00757507-01
11
Alarm, error and system messages
11.1
11.1
Overview
With certain operator input and if an error occurs in the processing, the SIMATIC VS120
provides you with diagnostic information. This is achieved as follows:
• Information on error diagnostics and error messages of the processing unit and setup
support
• Information on warnings and instructions on the LCD display of the processing unit
• Diagnostics messages based on the "BF" LED
• Diagnostic messages for PROFIBUS DP and PROFINET IO
11.2
11.2
Error messages and error handling
Error messages
When error messages are generated, the "IN_OP" signal (in operation) is reset and the SF
LED (group error) is lit.
With the exception of the error messages PROFIBUS DP error and PROFINET IO error, you
must acknowledge all errors that occur by setting the RES bit of the control byte.
If the SIMATIC VS120 is connected to PROFIBUS DP or PROFINET IO, all error messages
trigger a diagnostic interrupt on the respective DP master or I/O controller, for which there is
a number in the "PROFIBUS DP bit no. starting at diagnostic byte 0 (DP)" or "PROFINET IO
Value" column in the following table. How the diagnostic information is read from the
SIMATIC VS120 and evaluated is explained in the section Slave Diagnostics or IO
Diagnostics.
No.
Message on
the LCD
display
PROFIBUS
DP bit no.
starting at
diagnostic
byte 0
PROFINET
IO
Value
1
Invalid sensor
0
W#16# 5000 The connected
sensor head is
not supported.
Connect a sensor
supported by SIMATIC
VS120.
2
Sensor not
found
1
W#16# 5001 No sensor head
connected.
Connect the sensor to the
processing unit correctly.
Vision Sensor SIMATIC VS120
Operating Instructions, Edition 02/2006, A5E00757507-01
Description
Remedies
11-1
Alarm, error and system messages
11.2 Error messages and error handling
11-2
No.
Message on
the LCD
display
PROFIBUS
DP bit no.
starting at
diagnostic
byte 0
PROFINET
IO
Value
Description
Remedies
3
Model corrupt
5
W#16# 5005 The model could
not be recreated.
Run the training again.
4
Internal file
error
5
W#16# 5005 An error occurred
when saving to
the read-only
memory.
Contact Customer Support
if this error occurs often.
5
TCP/RS232
Trm. Error
7
W#16# 5007 The send buffer is
full because the
data cannot be
sent in an
adequately short
time,
Reduce the trigger
frequency or process the
results more quickly on the
server. A high load on the
network to which the
processing unit is
connected can also block
the transfer of the data. If
necessary, check the
network connection.
6
Archive
Trm. Error
7
W#16# 5007 The send buffer is
full because the
data cannot be
sent in an
adequately short
time or the server
does not confirm
receipt of the data
in good time
Reduce the trigger
frequency or reduce the
amount of diagnostic data
to be archived. Process
the results on the server
faster. A high load on the
network to which the
processing unit is
connected can also block
the transfer of the data. If
necessary, check the
network connection.
Vision Sensor SIMATIC VS120
Operating Instructions, Edition 02/2006, A5E00757507-01
Alarm, error and system messages
11.2 Error messages and error handling
No.
Message on
the LCD
display
PROFIBUS
DP bit no.
starting at
diagnostic
byte 0
PROFINET
IO
Value
7
DP/PNIO Trm.
Error
7
W#16# 5007 The transfer of
the last read
result is not yet
completed, the
next read result
is, however,
already available,
or the DP master
or IO controller
does not reply
within the
handshake
monitoring time
(parameter
Connect >Ports
>DP >Timeout on
processing unit or
within the time
limit parameter in
PROFIBUS DP in
Part 1/3: Ports of
the Connections
dialog in the
adjustment
support,
parameter
Connect >Ports
>PNIO >Timeout
on processing unit
or within the time
limit parameter in
PROFINET IO in
Part 1/3: Ports in
the "Connections"
dialog in the
adjustment
support).
Reduce the trigger
frequency or process the
results more quickly.
If necessary, change the
transmission rate for the
DP configuration or the
update time for the
PROFINET configuration.
8
Invalid DP
parameters
8
-
The PROFIBUS
DP settings are
not correct
Correct the DP settings.
9
PROFIBUS DP 13
Error
-
Error in
PROFIBUS DP
communication.
Make sure that the
parameters for
communication over
PROFIBUS DP and the
communication partners
are correctly configured
and active. Check the
connection to the DP
master.
Vision Sensor SIMATIC VS120
Operating Instructions, Edition 02/2006, A5E00757507-01
Description
Remedies
11-3
Alarm, error and system messages
11.2 Error messages and error handling
11-4
No.
Message on
the LCD
display
PROFIBUS
DP bit no.
starting at
diagnostic
byte 0
PROFINET
IO
Value
Description
Remedies
10
TCP/RS232
Communic.
14
W#16#500E
Connection error
in communication
over a TCP
connection or
when using an
Ethernet RS-232
converter:
There is no TCP
connection or the
data transmission
cannot be
completed within
the set time.
Make sure that the
connected TCP server or
Ethernet RS-232 converter
is correctly configured and
ready to receive.
Depending on the
connected Ethernet RS232 converter, it can take
up to 20 s before changes
to the RS-232 settings or
parameter changes for the
trigger source or the output
of the result string to
"TCP/RS232" take effect.
During this time, the first
trigger of a processing
cycle should not occur nor
should that be a change to
RUN.
11
Archive
Communic.
14
W#16#500E
Error in
communication
over the archiving
connection: There
is no TCP
connection, the
server does not
respond within the
set time limit or
violates the
archiving protocol.
Check the connection to
the server.
Make sure that the data is
processed by the server in
an adequately short time
and that the protocol is
maintained.
Vision Sensor SIMATIC VS120
Operating Instructions, Edition 02/2006, A5E00757507-01
Alarm, error and system messages
11.2 Error messages and error handling
No.
Message on
the LCD
display
PROFIBUS
DP bit no.
starting at
diagnostic
byte 0
PROFINET
IO
Value
Description
Remedies
12
Lamp overload
15
W#16#500F
The IR lighting
Reduce the trigger
unit is overloaded. frequency or reduce the
shutter speed.
Below you will
see the maximum
trigger frequency
fT for the selected
shutter speeds
TB:
TB = 500 µs with
fT = 60 Hz
TB = 1000 µs with
fT = 40 Hz
TB = 2000 µs with
fT = 20 Hz
TB = 3000 µs with
fT = 13 Hz
TB = 4000 µs with
fT = 10 Hz
TB = 5000 µs with
fT = 8 Hz
TB = 6000 µs with
fT = 7 Hz
TB = 7000 µs with
fT = 6 Hz
TB = 8000 µs with
fT = 5 Hz
TB = 9000 µs with
fT = 4.5 Hz
TB = 10000 µs
with
fT = 4 Hz
Note:
Trigger
frequencies
> 33 Hz are not
practicable.
13
PROFINET IO
Error
-
Vision Sensor SIMATIC VS120
Operating Instructions, Edition 02/2006, A5E00757507-01
W#16# 5011 An error occurred
in PROFINET IO
communication
Make sure that the
parameters for
communication over
PROFINET IO and the
communication partners
are correctly configured
and active. Check the
connection to the IO
controller.
11-5
Alarm, error and system messages
11.2 Error messages and error handling
Occurrence of PROFIBUS DP or PROFINET IO errors
If a "PROFIBUS DP Error" or "PROFINET IO Error" occurs, the processing unit checks
during the time the error is displayed if the cause of the error continues to be present.
When the relevant communication is reestablished, the processing unit resets the error
display.
In any case, you can acknowledge the error manually (on the processing unit or in the
adjustment support) and thereby make changes to the configuration.
The occurrence of these two errors as well as their automatic acknowledgment are
permanently saved in the diagnostics records, in other words, the corresponding entries are
not overwritten by new errors. They are indicated at the following locations if their number
deviates from zero:
• In the Info menu of the VS120 processing unit
• In the adjustment support for the "Processing" job
• In the adjustment support for the "Info" job in the "Statistics" tab
Note
The occurrence of a PROFIBUS DP Error or PROFINET IO Error results in an OB86 call
(rack failure) in a SIMATIC S7-CPU.
If you have not programmed OB86, the CPU goes to STOP.
Warnings/instructions as LCD displays on the processing unit
11-6
No.
Message
Description
Remedies
1
PROFIBUS
Connection
failed
When setting Control, OK/N_OK, Output
or Trigger on PROFIBUS DP, no
connection could be established.
The setting is adopted when the message
is acknowledged with OK. The settings
are not applied if you acknowledge with
ESC.
You must correct the PROFIBUS
DP parameters or activate the
communication partner.
2
Permission
denied for ...
The security settings prevent this value
being set in the menu of the processing
unit.
Set the value over the Web user
interface or change the security
settings over the Web user
interface.
3
Restart to
Activate
A device name change on PROFINET IO
only becomes active after restarting the
processing unit.
Turn the power supply for the
processing unit off and on again.
4
TCP/IP
Esc:Skip
During the self-test, the system waits for
the activation of the TCP/IP connections
(if applicable when obtaining the IP
address from the DHCP server).
If the message does not disappear
automatically after a few seconds,
check the network connection.
With ESC, you can skip connection
establishment (or it continues in
the background).
Vision Sensor SIMATIC VS120
Operating Instructions, Edition 02/2006, A5E00757507-01
Alarm, error and system messages
11.2 Error messages and error handling
No.
Message
Description
Remedies
5
Archive
Esc:Skip
In the self-test, the system waits for the
TCP/IP connection to the archiving
software to be established.
If the message does not disappear
automatically after a few seconds,
check the connection to the
archiving software.
With ESC, you can skip connection
establishment (or it continues in
the background).
6
TCP/RS232
Esc: Skip
In the self-test no connection to the
configured Ethernet RS-232 converter or.
PC/PG with TCP server can be
established (yet).
If the message does not disappear
automatically after a few seconds,
check the connection to the
Ethernet RS-232 server or PC/PG
with TCP server.
With ESC, you can skip connection
establishment (or it continues in
the background).
7
PROFIBUS
Esc:Skip
During the self-test, it is still not possible
to start communication over PROFIBUS
DP.
If the message does not disappear
automatically after a few seconds,
check the connection to the DP
master.
With ESC, you can skip connection
establishment (or it continues in
the background).
8
PROFINET
Esc:Skip
During the self-test, it is still not possible
to start communication over PROFINET.
This message has its origins in the
changeover of the IP address
during reconfiguration. The
message exists until the
changeover procedure has ended.
If the message does not disappear
automatically after a few seconds,
check the connection to the IO
controller.
With ESC, you can skip connection
establishment (or it continues in
the background).
9
Factory
Settings
used.
The defaults for all parameters are used,
no models have been trained. After the
self-test, the processing unit changes
immediately to the Adjust mode.
10
This will
cause a
restart.
IP mode is changed to PNIO or it is in
PNIO and should obtain a different value.
The change comes into effect only after a
restart of the processing unit. Confirmation
with "OK" leads to a restart. If you press
"ESC", the change is not applied and no
restart occurs.
11
This will
reset
DelaySrc
If you change the current parameter, the
configured trigger delay source is reset to
"manual".
Vision Sensor SIMATIC VS120
Operating Instructions, Edition 02/2006, A5E00757507-01
11-7
Alarm, error and system messages
11.2 Error messages and error handling
No.
Message
Description
Remedies
12
Invalid
Netmask
You have entered an illegal value in a
subnet mask under Ports > Ethernet. The
value will not be used.
The subnet mask must have the
form xxx.xxx.xxx.xxx with xxx =
0...255, and binary requires that
the left part be made up of ones
without a gap and the right part be
made up of zeros without a gap. In
addition, the 0.0.0.0 and
255.255.255.255 masks are not
allowed.
13
Must be a
DNS-style
Name
The entered PROFINET station name
does not match the DNS convention.
14
Hires not
supported
You cannot operate a high-resolution
sensor with this processing unit.
15
Hardware not You cannot operate this firmware on your
supported
processing unit.
16
Loading
When starting processing or when a
model data.
model (set) is changed, the model data is
Please wait... loaded and preprocessed. This can take
several seconds or even minutes
depending on the amount of data.
17
Model not
trained
When working with an automation system, Check your model selection. If
a model was selected that has not been
necessary, retrain the model.
trained
18
Model set
incomplete
When working with an automation system, Remove the untrained model from
a model set was selected that contains
the model set or train the missing
untrained models
model.
19
Different
precisions
When working with an automation system, Based on Information -> Models,
a model set was selected that contains
check the precision of the models
models with different precisions.
in the set. If necessary, train
models
20
Model set too When working with an automation system,
large
a model set was selected whose models
cannot all be loaded in memory at the
same time.
Use a low resolution sensor.
Use the system update to install
firmware that is valid for your
processing unit or use a
processing unit with a version that
supports this firmware version.
Remove the models from the
model set or reduce the number of
sub-ROIs in the individual models.
Check whether you could work with
lower precision.
Error information FB1
See the section Control over an automation system (PLC, PC) / function block FB1
11-8
Vision Sensor SIMATIC VS120
Operating Instructions, Edition 02/2006, A5E00757507-01
Alarm, error and system messages
11.2 Error messages and error handling
Display: Temporary error
"Temporary errors: xx" on the SIMATIC VS120 Vision Sensor indicates that there was a
problem on the connection over PROFIBUS DP or PROFINET IO, where "xx" is the number
of problems.
Example:
During operation, new project engineering data is transferred to the CPU with HW Config.
The CPU then terminates the connection to the slaves and restarts communication with
PROFIBUS DP. This is noted on the SIMATIC VS120 Vision Sensor and the error messages
are incremented as temporary errors.
If the counter reading for temporary errors increases, this may indicate that the connection
with PROFIBUS DP was restarted often or that the slaves had new parameters assigned by
the CPU. This symptom indicates that the PROFIBUS DP segments are not working
efficiently. It may be necessary for a PROFIBUS DP systems specialist to check the entire
system.
Vision Sensor SIMATIC VS120
Operating Instructions, Edition 02/2006, A5E00757507-01
11-9
Alarm, error and system messages
11.3 Diagnostics based on the "BF" LED
11.3
11.3
Diagnostics based on the "BF" LED
"BF" LED with PROFIBUS DP
"BF" LED
Meaning if an error occurs
Remedies
ON
SIMATIC VS120 is not in the data
exchange phase but is searching
for the transmission rate
•
•
•
Flashing
•
SIMATIC VS120 is neither in the
data exchange phase nor
searching for the transmission rate •
•
•
Check that the bus connector is correctly
inserted.
Check that there is no break on the
bus cable to the DP master.
If you use an S7 DP master: Check the
diagnostic buffer of the DP master or the slave
diagnostic information in HW Config.
Check the cable lengths relative to the
transmission rate.
Check the settings of the terminating resistors.
Check the configuration of the DP master
(PROFIBUS address, transmission rate,
configuration, bus profile).
If you use an S7 DP master: Check the
diagnostic buffer of the DP master or the slave
diagnostic information in HW Config.
"BF" LED with PROFINET I/O
"BF" LED
Meaning if an error occurs
ON
•
•
•
Flashing
•
•
•
•
•
•
11-10
Remedies
Bus problem (no physical
connection to a subnet/switch)
Wrong transmission rate
Full duplex transmission is not
enabled
Check that the bus connector is correctly inserted.
Bus communication via
PROFINET IO has been
interrupted.
IP address is incorrect.
Bad engineering configuration
Incorrect parameter
assignment
Incorrect or missing device
name
IO controller not
available/switched off but
Ethernet connection
established
Check whether the IP address or device name is
duplicated on the network.
Check the settings of the IO controller.
Vision Sensor SIMATIC VS120
Operating Instructions, Edition 02/2006, A5E00757507-01
Alarm, error and system messages
11.4 Slave diagnostics or /O device diagnostics
11.4
11.4
Slave diagnostics or /O device diagnostics
Errors such as "Sensor not found" trigger a slave or I/O device diagnostic message. Slave
diagnostics works according to the PROFIBUS standards EN 50170 and IEC 61158 /
IEC 61784. Depending on the DP master or I/O controller, the diagnostic information can be
read with STEP 7.
How to read out the slave or IO device diagnostic information and how it is structured is
described briefly below. You will find a detailed description in the Distributed I/O Station
ET 200M manual or in the PROFINET IO – From PROFIBUS DP to PROFINET IO
Programming Manual.
Note
SIMATIC® VS120 does not support the SYNC and FREEZE control commands. If the
SIMATIC® VS120 slave nevertheless receives one of these control commands, bit 0 in
diagnostic byte 1 is set (see Section Diagnostics in PROFIBUS DP).
Reading out diagnostic information with S7
If an error message such as "Sensor not found" occurs on the processing unit and you are
using an S7 CPU as the DP master or I/O controller, the diagnostic interrupt OB (OB82) is
started.
Its local variables OB_82_EV_CLASS, OB_82_MDL_DEFECT, and OB82_EXT_FAULT can
have the following values:
Variable
Value
Meaning
OB_82_EV_CLASS
B#16#39
Event entering state
OB_82_MDL_DEFECT
TRUE
Module fault
OB_82_EXT_FAULT
TRUE
External fault
Unfortunately it is not possible to recognize the actual cause of the problem from the local
variables of OB82. This can be determined as follows:
• For PROFIBUS DP: by calling SFC13 "DPNRM_DG" or SFB 54 "RALRM" in OB82;
• For PROFINET IO: by calling SFB54 "RALRM" in OB82.
The entry "Module fault" appears in the diagnostic buffer and the relevant text from the GSD
file is shown as the module status of the SIMATIC VS120, for example "Sensor not found".
When the error is eliminated (in the example: you have inserted the sensor again) and
acknowledged this on the processing unit, the diagnostic interrupt OB (OB82) is started
again on the DP master or IO controller.
Vision Sensor SIMATIC VS120
Operating Instructions, Edition 02/2006, A5E00757507-01
11-11
Alarm, error and system messages
11.4 Slave diagnostics or /O device diagnostics
Its local variables OB_82_EV_CLASS, OB_82_MDL_DEFECT, and OB82_EXT_FAULT can
have the following values:
Variable
Value
Meaning
OB_82_EV_CLASS
B#16#38
Event exiting state
OB_82_MDL_DEFECT
FALSE
No module fault
OB_82_EXT_FAULT
FALSE
No external error
The entry "Module OK" now appears in the diagnostic buffer in PROFIBUS DP and the error
text from the GSD file is no longer shown as the module status of the SIMATIC VS120.
Diagnostics for PROFIBUS DP
Reading the diagnostics data (slave diagnostics) with the SFC13 "DPNRM_DG"
Bytes 7 through 10 of the slave diagnostic information (diagnostic bytes 0 through 3) read
with SFC13 correspond to the 32-bit long field "Unit_Diag_Bit" of the GSD file
SI0180ED.GSD or the diagnostic bits shown in the table in Error messages.
The slave diagnostic information is structured designed as follows:
11-12
PROFIBUS
frame
Meaning
Scope of validity
Byte 0
Station status 1 (bit 3 = 1: External diagnostic
information available)
According to standard
Byte 1
Station status 2
According to standard
Byte 2
Station status 3
According to standard
Byte 3
Master PROFIBUS address
According to standard
Byte 4
Manufacturer ID (high byte): B#16#80
According to standard
Byte 5
Manufacturer ID (low byte): B#16#ED
According to standard
Byte 6
Length of the SIMATIC VS120-specific diagnostic
data including byte 6: B#16#05
According to standard
Byte 7
Diagnostic byte 0 (bit 1 "Sensor not found")
SIMATIC VS120-specific
Byte 8
Diagnostic byte 1
SIMATIC VS120-specific
Byte 9
Diagnostic byte 2
SIMATIC VS120-specific
Byte 10
Diagnostic byte 3
SIMATIC VS120-specific
Vision Sensor SIMATIC VS120
Operating Instructions, Edition 02/2006, A5E00757507-01
Alarm, error and system messages
11.4 Slave diagnostics or /O device diagnostics
Receive alarm with SFB54 "RALRM"
SFB 54 "RALRM" returns the following diagnostic information in the TINFO parameter
(task information) for PROFIBUS DP:
Byte
Value
Meaning
0 to 19
See OB description
Start information of the OB in which SFB 54 is called.
20 to 21
Depending on configuration
Address:
• Bit 0 to 7: Station number (acc. to configuration)
• Bit 8 to 14: DP master system ID (acc. to
configuration)
• Bit 15: 0
22
B#16#00
•
•
Bit 0 to 3: Slave type (DP)
Bit 4 to 7: Profile type: 0000
23
B#16#01
•
Bit 0 to 3: Alarm information type (alarm of a
non-DPV1 slave / non-IO device)
Bit 4 to 7: Structure version
•
24
B#16#00 / B#16#01
Flags of the PROFIBUS DP master interface:
• Bit 0 = 0: Alarm from integrated interface module
• Bit 0 = 1: Alarm from external interface module
• Bit 1 to 7: In each case 0
25
B#16#01 / B#16#00
Flags of the PROFIBUS DP master interface:
• Bit 0 = 1 for alarm entering state
• Bit 0 = 0 for alarm exiting state
• Bit 1 to 7: In each case 0
26 to 27
W#16#80ED
PROFIBUS identification number (fixed)
Vision Sensor SIMATIC VS120
Operating Instructions, Edition 02/2006, A5E00757507-01
11-13
Alarm, error and system messages
11.4 Slave diagnostics or /O device diagnostics
SFB54 "RALRM" returns the following diagnostic information in the AINFO parameter (alarm
status information) for PROFIBUS DP:
Byte
Value
Meaning
0
B#16#0F
Length of the received alarm information in bytes: 15
1
B#16#01
ID for the alarm type: 1=diagnostic interrupt
2
B#16#00
Slot number of the alarm triggering component
3
B#16#01 / B#16#02
1: event entering state, slot fault
2: event exiting state, slot fault cleared
11-14
4
According to standard
Station status 1 (bit 3 = 1: External diagnostic
information available)
5
According to standard
Station status 2
6
According to standard
Station status 3
7
According to standard
Master PROFIBUS DP address
8
B#16#80
Manufacturer ID (high byte)
9
B#16#ED
Manufacturer ID (low byte)
10
B#16#05
Length of the SIMATIC VS120-specific diagnostic data
including this byte
11
SIMATIC® VS120
Diagnostic byte 0 (bit 1 "Sensor not found")
12
SIMATIC®
VS120
Diagnostic byte 1
13
SIMATIC® VS120
Diagnostic byte 2
14
SIMATIC®
Diagnostic byte 3
VS120
Vision Sensor SIMATIC VS120
Operating Instructions, Edition 02/2006, A5E00757507-01
Alarm, error and system messages
11.4 Slave diagnostics or /O device diagnostics
Diagnostics for PROFINET IO
Receive alarm with SFB54 "RALRM"
SFB54 "RALRM" returns the following diagnostic information in the TINFO parameter
(task information) for PROFINET IO:
Byte
Value
Meaning
0 to 19
See OB description
Start information of the OB in which SFB 54 is called
20 to 21
Depending on configuration
Address:
• Bit 0 to 10: Station number (acc. to configuration)
• Bit 11 to 14: IO system ID (acc. to configuration)
• Bit 15: 1
22
B#16#08
•
•
Bit 0 to 3: Slave type 1000 = PNIO
Bit 4 to 7: Profile type: 0000
23
B#16#00
•
•
Bit 0 to 3: Alarm info type: 0000
Bit 4 to 7: Structure version: 0000
24
B#16#00 / B#16#01
Flags of the PNIO controller interface:
• Bit 0 = 0: Alarm from integrated interface module
• Bit 0 = 1: Alarm from external interface module
• Bits 1 through 7: In each case 0
25
B#16#01 / B#16#00
Flags of the PNIO controller interface:
• Bit 0 = 1 for alarm entering state
• Bit 0 = 0 for alarm exiting state
• Bits 1 through 7: In each case 0
26 to 27
W#16#0B01
PNIO device identification number (fixed)
28 to 29
W#16#002A
Manufacturer ID (fixed)
30 to 31
W#16# 0001
Identification number of the instance
The SFB 54 "RALRM" returns the following diagnostic information in the AINFO parameter
(alarm status information) for PROFINET IO:
Note
Only bytes 0 to 25 of the AINFO parameter are written for alarms exiting state (see also the
meaning of bytes 2 and 3 of AINFO).
Vision Sensor SIMATIC VS120
Operating Instructions, Edition 02/2006, A5E00757507-01
11-15
Alarm, error and system messages
11.4 Slave diagnostics or /O device diagnostics
Byte
Value
Meaning
0 to 1
W#16# 0002
Block type (fixed)
2 to 3
W#16#0022 / W#16#0016
Length of diagnostic data with alarm entering / exiting
state
4 to 5
W#16# 0100
Version (fixed)
6 to 7
W#16#0001 / W#16#000C
ID for the alarm type: Diagnostic interrupt entering state /
diagnostic interrupt exiting state
8 to 11
DW#16# 00000000
API (fixed)
12 to 13
W#16# 0000
Slot (fixed)
14 to 15
W#16# 0001
Subslot (fixed)
16 to 19
DW#16# 00000300
Module identification (fixed)
20 to 23
DW#16# 00000000
Submodule identification (fixed)
24 to 25
W#16#Bxxx / W#16#0xxx
Alarm specifier for alarms entering/exiting state:
• Bits 0 through 10: Sequence number
• Bit 11: Channel diagnostics: 0 (fixed)
• Bit 12: Status of vendor-specific diagnostics
• Bit 13: Status of diagnostics on submodule
• Bit 14: reserved: 0
• Bit 15: Application relation diagnostic status
26 to 27
W#16#0003
Format ID for manufacturer-specific diagnostics (fixed)
28 to 29
W#16# 0000
Slot (fixed)
30 to 31
W#16# 0001
Subslot (fixed)
32 to 33
W#16# 0000
Channel (fixed)
34 to 35
W#16# 0805
Properties (fixed)
36 to 37
Value from the table in Error
messages
ID for occurring error
Read data record with SFB52 "RDREC"
In contrast to event-based reading of diagnostic data with the SFB54, it is also possible to
read diagnostic data based on the status. Status-related reading of the diagnostic data is
performed using SFB52 "RDREC".
SFB52 is called as follows:
• Assign the diagnostic address of the SIMATIC VS120 to the parameter ID in hexadecimal
format.
• Assign the INDEX parameter the value 2.
11-16
Vision Sensor SIMATIC VS120
Operating Instructions, Edition 02/2006, A5E00757507-01
Alarm, error and system messages
11.4 Slave diagnostics or /O device diagnostics
The diagnostic data record is structured as follows:
Byte
Value
Meaning
0 to 1
W#16# 0010
Data record type: Diagnostic data record
2 to 3
W#16# 0012
Data record length starting at byte 4: 18 bytes
4 to 5
W#16# 0100
Version
6 to 7
W#16# 0000
Slot
8 to 9
W#16# 0001
Subslot
10 to 11
W#16# 0000
Channel
12
B#16#08 / B#16#10
Error detected / no error detected
13
B#16#05
Indicates that all variables are save word by word
beginning at byte 14
14 to 15
W#16#0003
ID for manufacturer-specific diagnostics
16 to 17
W#16# 0000
Channel number
18 to 19
W#16#0805 / W#16#1005
Content identical to bytes 12 and 13
20 to 21
Value from the table in Error
messages
ID for occurring error
Vision Sensor SIMATIC VS120
Operating Instructions, Edition 02/2006, A5E00757507-01
11-17
Alarm, error and system messages
11.4 Slave diagnostics or /O device diagnostics
11-18
Vision Sensor SIMATIC VS120
Operating Instructions, Edition 02/2006, A5E00757507-01
12
Technical data
12.1
12.1
General technical specifications
Power supply
Supply voltage (UN)
•
•
24 V DC; (20.4...28.8 V DC, safety extra low
voltage, SELV). SIMATIC VS120 does not have
integrated protection against surge in the μs
range (surge pulse). For external measures,
see EMC.
Input voltage protected against polarity
reversal
Power down (bridgeable)
Yes
≤ 20 ms
Current consumption (IN)
Typical: I = 2 A (maximum load of 1.5 A over the
digital inputs/outputs)
Fuse
Max. 10 A
Inrush current
I1 max. 10 A; < 1 ms
Safety requirements complying with
IEC 61131-2 corresponds to DIN EN 61131-2
Electromagnetic compatibility
Pulse-shaped interference
Interference
Test voltage
Corr. to severity
Electrostatic discharge
according to IEC 61000-4-2
•
•
Air discharge:
Contact discharge:
Burst pulse (fast transients)
complying with IEC 61000-4-4
•
•
2 kV (power supply cable)
2 kV (signal line)
±8 kV
±6 kV
3
3
Surge complying with IEC 61000-4-5
Coupling
Test voltage
Asymmetrical
2 kV (power supply cable) direct
voltage with protective elements
3
Symmetrical
1 kV (power supply cable) direct
voltage with protective elements
3
Vision Sensor SIMATIC VS120
Operating Instructions, Edition 02/2006, A5E00757507-01
Corr. to severity
12-1
Technical data
12.1 General technical specifications
Electromagnetic compatibility
Sine-shaped interference
RF interference
(electromagnetic fields)
Test values
Corr. to severity
Conforming to IEC 61000-4-3
10 V/m at 80 % amplitude
modulation of 1 kHz in the range
from 80 to 1000 MHz
3
Conforming to IEC 61000-4-3
10 V/m at 50% pulse modulation at
900 MHz
3
RF interference on cable/cable
shields
Test values
Conforming to IEC 61000-4-6
Test voltage 10 V at 80% amplitude
modulation of 1 kHz in the range
from 9 kHz to 80 MHz
Corr. to severity
3
Emitted interference
Limit class
•
•
•
Emitted interference of electromagnetic fields in accordance
with EN 55011: Limit class A, group 1;
Emitted interference via the AC input power supply in
accordance with EN 55011: Limit class A, group 1;
Emitted interference and illumination are within the limit value
to comply with EN 55022: Class B.
Transport and Storage of Modules
With regard to transportation and storage conditions, the SIMATIC VS120 surpasses the
requirements specified in IEC 61131-2. The following conditions apply to modules that are
transported and stored in the original packaging.
The climatic conditions correspond to IEC 60721-3-3, Class 3K7 for storage and IEC 60721-3-2,
Class 2K4 for transport.
The mechanical conditions correspond to IEC 60721-3-2, Class 2M2.
12-2
Conditions
Permitted range
Free fall
≤ 1 m (up to 10 kg)
Temperature
-30 to +70° C
Atmospheric pressure
1080 to 660 hPa, corresponds to a height of 1000
to 3500 m
Relative humidity (at +25 °C)
5 to 95%, no condensation
Sine-shaped oscillations complying with
IEC 60068-2-6
5 - 9 Hz: 3.5 mm
Shock complying with IEC 60068-2-29
250 m/s2, 6 ms, 1000 shocks
9 - 500 Hz: 9.8 m/s2
Vision Sensor SIMATIC VS120
Operating Instructions, Edition 02/2006, A5E00757507-01
Technical data
12.1 General technical specifications
Mechanical Environmental Conditions for Operation
SIMATIC VS120 is designed for fixed installation in an environment protected from the weather and
meets the conditions for use complying with DIN IEC 60721-3-3:
• Class 3M3 (mechanical requirements);
• Class 3K3 (climatic environmental conditions);
Mechanical environmental conditions, sine-shaped oscillations
Frequency range in Hz
Test values
10 ≤ f < 58
0.075 mm amplitude
58 ≤ f < 500
1 g constant acceleration
Test for mechanical environmental conditions
Test for / Test standard
Comments
Vibrations
•
Oscillation test complying
with IEC 60068-2-6
(sine)
•
Vibration type: Frequency cycles with a rate of change of 1
octave/minute.
– 10 Hz ≤ f < 58 Hz, constant amplitude 0.075 mm
– 58 Hz ≤ f < 500 Hz, constant acceleration 1 g
– 10 Hz ≤ f ≤ 55 Hz, amplitude 1 mm (only sensor head and lighting
unit)
Vibration duration: 10 frequency cycles per axis in each of
the 3 perpendicular axes.
Test for / Test standard
Comments
Shock Shock test
complying with
IEC 60068-2-29
•
•
•
Shock test
complying with
IEC 60068-2-27
Type of shock: Half-sine
Strength of the shock:
– Processing unit 10 g peak value / 16 ms duration
– Sensor head, illumination: 10 g peak value / 16 ms duration
Direction of shock: 100 shocks in each of the 3 perpendicular axes
Sensor head, illumination:
• 70 g peak value / 6 ms duration 3 times in each direction
• 30 g peak value / 11 ms duration 3 times in each direction
Ambient climatic conditions for operation
Ambient conditions
Permitted range
Temperature
0 to +50° C
Temperature change
Max. 10 °C/h
Relative humidity
max. 95 % at +25 °C
Atmospheric pressure
1080 to 795 hPa, corresponds to
a height of 1000 to 2000 m
Contaminant
concentration
•
•
Vision Sensor SIMATIC VS120
Operating Instructions, Edition 02/2006, A5E00757507-01
SO2: < 0.5 ppm; RH < 60 %,
no condensation
H2S: < 0.1 ppm;
RH < 60 %, no condensation
Comments
No condensation, corresponds to
relative humidity degree 2 to
IEC 61131-2.
•
•
Check: 10 ppm; 4 days
Check: 1 ppm; 4 days
12-3
Technical data
12.1 General technical specifications
Note
The mechanical and climatic environmental conditions for operation specified above apply
only to the sensor heads with order numbers 6GF2 002-8DA01 and 6GF2 002-8EA01.
For the sensor heads with order numbers 6GF2 002-8CB, the mechanical and climatic
environmental conditions depend on the lens used.
Test voltages to IEC 61131-2
12-4
Circuits with nominal voltage Ue to other circuits
or ground.
Test voltage
0 V < Ue ≤ 50 V
350 V
50 V < Ue ≤ 100 V
700 V
100 V < Ue ≤ 150 V
1300 V
150 V < Ue ≤ 300 V
2200 V
Vision Sensor SIMATIC VS120
Operating Instructions, Edition 02/2006, A5E00757507-01
Technical data
12.2 Technical specifications of SIMATIC VS120
12.2
12.2
Technical specifications of SIMATIC VS120
Lighting unit
LED ring flash
•
•
•
LEDs, wavelength 630 nm (red)
Ring flash with flash duration of 20 μs ... 10 ms, diffuse
DIN EN 60825-1:1994+A11:1996+A2:2001
Casing
Plastic
Dimensions
(W x H x D) in mm
102 × 102 × 26.5
Weight
Approx. 0.13 kg
Rated voltage
16.5 V DC
Degree of protection
IP 65
Sensor head
Image capture
CCD chip ¼", 640 × 480, square pixels; full-frame shutter
Image data transfer
Triggered image capture
Casing
Aluminum profile casing, anodized black
Dimensions
(W x H x D) in mm
42 × 42 × 110
Weight
Approx. 0.24 kg
Rated voltage
16.5 V DC
SIMATIC VS120 for large SIMATIC VS120 for
specimens
small specimens
Distance
sensor front edge – test
piece
Field of vision
100 mm
90 mm
Depending on lens
70 mm × 50 mm
40 mm × 30 mm
Variable,
depending on lens
Degree of protection
CCD resolution
Vision Sensor SIMATIC VS120
Operating Instructions, Edition 02/2006, A5E00757507-01
Sensor head for variable
specimens
(C/CS mount)
IP 65 to IEC 60529
0.11 mm÷pixels
0.06 mm÷pixels
Image width ÷ 640
pixels
12-5
Technical data
12.2 Technical specifications of SIMATIC VS120
Processing unit
Operator controls
4-row text display and 6 control buttons
Training new models and model
sets
Models can be trained.
Number of models that can be
stored
64 different models in 15 model sets; can be selected with
adjustment support, buttons, or digital inputs, non-volatile storage
Triggering tests
External via digital input or via PROFIBUS DP, PROFINET IO or
Ethernet TCP connection, Minimum pulse duration 5 ms
Commissioning software
Web interface for commissioning, mounting and adjustment of the
sensor head and lighting
Casing
Plastic, all cables can be plugged in, suitable for installation
without cubicle
Dimensions (W x H x D) in mm
170 × 140 × 76
Weight
Approx. 0.5 kg
Rated voltage
16.5 V DC
Degree of protection
IP 40 to IEC 60529
Interfaces on the processing unit
Interface for load current supply
•
•
•
•
•
4-pin circular connector (male) for load current supply
Cable length: 10 m (4 × 0.56 mm2)
Rated input voltage: 24 V DC
Rated input current: 2.2 A
Input voltage range: 20.4 V... 28.8 V DC
Illumination control
•
4-pin circular connector (female) for power supply and for
triggering the flash
Power consumption at 16.5 V: Max. 0.3 A
Cable length: 2,5 m (4 × 0.23 mm2)
•
•
Sensor head interface
•
•
•
Digital inputs for 24 V DC
•
•
Digital outputs for 24 V DC
•
•
12-6
Digital interface (26-pin D-sub female connector) for
connecting the SIMATIC VS120 sensor head
Power consumption at 16.5 V DC: Max. 0.16 A
Cable length: 2.5 m (26 × 0.09 mm2)
8; one being a trigger input with interrupt capability for
standard binary sensors,
7 further PLC-compliant control inputs
6; max. load 0.5 A each, however in total a maximum of 1.5 A
(15-pin D-sub female for inputs/outputs)
Cable length: 10 m (15 × 0.14 mm2)
DP interface
•
9-pin D-sub socket; programmable;
– Isolated: Data lines A, B; control lines RTS; 5 V power
supply (max. 90 mA)
– Grounded Shield of the DP12 connecting cable; RS 485;
floating
– Non-floating 24 V DC/150 mA
Ethernet interface
•
8-pin RJ-45 jack, 10/100 Mbps
Vision Sensor SIMATIC VS120
Operating Instructions, Edition 02/2006, A5E00757507-01
Technical data
12.2 Technical specifications of SIMATIC VS120
Side length of a pixel
Graphic
width
Actual length
at a resolution
of 640 × 480
Actual length
at a resolution
of 640 × 480
SIMATIC VS120
for large specimens
70 mm
70/640 mm
70/320 mm
SIMATIC VS120
for small specimens
40 mm
40/640 mm
40/320 mm
C/CS mount
12 mm
12/640 mm
12/320 mm
300 mm
300/640 mm
300/240 mm
Vision Sensor SIMATIC VS120
Operating Instructions, Edition 02/2006, A5E00757507-01
12-7
Technical data
12.3 Port assignment of the processing unit
12.3
12.3
Port assignment of the processing unit
Power supply "IN 24 V DC" (pin)
Wiring
Name
Function
Direction
Wire color
1
+24V
24 V DC supply voltage
-
Red
2
+24V
24 V DC supply voltage
-
Orange
3
M
Ground
-
Black
4
M
Ground
-
Brown
Interface to the Lighting Unit "LAMP" (socket)
Wiring
Name
Function
Direction
1
+16V
16.5 V DC supply voltage
-
2
LIGHT
Pulse to start a light flash (24 V DC)
Output
3
M
Ground
-
4
M
Ground
-
Interface to Sensor Head "SENSOR" (socket)
Wiring
Name
Casing
Function
Direction
Shielding
-
9
M
-
10
M
-
14
+16 V
-
20
TxDP
Image data +
Input
21
TxDN
Image data -
Input
22
CLK_P
Image synchronization +
Output
23
CLK_N
Image synchronization -
Output
24
RxD_P
Sensor parameter +
Output
25
RxD_N
Sensor parameter -
Output
26
M
-
I/O interface "DI/DO" (socket)
12-8
Wiring
Name
Function
Direction
Wire color
1
DISA
Disable: Disable manual keypad input,
model selection via digital I/O
Input
Black
2
SEL0
Select 0: Model selection: Bit 0
Input
Brown
3
SEL1
Select 1: Model selection: Bit 1
Input
Green
4
SEL2
Select 2: Model selection: Bit 2
Input
Orange
5
SEL3
Select 3: Model selection: Bit 3
Input
Yellow
Vision Sensor SIMATIC VS120
Operating Instructions, Edition 02/2006, A5E00757507-01
Technical data
12.3 Port assignment of the processing unit
I/O interface "DI/DO" (socket)
6
--
Not used
--
--
7
TRG
Trigger: An evaluation is started on the
positive-going edge
Input
Blue
8
RES
Reset: Reset error
Input
Violet
9
IN_OP
In operation:
• 0 = SIMATIC VS120 starting up or
error message is displayed.
• 1 = SIMATIC VS120 functional, no
errors
Output
White-black
10
TRD
Trained: Selected model has been trained. Output
White-brown
11
RDY
Ready:
• 0 = Device startup or SIMATIC VS120
in Stop
• 1 = SIMATIC VS120 in processing
mode (Run)
Output
White-green
12
OK
Evaluation result: Trained model was
recognized.
Output
White-orange
13
--
Not used
--
--
14
N_OK
Evaluation result: Trained model was not
recognized.
Output
White-red
15
M
Ground
-
Gray
PROFIBUS DP Interface (socket)
Wiring
Name
Function
1
-
Not used
2
M
Chassis, non-floating
3
LTG_B
Data line (I/O)
4
RTSAS
Turn on PLC transmitter (O)
5
GND
Chassis, floating
6
P5V
+ 5 V (fused) floating
7
24V
Non-floating
8
LTG_A
Data line (I/O)
9
-
Not used
Vision Sensor SIMATIC VS120
Operating Instructions, Edition 02/2006, A5E00757507-01
12-9
Technical data
12.3 Port assignment of the processing unit
Ethernet interface "ETHERNET" (socket)
12-10
Wiring
Name
Function
1
TxD +
Send data +
2
TxD -
Send data -
3
RxD +
Receive data +
4
-
Not used
5
-
Not used
6
RxD -
Receive data -
7
-
Not used
8
GND
Chassis, non-floating
Vision Sensor SIMATIC VS120
Operating Instructions, Edition 02/2006, A5E00757507-01
13
Dimension drawings
13.1
13.1
SIMATIC VS120 processing unit
Figure 13-1
Processing unit
• Intended fixing screws M4×12 or longer
• Permitted, static bending radii with:
– Power supply cable with a minimum radius of 40 mm
– Illumination cable with a minimum radius of 25 mm
– Sensor cable with a minimum radius of 40 mm
– DI / DO cable with a minimum radius of 50 mm
Vision Sensor SIMATIC VS120
Operating Instructions, Edition 02/2006, A5E00757507-01
13-1
Dimension drawings
13.2 SIMATIC VS120 sensor head
13.2
13.2
SIMATIC VS120 sensor head
9DULDEOHOHQJWK
9DULDEOHOHQJWK
%
0
$
%
0D[
$
Figure 13-2
Sensor head
[|
[|
Figure 13-3
Mounting plate for sensor head
1) press-in nut M4
2) press-in bolt M4 x 22
13-2
Vision Sensor SIMATIC VS120
Operating Instructions, Edition 02/2006, A5E00757507-01
Dimension drawings
13.3 SIMATIC VS120 lighting unit
13.3
SIMATIC VS120 lighting unit
13.3
Figure 13-4
Lighting unit
1) M4 screw
2) Mounting bracket for mounting the sensor head
Vision Sensor SIMATIC VS120
Operating Instructions, Edition 02/2006, A5E00757507-01
13-3
Dimension drawings
13.3 SIMATIC VS120 lighting unit
13-4
Vision Sensor SIMATIC VS120
Operating Instructions, Edition 02/2006, A5E00757507-01
Scope of delivery/Spares/Accessories
14.1
14.1
14
Components
Full package
The full SIMATIC VS120 package comprises:
• Sensor head with CCD sensor chip for acquiring specimens
• LED ring light red, diffuse for SIMATIC VS, degree of protection IP65 (not included in
every full package)
• Processing unit for image processing, output of results, attachment to PROFIBUS DP
and Ethernet, and parameter assignment
• Cables to connect the individual components
• Documentation package
Documentation package
The SIMATIC VS120 documentation package comprises:
• Operating Instructions (compact) for SIMATIC VS120 as hard copy version in the
languages
– German
– English
– Spanish
– Italian
– French
• Documentation CD SIMATIC VS120 with:
– Operating Instructions for SIMATIC VS120 in the languages German, English,
Spanish, Italian and French
– Operating Instructions (compact) for SIMATIC VS120 in the languages German,
English, Spanish, Italian and French
– Online Help
– Function block FB1 and data block DB10 for PROFIBUS DP and PROFINET IO data
exchange
– Example programs for FB1
– Example program for archiving of diagnostic information
Vision Sensor SIMATIC VS120
Operating Instructions, Edition 02/2006, A5E00757507-01
14-1
Scope of delivery/Spares/Accessories
14.2 Full packages
– SIMATIC S7-300 Automation System, Installation Manual
– Device master data file SI0180ED.GSD with the corresponding bitmap file
VS1X0__N.DIB for PROFIBUS DP
– Device master data file GSDML-V2.0-Siemens-002A-VS100-20060208.XML with
corresponding bitmap file VS100.BMP for PROFINET IO
You will find an overview of the complete range of components in the section Complete
Packages.
Note
If you want to use C- or CS-mount sensors under IP65 conditions, use a lens protective
housing.
14.2
14.2
Full packages
The following tables list the order numbers (MLFB) of the full packages and the individual
components.
14-2
6GF1 120-1AA
SIMATIC VS120 full package, field of view 70 x 50 mm, cable 2.50 m
6GF1 018-2AA10
SIMATIC VS120 processing unit
6GF2002-8DA01
Sensor head with mounting plate (A5E00190326), degree of protection IP 65,
field of view 70 x 50 mm
6GF7 021-1AA10
Documentation package for SIMATIC VS120
6GF9002-8CA
Cable for power supply, 10 m
6GF9002-8CB
Cable for connecting digital I/O devices, 10 m
6GF9002-8CD
Cable between processing unit and sensor head, 2.5 m
6GF9002-8CE
Cable between illumination and processing unit, 2.5 m
6GF9004-8BA
LED ring light red, diffuse with mounting bracket (A5E00200046) for
SIMATIC VS, degree of protection IP65
6GF1 120-1AA01
SIMATIC VS120 full package, field of view 70 x 50 mm, cable 10 m
6GF1 018-2AA10
SIMATIC VS120 processing unit
6GF2002-8DA01
Sensor head with mounting plate (A5E00190326), degree of protection IP 65,
field of view 70 x 50 mm
6GF7 021-1AA10
Documentation package for SIMATIC VS120
6GF9002-8CA
Cable for power supply, 10 m
6GF9002-8CB
Cable for connecting digital I/O devices, 10 m
6GF9002-8CF
Cable between processing unit and sensor head, 10 m
6GF9002-8CG
Cable between illumination and processing unit, 10 m
6GF9004-8BA
LED ring light red, diffuse with mounting bracket (A5E00200046) for
SIMATIC VS, degree of protection IP65
Vision Sensor SIMATIC VS120
Operating Instructions, Edition 02/2006, A5E00757507-01
Scope of delivery/Spares/Accessories
14.2 Full packages
6GF1 120-2AA
SIMATIC VS120 full package, field of view 40 x 30 mm, cable 2.50 m
6GF1 018-2AA10
SIMATIC VS120 processing unit
6GF2002-8EA01
Sensor head with mounting plate (A5E00190326), degree of protection IP 65,
field of view 40 x 30 mm
6GF7 021-1AA10
Documentation package for SIMATIC VS120
6GF9002-8CA
Cable for power supply, 10 m
6GF9002-8CB
Cable for connecting digital I/O devices, 10 m
6GF9002-8CD
Cable between processing unit and sensor head, 2.5 m
6GF9002-8CE
Cable between illumination and processing unit, 2.5 m
6GF9004-8BA
LED ring light red, diffuse with mounting bracket (A5E00200046) for
SIMATIC VS, degree of protection IP65
6GK1 120-2AA01
SIMATIC VS120 full package, field of view 40 x 30 mm, cable 10 m
6GF1 018-2AA10
SIMATIC VS120 processing unit
6GF2002-8EA01
Sensor head with mounting plate (A5E00190326), degree of protection IP 65,
field of view 40 x 30 mm
6GF7 021-1AA10
Documentation package for SIMATIC VS120
6GF9002-8CA
Cable for power supply, 10 m
6GF9002-8CB
Cable for connecting digital I/O devices, 10 m
6GF9002-8CF
Cable between processing unit and sensor head, 10 m
6GF9002-8CG
Cable between illumination and processing unit, 10 m
6GF9004-8BA
LED ring light red, diffuse with mounting bracket (A5E00200046) for
SIMATIC VS, degree of protection IP65
6GF1 120-3AB
SIMATIC VS120 full package, field of view variable, cable 2.50 m
6GF1 018-2AA10
SIMATIC VS120 processing unit
6GF2002-8CB
Sensor head with mounting plate (A5E00190326), degree of protection IP 65,
field of view variable
6GF7 021-1AA10
Documentation package for SIMATIC VS120
6GF9002-8CA
Cable for power supply, 10 m
6GF9002-8CB
Cable for connecting digital I/O devices, 10 m
6GF9002-8CD
Cable between processing unit and sensor head, 2.5 m
6GF1 120-3AB01
SIMATIC VS120 full package, field of view variable, cable 10 m
6GF1 018-2AA10
SIMATIC VS120 processing unit
6GF2002-8CB
Sensor head with mounting plate (A5E00190326), degree of protection IP 65,
field of view variable
6GF7 021-1AA10
Documentation package for SIMATIC VS120
6GF9002-8CA
Cable for power supply, 10 m
6GF9002-8CB
Cable for connecting digital I/O devices, 10 m
6GF9002-8CF
Cable between processing unit and sensor head, 10 m
Vision Sensor SIMATIC VS120
Operating Instructions, Edition 02/2006, A5E00757507-01
14-3
Scope of delivery/Spares/Accessories
14.3 Accessories
14.3
14.3
Accessories
Machine-Readable
Product Code
Designation
6XV1 850-2HH20
Ethernet RJ-45 x RJ-45 (send and receive line crossed over), 2 m long
6XV1 850-2GH20
Ethernet RJ-45 = RJ-45 (send and receive line not crossed over), 2 m long
Supported Sensors
MachineReadable Product
Code
Lens
Max. resolution
Distortion factor
Light
6GF2002-8AA
Fixed focus 6.5mm
640 × 480 pixels
50
Infrared with
infrared band filter
6GF2002-8BA
Fixed focus 8mm
640 × 480 pixels
5
Infrared with
infrared band filter
6GF2002-8CB
C-mount suitable for
tube
640 × 480 pixels
0
Daylight
6GF2002-8DA01
Fixed focus 6.5mm
640 × 480 pixels
130
Daylight
6GF2002-8EA01
Fixed focus 8mm
640 × 480 pixels
50
Daylight
6GF2002-8FA01
Fixed focus 16 mm
640 × 480 pixels
0
Daylight
Note
For other accessories such as IP65 lens protective housing, protective housing, LED ring
light, sensor head holder, and sensor head holder and sensor head holder (solid), refer to:
• Simatic Sensors catalog, order number E86060-K8310-A111-A2SIMATIC SENSORS;
• On the Internet at http://www.automation.siemens.com/simatic-sensors or
http://www.siemens.com/automation/mall.
14-4
Vision Sensor SIMATIC VS120
Operating Instructions, Edition 02/2006, A5E00757507-01
Scope of delivery/Spares/Accessories
14.4 C-mount lens and inspection window size
14.4
14.4
C-mount lens and inspection window size
Note
From the following table, you can select the lens suitable for your application by selecting the
best distance and inspection window.
Distance lens front
edge – object in m
Lens
Inspection window
Image
width in
mm
Image
Order no.(MLFB)
height in
mm
Focal distance in mm,
light intensity
0,30
91
68
6GF9 001-1BL01
12, 1:1,4
0,40
121
90
6GF9 001-1BL01
12, 1:1,4
0,40
92
69
6GF9 001-1BF01
16, 1:1,4
0,50
115
85
6GF9 001-1BF01
16, 1:1,4
0,50
72
54
6GF9 001-1BG01
25, 1:1,4
0,60
87
65
6GF9 001-1BG01
25, 1:1,4
0,70
101
75
6GF9 001-1BG01
25, 1:1,4
0,80
115
86
6GF9 001-1BG01
25, 1:1,4
0,80
85
63
6GF9 001-1BH01
35, 1:1,6
0,90
95
71
6GF9 001-1BH01
35, 1:1,6
1,00
105
79
6GF9 001-1BH01
35, 1:1,6
1,10
116
86
6GF9 001-1BH01
35, 1:1,6
1,20
126
94
6GF9 001-1BH01
35, 1:1,6
1,20
81
60
6GF9 001-1BJ01
50, 1:2,8
1,30
88
65
6GF9 001-1BJ01
50, 1:2,8
1,40
95
71
6GF9 001-1BJ01
50, 1:2,8
1,50
102
76
6GF9 001-1BJ01
50, 1:2,8
1,60
109
81
6GF9 001-1BJ01
50, 1:2,8
1,70
116
87
6GF9 001-1BJ01
50, 1:2,8
1,70
79
59
6GF9 001-1BK01
75, 1:2,8
1,80
84
63
6GF9 001-1BK01
75, 1:2,8
1,90
89
66
6GF9 001-1BK01
75, 1:2,8
2,00
94
70
6GF9 001-1BK01
75, 1:2,8
2,10
99
73
6GF9 001-1BK01
75, 1:2,8
2,20
103
77
6GF9 001-1BK01
75, 1:2,8
Vision Sensor SIMATIC VS120
Operating Instructions, Edition 02/2006, A5E00757507-01
14-5
Scope of delivery/Spares/Accessories
14.4 C-mount lens and inspection window size
Distance lens front
edge – object in m
14-6
Lens
Inspection window
2,30
108
81
6GF9 001-1BK01
75, 1:2,8
2,40
113
84
6GF9 001-1BK01
75, 1:2,8
2,50
118
88
6GF9 001-1BK01
75, 1:2,8
2,60
122
91
6GF9 001-1BK01
75, 1:2,8
2,60
88
66
6GF9 001-1BJ01 and 6GF9 50 and extender
001-1BV
2,70
92
69
6GF9 001-1BJ01 and 6GF9 50 and extender
001-1BV
2,80
96
71
6GF9 001-1BJ01 and 6GF9 50 and extender
001-1BV
2,90
99
74
6GF9 001-1BJ01 and 6GF9 50 and extender
001-1BV
3,00
103
77
6GF9 001-1BJ01 and 6GF9 50 and extender
001-1BV
Vision Sensor SIMATIC VS120
Operating Instructions, Edition 02/2006, A5E00757507-01
Service & Support
15.1
15.1
15
A&D Mall / Interactive Catalog (CA01)
In the online catalog CA01 of the Automation & Drives group, you will find details on the
following and can place orders:
• Products
• Systems
Internet address:
http://mall.ad.siemens.com
15.2
15.2
Service and support
Technical support
You can reach the technical support team for all A&D projects at:
• Telephone: ++49 (0) 180 5050 222
• Fax:
++49 (0) 180 5050 223
Internet
• Visit our site on the Internet at:
http://www.siemens.com/automation/service&support
• You can send a support query to:
http://www.siemens.de/automation/support-request
• The online catalog and the online ordering system is available at:
www.siemens.de/automation/mall
• For further information on factory automation sensors, visit
http://www.siemens.de/simatic-sensors
Vision Sensor SIMATIC VS120
Operating Instructions, Edition 02/2006, A5E00757507-01
15-1
Service & Support
15.2 Service and support
15-2
Vision Sensor SIMATIC VS120
Operating Instructions, Edition 02/2006, A5E00757507-01
16
Directives and declarations
CE Label
SIMATIC VS120 meets the requirements and protective aims of the following EU directive.
EMC Directive
The devices meet the requirements of the EC directive “89/336/EEC Electromagnetic
Compatibility” (modified by 91/263/EEC, 92/31/EEC and 93/68/EEC) and are designed
according to the CE marking for use in an industrial environment.
Area of application
Industry
Requirements
Emitted interference
Immunity to interference
EN 61000-6-4: 2001
EN 61000-6-2: 2001
Declaration of conformity
The EC Declaration of Conformity and the corresponding documentation are available for the
responsible authorities according to the above-mentioned EC Directive at the following
address:
Siemens AG
Automation and Drives
Factory Automation Sensors
P.O.Box 4848
90437 NUREMBERG
GERMANY
Your sales representative can provide these on request.
Observance of installation guidelines
The installation guidelines and safety instructions in this documentation must be followed
during commissioning and operation.
Vision Sensor SIMATIC VS120
Operating Instructions, Edition 02/2006, A5E00757507-01
16-1
Directives and declarations
DIN ISO 9001 certificate
The quality assurance system for the entire product process (development, production, and
marketing) at Siemens fulfills the requirements of ISO 9001 (corresponds to EN29001:
1987).
This has been certified by DQS (the German society for the certification of quality
management systems).
EQ-Net certificate no.: 1323-01
Software license agreement
The device ships with preinstalled software. Please observe the corresponding license
agreements.
EMC
USA
Federal
Communications
Commission
Radio Frequency
Interference
Statement
This equipment has been tested and found to comply with the limits for a Class
A digital device, pursuant to Part 15 of the FCC Rules. These limits are
designed to provide reasonable protection against harmful interference when
the equipment is operated in a commercial environment. This equipment
generates, uses, and can radiate radio frequency energy and, if not installed
and used in accordance with the instruction manual, may cause harmful
interference to radio communications. Operation of this equipment in a
residential area is likely to cause harmful interference in which case the user
will be required to correct the interference at his own expense.
Shielded Cables
Shielded cables must be used with this equipment to maintain compliance with
FCC regulations.
Modifications
Changes or modifications not expressly approved by the manufacturer could
void the user's authority to operate the equipment.
Conditions of
Operations
This device complies with Part 15 of the FCC Rules. Operation is subject to
the following two conditions: (1) this device may not cause harmful
interference, and (2) this device must accept any interference received,
including interference that may cause undesired operation.
CANADA
Canadian Notice
This Class B digital apparatus complies with Canadian ICES-003.
Avis Canadien
Cet appareil numérique de la classe b est conforme à la norme NMB-003 du
Canada.
AUSTRALIA
This product meets the requirements of the AS/NZS 3548 standard (Class A).
16-2
Vision Sensor SIMATIC VS120
Operating Instructions, Edition 02/2006, A5E00757507-01
Glossary
Actuator
Component at the output section of a controlled system, which intervenes in energy or mass
flows and thereby causes changes.
Adjustment support
Software Web server application, in which most operator actions are performed on the PC
screen using a mouse and keyboard. The software processes and displays models.
ASCII
American Standard Code for Information Interchange.
Automation system
An automation system is a programmable logic controller consisting of at a central
processing unit, a variety of input and output modules as well as operator control and
monitoring (HMI) devices.
BF
Bus fault
Bit
Binary digit
Bus
A cable or conductor system used for data transfer among the components of a computer
system. Buses are characterized by the number of bits they can transfer at any one time.
There are serial bus systems (one bit after the other) and parallel bus systems (multiple bits
simultaneously over several lines).
Byte
Binary term
Vision Sensor SIMATIC VS120
Operating Instructions, Edition 02/2006, A5E00757507-01
Glossary-1
Glossary
CCD
Charge Coupled Device
Com server
A Com server represents the communication center between a serial DTE (machine,
measuring device, controller...) and the TCP/IP computer network.
Contour
Closed line that completely runs along the edge of an object, i.e. it encompasses the border
points.
Counter
A counter registers the status transitions (edges) of a digital signal. With each status
transition, the counter increases (increments) or decreases (decrements) a value that is then
evaluated by SIMATIC S7 or a PLC.
CPU
Central Processing Unit
Crossover cable
A crossover cable can only be used for a direct connection between two PCs or devices.
Due to the crossing of the send and receive wires, the PCs/devices can communicate
without additional components (HUB, switch).
Both the PC and processing unit must have an Ethernet RJ-45 port.
CSV
Character Separated Values -> A CSV file (can be read with Microsoft Excel, for example) is
a text file for saving or exchanging simply structured data.
DB
Data block
Debouncing
Permanent electrical contact does not occur immediately when electrical switching or key
contacts are closed; the connection opens and closes several times within a fraction of a
second. With digital input devices (computer keyboards, input controllers on keypads, etc.),
this bouncing effect causes each occurrence of the contact to be registered as a separate
input (multiple input). Since the discovery of the phenomenon, various hardware and
software solutions have been developed. Counteracting this effect is known as debouncing
(debouncing circuit or routine).
Glossary-2
Vision Sensor SIMATIC VS120
Operating Instructions, Edition 02/2006, A5E00757507-01
Glossary
DHCP client
Each device with network capability that supports communication with a DHCP server to
obtain dynamically leased IP configurations and other optional parameter information.
DHCP server
A computer on which the Microsoft DHCP service runs. This provides active DHCP clients
with dynamic configuration of IP addresses and related information.
DHCP: Dynamic Host Configuration Protocol
A TCP/IP service protocol that allows dynamic configurations of host IP addresses for a
certain time and distributes related configuration parameters to authorized network clients.
DHCP provides safe and simple-to-use configuration of TCP/IP networks, prevents address
conflicts and helps to restrict the number of IP addresses required in the network. DHCP
uses a client/server model in which the DHCP server takes over central management of IP
addresses used in the network. Clients with DHCP support can then request and obtain the
lease of an IP address from a DHCP server when the network starts up.
DI/DO
Digital Input /Digital Output
DIN
Deutsches Institut für Normung - German institute for standardization
Distortion: Distortion
Image error that becomes evident in the image of a rectangular grid where the straight lines
are bent inwards or outwards.
DNS server Domain Name System server
A hierarchically distributed database containing assignments of DNS domain names to
various data types, such as IP addresses. DNS allows computers and services to be found
based on user-friendly names and also allows other information stored in the database to be
found.
Download
In communications, to transfer a data copies from a remote computer to the requesting
computer, for example, to send the operating system from a PC to a controller.
DP
Distributed Peripheral I/O
Vision Sensor SIMATIC VS120
Operating Instructions, Edition 02/2006, A5E00757507-01
Glossary-3
Glossary
D-sub
Type identification for a connector.
EEPROM
Electrically Erasable Programmable Read Only Memory
EMC
ElectroMagnetic Compatibility
Endian
The data are partly saved with different byte sequences in various computer architectures.
Intel-based computers, for example, save the data differently than the controllers from
Siemens (S7), namely, in reverse sequence. The byte sequence from Intel, termed Little
Endian, is therefore the reverse S7 byte sequence, Big Endian. The following applies to
these two forms:
• Little Endian: The most significant byte is located at the right end of a word.
• Big Endian: The most significant byte is located at the left end of a word.
Ethernet
This is a specific type of local network that works according to a standard defined by Intel,
DEC and Xerox.
FB
Function Block
FDB
A Function Block Diagram is a graphic representation of control functions. Each control task
(function) has a corresponding symbol.
Firmware
Software routines stored in the Read-Only Memory (ROM). Startup routines and local
machine I/O commands are stored in firmware. In terms of user friendliness, firmware takes
an intermediate position between software and hardware.
Gateway
This is a device that is connected to more than one physical TCP/IP network and can
forward or distribute IP packets. A gateway translates various transport protocols or data
formats (for example IPX and IP) and is included in networks mainly because of this
translation function.
Gateways are also known as IP routers.
Glossary-4
Vision Sensor SIMATIC VS120
Operating Instructions, Edition 02/2006, A5E00757507-01
Glossary
Gnd
Ground
GSD
Device master data file
Handshake
Method for synchronizing transfer of data at irregular intervals. The sender signals when it
can send new data and the recipient signals when it is ready to receive new data.
HF
High Frequency
Host name
The DNS name of a device on a network. These names are used to locate a computer in the
network. Before a computer can be located, its host name must be listed in the host file or be
known to a DNS server. On most computers running Windows, the host name and computer
name are identical.
HTML
HyperText Markup Language -> plain text language for structuring text and hypertext
HTTP
HyperText Transfer Protocol -> protocol used mainly by Internet browsers on the World-Wide
Web.
IEC
International Electrotechnical Commission
IP
Internet Protocol
IP address
A 32-bit address to identify a node in an IP network. Each node in the IP network must be
assigned a unique IP address. This consists of the network ID and a unique host ID. This
address is typically represented with the decimal value of each octet separated by a period
(for example, 192.168.7.27). In this version of Windows, you can configure a static IP
address or have it assigned dynamically by DHCP.
Vision Sensor SIMATIC VS120
Operating Instructions, Edition 02/2006, A5E00757507-01
Glossary-5
Glossary
LAD
LAdder Diagram -> Graphic representation of controller functions based on a circuit diagram
from protection technology. The current paths, however, are not arranged horizontally in
relation to one another and the symbols deviate.
LAN
Local Area Network, for example, Ethernet network within a building.
LCD
Liquid Crystal Display
LEDs
Light Emitting Diode.
LF
Low Frequency
MAC
Media Access Control
MAC address
The MAC address is the hardware address for each network device (network card, switch ,
etc.) and is used for unique identification of the device in the network. The MAC address is
burned into a chip and cannot normally be modified.
Machine-Readable Product Code
German Maschinenlesbare Fabrikatebezeichnung ->The MLFB is the order number of a
product and at the same time the type/system identifier.
Main ROI or ROI
Region of Interest The main ROI is the area with characteristics of the specimens relevant
for image processing.
Master
The device configured as master in a communications system passes on data to the device
configured as slave. The master is always the active partner.
PC
Personal Computer.
Glossary-6
Vision Sensor SIMATIC VS120
Operating Instructions, Edition 02/2006, A5E00757507-01
Glossary
PELV
Protective Extra Low Voltage = extra low voltage with safe isolation
Persistence
Persistence is the ability to store data structures (or objects) in non-volatile memory such as
file systems or databases. In other words, on the SIMATIC VS120 processing unit, data is
stored and retained if there is a power outage.
PG
Programming device
Ping
A utility for checking connections to one or more remote hosts. The "ping" command uses
the echo packets and echo replies of ICMP to check connectivity with an IP system in a
network. Ping is useful in troubleshooting the IP network or the router.
PLC
Programmable Logic Controller.
Port or port address
Address for a channel for data transfer between an input or output device and the processor.
From the CPU’s perspective, a port represents one or more memory addresses to which it
can send data or from which it can receive data. Special hardware such as expansion
boards places data from a device in the memory address and sends data from these
addresses to the device. Some ports are only for input and some only for output.
Processing unit
SIMATIC VS120 hardware unit for the recognition of models and test specimens. Operator
control is interactive using operator buttons and a display field or controlled by signals over
an automation system.
PROFIBUS
Process Field Bus-> International fieldbus standard to EN 50170/IEC 61158
PROFIBUS DP
PROFIBUS-DP (distributed peripheral I/O) is used for controlling sensors and actuators
using a central controller in production engineering. It is also used in connection with
"distributed intelligence", i.e. connecting multiple controllers to form a network. It provides
data transmission up to 12 Mbps on twisted-pair cables and data transmission over sliding
contacts for mobile subscribers in exceptional cases or optical data transmission in
unobstructed space.
Vision Sensor SIMATIC VS120
Operating Instructions, Edition 02/2006, A5E00757507-01
Glossary-7
Glossary
PROFINET device
A PROFINET IO system is assembled from the following devices:
• An IO controller is a controller or PC that controls automation tasks.
• An IO device is a field device that is configured and controlled by an IO controller. An IO
device consists of several modules and submodules.
• IO Supervisor is an engineering tools typically based on a PC that is used to configure
and perform diagnostics on individual IO devices, and to configure the complete plant.
The controller gets its data from the Supervisor and configures the device based on this.
An application relation (AR) is formed between an IO controller and and IO device
Communication relations (CR) with varying properties are specified for the transfer of
parameters, cyclical data communication and alarm handling based on this AR.
The properties and options of an IO device are described in a Generic System Description
(GSD) file. This file is written in GSDML (GSD Markup Language) - an extension of XML and is used as a planning tool to create a base configuration for PROFINET IO systems for
planning.
PROFINET IO
PROFINET IO (Input Output) is used for controlling sensors and actuators using a central
controller in production engineering.
Proxy
A computer that responds to name query broadcasts and answers to names that do not go
to the local subnet. To evaluate the names, the proxy communicates with a WINS server and
then retains the names in the cache for a certain time.
RS-232: Recommended Standard 232
RS is an accepted industrial standard for serial data communication. For cable lengths
shorter than 15 m. No differential evaluation. Sending and receiving on different lines.
SELV
Safety extra low voltage
Sensor
In electrical engineering, a sensor is a component that can qualitively measure not only
specific physical or chemical properties (such as heat radiation, temperature, humidity,
pressure, excess pressure, sound, luminance, magnetism, acceleration, force) as well as the
physical condition of its surroundings or register them as measured variables.
Server
Network station that provides services and resources for other stations, for example, a
computer that manages data and passes this on to other computers as needed.
Glossary-8
Vision Sensor SIMATIC VS120
Operating Instructions, Edition 02/2006, A5E00757507-01
Glossary
SF
General fault
Shutter speed: Shutter speed
The shutter speed decides how long the CCD sensor of a camera is exposed. When more
light is available, the operator can select a faster shutter speed and vice versa. At slow
shutter speeds, there is greater risk that the image will suffer from "camera shake"
SIMATIC S7
Siemens automation system with the controller families SIMATIC S7-300 and SIMATIC S7400.
SIMATIC VS120 Vision Sensor
Hardware and software: Full package consisting of the components: Sensor, LED overhead
lighting, processing unit, connecting cable, installation instructions, CD with adjustment
support and documentation.
Slave
The device configured as slave in a communications system receives data from the device
configured as master. The slave is always the passive partner.
SNTP: Simple Network Time Protocol
SNTP is a simplified version of NTP and NTP is one of the oldest TCP/IP protocols still in
use.
SP1
Service Pack 1 -> Additional software for the Windows XP Professional operating system
and Internet Explorer 6.0.
STEP 7
STEP 7 is programming software for the S7-300 and S7-400 controller families
STL
STatement List -> User program in which control functions are listed in the form of
statements.
Sub-ROI
The area in the main ROI with characteristics of the specimens of special relevance for
image processing. Sub-ROIs are created when the characteristics of the main ROI are not
adequate for evaluation.
Vision Sensor SIMATIC VS120
Operating Instructions, Edition 02/2006, A5E00757507-01
Glossary-9
Glossary
Switch: English: switch
A switch is an electronic device for connecting several computers or network segments in a
local network (LAN) - similar to a hub. Switches are also known as intelligent hubs. In its
original form, the switch operates at layer 2 (Data Link layer) of the OSI model. The switch
processes 48-bit MAC addresses and creates an SAT (Source Address Table).
The switch has properties similar to a bridge and is also known as a multi-port bridge.
Ethernet switch is the shortened form, of switching hub and indicates the ability to operate
switched Ethernet.
TCP
Transmission Control Protocol -> Connection-oriented protocol for reliable data transmission.
TCP/IP
Collective term for a family of protocols.
Trigger
A trigger is a switch that is activated by a specific event.
URL: Uniform Resource Locator
An address uniquely identifying a location on the Internet. A URL for a WWW page is
preceded by http://. A URL can contain other details such as the name of a hypertext page
identified by the file name extension HTML or HTM.
VDE
Association of Electrical Engineering, Electronics and Information Technology (Germany)
WAN
Wide Area Network -> For example the Internet.
XML
Extensible Markup Language ->XML is a standard for definition of formats for data exchange
on the Internet.
Glossary-10
Vision Sensor SIMATIC VS120
Operating Instructions, Edition 02/2006, A5E00757507-01
Index
A
A&D Mall, 15-1
Adjust
Display, 9-2
Adjustment support, 8-16
Operator control, 9-19
Administrator privileges
Test, 8-1
Assigning permissions, 9-41
Assigning Permissions, 9-41
Atmospheric pressure, 12-3
B
BF LED
For PROFIBUS DP, 11-10
For PROFINET IO, 11-10
Bit pattern
Creating, 10-9
Brightness, 4-2
Button
Change password, 9-41
C
Cable connection, 7-3
CE Label, 16-1
Checking connections, 8-14
Climatic ambient conditions, 12-3
Climatic Conditions
Atmospheric pressure, 12-2
Temperature, 12-2
Colors, 9-35
Com server, 5-6
Components
Documentation package, 14-1
Full package, 14-1
Configuration
Avoiding interference, 7-1
Configuration
PC / PG, 8-6
Processing unit, 8-6, 8-8
Vision Sensor SIMATIC VS120
Operating Instructions, Edition 02/2006, A5E00757507-01
Proxy, 8-13
Configuration example, 10-2, 10-4
Configuration guidelines, 7-1
Connect
Menu, 9-2
Connection
Sensor head, 7-1
Connection variants
Ethernet connection, 8-5
csv file
Size, 10-23
D
Data block DB10, 10-16
Data blocking, 10-14
Data transmission
PROFIBUS DP, 10-10
PROFINET IO, 10-10
Declaration of conformity, 16-1
Device Info, 9-48
Device names
Assigning, 10-6
Devices
Information, 9-48
DHCP client, 8-7, 8-9
DHCP server, 8-6
Diagn. & Monitoring, 9-42
Options, 9-42
Diagnostic buffer, 11-11
Diagnostics, 9-47, 11-10
For PROFIBUS DP, 11-12
For PROFINET IO, 11-15
Information, 9-47
Read out, 11-11
Digital I/O
System configuration, 5-2
DISA bit, 9-50, 10-19
Display
Adjust, 9-2
Distortion, 4-7
Index-1
Index
E
G
Edge lines
Unwanted, 4-3
Edges, 9-35
Recognition principle, 3-3
Training, 9-31
EMC Directive, 16-1, 16-2
Erasure function, 4-4
ERRCODE, 10-20
Error display, 9-22
Error Information, 10-20
Error information FB1, 11-8
Error Message
Description, 11-1
Error messages
Acknowledge, 11-1
Remedies, 11-1
Errors
Automatic acknowledgement, 11-6
Manual acknowledgement, 11-6
Ethernet
System configuration, 5-5
Ethernet connection
Connection variants, 8-5
Evaluation results
For part recognition, 9-37
In normal mode, 9-35
Example
Archiving diagnostic information on PC / PG, 10-21
Link with FB1, 10-21
Example 1
Integrating the FB1, 10-22
Linking to the SIMATIC controller, 10-21
Process interfacing, 10-22
Example 2
Adjustment support, 10-23
Process interfacing, 10-23
Exposure time, 4-2
Extras, 9-43
Options, 9-43
General fault, 11-1
GSD file, 10-1, 10-4
F
Faults, 7-1
Firmware updates, 9-49
Fixing screws, 13-1
Fluctuations in size, 4-7
Function block FB1, 10-16
Fuse, 12-1
Index-2
H
Handshaking, 10-14
Hardware, 3-5
HW Config
Module catalog, 10-1
I
I/O interface
DI/DO, 10-7
Incorrect response
due to interference signals, 7-1
Information
Device Info, 9-43
Devices, 9-48
Diagnostics, 9-43, 9-47
Model, 9-43, 9-46
Statistics, 9-43, 9-44
initial start-up, 8-3
Inrush current, 12-1
Interface assignments
Ethernet interface, 12-8
Lighting unit, 12-8
Power supply, 12-8
PROFIBUS DP interface, 12-8
Interfaces, 3-7
Communication, 9-25
Illumination control, 12-6
Load power supply, 12-6
Parameters, 9-25
Sensor head interface, 12-6
Interference, 4-4
Internet, 15-1
IP setting, 8-8
IP65 protective lens housing, 14-4
J
JAVA JIT Compiler, 8-2
K
Keypad, 3-7
Vision Sensor SIMATIC VS120
Operating Instructions, Edition 02/2006, A5E00757507-01
Index
L
N
Language setting
Change, 9-22
LCD display, 11-6
LCD display, 3-7
LED ring flash, 14-4
LED ring flash, 3-8
Linking
PROFIBUS DP device, 10-1
PROFINET IO device, 10-4
Localization
of parts, 3-3
Normal mode, 8-3
M
MAC address, 8-9
Main ROI, 4-8
Maintain
Menu, 9-18
Maintain, 9-49
Menu
Connect, 9-2, 9-4
Integrate, 9-6
Maintain, 9-18
Options, 9-15
Output, 9-8
Port, 9-4
RUN, 9-9
Model, 9-46
Information, 9-46
Loading, 9-49
Select, 9-34
Test, 3-3
Model selection, 10-8
Model set
Example, 4-20
Features, 4-19
Select, 9-34
Model sets, 3-3
Models, 9-49
Deleting, 9-49
Restoring, 9-49
Save, 9-49
Module catalog
HW Config, 10-4
Module fault, 10-20
Mounting
LED ring flash, 6-1
Processing unit, 6-1
Sensor head, 6-1
Mounting bracket, 13-3
Mounting plate, 13-2
Vision Sensor SIMATIC VS120
Operating Instructions, Edition 02/2006, A5E00757507-01
O
OB86, 11-6
Object detection, 4-6
Online catalog, 15-1
Operating status
Stop, 9-51
Operating system, 3-5
Operator control
Adjustment support, 9-1
Model selection, 10-19
Processing unit, 9-1
Reading and transferring result data, 10-19
Reset, 10-19
Transferring the delay time, 10-19
Triggering, 10-19
Options
Diagn. & Monitoring, 9-42
Diagnostics & Monitoring, 9-37
Extras, 9-37, 9-43
Menu, 9-15
Security, 9-37, 9-39
Training, 9-37, 9-38
Overexposure, 4-2
Manual, 4-4
P
Parameters, 9-2, 10-17
Diagnostics, 9-16
Example, 4-13
Find, 4-13
Identify, 4-13
Image capture, 9-24
Image processing, 9-24
Integrate, 9-6
Light, 9-16
Maintain, 9-18
Options, 9-16
Output, 9-8
Port, 9-4
Precision, 4-5
Part recognition, 9-36
Part recognition with classification mode, 9-45
Parts
Localization, 3-3
Password, 9-41
Performance Features, 3-2
Pixel size, 4-8
Index-3
Index
Power consumption, 12-1
Power supply, 12-1
Precision, 4-5
Processing precision, 4-7
Processing unit
Connecting manually, 8-5, 8-7
DHCP client, 8-5, 8-9
DHCP server, 8-5
Indicators, 11-6
Integrating, 8-9
Warnings, 11-6
PROFIBUS DP
Address, 10-3
System configuration, 5-3
Transmission rate, 10-3
PROFIBUS DP Error, 11-6
PROFIBUS DP slave
Linking, 10-1
PROFIBUS DP slaves
Linking, 10-1
PROFINET IO
System setup, 5-4
Transmission rate, 10-6
PROFINET IO device, 8-10
Linking, 10-4
PROFINET IO devices
Linking, 10-4
PROFINET IO Error, 11-6
PROFINET IO network, 8-11
Proxy
Configuration, 8-13
Server, 8-12
Purpose
Manual, 1-1
Q
Quality value, 4-10
R
Recognition principle
of edges, 3-3
Relative humidity, 12-3
Resolution, 4-8
ROI, 4-8, 9-29
Changes, 9-30
Colors, 9-30
Example, 4-9
Main, 9-30
Names, 9-30
Parameter assignment, 4-9
Sub, 9-30
Index-4
Training, 9-29
RS232
System configuration, 5-6
Run, 9-33
Normal mode, 9-34
RUN
Menu, 9-9
S
Save
Training, 9-33
Scope of validity
Manual, 1-1
Security, 9-39
Options, 9-39
Selection
Training, 9-28
Sensor head, 3-8
Adjusting, 8-17
Connection, 7-1
Degree of protection, 12-5
Field of vision, 12-5
Resolution, 12-5
Sensor head holder, 14-4
Server
Proxy, 8-12
SFB 54, 11-13
SFB52, 11-16
Slave diagnostics, 11-11
Software, 3-5
Sorting functions, 3-3
Specimens, 4-11
Statistics, 9-44
Information, 9-44
Status byte, 10-7
Status LEDs, 3-6
Stop, 9-51
Sub-ROI, 4-8
System components, 3-4
System configuration, 3-4, 5-1
Digital I/O, 5-2
PROFIBUS DP, 5-3
with digital I/O, 5-2
With Ethernet, 5-5
with PROFINET IO:, 5-4
with RS-232, 5-6
System expansion, 2-1
System requirements, 3-5
T
Tab
Vision Sensor SIMATIC VS120
Operating Instructions, Edition 02/2006, A5E00757507-01
Index
Edges, 9-31
ROI, 9-29
Save, 9-33
Test, 9-32
Technical support, 15-1
Temperature, 12-3
Temporary error, 11-9
Test
of a model, 3-3
Training, 9-32
Traffic Light, 9-21
Training, 9-27, 9-38
Edges, 9-31
of a model, 9-27
Options, 9-38
ROI, 9-29
Save, 9-33
Selection, 9-28
Test, 9-32
U
Underexposure, 4-3
User, 9-40
User data interface
Errors, 10-15
Faults, 10-15
User data structure, 10-13
User interface, 9-20
User name, 9-23
W
Warnings
Description, 11-6
Remedies, 11-6
Warranty, 2-1
Vision Sensor SIMATIC VS120
Operating Instructions, Edition 02/2006, A5E00757507-01
Index-5
Index
Index-6
Vision Sensor SIMATIC VS120
Operating Instructions, Edition 02/2006, A5E00757507-01
Siemens AG
Automation and Drives
Industrial Automation Systems
Postfach 4848
90437 NUERNBERG
Federal Republic of Germany
www.siemens.com/automation
,'$(