1
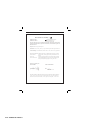
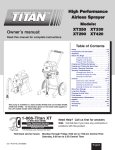
3M™ Accuspray™ Spray Gun Owner’s Manual
Guide d'utilisation des pistolets de pulvérisation Accuspray™ 3M™
Manual de Instrucciones de la Pistola Atomizadora Accuspray™ de 3M™
Read Warnings and Instructions
This Manual Covers 3M™ Accuspray™ Spray Guns
(PN16580, 16579, 16578).
Lire les mises en garde et les directives.
Ce guide porte sur les pistolets de
pulvérisation Accuspray™ Spray 3M™ (modèles 16580,
16579, et 16578).
Lea las Advertencias e Instrucciones
Este Manual cubre las Pistolas Atomizadoras
Accuspray™ de 3M™ (PN 16580, PN 16579, PN 16578).
For more information visit our website
3MCollision.com/accuspray-system.
Pour obtenir de plus amples renseignements, veuillez consulter notre site Web à l’adresse 3MCollision.com/
accuspray-system.
Para más información, visite nuestro sitio
3MCollision.com/es/accuspray-system.
ORIGINAL INSTRUCTIONS
DIRECTIVES D'ORIGINE
INSTRUCCIONES ORIGINALES
PDF Scaled at 100.0%
3M Automotive
Aftermarket Division
3M Center
St. Paul, MN 55144-1000
651 733 1110
February 13, 2014
Dear Valued 3M Customer,
3M Company, Automotive Aftermarket Division, certifies that the following 3M spray guns meet
requirements for classification as High Volume Low Pressure (“HVLP”) spray equipment when
operated in accordance with 3M recommended directions for use. 3M AAD defines “HVLP”
based on the guidelines outlined in EPA 40 CFR Part 63, Subpart 6H (Jan. 9, 2008):
Accuspray One Spray Gun PN 16579
Accuspray Spray System, HG Series
Accuspray Spray System, HGP Series
Note –Test Air Caps are available for the purposes of demonstrating that 3M spray equipment meets the
HVLP definition.
Please contact Monica Bastien, 3M AAD Regulatory Compliance Associate, at 651-733-1849 if
there are any additional questions.
Sincerely,
C. Alonzo Knowles
Regulatory Supervisor
3M Automotive Aftermarket Division
1
PDF Scaled at 100.0%
EC Declaration of Conformity
Manufacturers Name:
Manufacturers Address:
, Automotive Aftermarket Division
3M Center, Building 223-6N-01
St Paul, MN USA 55144-1000
Does hereby declare under our sole responsibility that the machinery described below complies with those
applicable essential health and safety requirements of the Machinery Directive 2006/42/EC; together with
all amendments to date.
Description: 3M™ Accuspray™ ONE Spray Gun
Model Number: 16579, or “HGxy”, where xy is a 2-digit code referring to the included spray head orifice size
Serial Number Range: Year of manufacture, as marked: “20ab”–to–”2099”, where “ab” is any 2-digit number.
The following standards have either been referred to, or complied with, in full or in part as relevant:
EN ISO 12100:2010
Safety of machinery. General principles for design. Risk assessment and risk
reduction
EN 1953:2013
Atomizing and spraying equipment for coating materials. Safety requirements
EN 14462:2005+Al:2009
Surface treatment equipment. Noise test code for surface treatment equipment
including its ancillary handling equipment. Accuracy grades 2 and 3.
Full Name of responsible person:
Mark N. Schaeffer
Position: Technical Director
Signature: ........................
Date: ..................................
St. Paul, Minnesota, USA
Full Name and address of individual responsible to compile technical file within the Community:
Dr. Phil J. Bouie, Country Technical Mgr., Industrial Business Sponsor, 3M United Kingdom PLC,
Ratcliffe Road, Atherstone, Warwickshire, CV9 1PJ, England, United Kingdom, +44-1827-710373
PDF Scaled at 100.0%
English
3M™ Accuspray™ Spray Gun Safety Statements ������������������������������������������������������������������������������������������������������������4
Intended Use:��������������������������������������������������������������������������������������������������������������������������������������������������������������������4
Explanation of Safety Symbols Consequences�������������������������������������������������������������������������������������������������������������������4
Technical Specifications:���������������������������������������������������������������������������������������������������������������������������������������������������5
Spray Gun Overview ���������������������������������������������������������������������������������������������������������������������������������������������������������6
CONTENTS �����������������������������������������������������������������������������������������������������������������������������������������������������������������������6
General Set Up and Spray Gun Use �����������������������������������������������������������������������������������������������������������������������������������7
Replacement Parts and Accessories��������������������������������������������������������������������������������������������������������������������������������12
Troubleshooting ��������������������������������������������������������������������������������������������������������������������������������������������������������������12
Spray Equipment Warranty and Limited Remedy�������������������������������������������������������������������������������������������������������������13
Français
Énoncés relatifs à la sécurité concernant le pistolet de pulvérisation Accuspray™ 3M™������������������������������������������������16
Usage prévu �������������������������������������������������������������������������������������������������������������������������������������������������������������������16
Explication des symboles sur les étiquettes de sécurité ��������������������������������������������������������������������������������������������������16
Spécifications techniques �����������������������������������������������������������������������������������������������������������������������������������������������18
Aperçu – Pistolet de pulvérisation�����������������������������������������������������������������������������������������������������������������������������������19
Préparation et utilisation générale du pistolet de pulvérisation ����������������������������������������������������������������������������������������20
Pièces de rechange et accessoires ���������������������������������������������������������������������������������������������������������������������������������25
Dépannage���������������������������������������������������������������������������������������������������������������������������������������������������������������������25
Garantie du matériel de pulvérisation et limite de recours�����������������������������������������������������������������������������������������������26
Español
Declaraciones de Seguridad de la Pistola Atomizadora Accuspray™ de 3M™����������������������������������������������������������������29
Intención de Uso:������������������������������������������������������������������������������������������������������������������������������������������������������������29
Explicación de las consecuencias de los símbolos de seguridad �������������������������������������������������������������������������������������29
Especificaciones Técnicas:����������������������������������������������������������������������������������������������������������������������������������������������30
Resumen de la Pistola Atomizadora ��������������������������������������������������������������������������������������������������������������������������������31
Contenido�����������������������������������������������������������������������������������������������������������������������������������������������������������������������31
Desempaque ������������������������������������������������������������������������������������������������������������������������������������������������������������������31
Configuración General y Uso de la Pistola Atomizadora ���������������������������������������������������������������������������������������������������32
Refacciones y Accesorios������������������������������������������������������������������������������������������������������������������������������������������������37
Búsqueda de Fallas ��������������������������������������������������������������������������������������������������������������������������������������������������������37
Garantía y Remedio Limitado del Equipo de Atomización�������������������������������������������������������������������������������������������������38
3
PDF Scaled at 100.0%
3M™ Accuspray™ Spray Gun Safety Statements
Read, understand and follow all safety information contained in these instructions prior to set up and operation
of any 3M™ Accuspray™ Spray Gun. Retain these instructions for future reference. Refer to the applicable Safety
Data Sheet and material container label for each material to be sprayed before using this 3M equipment.
Intended Use:
The 3M™ Accuspray™ Spray Gun and Atomizing Heads are intended for professional use only� They are intended to deliver
the desired quality, atomization, and rate of application for larger production needs�
The spray gun must be set up as specified in the 3M™ Accuspray™ Spray Gun Owner’s Manual. They are intended
for use in a professional/industrial environment only. They have not been evaluated for other uses.
Explanation of Safety Symbols Consequences
WARNING:
Indicates a hazardous situation, which, if not avoided, could result in death or serious injury�
CAUTION:
Indicates a hazardous situation, which, if not avoided, could result in minor or moderate
injury�
WARNING
To reduce the risks associated with all hazards related to the use of this product:
• Read, understand and follow all safety statements in applicable equipment owners’ manuals to avoid possible
safety hazards�
• This equipment is to be used only by professionals familiar with the possible applicable safety hazards�
• Do not use this product around unsupervised children�
• Never modify any part of this product�
• Always comply with local, state, and national codes governing ventilation, fire protection, operation, maintenance,
and housekeeping�
To reduce the risks associated with chemical exposure:
• Never point a spray gun at anyone else or place any part of your body in front of the atomizing head�
• Before use check spray equipment for damage and proper function� Repair/replace worn, damaged or
malfunctioning components�
• Always wear appropriate personal protective equipment for eye, skin, respiratory and hearing protection per the
applicable MSDS and material container labels at all times when spraying�
To reduce the risks associated with fire and explosion:
• Must maintain adequate ventilation per applicable MSDS and material container labels for each material being sprayed
in the work area�
• All ignition sources such as smoking must be kept out of the spray area�
• Always maintain a readily available, approved fire extinguisher or other approved fire fighting equipment in the
spray area�
To reduce the risk associated with noise:
• Always wear hearing protection while using the spray gun�
4
PDF Scaled at 100.0%
CAUTION
To reduce the risks associated with impact from an atomizing head projectile:
• Always inspect to ensure that the atomizing head is securely in place and test the spray gun for possible obstruction
prior to each use�
To reduce the risks associated with sharp point:
• Do not touch the sharp end of the fluid needle when exposed and handle fluid needles carefully during replacement�
To reduce the risks associated with muscle strain:
• Avoid using spray equipment continuously without taking occasional breaks�
To reduce the risks associated with property damage:
• Do not maintain or service the spray gun other than as instructed in the user’s manual�
To reduce the risks associated with environmental contamination:
• Spray materials, solvents, other cleaning materials and electronic components must be disposed of per federal, state
and local regulations�
Technical Specifications:
Operator Hand/Arm Vibration level: less than 2�5 m/s²
Declared vibration level in accordance with EN 12096, measurements carried out in accordance with standard EN ISO
28662-1 and EN ISO 20643�
Declared Dual-Number Noise Emission Values according to EN ISO 4871
A-WEIGHTED EMISSION SOUND PRESSURE LEVEL AT THE WORKSTATION:
Measured value: LpA = 71,4 dB(A) (ref 20μPa)
Uncertainty: KpA = 2,5 dB
A-WEIGHTED SOUND POWER LEVEL:
Measured value: LWA = 83,1 dB(A) (ref 1 pW)
Uncertainty: KWA = 2,5 dB
Values determined according to noise test code EN 14462 using the basic standards
EN ISO 11201 - grade 2, and EN ISO 3741
NOTE: The sum of a measured noise emission value and its associated uncertainty represents an upper bound of the range
of values which can occur in the measurements�
IMPORTANT NOTE: The noise and vibration values stated are from laboratory testing in conformity with stated codes and
standards and are not sufficient risk evaluation for all exposure scenarios� Values measured in a particular work place may
be higher than the declared values� The actual exposure values and amount of risk or harm experienced to an individual
is unique to each situation and depends upon the surrounding environment, the way in which the individual works, the
particular material being worked, work station design, as well as upon the exposure time and the physical condition of the
user� 3M cannot be held responsible for the consequences of using declared values instead of actual exposure values for
any individual risk assessment�
5
PDF Scaled at 100.0%
ENGLISH
CAUTION
To reduce the risks associated with tripping, falling and tipping:
• Route air hoses and any extension cords away from traffic areas, sharp edges, moving parts and hot surfaces� Do not
pull on air hoses to move the compressor�
To reduce the risks associated with hazardous air pressure:
• Care for the spray gun per 3M instructions in the applicable owner’s manual�
• Ensure air input pressure and all applicator system regulators are properly
adjusted per material’s recommendations prior to each use�
• Always follow required air pressure relief procedures for relieving air pressure from the spray gun�
Spray Gun Overview
3M™ Accuspray™ Spray Guns were designed from the inside out for the effective, efficient, and economical application of
paints, adhesives, coatings and finishes� This spray gun has a large spray pattern with very low overspray� The soft, tight,
adjustable pattern with complete atomization results in a high finish quality and absolute control� Each ultra-light weight
spray gun is designed for easy handling, reliability and durability and for minimum maintenance costs� Combine your
3M™ Accuspray™ Spray Gun with the 3M™ PPS™ Paint Preparation System and enjoy additional savings of time and
cleaning solvents�
3M™ Accuspray™ Spray Gun is for professional use only� Hazards can occur from equipment misuse� Any misuse of the
equipment or accessories, such as over pressurizing, modifying parts, using incompatible chemicals and fluids, or using
worn or damaged parts can cause serious bodily injury, fire, explosion or property damage� Read and follow all Safety
Statements and Instructions.
CONTENTS
Unpacking
Remove the components from the box� Inspect for concealed damage and/or missing items� If you discover any damage
and/or missing pieces, contact your distributor immediately�
Your 3M™ Accuspray™ Spray Gun Kit could include one or more of the following, depending on the kit that was purchased:
• 10 Color Identification Clips (2 each of 5 colors)
• 1 Spray Gun Body
• PPS™ Standard Size Mixing Cup and Collar
• 1 Air Flow Control Valve
• PPS™ Standard Size Lids and Liners
• 1�2 mm atomizing head
• PPS™ Sealing Plugs
• 1�3 mm atomizing head
• PPS™ Generic Mix Ratio Insert
• 1�4 mm atomizing head
• Spray Gun Hanger
• 1�8 mm atomizing head
• 2�0 mm atomizing head
3M™ Accuspray™ Spray Gun
The 3M™ Accuspray™ Spray Gun features a black composite* body,
13 scfm (370�5 L/min) air consumption, 1/4” (1/4” BSP) air inlet and 20
psi (1�4 bar) maximum inlet pressure with full trigger pull **� This spray
gun is for use with compressed air systems�
* Product material compatibility information available upon request�
** Maximum inlet pressure at a 2:1 reduction ratio will yield
approximately 10 psi (0�69 bar) at the air cap�
6
PDF Scaled at 100.0%
Note: Complete steps below before connecting spray gun to air source�
One atomizing head may already be semi-attached to the spray gun body in the package� You only need to fully engage and
secure onto the spray gun body� Follow the procedure below�
3� Secure the atomizing head and listen for the “clicking”
sound for full engagement then release the trigger�
Attaching the Atomizing Head
1� Pull trigger back and hold�
Note: It is not necessary to pull the trigger back when
changing the atomizing head� To change the atomizing
head simply depress release buttons and pull the atomizing
head away from the spray gun body� Make sure fluid needle
is clean when replacing the atomizing head� Then follow
“Attaching the Atomizing Head” procedure for connecting
atomizing head�
Attaching Air Fitting or Regulating Equipment
It will be necessary to connect an air fitting, an air regulator
or air flow control valve to the air inlet located at the base of
the spray gun body�
2� Slide the atomizing head over the fluid needle and push
towards the spray gun body making sure the release
buttons are aligned with the latch openings�
Note: Do not use the spray gun body to tighten the
connection with air flow control valve.
Note: When used with flammable materials this device
must be grounded. A test for adequate grounding
should be performed regularly.
7
PDF Scaled at 100.0%
ENGLISH
General Set Up and Spray Gun Use
General Set Up and Spray Gun Use cont.
Spray Gun Identification
Attach color clips into the groove on the fan and fluid
adjustment knobs, to identify the application of the spray
gun use�
Adding the PPS™ Components
3�
To facilitate measurement of materials to be sprayed
according to manufacturer’s guidelines, place the
3M™ PPS™ Mix Ratio Film Insert into the 3M™
PPS™ mixing cup�
Example of attaching air flow control valve:
1� Manually attach the air flow control valve to the air inlet
by hand threading the connection�
4�
Insert the 3M™ PPS™ liner into the 3M™ PPS™
mixing cup�
5�
Pour material to be sprayed into the 3M™ PPS™
mixing cup� Stir as needed�
6�
Place the 3M™ PPS™ lid with built-in filter on top
of the 3M™ PPS™ mixing cup with liner and snap
into place�
2� Use two wrenches to connect the air flow control valve�
Adjust to fit the air inlet and adjust the other to fit the
air flow control valve then tighten the connection�
Setting the Air Pressure
Pull trigger back (fluid and air/full trigger pull) and adjust
operating pressure to read 20 psi (1�4 bar) for optimum
spray performance�
8
PDF Scaled at 100.0%
7�
Fluid Needle
Adjustment
Knob
Position the 3M™ PPS™ collar onto the
3M™ PPS™ mixing cup with liner and turn until
tight� Insert 3M™ PPS™ sealing plug prior to
shaking or storage�
Fig� 1
8�
Attach spray gun to filled 3M™ PPS™ cup�
9
PDF Scaled at 100.0%
ENGLISH
Adjusting the Fluid Flow
The fluid flow can be adjusted by using the fluid needle
adjustment knob as noted in Fig� 1� The spray gun in the kit
is preset in the closed position (pull trigger to verify; there
should be minimal fluid needle movement)� To allow fluid
flow, gently turn the fluid needle adjustment knob counterclockwise 3 full turns� These adjustment procedures
will serve only as a starting point� Fine tuning of these
adjustments will be based on your material and technique�
General Set Up and Spray Gun Use cont.
Adjusting the Fan Pattern Size
The fan size is regulated by the fan adjustment knob
as noted in Fig� 2� The spray gun in the kit is preset in
the closed position (gently turn the fan adjustment knob
clockwise to verify; knob should not move)� Next, turn the
knob counter-clockwise full rotation� The fan adjustment will
allow you to spray from a small round to a full fan pattern�
Do not point the spray gun up while cleaning it�
Fan Adjustment
Knob
Do not immerse the spray gun in solvent�
Do not wipe the spray gun with a cloth soaked in solvent;
wring out the excess�
Fig� 2
Do not use metal tools to clean the air cap holes as this may
scratch them; scratches can distort the spray pattern�
Vertical Pattern
Horizontal Pattern
Note: The spray pattern can also be changed from vertical
to horizontal by rotating the air cap a 1/4 turn�
Note: Do Not Put In Gun Washer. Read, understand and follow all safety statements as well as wear
appropriate, approved personal protective equipment per the applicable SDS and material container labels for
cleaning solutions.
Periodically, lubricate moving components such as the fluid needle, fan adjustment threads, fluid needle adjustment threads
and spring�
10
PDF Scaled at 100.0%
ENGLISH
ATTENTION
Note: Do Not Put In Gun Washer.
Solvent left in the spray gun air passages could result in a
poor quality paint finish� Do not use any cleaning method
which may allow solvent into the spray gun air passages�
Do not expose air flow control valve and gauges to solvent
as damage may occur�
Cleaning Process
1� Relieve the air and fluid pressure from the spray gun and cup before servicing�
2� To retain unused paint or temporarily store mixed material, see your Local, State, Federal and OSHA guidelines, along
with paint manufacturer’s recommendations for storage�
3� To flush spray gun, run water or compatible and compliant solvent into the spray gun fluid passage while triggering the
spray gun until the cleaning fluid appears clear�
Note: If feasible, clean atomizing head prior to disposal� Dispose of all used atomizing heads and spray gun bodies in
accordance with federal, state and local regulations� To change the atomizing head, refer to the section “Attaching the
Atomizing Head” on page 7�
11
PDF Scaled at 100.0%
Replacement Parts and Accessories
Description
Replacement PN
3M™ Accuspray™ Fluid Needle
3M™ Accuspray™ HVLP Test Air Cap
3M™ Accuspray™ Air Flow Control Valve
3M™ Accuspray™ ONE Replacement Spray Gun Kit
3M™ Accuspray™ Atomizing Head Refill Kit 2�0 mm
3M™ Accuspray™ Atomizing Head Refill Kit, 1�8 mm
3M™ Accuspray™ Atomizing Head Refill Kit, 1�4 mm
3M™ Accuspray™ Atomizing Head Refill Kit 1�3 mm
3M™ Accuspray™ Atomizing Head Refill Kit 1�2 mm
3M™ Accuspray™ Magnetic Spray Gun hanger
16571
16572
16573
16579
16609
16611
16612
16614
16615
16236
Troubleshooting
Problem
Cause
Remedy
Gun leaking fluid
behind trigger
Atomizing head seals
Replace atomizing head and clean needle
Trigger sticking
Dirty needle
Clean needle
Leaking air around
Atomizing head seal
Atomizing head not
secured in latches
Remove atomizing head and reattach in gun body and listen
for double click
Atomizing head won’t
stay on gun
Frayed latch tabs on
atomizing head
Replace atomizing head
Gun leaking fluid in
gun holder
Wrong gun holder or
support
Use 3M gun hanger PN 16236
Gun body leaking air
behind trigger
Bad Poppet seal
Replace gun: Call 1-877-MMM-CARS or (1-877-666-2277)
Can't hear double
click when attaching
atomizing head
Frayed latch tabs on
atomizing head
Replace atomizing head
New atomizing head
leaking fluid
Scored seals in
atomizing head
Clean needle and replace atomizing head
12
PDF Scaled at 100.0%
3M warrants to the original purchaser that, when used in accordance with 3M’s written instructions, 3M spray equipment
will be free of defects in materials and manufacture for year from the date of purchase� This warranty does not apply to
damage or malfunction caused by normal wear, failure to maintain, or by any abuse, accident, tampering, alteration, or
misuse of the spray equipment�
To make a claim under the warranty, you must first contact the 3M Service Center at 1-877-MMM-CARS to receive a return
authorization number� Spray equipment must be returned, freight prepaid by the purchaser, to the service location address
given by the 3M Service Center� Upon validation of the warranty claim, 3M will replace or repair the spray equipment,
at 3M’s option, and return it to the purchaser at 3M’s expense, including parts, labor and return shipping charges� If it
is determined that the claim is not covered by the warranty, the purchaser will be given the option to have the spray
equipment repaired outside of the warranty� An estimate of parts and labor will be provided by 3M and must be approved by
the purchaser in advance�
Except as written above, 3M MAKES NO OTHER WARRANTIES OR CONDITIONS, EXPRESS OR IMPLIED, INCLUDING, BUT NOT
LIMITED TO, ANY IMPLIED WARRANTY OR CONDITION OF MERCHANTABILITY OR FITNESS FOR A PARTICULAR PURPOSE OR
ANY IMPLIED WARRANTY OR CONDITION ARISING OUT OF A COURSE OF DEALING, CUSTOM OR USAGE OF TRADE� Many
factors beyond 3M’s control and uniquely within user’s knowledge and control can affect the use and performance of a 3M
product in a particular application� Given the variety of factors that can affect the use and performance of a 3M product,
user is solely responsible for evaluating the 3M product and determining whether it is fit for a particular purpose and
suitable for user’s method of application�
Limitation of Liability: Except where prohibited by law, 3M will not be liable for any loss or damage arising from the 3M
product, whether direct, indirect, special, incidental or consequential, regardless of the legal theory asserted, including
warranty, contract, negligence or strict liability�
TO PLACE AN ORDER, contact your 3M AAD Sales Representative or Distributor, or call the number below:
3M Automotive Aftermarket Division
3M Center, Bldg� 223-6N-01
St� Paul, MN 55144-1000
1-877-MMM-CARS (666-2277)
3MCollision.com
All written and visual data contained in this document reflects the latest
product information available at the time of publication�
3M reserves the right to make changes at any time without notice�
PRINTED IN U�S�A� © 3M 2015� All rights reserved�
3M, Accuspray and PPS are trademarks of 3M Company, used under license in Canada�
13
PDF Scaled at 100.0%
ENGLISH
Spray Equipment Warranty and Limited Remedy