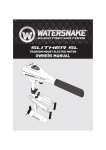
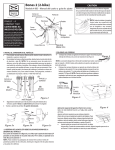
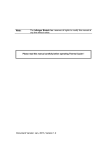
1
GPSMART
BOW MOUNT GPS ELECTRIC MOTOR
OWNERS MANUAL
Includes quick release mount and 2 fobs.
Anchor locations can be adjusted in precise 5-ft increments.
Automatic compensation for wind, waves and cross current.
CONTENTS
2
3
Specifications
4
General Information
5
Motor Drawing / Features
6
Installation
Motor to Boat
7
Installation
Deploying / Stowing
8
Installation
Propeller
9
Installation
Electrical
11
Modes of Operation
Powering up Motor, Battery Level Indicator
12
Modes of Operation
Thrust, Steering Modes
13
Modes of Operation
Anchor, Adjusting Anchor, Storing Anchor Modes
14
Modes of Operation
Re-call Anchor Site, Re-call last Anchor Site
15
Modes of Operation
Tracking Mode, Adjust Tracking Speed, Adjust Tracking Course
16
Modes of Operation
Route Mode - Storing
17
Modes of Operation
Route Mode - Re-calling
18
Calibrations
Centering, Manual Compass Calibration
19
Calibrations
Automatic Compass Calibration
20
Wireless Control FOB
Replacing battery
21
Wireless Control FOB
Programming new Wireless FOB, Erasing FOB memory
22
Maintenance
Storage
23
Maintenance
Troubleshooting Guide
24
Spare Parts
Schematic
25
Accessories
Watersnake Motor Accessories
27
Notes
Watersnake
GPSMART
WATERSNAKE ELECTRIC MOTORS
Congratulations and welcome to a world of silent motoring.
Powerful yet silent, the Watersnake electric motors are built to suit all angling
conditions. High quality materials, superior design and precision engineering
make these motors longwearing and reliable.
WARNING!
Please read manual completely before starting installation.
Failure to do so may result in accident and or injury.
SPECIFICATIONS
Anchor memory locations
4
Multi use memory locations (route or anchor)
8
Maximum coarse memory length
1000+ Miles*
Thrust rating
80lbs
Operating voltage
24 Volts DC
Amperage
0-42 Amps**
Recommended breaker rating
50 Amps
Propeller
3 Blade Weedless
Shaft Length
60 Inches
* The distance of a recorded route will in most cases be limited to the time it takes to traverse
or by the battery capacity to power the motor. The motor has enough memory to store over 1000
miles or 1600km of courses. ** System draw will alter with level of thrust going up to maximum
of 42 Amps at full thrust.
AS/NZS 4268: 2012 EMC COMPLIANCE
www.watersnake.com.au
3
GENERAL INFORMATION
The Waternsnake GPS motor has been optimized for use on 16
to 24 foot sport fishing boats, such as a typical bass or flats boat.
Generally speaking it can hold position in currents of 2+ knots
or wind speeds up to about 30 knots, assuming wave action is
not too great.
Boats larger than 24 feet, or those with larger draft or windage may require
higher amounts of thrust to maintain position under adverse conditions such as
high wind or current. Under fair weather conditions the system can generally
be expected to perform reasonably well on larger boats.
Installation on boats smaller than 16 feet, or those of lighter weight, may result
in overly aggressive movements. In extreme cases this could lead to injury or
even death.
It is recommended that a trained technician install the
Watersnake GPSMART Motor. Improper installation can
lead to poor performance, injury or even death. It is the
responsibility of the installer to verify proper installation.
DO NOT connect the Waternsnake GPS motor to a power
source until installation is completed.
The Waternsnake GPS motor utilizes sensors which will likely
be affected by nearby magnetic fields. DO NOT install unit with or
near anything that produces a magnetic field (steel, magnets, etc.)
4
Watersnake
GPSMART
Head unit
Remote control unit.
Depth adjustment
collar
Quick lock and
release lever
Handle
Integrated quick
release bracket
Composite
shaft
Motor Assembly
unit
Weedless
propeller
www.watersnake.com.au
5
It is recommended that you read these assembly instructions prior to
installing your Watersnake GPSMART Motor. Improper installation can
lead to poor performance or injury. It is the responsibility of the
installer to verify proper installation.
ATTACHING THE MOTOR TO THE BOAT
The GPSmart motor integrates a quick release bracket mechanism.
Attach the bracket to the bow of the boat, taking care to ensure it is on the
centreline of the boat and placed forward enough so that when the motor is
attached the shaft of the motor is not making contact with the boats gunwale
rubber. With the bracket in position, mark the holes for drilling, ensuring as
you do that the bow area below the mounting location is clear and accessible.
Attach the bottom Nylon bracket to the bow using the stainless steel bolts,
nuts and washers provided. It is important when doing this work that the boat
is level.
1. Top plate (Attach to motor mount)
1. Attach top plate to the bracket
2. Attach bottom plate to the boat.
3. Position motor bracket over top of bottom plate.
4. Push steel locking wire into locking plate
Locking wire.
2. Bottom plate (Attach to boat)
Plates fitted and locked together.
PLEASE NOTE:
Watersnake Distribution accepts no liability for injury or damage caused while
drilling/mounting this motor. Please wear appropriate protective clothing and
eyewear/ face shield.
6
Watersnake
GPSMART
DEPLOYING THE UNIT
Loosen the depth adjustment collar and
slide it up the shaft to a position that will
give the desired motor depth. Firmly hand
tighten the adjustment knob to secure the
collar.
Step on the Tilt/Lock Lever and slide the
motor forward until the lower unit is clear of
the storage cradle.
Carefully tilt the unit forward and lower the
motor until the depth adjustment collar is
engaged with the steering bosses. The
Tilt/Lock Lever can be released as soon
as the motor begins to tilt. Once the unit is
fully deployed, verify that the lever has fully
returned to its up and locked position.
STOWING THE UNIT
Step on the Tilt/Lock Lever. Grasping the
head of the unit, pull it up and then back
until the lower unit rests securely in the
storage cradle. Release the Tilt/Lock Lever
and verify that it returns fully to its up and
locked position. Slide the depth adjustment
collar down until it is in contact with
the steering bosses, then very firmly hand
tighten the adjustment knob to secure the
unit. Done properly the unit cannot deploy.
Warning: Failure to secure the unit with the depth adjustment collar when
stowed can result in accidental deployment during extremely rough pounding
seas which will not be covered by the warranty.
www.watersnake.com.au
7
ATTACHING THE PROPELLER
Before doing anything with the propeller, ensure the cables to
the battery are disconnected.
1: Place shear pin in shaft as shown.
2: Align the propeller against the shear pin on the shaft
(there is a groove on the back of the propeller which the
shear pin needs to slot into)
and then tighten the propeller nut securely.
1 Shear Pin
Propeller
Nut
Propeller Shaft
2 Propeller
8
Watersnake
GPSMART
ELECTRICAL INSTALLATION
The Watersnake GPSmart motor requires 24 Volts DC to Operate. Typically,
(2) 12V deep-cycle marine batteries are used.
Batteries produce and contain harmful materials that may result in personal
injury and/or property damage if improperly used. Refer to your battery
manufacturer’s guidelines for charging, discharging, storage and care instructions.
Be sure all switches/circuit breakers are in the OFF position and fuses are
removed when making battery connections. Failure to do so may result in
personal injury and/or property damage.
DO NOT connect the trolling motor batteries to any other device, including the
main outboard engine.
Verify that all conductors and connectors are rated for at least 50 Amperes
and 24VDC. All circuits MUST be protected using a 50A fuse or circuit breaker
in series with the positive lead. Failure to do so may result in personal injury and/or
property damage.
BASIC INSTALLATION
Your Watersnake GPSmart system is provided with a factory installed 6’ power
cord with 5/16”ring terminals for connection to breaker/battery terminals
or power lugs. Please note that it is mandatory to install a fuse or breaker
protection for the system circuit. This protection should be rated for 50A, 24V.
If you boat is already wired with a 24 volt power system with appropriate circuit
protection, simply connect the white wire to the positive lug and the black wire
to the negative lug. Should you boat use a trolling motor plug or not have a
24 volt trolling motor circuit, please refer to additional instructions below or
contact an approved system installer.
PLUG INSTALLATION
If your boat is already wired with a 24 volt trolling motor battery system it may
be necessary to install a plug on the end of the main power conductor in order
to work with your boat.
The following process is of moderate difficulty. Should you not feel comfortable
performing the steps listed below, we recommend that you contact an
authorized installer to complete this process for you.
There are many different plugs on the market, but generally it is possible to
obtain the appropriate plug from your local boating supply store. Please make
sure that the plug you install is rated for 50A, 24V. Should you have difficulty
locating the appropriate plug,please contact your nearest Watersnake dealer ,
and we will do our best to assist you.
www.watersnake.com.au
9
Once the appropriate plug is obtained, it will need to be installed on the
power cord. Depending on the location of the socket relative to your system
it may be appropriate to trim the main power conductor to a shorter length.
If shortening the power cable, be sure to leave adequate length to complete
the connection to the plug and allow for the plug to be inserted with a small
amount of slack remaining. Generally you should have 6” to 12” of slack in the
cable when plugged in.
Using a volt meter, determine the positive 24 volt and ground (negative)
terminals on the socket and plug. Following the instructions provided with
the plug, connect the white power wire to the positive 24 volt terminal and the
black power wire to the negative terminal.
When complete, reinstall any fuses or turn on your circuit breaker and
insert the plug into the socket. At this point you should hear the system beep
indicating that it is getting power.
COMPLETE ELECTRICAL INSTALLATION
If your boat is not already equipped with a 24 volt battery power system it will
be necessary to install one.
This process is of moderate difficulty and should only be attempted by experienced
technicians. We recommend that you contact an authorized installer to complete
this process for you.
A 24 volt trolling motor battery system will generally consist of two, 12 volt
deep cycle batteries, #6 (or larger for long runs) power conductors, a 24v, 50A
rated circuit breaker, a 24v, 50A rated receptacle, and optionally a permanently
installed 24v battery charger as per the following wiring schematic. If you plan
to attempt a complete installation yourself, please feel free to contact your
nearest Watersnake dealer for additional guidance and information.
10
Watersnake
GPSMART
MODES OF OPERATION
POWERING UP THE MOTOR
The motor is able to function in Manual Mode immediately when powered up
and deployed. Anchor Mode and Track Mode will be will take 30 seconds before
it becomes available after it has received a GPS fix.
The motor will sound 1 “beep” to let you
know that it is powered up.
The motor will sound 4 rapid “beeps” to let you
know that it has acquired a GPS fix.
GPS accuracy will continue to improve for several minutes after being
powered up. It is suggested that you power up the GPSmart early
in the trip so that it will achieve maximum accuracy before being used.
The motor is equipped with a “Tilt” sensor that prevents the propeller from
running in the stowed position.
BATTERY LEVEL INDICATOR
Press and hold the off button on the remote fob for 5 seconds
to check the state of charge of the system batteries.
The motor will sound between one and five beeps which
indicates the amount of power still left in the battery.
5 beeps greater than 95% charge (greater than 25.20 volts)
4 beeps between 80% and 95% charge (between 24.84 volts and 25.20 volts)
3 beeps between 60% and 80% charge (between 24.40 volts and 24.84 volts)
2 beeps between 40% and 60% charge (between 23.80 volts and 24.40 volts)
1 beep between 20% and 40% charge (between 23.00 volts and 23.80 volts)
1 growl less than 20% charge (less than 23.00 volts)
This function will stop all thrust and steering operation and use the precision
voltage reference of the system to determine the battery’s remaining charge.
State of charge levels are based on voltage to charge references for ideal lead
acid batteries from leading battery manufacturers.
www.watersnake.com.au
11
MODES OF OPERATION
MANUAL MODE
To place the motor in Manual Mode, press the button with the “M” symbol on
the wireless fob.
The unit will emit 1 “beep” to indicate
that it has entered Manual Mode.
In the MANUAL MODE the GPSmart motor system behaves
much like a conventional trolling motor, by allowing the
user to control the direction and thrust level using the
directional controls on the wireless fob.
THRUST
The motor is equipped with 10 forward and 10 reverse
thrust levels. Momentarily pressing the Up-Arrow or
Down-Arrow buttons will increment the thrust level
accordingly. Holding the Up-Arrow or Down-Arrow
buttons will cause the thrust level to ramp until the
maximum level is reached or the button is released. It
will take 2.5 seconds for the system to ramp from
0 to 100% thrust or vice versa.
The motor will emit 1 “beep” when it reaches
100% forward thrust, 0% thrust or 100%
reverse thrust.
STEERING
Pressing the Left-Arrow or Right-Arrow buttons will
cause the motor to turn left or right, respectively. The
steering travel is limited to avoid wrapping up the motors
power cord.
12
Watersnake
GPSMART
ANCHOR MODE
To place the motor in Anchor Mode, press the button with the “A” symbol
on the wireless fob. The motor will instantly lock in the anchor coordinates
and begin maintaining position.
The motor will emit 1 “beep” to indicate
that it has entered Anchor Mode.
The motor will emit a “beep” and
two “growls” then exit this mode if
there is no GPS fix.
The Anchor Mode automatically controls the
steering and thruster speed to maintain the
position of the boat’s bow, acting as a “Virtual
Anchor”. It is recommended that the boat be
slowed or stopped prior to anchoring to minimize
any overshoot.
ADJUSTING THE ANCHOR LOCATION (JOGGING)
Pressing any of the directional controls on the wireless fob
(Up, Down, Left, or Right) moves the “Anchor Location” in
precise 5-foot (1.52M) increments relative to the boat’s heading.
For example, pressing the Right-Arrow once moves the
“Anchor Location” 5-feet (1.52M) to the right of the boat’s bow.
The motor will emit 1 “beep” for each
increment the Anchor location is moved.
The embedded system computer will be operating the trolling
motor causing the bow of the boat to move as needed to maintain
its location in this mode. Unexpected movement of the boat may
tend to unbalance you. Be cautious until you have become familiar
with the system dynamics.
STORING (OR OVERWRITING) AN ANCHOR SITE
From any mode, while holding down the “A” button,
press and hold a directional button for 5 seconds.
The buttons can then be released and your
boat will be anchored at this newly recorded site.
The motor will emit a 1 second “beep” to
indicate that the anchor site has been
successfully saved.
www.watersnake.com.au
13
RECALLING A STORED ANCHOR SITE
From any mode, while holding down the “A” button, press
and release the appropriate directional button. The “A”
button can then be released and your boat will navigate in
a straight line directly to that location and anchor at the
selected, previously recorded site.
The motor will “beep a tune”
(multiple consecutive beeps) to indicate
that the anchor site has been successfully
retrieved.
The motor will emit two “growls” and exit if
the memory location is empty or the boat
is not within 1 mile of a memorized location.
When recalling a stored anchor site if you hold the buttons for more
than 5 seconds you will over-write that existing memory location
with the boat’s present location, erasing it.
The system will calculate a beeline to the selected anchor site.
Make sure there are no obstructions between you and the anchor
site prior to recalling a location.
RECALLING LAST ANCHOR SITE
From any mode, press and hold the “A” button for 5 seconds.
The “A” button can then be released and your boat will
navigate directly to the last anchor location used.
The motor will “beep a tune”
(multiple consecutive beeps) to indicate
that the anchor site has been successfully
retrieved.
The motor will emit two “growls” and exit if
there is no active last memory location or
the boat is not within 1 mile of the previous
location.
14
Watersnake
GPSMART
TRACK MODE
To place the motor in Track Mode, press the button with
the “T” symbol on the wireless fob. The Track Mode
automatically locks in the boat’s current heading and
controls the steering to maintain a constant track, acting
as an “Autotrack” to compensate for wind or current
disturbances. The operator can adjust the speed or track
heading by using the directional controls on the wireless fob.
The motor will emit 1 “beep” to indicate that
it has entered Track Mode.
The motor will emit 2 “growls” and exit this
mode if there is no GPS fix.
The direction the boat is pointed when this mode is selected will
become the “Track Course”. The thruster will pull the bow of the boat
along this course in a straight line. The boat itself may seem to point
somewhat “off track” due to cross-wind or cross-track currents.
ADJUSTING THE TRACK SPEED
The motor will maintain its previous speed if Track
Mode is selected from the Manual Mode. Otherwise,
the unit will gradually ramp to 40% forward speed
to maintain the track. Pressing the Up-Arrow button
increases the thruster’s forward speed. The Down-Arrow
button decreases the thruster’s forward speed. Reverse
operation is disabled in this mode.
The motor will “beep” when the thruster reaches
100% forward speed or when it is stopped.
ADJUSTING THE TRACK COURSE
The “Track Course” may be adjusted in precise
5-degree increments by pressing the Left or Right
Arrow buttons on the wireless fob.
The motor will emit 1 “beep” each
time the track heading is changed.
In this mode, the steering is automatic, but the thrust level is user
selected. In extreme wind or current it is necessary for the user
to select a speed setting with adequate thrust to overcome the
disturbances and remain“on-track”.
www.watersnake.com.au
15
ROUTE MODE: STORING (OR OVER WRITING) A ROUTE
From any mode, while holding down the “M” or “T”
button,press and hold a directional button for 5
seconds. The buttons can then be released and
the motor will now be in the function corresponding
to the button you selected “M” or “T”.
The motor is now recording your route.
The motor will emit a 1 second “beep” to
indicate that the route is being recorded.
You can now navigate along your desired course,
switching at will between manual and track modes.
The recording will terminate when you press
“OFF” or “A”.
The motor will emit a 1 second “beep”
to indicate that the route has been
successfully saved.
Should you wish to record an anchor site using the “M” or “T” memory these
locations,simply hit “OFF” or “A” as soon as the path begins to record, thus
recording a path of zero length. A route can also be recorded at higher speeds
with the system in the stowed position. Simply use the route storing procedure
above and the system will accurately record your route at speeds of up to 60
knots. For safety, the thruster and steering motors will be disabled as long as
the system is in the stowed position.
16
Watersnake
GPSMART
ROUTE MODE: RECALLING A STORED ROUTE
From any mode, while holding down the “M” or “T”
button, press and release the appropriate directional
button.
The motor will “beep a tune”
(multiple consecutive beeps)
to indicate that the route has
been successfully retrieved.
The motor will emit two “growls” and exit
if the memory location is empty or the
boat is not within 1 mile of a point on the route.
The motor will navigate directly to the nearest point on the route and then
travel to the most distant end, anchoring when it arrives. At any time while
retracing a route you can reverse the direction of travel by simply repeating the
same recall command. The motor will “beep a tune” to indicate that the boat is
arriving at the end of the recorded route.
When recalling a stored route if you hold the buttons too long you will
over-write that existing route memory location with the boat’s present
location, erasing it and begin recording a new route.
The motor will calculate a beeline to the nearest
point on the route. Make sure there are no obstructions
between you and the route prior to recalling it.
www.watersnake.com.au
17
CALIBRATIONS
CENTERING CALIBRATION
Note: This procedure is required and is normally only completed once at the
time of the installation. It should also be performed every time the system is
transferred to another boat or after a compass calibration.
1. Power up the system and deploy it using the depth collar to adjust the height
so that the motor can steer without any obstructions.
2. Press the ‘M’ button to enter Manual Mode. Please note that the system is
in an operational mode: Stay a safe distance away from the propeller to
avoid injury.
3. Using the left and right arrows (or manually rotating the head of the
thruster),steer the unit so that it is aligned with the keel of the boat (pointing
straight ahead with the propeller facing the stern of the boat).
4. Press and hold the up and down arrow simultaneously for 5 seconds until
the system beeps.
5. The system will return to Manual Mode.
6. To verify that the system has been “centered”, press the off button. The
system will automatically steer to the centered position.
The accuracy of the steering calibration will impact the system’s
performance. Care must be taken to ensure that the thruster is aligned as
accurately as possible (ideally within 1 or 2 degrees) during this calibration.
COMPASS MANUAL CALIBRATION (Recommended)
Note: Performing a compass calibration procedure is recommended as part
of the installation process to improve the accuracy of the GPSmart motor. It
will account for magnetic errors that can occur if the system is mounted close
to other metallic objects (i.e. cleats, steel fasteners, etc.) which may cause
the system functions to misbehave. This routine performs a similar but more
accurate calibration than the “Compass Auto-Calibration” however it requires
an external means of propulsion (i.e.outboard engine or paddle).
1. The boat must be in the water to perform this calibration. Make sure that
there are no obstructions nearby (docks, pilings, other boats, etc.) and that
the water is fairly calm.
2. Power up the system and deploy it using the depth collar to adjust the height
so that the motor can steer without any obstructions.
3. Press the ‘M’ button to enter Manual Mode. Please note that the system is
in an operational mode: Stay a safe distance away from the propeller to
avoid injury.
18
Watersnake
GPSMART
4. Using the left and right arrow buttons steer the unit so that it is aligned with
the keel of the boat (pointing straight ahead with the propeller facing the
stern of the boat).
5. Using another means of propulsion (main engine, paddle, etc.) begin to
continuously rotate the boat in a tight circle at a rate of one full revolution
every 20-30 seconds.
6. While holding down on the Manual ‘M’ button, press and hold on the Track
‘T’ button for 5 seconds until the system beeps.
7. After the boat has completed (2) full revolutions it will beep to indicate that
the calibration is now complete.
8. The system will return to Manual Mode. The rotation may now be stopped.
9. It is required that the Centering Calibration is now performed.
COMPASS AUTO-CALIBRATION (Optional)
Note: This procedure is provided as an alternative to the “Compass Manual
Calibration”for situations where external means of propulsion (i.e. outboard
engine or paddle) are not available. Generally speaking the “Compass
Manual Calibration” will provide a more accurate correction and is preferred.
Performing a compass calibration procedure is recommended as part of the
installation process to improve the accuracy of the GPSmart motor. It will
account for magnetic errors that can occur if the system is mounted close to
other metallic objects (i.e. cleats, steel fasteners, etc.) which may cause the
system functions to misbehave.
1. The boat must be in the water to perform this calibration. Make sure that
there are no obstructions nearby (docks, pilings, other boats, etc.) and that the
water is fairly calm.
2. Power up the system and deploy it using the depth collar to adjust the height
so that the motor can steer without any obstructions.
3. Press the ‘M’ button to enter Manual Mode. Please note that the system is in
an operational mode: Stay a safe distance away from the propeller to avoid injury.
4. Using the left and right arrow buttons steer the unit so that it is aligned with
the keel of the boat (pointing straight ahead with the propeller facing the stern
of the boat).
5. While holding down on the Manual ‘M’ button, press and hold on the Anchor
‘A’ button for 5 seconds until the system beeps.
6. The motor will now automatically steer to the right and ramp up the thrust
causing the boat to begin rotating. The boat will complete (2) full rotations and
then the system will beep to indicate that the calibration is complete.
7. The system will return to Manual Mode.
8. It is required that the Centering Calibration is now performed.
www.watersnake.com.au
19
REPLACING A FOB BATTERY
The batteries in the wireless FOB should be capable of lasting a full
fishing season or longer under normal usage conditions. If your
system is powered up yet fails to respond to a FOB, or if you noticed
decreased wireless range, try replacing the battery.”
1. Using a #1 phillips screwdriver, remove the two screws on the back of the fob.
2. Separate the fob sections
3. Remove the rubber membrane and the circuit board from the back half of the
fob shell.
4. Slide the battery out of its holder on the back of the circuit board and replace
with a new CR2032 battery. Be sure to position the battery with the Positive side
away from the board.
Use care not to press the small switch on the back of the circuit board near
the battery holder. If this switch is accidentally pressed, or the unit does
not respond to fob commands after replacing a battery, please contact your
nearest Watersnake dealer for further assistance.
5. Reinstall the circuit board in the back half of the fob shell, taking care to make
sure it is properly positioned in the shell.
6. Place the rubber membrane over the lip on the back half of the fob shell and
press into place.
7. Place the front half of the fob shell over the rubber membrane and press into
place. Verify that all buttons are properly positioned within their opening and
function correctly.
8. Reinstall the two screws into the fob shell, taking care not to over-tighten the
screws.
20
Watersnake
GPSMART
PROGRAMMING A NEW WIRELESS CONTROL FOB
1. Power up the unit in the stowed position
2. Deploy, stow and re-deploy the unit prior to pressing any fob buttons.
3. The unit will begin “beeping” indicating that it is ready to learn new wireless
controls.
4. Press any button on the new fob within 20 seconds
5. When the unit stops beeping, the new fob will be learned by your system and
is ready to be used.
Warning, do not attempt to stow the unit until it has stopped beeping.
ERASING ALL FOBS FROM MEMORY
1. Power the unit up in the stowed position
2. Deploy, stow and re-deploy the unit prior to pressing any fob buttons.
3. The unit will begin “beeping” indicating that it is ready to learn new wireless
controls from the step above.
4. Within 20 seconds (while the system is still beeping) stow and deploy the
system once more.
5. The system will sound a long beep indicating that all fobs have been erased
frommemory.
If this step is being performed because of concerns about a defective fob, it
will be necessary to remove the batteries from all fobs in question prior to
completing this process.
www.watersnake.com.au
21
MAINTENANCE & STORAGE
It is recommended that the following steps be taken after each use.
Adhering to these recommendations can greatly increase the life of the
unit. Failure to properly maintain the unit may void the warranty and can
result in system damage, personal injury, and property damage.
• Rinse off any salt water deposits and wipe the motor down with a clean soft
cloth. Do not use a pressure washer to clean the unit.
• Check that the propeller is clear of any fishing line or weeds.
• Use the prop nut tool to ensure the prop nut is properly secured.
• Lubricate all moving parts with a non-aerosol lubricant.
• Clean battery terminals regularly and check for loose terminal nuts.
• Store in a well-ventilated, dry area
• Do not leave the motor outside in the elements, especially in cold winter
and/or saltwater environments. Long exposure to sub-zero temperature
will reduce the strength of the permanent magnets of the motor and result in
reduced thrust.
• Never use chemicals (alcohol, solvents, and acids) on any of the system
components.
• Use a Vinyl UV protector periodically on the power cables to avoid
excessive sun damage.
• Periodically check for loose connections and/or excessive corrosion.is ready
to be used.
22
Watersnake
GPSMART
TROUBELSHOOTING QUICK REFERENCE GUIDE
MOTOR IS SHAKING
• Check for line or weed fouling of the propeller.
• Check Prop and Prop Nut
• Check to see if propeller shaft is bent
• Check battery condition. Recharge and test
for a bad cell.
• Check battery connections for corrosion
• The power wiring from the battery to the motor
may be too small. Use #6 AWG.
LOSS OF SPEED
SYSTEM DOES
NOT RESPOND TO
WIRELESS COMMANDS
• Verify that unit is locked in the deployed position
• Cycle power off & back on
• Replace battery in wireless fob
SYSTEM WILL NOT
ANCHOR OR TRACK
• Allow at least 1-minute for system to acquire
a GPS fix. Listen for (4) beeps indicating good
GPS signal.
• Make sure that nothing is blocking the sky
view of the GPS antenna
AFTER SELECTING
A MODE, SYSTEM
BEEPS TWICE AND
THEN DOES NOTHING
• Battery voltage is low
• Check all connections
• Recharge battery and test for a bad cell
BATTERY DRAINS
• A drain of approximately 100 milliamps will
be imposed on the system batteries if
powered-up when not in use
• Always unplug the system when not in use
The above reference is included to assist you in troubleshooting some basic issues
that you might encounter. At any time should you have a question or concern about the
function of your GPSmart Motor, please feel free to contact your nearest Watersnake
dealer.
www.watersnake.com.au
23
24
Watersnake
WATERSNAKE MOTOR ACCESSORIES SOLD SEPERATLY
(SEE YOU NEAREST DEALER FOR MORE INFORMATION)
Watersnake Propeller Kits (Sold Separately)
Watersnake Propeller kits contain a propeller, nut and shear pins. It is
recommended you keep a spare propeller on your boat at all times. The Mini 2Bladed Kit is suitable for the T-18 and T-24 motors. The 2-Bladed Propeller Kit
is suitable for 28lb, 30lb and 34lb motors. The 3-Bladed Medium Propeller Kit is
suitable for all 44lb and 54lb motors. The 3-Bladed Large Propeller Kit is suitable for
all 70lb, 80lb and 105lb motors.
55501
Large 3 Blade
Prop (70lb-105lb)
55130
3 Blade Prop
(44lb-54lb)
55131
2 Blade Prop
(28-34lb)
55500
2 Blade Mini Prop
(18lb-24lb)
Watersnake Telescopic
Extendable Motor Handle
The Watersnake Telescopic Handle
can extend to 24” and will fit most
tiller handles.
55507
Watersnake Propeller
Accessory Kit
This kit is very handy and we
suggest you keep one at all times.
Consists of a propeller nut wrench,
propeller nut and shear pins.
55132
www.watersnake.com.au
25
Watersnake Trolling
Motor Connectors
Watersnake Motor Connector
Plugs makes it very quick and
simple to remove and replace
your motor from the boat as well
as providing a better connection
to your power source. Available
in a 12v plug.
55505
55506
12V Male
2 wire
12V Female
2 wire
Watersnake 50 Amp Fuse Kit
We strongly recommend the use of an in-line fuse kit to protect
your motor from shorts and electrical problems that can lead
to over heating of circuit boards in your trolling motor. Having
other devices hooked up to your motor battery can cause power
surges. Watersnake Fuse Kits come supplied with a 50 amp fuse
and are completely waterproof. These simple to install kits are an
essential accessory for your motor.
55503
Watersnake Replacement Fuse
Replacement 50 Amp fuse to suit a
Watersnake Fuse Kit. It’s a good idea to
always keep a spare!
55504
26
Watersnake
NOTES:
www.watersnake.com.au
27
CONTACT INFORMATION
REGION/COUNTRY
DISTRIBUTOR
PHONE
Jarvis Walker
+61 3 8787 6900
Asia Pacific
Australia
AUSTRALIAN REPAIRS AND SERVICING
Anglers’ Central Service Centre
2/7 Circuit Drive, Hendon
Africa
South Africa
South Australia, 5014 Australia
Apex Walker
+27 11 7920 611
Ph: 08 8244 8790
Email: [email protected]
www.watersnake.com.au
Watersnake Distribution Pty. Ltd.
297-305 South Gippsland Highway
Dandenong South, Victoria 3175 Australia
ACN: 143 230 175
Watersnake® and Jarvis Marine® are registered
trademarks of Watersnake Distribution Pty. Ltd.
© 2013 Watersnake Distribution Pty. Ltd. All Rights
Reserved. Specifications are subject to change
without notice.