1
iBonus DisplayTM User’s Manual
Manual For:
iBonus DisplayTM version 3.6
Lucky Technology Ltd.
iBonus Prepaid System Manual
1. INSTALLATION ...................................................................... 4
2. CONFIGURATION .................................................................. 4
2.1. Built-in Web Server .............................................................. 4
2.2. LCD Control Panel ............................................................... 4
2.3. Touch Screen Panel Calibration ........................................... 5
2.4. Network Configuration.......................................................... 5
2.4.1.
2.4.2.
On Web .........................................................................................6
On Touch Screen........................................................................13
2.5. Date and Time.................................................................... 13
2.5.1.
2.5.2.
On Web .......................................................................................13
On Touch Screen........................................................................13
2.6. Administrator’s User Name and Password ......................... 13
2.6.1.
2.6.2.
On Web .......................................................................................14
On Touch Screen........................................................................14
3. ADMINISTRATION ............................................................... 14
3.1. Member Profile / Questionnaire.......................................... 14
3.1.1.
3.1.2.
Privacy Agreement.....................................................................15
Administrator Defined Questionnaire ......................................15
3.2. Membership Class ............................................................. 17
3.3. Redemption Scheme.......................................................... 17
3.3.1.
3.3.2.
3.3.3.
3.3.4.
Changing to Bonus Mode..........................................................17
Addition of Reward Items..........................................................18
Preview .......................................................................................19
Modification ................................................................................19
3.4. Shopping Scheme.............................................................. 19
3.4.1.
3.4.2.
Changing to Shopping Mode ....................................................19
Addition of Shopping Items ......................................................20
www.lucky-tech.com
2/31
Lucky Technology Ltd.
3.4.3.
3.4.4.
iBonus Prepaid System Manual
Preview .......................................................................................20
Modification ................................................................................21
3.5. Advertisements .................................................................. 21
3.5.1.
3.5.2.
3.5.3.
Mode Change .............................................................................21
Uploading ...................................................................................22
Scheduling..................................................................................22
3.5.4.
Tutorial Wizard ...........................................................................23
3.6. Adjusting Audio Volume...................................................... 24
3.6.1.
3.6.2.
On Web .......................................................................................24
On Touch Screen........................................................................24
3.7. Resetting............................................................................ 24
3.8. Rebooting........................................................................... 24
3.8.1.
3.8.2.
On Web .......................................................................................24
On Touch Screen........................................................................25
4. BONUS MODE OPERATION................................................ 25
4.1. Checking Bonus Point ........................................................ 25
4.2. Selecting Reward Items ..................................................... 25
4.3. Entering/ Editing Member’s Info ......................................... 26
5. PREPAID MODE OPERATION ............................................. 27
5.1. Checking Balance .............................................................. 27
5.2. Selecting Shopping Items................................................... 27
5.3. Entering/ Editing Member’s Info ......................................... 28
6. ADVANCED FEATURES ...................................................... 29
6.1. Multi-lingual Support .......................................................... 29
6.1.1.
6.1.2.
6.1.3.
6.1.4.
Choosing Languages.................................................................29
Adding New Languages ............................................................29
Editing Existing Languages ......................................................30
Uploading/ Downloading Language Files ................................30
www.lucky-tech.com
3/31
Lucky Technology Ltd.
6.1.5.
iBonus Prepaid System Manual
Resetting Language Default......................................................30
6.2. Backup / Restore................................................................ 31
6.3. Uploading Firmware Patch ................................................. 31
1. Installation
Determine the location(s) for installing iBonus Display. iBonus can be mounted
on the wall using 4 screws.
iBonus Display comes with a power supply with 110-220 V input. Connect the
power supply to iBonus Display.
iBonus Display can be connected directly to your corporate network via
standard RJ-45 cable & TCP/IP protocols. If you want to connect iBonus
Display to a computer directly, you have to use Crossover RJ-45 cable. Please
see the section Configuration for more detail.
iBonus Display requires initialization of the setting by presenting a Master Card
supplied by the factory.
2. Configuration
2.1. Built-in Web Server
iBonus has a built in web server. By typing the iBonus Display’s IP address in
the browser, you can configure and administrate it. You can choose either
normal login or secure (SSL) login. Enter user name (default: admin) and
password (default: 123). (If you have chosen secure login, you have to accept
the certificate by clicking yes.) Then you can get to the web admin page.
2.2. LCD Control Panel
iBonus has an on screen set up program which is called LCD Control Panel. It
is made for you to do some on-site configurations and settings on the iBonus
www.lucky-tech.com
4/31
Lucky Technology Ltd.
iBonus Prepaid System Manual
Display. To use the LCD Control Panel, press the touch screen for 5 seconds
when the iBonus Display is idle or playing advertisement. Enter password
(Default: 123). Then you can get to the LCD Control Panel.
2.3. Touch Screen Panel Calibration
When the iBonus is used the first time, it requests you to calibrate the touch
screen. Simply press on the center of the circle one by one.
To recalibrate the touch screen:
Click “Touch Screen” in the menu of the web server page.
Click Calibrate.
The calibration process will be carried out in the next reboot.
2.4. Network Configuration
You should consult your IT department, network engineer or consultant. You
can also study this link
http://www.oreilly.com/catalog/coreprot/chapter/appb.html for explanation of IP
address.
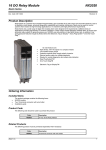
Here is a simplest network in a small office using network hub/switch.
IP address is an identifier of the location/address of device or computer in a
network. The communication of devices/computers in the network relies on the
IP address. Subnet Mask defines the range of IP addresses in a network. For
example, we can setup an IP address ranges from 192.168.0.1, 192.168.0.2 ...
to 192.168.0.254 with a Subnet Mask setting of 255.255.255.0.
The default IP address of iBonus Display is 192.168.1.100. All computers in
the network have to set with IP address within the range of 192.168.1.xxx and
Subnet Mask of 255.255.255.0 .To test the connectivity, you can use the Ping
command in DOS mode. In Windows, you can choose the DOS command,
and then type ping 192.168.1.100. If successful, it will shows the time such as
<10ms.
C:\>ping 192.168.1.100
Pinging 192.168.1.100 with 32 bytes of data:
Reply from 192.168.1.100: bytes=32 time<10ms TTL=128
Reply from 192.168.1.100: bytes=32 time<10ms TTL=128
Reply from 192.168.1.100: bytes=32 time<10ms TTL=128
www.lucky-tech.com
5/31
Lucky Technology Ltd.
iBonus Prepaid System Manual
Reply from 192.168.1.100: bytes=32 time<10ms TTL=128
Once you have setup the computers, you can use any Internet browser to
access the administration page of iBonus Display by typing their IP address.
2.4.1. On Web
To change the IP configuration of the iBonus Display click “Network” in the
menu. You can change the followings in that page:
2.4.1.1. General Network Settings
To setup the network:
Click “Network” in the menu
Enter or select the parameters explained below.
Click “Save”
Host Name
The name of this unit for you to
identify this unit when you have
launched a lot of them. Master
iBonus Display can use this to
identify the slaves.
Primary/ Secondary DNS
The domain name server used by
this unit.
Only Allow SSL Connection
Determines whether this unit only
uses SSL connection for web
administration program and master/
slave connection.
Webserver Port
The port number of unencrypted web
server service. Default value: 80
SSL Webserver Port
The port number of secure web
server service. Default value: 443
2.4.1.2. Network Interface Settings
Every iBonus unit has a network interface, the internal network interface. If it is
equipped with a wireless LAN interface, you can configure both internal
network interface and wireless LAN interface on the web-page. The following
parameters are common for all network interfaces.
www.lucky-tech.com
6/31
Lucky Technology Ltd.
Enabled
iBonus Prepaid System Manual
Determines whether this interface is turned on. If you have more
than one network interface, it is suggested that you enable only
one of them.
IP Address Internet Protocol address of this interface.
Network
The subnet mask of this interface.
Mask
Gateway
The IP address of the device which connect this unit to the
outside world.
The followings are particular of wireless LAN interface.
ESSID
It has to match the ESSID of the network it is connected with.
Connect
With
Wireless router : Also known as Infrastructure mode or Managed
mode
Another Computer or iBonus using wireless interface : Also
known as Ad-Hoc Mode or Peer to Peer Mode
Channel
The channel to which this network interface is connected.
It is suggested that you enable only one network interface in an iBonus
Display.
2.4.1.3. Master/ Slave Settings
Imagine you are going to deploy a group of iBonus Display in different
locations. To keep the content of the display units up to day, you might have
thought you need to browse each unit and do the update one by one. Master/
Slave feature saves up the tedious steps mentioned above and the update
procedure can be done in just one click.
There are more functions which comes with the master/ slave features
Monitoring the update progress and the health of the slaves units.
Authenticating the connecting slaves.
Scheduling the time of updating.
www.lucky-tech.com
7/31
Lucky Technology Ltd.
iBonus Prepaid System Manual
Sending alert email to a designated email address when there is
something wrong.
Parameters:
Master Unit
Select the radio button when it is a master unit or a
stand-alone unit.
Slave Unit
Select the radio button when it is a slave unit
Master Unit IP
Required when Slave Unit is selected. It is the IP
address of the Master.
Synchronization
Hours
The hour in which the slave can start synchronization
with master.
Need Password to
Login Master
The Master/ Slave service of the master may be
protected by password. A valid password must be types
here in a slave order to login to the master.
Master’s
Webserver Port
A slave is connected to the master thru the master’s web
server. This port number has to be the corresponding
number of master’s.
Master’s SSL
Webserver Port
If either master or slave has been chosen to use SSL for
web server connection. The connection between master/
slave will use SSL. This port number has to be the
corresponding number of master’s.
Points to note:
If you have only one unit of iBonus Display or the unit which is not networked
with other iBonus Display units, simply choose Master Unit.
If you have more than one unit of iBonus Display and you want all units having
the same advertisement content, advertisement schedule, and reward scheme,
configure one unit as a Master Unit, and the rest as Slave Unit. In the Slave
Unit, you have to fill in the IP address of the Master Unit.
It is suggested that you set up the master unit in a place which can be
physically accessed easily, for example, your office. You can see what the
content will look like before broadcasting them to the slaves.
If you have several groups of iBonus Displays which have different content
between the groups (but the content are the same among the same group),
you need divide the slave in several groups and connect each group to one
master, thus forming several groups of master and slaves.
www.lucky-tech.com
8/31
Lucky Technology Ltd.
iBonus Prepaid System Manual
To establish a connection between a master and a slave, a master has to have
an IP-address or, at least, a web server port connectable by the slaves. A
slave, however, can hide in a subnet without exposing an IP address to the
outside world (If you don’t mind not having the web administration function of
the slaves). At any time, only 20 slaves are allowed to be connected to a
master.
Step of performing data synchronization after updating the content in master:
Click “File Sync” in the menu. You can see the status of the units
connected to this unit.
Click the “Sync” button.
After clicking the Sync button, the master sends a notification signal to its
slaves. If the master cannot connect to the slave’s web server, slave can still
notice the master’s has commanded a synchronization request by polling the
master. As soon as the slave finishes its current advertisement, it will start
downloading content from the master. At most 5 slaves can download content
from the master at a time. When the download procedure is in progress,
content modification is not allowed in the master. The information on the
browser shows the progress of synchronization.
www.lucky-tech.com
9/31
Lucky Technology Ltd.
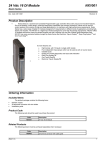
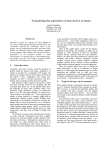
2.4.1.3.1.
iBonus Prepaid System Manual
Topology
master
slaves
master
slaves
master
slaves
One master can be shared by at most 20 slaves. A slave itself can be a master
relative to its slaves.
2.4.1.3.2.
Monitoring the updating progress
Steps:
Click “File Sync” in the menu. You can see the status of the units
connected to this unit.
Click the hyper link “Keep refreshing this page” if you wish to keep the list
updated.
The list shows the slaves which is online. If you want the list to tell you which
slaves are supposed to be connected, and monitor if there is any slave which
cannot connect to the master, follow the steps below:
Give each of each slave a host name in their network settings. (Max 10
Characters)
In the master web page, click “Network” in the menu.
www.lucky-tech.com
10/31
Lucky Technology Ltd.
iBonus Prepaid System Manual
Make sure the check box “Only slaves with designated host names can be
connected to this unit” is checked. Click “Save” if you have changed this
setting.
Click the link named “Click here to define the host names, with which
slaves can connect to this unit”. A new window is shown.
In the text field named “Add Host Name”, enter the name which you have
assigned to the slaves. Multiple host name can be separated by “,”. After
clicking the button “Add” the host names are added to the list. Only the
slaves with their host name in the list can connect to this master unit.
Click “File Sync” in the menu on the left. If there is a slave which host
name is added but it is offline, the problem will be shown on the list where
the corresponding slave is marked as offline.
2.4.1.3.3.
Authenticating the connecting
slaves
2.4.1.3.3.1. Password protection
Master can setup a password for the slave to login; So that the content won’t
be “stolen” by an unauthorized party.
Steps for setting up the password in master:
In the master’s web page. Click “Password” in the menu.
In the text field named “Password for accessing master” key in the
password. (Max 10 characters)
Click “Save”.
In the slaves’ web page. Click “Network” in the menu.
Check the check box named “Need password to login master”
Enter the password you have just entered into the field “Password”
Click “Save”
2.4.1.3.4.
Scheduling the Time of Updating
You might not want you audience notice that the Display is downloading
www.lucky-tech.com
11/31
Lucky Technology Ltd.
iBonus Prepaid System Manual
content from the master while the advertisement is supposed to be on air. You
might not want your customer to wait for the download progress before being
able select their gift or product items from the Display. As an administrator,
however, the most painstaking thing is that you are allowed to update your
company’s computer systems only when every one is off duty, having their
chilled beer in front of a TV. If you don’t want to wait till every one is gone
before you can update the display’s content, the update scheduler is made for
you.
To tell the time slot in which the slave can perform synchronization:
In each slave’s web page, click network.
Change the value of the “Synchronization Hour”. The time value here can
cross a day boundary. For example, 23:00 to 06:00 means the slave can
start downloading content between 11pm and 6am of the next day. Each
slave can have different time slots.
In master’s web page, after updating the content, you still need to click the
“Sync” button in page “File Sync”. The slaves will start downloading as
soon as the clock turns to their synchronization hours.
Make sure the clocks in the master and slaves are adjusted properly.
2.4.1.3.5.
Sending Alert Email
Network connections between master and slaves may go wrong sometimes.
(Murphy says it will!)
For a master, alert email can be sent to a designated email address when:
A slave is not connecting
A slave does not start downloading from master even it is supposed to
A slave can never finish downloading
For a slave, alert email can be sent when:
It cannot connect to a master.
Steps:
In the menu, click “Network”
Check the check box “Enabled” underneath Email Fault Alert
Enter SMTP server domain name. (Make sure you have entered the DNS)
Enter Port and recipient email addresses. Multiple recipients can be
separated by space.
Check the check box in any of the alert items below and enter the value. In
particular the second item “Send email alert when a slave does not start
www.lucky-tech.com
12/31
Lucky Technology Ltd.
iBonus Prepaid System Manual
downloading after placing the synchronization command after certain
duration.” If the slave is restricted to download in a certain time slot, you
have to enter a value larger than 24 in that text field.
Click “Save”
2.4.2. On Touch Screen
The network general setting, interface settings and master/ slave setting can
be done in the LCD touch screen control panel. However, there are some
parameters you cannot change on the LCD control panel:
The host name with which slave can connect to this unit.
Email fault alert
2.5. Date and Time
You can adjust the date and time of iBonus.
2.5.1. On Web
Select menu “Set Clock”.
If “Auto DateTime” is turned on the date and time on the text field will
follow the time of your computer.
If you want to enter the date and time manually, switch off the “Auto
DataTime”
Click “Save”
2.5.2. On Touch Screen
In the LCD control panel click “date/time”
Adjust the date and time by clicking the arrow in the spin box.
Click “Ok” or “Apply”
2.6. Administrator’s User Name and
Password
The administrator’s password and username should be altered from its default
value before it is launched to the public. Please note that the password set in
www.lucky-tech.com
13/31
Lucky Technology Ltd.
iBonus Prepaid System Manual
the webpage is not corresponding to that set in the LCD control panel. They
are individual passwords. The web administrator password can only be
changed in the web page. The LCD control panel password can only be
changed on the LCD control panel.
The password set in the webpage is not corresponding to that set in
the LCD control panel
2.6.1. On Web
To set the web administrator password:
Click “Password” from the menu.
Enter username to the field “System Administrator’s Username”. (Max 10
char)
Enter new administration password in both of the remaining fields. (Max
10 char)
Click “Save”.
2.6.2. On Touch Screen
To set the LCD control panel’s password:
Click the tab “Password” in the control panel
Enter the password in both fields. (Max 10 char)
Click “Apply” or “Ok”.
3. Administration
3.1. Member Profile / Questionnaire
The user’s profile is collected when the customer tries to do his first
redemption on iBonus Display. Customers are more willing to submit accurate
answer when they see the benefit ahead.
Customers can also input or edit their profile by touching the person icon in the
page showing his/her bonus point.
www.lucky-tech.com
14/31
Lucky Technology Ltd.
iBonus Prepaid System Manual
The involved information includes:
Privacy agreement
Language Preference
Date of birth
Administrator defined questionnaire
3.1.1. Privacy Agreement
Right after the customer first confirmed his redemption item, he will see a page
which tells the customer that he/she is about to answer a series or questions.
The words in the page can be modified in language settings. Please refer to
the chapter Multi-lingual Support in the Advanced Features topics for knowing
how to change the words.
3.1.2. Administrator Defined Questionnaire
There are 12 binary bits of memory in the Member Card assigned for
membership profile. The 12 bits store the answer of several multiple choice
questions. The number of questions which the 12 bit can store determines by
the number of choice of each question. The larger number of choice in a
question, the more space of the 12 bit it occupies.
The answers of the multiple choice questions can be used to define the
redemption scheme. The order of display of the reward item can be
determined by the answer. You can set up the display to show your customer
the reward items which they would probably like most at the beginning. We will
go back to this in the chapter Addition of Reward Items.
The general equation of calculating how many bits that a question occupies is
as follows:
bit = ceiling(log2(no. of choice))
Following is an example of questions, choices and how they occupy the 12 bit:
No. Question
Choices
No. of bit data stored
1
1. Male,
1
Gender
www.lucky-tech.com
Choice 1: 0
15/31
Lucky Technology Ltd.
iBonus Prepaid System Manual
2. Female
2
Monthly Salary 1. 0-7,999
2. 8,000-13,999
Choice 2: 1
2
3. 14,000-19,999
Choice 1: 00
Choice 2: 01
Choice 3: 10
4. 20,000 or above
Choice 4: 11
If the user has chosen “Male” in question 1 and “14,000-19,999” in question 2.
The 12 bit in the card is stored as follows:
001000 000000
Reading from right to the left, the second zero above is the least significant bit
of question 2.
In the above example, it has only used 3 bits and leaves 9 bits for more
questions.
Maximum number of choices of a question is 16.
Since the 12 bit of the member card has to combine with the
questionnaire in order to form the profile. You cannot change the
questionnaire after the iBonus Display is launched to public and used.
Otherwise, the 12 bit may match to a wrong question.
To add a new question:
Click Questionnaire in the menu under Reward Scheme
In the session Adding New Session, select the Number of choice and the
question number for the new question.
Click “Add”.
Enter the question and choices in all languages.
Click “Save”. The new question is inserted into the questionnaire.
To delete a question:
Click Questionnaire in the menu under Reward Scheme
Check the checkbox next to the question.
www.lucky-tech.com
16/31
Lucky Technology Ltd.
iBonus Prepaid System Manual
Click “remove”
To modify a question:
Click Questionnaire in the menu under Reward Scheme
Click the “edit” button next to the question.
After the modification, click “Save”.
3.2. Membership Class
You can define and name up to 5 different classes of Membership based on
accumulative spending.
For example,
Basic Membership started from 0 accumulative spending.
VIP Membership started from 5,000 accumulative spending.
To add a membership class:
Click Membership Class in the menu under Reward Scheme
Underneath “You can add a new membership class here:” enter the
starting accumulative spending and the membership class name in
different languages.
Click “add”.
3.3. Redemption Scheme
Redemption is one of the core functions of iBonus Display. When a customer
presents their member card to the Display, it shows the bonus points in the
card. Then the customer can select one or more bonus items from the scheme.
3.3.1. Changing to Bonus Mode
If you wish to use iBonus Display for gift redemption, please make sure that
your iBonus Display is operating in Bonus Mode.
To switch back to Bonus Mode from Shopping Mode:
www.lucky-tech.com
17/31
Lucky Technology Ltd.
iBonus Prepaid System Manual
Underneath Shopping Scheme, click To Bonus Mode
Click the radio button named Bonus Mode in the page at the right hand
side.
Click the button change mode.
Before changing mode, it is recommended that you delete all your
shopping or reward items.
3.3.2. Addition of Reward Items
To add a new reward item:
Click Add Reward Item in the menu of the web page.
Enter the item code, select the image file and enter redemption points.
The mandatory setting of a reward item includes:
Item Code
The code name of item which will be shown in iBonus
Terminal during redemption. Accepted characters: {0-9, a-z,
A-Z, '_', '.'}. Max 10 Characters.
JPEG File
The image shown on redemption catalog on LCD display.
The JPEG file has to be smaller then 1MB. The JPEG file
will be resized to 640x480 if it is too big.
Redemption
Bonus Point
The cost of this bonus item. By default the bonus will be
shown to the customer only if the customer has enough
bonus point balance.
Enter the optional detail.
Optional detail includes:
Minimum Display
Bonus Point
If you wish this item to be viewable to those members
who do not have enough bonus points to redeem this
item, enter a value lower then the Redemption Bonus
Point here.
Availability period.
After the last day of availability period, the reward item
will not be redeemable
Redeemable age
Only the customer at a certain age can redeem the
item.
Birthday gift
The reward item is redeemable only on the customer’s
birthday.
Profile match
The reward item can be displayed first if the member
www.lucky-tech.com
18/31
Lucky Technology Ltd.
iBonus Prepaid System Manual
recommendation
has chosen a certain answer in the questionnaire,
Membership Class
Availability
The item can be available to certain membership
classes.
Click “save”
3.3.3. Preview
Click Preview Reward Item in the menu of the web page.
Then you can see the preview page of reward items.
3.3.4. Modification
In the preview page of reward items.
Click the button “modify” underneath the detail of the item you want to edit.
After changing the detail, click “save”.
3.4. Shopping Scheme
Letting customers to choose shopping items is one of the core functions of
iBonus Display. When a customer presents their member card to the Display, it
shows the stored value balance in the card. Then the customer can select one
or more shopping items from the menu.
3.4.1. Changing to Shopping Mode
If you wish to use iBonus Display for selling products, please make sure that
your iBonus Display is operating in Shopping Mode.
To switch to Shopping Mode from Bonus Mode:
Underneath Reward Scheme, click To Shopping Mode
Click the radio button named Shopping Mode in the page at the right hand
side.
Click the button change mode.
Before changing mode, it is recommended that you delete all your
shopping or reward items.
www.lucky-tech.com
19/31
Lucky Technology Ltd.
iBonus Prepaid System Manual
3.4.2. Addition of Shopping Items
To add a new shopping item:
Click Add Shopping Item in the menu of the web page.
Enter the item code, select the image file and enter the value of price.
The mandatory setting of a shopping item includes:
Item
The code name of item which will be shown in iBonus Terminal
Code
during shopping. Accepted characters: {0-9, a-z, A-Z, '_', '.'}. Max 10
Characters.
JPEG
File
The image shown on shopping item catalog on LCD display. The
JPEG file has to be smaller then 1MB. The JPEG file will be resized
to 640x480 if it is too big.
Price
The cost of this bonus item. By default the bonus will be shown to the
customer regardless of the customer card’s stored value.
Enter the optional detail.
Optional detail includes:
Minimum Display
Bonus Point
If you wish this item to be viewable to those members
whose stored value is not 0, enter another value.
Availability period.
After the last day of availability period, the shopping
item will not be purchasable.
Purchasable age
Only the customer at a certain age can purchase this
item.
Birthday product
The shopping item is purchasable only on the
customer’s birthday.
Profile match
The shopping item can be displayed first if the
recommendation
member has chosen a certain answer in the
questionnaire,
Membership Class
Availability
The item can be available to certain membership
classes.
Click “save”
3.4.3. Preview
Click Preview Shopping Item in the menu of the web page.
Then you can see the preview page of shopping items.
www.lucky-tech.com
20/31
Lucky Technology Ltd.
iBonus Prepaid System Manual
3.4.4. Modification
In the preview page of shopping items.
Click the button “modify” underneath the detail of the item you want to edit.
After changing the detail, click “save”.
3.5. Advertisements
The iBonus Display shows MPEG 1 movies and JPEG still pictures when it is
idle. It stores up to 200 movies or pictures. The capacity depends on the
compact flash installed in the Display. Normally, 128 MB of storage space can
store 15 minutes of movies.
3.5.1. Mode Change
The advertisement has two scheduling mode. 1, Simple Mode, 2, Advanced
Mode.
3.5.1.1. Simple Mode
In Simple Mode, the advertisements i.e. the uploaded movies and pictures are
played either in sequence or randomly. The duration of every JPEG still picture
can be set individually or in a whole. iBonus Display is set to Simple Mode by
default.
To change to simple mode:
Click “To Simple Mode” or “To Advanced Mode” in the menu
Click the radio button “Simple Mode”
Choose either sequential or random. (The sequence is based on the file
name, and it is case sensitive.)
Enter the default duration of each advertisement. The duration of
individual advertisement can be set at the preview page.
Click “Save”.
3.5.1.2. Advanced Mode
In Advanced Mode, the advertisements can be scheduled.
www.lucky-tech.com
21/31
Lucky Technology Ltd.
iBonus Prepaid System Manual
Click “To Simple Mode” or “To Advanced Mode” in the menu
Click the radio button “Advanced Mode”
Click “Save”.
3.5.2. Uploading
To upload advertisement:
Click “Upload” under Advertisement in the menu.
You can see there are 10 file selection boxes for you to type in the file
name. You can upload up to 10 files at a time.
Click “browse” next to a file selection box and choose the JPEG or MPEG
file you want to upload.
The JPEG file has to be smaller than 1MB. If it is bigger than 640 x
480, it will be resized to that size.
The MPEG file is required to have sound track. It is recommended to
be in the resolution of 320x240 pixels and 25 frames per second.
Click “upload”.
3.5.3. Scheduling
With the scheduling function, you can set how many times (and for how long
each time for JPEG) an advertisement should be shown in a session.
Scheduling an advertisement involves three procedures.
Uploading an advertisement as normal
Defining Sessions and Holidays
Defining frequency of display and duration.
3.5.3.1. Defining Sessions and Holidays
A session can be defined as a time period (Starting hour to Ending hour) in
EVERDAY (everyday of a week), SATURDAY (Saturday of a week), SUNDAY
(Sunday of a week), or HOLIDAY (defined by administrator). The time period
of different sessions cannot be overlapped.
To add a new session:
Click “Session” in the menu.
Select the day of the session, select the start time and end time of the
session.
www.lucky-tech.com
22/31
Lucky Technology Ltd.
iBonus Prepaid System Manual
Click “Add”.
Too add a new holiday
Click “Holiday” in the menu.
In the text field name “Date”, enter the holiday in the format of
YYYY-MM-DD.
Click “Add”.
3.5.3.2. Defining Frequency of Display and
Duration
Frequency of display and the duration of each display have to be determined
for each advertisement. The total duration (Frequency of Display x duration of
each display of all advertisements) in one session is not allowed to exceed the
total time defined in that session.
For example, a session defined as 14:00-15:00 of SUNDAY. The total time in
this session is 3600 seconds. There are 2 advertisements (A) and (B) to be
scheduled. Advertisement (A) scheduled for 60 in Frequency of Display for
duration of 40 seconds, and then the remaining Advertisement (B) will only be
allowed for 1200 seconds. Advertisement (B) may be scheduled for 60 in
Frequency of Display for a duration of 20 seconds.
To define duration and frequency of display:
Click preview in the menu.
Click schedule button next to the advertisement that you want to schedule.
Check the check box of the session you want to put the advertisement to.
Enter the value of the frequency of display and duration in seconds.
Please note that the multiple of the two values cannot exceed the value of
seconds left.
Click “Save”.
3.5.4. Tutorial Wizard
Wizard can guide you through the progress of schedule Advertisement in
Advanced Mode:
Click “Tutorial Wizard” in the Menu under Advertisement.
www.lucky-tech.com
23/31
Lucky Technology Ltd.
iBonus Prepaid System Manual
3.6. Adjusting Audio Volume
3.6.1. On Web
To adjust sound volume on the web:
Click “Audio” in the Menu
Select the value sound volume in the combo box.
Click “Save”
3.6.2. On Touch Screen
To adjust sound volume on the LCD display:
In the LCD control panel, click “sound volume”.
Adjust the sound volume by the scroll bar.
Click “Ok” or “Apply”.
3.7. Resetting
There are four options of resetting the iBonus Display:
Reset database
Reset database, advertisement files and reward scheme
Reset network settings, sound volume and other configuration
Reset everything, i.e. back to factory default. If this option is chosen,
Master Card has to be presented to this device before it can operate
again.
To reset the iBonus Display
Click “Reset” in the menu
Choose any of the options for resetting.
Click the button “Reset”.
3.8. Rebooting
3.8.1. On Web
To reboot the iBonus Display
www.lucky-tech.com
24/31
Lucky Technology Ltd.
iBonus Prepaid System Manual
Click “Reboot” in the menu
Click the button “Reboot”.
3.8.2. On Touch Screen
To reboot the iBonus Display at the LCD control panel
Click “Restart” in the menu
Click the button “Restart”.
4. Bonus Mode Operation
4.1. Checking Bonus Point
By presenting Member smart card to the iBonus Display, the current bonus
point and the accumulated spending are displayed.
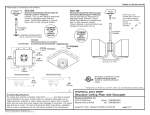
4.2. Selecting Reward Items
After checking the bonus point, member can see the
redemption items displayed in the next screen. Member
can start selecting the reward items by touching the
shopping cart.
Member can view more selections by touching the right
arrow button or can view the preceding selections by
touching the left arrow button.
www.lucky-tech.com
25/31
Lucky Technology Ltd.
iBonus Prepaid System Manual
If the customer card is a Classic Card, they can make
multiple selections of the reward items.
To do so:
Touch the star button.
Touch the basket button to select the item. Touch
the right arrow key to view more selection.
Touch the basket button to make selection again.
When finishing the selection, touch the check
button to check out.
The display will prompt you to confirm the selection by
presenting customer's smart card.
After the customer's smart card is presented, the display
will show confirmation. At this stage, the selection is written
on the smart card and the bonus point is not deducted yet.
The customer can make a new selection whenever they
change their mind. The old selection is overridden.
The customer can now bring the smart card to an iBonus
Terminal (in bonus mode) to make the real redemption.
If the customer’s smart card is not presented within a
period of time, the display shows time out. The customer
has to start over again for redemption process.
4.3. Entering/ Editing Member’s Info
When the Member first makes a confirmation of the selection of a reward item,
the iBonus Display prompts for inputting the administrator defined member
profile and the language preference.
Also, the member profile can be edited by touching the person icon at the
bottom of the first displayed page after presenting the member card
www.lucky-tech.com
26/31
Lucky Technology Ltd.
iBonus Prepaid System Manual
5. Prepaid Mode Operation
5.1. Checking Balance
By presenting Member smart card to the iBonus Display, the current prepaid
stored value and the accumulated spending are displayed.
5.2. Selecting Shopping Items
After checking the stored value balance, member can see
the shopping items displayed in the next screen. Member
can start selecting the shopping items by touching the
shopping cart.
Member can view more selections by touching the right
arrow button or can view the preceding selections by
touching the left arrow button.
If the customer card is a Classic Card, they can make
multiple selections of the shopping items.
To do so:
Touch the star button.
Touch the basket button to select the item. Touch
the right arrow key to view more selection.
Touch the basket button to make selection again.
When finishing the selection, touch the check
button to check out.
www.lucky-tech.com
27/31
Lucky Technology Ltd.
iBonus Prepaid System Manual
The display will prompt you to confirm the selection by
presenting customer's smart card.
After the customer's smart card is presented, the display
will show confirmation. At this stage, the selection is written
on the smart card and the prepaid stored value is not
deducted yet. The customer can make a new selection
whenever they change their mind. The old selection is
overridden.
The customer can now bring the smart card to an iBonus
Terminal (in prepaid mode) to perform the transaction of
purchasing.
If the customer’s smart card is not presented within a
period of time, the display shows time out. The customer
has to start over again for the shopping progress.
5.3. Entering/ Editing Member’s Info
When the Member first makes a confirmation of the selection of a shopping
item, the iBonus Display prompts for inputting the administrator defined
member profile and the language preference.
Also, the member profile can be edited by touching the person icon at the
bottom of the first displayed page after presenting the member card
www.lucky-tech.com
28/31
Lucky Technology Ltd.
iBonus Prepaid System Manual
6. Advanced Features
6.1. Multi-lingual Support
iBonus Display supports multi-lingual in two areas.
1. Language to be shown on LCD for customers
2.
Language to be shown on Webpage and LCD control panel for
administrator.
A new language can be easily created in the webpage of iBonus Display. All
the language settings can be replicated thru master/ slave synchronization.
6.1.1. Choosing Languages
iBonus Display supports up to four languages to be displayed on the LCD
display for customers. Customers can choose their language preference after
they have presented their member’s card.
The language preference is recorded in member card in the following format:
0 – default language
1 – alternative language 1
2 – alternative language 2
3 – alternative language 3
Changing the order of the four languages, the member may not see the correct
language in the display.
To change languages:
Click “Languages” in the menu.
Underneath “The four languages selectable to members”, choose default
language and alternative languages. Default language is displayed when
the customer has not yet chosen their language preferences.
Underneath Language for administration, choose the language for
administrator.
Click “Save”.
6.1.2. Adding New Languages
To add a new language, which does not exist in iBonus Display:
www.lucky-tech.com
29/31
Lucky Technology Ltd.
iBonus Prepaid System Manual
Click “Languages” in the menu.
Underneath “Add new language”, choose the one you want to add
language for.
Click “Add”. A translation table will be displayed. It may take seconds to be
generated.
Enter all translation and click “Save”.
6.1.3. Editing Existing Languages
Click “Languages” in the menu.
Underneath “All languages for members” or “All language for
administration”, click “Edit” on the language you want to edit. A translation
table will be displayed. It may take seconds to be generated.
Enter all translation and click “Save”.
6.1.4. Uploading/ Downloading Language Files
Each set of translation of a language is saved in a language files. You can
replicate the translation to other iBonus Display or backup/restore the
translation file by downloading and restoring the translation file.
To download the translation file:
Click “Languages” in the menu.
Underneath “All languages for members” or “All language for
administration”, click “Download” on the language you want to download.
Save the language file.
To upload the translation file:
Click “Languages” in the menu.
Underneath “Upload Language File”, choose the language file download
before in the file selection box. Click browse to help locate the file.
Choose whether the file is to be applied on the “user interface for member”
or “user interface for administration”.
Click “upload”.
6.1.5. Resetting Language Default
To reset the language setting to factory default:
Click “Languages” in the menu.
www.lucky-tech.com
30/31
Lucky Technology Ltd.
iBonus Prepaid System Manual
Underneath “Reset locale setting default”, choose the area which you
want to reset.
Click “Reset”.
6.2. Backup / Restore
You can backup all the settings e.g. language, reward scheme and
advertisements by using the backup function.
To backup all the settings:
Click “Backup” in the menu.
Click the “Backup” button.
Save the backup file.
To restore the settings:
Click “Backup” in the menu.
Choose the backup file in the file selection box.
Click “Send”.
During restoration, the version of the backup file has to be the same as the
backup file.
6.3. Uploading Firmware Patch
To upgrade the system by patching:
Please make sure you have about 10MB in the flash memory before
patching.
Click “Sys Patch” in the menu.
In the file selection box, choose the patch file in your computer. Click the
browse button to help you to do so.
Click “Send”.
The patch file will be applied after rebooting. Do not turn off the power or
reset the system when it is in progress.
www.lucky-tech.com
31/31