1
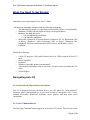
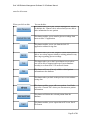
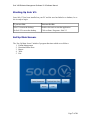
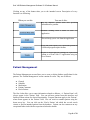
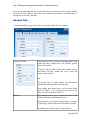
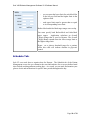
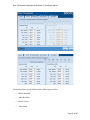
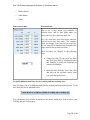
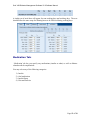
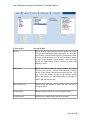
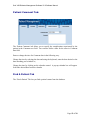
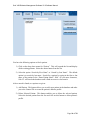
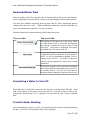
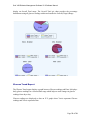
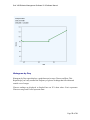
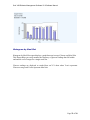
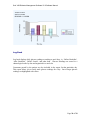
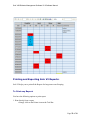
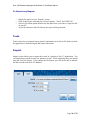
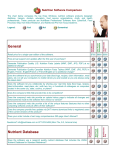
Solo V2® Diabetes Management Software V2.0 Software Manual Table of Contents PART 1: Before You Begin 1. 2. 3. 4. Welcome About This Manual What You Need to Get Started Navigating Solo V2 4.1.1. Keyboard and Mouse Pointer Conventions 4.1.2. Solo V2 Button Behaviors PART 2: Getting Started 1. 2. 3. 4. Installing Solo V2 on Your PC Uninstalling Solo V2 Starting Solo V2 Main Screen Set-Up 4.1.1. Patient Management 4.1.1.1. General Tab 4.1.1.2. Schedule Tab 4.1.1.3. Medications Tab 4.1.1.4. Patient Comment Tab 4.1.1.5. Find a Patient Tab 4.1.2. Download Meter Data 4.1.3. Reports 4.1.3.1. To view Program Reports you have options 4.1.3.2. Report Screen 4.1.3.3. Standard Day Report 4.1.3.4. Pie Chart Report 4.1.3.5. Glucose Trend Report 4.1.3.6. Histogram By Day 4.1.3.7. Histogram By Meal Slot 4.1.3.8. Log Book 4.1.3.9. Printing and Exporting Solo V2 Reports 4.1.3.10. To Print any Report 4.1.3.11. To Export any Report 4.1.4. Tools 4.1.4.1. Import 4.1.4.2. Export Page 2 of 28 Solo V2® Diabetes Management Software V2.0 Software Manual PART 1: Before You Begin WELCOME Solo V2 enables you to do the following: 1. Transfer glucose readings and other data from a meter to your PC (personal computer). 2. Calculate both glucose average and standard deviations. 3. Highlight a glucose reading when it is above or below the target range. 4. Customize dates, meal slots, target glucose ranges, etc. 5. Print reports for long term record keeping. About This Manual User manual is formatted in the style similar to the following: When you see this: You can do this: Part 1: Before you begin Get a brief introduction of Solo V2 before use Part 2: Getting started Install Solo V2 and start using it Part 3: Diabetes Management Transfer meter readings, manage data, and generate reports Part 4: Solo V2 Database Management Archive Part 5: Appendices Learn the Solo V2 menu, terminology, commands, tool bar, troubleshooting Page 3 of 28 Solo V2® Diabetes Management Software V2.0 Software Manual What You Need To Get Started Minimum system requirements for the Solo V2 DMS: A Windows®-compatible computer with the following components • 266 MHz Intel® Pentium 2 or equivalent (when possible, higher is recommended) • Minimum 128 MB of RAM (higher will help overall performance) • Minimum free hard disk space: • 100-200 MB during installation • 100 MB after installation • Microsoft® Windows® 98 Second Edition, Windows® NT 4.0 Workstation (SP6 or above), Windows® 2000 Professional (SP4 or above), Windows® Me, Windows® XP Home and Professional (SP2 or above), and Windows Vista™. • USB port Adapter Include the Following • • • • • • A Solo V2 Interface Cable (with Software driver for USB) (required for Solo V2 only), Mouse/Trackball Keyboard Windows-compatible printer (recommended) Video monitor and adapter with at least 800 x 600 pixel screen resolution and 256 colors CD-ROM drive Navigating Solo V2 4.1.1. Keyboard and Mouse Pointer Conventions Solo V2 is designed for users who know how to use a PC mouse for “point-and-click” operation. Mouse and keyboard are all you need for Solo V2 navigation. Solo V2 uses standard Microsoft® Windows® keyboard, mouse pointer, and drop down menu conventions. 4.1.2. Solo V2 Button Behavior The following Command buttons appear on several Solo V2 screens. Their actions are the Page 4 of 28 Solo V2® Diabetes Management Software V2.0 Software Manual same for all screens. When you click on this: You can do this: This button takes you to the “Patient Management” screen. By default, the „General‟ tab is selected and you are able to enter information for new patient This button enables you to transfer glucose readings from meter to Solo V2 application This button enables you to exit from the Solo V2 application without saving data This button takes you to the „Reports‟ screen where you are able to see various reports related to existing patients in any date range regarding glucose readings This button takes you to the Export/Import screen where you will be able to import/export one or more database record(s) to or from Solo V2 in an Excel format This button will save all newly added or edited patient information to the database This button takes you back to the previous screen without saving data This button enables you to add a new patient. It will take you to the “General Tab” where you can enter new patient information This button will delete the selected patient from the database This button enables you to export data to PC in an „Excel‟ file format Page 5 of 28 Solo V2® Diabetes Management Software V2.0 Software Manual This button enables you to import Excel formatted data from PC to Solo V2 Solo V2 Links There are many hyperlinks in the Solo V2 application; these links provide faster and easier ways to access various functions. Hyperlink is denoted by a recycled arrow followed by respective text. Hyperlink click takes you to the intended Solo V2 function. Some hyperlink examples are as follows: Add a Patient Find a patient Installing Solo V2 on your PC You can install Solo V2 from the CD-ROM, if your PC contains one. 1. To begin installation, insert the CD-ROM into your PC‟s CD-ROM drive and click on the .EXE file. 2. Select any of the following options from the Auto-run screen: Install Solo V2 for yourself Install Solo V2 for anyone who uses this computer 3. 4. 5. 6. Follow the instructions displayed on your PC screen. You must read and accept the license agreement before continuing. You may be asked to restart the computer during the installation. When the installation is complete, a „Solo V2‟ icon will be displayed on your PC desktop. Un-Installing Solo V2 from your PC 1. Click Start> Settings> Control Panel> Add/ Remove Programs. 2. Follow the Instructions on the screen until the program files are removed. Page 6 of 28 Solo V2® Diabetes Management Software V2.0 Software Manual Starting Up Solo V2: Once Solo V2 has been installed on your PC and the user has linked to a database, he or she is ready to begin. If you see this: You can do this: Solo V2 icon on the desktop Double click on it to start the application No Solo V2 icon on the desktop Click on Start> Programs> Solo V2 Set Up Main Screen: The “Set-Up Main Screen” includes 5 program functions which are as follows: 1. Patient Management 2. Download Meter Data 3. Report 4. Tools 5. Exit Page 7 of 28 Solo V2® Diabetes Management Software V2.0 Software Manual Clicking on any of the button takes you to the intended screen. Description of every function is as following: When you see this: You can do this: Set up diabetes profile data and personal information for patients Transfer reading from a meter to Solo V2 application This will help you to exit from the application View and print report(s) for a particular patient in 6 different program report formats Export or import glucose readings for a particular patient to or from Solo V2 application using an Excel format Patient Management The Patient Management screen allows you to create or delete diabetes profile data for the patients. The „Patient Management‟ screen contains five tabs. They are as follows: General Schedule Medication Patient Comment Find a Patient The first 4 tabs allow you to enter information related to diabetes. A „Patient Name‟ will always appear in the „Patient‟ field. You can add new patient from this interface and further perform actions for desired functionality. Program functions apply to the „Patient‟, whose name appears in the „Patient‟ field. You can switch to another patient using the down arrow key. You can click on the „Find a Patient‟ tab which has several search criteria to find an intended patient from the database. Patient can also comment on any exceptional behavior he/she has experienced related to health. Page 8 of 28 Solo V2® Diabetes Management Software V2.0 Software Manual If you are downloading data for a new patient then you must set up new patient‟s profile. Click on the „Add a Patient‟ tab to add a new patient to the database. The following is a description of each tab‟s function: General Tab: „General‟ tab allows you to enter and view personal profile data for a patient. Patient entry field Patient profile can be created by entering patient‟s first name, last name, middle name, date of birth, gender, doctor information To specify date of birth, click on the calendar control and choose the date, month, and year to enter the patient‟s date of birth. OR To specify date of birth, modify the information directly from the keyboard in the date field From gender drop down menu, you can select either male or female. You can specify the name of the doctor in the field marked “Doctor:” Diabetes This interface allows you to specify the name of the Diabetes Educator and Insurance Carrier Target Ranges: set a glucose target range for a patient by specifying „Before-Meal‟ and „After-Meal‟ periods Guidelines for entering Glucose Target Ranges: Page 9 of 28 Solo V2® Diabetes Management Software V2.0 Software Manual - you can enter the lower limit for each Meal Slot in the left text field and the higher limit in the right text field - each upper limit must be greater than or equal to its corresponding lower limit Before-Meal and After-Meal target ranges can overlap You must specify both Before-Meal and After-Meal target ranges. Application calculates an Overall (Target) Range that is used in Reports. The Overall (Target) Range extends from the lowest range limit to the highest range limit Hyper: set a glucose threshold target for a patient; below this value will indicate disorder in glycemic control Schedule Tab: Solo V2 uses meal slots to organize data for Reports. The Schedule tab of the Patient Management screen lets you customize the start and end time for seven pre-defined meal slots for both working and non-working days. As a result, you can track and monitor your glucose levels and medications for specific time periods throughout the day. Page 10 of 28 Solo V2® Diabetes Management Software V2.0 Software Manual Start and end times can be defined for the following meal slots: Before-Breakfast After-Breakfast Before-Lunch After-Lunch Page 11 of 28 Solo V2® Diabetes Management Software V2.0 Software Manual Before-Dinner After-Dinner Night When you see this: You can do this: Set the meal slot time: check or review the meal slots to see if they match your schedule. It includes „from‟ and „to‟ date fields where you can set the time for a particular meal slot For every meal slot, start time begins when the previous meal slot's time ends. For example, when you change „from’ time for any meal slot, the „to‟ time will be automatically changed to the same value for the previous meal slot Meal slot times are changed in the following ways: Change the time for any meal slot from the „from‟ date field by selecting the time and changing it (using the keyboard) to match your schedule Select the time from the „from‟ date field and click on the up/down arrows until you reach the desired time To specify different meal slots for the working and non-working days: Solo V2 allows you to set different meal slots for working and non-working hours. To do this, check the box as indicated below. You will then be given a menu in which you can choose which days of the week are your working and non-working days. Page 12 of 28 Solo V2® Diabetes Management Software V2.0 Software Manual A similar set of meal slots will appear for non-working days and working days. The user should follow the same steps for allotting hours to be followed during working days. Medication Tab: „Medication‟ tab lets you specify any medications (insulin or other) as well as diabetes related medical complications. You may select any of the following categories: 1) 2) 3) 4) Insulin Oral medication Insulin Pump Diet and Exercise Page 13 of 28 Solo V2® Diabetes Management Software V2.0 Software Manual If you see this: Insulin You can do this: Specify Insulin Types from the list that appears on screen. Check each of the Insulin Types that apply. You may also specify three custom Insulin Types by selecting any of the Custom selections below the list and create new names for any of the default Custom names. You may also specify one other Insulin Type by clicking on „other‟ and entering a name Oral Meds Specify Oral Meds from the list that appears on screen. You may also specify 3 custom medications by clicking on any of the custom selection boxes below the list. You may create new names for any of the default custom names and specify one other medication by clicking on „other‟ and entering the data Diet and Exercise Indicates that the patient is using diet and exercise to manage diabetes Insulin Pump Indicates that the patient is using an Insulin Pump Complications Indicates any complications patient experiences Page 14 of 28 Solo V2® Diabetes Management Software V2.0 Software Manual Patient Comment Tab: The „Patient Comment‟ tab allows you to specify the complications experienced by the patient in the Comment text field. You can also define a date for the same in Comment date field. Enter or change the time for Comment date in the following way: Change the time by selecting the date and using the keyboard, enter the date desired or the date matching your schedule or, Change the time by clicking on the calendar control. A pop-up calendar box will appear. Select the desired date from the calendar. Find A Patient Tab The “Find a Patient” Tab lets you find a patient‟s name from the database. Page 15 of 28 Solo V2® Diabetes Management Software V2.0 Software Manual You have the following options to find a patient: 1) Click on the drop down menu for “Patient.” This will expand the list and display all the existing patients. Select the desired name from the list. 2) Select the option “Search by First Name” or “Search by Last Name”. The default option is to search by last name. Search for a patient by typing in the first or last name of the patient in the “Enter Patient Name” field. As you enter characters, Solo V2 will search the database until it finds an exact or close match. After a match is found, two options are given: 1) Add Patient: This button allows you to add a new patient in the database and takes you to the General Tab to create the patient‟s diabetes profile. 2) Delete Selected Patient: This button enables you to delete the selected patient. Select the desired patient from the list and click on this button to delete patient‟s profile. Page 16 of 28 Solo V2® Diabetes Management Software V2.0 Software Manual Download Meter Data Glucose readings, Date/Time tags and units are transferred from the meter to the database. Once readings have been transferred, you may erase the readings from the meter memory. You must first establish connection between meter and PC before transferring glucose readings from the device to PC. While establishing connection, remember that only one meter can communicate with Solo V2 at any given time. Download meter data section includes the following sub sections: If you see this: You can do this: This button will navigate you to the screen which is visible before meter is connected and displays the message “Connect the meter to your PC and click next”. Once meter is connected, this option is disabled and will connect to the PC This option navigates to the screen which displays all data that has been transferred from the meter to the PC as well as instructions regarding “How to connect meter with PC”. It provides an option to select the desired patient for whom data is being transferred This option navigates to the screen which displays all the data transferred and saved from meter to PC in a tabular format. You can view the report of transferred meter readings for patient in this screen Connecting a Meter to Your PC When the meter is turned off, connect the PC and meter with the mini USB cable. Hold both of the buttons on the meter at the same time for 5 seconds in order to activate the transmission function until “PC” is displayed on meter and you hear “ready to transmit data.” Transfer Meter Reading After connecting the meter to your PC, press the key from the meter to begin transmitting the data. All of the selected patient‟s data will be displayed. Page 17 of 28 Solo V2® Diabetes Management Software V2.0 Software Manual Reports SoloV2 lets you view and analyze glucose readings over different periods of time. You have the option to choose from 6 different Report formats. Each one presents glucose readings in a different way. To view Program Reports you have following options: ■ Click on the “Reports” button from the Home screen. This will take you to the “Reports” main screen where a drop down list (Report) is available which includes 6 types of report format. Select any of the report formats to display the desired report. ■After displaying the current Report, you can change the Date Range for the same Report or you can choose to view another report for the same inputs. The following are the different ways to specify the Date Ranges for the reports: 1) Date Range: This enables you to select one of the pre-defined „Date Ranges‟ from the drop-down menu. Date Ranges vary from Latest 7 days, Latest 14 days…Latest 90 days. 2) From...To: To customize the Date Range, modify the dates in the „from‟ and „to‟ boxes. A calendar box will appear where you can modify dates. 3) To change the Report, click on the Report field drop down menu which will expand the Page 18 of 28 Solo V2® Diabetes Management Software V2.0 Software Manual list of all the reports and you can select a new Report format. You must click on “Apply” before the new Report will appear. Note that some Reports may be larger than the current SoloV2 screen. Use the scroll bar on the right to scroll down to the bottom part of the Report if necessary. To enlarge your screen for enhanced viewing, click the “Zoom” drop down menu from the top right corner of the Solo V2 screen. Report Screen: Standard Day Report The Standard Day Report displays average glucose readings for a 24 hour period of time which helps you identify patterns in glucose readings by time of day. Glucose readings are displayed as dots on X-Y graph where Y-axis represents Glucose readings and X-axis represents time of day. Page 19 of 28 Solo V2® Diabetes Management Software V2.0 Software Manual Pie Chart Report Pie Chart Report displays the percentage of glucose readings that fall above, below, and within each „Before-Meal‟ and „After-Meal‟ target range. This Report helps you compare the glucose readings with target ranges for each Meal Slot. ■ Eight different pie charts will appear in the Report. These represent the Before-Meal and After-Meal breakdowns for each Meal Slot, one for Night and one for Overall Target Range. ■ Pie charts for each Before-Meal and After-Meal pair will appear side by side. This helps you scan for trends within a particular Meal Slot. ■ Chart pairings are also stacked vertically so you can compare the percentages of BeforeMeal and After-Meal across all Meal Slots. ■ The Pie Chart Report uses the applicable ranges for Before-Meal and After-Meal to Page 20 of 28 Solo V2® Diabetes Management Software V2.0 Software Manual display an Overall Total range. The Overall Total pie chart provides the percentage breakdowns using all glucose readings within and outside the Overall (Target) Range. Glucose Trend Report The Glucose Trend report displays a graph between Glucose readings and Date. It displays daily glucose readings for a selected date range which helps to track changes in glucose readings from day to day. Glucose readings are displayed as dots on X-Y graph where Y-axis represents Glucose readings and X-axis represents Date. Page 21 of 28 Solo V2® Diabetes Management Software V2.0 Software Manual Histogram by Day Histogram by Day report displays a graph between Average Glucose and Date. This Report helps you easily monitor the frequency of glucose readings that fall within and outside a set of ranges. Glucose readings are displayed as Stacked bars on X-Y chart where Y-axis represents Glucose average and X-axis represents Date. Page 22 of 28 Solo V2® Diabetes Management Software V2.0 Software Manual Histogram by Meal Slot Histogram by Meal Slot report displays a graph between Average Glucose and Meal Slot. This Report helps you easily monitor the frequency of glucose readings that fall within and outside a set of ranges for a single meal slot. Glucose readings are displayed as stacked bars on X-Y chart where Y-axis represents Glucose average and X-axis represents Meal slot. Page 23 of 28 Solo V2® Diabetes Management Software V2.0 Software Manual Log Book Log book displays daily glucose readings according to meal slots, i.e. „Before Breakfast‟, „After Breakfast‟, „Before Lunch‟, and other data. Glucose Readings are sorted in a chronological order by date and organized in a meal slot. Comments posted by the patient are also included in the report for that particular day. This report allows you to easily track glucose readings for a day. Out of target glucose readings are highlighted with colors. Page 24 of 28 Solo V2® Diabetes Management Software V2.0 Software Manual Printing and Exporting Solo V2 Reports: Solo V2 helps you to print all the Reports for long-term record keeping. To Print any Report: You have the following options to print report: 1. Print directly from a report • Simply click on the Printer icon on the Tool Bar. Page 25 of 28 Solo V2® Diabetes Management Software V2.0 Software Manual To Export any Report: • • • • Display the report on your “Reports” screen. Click on the Export Icon and you will get 2 options: “Excel” and “PDF File”. Select a file format option then browse the path where you want to export the file on your PC. As per the selection of the file format, the report will be generated. Tools Tools section lets you import/export patient‟s information in an Excel file format to/from the application. It includes import and export subsections: Import Import section allows you to import the record of a patient to Solo V2 application. You can import data records for only one patient at a time. While importing data, you should keep the Excel file format. If you change the file format, you will not be able to transfer the data records to the Solo V2 database. Page 26 of 28 Solo V2® Diabetes Management Software V2.0 Software Manual When you see this: From File You can do this: Specify the path of the file from where you want to import the record of a patient to Solo V2 application. You may also use the Browse function to help locate a file From and To Specify the date range for the data records you wish to restore. You may modify the dates in the field by entering the desired date Or You can click on the calendar control. The pop-up calendar box will appear from where you can select the day, month, and year Select Patient Specify the name of the Patient whose data records you would like to Import. You can import records for only one patient at a time Clicking on this drop down list will expand, showing the list of all patient names saved in the application. Select the desired patient name from the list Import (button) Allows you to import the data to the Solo V2 application Cancel(button) This allows you to close the current screen and takes you to the main window Export The Export section lets you export records for one or more patients from the Solo V2 database. Records are exported in an Excel format on your PC. You can export data for one patient at a time. Page 27 of 28 Solo V2® Diabetes Management Software V2.0 Software Manual When you see this: When you see this: To File You can do this: Specify the path of the file where you want to export the data. You may also use the Browse function to locate a file Select Patient Specify the name of the patient whose data you wish to export. Clicking on the drop down list will expand the list of existing patients. Select the desired patient‟s name from the list From and To Specify the date range for the data records you want to archive. The „from‟ and „to‟ dates are required date fields. You may modify the dates in the field by entering the desired date or by clicking on the calendar control. The pop-up calendar box will appear and you can change the day, month, and year Export (button) Export button lets you export data to a specified location in your system for the selected patient Cancel (button) This button will close the current screen and takes you to the main window Page 28 of 28