1
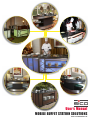
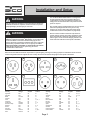
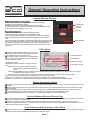
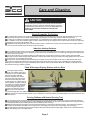
User’s Manual
MOBILE BUFFET STATION SOLUTIONS
SICO Part #282562 Rev. B
Introduction
Thank you for purchasing your new SICO® Mobile Buffet Station. We appreciate your business and rest assured, you can feel confident that
you have made the right purchase decision. It is our pleasure to provide you with a product that will perform to your every expectation and
embodies the high quality standards and service that SICO® is known for around the globe.
Your satisfaction is our #1 priority at SICO®. For over 60 years, SICO® has been a leading, worldwide manufacturer of mobile folding products
to help facilities maximize the efficient use of their space. From our renowned portable dance floors to our full line of mobile folding tables
and easy to use mobile folding stages, we offer a host of innovative products that offer the same ingenuity and quality that so many of our
customers have come to expect from SICO®.
Should service become necessary, your SICO® Mobile Buffet Station is backed by one of the finest warranties in the industry. Please take a
moment to review the warranty information on page 21.
This owner’s manual will answer most of questions concerning the features, operation and care of your new SICO® Mobile Buffet Station. If
you find you have a question not addressed here, please do not hesitate to contact SICO® Customer Care. Details see page 23-25.
Once again, from the entire staff at SICO®, we thank you for choosing our products and look forward to serving you again in the future.
TABLE OF CONTENTS:
Safety Information.......................................................2
Installation and Setup............................................3 - 5
Operating Instructions...........................................6 - 7
Care and Cleaning.......................................................8
Troubleshooting Guide...............................................9
Warranty & Service ...................................................10
Worldwide Customer Care.................................11 - 12
Page 1
Safety and Precautions
As you read the information provided in this manual, please pay
particular attention to the CAUTION and WARNING symbols as
they appear. This information is very important to all users for
CAUTION
WARNING
the safe and efficient operation of SICO Buffet products.
In addition, throughout this manual you may find
that signals
an IMPORTANT NOTE, which highlights information that should
be noted.
Designates a situation where
injury or product damage may
occur if instructions are not
followed.
WARNING
Dependent on the features of each unit, proper electrical
service MUST be supplied to each SICO® Buffet Station in
accordance with local codes. Installation and service should
be performed by a qualified installer or service agency. ALL
UNITS MUST BE PROPERLY GROUNDED TO AVOID INJURY
OR LOSS OF LIFE. DO NOT attempt to alter or replace any part
unless recommended in this manual.
Designates a HAZARD that
may result in a serious injury
or death if precautions are not
followed.
WARNING
For your safety, the information in the manual must be followed to
minimize the risk of fire, explosion, electrical shock or to prevent
property damage, personal injury or loss of life.
CAUTION
Use this appliance only for its intended use as described in
Persons with a pacemaker or similar medical device should exercise
this manual.
caution when using or standing in close proximity with an induction
Before performing any cleaning or service, disconnect all
cooking/warming unit while it is in operation. Electromagnetic fields
supplied power to the unit.
generated by such devices may affect the function of the pacemaker
For units provided with induction cooking and/or warming
or similar medical device. It is advisable to consult a doctor or the
appliances, fully familiarize yourself with the operation of
manufacturer of the medical device in such cases.
induction units as described in the provided manuals.
Use proper pan sizes. The detection sensors will not allow the
affected cooking element to function without a pan present. Use cookware that is flat bottomed and fully covers the cooking surface for best
results.
To avoid the risk of burns, use caution when using metal utensils. If left in close proximity to the induction unit, these utensils may
become hot.
Keep unopened canned goods a safe distance away from the induction surface, they may become heated causing internal pressure which
may burst, causing injury.
Do not store flammable liquids on or near this or any other heating appliance.
Never leave prepared food on the cooking elements unattended.
Protective liners. Do not use aluminum foil on or near the cooking/warming surface. Aluminum foil may be used after the cooking process
is complete. Any other use of aluminum foil may result in electrical shock, fire or short circuit.
Avoid placing objects near the keypad controls in order to avoid accidental activation or adjustment of the control settings.
Always keep towels, cloths and/or pot holders a safe distance from the heating surface. Avoid wearing loose fitting or hanging garments
while operating. Flammable materials could be ignited causing severe burns.
Use only dry pot holders. Moist or damp pot holders transfer heat quickly and may cause burns from steam.
Do not use water to extinguish grease fires. Turn controls off if possible and smother the flaming pan by covering it with a well fitting lid,
baking sheet or flat metal tray. Flaming spills outside the pan can be put out with a multipurpose dry chemical or foam type fire extinguisher.
NEVER attempt to move a flaming pan.
Do not touch glass surface elements while cooking or warm holding. Surfaces may be hot enough to burn even though they appear dark
in color.
Deep fat frying is not recommended unless proper ventilation and proper safety precautions can be provided.
Maintaining a clean cooking surface will prevent accumulation of grease or other spills which may ignite. Spilled foods may also cause
accidental activation or deactivation of the control pad surface. It is especially important to always keep this area clean and clear of spills.
See the cleaning guidelines listed in this manual for more information.
Choose cookware with easily grasped handles. Always turn pan handles inward to avoid accidental spills. Handles should not extend
over adjacent work areas or other heating surfaces.
Never use the heating surface as a cutting board.
DO NOT operate the induction unit if the glass heating surface is cracked or broken. Spillovers and/or cleaning solutions may penetrate a
broken surface creating a significant risk of electrical shock. Remove from service and contact a qualified service technician immediately
should your heating surface become cracked or broken.
To avoid possible damage to the heating surface, it is recommended that you avoid cleaning the surface unitl it has cooled. The exception
to this is food spills with high sugar content such as jams, jellies or fudge or any melted plastics which can cause permanent damage to the
heating surface if not immediately removed. See the cleaning guidelines section in this manual for more information.
Page 2
Installation and Setup
The new SICO® Mobile Buffet Stations are designed for
minimal setup time and ease of operation. Many unit
configurations arrive fully assembled and ready for use,
simply roll to the intended location and provide electrical
power as required.
WARNING
For your safety, the information in the manual must be followed to
minimize the risk of fire, explosion, electrical shock or to prevent
property damage, personal injury or loss of life.
Any unit that requires assembly before use will have specific
instructions packaged with the unit. If you have any
questions or concerns during this initial setup, please
contact SICO® Customer Care (details see page 23-25).
WARNING
Each unit will have different electrical requirements to
operate lighting, warming and cooking equipment. Listed
below are the baseline electrical requirements for each
station. Again, see the electrical rating tag located on the
inside wall of the cabinet for more specific information.
Depending on the features of each unit, proper electrical service
MUST be supplied to each SICO® Buffet Station in accordance with
local codes. Refer to each units individual rating tag for more
specific electrical requirements. Installation and service should be
performed by a qualified installer or service agency. ALL UNITS
MUST BE PROPERLY GROUNDED TO AVOID INJURY OR LOSS OF
LIFE. DO NOT attempt to alter or replace any part unless
recommended in this manual.
Each unit will have different electrical requirements to operate lighting, warming and cooking equipment. Listed below are the electrical
socket confirgurations that are supplied for each country. See each units electrical rating tag for more specific information:
A
B
C
D
E
F
G
H
J
K
Country
Voltage
Freq/Hz
Pattern
Country
Voltage
Freq/Hz
Pattern
Argentina
Australia
Brazil
Canada
Chile
Colombia
Costa Rica
Dominican Rep.
England
France
Germany
Guatemala
Haiti
220
230
127-220
120
220
120
120/240
120/240
230
230
230
110/220
110/220
50
50
60
60
50
60
60
60
50
50
50
60
60
B
B
D
A
G, H, J
A
A, F
A
E, F
H
H, J
A, B, F
A
Italy
Jamaica
Japan
Mexico
New Zealand
Norway
Panama
Spain
Switzerland
Sweden
United Kingdom
United States
230
110
100
127
230
230
120/240
230
230
230
230
120/240
50
50
50/60
60
50
50
60
50
50
50
50
60
G, H, J
A, E, F
A
A
B
H, J
A
E, H, J
D
H, J
E, F
A, C, K
Page 3
Installation and Setup
Induction Warming Station (DECO & Ovation)
120VAC Load Rating:
Induction Warming units : 3.3A each
LED lighting: 0.2 A
Total Load: 10.1A @ 120VAC
240VAC Load Rating:
Induction Warming units : 1.7A each
LED lighting: 0.2 A
Total Load: 5.3A @ 240VAC
Induction Warming & Hotplate Station (DECO)
240VAC Load Rating:
Induction Warming units : 1.7A each
Hot Plate Unit: 1.8A
LED lighting: 0.2 A
Heat lamp Lighting: 2.0A (250w Bulbs)
Total Load: 7.4A @ 240VAC
120VAC Load Rating:
Induction Warming units : 3.3A each
Hot Plate Unit: 3.5A
LED lighting: 0.2 A
Heat lamp Lighting: 4.2A (250w Bulbs)
Total Load: 14.5A @ 120VAC
Hotplate Warming Station (DECO & Ovation)
120VAC Load Rating:
Hotplate unit: 10.2A
LED lighting: 0.2 A
Heat lamp Lighting: 6.3A (250w Bulbs)
Total Load: 16.7A @ 120VAC
240VAC Load Rating:
Hotplate unit: 5.3A
LED lighting: 0.2 A
Heat lamp Lighting: 3.2A (250w Bulbs)
Total Load: 8.7A @ 240VAC
Cooking Station (DECO & Ovation)
120VAC Load Rating:
Induction Cooking units: 15A each
LED lighting: 0.2 A
Total Load: 30.2A @ 120VAC
Note: Two dedicated circuits are required to operate this unit
240VAC Load Rating:
Induction Cooking units: 7.8A each
LED lighting: 0.2 A
Total Load: 15.8A @ 240VAC
Carving and Induction Warming Station (DECO & Ovation)
120VAC Load Rating:
Induction Warming units : 3.3A each
Carving Tray Heater: 5A
LED lighting: 0.2 A
Heat lamp Lighting: 4.2A (250w Bulbs)
Total Load: 16.0A @ 120VAC
240VAC Load Rating:
Induction Warming units : 1.7A each
Carving Tray Heater: 2.6A
LED lighting: 0.2 A
Heat lamp Lighting: 2.2A (250w Bulbs)
Total Load: 8.4A @ 240VAC
Multi-Purpose Station (DECO & Ovation)
120VAC Load Rating:
LED lighting: 0.2 A
Accessory Outlets: 15A (Total Max Load)
Total Load: 16A @ 120VAC (Maximum)
240VAC Load Rating:
LED lighting: 0.2 A
Accessory Outlets: 15A (Total Max Load)
Total Load: 16A @ 240VAC (Maximum)
Food & Beverage Display Station (DECO & Ovation)
120VAC Load Rating:
Display Lighting: 1A
LED lighting: 0.2A
Total Load: 1.2A @ 120VAC Nominal
240VAC Load Rating:
Display Lighting: 0.5A
LED lighting: 0.2A
Total Load: 0.7A @ 240VAC Nominal
Bar Station (DECO)
120VAC Load Rating:
LED lighting: 0.2A
Total Load: 0.2A @ 120VAC Nominal
240VAC Load Rating:
LED lighting: 0.2A
Total Load: 0.2A @ 240VAC Nominal
Page 4
Installation and Setup
Trapezoid Side Station
240VAC Load Rating:
LED lighting: 0.2A
Total Load: 0.2A @ 240VAC Nominal
120VAC Load Rating:
LED lighting: 0.2A
Total Load: 0.2A @ 120VAC Nominal
Trapezoid Side Station with Ice Bin
120VAC Load Rating:
LED lighting: 0.2A
Total Load: 0.2A @ 120VAC Nominal
240VAC Load Rating:
LED lighting: 0.2A
Total Load: 0.2A @ 240VAC Nominal
Sophisticate Plus - 1 Cooking Unit
240VAC Load Rating:
Induction Cooking: 7.5A
Total Load: 7.5A @ 240VAC Nominal
120VAC Load Rating:
Induction Cooking: 15A
Total Load: 15A @ 120VAC Nominal
Sophisticate Plus - 2 Cooking Units
240VAC Load Rating:
Induction Cooking: 7.5A
Total Load: 15A @ 240VAC Nominal
120VAC Load Rating:
Induction Cooking: 15A
Total Load: 30A @ 120VAC Nominal
Sophisticate Plus - 1 Warming Unit
240VAC Load Rating:
Induction Warming: 1.7A
Total Load: 1.7A @ 240VAC Nominal
120VAC Load Rating:
Induction Warming: 3.3A
Total Load: 3.3A @ 120VAC Nominal
Sophisticate Plus - 2 Warming Units
240VAC Load Rating:
Induction Warming: 1.7A
Total Load: 3.3A @ 240VAC Nominal
120VAC Load Rating:
Induction Warming: 3.3A
Total Load: 6.6A @ 120VAC Nominal
Sophisticate Plus - 3 Warming Units
240VAC Load Rating:
Induction Warming: 1.7A
Total Load: 5.0A @ 240VAC Nominal
120VAC Load Rating:
Induction Warming: 3.3A
Total Load: 9.9 @ 120VAC Nominal
Sophisticate Plus - 1 Warming Unit and 1 Cooking Unit
120VAC Load Rating:
Induction Cooking: 15A
Induction Warming: 3.3A
Total Load: 18.3A @ 120VAC Nominal
240VAC Load Rating:
Induction Cooking: 7.5A
Induction Warming: 1.7A
Total Load: 9.2A @ 240VAC Nominal
Page 5
General Operating Instructions
WARNING
For your safety, the information in the manual must be followed to minimize the risk of fire, explosion, electrical shock or to prevent
property damage, personal injury or loss of life.
Induction Cooking and Chafing Surfaces
Induction Unit Features and Functions:
1) Induction Zone: This area indicates the central location of
the induction zone where cookware should be placed.
2) Temperature Controls: Used to adjust cooking and
warming temperature settings.
3) Display: Indicates temperature setting, cookware sensing
and numerical error codes. If the cooking vessel is
undersized, unsuitable or missing, a blinking “U” will be
shown. See the Troubleshooting section of this manual for a
description of error codes.
4) Power Indicator: A small red indicator will show that the
unit is receiving power and is ready to be used.
5) Power Button: Initiates Cooking/Warming function. The
unit will indicate a “zero” at startup giving the indication that
the unit is ready for temperature adjustment.
1) Induction Zone
2) Temperature Controls
3) Display
4) Power Indicator
5) Power Button
Induction Chafing (Warming) Surfaces
Induction Cooking Surfaces
Carefully review the Safety and Precautions section of this
manual for important notes regarding the care and use of
induction cooking and chafing units.
Use only induction certified chafing dishes. Certain grades of
stainless steel used to manufacture chafing dishes are non-magnetic and unsuitable for use with induction heating technology.
In general, use vessels made from 400
series stainless steel.
It is recommended that chafing dishes should be filled with
hot water. This will decrease the time it will take the chafing dish
to reach safe food holding temperature.
The results of temperature settings may vary due to the
differences in materials and the preparation environment. The
following will serve as a general guideline:
Carefully review the Safety and Precautions section of this manual for
important notes regarding the care and use of induction cooking and chafing units.
Use only induction certified cookware. Cookware must be constructed
of ferrous (magnetic) metals to be used with induction cooking and warming. Glass, Ceramic, Aluminum, Bronze, Copper and even certain grades
of stainless steel used to manufacture cookware are non-magnetic and
unsuitable for use with induction heating technology. When choosing
cookware, a simple test to determine whether a cooking vessel is suitable
is to place a magnet to its surface. Typically, use cookware made from 400
series stainless steel, cast iron or certified enamelware.
The results of temperature settings may vary due to the differences in
materials and the preparation environment. The following will serve as a
general guideline:
1 - 95°F / 35°C
2 - 104°F / 40°C
3 - 122°F / 50°C
4 - 140°F / 60°C
1 - 95°F / 35°C
2 - 125°F / 52°C
3 - 175°F / 79°C
4 - 250°F / 121°C
5 - 158°F / 70°C
6 - 176°F / 80°C
7 - 194°F / 90°C
5 - 300°F / 148°C
6 - 350°F / 177°C
7 - 400°F / 204°C
8 - 450°F / 232°C
CAUTION
The drainage system is continuous . It is very important for
operators to be mindful of the liquid levels in the holding tanks. To
prevent overflow, they should be emptied as often as possible,
especially in cases where the display station has been in
continuous use for a long period of time and additional ice has been
added to maintain the display.
Page 6
General Operating Instructions
Hotplate Warming Surfaces
1) Temperature Controls: Used to adjust warming temperature settings.
2) Display: Indicates temperature setting.
3) Set Key: Used to enter a setpoint temperature value into memory.
4) Power Button: Provides power to the warming plate. The indicator light in this
switch will glow red indicating the unit is in use.
1) Temperature
Controls
2) Display
3) Set Key
1) Press the key once to view the setpoint temperature value.
2) Press the key again to display the current temperature value.
3) Press the up or down temperature control keys to select the desired setpoint
value. Pressing and holding either of the keys will rapidly advance the setpoint
value.
4) Press the set key to complete the programming sequence and enter the value into
memory. The display will go blank for approx. 2 seconds to acknowledge the end of
the programming sequence and acceptance of the setpoint temperature value.
5) The unit will now automatically heat to the setpoint value each time the unit is
powered on.
4) Power Button
LED Lighting
Carefully review the Safety and Precautions section of
this manual for important notes regarding the care and use
of the LED lighting components and controls.
An indicator strip is provided next to the LED operating
console. This will give the user the ability to preview LED
settings as they are changed.
1) PT (Mode Control)
2) Pause Button
3) Brightness Control
Operating Instructions:
1) PT Button: Press the PT button to change the desired
4) Cycle Speed Control
mode.
Mode 1: Seven color gradual change. This setting
changes gradually between the seven main
colors.
Mode 2: Leaning gradual change. This setting changes gradually between the seven available colors with gradient color changes
providing an infinite number of colors.
Mode 3: Seven color change. Each time you press the PT button, it will select one of the seven main colors individually.
2) Pause: Press the Pause button to pause the LED sequence at its current color setting.
3) Brightness +/- : Changes the brightness of the entire LED circuit. Default setting is at the brightest setting.
4) Speed +/- : Changes the cycle speed at which the LED lighting changes colors. Default setting is at the fastest speed.
Display & Heatlamp Lighting
All lighting is controlled at the power center located in the lower cabinet. Simply turn on the power strip to provide power to the unit and
all lighting.
If bulbs need replacement during use, unplug the powercord that provides power to the light fixtures and allow ample time for cooling
before replacement.
Use only properly rated replacement bulbs. For heatlamp applications, standard 250 watt infrared heatlamps are recommended. For
display lighting applications, any standard medium E-27 base bulb in your choice of color and wattage will suffice.
As in all food display/preparation environments, it is always recommended to use shatter resistant bulbs.
Carving Stations with Heated Carving Tray
The carving tray heating element is controlled at the power center located in the lower cabinet. Simply turn on the power strip to provide
power to the unit and the carving tray heater.
Remove the vented cap on the top surface of the carving tray and fill with hot water. The heating element will maintain the tray
temperature of approximately 200°F / 93°C automatically. For best results, make sure the carving tray always has sufficient water to accommodate uniform heating of the tray surface.
Food & Beverage Display Stations with Ice Bins
For best results, fill the ice display approximately 1/3 to half full. Proceed to make your arrangement of items in the display. If needed, add
additional ice to surround the displayed items if they require additional cooling.
Page 7
Care and Cleaning
CAUTION
For your safety, the information in the manual must be followed to
minimize the risk of fire, explosion, electrical shock or to prevent
property damage, personal injury or loss of life. DISCONNECT ALL
POWER TO UNIT BEFORE CLEANING PROCEDURES ARE
PERFORMED!
Quartz Composite Top Surface
As a natural stone product, your countertop is subject to damage from thermal shock if exposed to rapid temperature changes. Avoid
placing hot pans directly on the countertop surface. Always place hot pans on a trivet, rack or other suitable cooling surface.
To clean your countertop and protect its polished finish , we recommend you use a mild household cleaner, such as 409®, Fantastik®,
Lysol®, or Windex®. In the case of stubborn spills or stains, soak the area for up to 10 minutes with one of the above cleaners and vigorously
wipe away with a non scratch Scotch Brite® pad.
CAUTION: The following will harm your countertop surface: Drano®, Liquid Plumr®, common oven cleaners and floor strippers. DO NOT
use these or any other similarly harsh chemicals on your top surface.
Induction Heating Surfaces
It is recommended to thoroughly clean the glass surfaces prior to using the appliance for the first time. This will help protect the top and
make future cleaning easier. Use a good, high quality ceramic top cleaner and multi-purpose, non-scratching cleaning pad. Thoroughly clean
the entire surface of any residue.
The key to maintaining your cooktop surfaces is to clean after every use. For heavier, burned on residue, a single-edge razor blade
scraper may be used to remove tougher spills. Afterwards, continue with normal cleaning procedures with a high quality ceramic top cleaner
and multi-purpose, non-scratching cleaning pad.
In most cases, allow the heating surface to completely cool before cleaning. The exception to this rule are spills of foods with a high
sugar content or melted plastic which may cause permanent damage to the glass top. In these cases, immediately turn off the appliance.
Wearing an oven mitt and using a scraper, immediately remove as much of the spill as possible. Allow the cooktop to completely cool and
proceed with removing all remaining residue.
Food & Beverage Display Stations with Ice Bins
Thoroughly empty and wipe
clean the inner chamber of the glass
ice display. It is not recommended to
flush the ice display with large
amounts of water to clean as this
may cause drain obstruction and/or
back pressure that may force water
to leak into the inner cabinet causing
internal damage. The glass display is
very heavy. It is recommended that a
minimum of two people are utilized
to remove the glass display to access the inner cabinet for cleaning.
Remove the inner plastic liner
tray and thoroughly wipe clean. Make sure the inner liner tray is clean and dry before replacing.
Wipe clean the inner stainless steel chamber of any condensation or other spills. Before re-assembly make sure all drain orifices are clear
and unobstructed.
Carving Stations with Heated Carving Tray
The carving tray may be cleaned by hand without disconnecting it entirely from the unit. In most cases, it will be required to detach the
heating element from the carving tray allowing it to be completely removed from the unit for proper cleaning. Remove the heating element by
unscrewing the two M8 wingnuts holding the element to the bottom surface of the tray.
Empty all water from the carving tray. The tray may be hand washed or run through a commercial washer. The cutting/carving board is
also commercial dishwasher safe. Make sure all components are thoroughly clean and dry prior re-assembly of the carving tray.
The heating element must be cleaned by hand. DO NOT immerse the heating element in water. Again, make sure all components are thoroughly clean and dry prior re-assembly and use.
Page 8
Troubleshooting Guide
Before you call service...
Induction Surfaces:
Problem:
Symptom / Cause:
What to do:
Display is black.
No Power.
Unit unplugged.
breaker tripped.
Ensure all power sources are functional. Check all breakers.
Flashing “
Missing or unsuitable cookware.
Ensure cookware is of suitable material and size.
Flashing “ ”
Abnormal supply current.
Disconnect power from unit and retest. If problem persists,
contact Customer Care immediately.
Flashing “ ” & “ ”
Abnormal supply voltage below 85VAC.
Check line voltage.
Flashing “ ”
Overheating or thermal overload.
Check if fan is operational or if ventilation grill is obstructed.
Flashing “ ”
Internal hardware error.
Contact Customer Care immediately.
Flashing “ ”
Over-heated cookware.
Ensure cookware is not empty or boiled dry.
Flashing “ ”
Fluctuation in supply power frequency.
Resume after power frequency stabilizes.
Flashing “ ”& “ ”
Internal hardware error.
Contact Customer Care immediately.
”
HotPlate Surfaces:
Problem:
Symptom / Cause:
What to do:
Unit temperature is high.
Thermostat control set too high.
Thermostat control stuck in the “ON” position.
Unit plugged into an incorrect power supply.
Adjust thermostat control to a lower setting.
Contact Customer Care immediately.
Have a certified technician verify power
specifications match unit requirements.
Unit temperature is low
Thermostat control set too low.
Location is susceptible to air currents (air
conditioning ducts or exhaust fans)
Adjust thermostat control to a higher setting.
Redirect air currents or relocate unit.
Unit is non-functional
No power to unit
Verify power sources.
Power switch not functioning. Heating Element is Breakers are not tripped and unit is on.
burned out or Thermostat control is defective.
Contact Customer Care immediately.
General:
Problem:
Symptom / Cause:
What to do:
Display or Heatlamp
Lighting not working or
flickering.
No power to unit, non-secure plug connections,
defective bulbs.
Bulbs not securely screwed in sockets.
Verify power sources, that breakers are not tripped
and unit is on.
Replace or tighten bulbs in fixtures.
No power to unit.
LED lighting not working
Defective controller unit or power supply.
or sections of unit not lit.
Burned out LED nodes.
Page 9
Verify power sources, that breakers are not tripped
and unit is on. If problems persist, contact Customer
Care immediately.
Warranty & Service
Buffet Station Warranty
SICO America, Inc., Minneapolis, Minnesota fully warrants the Buffet Station to be free from defect in materials and workmanship for
a period of 1-year from the date of delivery, with the following exception. Due to the nature of the composite top, the top is not
Covered under the 1-year warranty period. Product defects arising from faulty materials or substandard workmanship will be, at the
sole discretion of SICO AMERICA, replaced or repaired to a serviceable condition free of charge to the original purchaser for said
1-year period. The foregoing is SICO's exclusive warranty with respect to the products purchased. SICO MAKES NO WARRANTIES
OF MERCHANTABILITY OR FITNESS FOR PURPOSE, and makes no other warranties except for the warranties expressly set forth
above.
All repairs and returns must be approved, in writing, by the factory before action is taken. All claims are to be reported to:
SICO America, Inc.
Attn: Customer Care Center
7525 Cahill Road
Minneapolis, MN 55439
The product serial number will be required to process and authorize any warranty claim.
Repair or replacement in accordance with the foregoing procedure is the buyer's sole and exclusive remedy for any defective
products, whether buyer's claim arises under contract, tort or otherwise. SICO shall not be liable for any consequential damages,
and in any event, SICO's liability is limited to the purchase price paid for the products purchased.
Before Calling Service:
Service:
Customer Care Contact information please see page 23-25.
Refer to the troubleshooting guide on pages 18-19.
When requesting information, literature, replacement parts or service,
always refer to the model number and serial number of your unit. This
information is found on the rating plate located on the inner wall of the
storage cabinet near the central power center.
For electrical issues, double check to ensure proper electrical
connection to the unit. Check circuit breakers are not tripped
or defective. Outlet receptacles are proper working order or
the possibility of a power outage.
Record all the rating plate information here or on the front page of this
manual for future reference.
For warranty purposes, have your model, serial number and
date of purchase before contacting the SICO Customer Care
Center.
Model Number:________________________
Serial Number:________________________
Shipping Damage Claims:
Purchase Date:________________________
This product contained in this shipment was packaged in
accordance with stringent standards and inspected before
leaving the factory. All products should be inspected immediately
upon receipt to insure damage is discovered and noted on the
delivery receipt. Any concealed damage must be reported to the
carrier within 15 days of delivery. All damage claims must be filed
directly with the carrier.
Regarding The Warranty:
This equipment and/or the components contained therein are design
certified by various, nationally recognized, testing laboratories to the
appropriate national standards as indicated on the individual components
model/serial rating plate. ANY modification to this equipment or any
components contained therein without written permission from SICO
America Incorporated® voids any certifications and warranty of this
product.
SICO America Incorporated® does not assume responsibility for
damage or loss incurred in transit. However, we will be more than
happy to furnish you with any documents necessary to support
your claims.
Page 10
Worldwide Customer Care
SICO® America Inc.
Phone: 952.941.1700
Toll-Free: 1.800.328.6138
Fax: 952.941.6688
Email: [email protected]
All the following countries below are served through the SICO® America office.
A
Chile
Guadeloupe
American Samoa
Colombia
Guam
Anguilla
Cook Islands
Guatemala
Antigua And Barbuda
Costa Rica
Guyana
Argentina
Aruba
D
H
Dominica
Haiti
B
Dominican Republic
Honduras
Bahamas
Barbados
E
J
Belize
Ecuador
Jamaica
Bermuda
El Salvador
Bolivia
K
Brazil
F
Kiribati
British Virgin Islands
Falkland Islands
French Guiana
M
C
Marshall Islands
Canada
G
Martinique
Cayman Islands
Grenada
Mexico
Micronesia
Montserrat
St Vincent And The
Grenadines
Suriname
N
Netherlands Antilles
Nicaragua
Northern Mariana Islands
P
Panama
Paraguay
Peru
Puerto Rico
T
Trinidad & Tobago
Turks & Caicos Islands
U
United States
Uruguay
S
Saint Kitts And Nevis
Saint Lucia
Saint Pierre & Miquelon
Samoa
V
Venezuela
Virgin Islands
SICO® South Pacific
Phone: +61 2 4336 1333
Fax: +61 2 4388 4643
Email: [email protected]
All the following countries below are served through the SICO SOUTH PACIFIC Limited office.
A
Angola
Australia
F
Fiji
French Polynesia
B
Botswana
L
Lesotho
C
Christmas Island
Cocos (keeling) Islands
Comoros
M
Madagascar
Malawi
Mauritius
Mayotte
Mozambique
Pitcairn Islands
N
Namibia
Nauru
New Caledonia
New Zealand
Niue
Norfolk Island
P
Palau
Papua New Guinea
SICO® ASIA PTE LTD (except China and Japan)
Phone: [65] 6500 0800
Fax: [65] 6500 0811
Email: [email protected]
All the following countries below are served through the SICO® ASIA Limited office.
H
K
M
B
C
Bangladesh
Cambodia
Hong Kong
Korea
Macau
Malaysia
Bhutan
L
Maldives
Brunei
E
I
East Timor
India
Laos
Mongolia
Burma
Indonesia
SICO® Japan
Tel: [81] (03) 3288-0145
Fax: [81] v(03) 3288-0146
Email: [email protected]
Page 11
Tokelau
Tonga
Tuvalu
R
Reunion
V
Vanuatu
S
Saint Helena
Solomon Islands
South Africa
Swaziland
W
Wallis And Futuna
Z
Zambia
Zimbabwe
T
Tanzania
N
Nepal
P
Pakistan
Philippines
S
Singapore
Sri Lanka
T
Taiwan
Thailand
V
Vietnam
Worldwide Customer Care
SICO Europe Limited
Phone: +44 (0) 1303 234000
Fax: +44 (0)1303 234001
Email: [email protected]
All the following countries below are served through the SICO EUROPE LIMITED® office.
A
Cyprus
Greece
Kyrgyzstan
Afghanistan
Czech Republic
Greenland
Albania
Guernsey
L
Algeria
D
Guinea
Latvia
Armenia
Denmark
Guinea-bissau
Lebanon
Austria
Djibouti
Liberia
Azerbaijan
H
Libya
E
Vatican City
Liechtenstein
B
Egypt
Hungary
Lithuania
Bahrain
Equatorial Guinea
Luxembourg
Belarus
Eritrea
I
Belgium
Estonia
Iceland
M
Benin
Ethiopia
Iran
Macedonia
Bosnia & Herzegovina
Iraq
Mali
Bulgaria
F
Ireland
Malta
Burkina Faso
Faroe Islands
Israel
Mauritania
Burundi
Finland
Italy
Moldova
France
Monaco
C
J
Morocco
Cameroon
G
Jersey
Cape Verde
Gabon
Jordan
N
Central African Rep.
Gambia
Netherlands
Chad
Gaza Strip
K
Niger
Congo
Georgia
Kazakhstan
Nigeria
Cote D'ivoire
Germany
Kenya
Norway
Croatia
Ghana
Kuwait
O
Oman
P
Poland
Q
Qatar
R
Romania
Russia
Rwanda
S
San Marino
Sao Tome & Principe
Saudi Arabia
Senegal
Serbia & Montenegro
Seychelles
Sierra Leone
Slovakia
Slovenia
Somalia
Sudan
Svalbard
Sweden
Switzerland
Syria
T
Tajikistan
Togo
Tunisia
Turkey
Turkmenistan
U
Uganda
Ukraine
United Arab Emirates
United Kingdom
Uzbekistan
W
West Bank
Western Sahara
Y
Yemen
SICO® ESPAÑA
Phone: [34] (91) 736-4424
Mobile: [34] 663759248
Fax: [34] (91) 736-4426
Email: [email protected]
All the following countries below are served through the SICO® ESPAÑA (SICO Europe Ltd - Spain) office.
•Andorra
•Cuba
•Gibraltar
•Portugal
•Spain
SICO® Middle East JLT (LLC)
Tel: +971 4 422-8259
Fax: +971 4 422-8059
Email: [email protected]
All the following countries below are served through the SICO® Middle East JLT (LLC) office.
Bahrain
Egypt
Iran
Iraq
Jordan
Kuwait
Lebanon
Oman
Page 12
Qatar
Saudi Arabia
Syria
United Arab Emirates


![8KG HEAT PUMP DRYER [Met DTD 315]](http://vs1.manualzilla.com/store/data/005851733_1-4b2b64d3b006b4e2563952fefa7cfd52-150x150.png)