1
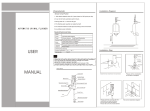
RFID Access Control System(No keypad)
User Manual
Please read the operation steps before installation
I. Introduction
This series Access Controller is the use of industrial-grade single-door controller chip
design, operating procedures of humanized operation, a management card to add and
delete users, you can change the door delay time, the material used Japanese import
resin sealing compound and it is very stable and with high capacity, fast response, simple
operation.This is the ideal equipment for high waterproof requirements and can be
working in a bad environment, and other places.
Ⅱ. Functional description
⒈ 2000 users capacity(ID/IC optional)
⒉ Add or delete user card by the management card
⒊ Change the door relay time by the management card
⒋ Can be connected a additional Wiegand card reader
⒌ The signal to open the door is output by relay directly(NO / NC optional)
Ⅲ. Technical parameters
1 Working DC power
DC power supply: 12 ± 10%;
Voltage current <0.1A
2 Maximum output
lock current: ≤ 2000MA
3 Ambient temperature
-20 ℃ ~ 70 ℃
4 Relative humidity
20% ~ 90%
5 Storage capacity
2000 user card, 1 card management
6 Read Range
3-15CM
7 Reader types
EM or MF1 card
Ⅳ.Operating instructions
⒈Setting the Management Card
Please connect Brown line and GND line and power on, the red light will be bright. There
will be three seconds to add the management card,.After finished adding the Management
Card ,then you will hear beeps twice and red&green light will be flashes both. Please
power off and remove the brown line, and power on again ,then adding management card
is finished.
If you would like to replace the management card,please operate the process as
above ,then the new management card will be instead of the old.
⒉Format the old data
Please connect purple line and GND line and power on.After 3seconds ,then you will hear
beeps twice,the red&green light will be flashed both.Please power off and remove the
purple line, and power on again ,then all the users data will be cleared up.
Note: When the user data i cleared up and it can't be restored, please use caution.
⒊ Setting the delay time for open the door
1, Connect Gray, brown and purple lines together.
2, Connect Red and Black line to 12V power supply. RED and Green light will blinking
together.
3, swipe master card, how many times you swipe master card, it is how many seconds for
door open delay.
4, make gray and brown and purple seperate.
5, After make seperate, the LED will become RED.
6, Set successfully.
Note: Initialize the RFID Access control ,its default relay time is 10 seconds.
⒋ Add user card
Please power on RFID Access Control and swipe management card and wait for a
second ,then red light will be off and green light will be flashed, please swipe the new user
card, then you will hear Didi twice,it means enrollment successfully. IF you add a
registered user card, you will hear a long-beep sound when you swipe card. For the
registered card ,you can't be added it again.After finished adding new cards,please swipe
your management card to exit. If you not swipe management card, the rfid access control
system will be exited after 10seconds.
⒌ Delete user card
Please power on RFID Access Control and swipe card twice in a second, red light will be
off, the green light will be flashed and swiping card that need to be deleted then you will
hear the beeps twice,it shows that deleting user card successfully. (IF you delete a
unregistered user card, you will hear a long-beep sound when you swipe card. )After
finished deleting ,please swipe your management card to exit. If you not swipe
management card, the rfid access control system will be exited after 10seconds.
Ⅴ. Wiring instructions
Red
+ (9-12V)
Black
GND
Green
NC
White
COM
Blue
NO
Yellow
OPEN
Orang
e
External reader D0
Light
green
External Reader D1
Pink
lighting control and voice control wires
Brown
Add the management card and initialize the access control
Purple
Formatted user data
Gray
GND
Only relay control signals output
Normal open button ,the other is connected GND (press the button
closed)