1
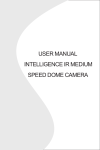
i
RAC-100 and 200 User’s Manual
Technical Support
If you have any questions about the use of the RAC-100 or 200, please call
the following number:
1-215-491-4899
Monday — Friday, 8:00 AM to 5:00 PM Eastern time
You may also contact us by fax at:
1-215-491-4889
or by e-mail at:
[email protected]
For more information on our products, or for the latest news in product
development, visit our web site at:
www.jamartech.com
For support information specific to the RAC-100 or 200, go to:
www.jamartech.com/RACSupport.htm
Address any correspondence to:
JAMAR Technologies, Inc.
151 Keith Valley Road
Horsham, PA 19044-1411
Volume 3.0 March 2002
ii
Table of Contents
Table of Contents
Technical Support
............................................................ ii
Introduction to the RAC-100 and 200 .............................................. 1-1
What are the RAC-100 and 200? ............................................ 1-2
How Do They Work? ......................................................... 1-3
Quick Start Guide
......................................................... 1-4
Installation
......................................................... 2-1
Before You Begin
......................................................... 2-2
Installing the Modular Distance Sensor ................................. 2-3
Installing the RAC Instrument ............................................... 2-7
Calibration
......................................................... 3-1
Automatic Calibration Procedure ........................................... 3-2
If Your DMI Fails to Calibrate................................................ 3-4
Manual Calibration Procedure ............................................... 3-6
Key Functions & Operating Procedures ......................................... 4-1
Key Functions: RAC-100 ....................................................... 4-2
Procedures: RAC-100 ......................................................... 4-5
Interval Distance ......................................................... 4-5
Distance Pulse Output (DPO) .......................................... 4-5
Key Functions: RAC-200 ....................................................... 4-7
Procedures: RAC-200 ......................................................... 4-8
Memory Store
......................................................... 4-8
Memory View
......................................................... 4-9
Memory Clear
....................................................... 4-11
Printing and Serial Port (RS-232) Output ...................... 4-12
Wireless Infra Red Remote Option ...................................... 4-15
Troubleshooting
......................................................... 5-1
Error Codes
......................................................... 5-2
Frequently Asked Questions ................................................... 5-3
Appendix
........................................................ A-1
Connection and Output Formats ............................................ A-2
Specifications
........................................................ A-3
DPU-414 Thermal Printer Operating Procedures ................. A-4
Glossary
........................................................ G-1
iii
RAC-100 and 200 User’s Manual
This page was intentionally left blank.
iv
Chapter 1 — Introduction
Chapter 1
Introduction
to the
RAC-100
and 200
1-1
RAC-100 and 200 User’s Manual
What are the RAC-100 and 200?
The JAMAR Technologies Road Analysis Computer (RAC) Models 100
and 200 are accurate, easy-to-use distance measuring instruments (DMI)
that use state-of-the-art microprocessor technology. The RAC-100 and 200
DMIs have been designed with features to provide you with a versatile and
functional instrument that can be learned in a very short time.
The RAC-200 contains all of the features of the RAC-100 with the addition
of memory storage and data output. This allows for saving of information
for later download to a computer or printer. The RS-232 port used for downloading can also be used to control the unit in a real-time mode from a laptop computer.
Figure 1.1 — RAC-100 and 200 Distance Measuring Instruments
1-2
Chapter 1 — Introduction
How do they work?
To use the RAC-100 or 200 DMI to accurately measure distance, either a
modular distance sensor (MDS) or mechanical transmission interface
is used to send pulses to the DMI. The Quick-Kit, which is a modified
version of the MDS, can also be used.
Most newer vehicles (1992 and newer) have an electronic distance/speed
sensor inside the transmission which sends pulses to the vehicle's on-board
computer for use in the speedometer, ABS braking system, engine/transmission control, etc. These vehicle-generated signals can be as many as 100,000
pulses per mile, which is far more than the DMI needs to accurately measure distance. Further, since the vehicle manufacturers are not concerned
with accurate distance and speed readings at very low speeds (your speedometer may not move below 5 mph), the signal strength at these low speeds
is extremely minimal.
The MDS is not just an improvement over other electronic interface type
sensors. First, and foremost, its proprietary circuitry allows more accurate
slow speed measurements by sensing signals as low as 10 Mv from the
vehicle speed sensor. Second, it is designed to be mounted under the vehicle
dashboard rather than under the hood as with other interface sensors. This
gets the MDS out of a severe heat and moisture environment and into a more
controlled environment. Third, our exclusive internally generated Sensor
Test and Tap Test features allow the user to verify proper sensor and instrument operation. Finally, the Modular Design simplifies installation.
Older vehicles with mechanical speedometer cables use the mechanical
transmission sensor, which is screwed on to the transmission. For information on how to install this type of sensor, refer to the instructions that came
with the sensor.
The next chapter details how to install a modular sensor into your vehicle.
If your already have a sensor installed, you may skip to Chapter 3 for information on calibrating your DMI.
1-3
RAC-100 and 200 User’s Manual
Quick Start Guide
The RAC-100 and 200 DMIs will allow you to accurately measure distance
quickly and easily. However, before you can do this a few basic steps must
be taken to ensure that you get the optimum performance from your instrument.
Step 1 Install your DMI and its modular sensor. Refer to Chapter 2 for detailed instructions on this. If you would like to have the equipment
professionally installed, contact a garage or speedometer shop in
your area.
Step 2 Calibrate your instrument. Refer to Chapter 3 for detailed instructions on how this is done. Your DMI will not accurately measure
distance unless it is properly calibrated.
Step 3 Perform a test measurement with your vehicle. Once your DMI has
been calibrated, you should perform a test measurement over a
known distance. This will ensure that the instrument has been calibrated correctly. To do a test measurement, drive to your starting
point and stop. Turn on the DMI and wait until C.H is shown on the
right side of the display and zero is shown on the left side. Next,
press the C Hold (count hold) button to release the instrument from
count hold and then drive the distance to be measured. Stop and/
or press the C Hold button once you reach the end of the distance
to be measured.
Step 4 Familiarize yourself with the features and options of the instrument
that you will be using. Refer to Chapter 4 for more detailed instructions on the functions and procedures of the RAC-100 or 200.
Step 5 Practice. Before attempting to use the instrument on a job, be sure
you are comfortable with how to operate it.
1-4
Chapter 2 — Installation
Chapter 2
Installation
2-1
RAC-100 and 200 User’s Manual
Before You Begin
Note: The following instructions are for installing a RAC with a Modular
Distance Sensor. If you are installing a different type of sensor, refer to the
instructions that came with the sensor itself.
The JAMAR RAC-100 and 200 distance measuring instruments (DMI) are
very reliable instruments. However, there can be some external variables
that could affect proper operation and the ability to accurately measure distance traveled. By observing a few simple precautions you will be able to
eliminate potential problems.
• Do not install wires near any object that could cause stray pulses to
be picked up, such as the alternator, spark plugs or engine coil.
• Do not install the wires or sensor near any objects that will get hot,
such as the manifold. The installation wires or sensor can melt if they
are too close to a heat source.
• Do not install wires near any objects that could vibrate and cut the
wires.
• Tire pressure should be the maximum suggested by the tire manufacturer, typically 32-35 PSI cold. The tire should have ample tread depth.
Steel belted radial tires are highly recommended.
• Drive the vehicle 3 to 5 miles (depending on climate) to warm the tires
up to normal operating temperatures prior to calibrating your DMI.
Refer to Chapter 3, Calibration for more detailed instructions.
2-2
Chapter 2 — Installation
Installing the
Modular Distance Sensor
Most newer vehicles (1992 and newer) have an electronic speed output
rather than a mechanical speedometer cable coming from the transmission.
With the newer vehicles you will need to install either a Modular Distance
Sensor (MDS) Vehicle Kit or a Modular Distance Sensor Quick Kit. Use
the following instructions for installation of the MDS Kits.
1. Find a location under the vehicle
dashboard that will allow fairly easy
access to the MDS. Do Not mount the
MDS on the heater ducts or where the
heater vents will blow directly onto it.
Attach the MDS using the nylon ties
or Velcro provided, as shown in Figure
2.1.
Figure 2.1
MDS Mounted Under Dash
2. Locate the 2 wires coming from the Vehicle’s Speed Sensor (VSS).
• On most Ford and Chrysler pick-up trucks, the best place is on the
rear end differential housing using the rear ABS signal.
• On General Motors pick-up trucks, the best place is the VSS at the
transmission.
• On many vehicles (both trucks and autos) you can go to the cruise
control signal or to the vehicle ECU which is often located under the
dashboard.
(Your local Auto/Truck dealer can usually tell you
where the VSS can be located on your vehicle. If
you need additional assistance, contact JAMAR.)
All wires and the
MDS itself should be
kept away from any
heat source that
could cause melting.
3. Route the red and black end of the 20’ grey
VSS cable through the firewall. This can usually be done by using an existing rubber grommet where other wires pass through the firewall. If you
cannot locate an existing hole, CAREFULLY drill a small hole large enough
for both the VSS cable and the +12Volt/Ground wires. EXTREME CAUTION must be taken to insure you do not drill into anything mounted on
the opposite side of the firewall or cut any existing wiring.
2-3
RAC-100 and 200 User’s Manual
Use the cable ties provided while routing the cable to the location for getting the speed signal that you previously identified. Attach the red and
black wires of the VSS cable to the vehicle’s speed sensor wires using the
tap splice connectors provided. The red wire goes to the high-speed signal
wire; the black goes to the low speed signal wire.
NOTE: The tap splice connectors are supplied for convenience for initial
installation. However, we recommend that once the installation is completed and you have verified the instrument is working properly, remove
the tap splice connectors and solder the connections. Insulate using electrical tape or silicone.
4. Plug the connector of the VSS cable
into the hole labeled VSS Input located
on the right side of the MDS, as shown
in Figure 2.2.
Figure 2.2 –VSS Plug-in
5. Route the black DMI cable from the MDS to the desired instrument
location. This will usually be routed between the doorpost and the dashboard. Make sure the cable will not be pinched when closing the door. If
the instrument is going to be mounted to the front of the dashboard, you
may want to bring the cable straight up the front of the dash. There is
adequate cable length to allow mounting the DMI in any desired location
inside the vehicle. Plug the cable into
the MDS jack labeled To DMI, as
shown in Figure 2.3. It does not matter
which end of the cable is plugged into
Figure 2.3 –DMI Plug-in
the MDS or DMI.
6. Route the Red (+12 Volts) and Black
(Ground) power cables directly to the
vehicle’s battery. This can be done using the same feed through location that
was used for the VSS Cable. If, out of
Figure 2.4 –Power Plug-in
convenience, you elect to obtain the
+12VDC and ground from a fuse panel
or other location under the dashboard, make sure it is a constant 12 volt
source and not one that is switched off with the ignition key. We also
recommend the circuit should have as few devices as possible to avoid
2-4
Chapter 2 — Installation
voltage fluctuations from Turn Signals, Brake Lights, etc. Plug the power
cable into the hole labeled Power on the MDS, as shown in Figure 2.4.
A diagram of the complete installation for the MDS is shown in Figure 6
on page 2-6.
Adjusting the Vehicle Speed Sensor Pulse Rate
The signal pulses coming from the vehicle speed sensor are generated for
use by the vehicle’s computer, engine/transmission control, fuel management, ABS brakes, etc. The pulse rate can vary from 4,000 to in excess of
100,000 pulses per mile. The MDS will
condition and amplify these pulses for
use by the DMI. Since the higher pulse
rates are not required for accurate distance measurements, the MDS incorporates a divider circuit to reduce the
pulse rate. This is done by adjusting
Figure 2.5
the rotary switch on the front of the
Rotary Switch Adjustment
MDS, as shown in Figure 2.5.
Although your particular vehicle may vary, generally Chrysler and Ford
vehicles use a 4 to 1 ratio (position 4 on the switch) while General Motors
vehicles use a 16 to 1 ratio (position 16 on the switch). To adjust the ratio,
use a small screwdriver to rotate the switch until the slot in the switch
points to the desired ratio. Note that when the switch is turned counterclockwise until it stops, it is at the 1 to 1 ratio.
The adjustments go from 1 to 1 (1 pulse into the sensor, 1 pulse out) through
64 to 1 (64 pulses into the sensor, 1 pulse out). The Tap Test positions are
explained in the troubleshooting section on page 3-4. You may need to
adjust the ratio again based on the results of the calibration procedure described in Chapter 3. Any time you change the pulse ratio, you will need to
re-calibrate the DMI.
Once you have installed the MDS, install your RAC 100 or 200 using the
instructions on page 2-7.
2-5
RAC-100 and 200 User’s Manual
DMI Connector
Fuse
The number of pulses per mile from
a vehicle will vary with the make and
model. Your calibration factor
should be between .500 and 1.200.
If not, adjust the rotary switch then
recalibrate to reach a calibration
number within this range.
Fire
Wall
Note: If the speedometer does not
respond to vehicle movement, simply reverse the RED and BLACK
wires to correct polarity.
Fire
Wall
Vehicle Speed
Sensor (VSS)
+12 VDC
Red
Ground Black
Tap Splice
Connectors
Battery
Most vehicles should have a 2-wire output from the VSS.
Dodge & Ford trucks may have the VSS located on top of the
rear end housing instead of at the transmission. It will normally be a 2-wire output, small gauge wire.
Connect the red and black wires of the long 20’ VSS cable to
the wires from the vehicle’s speed sensor. Crimp-on tap splice
connectors are supplied for convenience on initial installation.
However, we recommend removing the tap splice connectors
and reconnecting using wire to wire solder once you are sure
all connections to the VSS are proper. Insulate with sealant/
electrical tape as needed.
Figure 2.6 –MDS Installation Diagram
2-6
Installing the RAC Instrument
The compact case design of the RAC-100/200 allows mounting of it in a
number of convenient locations. Popular locations include on the front of
the dashboard, above or below the dashboard, or on the windshield using
the optional windshield mounting bracket. Wherever you decide to mount
the instrument, remember it should be within easy reach and the display
should be visible without obstructions.
After mounting the RAC, plug the black cable from the MDS into the DMI.
You may want to consider allowing enough slack in the cable to permit a
passenger to hold/operate the RAC if necessary. Regardless of the mounting location, velcro strips are provided for quick, easy mounting & removal
of your RAC.
Once you have mounted your RAC and connected it to the MDS, proceed
to the calibration instructions in the following chapter.
2-7
RAC-100 and 200 User’s Manual
This page was intentionally left blank.
2-8
Chapter 3 — Calibration
Chapter 3
Calibration
3-1
RAC-100 and 200 User’s Manual
Automatic Calibration Procedure
In order to accurately measure distance, your RAC-100/200 must know the
exact distance that the vehicle will travel based on pulses from the vehicle's
transmission. The calibration number is the automatic calculation that represents the number of pulses received over a set distance. This number, once
calculated, will remain accurate for any instrument requiring a calibration
factor until a change to the vehicle occurs, such as different size tires put
on the vehicle, tire wear, air added to the tires, etc. At that time, you must
re-calibrate.
In order to calculate the calibration number for
Your RAC 100/200
must be calibrated in your particular vehicle, you must first establish a
order to accurately calibration course. The length of the course can
be any known distance more than 500 feet —
measure distance.
1000 feet is ideal. In general, a shorter more precise course is better than a longer imprecise
course. Your course should be straight and accurate, so take the time to
measure the course using a 100' tape. Mark the beginning and ending points
so they can be seen from inside your vehicle. Remember, the course length
can be any accurate distance over 500 feet, so for convenience you could
use a telephone pole or other marker as reference point.
Step 1 Slide the ON/OFF switch to ON. Your DMI will perform a brief
Self Test. The current Calibration Number will be displayed for
approximately three seconds, then [C.H 0.000] will appear
with the decimal between the C & H flashing.
Step 2 Align your vehicle to the marker at the beginning of the course
using a reference point on or in the vehicle, such as a window
post, door handle, your shoulder, etc.
Step 3 Press the UNIT key to select feet. The FEET LED will come on
and [ 0 ] will be displayed.
Step 4 Press the CAL key. [CL 0] will show up. The instrument is
asking for the Course Length. Key in the length of your
calibration course in feet using the numeric keypad and press
the ENTER key. [C.H 0] is again on the display. Press the
C-HOLD key, C.H will go off.
3-2
Chapter 3 — Calibration
Step 5 Drive the calibration course. The count you see represents the
pulses seen from your transmission sensor and not the distance
being traveled, so don't panic when the display doesn't equal the
actual length of your course.
Step 6 When you reach the end of the course, stop your vehicle so that
you are exactly aligned with the end marker using the reference
point on the vehicle used at the beginning of the course Press the
C-HOLD key and C.H along with the pulses counted will be on
the display. Press the CAL key and CF along with the computed
calibration number will be displayed. Record this number for
future reference. Press the ENTER key. Your calibration number is now stored in the DMI's nonvolatile (permanent) memory
and [C.H
0] is displayed. The
calibration number will stay in If you RAC does not
memory for more than 40 years until count during the caliyou re-calibrate or manually change bration procedure,
refer to the troublethe calibration number. You are able
shooting section on
to view the current number every the next page.
time you power on the DMI.
You should rerun the calibration course to verify the calibration for your
vehicle. Press C-HOLD prior to measuring. If this is the first time you have
calibrated a DMI, you may want to run the course a couple of times to practice being properly aligned when starting and stopping at the course markers.
The calibration number used should be between .500 and 1.200. If your
calibration number is below this range, you need to use a higher division
factor (such as 1 to 16 or 1 to 32) by adjusting the
rotary switch on your MDS. Of course, if the cali- Your calibration
bration number is too high, use a lower division number should be befactor (such as 1 to 1 or 1 to 2). Refer to the Ad- tween .500 and 1.200.
justing the Vehicle Speed Sensor Pulse Rate sec- If not, you need to adtion in Chapter 2 for more information on this. just the rotary switch
on your MDS.
Several calibration runs may be necessary to determine which division factor is best for your vehicle.
3-3
RAC-100 and 200 User’s Manual
If Your DMI Fails to Calibrate
If your DMI fails to count during calibration, perform the following operational checks:
Step 1 Locate the Sensor Test button on
the front upper right of the
MDS, shown in Figure 3.1.
When pressed, this will generate an internal low-level signal
that is fed directly into the VSS
Input circuit. First, unplug the
Figure 3.1 – Sensor Test
VSS Input connector from the
right side of the MDS. Second, turn on the DMI and press the CHOLD key just like you would prior to starting a measurement.
Next, using a small pointed object (pen, pencil, screwdriver, etc.)
or your finger press the Sensor Test button for a few seconds. The
DMI should count when the button is pushed. What number it
counted doesn’t matter as long as it did count.
If the DMI did count, everything from the MDS up to the DMI is
okay and the problem is most likely either a poor connection at the
vehicle’s speed sensor or the connection is not at the correct location to get the vehicle speed signal. The speed sensor output is
generally at the transmission or the rear differential. If you are
unsure about being attached to the correct output, disconnect the
plug and move the vehicle. If the speedometer does not function,
you have chosen the correct plug wires.
If you are at the correct location, make sure you have a good electrical connection at the tap in point. Once you are sure you tapped
into the correct location, it is always better to wire solder the connection.
After checking the connection, plug the VSS Input connector back
into the MDS and try the DMI again. If the DMI counts, you can
proceed with calibration. If the DMI still does not count, go to
Step 2.
3-4
Chapter 3 — Calibration
Step 2 The Tap Test will determine if
the distance pulses being sent
from the MDS are getting to,
and being processed by, the
DMI. The Tap Test is performed using the rotary switch
shown in figure 3.2. First make
Figure 3.2 – Tap Test
sure you note the current position of the rotary switch (1, 2, 4, 8,16, 32 or 64), as you will have
to return the slot back to this same position after the test is completed.
Next, turn on the DMI. Press the C-HOLD key just like you were
beginning to measure. Using a small screwdriver, rotate the switch
between the Tap and Test positions four or five times. (Note that
when the switch is turned clockwise until it stops, it is at the Test
position.) The DMI should register. The count shown does not matter, just as long as the DMI did register a count. If it did count, the
cable from the MDS to the DMI and the instrument itself are OK.
If the DMI did not count, the problem is most likely a bad cable to
the DMI or the DMI itself is bad. If available, try another DMI and
repeat the Tap Test. If the second DMI doesn’t count, the problem
has to be the cable between the MDS and the DMI.
Once the test is complete, return the Rotary Switch to the previous
position.
If the previous steps do not correct the problem, contact us using the information on page ii.
3-5
RAC-100 and 200 User’s Manual
Manual Calibration Procedure
It is very common to use one DMI on a plug-in basis between a number of
different vehicles that have been equipped to accept the instrument. Installing additional vehicle kits on other vehicles is an inexpensive and cost effective means to greatly expand your measuring capabilities. Obviously,
each vehicle so equipped would have to be calibrated and the number recorded. If you are moving the DMI from vehicle to vehicle you will need
to enter the correct calibration number for each vehicle before use. The
following procedure assumes the calibration number for a particular vehicle
has already been determined and recorded.
Step 1 Slide the ON/OFF switch to ON. The RAC 100/200 will
complete a brief Self Test, the current calibration number will
be displayed with a three second tone, then [C.H 0.000] will
appear.
Step 2 Press the CAL key. [CL 0.000] will be displayed. DO NOT
key in a calibration course length, just press the ENTER key.
[CF ] along with the current calibration number will be displayed.
Step 3 To change this number, key in the new calibration number and
press ENTER. [C.H 0.000] is displayed and the new calibration number is stored in the nonvolatile memory. If you did not
key in a new number and just pressed ENTER, the old calibration number has been placed back into memory.
Step 4 Select the desired unit of measurement and press C-HOLD
prior to measuring.
Once your DMI is properly installed and calibrated, you are ready to
begin accurately measuring distance.
3-6
Chapter 4 — Key Functions & Operating Procedures
Chapter 4
Key Functions
& Operating
Procedures
4-1
RAC-100 and 200 User’s Manual
Key Functions: RAC-100
UNIT
ADD
1
2
3
T-S
SUB
4
5
6
7
8
9
CLR
0
ENTR
FEET
MILE
METER
TIME
OFF
ON
RAC - 100
C
HOLD
D
HOLD
CAL
P
DIST
DPO
JAMAR TECHNOLOGIES, INC.
Figure 4.1 — RAC-100 Key Layout
Your RAC-100 has been designed for simple operation using large individual sealed keys which provide a Click and Tone feedback.
This is the slide switch which provides power to the RAC-100.
When turned on the RAC-100 will do the following:
1. Initiate internal Self Test sequence.
2. Display calibration number with a tone for 3 seconds.
OFF/ON 2. Set itself in Count Hold (C.H with decimal flashing).
3. Set the unit to be used for measuring to the last unit used
when shut off.
4. Set itself to count UP.
5. Set the Distance Pulse Output interval to zero.
Pressing this key will start or stop the computation of distance
pulses. When in Count Hold, [C.H ] will be displayed on the
left digits with the decimal between C and H flashing. If Speed
(Count is also being displayed, C.H is not shown. The speed drops to
Hold) "0" but the decimal is flashing. If C.H is displayed the DMI will
not count. Press C Hold and C.H will go off. The DMI will now
count as you drive.
C
HOLD
Pressing this key will stop the display from counting while
internally the DMI will continue to accumulate distance. Once
pressed, [dH. ] is displayed on the far left digits with the deci(Display mal to the right of the H flashing. If Speed is being displayed,
Hold)
[dH. ] will not be shown but the decimal will be flashing.
Note: You cannot put the DMI in both Count Hold (C.H) and
Display Hold (dH.) at the same time. If the DMI is already in
Count Hold, it will ignore Display Hold and vice versa.
D
HOLD
4-2
Chapter 4 — Key Functions & Operating Procedures
UNIT
CAL
This key selects the desired unit of measurement. This can be
done while measuring or at rest. When pressed, the distance
will cycle from MILES to FEET to METERS and then back to
MILES. The LED indicating the unit of measurement selected
will be lit.
This key is used when calibrating the DMI or to manually enter a new calibration number. Refer to Chapter 3, Calibration,
for more detailed instructions.
This key can be used to Pre-Distance the display to enter a
known distance starting point. You can also add to or subtract
from any distance currently displayed. You do not have to be
(Pre- in Count Hold to perform the Pre-Distance function. It can even
Distance) be done while measuring.
P
DIST
Step 1 Press the P-DIST key and [Pd ] will appear on the
far left digits.
Step 2 Key in the desired distance.
Step 3 To change the distance display to read the value just
keyed in, press ENTER.
A. If you just want to add the value to the current
distance, press the ADD key.
B. To subtract the value from the current distance, press the SUB key.
This key allows you to select whether to display your Speed or
elapsed Time.
T-S
(TimeSpeed)
Step 1 Pressing the T-S key one time will show the Speed of
your vehicle in the two far left digits. At the same time,
distance will be displayed on the remaining six digits.
Speed indicated will be in miles per hour or kilometers
per hour depending on the unit of measurement.
Step 2 Pressing the T-S key a second time will indicate
elapsed TIME in hours, minutes and seconds and
the TIME LED will be on. Although distance is still
being computed, it will not be displayed simultaneous
with TIME. Count Hold controls the time event, therefore time is being calculated only while actually mea-
4-3
RAC-100 and 200 User’s Manual
suring. While displaying time, you can reset it to zero
without resetting distance by pressing the CLEAR
key.
Step 3 Pressing the T-S key a third time cycles back to the first
display of distance traveled.
ADD
SUB
The DMI is instructed to count up with this key. This same key,
when used with the Pre-Distance function will ADD the value
entered to the current distance display.
The DMI is instructed to count down with this key. The LED
for the unit of measurement will flash telling you that you are
subtracting distance. Should you count down to "0", the DMI
will provide a tone and automatically begin counting up. This
same key, when used with the Pre-distance function will subtract the value entered from the current distance display. A third
but lesser used function is to turn off the tone when using the
Distance Pulse Output.
This key resets the distance or time to zero (0). For added
CLR convenience, CLEAR can be used on the run (while measuring). This feature will allow you to establish a zero starting
(Clear) point without having to stop your vehicle in traffic or in the
center of a busy intersection.
This key instructs the DMI to accept the previously keyed value
ENTR on the display, such as calibration number, Pre-Distance, etc.
Remember that after keying in a value, you must press the
(Enter) ENTER key.
These keys are used to identify and select the numbers desired
for calibration, pre-distance, distance pulse output, etc. They
are also used in combination with other keys to perform certain
(Numbers) functions.
1, 2...
This key is used to activate the Distance Pulse Output feature
of the DMI. Refer to the Distance Pulse Output procedure on
page 4-5 for more detailed information on how this feature can
(Distance be used.
Pulse
Output)
DPO
4-4
Chapter 4 — Key Functions & Operating Procedures
Procedures: RAC-100
Interval Distance
This feature allows you to determine the distance between points of interest,
such as telephone poles, signs, pavement markings, etc. You can activate
this mode at any time as long as you are not already in a different mode
such as Pre-Distance, Calibrate or Count Hold.
Step 1 At the point you wish to begin measuring intervals (Point “A”),
press the number 1 key and [id] will be displayed on the far
left digits. The distance display will start at zero (0) and begin
counting. If you already had a distance on display it will not
be lost. When you exit the Interval Distance mode it is included
in the total traveled distance.
Step 2 When you get to reference point “B” press the #2 key. The first
interval distance (A to B) will be displayed and stay on display
until the next interval. When you get to the next interval, press
the #2 key again. The display will then show the distance from
B to C. Continue pressing the #2 key at each reference point
and the distance between each reference point will be displayed
(C to D, D to E, E to F, etc.). There is no limit as to the number
of times you can use the #2 key to display the interval distance
between points of interest.
Step 3 To EXIT the Interval Distance mode, press the #3 key. The
display is now the total distance traveled, so that you have not
lost any distance traveled before going to the Interval
Distance mode.
Distance Pulse Output (DPO)
NOTE: Use of the Distance Pulse Output feature with a Modular Distance
Sensor requires a factory modification to the MDS. Contact us using the
information on page ii if you need to use this feature with an MDS.
When activated, the distance pulse output (DPO) will provide a +5VDC
(TTL level) output pulse at a pre-selected distance interval and signal
duration. This low level signal is provided on the red wire in the Power/
Signal cable. The +5VDC signal can be used to send distance pulses to a
4-5
RAC-100 and 200 User’s Manual
computer or other device that can accommodate low voltage, low current
signals. Should you wish to control a +12VDC high current device, you will
need our optional DPO Amplifier.
To activate a DPO signal with tone:
Step 1 Select the desired unit of measurement using the UNIT key.
Step 2 Press the DPO key and [Po ] will be displayed.
Step 3 Key in the distance interval desired (the distance at which you
want the distance pulse to be output, such as .001 miles, 10 feet,
etc.) then press ENTER. [od 0] or a previously used output
duration will be displayed.
Step 4 Key in the desired signal duration from 10 milliseconds (key
in 1) to 2.55 seconds (key in 255) and press ENTER. Keep in
mind that if you use a long output duration, your signals will
run together at high speeds. A 10 millisecond pulse duration is
usually adequate for sending pulses to a laptop computer and
will not create a problem at normal highway speeds.
If you are using DPO capability for a long period of time, the tone heard
with each output pulse can become somewhat unnerving. To activate the
DPO signal without tone:
Step 1
Step 2
Step 3
Step 4
Select the desired unit of measurement.
Press the DPO key.
Key in the desired Distance Interval, press ENTER.
Key in the desired signal output duration, then press the SUB
key. The DPO signal will now operate without any tone.
NOTE: When the DMI is turned off, the DPO Distance Interval resets to
"0" thereby deactivating the output. The signal output duration previously
used will remain in memory until changed.
CAUTION: The DPO signal can be used to control potentially hazardous equipment. When activated, the DPO could cycle this equipment
at any time. If you are working with this type of equipment, TURN OFF
the DMI which will deactivate the DPO signal.
4-6
Chapter 4 — Key Functions & Operating Procedures
Key Functions: RAC-200
UNIT
T-S
ADD
1
2
3
SUB
4
5
6
7
8
9
CLR
0
ENTR
FEET
MILE
METER
TIME
OFF
C
ON HOLD
RAC - 200
D
HOLD
CAL
P
DIST
DPO
PRNT
STOR
VIEW
ERSE
JAMAR TECHNOLOGIES, INC.
Figure 4.2 — RAC-200 Key Layout
The RAC-200 contains all of the same key functions as the RAC-100. Refer to pages 4-1 to 4-4 for more information on these common keys. The
RAC-200 also contains four additional keys, described here:
When used in combination with several of the number keys,
this key will output information to a printer or computer. Refer to the Printing and Serial Port (RS-232) Output procedures
(Print) on page 4-12 for more detailed information.
PRNT
STOR
(Store)
VIEW
This key is used to set up the RAC-200 to store information in
memory. Refer to the Memory Store procedure on page 4-8 for
more detailed information.
This key can be used to view the information for any of the
memory locations (0 to 999) that have been stored in the DMI.
Refer to the Memory View procedure on page 4-9 for more
detailed information.
This key is used to clear the memory of the RAC-200. Refer
to the Memory Clear procedure on page 4-11 for more detailed
(Erase) information.
ERSE
4-7
RAC-100 and 200 User’s Manual
Procedures: RAC-200
The RAC-200 contains all of the same procedures as the RAC-100. Refer
to pages 4-5 to 4-6 for more information on these common procedures. The
RAC-200 also contains several additional procedures, described here:
Memory Store
This feature allows you to store survey information in the memory of the
RAC-200. This information can then be reviewed on the display or output
to a computer or printer. To store information in the RAC-200, use the following steps:
Step 1 Select the desired unit of measurement using the UNIT key and
then press the STOR key. [Loc xxx] appears on thedisplay
showing the first available empty memory location (0-999). If
there is nothing in memory, the location will be "0". If you have
not erased the memory, the first empty, or unused, memory location will be shown.
Step 2 To continue storing data at the memory location shown, press
ENTER. To start at a different location than that shown, key in
that memory location, then press ENTER.
CAUTION - If you decide to start at Location "0", you will
overwrite any data stored in subsequent memory locations.
Step 3 The two digits to the left of the distance displayed identify the
numeric code number. Using a numeric code (0-99) your are
able to identify the events you wish to inventory. As an example, an intersection to the right might be a 1, to the left a 2,
a bridge a 6, a culvert a 12, a 45 mph speed limit sign a 45, etc.
As you see an event ahead of you, key in its code number using the numbered keys. The number will appear on the two far
left digits. When you reach the event (using a reference point
on the vehicle) press the ENTER key. The EVENT CODE,
DISTANCE, SPEED and elapsed TIME are stored in memory.
The two far left digits will show - - waiting for the next event
code. If you are going to use a single digit code, a zero will
always precede the first digit. Should you key in an incorrect
code, you can overwrite it by simply keying in the correct code
4-8
Chapter 4 — Key Functions & Operating Procedures
number. This must be done prior to pressing the ENTER key.
Once you hit ENTER, whatever code was on display is stored
in memory.
There are 1000 memory locations available (0-999). If you plan
on conducting a number of different surveys, it will be helpful
later when downloading the data if you skip a number of
memory locations (at least one) between surveys. For example,
if Survey #1 starts at memory location "0" and ends at "57", set
Survey #2 to start at "60", etc.
Step 4 To exit Memory Store, press the STOR key. The display will
go back to the normal measuring function.
NOTE: Once in Memory Store, you cannot change the unit of measurement
displayed. You can, however, select any unit of measurement when viewing or downloading the memory. C.H (Count Hold) and DH. (Display Hold)
will not be shown when using Memory Store. However, the appropriate
decimal will be flashing indicating Count Hold or Display Hold.
Memory View
This feature allows you to view survey information that has been stored in
the memory of the RAC-200. To view this information, use the following
steps:
Step 1 The RAC-200 must be in COUNT HOLD to view the memory.
Once this is done, select the desired unit of measurement using the UNIT key then press the VIEW key.
Step 2 [Loc 0] will be displayed. At this point you have the option
of selecting the memory location you wish to start viewing or
stepping through to begin at the starting location of an individual survey stored in memory. To step through, simply press
the VIEW key again. The display will show the starting location of the next survey. By continuing to press the VIEW key
you will be able to see the starting location of every survey
stored in memory. To select the desired starting location, press
the ENTER key. If you already know the memory location you
wish to start at (0 - 999), key in that location number and press
the ENTER key.
4-9
RAC-100 and 200 User’s Manual
Step 3 [CodE 0] will be displayed. At this point you are able to recall a specific code number, either all memory locations that
have just a specific code (i.e. code #50) or all memory locations
regardless of the code number. To view all memory locations,
press ENTER. To view only the memory locations that have a
specific code number, key in that code number and press the
ENTER key.
Step 4 The data for memory location #0 (code number and distance)
will be shown. Of course, if you only requested to see a specific code number (i.e. #45 for 45 mph speed signs), the first
memory location with that code will be selected. Using the
ADD and SUB keys, you are now able to step forward or backward through the memory locations. Remember that if you
selected to see only a specific code, as you step forward or
backward through the memory you will see only the locations
with that specific code number, such as all the locations with
45 mph speed signs.
Step 5 To see the SPEED and elapsed TIME associated with each
event, press the T-S key. SPEED will be shown on the two far
left digits, elapsed TIME (hours. minutes.seconds) will be
shown on the remaining six digits. To go back to viewing the
code and distance, press the T-S key again. If, while viewing
the memory, you forget what memory location you are viewing, press and hold the ENTER key. The display will show you
the current memory location being displayed.
Step 6 To exit Memory View, press the VIEW key.
4-10
Chapter 4 — Key Functions & Operating Procedures
Memory Clear
This feature allows you to clear all memory locations that have been stored
in the RAC-200. Note that when using this feature all memory locations are
cleared. To clear the memory, use the following steps:
Step 1 The RAC-200 must be in COUNT HOLD to clear the memory.
Once this is done, press the ERSE key and [ErASE] will be
displayed.
Step 2 Press the ENTER key while [ErASE] is displayed. The display
will step through all of the memory locations (0-999), which
takes about eleven seconds. When completed, ALL memory locations will be erased and the display will return to Count Hold.
If after pressing the ERSE key you decide against clearing the memory locations, do not press the ENTER key, just press any other key. An error code
[E 0] will appear, you will exit the MEMORY CLEAR function and the
DMI will return to its normal operating state.
4-11
RAC-100 and 200 User’s Manual
Printing and Serial Port (RS-232) Output
The Print feature allows you to output data from the RAC-200 in one of
three ways:
1. Into the JAMAR WinRAC software program. This program is compatible with the Windows 95, 98, NT, 2000, ME and XP operating systems and comes with RS-232 cable, power supply and manual. It has
the following features:
• Reads directly from the RAC-200
• Converts Event Codes to Plain Language text
• Capable of merging multiple surveys together
• Provides extensive color reports and graphs
• Allows real-time data collection from the RAC-200
• Allows direct control of the RAC-200 from a laptop
Refer to the WinRAC manual for information on how to retrieve
data from the RAC-200.
2. Into an independent software program. The data from the RAC-200
can be output to any communications program that has been configured
properly to read the serial port. Refer to the appendix for more information on the RAC-200’s RS-232 format.
3. Directly to a printer. Data can be output directly to a printer such as
the DPU-414 Thermal Printer, available from JAMAR. Refer to the
Appendix for Operating Procedures for the DPU-414 printer.
When outputting data to an independent communications program or the
DPU-414 printer, the following Print commands should be used. When
using the WinRAC program, follow the procedures described in the
WinRAC manual.
PRNT
+
5
+
ENTR
This command will do a test print using a complete set of characters, alpha
and numeric.
4-12
Chapter 4 — Key Functions & Operating Procedures
This command instructs the RAC-200
PRNT
6
ENTR
to print "Real-Time" without storing
any data in the RAC-200’s
memory. Use the following steps to produce output in a Real-time mode:
+
+
Step 1 Once this command is entered [d t mm.dd.yy] will be displayed representing the past date used. Key in the current date
using the proper format, such as 082100 for August 21, 2000,
then press ENTER.
Step 2 [i d] will then be displayed. This allows you to key in an identification number which could represent an operator code number or route number (6 digits maximum). Once the ID is entered, press ENTER.
Step 3 The printer will then print a Header showing Date, Survey ID,
and identifiers for event, unit of measurement, time and unit of
speed. To collect data, press the C-HOLD key to release Count
Hold. As you see an event ahead of you, key in the appropriate code number which will be shown on the two far left digits. When you reach the event, press the ENTER key. (This is
the same procedure as described in the Memory Store section
on page 4-8.) The code number, distance, elapsed time and
speed will be printed but not stored in memory. There is no
limit to the number of events you can record. However, the
DPU printer does have a limit of about 3000 printed lines with
a fully charged battery. Continue this procedure until the survey is complete.
Step 4 To exit the real-time mode, press the C-HOLD key then the
PRINT key.
4-13
RAC-100 and 200 User’s Manual
PRNT
+
8
+
ENTR
This command instructs the RAC-200
to output data previously stored in
memory. Use the following steps to
output the memory to a printer or computer:
Step 1 Once this command is entered, [bAUD ] is displayed along
with the last baud rate used. Make sure the baud rate you select is the same as the setup in the serial communications port
in your computer (see the Appendix for more information on
the RAC-200’s RS-232 format). Using the ADD or SUB keys,
you can select the following baud rates: 300, 600, 1200, 2400,
4800, 9600 or 19200 bps. After selecting the baud rate to be
used, press ENTER.
Step 2 [Loc 0] will then be displayed. If you want to output ALL used
memory locations, press ENTER. To start outputting at a certain memory location other than zero (0), key in the desired
starting location then press ENTER.
Step 3 [CodE 0] will then appear. To output ALL used memory locations, press ENTER. To output just those locations with a
specific code number, key in the desired code, then press ENTER.
Step 4 [dt mm.dd.yy] will then be displayed with the last date used.
You can keep this date the same or key in the current date, press
ENTER.
Step 5 [id
] will appear. If you wish to use an Identification Number, key it in (6 digits maximum) and press ENTER.
Step 6 The output will then begin and show the Header information,
Memory Locations, Event Codes, Distance, Interval Distance,
Elapsed Time and Speed. At the end of that particular survey,
END SURVEY will be output and the next survey stored in
memory will be output WITHOUT a new header. It will be up
to you to keep records so that you can identify which survey
pertains to a specific route or street and the begin and end reference points. When all surveys in memory are output, the DMI
will exit the Print function.
4-14
Chapter 4 — Key Functions & Operating Procedures
Wireless Infra-Red Remote Option
If your RAC-100/200 Distance Measuring Instrument has the Wireless
Remote Option you will be able to control some basic operating features
of the DMI without having to use the keys on the instrument. These functions are:
• C-HOLD (Count Hold)
• D-HOLD (Display Hold)
• INTERVAL DISTANCE (#2 Key)
• UNIT (Miles-Feet-Meters)
• CLEAR
• ENTER
While it is not necessary to have a direct straight-line access from the remote to the DMI, you should try to mount the DMI so that when you operate the remote keys there is not more than a 45 degree angle between the
remote and the lens on the DMI.
For convenience, Velcro is supplied with the remote that will allow you to
attach the remote to the dashboard of the vehicle within easy reach.
To use the remote, pull it off the mounting location, point it towards the DMI
and press the desired function keys.
The remote control is powered by a standard 9 volt battery. To gain access
to the battery for replacement, remove the two (2) screws on the back of the
remote control, unplug the battery, make sure you align the connectors with
the proper + and - terminals on the battery, and plug in the new battery.
Replace the screws.
If your RAC-100/200 has a dark lens on the lower right below the display
window, it has the Remote Option. If there is a black plastic cap in this location, you do not have the Remote Option; however this option can be
added at a later date.
4-15
RAC-100 and 200 User’s Manual
This page was intentionally left blank.
4-16
Chapter 5 — Troubleshooting
Chapter 5
Troubleshooting
5-1
RAC-100 and 200 User’s Manual
Error Codes
The following Error Codes will be displayed if you fail to properly instruct
the RAC-100/200 to perform a particular function. The unit is more than
willing to communicate with you, but you must instruct it what to do in a
specific sequence. If you exceed its capabilities or do not properly tell it what
you want, you will see an Error Code (E).
E0
This only appears during a Memory Erase function. If the ERSE key
is pressed to complete the erase function, you must then press
ENTER. If you hit any other key, [e0 ] will be displayed and the
RAC-200 will exit the Erase function.
E2
This will only appear during a PRINT-8 (Memory Dump) and
indicates that the RAC-200 cannot communicate with the DPU
Printer or computer. Check the cable connections at both the DMI
and Printer/computer. Make sure the Printer is On Line.
E3
This will be displayed if you select an invalid Print function. Any
print request other than 5, 6, 7 or 8 will be considered invalid.
E4
This code tells you that the last memory location (999) has been
used. Any further entries into memory will overwrite what had
previously been stored in memory location 999. Prior to continuing,
you should dump the memory to the printer or, via the RS-232
output, to your computer. Erase the memory locations before
starting another survey.
E5
This code tells you there is no data in the memory location selected.
This will only happen when doing a PRINT-8 (Memory Output).
After the E5 is displayed, the DMI automatically exits the Print
function.
E7
This tells you that the DPO (Distance Pulse Output) duration
selected is out of range. The maximum time for output duration is
255, which equals 2.55 seconds.
E9
This is the only Error Code that is not operator induced. The RAC100/200’s Sensor Error Detection identifies a sensor pulse error,
indicating that the DMI did not receive a pulse from the sensor. This
5-2
Chapter 5 — Troubleshooting
is a rare error that will not greatly affect most applications as the
distance lost will be equal to the value of your calibration number,
i.e. a calibration number of .874 equals .874 feet. Should you see
the E9 error on a frequent basis, you probably have a loose
connection or faulty sensor. Corrective action must be taken prior
to continuing measurements.
Frequently Asked Questions
Q. My DMI will not count. What’s wrong?
A. In most cases, when a RAC-100 or 200 won’t count, it is not the unit
itself that has the problem. It is usually a problem with the interface sensor or wiring. Check the following:
1. Ensure the DMI has a calibration number in memory. The DMI
will not count if there is not a number in memory. As you switch on the
DMI the calibration number will be displayed for about three seconds.
The factory uses .900 as the test number. If no number is listed, refer
to the Manual Calibration Procedure on page 3-6 for information on
how to enter a number.
2. Ensure that you are attached to the speed sensor output. It is generally at the transmission or the rear differential. If you are unsure about
being attached to the correct output, disconnect the plug and move the
vehicle. If the speedometer does not function, you have chosen the correct plug wires.
3. Perform a Sensor Test. Locate the Sensor Test button on the front
upper right of the Modular Distance Sensor. When pressed, this will
generate an internal low-level signal that is fed directly into the VSS Input circuit. First, unplug the VSS Input connector from the right side
of the MDS. Second, turn on the DMI and press the C-HOLD key just
like you would prior to starting a measurement. Next, using a small
pointed object (pen, pencil, screwdriver, etc.) or your finger press the
Sensor Test button for a few seconds. The DMI should count when the
button is pushed. What number it counted doesn’t matter as long as it
did count.
If the DMI did count, everything from the MDS up to the DMI is okay
and the problem is most likely a poor connection at the vehicle’s speed
5-3
RAC-100 and 200 User’s Manual
sensor. Make sure you have a good electrical connection at the tap in
point. Once you are sure you tapped into the correct location, it is
always better to wire solder the connection.
After checking the connection, plug the VSS Input connector back into
the MDS and try the DMI again.
4. Perform a Tap Test. The Tap Test will determine if the distance
pulses being sent from the MDS are getting to, and being processed by,
the DMI. The Tap Test is performed using the rotary switch on the
MDS. First make sure you note the current position of the rotary switch
(1, 2, 4, 8,16, 32 or 64), as you will have to return the slot back to this
same position after the test is completed.
Next, turn on the DMI. Press the C-HOLD key just like you were beginning to measure. Using a small screwdriver, rotate the switch between the Tap and Test positions four or five times. (Note that when
the switch is turned clockwise until it stops, it is at the Test position.)
The DMI should register. The count shown does not matter, just as
long as the DMI did register a count. If it did count, the cable from the
MDS to the DMI and the instrument itself are OK. If the DMI did not
count, the problem is most likely a bad cable to the DMI or the DMI
itself is bad. If available, try another DMI and repeat the Tap Test. If
the second DMI doesn’t count, the problem has to be the cable between the MDS and the DMI.
Once the test is complete, return the Rotary Switch to the previous
position.
5. If after checking these items the DMI still does not count, contact us
using the information on page ii.
Q. My DMI counts while the vehicle is not moving. What's wrong?
A. There are three possible causes for this.
1. Your wiring may be picking up stray pulses from the vehicle. This
can occur if the wiring is too close to the alternator, spark plugs, distributor cap or engine coil.
5-4
2. Your ground wire may not be connected properly. Double check
its connections.
3. Your Modular Distance Sensor may not be working correctly.
Contact JAMAR using the information on page ii for information on
getting replacement parts.
Q. My DMI will not turn on. What’s wrong?
A. There are several possible causes for this.
1. You may have a loose connection. Double check all connections at
the MDS, DMI, to make sure they are tight and at the correct locations.
2. There may be a problem with the telephone jack on the power/
signal cable. Check to make sure the contacts are not bent.
3. Check the fuse between the MDS and the battery. If the internal
filament is broken the fuse has been blown.
Q. My DMI counts in increments of 2, 5, 10, etc. What’s wrong?
A. Your calibration number is too high. The calibration number should
be between .500 and 1.200. You can lower the calibration number by adjusting the jumper block within your transmission interface. Refer to Chapter 2 for more detailed information.
5-5
RAC-100 and 200 User’s Manual
This page was intentionally left blank.
5-6
Appendix
Appendix
A-1
RAC-100 and 200 User’s Manual
Connection and Output Formats
Power Connector
Pin 1 (Yellow)
Pin 2 (Green)
Pin 3 (Red)
Pin 4 (Black)
+12 VDC
Sensor Input
DPO
Signal Ground
4 3 2 1
RS-232 Output Connector
Pin 1 (Blue)
Pin 2 (Yellow)
Pin 3 (Green)
Pin 4 (Red)
Pin 5 (Black)
Pin 6 (White)
Not Used
Ground
RS-232 In
RS-232 Out
Not Used
Not Used
6 5 4 3 2 1
RS-232 Output Format
Baud (bps)
Start Bits
Data Bits
Stop Bits
Parity
300 to 19200
1
8
1
None
A-2
Appendix
RAC-100 and 200 Specifications
POWER: 9 to 16 VDC, negative ground.
DISPLAY: 8 Digit Separate LED Indicators for unit measurement, .60" High
Intensity LED, time, count hold, display hold.
ACCURACY: +/- 1 foot per mile
RESOLUTION: +/- 1 foot
KEYBOARD: 21 (25 for RAC-200) sealed single function, 5 million operation with click & tone feedback, ON/OFF slide switch.
WIRELESS REMOTE: Capable of accepting Wireless Remote Option.
SPEED: Two digit 0-99 (MPH, Fps, KPH) displayed simultaneous with distance.
TIME: Elapsed/Real Time (hh,mm,ss).
COUNT: Bi-Directional (Up/Down).
CALIBRATION: Automatic & manual w/Non-Volatile EEPROM Memory.
TEST: System check on power up w/display of Calibration Number.
AUTOMATIC DISTANCE CONVERSION: Miles (thousandths) to Feet to
Meters (kilometers).
COUNT HOLD: Stops accumulation of distance.
DISPLAY HOLD: Freezes display without loss of distance count.
PRE-DISTANCE: Capability of starting at known distance or Add/Subtract desired distance value from current distance display.
INTERVAL DISTANCE: Display of Distance Interval between events.
DISTANCE PULSE OUTPUT: 0-5 VDC, low going high, user selectable interval and duration.
SENSOR ERROR DETECTION: Checks for sensor error due to vehicle’s
dynamic motion.
MEMORY RETENTION: Non-Volatile EEPROM, for Calibration Number
— up to 50+ years retention.
CIRCUITRY: Solid state, modular circuits, EEPROM, micro-computer.
CASE: ABS Non-Warping Plastic
DIMENSIONS: 8.00" x 3.00" x 1.50"
WEIGHT: 9 oz.
OPERATING TEMPERATURE: 0°C to 75°C
INSTRUMENT WARRANTY: 5 Years parts and labor.
MEMORY: Storage up to 1000 Event locations, 0-99 Event code identifiers,
Distance, Time & Speed. (RAC-200 Only)
DATA OUTPUT: Serial RS-232, 300 to 19,200 Baud rate, user selectable.
(RAC-200 Only)
EXAMPLE: JAMAR Technologies RAC-100, JAMAR Technologies RAC200 or equal.
A-3
RAC-100 and 200 User’s Manual
DPU-414 Thermal Printer
Operating Procedures
These instructions can be used to conduct surveys and download data using the DPU-414 Printer. Refer to the printer’s Operation Manual for more
detailed information on the printer.
The DPU-414 Printer is a portable thermal printer that can operate on its
internal rechargeable batteries or from the AC Power Adapter. Used in the
vehicle, you are able to obtain a real-time printout of Event Code, Distance,
Elapsed Time and Speed. With a full charge, the batteries provide power for
approximately 3000 printed lines. When used in the office, it is recommended that you use the AC Power Adapter to extend battery life.
Mobile Operation
Make sure you fully charge the printer batteries before beginning a survey
and turn off the printer when it is not in use.
Step 1 Make sure the POWER switch on both the DPU-414 and the
RAC-200 are in the OFF position.
Step 2 Using the interface cable provided, plug the snap in or 9 pin
connector into the DATA port on the RAC-200 and the 25 pin
"D-type" connector into the top receptacle on the back of the
DPU-414 printer. Two screws on the connector can be tightened
to ensure the connector does not accidently come loose.
Step 3 Turn on the RAC-200 and the DPU-414. The On Line light on
the printer should be lit. To advance the paper, the printer must
be Off Line. Hold down the Feed button, then put the printer
back On Line to print.
Office Operation
Step 1 Connect the RAC-200 and the DPU-414 as described in Mobile Operation.
Step 2 Plug the RAC-200 into the JAMAR Power Supply/Signal Generator. Plug the AC Power Supply into the printer.
Step 3 Turn on both units. The printer must be Off Line to advance the
paper and On Line for printing.
A-4
Appendix
Charging Printer Batteries
The battery discharges when not used for a long period of time. Recharge
the battery immediately after purchase or after long periods of storage or
inactivity.
Step 1 Turn off power switch.
Step 2 Plug the DC connector into the back of the Printer then, the AC
Adapter into an AC outlet.
Step 3 Allow the battery to charge 10 hours. DO NOT charge continuously for more than 24 hours.
Step 4 When finished charging, unplug the AC Adapter then the DC
connector from the Printer.
Loading Printer Paper
Step 1 Using your thumb, pull the paper holder toward the back of the
Printer (Fig. A.1).
Step 2 Lift the cover upwards.
Step 3 Turn power switch ON.
Step 4 Cut or fold the paper into an inverted "V" (Fig. A.2).
Step 5 Place the paper roll onto the inside of the cover.
Step 6 Push the top of the paper into the inlet and feed it by hand until you can see the top of the paper from the paper cutter.
Step 7 Press and hold the paper feed button until the paper feeds
straight and smoothly. When the paper is correctly set, the Off
Line lamp stops flashing and stays lit.
NOTE: Red lines appear on both edges of the paper when the roll is about
to run out. Use only Jujo Paper Co. paper, part number TP411-28CL.
Figure A.1
Figure A.2
A-5
RAC-100 and 200 User’s Manual
This page was intentionally left blank.
A-6
Glossary
Glossary
G-1
RAC-100 and 200 User’s Manual
Refer to the page number listed after each entry for more information
Add — black button used to count up or add value to the screen on the DMI.
Page 4-4.
Baud Rate — speed at which data is transferred to a computer. The RAC200’s baud rate ranges from 300 to 19200. Page 4-14.
Cal — blue button on the DMI, it is used when calibrating the DMI or to
manually enter a new calibration number. Page 4-3.
calibration course — known distance used when calibrating the DMI. One
thousand feet is ideal, but it should not be less than 500 feet. Page 3-2.
calibration number — a number, unique to each vehicle, that represents the
pulses from the transmission received over a set distance. This number
should be as near to 0.500 - 1.200 as possible, and is necessary for the DMI
to count. Page 3-2.
CLR (Clear) — black button on the DMI that resets the distance or time
to zero. Page 4-4.
C-Hold (Count Hold) — red button on the DMI which stops the computation of distance pulses. Page 4-2.
D-Hold (Display Hold) — red button on the DMI which stops the display,
but allows the DMI to continue accumulating distance internally. Page 42.
DMI — generic industry term meaning Distance Measuring Instrument.
The RAC-100 and 200 are DMIs.
DPO (Distance Pulse Output) — gray button on the DMI, when activated
it will provide a +5VDC (TTL level) output pulse at a pre-selected distance
interval and signal duration. Page 4-4, 4-5.
EEPROM — stands for Electronically Erasable Programmable Read Only
Memory. It contains the permanent memory of the DMI. Page A-3.
G-2
Glossary
ENTR (Enter) — black button on the DMI, it accepts any number keyed
into the display. Page 4-4.
Erse (Erase) — red button on the RAC-200, it is used to clear all memory
locations in the DMI. Page 4-7.
LED — stands for light emitting diode, the display used with the JAMAR
DMI. Page A-3.
Modular Distance Sensor (MDS) – a device which, when installed, conditions pulses from a vehicle’s speed sensor to the DMI. Page 2-3.
nonvolatile memory — the permanent memory of the DMI, it is where the
data and calibration number are stored. It will remain here for up to forty
years unless changed. Page A-3.
Prnt (Print) — black key on the RAC-200, it is used to print data. Page 47.
pulses — signals generated by a vehicle which, when conditioned through
a sensor, are read by the DMI to calculate distance traveled. Page 1-3.
pulse rate — the frequency at which pulses are sent to the DMI. They can
vary from 4,000 to more than 100,000 per mile. Page 1-3.
P-Dist (Pre-Distance) — yellow button on the DMI, it allows you to enter
a known distance into the DMI. Page 4-3.
RAC — Road Analysis Computer. Brand name for JAMAR’s distance
measuring instruments.
RS-232 Serial output — a feature of the RAC-200, it allows collected data
to be dumped directly into a computer or printer. Page 4-12.
Sensor Error Detection (SED) — a feature of JAMAR’s DMIs, it alerts the
user to a sensor malfunction. Page 5-2.
Stor (Store) — green button on the RAC-200, it is used for the memory
store procedure. Page 4-7, 4-8.
G-3
RAC-100 and 200 User’s Manual
Sub — black button used to count down or subtract value from screen on
the DMI. Page 4-4.
T-S — gray button on the DMI, it allows you to select the display for your
elapsed time or speed. Page 4-3.
unit — gray button on the DMI, it selects the desired unit of measurement,
from miles to feet to meters. Page 4-3.
View — yellow button on the RAC-200, it is used for the memory view
procedure. Page 4-7.
WinRAC — software available from JAMAR for use with the RAC-200.
The program can analyze data downloaded from the RAC-200, as well as
collect data in a real-time mode. Page 4-12.
G-4
Notes:
G-5
RAC-100 and 200 User’s Manual
G-6