1
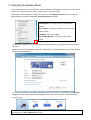
Quick Installation Guide USB to HDMI Adapter 1. Installing the Driver Caution: DO NOT connect the adapter to your computer before installing the provided driver. Insert the provided CD into your disc drive and the installer program will run automatically when the Driver CD is inserted. Then follow the on-screen prompts to complete the installation. For Windows Vista / Windows 7 / Windows® 8 users: A. Please click on Run Autorun.exe to execute the installer program. B. If you encounter a User Account Control dialog box when attempting to install a program, enter an administrator password or click Allow/ Yes to start the installation. C. You may see the License agreement screen prompted. Please click on I Accept to start the Driver installation. D. When prompted to restart your computer, click Yes. For Windows XP users: A. You may see the License agreement screen prompted. Please click on I Accept to start the Driver installation. B. When prompted to restart your computer, click Yes. 2. Making the Connection Please connect the USB to HDMI Adapter to your monitor or computer first, you will see the DisplayLink Manager Icon in system tray that looks like a monitor Please wait while DisplayLink software is configured for first use. Your screens may temporarily go black or flash during this process. Please click “OK” to start to use USB to HDMI Adapter. 3. Fit to TV Function ”Fit to TV” function is for HDMI TV connections. A new user interface option allows the correction of overscan on TVs when using a USB to HDMI adapter. The” Fit to TV” function allows a user to change the size of their Windows desktop to allow the entire desktop to be viewed. 4. Changing the Display Mode There are several ways you can utilize the monitor attached on the adapter. The add-on monitor can be configured to use either “mirror mode”, “extend mode” or “primary mode”. On Windows XP and Windows Vista, you can click on the DisplayLink Device icon to control the display adapter and select configuration Display Properties as below. -Extend Mode: The screen is part of the extended desktop. -Mirror Mode: The screen copies the contents of the primary screen. -Off Mode: The screen is black. -Set as Main Monitor: The screen is the primary screen. On Windows 7/Windows 8, you can change the appearance of your displays through the Window. ® Moreover, additional controls are available in Windows 7/Windows 8: Orientation (Portrait, landscape, rotated ® portrait, rotated landscape) To control the behavior of an attached DisplayLink device (or screen), it is possible to use Windows Key+P to display a menu (and cycle through it) to allow: Disconnect Projector, Duplicate, Extend, Projector Only. This Quick Installation Guide describes only the basic instructions on installation. For more information, please refer to the User’s Manual burnt in CD.