1
LeiseCap
Digital Imaging and Data Base Software
User Manual
Software Version 3.9 (02/2012)
1 Table of Contents
1
2
Table of Contents ................................................................................................................................1-2
System Requirements .......................................................................................................................2-10
2.1 Minimum requirements ..................................................................................................................2-10
2.2 Optimal configuration ....................................................................................................................2-10
3
Performance Description ..................................................................................................................3-12
3.1 Image recording ..............................................................................................................................3-12
3.2 Image processing ............................................................................................................................3-14
3.3 Database .........................................................................................................................................3-16
3.4 Printing ...........................................................................................................................................3-18
3.5 Database search ..............................................................................................................................3-19
3.6 Canon EOS digital camera .............................................................................................................3-20
3.7 Export modules...............................................................................................................................3-20
3.8 Special modules ..............................................................................................................................3-21
4
First Steps .........................................................................................................................................4-22
4.1 Installing the dongle .......................................................................................................................4-22
4.2 Selecting the camera .......................................................................................................................4-22
4.3 Camera configuration .....................................................................................................................4-23
4.3.1 Changing the camera settings ..................................................................................................4-23
4.3.2 Setting the video input .............................................................................................................4-27
4.3.3 Initialising video amplifier.......................................................................................................4-27
4.4 Foot switch configuration ...............................................................................................................4-28
4.4.1 Joystick-ID ...............................................................................................................................4-30
4.4.2 Snapshot ...................................................................................................................................4-30
4.4.3 Record video ............................................................................................................................4-30
4.4.4 Left/right ..................................................................................................................................4-30
4.4.5 Trigger snapshot ......................................................................................................................4-30
4.4.6 Video full screen ......................................................................................................................4-30
4.4.7 Still image ................................................................................................................................4-30
4.4.8 Show last image full screen .....................................................................................................4-31
4.4.9 Size of "L/R" images ...............................................................................................................4-31
4.4.10 Left/right overlay in image ....................................................................................................4-31
4.4.11 Use DirectX ...........................................................................................................................4-31
4.4.12 Function test ..........................................................................................................................4-31
4.5 Database .........................................................................................................................................4-31
4.5.1 Video storage configuration.....................................................................................................4-32
4.5.2 Creating a new patient .............................................................................................................4-32
4.5.3 Creating a new study................................................................................................................4-32
4.5.4 Specify active patient ...............................................................................................................4-33
4.6 Printing ...........................................................................................................................................4-33
4.6.1 Configure Quick print ..............................................................................................................4-33
4.6.2 Quick print parameter: .............................................................................................................4-36
4.6.3 Printing images ........................................................................................................................4-38
4.7 Image processing ............................................................................................................................4-38
4.7.1 Loading images ........................................................................................................................4-38
4.7.2 Sorting images .........................................................................................................................4-39
4.7.3 Full screen display ...................................................................................................................4-39
5
The Main Window ............................................................................................................................5-40
1-2
5.1 Settings ...........................................................................................................................................5-40
5.1.1 Login ........................................................................................................................................5-40
5.1.2 Language..................................................................................................................................5-42
5.1.3 Design ......................................................................................................................................5-42
5.1.4 Database ...................................................................................................................................5-43
5.1.5 Configure fields for automatic incrementation ........................................................................5-44
5.1.6 Configure address book search fields ......................................................................................5-45
5.1.7 Configure remote synchronisation ...........................................................................................5-45
5.1.8 Change database path ..............................................................................................................5-45
5.1.9 Database backup ......................................................................................................................5-45
5.1.10 Database search .....................................................................................................................5-45
5.1.11 Quickprint configuration .......................................................................................................5-45
5.1.12 Foot switch ............................................................................................................................5-45
5.1.13 Assign function keys..............................................................................................................5-46
5.1.14 Configure status bar ...............................................................................................................5-46
5.1.15 Printer set-up..........................................................................................................................5-46
5.1.16 Change combo box dropdown height ....................................................................................5-46
5.1.17 GDT .......................................................................................................................................5-47
5.1.18 Canon digital camera .............................................................................................................5-47
5.1.19 Show registered modules .......................................................................................................5-47
5.1.20 Video .....................................................................................................................................5-47
5.1.21 Email ......................................................................................................................................5-47
5.1.22 Reload open files after abnormal programme termination ....................................................5-48
5.1.23 Help .......................................................................................................................................5-48
5.1.24 Exit.........................................................................................................................................5-48
5.2 The status bar ..................................................................................................................................5-48
5.2.1 The popup menu ......................................................................................................................5-49
6
Image processing ..............................................................................................................................6-50
6.1 The menu bar ..................................................................................................................................6-50
6.1.1 Menu file ..................................................................................................................................6-51
6.1.2 Menu edit .................................................................................................................................6-55
6.1.3 Menu Twain .............................................................................................................................6-56
6.1.4 Image list .................................................................................................................................6-57
6.1.5 Sort images ..............................................................................................................................6-57
6.1.6 Filter layer ................................................................................................................................6-58
6.1.7 Additional button .....................................................................................................................6-58
6.2 The image window .........................................................................................................................6-60
6.2.1 The popup menu ......................................................................................................................6-60
6.2.2 Scale .........................................................................................................................................6-61
6.2.3 Status bar .................................................................................................................................6-62
6.3 Video player selection ....................................................................................................................6-62
6.3.1 Standard renderer .....................................................................................................................6-62
6.3.2 VMR9 renderer ........................................................................................................................6-62
6.3.3 GR32 player .............................................................................................................................6-62
6.4 The video player .............................................................................................................................6-64
6.4.1 Scaling .....................................................................................................................................6-64
6.4.2 Volume ....................................................................................................................................6-65
6.4.3 Speed........................................................................................................................................6-65
6.4.4 Timeline ...................................................................................................................................6-65
6.4.5 Operating bar ...........................................................................................................................6-65
6.4.6 Simple video cutting ................................................................................................................6-65
1-3
7
The video page ..................................................................................................................................7-67
7.1 Video context menu ........................................................................................................................7-68
7.1.1 Foot switch trigger ...................................................................................................................7-68
7.1.2 Switch video input ...................................................................................................................7-69
7.1.3 Overscan ..................................................................................................................................7-69
7.1.4 Show help on problem .............................................................................................................7-69
7.1.5 Show status bar dynamically ...................................................................................................7-69
7.1.6 Place button panel left..............................................................................................................7-69
7.1.7 Hide title bar ............................................................................................................................7-69
7.2 The button panel .............................................................................................................................7-69
7.2.1 Camera selection ......................................................................................................................7-69
7.2.2 Snapshot ...................................................................................................................................7-69
7.2.3 Record video ............................................................................................................................7-69
7.2.4 Full screen ................................................................................................................................7-70
7.2.5 Still ...........................................................................................................................................7-70
7.2.6 Review .....................................................................................................................................7-70
7.2.7 Video options "General" ..........................................................................................................7-70
7.2.8 Video options "Video" .............................................................................................................7-75
7.3 White balance .................................................................................................................................7-76
7.4 The video preview window ............................................................................................................7-77
7.5 The video amplifier (WDM) ..........................................................................................................7-77
7.6 The video amplifier (uEye) ............................................................................................................7-78
7.7 Magnification .................................................................................................................................7-78
7.8 Recordings ......................................................................................................................................7-78
7.8.1 Save image as….......................................................................................................................7-79
7.8.2 Store image in database ...........................................................................................................7-79
7.8.3 Print image ...............................................................................................................................7-79
7.8.4 Print image with patient data ...................................................................................................7-79
7.8.5 Open image in image processing .............................................................................................7-79
7.8.6 Show full screen.......................................................................................................................7-79
7.8.7 Clear thumb list........................................................................................................................7-80
7.8.8 Configure quickprint ................................................................................................................7-80
7.8.9 Delete selected image ..............................................................................................................7-80
7.9 The status bar ..................................................................................................................................7-80
7.9.1 Video........................................................................................................................................7-80
7.10 Patient data quick input ................................................................................................................7-81
8
The database .....................................................................................................................................8-82
8.1 Data grid .........................................................................................................................................8-83
8.1.1 Data grid context menu ............................................................................................................8-84
8.2 The data list ....................................................................................................................................8-88
8.2.1 Data list context menu .............................................................................................................8-89
8.3 Preview ...........................................................................................................................................8-91
8.3.1 Preview context menu..............................................................................................................8-92
8.4 Button patients ................................................................................................................................8-95
8.4.1 Edit ...........................................................................................................................................8-95
8.4.2 New patient ..............................................................................................................................8-96
8.4.3 Erase.........................................................................................................................................8-96
8.4.4 Sort sequence ...........................................................................................................................8-96
8.4.5 Export ......................................................................................................................................8-96
8.5 Button examinations .......................................................................................................................8-97
8.5.1 Edit ...........................................................................................................................................8-97
1-4
8.5.2 Add ..........................................................................................................................................8-97
8.6 Button images .................................................................................................................................8-98
8.6.1 Edit ...........................................................................................................................................8-98
8.6.2 Erase.........................................................................................................................................8-98
8.6.3 Load images .............................................................................................................................8-98
8.6.4 Send to… .................................................................................................................................8-99
8.6.5 Import ......................................................................................................................................8-99
8.6.6 Select........................................................................................................................................8-99
8.6.7 Show all images .......................................................................................................................8-99
8.6.8 Show full screen.......................................................................................................................8-99
8.6.9 Video editing .........................................................................................................................8-100
8.7 The navigation bar ........................................................................................................................8-100
8.8 Status bar ......................................................................................................................................8-100
8.9 Input dialogue ...............................................................................................................................8-100
8.9.1 Data fields ..............................................................................................................................8-100
8.9.2 Text fields ..............................................................................................................................8-101
8.9.3 Macros ...................................................................................................................................8-101
8.9.4 Dropdown lists .......................................................................................................................8-101
8.9.5 Deleting a text field................................................................................................................8-103
8.9.6 Insert entry into the dictionary ...............................................................................................8-103
8.9.7 Insert entry from dictionary ...................................................................................................8-104
8.9.8 Input dialogue context menu..................................................................................................8-104
8.9.9 Show dictionary dialogue ......................................................................................................8-104
8.9.10 Create dictionary entry ........................................................................................................8-105
8.9.11 Ask "Save" when data is modified ......................................................................................8-105
8.9.12 Display "Buffer-button".......................................................................................................8-105
8.9.13 Leave dialogue with "ESC" .................................................................................................8-105
8.9.14 Delete empty trailing lines ...................................................................................................8-105
8.9.15 Allow date and time editing.................................................................................................8-105
8.9.16 Double data list ....................................................................................................................8-105
8.9.17 TAB key for text fields ........................................................................................................8-105
8.10 Configure display .......................................................................................................................8-106
8.10.1 Data grid ..............................................................................................................................8-106
8.10.2 Data list ................................................................................................................................8-106
8.11 Adjust display names of the data fields ......................................................................................8-107
8.12 Database import..........................................................................................................................8-108
8.12.1 Database selection (1) ..........................................................................................................8-109
8.12.2 Table selection (2) ...............................................................................................................8-109
8.12.3 Data selection (3) .................................................................................................................8-109
8.12.4 Button panel data selection (4) ............................................................................................8-110
8.12.5 Preview "images and videos" (5) .........................................................................................8-110
8.12.6 Start import (6) ....................................................................................................................8-110
8.13 Database export ..........................................................................................................................8-110
8.13.1 Export via saved database search (1) ...................................................................................8-111
8.13.2 Export via "Drag and Drop" ................................................................................................8-111
8.13.3 Export of the entire database ...............................................................................................8-111
8.13.4 Data selection (3) .................................................................................................................8-111
8.13.5 Button panel data selection (4) ............................................................................................8-112
8.13.6 Preview "images and videos" (5) .........................................................................................8-112
8.13.7 Start export (6) .....................................................................................................................8-112
8.13.8 Options (2) ...........................................................................................................................8-113
1-5
8.14 Video archiving ..........................................................................................................................8-114
8.14.1 Save video to file .................................................................................................................8-115
8.14.2 Storage path .........................................................................................................................8-115
8.14.3 Display warning if less than x GB of disk space are free ....................................................8-115
8.14.4 Automatically cut long time recordings after x minutes .....................................................8-115
8.14.5 Save only videos greater than x MByte as file ....................................................................8-115
9
Database search ..............................................................................................................................9-116
9.1 Upper button panel .......................................................................................................................9-117
9.1.1 Load present search requests .................................................................................................9-117
9.1.2 New ........................................................................................................................................9-117
9.1.3 Edit .........................................................................................................................................9-117
9.1.4 Save........................................................................................................................................9-117
9.1.5 Save as ...................................................................................................................................9-117
9.1.6 Show ......................................................................................................................................9-118
9.1.7 Do Search...............................................................................................................................9-118
9.1.8 Jump to database ....................................................................................................................9-118
9.2 Creating search filter ....................................................................................................................9-118
9.2.1 Linking rule (AND/OR).........................................................................................................9-119
9.2.2 Setting brackets ("(…)") ........................................................................................................9-119
9.2.3 Observe Upper/lower case (U/l) ............................................................................................9-120
9.2.4 Quick changing of individual parameters ..............................................................................9-120
9.3 Edit search filter ...........................................................................................................................9-120
9.3.1 Logic operation ......................................................................................................................9-121
9.3.2 Table ......................................................................................................................................9-121
9.3.3 Case sensitive.........................................................................................................................9-121
9.3.4 Discard spaces........................................................................................................................9-121
9.3.5 Database field ........................................................................................................................9-121
9.3.6 Filter condition.......................................................................................................................9-121
9.4 Button "patients" ..........................................................................................................................9-123
9.4.1 The master table .....................................................................................................................9-123
9.4.2 Configure data grid ................................................................................................................9-123
9.4.3 WORD export ........................................................................................................................9-123
9.4.4 EXCEL export .......................................................................................................................9-123
9.5 Button "Examinations" .................................................................................................................9-123
9.5.1 Master examinations ..............................................................................................................9-124
9.5.2 Configure data grid ................................................................................................................9-124
9.6 Button "Images" ...........................................................................................................................9-124
9.6.1 Master images ........................................................................................................................9-124
9.6.2 Load selected .........................................................................................................................9-124
9.6.3 Select all.................................................................................................................................9-124
9.6.4 Unselect all ............................................................................................................................9-124
9.6.5 WORD-Export .......................................................................................................................9-124
9.6.6 PowerPoint-Export ................................................................................................................9-124
9.7 Popup menu data grid ...................................................................................................................9-125
9.7.1 Configure display...................................................................................................................9-125
9.7.2 Highlight whole row ..............................................................................................................9-125
9.7.3 Automatic sort sequence ........................................................................................................9-125
9.7.4 Set optimal column width ......................................................................................................9-125
9.8 Popup menu preview ....................................................................................................................9-126
9.8.1 Columns .................................................................................................................................9-126
9.8.2 Show full screen.....................................................................................................................9-126
1-6
10
Network operation ........................................................................................................................10-127
10.1 Installing Firebird database server ...........................................................................................10-127
10.2 Setting the database path ..........................................................................................................10-127
10.2.1 New entry (1) .....................................................................................................................10-128
10.2.2 Selected entry…(2) ............................................................................................................10-129
10.2.3 Available databases (3) ......................................................................................................10-130
10.2.4 This computer is configured as database server for other clients (4) ................................10-130
10.3 Remote control .........................................................................................................................10-130
10.3.1 Configure remote synchronisation .....................................................................................10-131
11 Additional modules .......................................................................................................................11-132
11.1 Export functions .......................................................................................................................11-133
11.1.1 WORD-Export ...................................................................................................................11-133
11.1.2 PowerPoint-Export ............................................................................................................11-138
11.2 CD/DVD writing ......................................................................................................................11-140
11.2.1 Windows XP ......................................................................................................................11-140
11.2.2 Windows Vista, Windows 7 ..............................................................................................11-141
11.3 Video recording ........................................................................................................................11-145
11.3.1 Video recording .................................................................................................................11-145
11.3.2 HD-Recording ...................................................................................................................11-148
11.4 Image processing ......................................................................................................................11-148
11.4.1 Markers and texts...............................................................................................................11-149
11.4.2 Filter functions ...................................................................................................................11-149
11.4.3 Histogram ..........................................................................................................................11-150
11.5 Database ...................................................................................................................................11-151
11.5.1 Database backup ................................................................................................................11-151
11.5.2 Free database configuration ...............................................................................................11-153
11.5.3 Dictionary ..........................................................................................................................11-156
11.5.4 KV card reader...................................................................................................................11-158
11.6 GDT practice software integration ...........................................................................................11-159
11.6.1 Client identification ...........................................................................................................11-160
11.6.2 Server identification...........................................................................................................11-160
11.6.3 Transfer file .......................................................................................................................11-160
11.6.4 Return file for examination................................................................................................11-160
11.6.5 Folder for images and videos .............................................................................................11-160
11.6.6 Options...............................................................................................................................11-160
11.6.7 Field assignments ..............................................................................................................11-162
11.6.8 Additional examination assignments .................................................................................11-162
11.6.9 Additional image data assignments ...................................................................................11-162
11.6.10 Button ..............................................................................................................................11-163
11.7 Canon EOS DSLR interface .....................................................................................................11-163
11.7.1 Button panel .......................................................................................................................11-164
11.7.2 LiveView ...........................................................................................................................11-165
11.7.3 Recordings .........................................................................................................................11-166
11.7.4 CF card ..............................................................................................................................11-167
11.7.5 Options...............................................................................................................................11-167
11.7.6 HDMI.................................................................................................................................11-171
11.8 Document printing (print) ) ......................................................................................................11-171
11.8.1 Print template .....................................................................................................................11-172
11.8.2 Data source ........................................................................................................................11-172
11.8.3 Address ..............................................................................................................................11-172
11.8.4 Edit.....................................................................................................................................11-172
1-7
11.8.5 Reload template .................................................................................................................11-172
11.8.6 Settings ..............................................................................................................................11-173
11.8.7 Serial letter function ..........................................................................................................11-173
11.9 Document database (documents) .............................................................................................11-175
11.9.1 Button documents ..............................................................................................................11-176
11.9.2 Data grid popup menu .......................................................................................................11-178
11.9.3 Database filter ....................................................................................................................11-178
11.9.4 Edit document data ............................................................................................................11-179
11.9.5 Button RTF-document .......................................................................................................11-179
11.9.6 Button display ....................................................................................................................11-180
11.9.7 Document info ...................................................................................................................11-180
11.10 Address book..........................................................................................................................11-181
11.10.1 Documents .......................................................................................................................11-181
11.10.2 Category filter ..................................................................................................................11-181
11.10.3 Deactivate filter ...............................................................................................................11-182
11.10.4 Entry: ...............................................................................................................................11-182
11.10.5 Data grid popup menu .....................................................................................................11-182
11.10.6 Configure address lookup fields ......................................................................................11-183
11.11 Print template generation (template) ......................................................................................11-184
11.11.1 Menu ................................................................................................................................11-185
11.11.2 Tool bar "Load/save template " .......................................................................................11-190
11.11.3 Load template ..................................................................................................................11-190
11.11.4 Save template...................................................................................................................11-190
11.11.5 Save template as ..............................................................................................................11-190
11.11.6 Manage templates ............................................................................................................11-191
11.11.7 Editor tool bar ..................................................................................................................11-192
11.11.8 Creating a print template .................................................................................................11-193
11.11.9 Configure conditional fields ............................................................................................11-196
11.11.10 Calculations in tables.....................................................................................................11-198
11.12 HD-video recording ...............................................................................................................11-199
11.12.1 Hardware installation.......................................................................................................11-200
11.12.2 Camera selection..............................................................................................................11-200
11.12.3 Dialogue video settings ...................................................................................................11-200
11.12.4 Extended bitrate ...............................................................................................................11-204
11.13 Canon EOS HD-video recording ...........................................................................................11-204
11.13.1 HDMI configuration ........................................................................................................11-205
11.13.2 HD recording configuration.............................................................................................11-205
11.14 HD-video streaming ...............................................................................................................11-205
11.14.1 Streaming active ..............................................................................................................11-206
11.14.2 Port ..................................................................................................................................11-206
11.14.3 Bit rate .............................................................................................................................11-206
11.14.4 Maximum connections ....................................................................................................11-206
11.14.5 Deinterlacing ...................................................................................................................11-206
11.14.6 HD-Streaming Client .......................................................................................................11-207
11.15 Panasonic HD-camera direct control .....................................................................................11-207
11.1 HD video processing (video cutting) .......................................................................................11-209
12 Frequently asked questions ...........................................................................................................12-210
12.1 What settings are needed for multi-user operation? .................................................................12-210
12.2 Setting the database path ..........................................................................................................12-210
12.3 Bad image quality.....................................................................................................................12-210
12.3.1 Deinterlacing filter off .......................................................................................................12-210
1-8
12.3.2 Video in half resolution only .............................................................................................12-210
12.4 The camera is not operated with a "USB 2.0" connection .......................................................12-210
12.5 Video amplifier misadjusted ....................................................................................................12-210
12.6 Only stripes in the live image after recording ..........................................................................12-210
12.7 No signal with the USB box .....................................................................................................12-211
12.8 Black bars in the recorded image .............................................................................................12-211
12.9 Foot switch is not working .......................................................................................................12-211
12.10 Programme runs in demo mode .............................................................................................12-211
13 Index .............................................................................................................................................13-212
1-9
2 System Requirements
To work comfortably with the programme, your PC should meet these requirements:
2.1 Minimum requirements
Colposcope
3MVC
3ML and 3MLW
Internal: Point Grey
Chameleon
Dual Core CPU as of
1,6 GHz
External: Canon EOS
DSLR
Dual Core CPU as of
1,6 GHz
External: Point Grey
Flea USB 3.0
Dual Core CPU as of
2 GHz
Memory
2 GB
2 GB
3 GB
Operating system
Windows XP
Windows XP
Windows 7
Hard disc – free
memory2
80 GB
80 GB
80 GB
Graphics and monitor
1280x960 Pixel
1280x960 Pixel
1280x960 Pixel
Interfaces
3x USB 2.0
3x USB 2.0
1xUSB 3.0 + 2x USB 2.0
Camera
Processor1
2.2 Optimal configuration
Colposcope
3MVC
3ML und 3MLW
Internal: Point Grey
Chameleon
Dual Core CPU as of
1,8 GHz
External: Canon EOS
DSLR
Dual Core CPU as of
1,8 GHz
External: Point Grey
Flea USB 3.0
Quad Core CPU as of
2 GHz
Memory
2 GB
2 GB
3 GB
Operating system
Windows 7
Windows 7
Windows 7
Hard disc – free
memory2
120 GB
120 GB
500 GB
Graphics and monitor
1280x960 Pixel
1920x1080 Pixel
1920x1080 Pixel
Interfaces
3x USB 2.0
3x USB 2.0
1xUSB 3.0 + 2x USB 2.0
Camera
Processor1
1) Excluded: Intel Atom and AMD C50
2) The optimal size of the hard disc depends on the recording frequency of pictures and videos
2-10
If your PC does not meet all of these requirements, the programme process may be impaired. In extreme
cases, you cannot use the programme. If you have any questions on this subject, contact:
Central customer service
Leisegang Feinmechanik-Optik GmbH
Leibnizstr. 32
10625 Berlin
Germany
Tel:
+49 30 319 009-0
Fax:
+49 30 313 5992
Email:
[email protected]
2-11
3 Performance Description
All coloured modules are not part of the basic version.
3.1 Image recording
Function
Live video display in real time
Full-screen display
Still
Last Image Hold
Recording images
Automatic saving to the database
Automatic opening of image
processing
Operation via foot switch
Hardware deinterlacing
Description
Basic
The camera's video image is written in the
graphics card memory without delay. This
x
leads to very low strain on the computer's
CPU.
Foot switch, keyboard or mouse can be used
to switch the video image to the entire screen
x
resolution.
Foot switch, keyboard or mouse can be used
to freeze video image, e.g. to talk about the
findings to the patient. The still can be saved
x
if required. This function is also available in
full screen mode.
Foot switch, keyboard or mouse can be used
to display the last image recorded, e.g. to
decide whether another recording is necessary
X
or not. This function is also available in full
screen mode.
Foot switch, keyboard or mouse can be used
to record images in full PAL/NTSC
X
resolution. This function is also available in
full screen mode.
The recorded images and videos can be either
inserted into the database automatically or
x
only loaded to the image processing to make a
manual selection.
The recorded images and videos can also be
automatically loaded to image processing.
x
This is sensible to gain an overview right after
completing the recordings.
The functions "Snapshot", "Record video",
"Still", "Last Image Hold" and "Full Screen"
can be put on the different foot switches via
x
the foot switch configuration dialogue. This
permits comfortable work, in particular in
case of three and four foot switches.
The line skip method of the video camera
results in so-called comb artefacts. These can
be eliminated entirely with the graphics card
x
deinterlacing function. The computer's CPU is
not put under any strain.
3-12
3.1 Image recording
Auto-Clear
Video amplifier
Image list
Left/right display
Recording videos
The function "Auto-Clear" ensures that only
those images that belong to the current patient
are open in image processing. Once the
patient in the database is changed, all images
are closed in image processing. This function
can also be switched off ("Settings" in the
main window).
The "Video amplifier" can be used to set
important parameters like brightness or
contrast. They can be saved and called again
with four switches. This may be sensible if
you frequently work with changing lighting.
The image list displays all recordings made as
slides.
For recordings where the assignment of left
and right is important, e.g. in the area of the
eyes, the software can be configured to
display and save "L" and "R" right in the
image.
Video recording either at full or half
PAL/NTSC resolution with 25/30 frames per
second. Video compression in MPEG 4 either
in real time or after recording. This leads to
higher-quality recordings with minimum file
sizes
3-13
x
x
x
x
3.2 Image processing
Function
General
Display
Freely configurable display of
the patient files per image/video
Parallel display of images and
videos
Concurrent playing of several
videos
Extracting images from videos
under maintenance of patient
reference
Assumption of changed images
to the database
Import, export function
Deinterlace filter
Changing image and colour values
Brightness
Contrast
Saturation
Red, green, blue values can be
changed individually
Aligning images
Free alignment
Quick alignment using predefined switches
Cutting and pasting screen contents
Create as new image
Insert as image in the image
Turn partial sections
Transparent display
Smooth zoom function via sliders
Description
Basic
Any number of images and videos can be
displayed, edited, enlarged and compared in
x
parallel in image processing.
Every image has its own status bar where the
associated patient data are displayed. The data
to be displayed can be configured freely.
Changed or flagged images are inserted into
the database as a new image. The original
recordings are always retained.
x
Loading and saving images and videos to the
hard disc or USB thumb drive.
Deinterlace filter: See "Image Recording
Hardware Interlacing"
Like at a screen, the parameters on the left
can be comfortably changed with sliders.
x
The above switches can be used to quickly
put all opened images and videos in the
respective alignment.
The clipboard can be used to insert complete
images or partial sections (markers and
filters) in other images or to create them as a
new image. The inserted sections can now be
turned freely and displayed transparently with
a slider. This makes it possible, e.g. to put
before and after images on top of each other
for detailed comparison.
On the left of the window, there is an
additional slider for smooth enlargement or
reduction of the image. This function is also
coupled with the mouse scroll wheel. The
image section can be freely moved by
clicking it with the mouse.
3-14
x
x
x
3.2 Image processing
Quick pressure
Twain interface
Support for scanners
Support for digital cameras
Setting markers
arrows
circles
rectangles
position, size, colour, line
thickness can be selected freely
Entering text
Position, font, size, colour of
text can be selected freely
Filter functions
Magnifying glass
Sharpness, edge emphasis...
Special filter (Prewit, Laplace)
Histogram functions
1. Manual
2. Balance
3. Extension
Wrong colours
Negative
Softener
The menu "File->Print image" permits a
quick print of the current image with the
associated patient data. The print template
consists of a letterhead, patient data and
image. The letterhead and patient data to be
printed can be configured freely (Settings>Quickprint configuration). The image is
always scaled to the full width of the paper.
The optional "Print module" with print
template generation, serial letter function,
address book, etc. offers much more extensive
options.
The Twain interface permits importing
images from scanners and digital cameras into
image processing and inserting them into the
database if required.
The images can be applied with markers to
indicate details.
Any texts may be added to the markers, e.g.
to describe findings right in the image.
Special filters, e.g. to improve underilluminated areas of an image. Particularly
good results are provided by the histogram
function.
Black/white recordings can be coloured with
the wrong colour filter.
The selected areas can be "frozen" and moved
to any position in the image or copied and
inserted in other images.
3-15
x
x
3.3 Database
Function
General
Free configuration of the database
field display
Sorting by patient, study, findings
Import / Export of images and videos
Printing images
Network, multi-station capability
Description
Basic
The database is used to record and save
patient data, studies, images, videos and
documents.
The currently selected patient is visible at all
X
times in the main window's status bar.
The displayed data is freely configurable
(right mouse button->Configure view).
All database fields can be displayed and
hidden as required, moved within the data
X
grids and used to sort the datasets.
The datasets can be sorted freely. By default,
all patients are listed and only the studies and
images for these patients are displayed.
However, it is also possible to have all studies
X
displayed and to sort them, e.g., by findings.
This makes it easier to find images of
different patients with the same findings to
compare them in image processing.
Images and videos that are saved in the
database can be exported to a hard disc or
thumb drive. Vice versa, images can also be
X
imported into the database from these media,
e.g. from a digital camera.
Use the button "Extras->Print image" in the
preview or the right mouse button on the
image for a quick printout of the current
image with the associated patient data. The
print template consists of a letterhead, patient
data and image. The letterhead and patient
data to be printed can be configured freely
x
(Settings->Quickprint configuration). The
image is always scaled to the full width of the
paper. The optional "Print module" with print
template generation, serial letter function,
address book, etc. offers much more extensive
options.
With the network module, you can access a
database from several workplaces, e.g. to
work with the same data in several treatment
X
rooms or to enter patient and study data at one
computer and to record the images at a
different one (see remote control).
3-16
3.3 Database
Remote control in the network
Creating own database fields
Dictionary
Card reader
GDT/BDT
The remote control module permits
synchronisation of another computer in the
network. This means that the active patient
and the active study of one computer are also
captivated at a second one by a button. Thus,
the physician does not have to enter data and
select the patient but only needs to operate the
foot switch.
To achieve best adjustment to personal
requirements, this module offers the option
for the user to create any database field in any
table.
The dictionary links recurring terms and
longer descriptions with abbreviations, they
can be easily selected from a dropdown list
during data input. The field "Category" also
permits explicit assignment of all entries to a
specific database field, so that they then only
appear in the list of this field.
You may simplify the input and search for
patient data greatly by connecting your
computer to a chip card reader. The
programme can use it to import the patient
data from insurance cards. If the patient is
found in the database, he is automatically
selected; otherwise, he will be set up newly
with the data from the insurance card.
The GDT/BDT interface is used to connect
the programme to a present practice software.
The practice software provides a file
containing the data of the selected patient.
This file is imported and the patient is
selected or, if not present yet, created.
Submission of data to the practice software is
also possible. If active, the practice software
is informed about every newly recorded
image or video and receives a link to the new
files via the return file.
3-17
X
3.4 Printing
Function
General
Quick print
Template generation
Print page
Serial letters
Description
Basic
The print module offers a lot more options
than the quick-print function. This module
offers an interface similar to WORD, in
which customised print templates with
placeholders for database fields or documents
with several images can be created. The
resulting documents can be assigned function
buttons to generate immediate printout or to
be viewed in print preview and edited before
printing. All database fields can be placed
anywhere in the text. Together with the
address book module, they permit simple
creation of letters to health insurances or
transfers to colleagues.
You may select from three sources - image
processing, the database and database search from where images and data are to be
inserted.
In the context of the serial letter module, you
may, for example, send thank you letters to all
of your colleagues.
The print module's quick-print function offers
the possibility of assigning function buttons to
different print templates so that you can print,
e.g., a referral to a colleague by pushing a
button after recording an image and entering
the findings.
An interface similar to WORD can be used to
create individual print templates with
placeholders for database fields or documents
with several images and to save them as
templates in the database. Additionally, you
may define "Conditional fields" in a separate
database. They output a specified text based
on the value of a freely selectable database
field, e.g. Mr/Ms depending on gender.
These templates then can be selected via a
dropdown list on the print page.
On the print page, among others you may
choose a pre-created print template, determine
the source of the images to be printed, adjust
the order of the images to be printed, select an
address from the address book, edit the
documents and submit the print order.
The module serial letters permits printing, e.g.
several corresponding letters with patient data
or addresses from the address book.
3-18
3.4 Printing
Document database
Address book
The document database offers a comfortable
option of archiving printed documents.
Every document is saved in a separate
database with patient and address book
reference so that the document history can be
reviewed at all times. Any saved documents
can also be corrected, printed again and
saved. Another feature is direct integration of
external documents from data carriers and
directly via a scanner.
Together with the address book module, you
can easily generate letters to health insurances
or referrals to colleagues. You may insert the
database fields of the address book in the
documents in template generation as well. On
the print page, you may then select the
corresponding address.
3.5 Database search
Function
General
Complex search with stored search
criteria as a chart
EXCEL Export as a table
WORD Export as a table
Printing
Description
Basic
Database search permits definition of search
requests and recalling them at any time. The
search request also offers the option of
selecting the database fields to be filtered, as
well as selection and order of the result fields.
The preview also offers immediate overview
of the images and videos of the query result.
They can be easily loaded in image
processing by double clicking or by using the
corresponding button.
Complex query charts can be generated in any
manner using AND, OR, NOT, etc. and saved
in the database with an indicative name. Here,
periods like "all studies of the last two weeks"
can be indicated.
All results of the search query can be
exported in an Excel table
All results of the search query can be
exported in a Word document
All results of the database search are available
on the print page and can be inserted into
print templates. The serial letter functions
permit, e.g., contacting all patients who were
found in the search.
3-19
3.6 Canon EOS digital camera
Function
Canon digital camera
Description
This module was developed specifically for
Canon EOS digital cameras and offers the
option of controlling a number of cameras
right via the software. In contrast to the
general digital camera module, e.g. Canon
PowerShot modules also offer a preview of
the motive as on the integrated LCD.
You may make high-resolution recordings
via the foot switch and do not need any
additional video camera for the preview.
The recorded images are then automatically
saved in image processing and with
reference to the active patients in the
database. Any images on the memory card
can be loaded as well.
Basic
Description
The export functions can be called from the
modules of image processing, database and
database search.
The WORD export function offers the
comfortable option of inserting images,
videos and patient data in a Word document
at the push of a button. For this, text marks
are inserted in the document where patient
data or images are to be inserted later. The
text marks have the format "table"_"field
name" (e.g. "patient_first name"). After
calling the function, a dialogue is opened
that permits selection of any Word
templates.
The PowerPoint export function offers the
comfortable option of integrating images,
videos and patient data in a presentation
with a button. A new slide is automatically
set up per image. The position of the images
and data on a slide can be configured in a
dialogue.
Basic
3.7 Export modules
Function
General
WORD Export
PowerPoint Export
3-20
3.8 Special modules
Function
Keratography
HD video recording
HD video cutting
Canon EOS HD video recording
Description
This module permits remote control of the
keratography programmes "Topcon CA
100" and "Oculus". The functions "Display
study", "Start new study" can be called from
the programme. The databases are also
synchronised so that all patients and studies
are available in both programmes. The
"Print button" can be used to record an
image of an open study that is then saved in
the database for the corresponding patient.
This module in combination with the
"Blackmagic Intensity HDMI video card
(PCIe)" permits recording of videos in FullHD resolution. The special feature about
this is the real time compression in H264.
The computing power of an ATI HD4xxx
graphics card is used for this. The
compression format H264 offers best
compression rates at very high quality.
This module offers the option of cutting and
assembling videos in Full-HD resolution.
The special feature here is that the videos
can be processed loss-freely and without
recoding, clearly reducing the required time.
This module corresponds to the module
"HD video recording", with the difference
that the HD-display is located on the
programme's "Canon page". This way, the
HDMI-output of the Canon EOS camera
can be used for the LiveView, which would
otherwise have the standard resolution and
be sent via USB interface.
3-21
Basic
4 First Steps
4.1 Installing the dongle
Connect the dongle with a free USB slot of your computer. The dongle is set up as HID device
and does not require any further drivers.
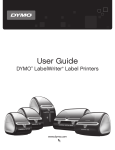
4.2 Selecting the camera
During the first start of the programme and activation of the video page (red arrow Figure 1), the
dialogue for selection of the camera to be used is called automatically. Alternatively, you may also
call the dialogue via the small button next to the video button (green arrow Figure 1) or the button
"Camera selection" on the video page (blue arrow Figure 1):
Figure 1
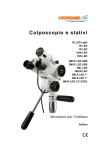
The camera selection dialogue lists all available cameras:
4-22
Figure 2
Activating the camera you want to use (blue arrow Figure 2), the window "Preview" shows the
camera's live image. If the preview does not display any image, you may switch the input if the
camera driver offers this. If you do not want to have this dialogue displayed every time the
programme starts, deactivate the corresponding control field (green arrow Figure 2).
4.3 Camera configuration
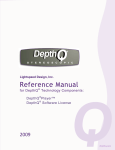
4.3.1 Changing the camera settings
The button "Options" on the video page takes you to the camera settings:
4-23
Figure 3 (Button bar left)
Figure 4 (Button bar top)
The button "Pal/NTSC" opens the dialogue to display and change the settings for the selected
camera (red arrow Figure 5).
4-24
Figure 5
The resulting dialogue depends on the selected camera and its drivers.
4-25
Figure 6 (Example 1 USB camera):
Figure 7 (Example 2 USB Box)
1
2
00
Choose the video standard for your camera in the selection box (1). In Germany, this is "PAL_B".
Make sure that "Signal detected (2)" indicates "1". This shows that your camera is connected and
works correctly. If this is not the case, you may have to switch the video input first. Now close all
dialogues with OK and then initialise the video amplifier.
4-26
4.3.2 Setting the video input
If your video device has several video inputs, you may have to set the input used first. For this, go
to the video page and click "Video options". Click the desired video input in the dialogue that now
opens:
Figure 8
Now close the dialogue with OK and then initialise the video amplifier.
4.3.3 Initialising video amplifier
On the right of the video window, there is the "Video amplifier" (Figure 9).
4-27
Figure 9
Click "Reset" once (green arrow Figure 8) and then "Save". If your camera is switched on and the
video input set correctly, you can now see the video image.
If the video amplifier is hidden, click the "+" icon to open the window (Figure 9):
Figure 10
If the video amplifier does not open, your camera does not support this interface!
4.4 Foot switch configuration
To record images with a foot switch, it must be configured first. For this, click "Settings" and then
"Foot Switch" in the main window.
4-28
Figure 11
The following dialogue appears:
4-29
Figure 12
4.4.1 Joystick-ID
Designates the Windows-ID of the joystick or foot switch. This is important if several foot
switches are present. The position of the button in the list "System menu->Game controller"
determines the ID.
4.4.2 Snapshot
Designates the button for taking snapshots.
4.4.3 Record video
Designates the button to start and stop a video recording.
4.4.4 Left/right
Designates the button for switching left/right.
4.4.5 Trigger snapshot
If a recording is to be made automatically when switching from left to right or vice versa, switch
on this option.
4.4.6 Video full screen
Switches the Live video to full screen mode.
4.4.7 Still image
Freezes the live video and returns to playback mode.
4-30
4.4.8 Show last image full screen
The last snapshot taken is displayed in full screen mode.
4.4.9 Size of "L/R" images
This input field can be used to set the size of the display of the left/right information in the image.
4.4.10 Left/right overlay in image
If you want to overlay the information left/right in the recorded image on a system that supports
this function, you have to check this box.
4.4.11 Use DirectX
Usually, this should be active. Under certain circumstances, this option can be switched off to
remove problems with foot switch recognition.
4.4.12 Function test
Once the foot switch has been recognised by Windows, the list is populated with the available
switches. Operating the foot switch now will check the corresponding entry in the list.
Figure 13
Joystick ID will show you the number of connected "button devices" in the addition "of..". If you
have several devices installed (joysticks, game pads, etc.) select the ID of your foot switch. You can
check this by operating your foot switch and watching the list "Foot Switch Test" for a checkmark to
appear for the respective switch. Now assign the desired function to each switch. Example: You have
a simple foot switch and want to record an image with it. Assign selection box "Snapshot" the number
"1".
4.5 Database
Click the button "database" or press the key "F5" on the keyboard.
4-31
Figure 14
4.5.1 Video storage configuration
If you want to record videos, you should always configure storage. See Video archivi pages 8-114.
4.5.2 Creating a new patient
1. First switch to the database page and click the button "New Patient" or enter "Ctrl + B".
Now you may enter the patient's data in the following "input dialogue".
2. If you are on the video page or the Canon page, you can directly enter data quickly with
the RETURN button. You may enter a new patient in this dialogue or select one that's
already present without having to switch to the database page.
3. If you have installed a KV card reader and the KVK module, a new patient is set up
automatically if you enter a KV card in the reader.
4.5.3 Creating a new study
1. First switch to the database page and click the button "Add" on the left side of the field
"Studies". Now you can generate an empty study ("Ctrl + G"), or clone the selected study
with all data ("Ctrl + H"). Now you may enter or change the study data in the following
"Input dialogue".
2. If you record an image and no study is present for the current patient, an empty study is
created automatically.
3. If the item "Insert images only in studies with the current date" is active in the popup menu
of the database page, a study with the current data is created as soon as you record an
image. To get to this menu, use the button in the upper left corner of the data grids for
patients and studies.
4-32
Figure 15
4.5.4 Specify active patient
All images you record are assigned to the "active patient". The patient who can currently be read
from the main window's status bar. There are several ways to specify the active patient:
1. Click the entry in the data grid
2. Click the data grid "Patients" on the database page and enter the first letter of the patient's
name. The programme skips to the matching patients.
3. Use a KV card reader (see above)
4. On the video page, press RETURN (see above)
4.6 Printing
4.6.1 Configure Quick print
Quick print can be performed from several pages and mainly serves creation of a standard print for
the files. The set-up is accordingly simple and consists of the following components:
1. letterhead with date and time
2. patients and study data
3. one or several images
The letterhead and data fields can be freely configured.
4-33
Figure 16
You can reach the quick print configuration dialogue via several popup menus or via "Settings" in
the main window. The lower image, for example, shows the menu for the image in the preview of
the database page (right mouse button).
4-34
Figure 17
Figure 18
4-35
To include an entry in print, just click the respective selection box in the left list. The entry then
automatically appears in the right list. Use the arrow buttons between the two lists to move the
position of the highlighted entry of the right list. To remove an entry, click the checkmark in the
right list. If you double-click an entry in the right list, you may change the description of the data
field, e.g. to have "Customer:" in front of the patient's name rather than "Patient:" in the printout:
Figure 19
4.6.2 Quick print parameter:
4.6.2.1 Edit letterhead:
This dialogue can be used to enter the text to appear in the upper section of the document
on every printout.
Figure 20
4.6.2.2 Setting the font:
Use this dialogue to determine the font and font size for the text to be printed in.
4-36
Figure 21
4.6.2.3 Print edges (set up page):
These dialogues can be used to set paper size, print edges and alignment of the document.
Figure 22
4-37
4.6.3 Printing images
There are several options to print one or several images as described above.
1. In image processing via the button
popup menu.
2. On the video page via the button
or the menu "File -> Print image" or the images'
or the popup menu "Recorded images"
3. On the database page via the preview popup menu preview, "Images -> Extras -> Print
image" on the left of the preview.
If you have selected several images, the programme automatically calculates an "Images split" as
in this example:
Figure 23
4.7 Image processing
4.7.1 Loading images
You have several options of loading images into image processing:
4-38
1. Via the menu "File -> Open image"
2. From the database via the button "Load images" or by double click on the image in the
preview
3. Via the video page: If the video options item "Loading images and videos into image
processing automatically" is checked, all recorded images are automatically loaded in
image processing.
4.7.2 Sorting images
There are pre-defined buttons for sorting images:
Figure 24
See image processing
4.7.3 Full screen display
The programme offers the option of displaying images in full screen mode. Click the image with
the right mouse button and select "Show full screen" from the popup menu.
Figure 25
4-39
5 The Main Window
Figure 26
The main window essentially consists of the buttons for the individual programme modules as well as the
menus for settings and help. Depending on the programme's module equipment, the button bar will look
different. The upper image shows the minimum selection, the lower one the button bar with all cleared
modules.
Figure 27
5.1 Settings
Figure 28
5.1.1 Login
The menu item "Edit login data" can be used to protect access to the programme with your user
name and a password. Both when activating and deactivating the request and when changing the
login data, you will be asked to enter the individual data. This ensures that no unauthorised person
will be able to change these settings.
5-40
Figure 29
5.1.1.1 Login data
Enter your user name and password here if you have entered them before to clear the
programme. For initial set-up, see "Change login data".
5.1.1.2 Enter new login data
Activate this option if you want to change your login data or if you want to set up the
access protection for the first time. This option is only available once your login data have
been entered correctly.
5.1.1.3 Change login data
Enter your new user name and the new password here. Observe:
user name and password must have at least six digits.
user name and password must not be the same.
write down your input!
login options
5.1.1.4 Remember user name
Only the password has to be entered for future logins.
5.1.1.5 No user authentication in future
The programme will start without user authentication. Caution: The patient data will not be
protected from third-party access!
5.1.1.6 Allow access only with dongle
The programme can only be started with a present and valid dongle. This also applies if
user authentication is deactivated.
5-41
5.1.1.7 Protect database
For best protection of the patient data, you can protect the database by encryption. Once
the programme is terminated, the database is packed in a password-protected zip file that
will be unpacked again at start-up.
5.1.2 Language
At this time, you may choose between six languages that can be switched with the programme in
operation.
Figure 30
5.1.2.1 Replace "Patient"
This dialogue permits replacing the term of "Patient", e.g. with "Client" throughout the
programme.
Figure 31
5.1.3 Design
This dialogue permits adjusting the looks of the programme to your wishes. In particular
presentation of the data grid on the database page can be adjusted individually. The settings of all
parameters are stored in the database. This permits saving several designs as datasets and loading
them as required.
5-42
Figure 32
5.1.4 Database
Figure 33
5.1.4.1 Configure Table
This function is designed as a module and not available in all versions of the programme.
See "Free database configuration" page 11-153.
5.1.4.2 Configure data grid
See "Data grid" page 8-106.
5.1.4.3 Data list configuration
5-43
See "Data list" page 8-106.
5.1.4.4 Examination – Use Standard Dialogue
5.1.4.5 Configure Video-Archiving
5.1.4.6 Configure "Delete Files"
In this dialogue, you may determine the action performed when an image or video is
deleted from the database.
Figure 34
5.1.4.6.1 Move files to Recycle Bin
The files are moved to the Windows recycle bin and can be restored from there
again.
5.1.4.6.2 Move files to folder "DB_Del"
The files are moved to the folder "DB_Del". It is set up by the programme and is a
subfolder of the "DATA" folder with the database. The advantage of this setting is
that the files are not deleted when the Windows recycle bin is emptied. If you delete
files very often, however this folder may very quickly grow very large. This setting
is not recommended, in particular for large video files.
The dialogue footer indicates the precise path to this folder.
5.1.4.6.3 Delete files directly
The files are deleted directly and irrevocably. Only use this setting if you are sure
that you will not delete any important data.
5.1.4.6.4 Footer
The footer displays the current settings and path to the folder "DB_Del".
5.1.5 Configure fields for automatic incrementation
See "Configure fields for automatic incrementation" page 11-155
5-44
5.1.6 Configure address book search fields
See "Configure address lookup fields" page 11-183
5.1.7 Configure remote synchronisation
See "Remote control" page 10-130
5.1.8 Change database path
This menu item opens the dialogue "Database selection" (Figure 35). It permits management of
several databases.
Figure 35
Also see "Installing Firebird database server" page 10-127
5.1.9 Database backup
See "Database backup" page 11-151.
5.1.10 Database search
5.1.10.1 Assume database search display from database
The configuration of the fields in the data grids and data lists is assumed from the database
page. This provides you with the same presentation in the database search as in the
database.
5.1.11 Quickprint configuration
See “Configure Quick print” page 4-33.
5.1.12 Foot switch
See "Foot switch " page 4-28
5-45
5.1.13 Assign function keys
The quick print function in the print module offers a way of assigning function buttons to different
print templates so that you can print, e.g., a referral by pushing a key after recording an image and
entering the findings:
Figure 36
5.1.14 Configure status bar
With this dialogue, you may specify database fields to be visible in the status bar. The prefix can
be changed, e.g. to read "Client" instead of "Patient". The dialogue for status bar configuration is
the same as for "Configure Quick print" on page 4-33.
5.1.15 Printer set-up
Opens a dialogue to select a printer and change the print parameters. The settings are temporary
and are not saved.
5.1.16 Change combo box dropdown height
All dropdown lists are controlled centrally. In this dialogue, you can specify the height of the lists
dropping down and adjust them to your screen resolution.
Figure 37
5-46
5.1.17 GDT
The GDT/BDT interface is used to attach the programme to a present practice software. The
practice software provides a file containing the data of the selected patient. This file is read in and
the patient is selected or, if not present, set up newly. Transmission of data to the practice software
is possible as well. Once activated, the practice software will be informed of every new image or
video recorded and receives links to the new files via the return file. For precise description. See
“GDT practice software integration” page 11-159.
5.1.18 Canon digital camera
Figure 38
5.1.18.1 Always trigger camera
If a Canon EOS camera is connected to the programme, the camera is only triggered when
the Canon page is active. If this option is active, the camera will always be triggered when
the foot switch is pressed, even if, e.g., the database page is active right then.
5.1.18.2 Auto connect camera on start-up
If this option is active, the programme will regularly try to connect the Canon EOS camera.
This means that the camera will be connected as soon as it is activated.
5.1.19 Show registered modules
See “Additional modules” page 11-132.
5.1.20 Video
Figure 39
5.1.20.1 Beep on capture
When recording an image, as well as when starting and terminating a video recording, an
acoustic message is output.
5.1.20.2 Automatically adjust video for Wide-Screen Displays
For wide-screen displays, the button bar is automatically put on the left side. This way,
video cameras in the standard PAL format have more space available. See (Button bar left
and (Button bar top).
5.1.20.3 Select camera
You can use this menu item to call the camera selection dialogue. See Selecting the camera
page 4-22.
5.1.21 Email
5.1.21.1 Pack multiple attachments in one ZIP archive
5-47
Figure 40
If several attachments are sent in one email, e.g. several images, they can be placed in a
single archive.
5.1.22 Reload open files after abnormal programme termination
If the programme or Windows crashes, all images and videos previously opened in image
processing will open again at the next programme start.
5.1.23 Help
Figure 41
5.1.23.1 Content
Opens the help file and the tab "Content".
5.1.23.2 Search with keyword
Opens the help file and the tab "Index".
5.1.23.3 Show user data path
In the user data path, all configuration files are saved. This path depends on the user name.
To manually adjust settings if required, an Explorer window is opened from which the files
can be opened directly.
5.1.23.4 Info
Opens a dialogue with information on the programme, such as version number or
manufacturer.
5.1.24 Exit
Exits the programme. You may also use the "X" to exit the programme.
5.2 The status bar
Figure 42
The status bar is located in the lower part of the programme and indicates the current patient. The
current patient is the one whom all recorded images are assigned to in the database. The data to be
displayed in the status bar can be set in the dialogue "Configure status bar" page 5-46.
5-48
5.2.1 The popup menu
Figure 43
5.2.1.1 Auto adjust field width
If this option is activated, the length of the field in the status bar is automatically adjusted
to the respective content. Otherwise, a fixed length can be specified by moving the mouse
to the vertical separating line between two fields and moving it to the right with the left
mouse button pressed.
Figure 44
5.2.1.2 Show hints
With this option activated, the entire content of the field on which the mouse pointer is
located is displayed in a notice window. This is particularly helpful in fields with several
lines of text.
5.2.1.3 Configure view
This menu item specifies the fields to be displayed in the status bar. See "Configure status
bar" page 5-46.
5-49
6 Image processing
Figure 45
6.1 The menu bar
Figure 46
The menu bar on the image processing page offers access to all functions to open, save and edit
images. If you want to learn more about the menu commands in a menu, click the respective fields in
the corresponding menu name in the following list or the screenshots as you are used to from
Windows.
6-50
6.1.1 Menu file
Figure 47
6.1.1.1 Open image
Use this menu item to load images to image processing from the hard disc, CD or thumb
drive.
6.1.1.2 Open Video
Use this menu item to load videos to image processing from the hard disc, CD or thumb
drive.
6.1.1.3 Save image
Use this menu item to save the current image to hard disc or USB thumb drive.
6.1.1.4 Save all images
Use this menu item to save all open images including patient and examination data on a
data carrier at once. A separate subfolder is created for every patient and the associated
study. The images are saved with their database number. After copying, you may receive
the following dialogue:
Figure 48
6.1.1.5 Printer set-up
Opens a dialogue to temporarily change the printer settings or to select a different printer.
6-51
6.1.1.6 Print image
The active image is printed with the current quick print settings.
See "Printing images " page 4-38
Also see “Configure Quick print” page 4-33.
6.1.1.7 Print all images
All images opened in image processing are printed with the current quick print settings.
See "Printing images " page 4-38
Also see “Configure Quick print” page 4-33.
6.1.1.8 PowerPoint Export
All images opened in image processing are sent to Microsoft PowerPoint via a dialogue.
See "PowerPoint-Export" page 11-138.
6.1.1.9 Word Export
All images opened in image processing are sent to Microsoft WORD via a dialogue.
See "WORD-Export" page 11-133.
6.1.1.10 Options
6.1.1.10.1 Configure info bar
Use this option to switch the status bar of the image windows on or off and to
configure the displayed fields. The process is the same as for the status bar in the
main window.
6-52
Figure 49
Figure 50
See "Configure status bar" page 5-46.
6-53
6.1.1.10.2 Configure video playback
Figure 51
This dialogue can be used to set special options that influence video playback. If
you have problems with video playback, contact your supplier. An important option
is selection of the video player, see “Video player selection” page 6-62.
6.1.1.10.3 Use FFDShow
If the "FFDShow Video Codec Pack", which is available for free online
("http://ffdshow-tryout.sourceforge.net/" ), is installed, this option can be used to
integrate the raw video filter. This filter offers a number of editing options. To call
the configuration dialogue, the task bar shows an icon you have to double-click:
Figure 52
The following dialogue appears:
6-54
Figure 53
6.1.1.11 Cancel
Exits and closes the programme.
6.1.2 Menu edit
6.1.2.1 Copy
The entire image, or, if activated, a "Layer" (image section) is copied to the clipboard.
6.1.2.2 Insert as a new image
If an image is in the clipboard, it is inserted in image processing as a new image. If
required, it can also be imported into the database.
6.1.2.3 Insert as layer
If an image is in the clipboard, it is inserted in the active image as a "layer" and can be
moved and changed in size. Example:
6-55
Figure 54
Additionally, you may turn the inserted image and display it partially transparently.
The window "Overlay" as visible in the example opens automatically.
6.1.2.4 Turning image by 90°
The current image is turned clockwise by 90°. This action can be repeated several times to
achieve 180° and 270° turns.
6.1.3 Menu Twain
Figure 55
6.1.3.1 Select Twain source
Figure 56
This dialogue permits selection of the source from which you want to collect your images.
This is necessary if you have several Twain-compatible devices connected. If your desired
device (camera...) is not in this list, re-install the driver.
6.1.3.2 Start TWAIN
6-56
The above window is only an example, the Twain capture module is part of the driver
software of your hardware. In case of problems, read the manual or the help files of your
hardware.
6.1.3.3 Insert images from Twain into database
The button to switch automatic insertion of the Twain image into the database on and off
is located on the image processing page in the left function bar. If this button is on top, the
Twain images are automatically inserted into the database. If this button is pushed, the
Twain images are only displayed in image processing.
6.1.4 Image list
Figure 57
The image list lists all images you have opened. Depending on whether the images are from the
database or a file, the patient data or file name will be displayed. This way, you can always access
any concealed images by clicking the corresponding entry in the menu.
6.1.5 Sort images
Figure 58
Figure 59
6.1.5.1 Cascading
All open windows are cascaded from the top left so that the title bar of each is visible. This
function is useful if you have many open windows and want to get a quick overview.
6.1.5.2 Arrange horizontally
All windows are minimised down to the title bar and put below each other in the main
window. This is useful, e.g. if you want to perform image analysis and record new images
in between.
6-57
Figure 60
6.1.5.3 Close all
All windows are closed. Any changes made to the open images are lost!
6.1.6 Filter layer
Figure 61
See additional modules image processing page Fehler! Textmarke nicht definiert.
6.1.7 Additional button
Figure 62
6.1.7.1 Brightness, contrast, saturation
6-58
This dialogue is used to change various parameters of video playback.
This option is not available in the standard video player!
Figure 63 "RGB"-GR32 video player
Figure 64 Video amplifier WMR9 video player
Use the option "Use setting always" to save
your preferred settings. The programme
now uses them automatically for every
video.
6.1.7.2 Insert image into database
The current image or video is inserted in the database under the current patient.
6.1.7.3 Print image
The active image, and in videos the image at the current position, is printed with the
current quick print settings.
See "Printing images" page 4-38.
Also see “Configure Quick print” page 4-33.
6.1.7.4 Video editing
See module “HD video processing (video cutting)” page 11-209.
6-59
6.2 The image window
Figure 65
00
Figure 66 (Popup menu image
window)
6.2.1
6.2.2.1
6.2.2.2
Figure 67 (Sent to…)
6.2.2.3
6.2.1 The popup menu
The popup menu can be opened with the button
or by right-clicking in the image window.
6.2.1.1 Brightness…
See Brightness, contrast, page 6-58
6.2.1.2 Filter
See “Filter functions” page 11-149.
6.2.1.3 Marker
See “Markers and texts” page 11-149.
6.2.1.4 Text
See “Markers and texts” page 11-149.
6.2.1.5 Insert
See “Insert as layer” page 6-55.
6.2.1.6 Deinterlace
Deinterlacing is necessary if images are recorded in interlaced scanning (PAL, NTSC) and
the two half images form an interlace comb. Example:
6-60
Figure 68 Left: no deinterlacing, right: deinterlacing
6.2.1.7 Full screen
Use this button to output the image in the entire screen independently of image window or
programme window size.
In full screen mode, you may zoom the image with the mouse scroll wheel and move it
with the left mouse button pushed.
6.2.1.8 Send to…
6.2.1.8.1 Printer
See “Printing images” page 4-38.
6.2.1.8.2 MS-Word
See “WORD-Export” page 11-133.
6.2.1.8.3 CD writer
See “CD/DVD writing” page 11-140.
6.2.1.8.4 Database
The current image or video is newly inserted in the database under the current
patient.
6.2.1.8.5 Data carrier
Use this menu item to save the active image to the hard disc or USB thumb drive.
6.2.2 Scale
6.2.2.1 Scaling to original size
The image is reset to its original size via the button
pixel level.
. This corresponds to 1:1 display on
6.2.2.2 Free scaling
Use the slider on the left of Figure 65 to manually set scaling in a wide range.
Alternatively, you may also use the mouse scroll wheel to zoom.
6-61
6.2.2.3 Adjust display to window
Use the button
to adjust the image to the current window size.
6.2.3 Status bar
6.2.3.1 The status bar shows the patient data for the image. When loading an
image from a data carrier, the patient currently selected in the database is
displayed here. Use “
Configure info bar” page 6-52 to adjust the bar to your needs or to switch it off.
6.3 Video player selection
The programme offers three different video players for selection. To get to the selection dialogue,
use Image processing -> Menu file -> Options ->”Configure video playback” on page 6-54.
Figure 69
6.3.1 Standard renderer
The standard renderer is the best selection for older and slower computers.
6.3.2 VMR9 renderer
This renderer is suitable for any computer that meets the system requirements for video recording.
This renderer should be chosen particularly for playback of HD video.
6.3.3 GR32 player
This video player is only suitable for computers that meet the system requirements for HD video
recording. It offers the options of zooming in on the video image and to apply filters in parallel in
6-62
the running video. However, this requires some computing power that will cause weaker
computers to stutter when displaying HD videos. The size of the filter window is decisive for load.
6-63
Figure 70 (Standard and VMR9 Renderer)
Figure 71 (GR32 Player)
6.4 The video player
Figure 72
6.4.1 Scaling
This function is only available in the "GR32-Player". See “Scale” page 6-61.
6-64
6.4.2 Volume
This slider adjusts the volume when the video has an audio track.
6.4.3 Speed
This control adjusts the playback speed in the area of 1/10 – 10x. Correct function, however,
depends on the video codec used. Therefore, it is possible that not the entire range will be useful in
every video. Higher speeds will also require a faster computer to prevent "image stutter". Use the
button
to reset playback to the normal speed.
6.4.4 Timeline
The timeline permits jumping to any position within the videos or scrolling through a scene
quickly by moving the slider with the left mouse button pushed. Clicking a free point of the
timeline will fast forward or rewind the video by a tenth of the overall playing duration.
6.4.5 Operating bar
Displays the current video position in "minutes:seconds,milliseconds".
Displays the total video duration in "minutes:seconds,milliseconds".
Rewind video to the beginning
Start/stop playback
Snapshot of the current video position. A new window is opened with the image
Sound on/off
Endless loop on/off. If you have inserted one or several cuts using the video cut
bar, endless playback will play the resulting video clip; cut-out parts will be skipped.
6.4.6 Simple video cutting
The video cutting bar can be displayed or hidden with the button
in the player's operating bar.
If the cutting bar is displayed, you may use the button
to insert a new cutting mark. These are
the cutting bar sections with red hatching. They represent the parts of the video that are cut out.
The cutting marks are inserted in the timeline at the slider position. The cutting marks can be
deleted again individually with the right mouse button. Use the button
to delete all cutting
marks at once. You may move the cutting marks with the left mouse button pushed or change the
start and end positions by moving the mouse to the start or end of the cutting mark until the mouse
pointer changes:
. Now move the position with the left mouse button held
down. The current video position will move along.
Use the button
to finally cut the video and to open it in a separate window as a new video; the
original file is maintained. An animation is displayed during generation of the new file:
6-65
6-66
7 The video page
Figure 73 Video page left button panel
7-67
Figure 74 Video page button panel top
7.1 Video context menu
Figure 75
7.1.1 Foot switch trigger
This item can be used to temporarily switch the foot switch function. E.g., if you only have one
foot switch, this still permits both starting and stopping the video recording with the foot switch.
This setting is, however, not saved. For permanent change of foot switch function, see “Foot
switch configuration” page 4-28.
7-68
7.1.2 Switch video input
If your frame grabber card has several inputs, you may use several cameras with the software. Use
this menu item to switch between them. The active input is visible in "Input" in the status bar at all
times.
7.1.3 Overscan
Quick change for overscan mode. See Overscan page 7-73.
7.1.4 Show help on problem
If your camera does not send any video signal, a help text is displayed to show possible error
causes. Also see “Disable video signal detection” page 7-74.
7.1.5 Show status bar dynamically
If this option is active, the status with the patient information is displayed upon switching to the
video page and shown again upon leaving.
7.1.6 Place button panel left
The button panel is displayed on the left so that the camera image has a higher area available. This
is sensible in particular in case of wide-screen displays if a camera is connected that works in the
PAL/NTSC standard resolution at a ratio of 4:3.
7.1.7 Hide title bar
When this function is activated, the programme is switched to full screen mode and the title bar is
hidden. You can comfortably switch between the two modes with the function button F12.
7.2 The button panel
7.2.1 Camera selection
See Select camera page 4-22
7.2.2 Snapshot
Use this button to record an image as with the foot switch. The image is automatically loaded in
image processing and/or inserted in the database, depending on video options configuration. The
recorded images are always assigned to the current patients, i.e. the ones visible in the status bar.
If the database has "Only insert images with the current date" activated, either the study with the
current data is activated or a new one is set up. With the WIA-module activated and a camera
connected, this button is used to trigger the digital camera. The recorded images automatically
appear in the "Snapshot list" and can be viewed in full screen mode by double-clicking. If the
option "Display left/right side in the image" is active, "L" or "R" is automatically displayed in the
image. The images are saved in the JPG format and will take approx. 330 kB in standard
resolution (approx. 800*600 pixel).
7.2.3 Record video
This button is used to record video sequences in "MPEG 4" when the "Video recording module" is
active.
See "Video recording" page 11-145.
7-69
7.2.4 Full screen
In full screen mode, you may view the camera image on the full screen. All Windows and
programme components are hidden. The side ratio of the camera is retained. Alternatively, you
may also click the video image or use a foot switch configured accordingly to enter full screen
mode. Another option is automatic switching to full screen mode (See "Automatic" page 7-73).
Key inputs or mouse clicks return to normal view.
Left-clicking into the full screen permits switching through several display modes:
7.2.4.1 Physical resolution
7.2.4.2 Adjust to window
7.2.4.3 Overscan mode
7.2.5 Still
The camera's video image is frozen. Pushing the button again returns to the normal playback
mode. Pressing "Snapshot" or the foot switch records the frozen image. This does not apply when
the "WIA-digital camera module" is active.
7.2.6 Review
This button can be used to display the last recorded image for inspection or discussion with the
patients in full screen mode.
7.2.7 Video options "General"
This dialogue can be used to configure the selected video device, specify actions after recording
and adjust video recording to the hardware. Also see Select camera page 4-22
7-70
Figure 76 General
7.2.7.1 Video device
The selected video device. Also see Select camera page 4-22
7.2.7.2 Video device configuration
Use the button right behind the video device list to set, among others, the video standard of
your camera to "PAL" or "NTSC". Also see Select camera page 4-22.
7.2.7.3 Video format
This window usually only offers information because the video format is automatically set
to the best values. If, in an individual case, special settings are necessary, activate "Adjust
video format manually".
7.2.7.4 Video input
Here you may select the input socket to which your camera is connected, e.g. if you use a
USB video box or PCI video card. Usually, you will find the two following connection
types:
7-71
Figure 77 Video socket/plug
Figure 78 Composite plug/socket
This selection box will not contain any entries for USB cameras.
7.2.7.5 Video renderer
The video renderer provides the interface to the graphics card and specifies the manner in
which the camera's input signal is processed. The standard setting is VMR9, because this
usually works easily. Under special circumstances, however, it may be of advantage to use
a different renderer.
7.2.7.5.1 Overlay mixer
This renderer directly forwards the video signal of the camera to the graphics card.
On weaker computers or when displaying HD contents, this may be of advantage,
in particular in case of latency problems (time difference between input signal and
display on the screen). Correct function, however, depends on all parts of the
playback chain interacting perfectly; this is not always the case.
7.2.7.5.2 VMR7
This renderer should only be used if no others provide the desired result, because
latency may be too large.
7.2.7.5.3 VMR9
This is the standard renderer and usually provides the best results.
7.2.7.5.4 Vista EVR
This renderer was introduced with Windows Vista and thus is not available in
Windows XP. If you use Windows Vista or Windows 7 and have problems with the
VMR9 renderer, this one would be better.
7.2.7.6 Open images into image processing
If this item is checked, the images are opened for viewing and editing in image processing
right after the foot switch is operated.
7.2.7.7 Autoinsert images into database
If this item is checked, the images are inserted in the database and assigned to the active
patient right after the foot switch is operated.
7.2.7.8 Set video window to physical resolution
If this item is checked, the video image is swept to the side indicated in the video format
dialogue. Otherwise, it is adjusted to the programme window sizes. In the worst case, this
may cause increased interlace strips. A fixed video size also has the benefit that the CPU
load on the computer is reduced. In particular in older computers or in DV operation, this
may cause noticeable improvement of video recording.
7-72
7.2.7.9 Overscan
In overscan mode, the video image is increased so that there are no black bars on the sides
anymore. However, this also decreases the visible area in height.
7.2.7.10 Activate hardware deinterlacing
Interlace scanning leads to very annoying distortion of the video image when the object
moves. This option uses the graphics card deinterlacing functions, if present. Very good
results are currently offered, e.g., by any graphics card by "ATI".
7.2.7.11 Automatically switch to full screen mode
This function automatically switches to full screen mode after approx. 3 sec. when
switching to the video page.
7.2.7.12 Always restart video
Some frame grabber or graphics cards or video formats may cause the video image to stop
or only show stripes after recording or switching to a different programme page. This
option prevents this.
7.2.7.13 Adjust video format manually
The video format is usually set to the best values automatically. If, however, special
settings are required in exceptions, activate "Adjust video format manually". Then the
button "RGB/YUY2" appears right behind "Video format".
Figure 79
Use this button to get to the following dialogue:
7-73
Figure 80
Observe that not all video formats are compatible with the programme; if possible, use
UYVY or YUY2.
7.2.7.14 Disable video signal detection
The programme usually assesses the information of the video device driver for whether or
not a video signal is pending or not. If it does not, a help text is displayed, however, some
drivers do not implement this information correctly, and will report "no signal" even if the
correct signal is pending. Activate this option if your camera has this problem.
7.2.7.15 Show full screen snapshot for "x" seconds
When this option is activated, the snapshot is displayed in full screen mode for an
adjustable time after you have taken it.
7-74
7.2.8 Video options "Video"
Figure 81
7.2.8.1 Activate real time compression
With this option activated, the video material will be compressed during recording.
Otherwise, the initial recording will be uncompressed and compression will only be
performed after completion of the recording. Depending on computer and recording
duration, this may take some time. On the other hand, real time compression requires a
quick computer. See “System Requirements” page 2-10.
7.2.8.2 Record videos with full resolution
Recording of videos in full resolution leads to great video quality but requires a fast
computer, in particular in connection with real time compression. See “System
Requirements” page 2-10.
7.2.8.3 Stop camera when playing full screen video
Double-clicking a video in the recording list leads to display in full screen mode while the
camera continues to run in the background. If there are any interferences in this (stutter,
stripes), this option should be activated. A problem is that the camera must be re-initialised
after playback of the video, which may take several seconds with some camera drivers.
7-75
7.2.8.4 Automatically terminate recording after "x" seconds
After the end of the maximum recording time set here in seconds, the video recording is
stopped automatically. The input field format is HH:MM:SS (hours:minutes:seconds).
7.2.8.5 Video quality / file size
Use this slider to determine the recorded video quality. Observe that the file size increases
with higher quality as well. The best settings for this greatly depend on how much the
image content changes during recording. If you have enough memory available, choose
maximum quality.
7.2.8.6 HD Options
7.2.8.6.1 Automatic video recording
With this option active, a video recording is started at once when switching to the
video page.
7.2.8.6.2 Calculate file size while recording
With this option active, the size of the recorded video file is determined during
recording. This is an approximate and only serves for general orientation.
7.2.8.7 Full screen video renderer
This selection box permits adjustment of the type of display when displaying your video in
full screen mode. This setting should only be changed when there are problems with full
screen playback. See Video renderer page 7-72.
7.2.8.8 Loop-in FFDShow video processor
See “Use FFDShow ” page 6-54.
7.2.8.8.1 Active
The filter is looped into the camera live stream.
7.2.8.8.2 Full screen video player
The filter is lopped into the full screen video player
7.2.8.8.3 Image processing video player
The filter is looped into the image processing video player.
7.3 White balance
Some USB cameras offer the option of performing white balance. If your camera has this option,
the button "white balance" appears in the button panel.
7-76
Figure 82 White balance button panel top
Figure 83 White balance button panel left
To perform correct white balancing, point the camera on a white surface; the following dialogue
appears:
Figure 84
Once the correct white values are reached, the
dialogue closes automatically.
7.4 The video preview window
If you use a Frame grabber card to view live video, you may follow the recording from your
camera in real time here. Your card must be installed properly and the camera must be connected.
It is also very important that all drivers that belong to the camera are installed. If all of these
conditions are met, you may also need to select the video signal input with the button "Options"
on this page. Left-clicking into the window will activate full screen mode. See “Full screen” page
7-70.
7.5 The video amplifier (WDM)
Figure 85
The video amplifier offers the option of making the basic
settings for brightness, contrast, hue and saturation of your
frame grabber card independently of the settings of your
screen. Additionally, you can specify your different setting
sets. Changes to the controls are always automatically
saved for the selection button pressed.
7-77
7.6 The video amplifier (uEye)
Using an uEye-camera you can perform the following settings:
Figure 86
Use the controls brightness, contrast and gamma to adjust the basic
settings. The button Reset resets these settings to the defaults.
Pointing the camera to a white surface and pressing the button
White Balance will cause the camera to recalibrate the colour
values so that a white area appears on the screen.
The shutter time can be set per image or to auto. If the automatic
function causes the image to be too dark, you may adjust the
desired brightness to your needs with the level control.
The display section permits enlarging the video image, e.g. if the
recorded object only fills a small part of the camera image.
"Automatic adjustment" prevents black stripes at the edges.
7.7 Magnification
This selection box permits indication of the magnification factor of
your lens. The selection is saved in the database with the image
and inserted in the image if "Show magnification" is activated (Fig. 82). This option is not
included in all programme versions.
Figure 87
Figure 88
7.8 Recordings
This list contains all images or videos you have made. This way, you will always have an
overview of the quality of your recordings and can decide at once whether a new recording is
required. Double-clicking one of the miniature images will display the corresponding image in full
screen.
7-78
Figure 89 Snapshot list
Figure 90 Popup menu recordings
7.8.1 Save image as…
The selected image or video is saved to the hard disc or thumb drive.
7.8.2 Store image in database
The selected image or video is stored in the database.
7.8.3 Print image
The selected image is sent to the printer without any further information.
7.8.4 Print image with patient data
The selected image is sent to the printer with the quick print parameters
7.8.5 Open image in image processing
The selected image is loaded in image processing and image processing is opened.
7.8.6 Show full screen
The selected image or video is displayed or played in full screen mode.
7-79
7.8.7 Clear thumb list
To keep an overview, it is sensible to delete the thumb list e.g. when switching patients. No data
will be deleted! The opened images in image processing also are not closed. You may, however,
close them with the option Clear image processing on manual changing of patient page 8-85.
7.8.8 Configure quickprint
See “Configure Quick print” page 4-33.
7.8.9 Delete selected image
The selected image or video is deleted from the thumb list.
7.9 The status bar
Figure 91
The status bar displays the currently used video input, the action triggered by the foot switch and
information during and after recording of a video.
The status bar is only visible if the button panel is on top; otherwise, this information is on the left
side, under status.
Figure 92
7.9.1 Video
Figure 93
Shows the current status of the video recording, e.g. "Recording active", "Recording stopped" or
any errors that have occurred.
7-80
7.10 Patient data quick input
The patient data quick input can be called on the video page with the RETURN button. This
dialogue permits changing the active patient without switching to the database page. Entering the
first letter of the patient will call the matching entry with the associated data. The programme will
automatically recognise that a new patient is to be displayed if you enter data that is not present in
the database. This can be viewed in the status bar. On demand, a new study is set up as well.
Figure 94
7-81
8 The database
Figure 95
The database is used to archive the patient data, studies, images and videos and is the central component
of legal obligation to document.
8-82
8.1 Data grid
The data grid provides a quick overview of the most important data of all datasets. Clicking or
scrolling will activate the individual datasets. Data field display can be configured freely and
permits simple sorting of data by clicking the title bar of the entry to be sorted. A small triangle
appears in the corresponding column, and the data is resorted. For multiple sorting, keep the "Ctrl
button" pressed and click the next field. Click and hold a title bar with the right mouse button and
then draw to quickly change the order of the data fields. The data grids also have a "quick-search
function". If a data grid is active, the title text colour changes. The data grid now reacts to key
input. Double-clicking a data line will take you to the editing dialogue. The data grids can also be
controlled via the navigation bars.
8-83
8.1.1 Data grid context menu
Figure 96
8.1.1.1 Database backup
See module Database backup page Fehler! Textmarke nicht definiert.
8.1.1.2 Colours and Fonts
See change design page 5-42
8.1.1.3 Configure representation
See configure data grid page Fehler! Textmarke nicht definiert..
8.1.1.4 Translate database fields
See change display name page 8-107
8.1.1.5 Auto sort data grids
Automatic sorting makes it possible to find certain database entries more quickly. For this,
sorting of the data grids upon input of the first letters of the search term is switched to the
active field.
Example: The sorting is set to first name, the active field is street.
8-84
Figure 97
After entering "w", the data grid will be sorted by street and the first entry with "w" is
found.
Figure 98
With this function off, every key input will be applied to the first sorting field. In this
example, the first first name with "w" would be found.
8.1.1.6 Clear image processing on changing patient by KV card
Every time the active patient changes via a KV card reader, all images in image processing
are closed automatically. This has the benefit that only the images of the current patient are
located in image processing.
8.1.1.7 Clear image processing on manual changing of patient
Every time the active patient changes via the database page or the patient quick input, all
images in image processing are closed automatically. This has the benefit that only the
images of the current patient are located in image processing.
8.1.1.8 Insert images only in studies with the current date
When inserting images in the database, the study with the current date is activated
automatically, or a new study is set up. If this option is not active, new images will be
entered in the active study. This may have to be switched off if you want to enter images
into older studies subsequently.
8.1.1.9 Select whole data grid row
The entire row of the active dataset is displayed in one colour. "Automatic sorting" is,
however, switched off.
8.1.1.10 Activate Hottrack
With this option active, the mouse wheel signals are automatically sent to the control
element above which the mouse is located; otherwise, only the active element will react to
input.
8.1.1.11 Set actual sort sequence as default
8-85
If you have changed the data grid sort sequence, you may use this menu item to apply this
sort sequence automatically at every programme start.
8.1.1.12 Always use default sort sequence
If you have changed the sort sequence of a data grid, e.g. to find a specific entry, and leave
the page, the standard sort sequence will be activated again when you call the database
page again if this is active.
8.1.1.13 Set optimal column width
This function calculates the best width of the individual columns of the data grid and sets
the column widths to these values.
8.1.1.14 Search for examination/image by number
Figure 99
8.1.1.15 Import database
See Database import page 8-108.
8.1.1.16 Database export
See “Database export” page 8-110.
8.1.1.17 Request patient data from medical server
See “GDT practice software integration” page 11-159.
8.1.1.18 Show database quick search hint
Database quick search help is displayed by default once the mouse pointer is above the title
bar of a data grid. You may switch off this hint in this menu item.
8-86
Figure 100
8-87
8.2 The data list
Figure 101
The data lists display selected data from the respective current dataset, e.g. patient "A". In contrast
to the data grids, the data lists can also display longer texts with several lines. The fields to be
displayed can be determined via the dialogue "Configure representation". The size of the fields is
set automatically, but you may also adjust them mutually by moving the mouse in the border
between two fields. The cursor will change. Pressing and holding the left mouse button now
permits changing the field size by drawing the mouse. Double-clicking a field will open the edit
window and the clicked field will be active automatically.
8-88
8.2.1 Data list context menu
Figure 102
8.2.1.1 Auto adjust field heights
The data field height in the data list is automatically adjusted to the content. If you want to
specify a fixed height, you may deactivate this option.
8.2.1.2 Show hints
If you move the mouse to a data field, the field content will be displayed as a short notice.
8.2.1.3 Edit display
8-89
Figure 103
Use this dialogue to determine the fields to be displayed in the data list and their order.
8.2.1.4 Translate database fields
See Translate database page 8-84.
8-90
8.3 Preview
Figure 104
The preview provides an overview of all images in a study. The respective current image is
marked with a red frame. Double-clicking an image will load it in image processing. If you want
to load several images at once, click the rectangular grey selection field at the lower right edge of
the respective image, which will cause a cross to appear in this field, or draw a frame around the
images with the left mouse button pressed. If you want to remove several images from a selection,
push the "ALT button" when drawing the frame.
8-91
8.3.1 Preview context menu
Figure 105
8.3.1.1 Submenu "Send to …"
8.3.1.1.1 Internal image processing
The active image or video is loaded in the programme's image processing.
8.3.1.1.2 External image processing
The active image or video is opened in the programme that Windows usually uses
for this kind of file. For images this is usually "MS-Paint" and for videos the
Windows Media Player.
8.3.1.1.3 Clipboard
Images are copied completely into the Windows clipboard so that they can be
inserted in email or text processing programmes with Ctrl-C. For videos, only the
path to the file is stored in the clipboard.
8.3.1.1.4 Data storage
A dialogue for selection of the target data carrier is displayed; you may save the
image or video on the hard disc, thumb drive or a network drive.
8.3.1.1.5 CD writer
The file is opened in the CD/DVD writer dialogue and can be burned to CD or
DVD from there. See “CD/DVD writing” page 11-140.
8.3.1.1.6 Printer
The active image or a selection of images is sent to the printer with the quick print
parameters. Video files cannot be printed.
8-92
8.3.1.1.7 MS-WORD
All selected images are sent to a Word document via the Word export interface.
Video files will be ignored. See “WORD-Export” page 11-133.
8.3.1.1.8 MS-PowerPoint
All selected images and videos are sent to a PowerPoint presentation via the
PowerPoint interface. See “PowerPoint-Export” page 11-138.
8.3.1.1.9 Email Client
All selected images and videos are sent to the standard email programme. A new
message is set up and the images and videos are inserted in the appendix as files. If
the option “Pack multiple attachments in one ZIP archive” (page 5-47) is active, all
files are packed in a single archive.
Caution: the maximum attachment size is 10 MByte!
8.3.1.1.10 Medical Practice EDV
The medical practice EDP is informed of the selected images and videos by GDT
file via the GDT interface. See “GDT practice software integration” page 11-159.
8.3.1.1.11 Export database
The selected images and videos are sent to the database export module and can be
copied into a database from there, e.g. to then import them on a second computer.
All patient and examination data are retained. See “Database export” page 8-110
and “Database import” page 8-108.
8.3.1.2 Submenu "Import from…"
Figure 106
8.3.1.2.1 … Clipboard
If you previously copied an image to the clipboard, you can insert it in the database
now via this menu item.
8.3.1.2.2 … Data storage
Use the open file dialogue to insert images or videos, e.g., on a thumb drive or
another computer in the network, directly in the database.
8.3.1.2.3 … Database
The database import module is opened. You may open a Firebird database (*.fdb)
and directly insert individual images or videos in your database. See Database
import page8-108.
8.3.1.3 Submenu Image data
8-93
Figure 107
8.3.1.3.1 Edit
Corresponds to the button "Edit" in the images button panel. The dialogue to edit
image data is called.
8.3.1.3.2 Copy image data
This function copies the user-defined image data into the clipboard. If you have set
up new fields for the table images via "free database configuration", you may copy
this data and insert it in a different image.
8.3.1.3.3 Paste image data
See "Copy image data".
8.3.1.4 Quickprint configuration
See “Configure Quick print” page 4-33.
8.3.1.5 Show full screen
The current image is displayed on the entire screen in full screen mode.
To return to normal view, press any button or click the full screen.
8.3.1.6 Double-click action
Figure 108
Set the action to be performed when double-clicking a preview image.
8.3.1.7 Show video import dialog
This option activates the video import dialogue. It is called when you want to import an
MPEG file.
8-94
Figure 109 Video import dialogue
8.3.1.8 Rotation
This submenu turns the selected images by 90°, 180°, 270°. Caution: this function is not
available for video files.
Figure 110
8.4 Button patients
Figure 111
8.4.1 Edit
Opens the edit dialogue to edit the data of the selected patient.
8-95
See Edit patient data page 8-100.
8.4.2 New patient
Opens the edit dialogue to enter data for a new patient.
See Creating a new patient page 4-32.
8.4.3 Erase
The current patient and all associated studies and images are deleted after a safety prompt.
Figure 112
8.4.4 Sort sequence
8.4.4.1 Patient sort
Standard setting. The examination table only displays the examinations for the
selected patient.
8.4.4.2 Examination sort
In this setting, the examination table shows all examinations. The patient changes in
the display depending on the selected examination. This permits sorting
examinations, e.g., by same findings, to then compare the images of these
examinations in image processing.
8.4.5 Export
8.4.5.1.1 Export patient list as "CSV File"
The entire patient list is exported as text file; the individual fields are separated by
commas.
8.4.5.1.2 Export patient list to EXCEL
The entire patient list is exported to an EXCEL table.
8.4.5.1.3 Export patient list to WORD
The entire patient list is exported to a WORD document.
8-96
8.5 Button examinations
Figure 113
8.5.1 Edit
Opens the edit dialogue to edit the data for the selected study.
See Edit patient data page 8-100.
8.5.2 Add
8.5.2.1 New Examination
Opens the edit dialogue to edit the data for the selected study.
See Create new examination page 4-32.
8.5.2.2 Clone examination
A new examination is set up and populated with the data of the active one.
8.5.2.3 Erase
The current study and all images associated with it are deleted after a safety prompt. Also
see “Configure "Delete Files"” page 5-44.
Figure 114
8-97
8.6 Button images
Figure 115
8.6.1 Edit
Opens the edit dialogue to edit the data of the selected image.
See Edit patient data page Fehler! Textmarke nicht definiert..
8.6.2 Erase
After a safety prompt, all selected images will be deleted. If no images are selected, the
active image will be deleted (red frame). Also see “Configure "Delete Files"” page 5-44.
Figure 116
8.6.3 Load images
8.6.3.1.1 Load selected images
All selected images are loaded in image processing.
8.6.3.1.2 Load all images
All images in the preview are loaded in image processing.
8.6.3.1.3 Clear image processing and load all selected images
All images listed in preview are loaded in image processing once all images opened
in image processing have been closed.
8-98
8.6.3.1.4 Load only originals
All images in preview with the attribute "Original" are loaded in image processing.
Originals are only unedited images generated by the programme. You may,
however, change this attribute manually.
8.6.4 Send to…
See popup menu preview Submenu "Send to …" page 8-92.
8.6.5 Import
See popup menu preview Submenu "Import from…" page 8-93.
8.6.6 Select
These buttons permit selection or unselection of all images.
8.6.7 Show all images
Usually, only those images are displayed that belong to the active study. Activating this
option will display all images for the active patient, independently of the selected study.
The images that belong to the current study are displayed in orange.
Figure 117
8.6.8 Show full screen
See “Show full screen” page 8-94.
8-99
8.6.9 Video editing
See “HD video processing (video cutting)” page 11-209.
8.7 The navigation bar
The navigation bar permits skipping to the start or end of the respective active table (red edge), or
a dataset forwards or back. The "Minus" button deletes a dataset. The button on the outer right can
be used to update the data in the display. This is particularly important in network operation if data
on other stations has been changed or added.
8.8 Status bar
Figure 118
The status bar provides a continuous overview of the current patients on all programme pages.
This is important because new images are inserted in the database for this patient. The field
display can be configured.
See "Configure status bar" page 5-46 and "Configure Quick print" on page 4-33.
8.9 Input dialogue
Figure 119
This dialogue appears if you want to edit data and is adjusted to the respective tables, so that the
same dialogue will appear for patient, study or image tables. The listed data fields correspond to
those checked in "Configure display". The tab key on your keyboard will take you from one field
to the next. To get to the previous field, also press the shift button. All changes in this dialogue are
only saved when confirmed with "OK". To cancel editing, click "Cancel" or press "ESC". The
individual fields contain dropdown lists or calendars each that can be reached via the
corresponding button within the data row. Alternatively, you may reach the lists via "Alt-arrow
down" and the calendar sheets via "Ctrl-Return".
8.9.1 Data fields
Data fields are date, time, number or text fields with less than 64 characters.
8-100
8.9.2 Text fields
All text fields exceeding 64 characters or with a variable length are listed as text fields. Here you
can enter longer texts with line breaks.
8.9.3 Macros
This dropdown list lists all entries from the dictionary that correspond to the currently selected
field. Selecting an entry in the dropdown list will insert the corresponding description in the active
memo window.
8.9.4 Dropdown lists
The dropdown lists are either put together from present data in the database or from dictionary
entries. If at least one entry is present for the respective field in the dictionary, only these entries
will be listed. The "Category" in the dictionary corresponds to the name of the database field.
8.9.4.1 Data fields
Dictionary selection:
Figure 120
Dictionary excerpt
Figure 121
Database selection:
8-101
Figure 122
Database excerpt
Figure 123
8.9.4.2 Text fields
Figure 124
8-102
Dictionary excerpt:
Figure 125
For detailed description, see dictionary page Fehler! Textmarke nicht definiert..
8.9.5 Deleting a text field
Deletes the content of the active text field.
8.9.6 Insert entry into the dictionary
The entered text will be inserted in the dictionary as a description.
Figure 126
8-103
8.9.7 Insert entry from dictionary
The dictionary dialogue is opened. You may select an entry that is then inserted in the
corresponding input field in the input dialogue. Changing the category also permits selection of
descriptions that are not part of the selected field.
Figure 127
8.9.8 Input dialogue context menu
Figure 128
8.9.9 Show dictionary dialogue
See "Inserting entry from the dictionary" page 8-104.
8-104
8.9.10 Create dictionary entry
See "Inserting entry into dictionary" page 8-103.
8.9.11 Ask "Save" when data is modified
With this option active, clicking "Cancel" will cause a prompt for whether the changed data is to
be saved.
8.9.12 Display "Buffer-button"
With this option active, an additional button is displayed to directly write the data entered in the
database without leaving the input dialogue.
8.9.13 Leave dialogue with "ESC"
Usually, "ESC" rejects changes to the active input field. Activating this option causes "ESC" to
leave the dialogue at once.
8.9.14 Delete empty trailing lines
With this option active, all spaces and empty lines at the end of the data fields are deleted.
8.9.15 Allow date and time editing
Usually, date and time editing is blocked; if you have to edit these fields anyway, e.g. because the
internal PC clock was misadjusted, you may activate it with this option.
8.9.16 Double data list
If a great number of fields is edited, it may be sensible to distribute them to two data lists.
Figure 129
8.9.17 TAB key for text fields
Activate this option if you want to navigate within the data list with the tab key.
8-105
8.10 Configure display
8.10.1 Data grid
Use this dialogue to select the data fields to be displayed in the respective data grids. To display
an entry, select it on the right side below "Available fields", then click the button with the blue
arrow. If you want to display the field as member of a group, click the button with the plus icon.
To delete a field, select it on the left below "Fields in data grid" and then click the button with the
recycle bin. To change the position of an entry, select it on the left and click the up or down arrow
button.
Figure 130
8.10.2 Data list
Figure 131
8-106
This dialogue determines the data fields to be displayed in the respective data lists.
8.11 Adjust display names of the data fields
This dialogue adjusts the designations of the data fields to your needs.
Caution: The display names must be unique, i.e. no name must be present twice!
8-107
Figure 132
8.12 Database import
The module database import permits either importing entire databases or transferring selected
patients with the associated studies and images, as well as videos, from one computer to another.
The module “Database export” page 8-110 is available for this.
8-108
Figure 133
8.12.1 Database selection (1)
You can use the database input field to select the path for the database you want import by
clicking the button "Browse":
Figure 134
Then the "Open file dialogue" opens and you can select the import file with the extension ".fdb".
The database is now read automatically. Click the button
again.
if you want to import the database
8.12.2 Table selection (2)
Select the tables within the database to be imported in the list "Data to be imported". For databases
generated via data export, only the first three tables are relevant.
8.12.3 Data selection (3)
The tree view "Data" lists all patients and the associated studies. Clicking an entry will display all
images and videos for this entry in the view "Images and videos" (5).
8-109
8.12.4 Button panel data selection (4)
These buttons can be used to open and close the view of individual elements and in particular to
also delete entries you do not want to import, if you only want to import one entry, you may also
activate the option "Import selected entry".
8.12.4.1 Delete all entries
8.12.4.2 Delete selected entry
8.12.4.3 Open selected entry
8.12.4.4 Close selected entry
8.12.4.5 Open all entries
8.12.4.6 Close all entries
8.12.5 Preview "images and videos" (5)
Once you click an entry in the data selection in the preview "Images and videos", all images and
videos that belong to this entry are displayed.
8.12.6 Start import (6)
Once you have selected the data you want to import, you may start import with the button "Start
import". The programme will now try to recognise entries already present in the database and not
add them again. You can follow the progress of the action with the progress bar. After completion
of import, you will receive information on the result:
Figure 135
8.13 Database export
The database export module permits export of complete databases, or transfer of selected patients
with the associated studies and images as well as videos from one computer to another. You can
either insert individual data right from the database via "Drag and Drop" or use a saved database
search as basis for export.
The subsequent import can be performed with the module “Database import” page 8-108.
8-110
Figure 136
8.13.1 Export via saved database search (1)
Using the module “Database search” page 9-116, you can save search requests such as "All
images of the last two weeks " or "All images with findings "Cataract". The saved search requests
can be called right from the database export module. Then you can delete entries from the result or
add additional data by "Drag and Drop".
8.13.2 Export via "Drag and Drop"
Via "Drag and Drop", you may assume images, videos, entire studies or complete patient files into
the export window. Click the corresponding entry in the database, either in the data grid patients,
the data grid studies or one of the preview images, and drag this entry to the export window with
the left mouse button pressed. Releasing the mouse button will enter the data in the list of the data
to be exported.
8.13.3 Export of the entire database
Options (2) page 8-113 permit activation of "Export entire database". All patients, studies, images
and videos are entered in the export list. Then you may use the button panel (4) to delete all entries
you do not want to export.
8.13.4 Data selection (3)
The tree view "data" lists all patients and the associated studies. Clicking an entry will display all
images and videos for this entry in the view "images and videos" (5).
8-111
8.13.5 Button panel data selection (4)
Use this button to display and hide the view of individual elements and to in particular delete
entries you do not want to export.
8.13.5.1 Delete all entries
8.13.5.2 Delete selected entry
8.13.5.3 Open selected entry
8.13.5.4 Close selected entry
8.13.5.5 Open all entries
8.13.5.6 Close all entries
8.13.6 Preview "images and videos" (5)
The preview "images and videos" displays all images and videos associated with the entry you
click in the data selection.
8.13.7 Start export (6)
Once the data you want to export are selected, you may start export with the button "Start export".
You can follow the progress of the action with the progress bar. After completion of export, you
will receive a report on the result:
Figure 137
8-112
8.13.8 Options (2)
Figure 138
8.13.8.1 General
8.13.8.1.1 Export entire database
Enters all patients, studies, images and videos in the export list. Then you may
delete all entries you do not want to export via the button panel (4).
8.13.8.1.2 Export images as a file
Usually, the images are saved in the export database ("Export.fdb") and do not
explicitly appear on the data carrier. With this option active, the images, as well as
the videos, are stored as files and can be loaded in any image processing
programme.
8.13.8.1.3 Open target folder after export
Opens an explorer window to the export file path after export.
8.13.8.2 Extended options
8.13.8.2.1 Integrating patient name into file name
If this option is active, the name and birth date of the patient are included in the file
name as well as the image number:
8-113
Figure 139
8.13.8.2.2 Creating subfolder per patient
If this option is active, a subfolder is generated in the target path for each patient;
otherwise, the images and videos are copied right into the target path:
Figure 140
8.13.8.2.3 Creating subfolder per study
If this option is active a subfolder is generated in the target path for each study;
otherwise, the images and videos are copied right into the target path:
Figure 141
8.13.8.3 Export format for images
The standard setting is JPEG. Alternatively, you may also save the images in Bitmap or
Tiff formats, depending on the format best suitable for further processing.
8.14 Video archiving
Use this dialogue to determine how to save videos. This is particularly important if you want to
record larger videos, e.g. entire operations of several hours.
8-114
Figure 142
8.14.1 Save video to file
Usually, all images and videos are saved directly in the database. However, this is no longer
sensible for videos with a size of several hundred megabytes; in particular recording HD-video
leads to large data volumes. In this case, activate this option.
8.14.2 Storage path
Use this input field to determine the path in which your video files are to be saved if you activate
"Save video to file". Please observe that the drive has sufficient free memory space available.
8.14.3 Display warning if less than x GB of disk space are free
Once the available disk space on the drive your videos are saved to undercuts the amount
indicated here, a dialogue will inform you of this.
8.14.4 Automatically cut long time recordings after x minutes
If you want to record video for several hours and may want to burn them on CD/DVD later, it may
be sensible to prevent the individual recording files from getting too large. With this option, you
can cause the programme to start a new file after a set time.
8.14.5 Save only videos greater than x MByte as file
Videos saved as a file cannot be called in the network. If you want to have at least smaller videos
available in the network, it may be sensible to activate this option.
8-115
9 Database search
Figure 143
The module "Database search" offers an option of performing simple as well as complex search requests
and to save them as a "search template". This permits quick and simple processing of recurring tasks. The
search results are displayed as on the database page, making orientation easier. Search templates
generated here can also be used for data export. See “Database export” page 8-110.
All buttons for setting, saving and calling search templates are in the upper button panel.
9-116
9.1 Upper button panel
Figure 144
Figure 145
9.1.1 Load present search requests
If you have already set up your own search filters, clicking this button will display the dialogue
"Load search filter". You may also use it to delete search filters.
Alternatively, you can also click the small arrow, which will display a menu with the present
search filters (see image top).
9.1.2 New
This button creates a new search filter. See “Creating search filter” page 9-118.
9.1.3 Edit
This button can be used to change the criteria of the current search filter.
9.1.4 Save
The search query is saved under the current name. If you have set up a new search query that was
not yet named, the dialogue "Save as" will open.
9.1.5 Save as
This button opens the dialogue "Save search query". The current search query can be saved under
a new name or a present one can be overwritten.
Figure 146
Clicking the entry "Current search" once, you can enter a name.
9-117
Figure 147
Double-clicking "Current search" opens an input dialogue:
Figure 148
9.1.6 Show
This button displays a short version of the current search query:
Figure 149
9.1.7 Do Search
Restarts the current query. This can be useful if you have performed changes to the database after
the last query and want to update the search results.
9.1.8 Jump to database
The database page is opened and the active patient, active study and selected image from the
search page are called.
9.2 Creating search filter
You may create a new search filter with the button "New" or change a present search filter by
loading it and clicking "Edit".
9-118
The following dialogue appears:
Figure 150
To change a search condition, select it with the mouse and click "Edit" in the search filter
dialogue. To create a new filter condition, click "Add". The "Edit filter dialogue" is opened (See
Edit filter).
Use the arrow buttons "Move" to move the selected entry up or down.
To delete a condition, select it again with the mouse and click "Delete".
In addition to the simple search criteria, you may also define this dialogue to use more complex
interrelations, as in the following dialogue:
Figure 151
9.2.1 Linking rule (AND/OR)
The logical link between the individual conditions can be switched between AND, OR by doubleclicking the corresponding field (red arrow).
9.2.2 Setting brackets ("(…)")
To set and remove brackets, double-click the corresponding field (blue arrows).
9-119
9.2.3 Observe Upper/lower case (U/l)
If you want to observe upper/lower case letters, double-click the corresponding field in "U/l". "x"
means that upper/lower case are observed. In the above example, the entries "Aok" or "aok" will
not appear in the search result.
9.2.4 Quick changing of individual parameters
You may also change individual parameters of the search filter by selecting the field to be changed
and then clicking it again. Now a list of possible values appears. In the example below, you may
now replace, e.g. "birth date" by "recording date" without calling the filter dialogue.
Figure 152
9.3 Edit search filter
Clicking "Add" in the dialogue "Search filter" or selecting an entry and then clicking "Edit" opens
the following dialogue:
Figure 153
In this dialogue you may select the database field and table to be searched and the conditions to be
met.
9-120
9.3.1 Logic operation
In the selection "Logic operation", you can specify how the new entry is to be linked with a
possible previous one.
9.3.2 Table
The selection "table" specifies the database table the field you want to use for your search is to
come from. If you want to search for a specific "result", for example, select the table "study".
Once you have selected the table, the selection list "database field" will be updated automatically.
9.3.3 Case sensitive
See above.
9.3.4 Discard spaces
If this option is activated, all leading and trailing spaces are removed from the "value" entered by
you before search. This is sensible in most cases because you cannot see things like trailing spaces
but the programme will process them.
9.3.5 Database field
The field from the chosen table to be filtered. In the above example this is "Type" from the table
"studies".
9.3.6 Filter condition
The following logic operators are possible:
Figure 154
The lower conditions permit entering several values in a list. The list appears once you select this
operator. To enter a new entry in this list, just push the button "arrow down" on your keyboard.
9-121
Figure 155
Date fields are a special feature. If you want to find, e.g. all patients you have admitted in the last
two weeks, you may do so using the addition "Dynamic point" and then enter "Today minus 2
weeks". This has the clear advantage that the search will always use the current date so that you do
not have to change the date entered every time for the search query you saved.
Example for a dynamic time:
Figure 156
In this example, all patients with a recording date no more than two weeks in the past will be
found. Observe that the filter condition must be "is bigger than".
9-122
9.4 Button "patients"
Figure 157
9.4.1 The master table
The master table is always the table in which all entries are displayed. The two other tables always
display only those items that are linked to the active entry in the master table. Example:
1. If the patient table is the master, all patients are displayed. The examination table
shows only studies of the active patient. The image table shows only images of the
active study.
2. If the examination table is the master, all studies found are displayed. The patient table
shows only the patient who belongs to the active study.
3. If the image table is the master, all images found are displayed. The examination table
shows only the study and patient belonging to the active image.
9.4.2 Configure data grid
See "Configure display", “Data grid” on page 8-106.
9.4.3 WORD export
This button enters all data of all patients found in a table and sends them to WORD.
9.4.4 EXCEL export
This button enters all data of all patients found in a table and sends them to Excel.
9.5 Button "Examinations"
Figure 158
9-123
9.5.1 Master examinations
See "The master table", page 9-123.
9.5.2 Configure data grid
See "Configure display", “Data grid” on page 8-106.
9.6 Button "Images"
Figure 159
9.6.1 Master images
See "The master table", page 9-123.
9.6.2 Load selected
All selected images are opened in image processing.
9.6.3 Select all
All images are selected.
9.6.4 Unselect all
All images are unselected.
9.6.5 WORD-Export
All selected images are exported in a WORD document.
See "WORD-Export", page 11-133.
9.6.6 PowerPoint-Export
All selected images are exported to PowerPoint.
See "PowerPoint-Export" page 11-138.
9-124
9.7 Popup menu data grid
Figure 160
9.7.1 Configure display
See "Configure display", “Data grid” page 8-106.
9.7.2 Highlight whole row
The entire row of the active dataset is coloured. This switches off "Automatic sort sequence",
however.
9.7.3 Automatic sort sequence
If you click a field in the data grid and enter the first letter of the value you are looking for, the
database will be sorted by this field automatically if "Automatic sort sequence" is active. In the
other case, key inputs will always be forwarded to the field that determines the currently selected
main sorting (recognisable by the small triangle with the 1 in the title bar).
Figure 161
9.7.4 Set optimal column width
The width of the individual columns of the data grid is set depending on field content so that all
entries are displayed completely.
9-125
9.8 Popup menu preview
Figure 162
9.8.1 Columns
Here you may enter the number of images to be displayed next to each other and thus the size of
the preview images.
9.8.2 Show full screen
The selected image (red frame) is displayed in full screen mode. A mouse click or key input
returns you to the usual view.
9-126
10 Network operation
10.1 Installing Firebird database server
If you want to set up a computer in your network as database server, this computer needs to have
the "Firebird database server" installed. It is available from the installation DVD, directory
"Firebird\Server". This directory contains the file "Firebird-2.1.1.17910-0_Win32.exe" (or newer).
If you want to run the programme on this computer as well, you also have to activate option (4)
Figure 164. It switches off the integrated database server on this computer.
10.2 Setting the database path
For operation of the programme in a network with a central server, you have to inform the
programme of where the jointly used database is located. These settings can be achieved via
"Settings -> Database -> Change database path".
Figure 163
10-127
Figure 164
This dialogue can be used to determine the position of your database or to switch between
different databases. You may also choose between local and remote database. One special feature
is the option (4) in case you do not use any extra database server. See This computer is configured
as database server for other clients (4) page 10-130.
In case of multi-station systems, you may synchronise several stations via one workplace. See
“Remote control” page 10-130.
10.2.1 New entry (1)
10.2.1.1 Local
The database is located on the same computer as the programme. A dialogue is opened to
search the database via an explorer view. The database file name is usually "patients.fdb",
for older installations (pre-3.5), the file is "Data1.fdb".
10.2.1.2 Remote
The database is located on a different computer in the network.
10-128
Figure 165
10.2.1.3 File name
The name of the database file. Usually, this is "patients.fdb", for older installations, the file
is called "Data1.fdb".
10.2.1.4 Server
Designates the name of the network computer. The server name corresponds to the
computer's Windows name.
10.2.1.5 Path
The path to the database on the network computer.
10.2.2 Selected entry…(2)
The selected entry is backlit in light blue. Select an entry by clicking the corresponding line.
Figure 166
10.2.2.1 Edit
10-129
Opens the edit dialogue for the database entry. Operation is according to New entry (1)
page10-128.
Figure 167
10.2.2.2 Delete
The selected entry is deleted.
10.2.2.3 Test
Here you may verify your printout. The programme tries to connect to the database without
leaving the dialogue.
10.2.3 Available databases (3)
This list contains all databases you have already configured. Clicking the respective selection box
in column "Active" turns a database active.
10.2.4 This computer is configured as database server for other clients (4)
If you have configured one computer in your network as database server and want to run the
programme on it as well, this option (4) Figure 164 must be activated. This switches off the
integrated database server on this computer.
10.3 Remote control
Synchronisation permits switching the patient on a network computer. With the right
configuration, the physician will not have to operate the programme anymore. For example, if a
computer is installed at the reception desk, the assistant may enter or change the patient on this
computer and use the button "Synchronize" on the database page to send the data to the computer
in the treatment room. The synchronised computer now has assumed the data and set the active
patient.
Excerpt database page "button studies"
10-130
Figure 168
This button is only available in a multi-station system!
10.3.1 Configure remote synchronisation
The following dialogue is reached via "Settings -> Database -> Configure remote
synchronisation".
Figure 169
10.3.1.1 Computer name
Windows network name of the computer to remote-control this one.
10.3.1.2 Browse
Opens a dialogue with all computers available in the network.
10-131
11 Additional modules
The programme offers the option of testing the various additional modules without limitation in time
to find out if the respective function corresponds to your ideas and needs. The modules work in demo
mode and are either limited in function, or the word "DEMO" is inserted in the recorded images. You
can get to the dialogue to display and activate the modules via "Settings – Show registered modules":
Figure 170
11-132
Figure 171
The green entries are registered via your dongle and are not subject to demo limitations. Activate
the module you want to test by mouse click. After confirmation with OK, it is available for you at
once. If you find that the module corresponds to your ideas, contact the manufacturer for
registration.
11.1 Export functions
11.1.1 WORD-Export
The WORD export module permits inserting images, videos and the associated data in a
WORD document in a specified position and selecting the desired document as needed.
WORD export is possible anywhere in the programme where images are displayed, usually
via the popup menu.
11-133
Figure 172
11.1.1.1 Available WORD templates (1)
This list displays all templates created by you for WORD export. Single mouseclick on the respective row renders the template active. Double-clicking opens an
Explorer window to change the path in. Double-clicking an empty row adds a new
template.
11.1.1.2 Button template (2)
11.1.1.2.1 Add
This button adds a present template on a storage medium to the list of available templates.
11.1.1.2.2 Edit
The active WORD template is opened in WORD for editing.
11.1.1.2.3 Delete
The active WORD template is deleted from the list of available templates, but the document is
retained.
11.1.1.3 Button (3)
11.1.1.3.1 Open WORD and send data
The active template is opened in WORD. Then the data from the database are inserted in the
document. The WORD window is put in the focus.
11.1.1.3.2 Close WORD
If you have a WORD window open, it is closed and the WORD export dialogue is exited. The
programme is put in the focus again.
11-134
11.1.1.3.3 Cancel
The WORD export dialogue is exited and the programme is put in the focus again.
11.1.1.4 Creating a Word template
Start MS-WORD and create a new document or open an existing template. Enter a
designator that clearly describes the field in the places where database fields are to
be inserted later, e.g. "Name" for the patient's last name, etc. This designator will
later be replaced by the contents of the corresponding data fields. Select the entire
word and ensure that no trailing spaces are selected.
Example:
Figure 173
Now select menu "Insert" -> "Text field".
Figure 174
In the following dialogue, you have to designate the text mark as follows: table
name_database field. If you want to enter, e.g. the last name of the patient, the
respective text mark is: "patient_name".
11-135
If you want to enter the patient name several times in the same document, you have
to add an underscore and number to the following text marks. In the above
example, this would be "patient_Name_1".
A special feature is database fields with special characters (except for "_") and
spaces. They must not be used as text marks in WORD!
In this case, leave out these characters or replace them with an underscore.
Example: the field "Referral to" becomes "Referral_to".
Example text marks:
Figure 175
After data exchange, the following text excerpt results from the above example.
Figure 176
11.1.1.5 Inserting placeholders for images
To add images in a WORD document, it is a good idea to put them in a table
because the size of the images is defined. The images are entered in the text marks
by "image+_+number" (image_1, image_2, etc.).
11-136
To prevent automatic size changes of the table, switch this off via "right mouse
button -> Table Settings -> Options". The table height is still set depending on
image size.
Figure 177
Example with four text marks for images:
11-137
Figure 178
11.1.2 PowerPoint-Export
The PowerPoint export module permits comfortable insertion of images, videos and notes
in a new or present presentation. All images and videos are copied into a directory so that
the presentation can also easily be run on other computers. To integrate backgrounds or
special characteristics even when setting up the presentation, you may indicate the
matching "PowerPoint template".
In the preview window, you may adjust the individual windows in position and size with
the mouse and specify the front and background colour for texts with the buttons
.
The data are sent to PowerPoint once you click "Send". To test your settings with an image
first, use the button "Test".
11-138
Figure 179
11.1.2.1 Active presentation
You may insert images and videos in an existing presentation or use the button
to create a new presentation.
11.1.2.2 PowerPoint format template
If you want to use a special background for your presentation, select the respective
format template here. Use the button
background is used.
to reset the format template so that no
11.1.2.3 Send
If you have made all settings, all images and videos will be sent to PowerPoint via
"Send".
11.1.2.4 Orientation
Changes the PowerPoint slide orientation.
11-139
11.1.2.5 Transparency
Can be used to display the text for titles and notes transparently. Any changes are
displayed right in the preview.
11.1.2.6 Note as subtitle
Activate this option if you want to enter the note saved in the database for the
images in the presentation.
11.1.2.7 Test
A demo image is sent to PowerPoint to test the correct function.
11.1.2.8 Cancel
The dialogue is closed and all settings are discarded.
11.1.2.9 OK
The dialogue is closed and all settings are saved.
11.2 CD/DVD writing
There are two burning modules, the standard module for CDs, plus, for all Windows
versions after Windows XP, a version that will also burn DVDs. The expanded burning
functions can also be added with the Microsoft Update KB932716 for Windows XP
(WindowsXP- KB932716 -v2-x86-<LNG>.exe).
11.2.1 Windows XP
In the above list (1) you can see the images and videos to be burned to CD; list (2)
additionally shows the files already present on the inserted CD. Use the button (3) to start
burning. If the data is not needed for another burning procedure after burning, check the
option "Delete temporary files after burning". Use the button "Delete all" to manually
empty the Windows folder with the data to be burned.
11-140
Figure 180
11.2.2 Windows Vista, Windows 7
All Windows versions as of Windows Vista offer extended burning functions (IMAPI2) and you
can thus also burn DVDs.
11-141
Figure 181
The available recorders will be found and verified first when opening the dialogue:
Figure 182
If no disc is inserted in the recorder, the following dialogue will appear:
11-142
Figure 183
11.2.2.1 Available recorders
This selection permits selection of the desired CD/DVD recorder, if your computer
has several. If you have an external recorder connected via USB or firewire, use the
button "Update" after connection of the external device to have it entered into the
list.
Figure 184
11.2.2.2 CD/DVD Info
This field displays the parameters of the inserted disc (type, storage space, free
memory and designator). Use the button "Detect" to update the display, e.g. after
changing disc.
Figure 185
11.2.2.3 Files to burn
The list of files to burn lists all files to be written on the disc.
11-143
Figure 186
11.2.2.4 Options
11.2.2.4.1 Create subfolders for each patient
A separate folder is created on the disc per patient.
11.2.2.4.2 Create subfolders for each examination
A separate folder is created on the disc per examination.
11.2.2.4.3 Integrate date of image into file name
The image recording date is integrated in the file name.
11.2.2.4.4 Integrate time of image into file name
The image recording time is integrated in the file name.
11.2.2.4.5 Eject CD/DVD
The disc is ejected after burning
11.2.2.5 Files on CD/DVD
If the disc inserted already contains files, they are displayed here.
11.2.2.6 Start burn
The data are written on the CD/DVD
11.2.2.7 Erase CD/DVD-RW
If you have inserted a rewriteable disc, you can erase it before burning.
11-144
11.2.2.8 Exit
Closes the window
11.3 Video recording
11.3.1 Video recording
The video module permits recording video sequences in full or half PAL/NTSC
resolution. The video settings also permit timer activation to stop the recording
automatically after a set time.
Figure 187 (Video recording button panel top)
Figure 188 (Video recording button panel left)
If the video module is active, the dialogue "Video options" displays expanded setting
options for video recording:
11-145
Figure 189
11.3.1.1 Real time compression
If this is activated, the video file will be compressed during recording already. This
has the advantage that you can continue to work at once after completing the
recording. This requires a very fast computer, however, when recording in full
video resolution (>3GHz). If this is not active, the video is written on the hard disc
uncompressed during recording and only compressed after recording is completed.
Depending on computer and length of the video, this may take some time. The
progress of this action can be followed in the video status bar in this case:
Figure 190
11.3.1.2 Record videos in full resolution
The video is recoded in full PAL resolution (768x576). If the option is deactivated,
only half the resolution (384x288) is used. Recording full video resolution will lead
to better-quality results but also requires a fast computer (Dual Core >2GHz).
11-146
11.3.1.3 Stop camera when playing full screen video
If you want to view a recorded video from the video page it may be sensible to stop
the video camera during live display. If the computer is not very high-performance,
stuttering playback may result otherwise.
11.3.1.4 Stop video recording automatically after x seconds
With this option active, the video recording is stopped automatically after the time
set here.
11.3.1.5 Video quality/file size
This slider adjusts the recording quality. The higher the quality, the larger the
resulting file. With the MPEG4 compression procedure, settings between 1 and 2
MByte/sec are usually enough for good results.
11.3.1.6 Full screen video renderer
This setting changes the method of how Windows will forward the video images to
the graphics card. Depending on Windows version used, service pack installed or
different graphics cards, some problems or stutter may result during video
playback. Choosing a different renderer will usually help.
11.3.1.7 Loop in FFDShow video processor
This option permits switching the "FFDShow-filter" between camera and playback
on the screen, the filter offers a great many options to influence the video image,
such as sharpness, mirroring, rotating, deinterlacing…
11-147
Figure 191
Caution: This option is not present in all video devices!
11.3.2 HD-Recording
See 11.12 page 11-199.
11.4 Image processing
The image processing modules are available in the button panel "Layer". They are only
released when an image is active. Once you click one of the buttons, the active image
displays a selection rectangle in which the corresponding function is displayed. This
Rectangle can be moved freely with the mouse and changed in size. The "X" in the upper
right corner removes the "layer" again. The lock icon in the lower left freezes the image
section so that it can be moved to any position in the image. The button in the upper left
corner, if present, is used for conditional inputs like measuring points again.
11-148
Figure 192
11.4.1 Markers and texts
Use the button with the red circle to embed markers like an arrow in the image to mark
specific findings.
Figure 193
11.4.2 Filter functions
The filter functions offer the option of highlighting image contents, improving image sharpness
and manipulating the histogram to balance out, e.g. under-illumination.
11-149
Figure 194
11.4.3 Histogram
Within the histogram window, you can see the brightness values of the image as yellow
area. The part of the histogram window with the light background is displayed in the
selected image. You may touch the part with the bright background with the mouse (the
cursor turns into a hand) and move it within the histogram window. Move the mouse
right onto the end of the light background to change the size of the light insertion. Press
the left mouse button when the double arrow appears (at the edge of the light area) and
keep the mouse button pressed. Now you can move the mouse back and forth to adjust
the size of the light insertion. If the light insertion has reached the desired size, you can
release the mouse button.
11.4.3.1 Button
11.4.3.1.1 Stretch
This setting stretches the brightness values not displayed; the brightness values not displayed
are white.
11.4.3.1.2 Cut
This setting cuts the brightness values not to be displayed and displays them in black.
11-150
11.4.3.1.3 Reset
This button resets the histogram to the original condition. The condition before changes to the
histogram were made is restored.
11.5 Database
11.5.1 Database backup
To get to the dialogue for database backup, use "Settings -> Database -> Database backup" or the
popup menu of a data grid on the database page.
Figure 195
The following dialogue appears:
11-151
Figure 196
If the programme has any problems that indicate an error in the database, click "Repair database".
To back up the database, enter a folder where the backups are to be saved as "Backup path" and
click "Backup database ".
If you want to restore the database from a backup, click "Restore database". Choose the path for
the backup files in the following dialogue:
11-152
Figure 197
Caution: all data of the current database are irrevocably overwritten!
11.5.1.1 Options
11.5.1.1.1 Overwrite existing backups
Activate this option if you want to provide only one database backup at a time. It is
automatically overwritten during each backup process. Otherwise, a new file will be created
for each backup.
11.5.1.1.2 Split backup files to fit on CD
If this option is activated, the backup file will automatically be split for each file to fit a CD.
Otherwise, a single large file will be generated.
11.5.1.1.3 Backup videos stored as file
If you have recorded video files and saved them as a file (See Video archivi page 8-114), they
are only backed up if you have activated this option.
Caution: this may cause the backup process to take very long!
11.5.2 Free database configuration
To get to this dialogue, use "Settings -> Database" and, depending on table you want to modify,
either "Patient, Study or Images -> Configure Table".
11-153
Figure 198
In this dialogue, you can adjust the programme tables to your needs. You may delete data in all
three main tables or add new ones. You may choose between all possible field types. All input will
be made only when confirming with ok.
11.5.2.1 Creating new database field
Click the input field "Field name" and enter the name for the new field. Select the
matching entry from the field type list and click the button "Insert new field". If you
want to set up a "String field", enter the maximum length in "Size" first. The new
field now appears in the list "Database fields". The new field will, however, only be
entered in the database when confirmed with "OK". Observe that no umlauts or
special characters are permitted for the "field name".
11.5.2.2 Rename present database field
Click the field to be renamed in the database field list so that it is highlighted in
grey. Now enter the new name in the input field "Field name". Click the button
"Rename field". The list "Database fields" on the right now shows: "Rename "Old
field name" to "New field name". The final renaming will only take place after
confirmation with "OK" and repeated safety prompt.
11.5.2.3 Delete present database field
Click the field to be deleted in the database field list so that it is highlighted in grey.
Click the button "Delete field". The field is now removed from the database field
list. Final deletion from the database will, however, only take place after
confirmation with "OK" and repeated safety prompt.
Caution: Deleting a field is final and will cause loss of all data already entered in
this field!
11-154
11.5.2.4 Function groups
11.5.2.4.1 Database fields
A list of all fields of the respective table.
11.5.2.4.2 Field name
Input field for the designator of new database fields. The database field names must not
contain any special characters, umlauts or spaces.
11.5.2.4.3 Display name
The name entered here may include any character and is used in all control elements of the
programme to designate the field.
11.5.2.4.4 Field type
Dropdown for the type of the new database field:
A.
B.
C.
D.
E.
F.
G.
Integer: Full numbers (1,-100,77...)
Boolean: Selection "yes"/no"
String: Text with limited length.
Float: Decimal digit (343,3284729)
Text: Text with variable length
Date: Date
Time: Time
Observe the difference between string and text fields: a text field cannot be displayed in the
data grid. Therefore, this field cannot be used for sorting. The access time needed by the
database is also much longer than for text fields.
11.5.2.4.5 Field size
Only important for text fields. Defines the maximum field length.
11.5.2.4.6 Insert field
See "Creating new database field".
11.5.2.4.7 Delete selected field
See "Delete existing database field".
11.5.2.5 Configure fields for automatic incrementation
Automatic fields are number fields that are increased by one for each new dataset. For
example, a field "Customer number" can be set up and set to a specific default value. For
every new patient who is set up, the starting value is increased by one.
11-155
Figure 199
11.5.3 Dictionary
Figure 200
The dictionary can store frequently-used sentences or longer words with a short designation. This
corresponds to the text components of MS-WORD. The individual items are structured in
subgroups by indicating a "Category". The category corresponds to the fields in the database.
This permits setting up a dedicated list of text components per database field to then comfortably
select in a dropdown list in the database input dialogues. An example: You have set up a text field
with the name "Referral" in the database table. You want this field to contain the address of the
specialist to whom you refer the patient. To avoid having to enter the address every time, you can
set up the following entries in the dictionary:
1. Category : Referral
Designator : Heisenberg
Description :
Dr. med. Werner Heisenberg
11-156
Rosenstr 7
33333 Hamm
2. Category : Referral
Designator : Koch
Description :
Dr. med. Robert Koch
Sedanstr 7
33334 Cologne
3. Category : Referral
Designator : Einstein
Description :
Dr. Dr. Albert Einstein
Hohe Warte 99
33335 Munich ...
If you want to enter the field "Referral" in the database via an input dialogue, the
following entries will appear in the dropdown-list:
4. Einstein
5. Heisenberg
6. Koch
If you select the entry "Einstein", the complete address will be entered in the database
and printed on the referral. Observe that the lists are sorted alphabetically so that it is
sensible to only use the last name as "designator" to find the term more easily.
Of course, the method described above will work for any field of the database. If you
did not make any entries for a specific field in the dictionary yet, the dropdown list of
the corresponding field in the input dialogues is filled with a list of all entries already
made in this field in the database.
11.5.3.1 Category filter
This dropdown list lists all database fields. Selection of one of these entries filters
the dictionary so that only those entries that correspond to this "Category" will be
visible. If you set the category filter, e.g., to "Referral", only the entries with the
category "Referral" will appear. Also see "Deactivate filter ".
11.5.3.2 Deactivate filter
If you have entered a filter in the "Category filter", you may deactivate it again with
this button this will display all dictionary entries again.
11.5.3.3 Keyword list
This data grid provides an overview of all dictionary entries.
11.5.3.4 Description:
Displays the text inserted in the database when selecting the corresponding entry in
the dropdown list of the input dialogues.
11-157
11.5.3.5 Entry:
11.5.3.5.1 Edit
Opens a dialogue to edit the current entry.
11.5.3.5.2 New
Opens a dialogue to create a new entry.
11.5.3.5.3 Copy
The current entry is copied. Then a dialogue opens to edit the copied entry.
11.5.3.5.4 Erase
The current entry is removed from the dictionary.
11.5.3.6 Context menu dictionary
Figure 201
11.5.3.6.1 Select all
All entries are selected. You may select individual entries or, if they are already selected,
unselect them by clicking the corresponding entry with the Ctrl button pressed.
11.5.3.6.2 Filter category from current item
After selection of this menu item, only entries with the same category as the currently selected
one will be displayed.
11.5.3.6.3 Change category for all selected items
Selecting this (See "Select all"), you may change the category of all selected entries. This is
particularly important if you have renamed a database field or created a new field you want to
assign some entries from a different field to.
11.5.4 KV card reader
The KV card reader module permits directly importing patient data into the programme
via the health insurance card. The imported patient is automatically the current patient,
so that you do not have to switch to the database page first. All Towitoko chip card
readers are supported.
11-158
Figure 202 (Towitoko Chip card reader)
11.6 GDT practice software integration
The GDT module permits connecting the software to a present practice software supporting the
GDT interface. The practice software will write a file with the new patient data upon patient
change. This file is continually monitored and imported by the programme in case of changes. The
imported patient is now active.
You may activate and configure the GDT interface via "Settings -> GDT":
Figure 203
Indicate the file your practice programme uses to submit patient data as "Transfer file" (ask the
manufacturer if required), and then activate the field "GDT active". If your practice programme
will submit another data as well that you want to include in the database, ask the manufacturer for
11-159
the corresponding GDT code. Then enter this and the database field to receive the data in the list
"Field assignments".
11.6.1 Client identification
The client identification tells the practice EDP on which PC or GDT device the
submitted data originates. In the reverse situation, the programme will only react to
GDT files that contain this identification if the option "Evaluate identification" is
active. If no other GDT devices are active in your system, this input can also be
dispensed with.
11.6.2 Server identification
The server identification can be used if the programme is to react only to GDT files
from a specific workstation in the network. The workstation must insert this
identification in the transfer file. Also, only this one station will be able to process the
return file. Also see "Evaluate identification".
11.6.3 Transfer file
Enter the path and name of the GDT file your practice EDP will write. This input must
correspond precisely to the settings of your practice software. Once the EDP writes this
file, the file will be read by the programme and deleted.
11.6.4 Return file for examination
Enter the path and name of the GDT file to be returned to your practice EDP here. This
input must correspond precisely to the settings in your practice software. Once the new
examination data are entered, this file is written and read by your EDP, and the data
will be imported in the practice EDP. Also see "Return examination data".
11.6.5 Folder for images and videos
If you want to provide images and videos for your practice EDP, you can enter the path
where the files are to be copied here. The options "Transfer images", "Transfer videos"
and "Transfer thumbs" specify precisely what data will be copied.
11.6.6 Options
11.6.6.1 GDT active
This option activates or deactivates the GDT functions.
11.6.6.2 Read GDT file on start-up
This option should be activated if you call the programme from your practice. If the
option is not active, any GDT files present at programme start-up will be ignored.
11.6.6.3 Beep on GDT transfer
Once a GDT return file was written, a beep is output. However, this only works if
the PC has an integrated speaker or external speakers are connected to it.
11.6.6.4 Return examination data
If this option is active, a return file for the practice EDP will be written once you
have edited an examination in the database. For this to work, your practice EDP
must be configured accordingly.
11-160
11.6.6.5 Transfer images
If this option is active and "Folder for images and videos" contains valid paths, all
new images will be copied to this folder for your practice EDP to access them.
11.6.6.6 Transfer videos
If this option is active and "Folder for images and videos" contains valid paths, all
new videos will be copied to this folder for your practice EDP to access them.
11.6.6.7 Transfer thumbs
If this option is active and "Folder for images and videos" contains valid paths, all
new thumbnails (preview images with a resolution of 160x120) will be copied to
this folder for your practice EDP to access them.
11.6.6.8 Open dialog for image note editing
If this is active, you will be taken to the database after every new image and asked
to edit the image data:
Figure 204
If you have not set up dedicated database fields for the image database, only the
field note will appear here. Also see "N
11.6.6.9 Send image note instead of examination note
Usually, the GDT return file will always transfer the note you have entered in the
image examination (GDT identification 6227); if this option is activated, the image
note will be used instead.
11.6.6.10 Clear images folder on start-up
If you provide your practice EDP with images and videos but it does not delete the
data imported, you may cause the programme to clear the folder for images and
videos at each start-up with this option.
11.6.6.11 Clear images folder on termination
See Clear images folder on ; the folder is only cleared upon termination of the
programme.
11-161
11.6.6.12 Evaluate identification
With this option active, only GDT files containing the matching identification are
evaluated. If you do not have any other GDT devices in your network, you may
deactivate this option.
11.6.6.13 Transfer data even without database storage
Transfer of images and videos to your practice EDP is usually only triggered if they
are saved in the database. This has the benefit that only the desired images and
videos will be submitted. With this option active, all data will be sent independently
of storage in the database.
11.6.6.14 Return file extension ".GDT"
The return files are usually given a serial number to ensure that no data is lost, e.g.
"GDT_Return.001". if your practice EDP has not evaluated and deleted this file yet,
the next GDT file will be "GDT_Return.002", etc. If your EDP expects the file
extension ".GDT", you can force this with this option.
11.6.6.15 Integrate L/R into file name
The differentiation between "left/right" is usually submitted in the GDT return file
(GDT identification 6004). If your practice EDP does not support this, the
identification is appended to the return file: "GDT_Return.001" is turned to
"GDT_Return_L.gdt" for left and "GDT_Return_R.gdt" for right.
11.6.7 Field assignments
Use this input template to set up additional links to your practice EDP that are not
implemented by default. If you need database fields that are not set up (such as "house
number"), you may create these fields in the database via the module Free database
configuration page 11-153.
Figure 205
If the GDT file of your practice software sends the entered GDT identification, the
corresponding data will be saved in the database.
11.6.8 Additional examination assignments
The same as for field assignments applies, but these are additional data the programme
returns to the practice EDP. The column "Field name/#value" permits entering fixed
values as well; they must start with the character "#", e.g. "#1" or "#treatment room 2".
11.6.9 Additional image data assignments
The same as for 11.6.8 applies, but referring to data from the image table:
11-162
Figure 206
11.6.10 Button
11.6.10.1 OK
All input is saved and the dialogue is closed.
11.6.10.2 Test
You may test the GDT function if "GDT active" and "Read GDT file at start-up"
are active and the transfer file is present. The data of the transfer file will be read
and written to the database.
11.6.10.3 Reset
All settings are reset to the values saved before the dialogue was called.
11.6.10.4 Cancel
All input is discarded and the dialogue is closed.
11.7 Canon EOS DSLR interface
This module permits digitally controlling any Canon EOS digital camera, importing and triggering
it. To use a connected camera, "Connect". Now you may use the button "Snapshot" to trigger the
camera. Any recording will appear both in the large view with zoom function and in the
"Snapshots" list. If a recording from the list is clicked, it will be loaded in the "zoom window".
The control on the left edge can be used to smoothly enlarge or reduce the image size and keeping
the left mouse button pressed permits freely moving the image.
11-163
Figure 207
11.7.1 Button panel
11.7.1.1 Connect/disconnect camera
This button can be used to connect or disconnect the camera. Alternatively, you
may activate "Automatic connection" in the options.
11.7.1.2 Snapshot
This button triggers the camera. Alternatively, you may use a foot switch.
11.7.1.3 Video recording/terminate recording
This button triggers video recording of the LiveView stream. It has a resolution of
approx. 800x600 pixels and delivers approx. 12 images/second, depending on USB
connection quality. Alternatively, you may use the HDMI module as well, with the
resolution 1920x1080 and 30 images/second.
11.7.1.4 State
Displays status information
11.7.1.5 Zoom/left-right
Depending on medical device connected, this field will display either identification
of left/right or amplification.
11-164
11.7.2 LiveView
Figure 208
Once the camera is connected and you switch to the tab LiveView, the camera's LiveView mode
will be activated, and you will see the video preview as you would on the camera LCD.
11-165
11.7.3 Recordings
Figure 209
The tab recordings permits watching the recorded images and videos and, if required, zooming
into the recordings. Clicking one of the images in the preview on the right side will load it in the
large view. If it is a video, the lower part of the display area shows an operating bar.
11-166
11.7.4 CF card
Figure 210
The tab CF card permits loading and viewing present images from a memory card. On the left
side, all recordings are listed in a tree structure; the centre view shows the corresponding preview
images. Clicking one of the preview images displays characteristics of the selected image on the
right. The checkboxes in the preview images can be used to select specific images and to load
them in the recordings list with the button "Load".
11.7.5 Options
On the page Options, you may set the most important camera parameters, specify the basic
behaviour of the software and view the communications log.
11-167
Figure 211
11.7.5.1 Camera settings
11.7.5.1.1 Rotation
With this selection box, you can automatically rotate the LiveView display and recorded
images by 90°, 180° or 270°. Alternatively, you can also use your camera for this setting.
11.7.5.1.2 White balance
The white balance makes sure that white areas appear white. Usually, the setting (automatic)
achieves the correct white balance. If this setting does not lead to natural colours being
displayed, you may manually adjust the white balance to the respective light source as well.
For a precise description of the individual modes, see the operating instructions of your
Canon EOS camera.
11.7.5.1.3 Image size
This setting corresponds to the item "Setting the image recording quality" in
the Canon EOS operating instructions. The better the quality, the larger the resulting file size.
11.7.5.1.4 AE mode
Shows the selected recording mode. This is the programme you can set at the camera using
the dial.
11.7.5.1.5 ISO
Choose the ISO sensitivity (light sensitivity of the image sensor) according to the ambience
light. In the motive area modes, ISO sensitivity is set automatically.
11-168
Information on ISO setting "Auto": In this mode, the ISO sensitivity is automatically set
between ISO 100 and 800 according to recording mode and ambience light. Using a flash and
manual illumination, ISO 400 is set.
11.7.5.1.6 Shutter Speed (TV)
You may set the desired shutter speed. This setting is only available in the mode "M"
(manual).
11.7.5.1.7 Aperture (AV)
This setting specifies the aperture value and is only sensible when using the Canon lens.
11.7.5.1.8 LiveView frames/sec
The maximum LiveView frame rate depends on the transfer rate of the USB bus and the
performance of the computer used. To warrant stable and stutter-free display, it is sensible to
specify a fixed frame rate value below the maximum that can be achieved. A good
compromise is the value 10.
11.7.5.2 Video quality/file size
This slider can be used to specify the quality of the recorded videos; observe that
increasing quality will also increase file size. For best results, use the maximum
setting of "1 Megabyte / second".
11.7.5.3 Protocol
Use the protocol options to specify the events to be logged and whether or not they
should be saved to a file for later evaluation. These options are only used for error
search in case of problems in transfer.
11.7.5.4 Automatic options
11.7.5.4.1 Auto-connect camera on start-up
If this option is active, the programme will try to connect with a connected Canon EOS
camera every 10 seconds. Once connection was successful, the button will switch from
"Connect" to "Disconnect".
11.7.5.4.2 Read CF card on camera connect
If a storage card is found in the camera and this option is active, the CF-card will be read and
you can then import individual images into the programme with the tab "CF-card".
11.7.5.4.3 Save images on CF card also
If this option is active and a storage card is inserted in the camera, any recording will be saved
on the PC as well as on the CF card.
11.7.5.4.4 Jump to image processing page after snapshot
The programme automatically jumps to image processing after each snapshot.
11.7.5.4.5 Load images into image processing
Every recording is loaded in image processing.
11.7.5.4.6 Store images in database
Every recording is stored in the database at once under the current patient.
11-169
11.7.5.5 LiveView options
11.7.5.5.1 Immediately start LiveView-Mode
After camera connection, the LiveView page is activated automatically and LiveView
transmission is started.
11.7.5.5.2 Keep LiveView while changing page
If this option is active, the LiveView transmission remains active when switching to a
different tab or a different main page. This may cause delay or stutter in low-performance
computers, in particular if videos are played in parallel. In such cases, it is sensible to
temporarily deactivate LiveView mode.
11.7.5.5.3 Auto fit LiveView to window
If this option is active, the LiveView is adjusted to the size of the preview window; otherwise,
the LiveView is displayed 1:1.
11.7.5.5.4 Show camera settings in LiveView window
The current values for AV(aperture), TV(shutter speed) and ISO-settings are displayed in the
LiveView window.
11.7.5.5.5 Stop LiveView before snapshot
Activating this option may accelerate transfer of recordings via the USB bus.
11.7.5.5.6 Show CPU utilisation while recording
In particular for low-performance computers, it may be sensible to check CPU utilisation
during video recording, if the video is not recorded smoothly and without stutter and the CPU
utilisation exceeds 80% during recording, the computer is overloaded by this function.
11.7.5.5.7 Show focus buttons for Canon lens
The sharpness point can be set via the software when using Canon lenses. For this purpose,
the following bar is displayed in the lower right of the LiveView window:
. The number of arrows corresponds to the step size of the change.
11.7.5.6 Foot switch
This selection field specifies the action to be performed when operating the foot
switch: Capture image, or video recording.
11.7.5.7 HDMI options
Figure 212
To display the LiveView via the Canon EOS camera's HDMI-interface, you need a
"Decklink HDMI Videocapture card". The advantage of this solution is the higher
resolution (USB LiveView: 800x600, HDMI-LiveView: 1920x1080), as well as the
11-170
higher frame rate (USB LiveView: 12 frames/second, HDMI-LiveView: 30 frames
/second).
11.7.5.7.1 LiveView via HDMI
If your computer meets the above conditions, this option activates the HDMI output of the
camera, as well as internal HDMI processing.
11.7.5.7.2 Video recording via HDMI
If your computer meets the above conditions, this option activates video recording of the
HDMI signal.
11.7.5.7.3 Permanently activate the HDMI output
Activating this option permanently maintains HDMI-transmission. This prevents delays when
switching back to the HDMI tab. However, low-performance computers may experience
performance problems here.
11.7.5.8 HD video recording
See 11.13 page 11-204.
11.7.6 HDMI
The HDMI tab corresponds to the LiveView tab, except that the preview is not supplied
via the USB connection but the HDMI interface.
11.8 Document printing (print) )
The document print module offers the option of printing self-created print templates with patient
data and images and editing them on demand. In combination with the document database. You
may save all documents for a history or later printout. Additionally, you may save the completed
documents in RTF format or export them to WORD.
11-171
Figure 213
11.8.1 Print template
The selection box "Print template" offers immediate access to all templates you have
generated.
11.8.2 Data source
Data source specifies where the images and patient data are to come from. You may
select among the data sources "image processing", "database" and "database search",
depending on whether you have, for example, opened images in image processing or
performed a database search.
11.8.3 Address
This field can only be selected if you load a print template that contains placeholders
for address book data. If the address book module is cleared, you may include your
colleagues' addresses in the address book, set up a print template with address field and
print, e.g., a referral to a specialist.
11.8.4 Edit
Use the button Edit to set the print preview to processing mode. This permits making
special changes before printing that are not yet included in the selected template.
11.8.5 Reload template
If you want to revoke changes to the document, click the button
template".
11-172
"Reload
11.8.6 Settings
11.8.6.1 Always reload template
With this option, the template is automatically reloaded when the print page is left
and called again. If you have changed the document with "Edit" and want to make
additional prints with this changed template, the option must be switched off.
11.8.6.2 Show print dialog
Shows the dialogue for print parameter input before printout.
11.8.6.3 Show "Note" input dialog
If you use the document database, you can enter a note in the dialogue before
printing any document; it is then entered in the corresponding database field.
11.8.6.4 Save documents
When using the document database, every printed document will be saved in this
database. You may also save selected documents only with this button
.
11.8.6.5 Use preview images
Usually, the document's print preview always uses original images in full
resolution. However, in pictures with a very high resolution, this may impair
display because very large data volumes must be processed. If this option is active,
only the small preview images are used. However, this only affects preview on the
screen; print always uses the original images.
11.8.6.6 Last image on top
This option can be used to reverse the order of the preview images. It may be
sensible if you have recorded several images and the last image is to be inserted in
the document.
11.8.7 Serial letter function
The serial letter module permits contacting a selection of your patients or, via the address book, of
your colleagues. After a database search, you may also use the results for serial letters. This
permits, e.g., finding all new patients/clients in the database search of the last six months, and
sending them a letter to thank them for their trust.
11-173
Figure 214
11.8.7.1 Selecting entries for print
There are two ways to select datasets for print. In standard input, you may simply check the
entries to be printed by mouse click. With the expanded selection, you may select entire areas with
the "Shift button" pressed and add or remove individual entries with the "Ctrl button" pressed. The
"Selection mode" can be switched in the popup menu that appears upon click on the field in the
upper left of the data grid.
11.8.7.2 Select data source
The data source selection specifies the database you want to use for serial letters.
11.8.7.3 Print preview
If this option is active, the current dataset is inserted in the document to be printed
in the main window. This way, you can check at once whether the result meets your
requirements and whether the selected print template is suitable for serial print.
11.8.7.4 Save documents
All serial letters that were printed are automatically saved in the database
"Documents". This is recommended for complete document history.
11-174
11.8.7.5 Enter note
If "Save documents" is activated, you may enter a joint note for all documents that
is then stored in the document database.
11.8.7.6 Print
This button starts printout of the selected serial letters.
11.8.7.7 Save
This button saves the serial letters in the document database without printing them.
11.8.7.8 Popup menu
Figure 215
11.8.7.8.1 WORD-Export
WORD is opened and the selected data visible in the data grid are inserted in a new document
as a table. Example:
Figure 216
11.8.7.8.2 EXCEL-Export
EXCEL is opened and the selected data visible in the data grid are inserted in a worksheet.
11.8.7.8.3 Use advanced selection
Expanded selection permits selecting entire areas with the "Shift button" pressed and adding
or removing individual entries with the "Ctrl button" pressed. "Selection mode" can be
switched in the popup menu that appears upon click on the field in the upper left of the data
grid.
11.8.7.8.4 Set optimal column width
This function calculates the best width for the individual columns of the data grid and sets the
column widths to these values.
11.9 Document database (documents)
The document database saves all documents you want to print. They can be set on the print page.
You also have the option of scanning documents or importing them from a data carrier. The filter
can be used to limit display of the present documents. The document window as such permits
11-175
subsequent editing of documents already printed and printing them. Use the button "Show" to
open the documents in the programme intended for this by Windows. This way, you can also save,
e.g., PDF documents and display them in "Acrobat Reader". Double-clicking the data grid permits
subsequent changes to the data.
Figure 217
11.9.1 Button documents
11.9.1.1 Scan
This button permits importing documents or images into the document database via
the TWAIN-interface. This may use a scanner, digital camera or any device
supporting this interface.
Submenu
Figure 218
11.9.1.1.1 Select TWAIN source
If you have several devices installed that support the TWAIN-interface, you can select which
one to use here.
11-176
11.9.1.1.2 Specify JPEG quality
The scanned images are saved in JPEG format. The lower the quality is set, the smaller the
resulting files.
11.9.1.2 Import
This document imports documents or images from a data carrier to the document
database.
11.9.1.3 Export
This document exports the current document or image from the document database
to an external data carrier.
11.9.1.4 Show
Opens the current document in the application intended by Windows. RTFdocuments, for example, are opened in WORD.
11.9.1.5 Print
The current document is sent to the printer.
Submenu
Figure 219
11.9.1.5.1 Printer set-up
The dialogue for setting the print parameters, such as paper size or number of copies, is
called.
11.9.1.5.2 Show print dialog
Once this menu item is active, the print dialog is called before every printout.
11.9.1.6 Filter
11.9.1.6.1 Show images
If you have saved many scanned documents in the database, it may be sensible to deactivate
this item. These documents are often much larger than the pure RTF-documents and the
computer needs relatively much time to display them.
11.9.1.6.2 Show current image
With the filter "Show images" deactivated, you may still have the current image
displayed with this button.
11-177
11.9.2 Data grid popup menu
Figure 220
11.9.2.1 Configure representation
See "Configure representation", “Data grid” on page 8-106.
11.9.2.2 Edit database fields display names
See Edit display names page 8-107.
11.9.2.3 Highlight whole row
The entire row of the active dataset is displayed in one colour. This switches off
"Automatic sort sequence".
11.9.2.4 Automatic sort sequence
Clicking a field in the data grid and entering the first letter of the printed value will
automatically sort the database by this field with "Automatic sort sequence" active.
Otherwise, the key input is always made in the field that specifies the currently
selected main sort sequence (see the small triangle with the 1 in the title bar).
Figure 221
11.9.2.5 Set optimal column width
This function calculates the best width for the individual columns of the data grid
and sets the column widths to these values.
11.9.2.6 Set current sort sequence as default
If you have changed the data grid sort sequence, you can use this menu item to
ensure that this sort sequence is used automatically at start-up.
11.9.3 Database filter
This filter permits listing only those documents in the database that are assigned to the
current patient and/or the current address in the address book.
11-178
Figure 222
11.9.4 Edit document data
Double-clicking an entry in the data grid shows the following dialogue to edit the
document data. Also see Edit patient data page Fehler! Textmarke nicht definiert..
Figure 223
11.9.5 Button RTF-document
11.9.5.1 Edit mode
If you have opened an RTF document to view, you can use this button to switch to
editing mode. Now you can, e.g. correct mistakes or add something and print the
document again. In editing mode, a tool bar appears additionally above the
document as shown in the example below.
11-179
Figure 224
11.9.5.2 Saving
If you have changed a document via the editing mode, you may save the changes on
this in the database. The original document is replaced.
11.9.5.3 Save new
If you have changed a document in edit mode, you may save the changes on this in
the database. A new database entry is generated and the original document will not
be replaced.
11.9.5.4 No images
If you have lots of documents with high-resolution images in your database, it may
be sensible to activate this item. These images are often much larger than the pure
RTF documents and the computer requires relatively much time to display them. If
this option is active no images that may be present in the document will be
displayed.
11.9.6 Button display
11.9.6.1 Fit to height
The full height of the document or image is shown.
11.9.6.2 Fit to width
The full width of the document or image is shown.
11.9.6.3 Original size
The document or image is shown in its original size.
11.9.7 Document info
Document Info shows the template used by the document, the format the document was
saved in the database as and the amount of memory space it requires. The addition "-Z"
means that the document was saved compressed.
11-180
Figure 225
11.10 Address book
The address book permits attaching documents not only with patient reference but also with
address data. This is helpful, e.g. if you want to write referrals to colleagues in which you refer to
the patient. For this purpose, the print template generation also permits insertion of address
placeholders.
Figure 226
11.10.1 Documents
Clicking this button will cause the programme to switch to the page "documents" and
display all entries in the document database that are linked to the currently selected
address.
11.10.2 Category filter
Use the database field "Category" to classify your addresses in different groups, such as
physicians, health insurances, pharmacists, etc. This dropdown list lists all the present
categories. Selection of one of these entries will filter the address book so that only
those entries are visible that correspond to this "Category". E.g., the category filter
"Physicians" will only display the entries with the category "physicians". Also see
"Deactivate filter".
11-181
11.10.3 Deactivate filter
If you have entered a filter in the "Category filter", you can deactivate it again with this
button. This will show you all entries in the address book again.
11.10.4 Entry:
11.10.4.1 Edit
Opens a dialogue to edit the current entry.
11.10.4.2 New
Opens a dialogue to create a new entry.
11.10.4.3 Copy
The current entry is copied. Then a dialogue opens to edit the copied entry.
11.10.4.4 Erase
The current entry is removed from the address book.
11.10.5 Data grid popup menu
Figure 227
11.10.5.1 Configure Table
Use this menu item to add new database fields to the address book.
See "Free database configuration" page 11-153.
11.10.5.2 Configure Representation
See "Configure display" page 8-106.
11.10.5.3 Edit database fields display names
See Edit display names page 8-107
11.10.5.4 Highlight whole row
The entire row of the active dataset is coloured. This switches off "Automatic sort
sequence", however.
11-182
11.10.5.5 Automatic sort sequence
If you click a field in the data grid and enter the first letter of the value you are
looking for, the database will be sorted by this field automatically if "Automatic
sort sequence" is active. In the other case, key inputs will always be forwarded to
the field that determines the currently selected main sorting (recognisable by the
small triangle with the 1 in the title bar).
Figure 228
11.10.5.6 Always use default sort order
If you have changed the data grid sort sequence, you can use this menu item to
ensure that this sort sequence is used automatically at start-up.
11.10.5.7 Set optimal column width
The width of the individual columns of the data grid is set depending on field
content so that all entries are displayed completely.
11.10.6 Configure address lookup fields
This dialogue specifies the data to be listed in the short presentation of the address. The
short presentation is used, e.g., on the print page at "address" or in the input dialogues
of the document database.
11-183
Figure 229
To get to this dialogue, use "Settings -> database -> Configure address lookup fields".
To move an entry, click it with the mouse, keep the mouse button pressed and draw the
entry to the desired position.
Example print page:
Figure 230
11.11 Print template generation (template)
The print template editor quickly and comfortably creates templates with placeholders for
database fields and images. The scope of functions corresponds to state-of-the-art text processing
programmes with paragraph control, table generation, letterhead and foot, placeholders for date,
page indications, etc.
If you have already generated templates in the WORD or RTF format, you may simply import
them and assign the required placeholders. If you call the template you are currently editing on the
print page as well, you can verify your changes at once with the data inserted. Images are placed
by simple Drag&Drop and the image size can be defined freely.
To customise your printouts, you may also firmly integrate images and logos in the document.
Another peculiarity is the option to perform simple calculations in tables.
Use the function "Conditional fields" to have any text inserted in the document depending on the
value of a database field. For example, your colleagues can be addressed "Dear Mr / Dear Ms " if
you enter the field form of address or gender in the corresponding database.
In combination with the address book, you may very comfortably contact physicians or health
insurances and refer to the respective patients – if desired including image and findings.
Use the button "Print templates configuration" to sort all print templates into groups.
11-184
Figure 231
11.11.1 Menu
Figure 232
11.11.1.1 File
Figure 233
11.11.1.1.1 New
Creating a new template. Any template currently open will be closed.
11.11.1.1.2 Open file
Use this menu item to load present Word or RTF documents from a data carrier and to expand
them into a print template.
11-185
11.11.1.1.3 Save
Saving the open template on a data carrier, e.g. to complete it later.
11.11.1.1.4 Footer – Header
Figure 234
Use these items,
e.g. to load a
present letterhead or
to save one on a
data carrier. The
letter's header or
footer is a common
text or RTF file like
the main document.
Use the expanded
settings to specify
where the letter's
header/footer is to
be printed in case of
multi-page
documents. At the
lower end of the
edit window, there
are three tabs to
switch between the
different areas for
editing.
11.11.1.1.5 Printer set-up
Opens the dialogue for print settings like paper orientation, number of copies, etc.
11.11.1.1.6 Print
The current print template is sent to the printer.
11-186
11.11.1.2 Edit
Figure 235
The menu items under "Edit" correspond to those of the common text processing
programmes and work with the Windows clipboard.
11.11.1.3 Insert
Figure 236
The menu "Insert" offers a selection of placeholders (page count, date…) or special
objects (graphic, symbol …) to be embedded in the document.
11.11.1.4 View
Figure 237
The menu view controls the way the document is displayed on the screen.
11-187
11.11.1.5 Format
Figure 238
Format provides access to the usual formatting functions in text processing
programmes, such as justify or numbers.
11.11.1.6 Table
Figure 239
This menu permits entering a table in the document or changing present tables. To
change a present table, just place the cursor in the corresponding field and select the
function.
11-188
11.11.1.7 Extras
Figure 240
11.11.1.7.1 Paragraph dialog
This menu item opens a dialogue to set the parameters of the current paragraph.
Figure 241
11.11.1.7.2 Paragraph border dialogue
This menu item opens a dialogue to set special parameters of the current paragraph, such as
borders and shading.
11-189
Figure 242
11.11.1.7.3 Set current font as default
The font you see in the font selection box becomes the standard font. Whenever you set up a
new document, it will be used first.
11.11.1.7.4 Edit conditional fields
See "Configure conditional fields".
11.11.2 Tool bar "Load/save template "
Figure 243
11.11.3 Load template
Use the selection box "Load template" to load and edit one of the available templates
from the database.
11.11.4 Save template
The changes to the current template are saved under the current name without
prompting.
11.11.5 Save template as
Opens a dialogue in which you can save the current template under a new name.
11-190
Figure 244
11.11.6 Manage templates
Opens a dialogue in which you can comfortably rename, delete or move all present
templates in different categories. Just click the corresponding field of the data grid to
edit an entry and enter the new designation.
11-191
Figure 245
11.11.7 Editor tool bar
Figure 246
The editor tool bar provides quick access to most functions of a state-of-the-art text processing
programme. All functions have short notes that appear when you move the mouse above them and
are mainly self-explanatory.
11-192
11.11.8 Creating a print template
Figure 247
List of patient fields:
11.11.8.1 Inserting a database placeholder
To insert a placeholder for database fields, first place the cursor where the data is to
appear later. Fold open the selection list of the corresponding table and select the
corresponding field. Now you will see an entry underlined in blue in the document
with a red colon in front of it. In the example below this is "first name last name".
These placeholders are replaced with the patient data during printout later.
11-193
Figure 248
11.11.8.2 Inserting a placeholder for an image
To insert a placeholder for an image, click the slide with the corresponding image
number and draw it to the position in the document where it is to appear later with
the mouse button pressed. To insert an image in the document several times, you
may also draw, e.g., "Figure 1" into the document several times.
11-194
Figure 249
Figure 250
11.11.8.3 Creating letterhead and footer
To create a header or footer, click the corresponding tab at the bottom of the
document preview and enter your text. In the menu "File", you can specify where
the header and footer are to be printed on multi-page documents.
11-195
Figure 251
11.11.8.4 Special features when creating a serial letter template
When creating serial letter templates, the studies and image tables, as well as
insertion of image placeholders, must not be used.
11.11.9 Configure conditional fields
Conditional fields are placeholders for fixed terms inserted depending on a database
field value. Example: "Dear Mr …", "Dear Ms …", depending on the value in the field
"Gender". The dialogue below permits definition of these differences and saving them
in the database. Clicking a button as indicated in the figure below will open the
configuration dialogue.
Figure 252
This dialogue lists all conditional fields set up by you in a table. The condition is
displayed understandably in the lower text field.
11-196
Figure 253
Use the button "entry" to define new conditions edit or delete present ones and use
"Copy" to apply the selected condition as template for a new one. The following
dialogue appears:
11.11.9.1 Edit placeholder
Enter an indicative name for the condition as "Name of the condition". The list
below lists all available database fields that can be used as conditions, in the
example below, the instructions for the programme are: "If the database field
gender in the patient table has the value 'F', set "Ms", for the value 'M' use "Mr.";
otherwise, use "Sir or Madam". Apart from "=", "larger than" and "smaller than"
are available as comparative operators as well.
11-197
Figure 254
Once you have entered your data and terminated the dialogue with OK, you may
now access this placeholder using the list of conditional fields:
Figure 255
11.11.10 Calculations in tables
You may enter simple formulas in connection with tables and call input dialogues for values.
Double-clicking a table cell, you can enter a name for the cell, a default value or a sum formula.
11-198
Figure 256
To generate an input dialogue, use the keyword "Input", followed by "designation", "title" and
"default value".
Figure 257
This input generates the following dialogue:
Figure 258
11.12 HD-video recording
The module "HD-video recording" was developed specifically to record high definition
video via the HDMI-interface with full resolution and frame rate, with the great benefit
being in real time compression in the H264 format. This is achieved by using the very
high-performance GPU (Graphics Processing Unit) of an ATI-HDxxxx graphics card to
compress the video signal. This permits using cost-efficient current standard PCs.
The second important requirement is using an HDMI video card by "Blackmagic". TI has
an HDMI input as well as an HDMI output to connect large LCD displays.
The videos are recorded at a bit rate of 8 megabit, leading to a file size of 1
megabyte/second. This way, one hour of video will require 3.6 gigabyte of data.
11-199
11.12.1 Hardware installation
The minimum version of the ATI HD graphics card is HD4xxx. After installation of the
card, always install the latest Catalyst drivers as well as the matching ATIAVIVO/XCODE version.
11.12.2 Camera selection
Select the entry "Decklink Video Capture" in the camera selection dialogue
Figure 259
11.12.3 Dialogue video settings
Use the button "Options" on the video page to get to the dialogue video settings:
11-200
11.12.3.1 Tab general
Figure 260
11.12.3.1.1 Setting the video format
Click the button "PAL/NTSC" to get to the following dialogue:
11-201
Figure 261
Select the video format provided by your camera from the list "video format".
11.12.3.1.2 Setting the video renderer
Figure 262
The best video renderer selection strongly depends on the graphics card used and its drivers
and therefore must be tested from case to case. The best results are expected, however, when
using the overlay modes, because this means that image data will be transferred to the
graphics card directly rather than taking the detour via the Windows-API.
11-202
11.12.3.2 Tab video recording
Figure 263
11.12.3.2.1 ATI multiplexer
Use the button "ATI-Multiplexer" to set the video file type:
Figure 264
The specification here is "AVI" and should only be changed upon coordination with the
manufacturer.
11-203
11.12.3.2.2 ATI compressor
Use the button "ATI compressor" to set the video codec and compression parameters:
Figure 265
The requirements here are "H264" with best quality and bit rate. These settings provide best
quality at the lowest possible file size. These settings also should only be changed if the
standard settings do not provide the desired results. In particular for highly demanding
formats like 1080p50/60, the compression method may have to be changed, e.g. to MPEG-4.
11.12.4 Extended bitrate
If the quality of the recorded videos is not sufficient, you can use this selection box to
set a higher bit rate. Observe that this will increase file size. Increasing the bit rate may
be sensible if a less effective video codec must be used.
11.13 Canon EOS HD-video recording
When using a Canon EOS SLR camera, the live image will usually be transferred via the
camera's LiveView function. The camera signals are transmitted via the USB interface,
which has two problems: On the one hand, the resolution is limited to approx. 800x600
pixels; on the other hand, the frame rate is at approx. 12 frames per second.
These limitations can be avoided with the module "Canon EOS HD-video recording". The
video signal is sent to the video capture card "Blackmagic Intensity Pro" via the camera's
HDMI connection, leading to a resolution of 1920x1080 pixels (Full-HD) and frame rate of
up to 60 frames per second. This leads to a considerable quality increase both for
LiveView preview and video recording.
The second decisive item in this version is use of an ATI graphics card to encode the video
signals in the H264 format. This is the best currently available compression method,
cutting the file size in half as compared to MPEG2 while leaving the quality intact.
11-204
11.13.1 HDMI configuration
Figure 266
See 11.7.5.7 page 11-170.
11.13.2 HD recording configuration
Figure 267
The recording parameter configuration is explained in detail in the section HD-video
recording:
11.13.2.1 Decklink Intensity
See 11.12.3.1.1 page 11-201.
11.13.2.2 ATI multiplexer
See 11.12.3.2.1 page 11-203.
11.13.2.3 ATI compressor
See 11.12.3.2.2 page 11-204.
11.14 HD-video streaming
The module "HD video streaming" permits streaming of the audio and video files of the
HD camera into a network in real time and full HD resolution. This way, the processes,
e.g. during surgery, can also be viewed on computers outside of the operating room. The
highly effective compression of the data in MPEG-4 format also permits transmission via a
standard-WLAN network.
Caution:
This module is only available when using the module "HD-video recording".
Additionally, at least one quad core processor (as of Intel Core-I5 or AMD Phenom II X4)
and 3.5 GB DDR3 memory are needed.
You can get to the settings for this module with the button "Options" on the video page:
11-205
Figure 268
11.14.1 Streaming active
Activates or deactivates HD live streaming. Please deactivate streaming if you do not
need it, because the live video will otherwise be permanently compressed and cause
considerable strain on the CPU.
11.14.2 Port
This is the port through which the transfer takes place. You may enter any value
between 100 and 65000 here. It is important that this port is also set on the streaming
player/s.
11.14.3 Bit rate
Figure 269
The selection box "Bitrate" permits
specification of the transmission quality. The
higher the bit rate, the lower the computer's
CPU load.
Preferably, select a high bit rate as long as no
interferences or problems on the player page
occur.
11.14.4 Maximum connections
Enter the maximum permissible number of connections.
11.14.5 Deinterlacing
When using HD-cameras with an interlaced format like 1080I50, activation of this
option considerably improves image quality. When using full-image formats (e.g.
1080P50), this option should be deactivated.
11-206
11.14.6 HD-Streaming Client
The "HD Streaming Client" is a separate programme to be installed on the computer with which
you receive and play back the live stream.
Figure 270
11.14.6.1 Auto Reconnect
"Auto Reconnect" causes the streaming player to automatically try to re-establish
connection to the server if it is interrupted.
11.14.6.2 Server
Enter the network name of the computer to which the camera is connected in this
field.
11.14.6.3 Port
Enter the same port that you have set for the main computer.
See 11.14.6.3 page 11-207.
11.15 Panasonic HD-camera direct control
This module permits controlling a Panasonic camera type US932 via the software. For this
purpose, the camera must be connected to the computer's COM-interface with a serial
cable and the camera must be switched to "control per software". Activate the module by
selecting the type of the camera used in the dialogue "video settings".
11-207
Figure 271
Then the following operating elements are available:
Figure 272
11-208
11.1 HD video processing (video cutting)
Figure 273
11-209
12 Frequently asked
questions
12.1 What settings are needed for multi-user operation?
The programme is fully network-capable; this means that you can operate several
workstations with one database so that all users can access the same data master at the
same time. Additionally, you may remote-control, e.g. the computer in the treatment rooms
with the computers in the reception area if you have several stations connected. Only two
settings are necessary for this:
12.2 Setting the database path
A computer in the network must be configured as server for the database. For this, only the
"Firebird database server" must be installed, and the database files must be present on the
computer. Both is the case if the programme is entirely installed once. Write down the
server's network name and the path to the database. In the default condition, this always is
"C:\Program Files\<Company>\<Programme name> <Version>\Data\patients.fdb".
Enter this data into all other computers in the network and set "Connection remote".
12.3 Bad image quality
12.3.1 Deinterlacing filter off
Check that the item "Hardware deinterlacing" is active in the "video options".
12.3.2 Video in half resolution only
In "Video options", check the information in the field video format. The resolution
should be at least 720x576. If required, activate "Adjust video format manually". Now
a button appears behind "video format"; you may use it to select the best resolution
from a list.
12.4 The camera is not operated with a "USB 2.0" connection
Some older computers do not have any "USB 2.0 Interface" yet. You will not be able to
achieve satisfactory function in these computers. If in doubt, check the manual of your
computer.
12.5 Video amplifier misadjusted
See "First steps– initialising the video amplifier"
12.6 Only stripes in the live image after recording
Some video boxes and cameras require activation of the option "Always initialise video" in
the video options.
12-210
12.7 No signal with the USB box
Some USB video boxes use a setting deviating from the standard for the video input. In
most cases, you can set this in the dialogue you get to with the button "video device" in the
video options.
12.8 Black bars in the recorded image
Some cameras will show black bars at the sides of the recorded image. Switch off "Use
overlay mixer" in the video set-up in this case.
12.9 Foot switch is not working
See foot switch.
12.10 Programme runs in demo mode
See dongle installation.
12-211
13 Index
A
G
Address book ............................................ 11-176
Assigning function keys ............................... 5-43
Automatic fields........................................ 11-151
GDT interface ........................................... 11-154
C
HD-video recording .................................. 11-193
Help............................................................... 5-46
H
Canon EOS DSLR interface ..................... 11-159
CF card.................................................. 11-162
LiveView .............................................. 11-160
Recordings ............................................ 11-161
Changing database path ................................ 5-43
Configuration
Address book ........................................ 11-178
Automatic fields.................................... 11-151
Camera ...................................................... 4-22
Canon EOS DSLR interface .... 11-159, 11-162
Database .................................................... 5-41
Database fields ...................................... 11-149
Database, Change path.............................. 5-43
Database, Data grid ................................... 8-98
Database, Data list .................................... 8-99
Delete files ................................................ 5-42
Design ....................................................... 5-40
Foot switch................................................ 4-26
Function keys ............................................ 5-43
GDT interface ....................................... 11-154
Image processing ............................. 4-36, 6-50
Language................................................... 5-40
Login ......................................................... 5-38
Quick print ................................................ 4-31
Remote synchronisation........................ 10-123
Status bar .................................................. 5-44
Video archiving ...................................... 8-107
I
Image processing .......................................... 6-48
Add layer .............................................. 11-140
Add marker ........................................... 11-140
Add text ................................................ 11-140
Filter ...................................................... 11-141
Histogram ............................................. 11-142
Loading images ......................................... 4-36
Printing images ......................................... 4-35
Snapshot .................................................... 7-65
Installation .................................................... 4-21
K
KV card reader .......................................... 11-154
M
Main window ................................................ 5-38
Modules .................................................... 11-125
Additional module " PowerPoint-Export" .. 11131
Additional module "Document printing" .... 11166
Additional module "WORD-Export".... 11-126
Show registered modules ...................... 11-125
N
D
Network operation .................................... 10-120
Data grid ....................................................... 8-98
Data list ......................................................... 8-99
Database
repair, backup, restore........................... 11-146
Database backup ....................................... 11-146
Database search .......................................... 9-109
Dictionary, new entry ............................... 11-152
Document database ................................... 11-170
Document printing .................................... 11-166
P
F
Record video ................................................. 7-65
Remote synchronisation............................ 10-123
Performance description ............................... 3-11
PowerPoint-Export ................................... 11-131
Print
Documents ............................................ 11-166
Images, Quick print .................................. 4-35
Print template generation .......................... 11-179
R
FAQ .......................................................... 12-203
13-212
S
Video recording ........................................ 11-137
Serial letter function ................................. 11-168
System requirements ....................................... 2-9
W
V
White balance ............................................... 7-71
WORD-Export .......................................... 11-126
Video page .................................................... 7-63
Doc.Nr.: BH-1-EN
Doc.Version: 2
Date of issue: 02/2012
13-213