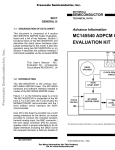
1
Dok.Nr./Doc. No.: CGS–RIBRE–SUM–0002 Ausgabe/Issue: Überarbtg./Rev.: EADS SPACE Transportation - Bremen 2003 Titel: Title: 12 – Datum/Date: Datum/Date: 30.06.2014 – CGS 7 Installation Manual Dokument No.: Document No.: CGS–RIBRE–SUM–0002 Klassifikations Nr: Class. Prod. Code: 8–QA Ausgabe Nr.: Issue No.: 12 Ausgabedatum: Issue Date: 30.06.2014 Ueberarbeitung: Revision: – Ueberarbeitungsdatum: Revision Date: – Liste der zu liefernden Dokumente / Dok.–Anforderungs–Beschreibung (LLD/DAB): Document Requirements List / Doc. Requirements Description (DRL/DRD): N.Sölter / I.Lenz Firma: Company: EADS ST Geprueft: Agreed by: S. Marz Firma: Company: EADS ST Bearbeitet: Prepared by: Vertrags–Nr: Contract–No.: _____________________ Previous Doc.–No.: MA 1214 597 002 Astrium–SI/COL _________________________________ _________________________________ Projekt Manager Projekt Manager Project Manager Project Manager Dok.Nr./Doc. No.: CGS–RIBRE–SUM–0002 Ausgabe/Issue: Überarbtg./Rev.: 12 – Datum/Date: Datum/Date: Seite /Page: i Von/Of: 30.06.2014 – iv DOCUMENT CHANGE RECORD PLEASE NOTE: The old document number for the Columbus CGS version 4.5.0 is: COL–RIBRE–MA–0025 Issue/ Rev. Issue date Pages / Section Affected Remarks 1/A 1/C 1/E 3/A 4/– 6/– 17.11.2004 08.02.2007 11.09.2007 19.11.2008 22.07.2009 31.01.2011 Initial Solaris Release, copy from COL–RIBRE–SUM–002 Logo Change, update description time synchronisation nfslock, user name restriction,media installation Configurator, CGS in a box Create MDB instance Installing the Oracle Software 7/– 8/– 08.08.2011 08.06.2012 25.09.2012 9/– 01.02.2013 All All All Sections 4 and 9 Section 4 Section 4.4.1.1.9 New astrium logo Section 4.1.1 Section 4.5.16 Section 4.5.12 Section 4.5.14 Section 4.5.15 Section 4.5.2 Section 5.1/9.7 Section 4.5.16 9/– 10/– 01.02.2013 02.08.2013 EADS SPACE Transportation - Bremen 2003 4/H, 21.06.2001 Swap Space for Oracle add CSS configuration part remove this section remove Oracle SYS password remove Oracle SYS password change installation steps Change $GSAF_HOME to $CGS_HOME visualisation software – remove this section and all references to DataViews and Gipsy Section 4.5.17 OTC toolkit configuration – remove this section Section 4.4.1 update Oracle version to 11gR2 Section 4.5.13–14 remove Oracle passwords (already entered in configrator) Section 9.5 use the CGS configurator for Deinstall CGS User Section 10.2.4–5 remove Oracle passwords (already entered in configrator) 1 INTRODUCTION . . . . . . . . . . . . . . . . . . . . . . . . . . . . . . . . . . . . . . . . . . . . . . . . 1.1 Identification and Scope . . . . . . . . . . . . . . . . . . . . . . . . . . . . . . . . . . . . . . . . 1.2 Purpose . . . . . . . . . . . . . . . . . . . . . . . . . . . . . . . . . . . . . . . . . . . . . . . . . . . . . 1.3 Procedure Conventions . . . . . . . . . . . . . . . . . . . . . . . . . . . . . . . . . . . . . . . . . 2 APPLICABLE AND REFERENCE DOCUMENTS . . . . . . . . . . . . . . . . . . . . 2.1 Applicable Documents . . . . . . . . . . . . . . . . . . . . . . . . . . . . . . . . . . . . . . . . . 2.2 Reference Documents . . . . . . . . . . . . . . . . . . . . . . . . . . . . . . . . . . . . . . . . . . 3 CONFIGURATION OVERVIEW . . . . . . . . . . . . . . . . . . . . . . . . . . . . . . . . . . . 3.1 The CGS Server/Client Configuration . . . . . . . . . . . . . . . . . . . . . . . . . . . . . 3.2 Preparation for Installation . . . . . . . . . . . . . . . . . . . . . . . . . . . . . . . . . . . . . . 3.2.1 Existing Operating System . . . . . . . . . . . . . . . . . . . . . . . . . . . . . . . . 3.2.2 Selection of Operating System Software . . . . . . . . . . . . . . . . . . . . . 3.2.3 Configuration Map . . . . . . . . . . . . . . . . . . . . . . . . . . . . . . . . . . . . . . 3.2.4 Disk and Filesystems . . . . . . . . . . . . . . . . . . . . . . . . . . . . . . . . . . . . . 3.2.5 Logical Directory Structure . . . . . . . . . . . . . . . . . . . . . . . . . . . . . . . . 3.2.6 Network Information Service Convention . . . . . . . . . . . . . . . . . . . . 3.2.7 User Accounts . . . . . . . . . . . . . . . . . . . . . . . . . . . . . . . . . . . . . . . . . . 3.3 Summary . . . . . . . . . . . . . . . . . . . . . . . . . . . . . . . . . . . . . . . . . . . . . . . . . . . . 4 INSTALLATION PROCEDURE . . . . . . . . . . . . . . . . . . . . . . . . . . . . . . . . . . . . 4.1 Linux Installation (CGS Server) . . . . . . . . . . . . . . . . . . . . . . . . . . . . . . . . . . 4.1.1 Preliminary Information . . . . . . . . . . . . . . . . . . . . . . . . . . . . . . . . . . 4.1.2 Installation of the Basic Operating System . . . . . . . . . . . . . . . . . . . . 4.1.3 Network configuration . . . . . . . . . . . . . . . . . . . . . . . . . . . . . . . . . . . 4.1.4 Start services . . . . . . . . . . . . . . . . . . . . . . . . . . . . . . . . . . . . . . . . . . . 4.1.5 NIS server . . . . . . . . . . . . . . . . . . . . . . . . . . . . . . . . . . . . . . . . . . . . . 1 1 1 2 4 4 4 5 5 7 7 7 7 8 10 10 10 11 12 12 12 12 13 14 14 4.1.5.1 Install the server as NIS server . . . . . . . . . . . . . . . . . . . . . . . . . . . . . 4.1.5.2 CGS NIS netgroup . . . . . . . . . . . . . . . . . . . . . . . . . . . . . . . . . . . . . . 14 16 4.1.6 Install NFS server . . . . . . . . . . . . . . . . . . . . . . . . . . . . . . . . . . . . . . . 4.2 CGS Testnodes and Workstations . . . . . . . . . . . . . . . . . . . . . . . . . . . . . . . . . 4.2.1 Client Installation . . . . . . . . . . . . . . . . . . . . . . . . . . . . . . . . . . . . . . . 4.3 FAQ . . . . . . . . . . . . . . . . . . . . . . . . . . . . . . . . . . . . . . . . . . . . . . . . . . . . . . . . 4.3.1 Xserver . . . . . . . . . . . . . . . . . . . . . . . . . . . . . . . . . . . . . . . . . . . . . . . 4.4 Service Installation . . . . . . . . . . . . . . . . . . . . . . . . . . . . . . . . . . . . . . . . . . . . 4.4.1 Oracle 11 Installation on Linux . . . . . . . . . . . . . . . . . . . . . . . . . . . . . 17 18 18 19 19 20 20 4.4.1.1 Basic installation . . . . . . . . . . . . . . . . . . . . . . . . . . . . . . . . . . . . . . . . 4.4.1.2 Installation of Oracle patch . . . . . . . . . . . . . . . . . . . . . . . . . . . . . . . . 20 23 4.5 CGS Delivery Installation . . . . . . . . . . . . . . . . . . . . . . . . . . . . . . . . . . . . . . . 4.5.1 Preparations . . . . . . . . . . . . . . . . . . . . . . . . . . . . . . . . . . . . . . . . . . . . 4.5.2 Load CGS Distribution . . . . . . . . . . . . . . . . . . . . . . . . . . . . . . . . . . . 4.5.3 Configure Installation . . . . . . . . . . . . . . . . . . . . . . . . . . . . . . . . . . . . 24 24 26 26 4.5.3.1 MDB SID Ranges . . . . . . . . . . . . . . . . . . . . . . . . . . . . . . . . . . . . . . . 4.5.3.2 MDB Data Dictionary . . . . . . . . . . . . . . . . . . . . . . . . . . . . . . . . . . . . 4.5.3.3 Configurator . . . . . . . . . . . . . . . . . . . . . . . . . . . . . . . . . . . . . . . . . . . 26 27 27 Configure Host . . . . . . . . . . . . . . . . . . . . . . . . . . . . . . . . . . . . . . . . . Create MDB instance . . . . . . . . . . . . . . . . . . . . . . . . . . . . . . . . . . . . . Create TRDB instance . . . . . . . . . . . . . . . . . . . . . . . . . . . . . . . . . . . . Create CMDH instance . . . . . . . . . . . . . . . . . . . . . . . . . . . . . . . . . . . Check Oracle instances (optional) . . . . . . . . . . . . . . . . . . . . . . . . . . . Configure the Oracle Enterprise Manager . . . . . . . . . . . . . . . . . . . . . Oracle Automated Maintenance Tasks (optional) . . . . . . . . . . . . . . . 29 29 30 31 31 33 33 4.5.10.1 Available Automated Maintenance Tasks . . . . . . . . . . . . . . . . . . . 4.5.10.2 Performance Problems . . . . . . . . . . . . . . . . . . . . . . . . . . . . . . . . . . 33 34 Install and initialize the MDB . . . . . . . . . . . . . . . . . . . . . . . . . . . . . . Install User . . . . . . . . . . . . . . . . . . . . . . . . . . . . . . . . . . . . . . . . . . . . . Install the TRDB . . . . . . . . . . . . . . . . . . . . . . . . . . . . . . . . . . . . . . . Install the Command History Database (CMDH) . . . . . . . . . . . . . . 35 36 37 38 4.5.4 4.5.5 4.5.6 4.5.7 4.5.8 4.5.9 4.5.10 4.5.11 4.5.12 4.5.13 4.5.14 5 6 7 8 9 4.5.15 Configure CSS (optional) . . . . . . . . . . . . . . . . . . . . . . . . . . . . . . . . . 38 4.5.15.1 Ada Compiler . . . . . . . . . . . . . . . . . . . . . . . . . . . . . . . . . . . . . . . . . 4.5.15.2 System Topology Table . . . . . . . . . . . . . . . . . . . . . . . . . . . . . . . . . 38 39 CHECKOUT CONFIGURATION . . . . . . . . . . . . . . . . . . . . . . . . . . . . . . . . . . . 5.1 System Topology Table . . . . . . . . . . . . . . . . . . . . . . . . . . . . . . . . . . . . . . . . . 5.2 Start CGS Daemon . . . . . . . . . . . . . . . . . . . . . . . . . . . . . . . . . . . . . . . . . . . . 5.3 NTP Configuration . . . . . . . . . . . . . . . . . . . . . . . . . . . . . . . . . . . . . . . . . . . . 5.3.1 Select the NTP Master . . . . . . . . . . . . . . . . . . . . . . . . . . . . . . . . . . . . 5.3.2 Configure external time distribution . . . . . . . . . . . . . . . . . . . . . . . . . 5.3.3 Start NTP Service . . . . . . . . . . . . . . . . . . . . . . . . . . . . . . . . . . . . . . . 5.3.4 Time Synchronization of CGS environment (boot sequence) . . . . . . 5.4 CGS addational configuration . . . . . . . . . . . . . . . . . . . . . . . . . . . . . . . . . . . . 5.5 Add CGS Processes on the CGS Server . . . . . . . . . . . . . . . . . . . . . . . . . . . . 5.6 Installation of further CGS Hosts . . . . . . . . . . . . . . . . . . . . . . . . . . . . . . . . . 5.7 Project specific environment . . . . . . . . . . . . . . . . . . . . . . . . . . . . . . . . . . . . . MDB ADAPTATION . . . . . . . . . . . . . . . . . . . . . . . . . . . . . . . . . . . . . . . . . . . . . . 6.1 Example Database . . . . . . . . . . . . . . . . . . . . . . . . . . . . . . . . . . . . . . . 6.1.1 Import UCL Libraries . . . . . . . . . . . . . . . . . . . . . . . . . . . . . . . . . . . . CGS API LIBRARIES . . . . . . . . . . . . . . . . . . . . . . . . . . . . . . . . . . . . . . . . . . . . 7.1 General . . . . . . . . . . . . . . . . . . . . . . . . . . . . . . . . . . . . . . . . . . . . . . . . . . . . . 7.2 Installation of the CGS API Libraries . . . . . . . . . . . . . . . . . . . . . . . . . . . . . . 7.3 Usage of the CGS API Linux library . . . . . . . . . . . . . . . . . . . . . . . . . . . . . . UPDATE PROCEDURE . . . . . . . . . . . . . . . . . . . . . . . . . . . . . . . . . . . . . . . . . . . 8.1 Overview . . . . . . . . . . . . . . . . . . . . . . . . . . . . . . . . . . . . . . . . . . . . . . . . . . . . 8.2 Save Configuration and Data Files . . . . . . . . . . . . . . . . . . . . . . . . . . . . . . . . 8.2.1 Save Configuration Software . . . . . . . . . . . . . . . . . . . . . . . . . . . . . . 8.2.2 TRDB Contents . . . . . . . . . . . . . . . . . . . . . . . . . . . . . . . . . . . . . . . . . 8.2.3 Command History . . . . . . . . . . . . . . . . . . . . . . . . . . . . . . . . . . . . . . . 8.2.4 MDB Users . . . . . . . . . . . . . . . . . . . . . . . . . . . . . . . . . . . . . . . . . . . . 8.2.5 MDB Contents . . . . . . . . . . . . . . . . . . . . . . . . . . . . . . . . . . . . . . . . . . 8.2.6 Copy data into Backup Directory . . . . . . . . . . . . . . . . . . . . . . . . . . . 8.2.7 Save additional data . . . . . . . . . . . . . . . . . . . . . . . . . . . . . . . . . . . . . . 40 40 40 41 41 41 42 42 42 43 43 43 44 44 44 45 45 45 46 47 47 48 48 48 49 50 50 51 51 8.2.7.1 Export TRDB Final Archive Files . . . . . . . . . . . . . . . . . . . . . . . . . . 51 8.2.8 Backup the CGS server . . . . . . . . . . . . . . . . . . . . . . . . . . . . . . . . . . . 52 8.2.9 Backup the CGS Configuration . . . . . . . . . . . . . . . . . . . . . . . . . . . . . 52 8.3 Deinstallation Procedure . . . . . . . . . . . . . . . . . . . . . . . . . . . . . . . . . . . . . . . . 52 8.4 Upgrade Installation Procedure . . . . . . . . . . . . . . . . . . . . . . . . . . . . . . . . . . . 53 8.4.1 Restore the Backup Directory . . . . . . . . . . . . . . . . . . . . . . . . . . . . . . 53 8.4.2 Install CGS delivery . . . . . . . . . . . . . . . . . . . . . . . . . . . . . . . . . . . . . 53 8.4.3 MDB Installation and Initialization, TRDB and Command History Installation . . . . . . . . 53 8.4.4 MDB Data Upgrade / Import . . . . . . . . . . . . . . . . . . . . . . . . . . . . . . . 53 8.4.5 MDB Users . . . . . . . . . . . . . . . . . . . . . . . . . . . . . . . . . . . . . . . . . . . . 54 8.4.6 Checkout Configuration . . . . . . . . . . . . . . . . . . . . . . . . . . . . . . . . . . 55 8.4.7 TRDB data import . . . . . . . . . . . . . . . . . . . . . . . . . . . . . . . . . . . . . . . 55 8.4.8 Command History data import . . . . . . . . . . . . . . . . . . . . . . . . . . . . . 55 8.4.9 Import TRDB Final Archiving Files . . . . . . . . . . . . . . . . . . . . . . . . . 55 8.5 Update CGS Hosts . . . . . . . . . . . . . . . . . . . . . . . . . . . . . . . . . . . . . . . . . . . . . 56 8.6 Data Upgrade . . . . . . . . . . . . . . . . . . . . . . . . . . . . . . . . . . . . . . . . . . . . . . . . . 56 ADMINISTRATION . . . . . . . . . . . . . . . . . . . . . . . . . . . . . . . . . . . . . . . . . . . . . . 57 9.1 Add Additional Client . . . . . . . . . . . . . . . . . . . . . . . . . . . . . . . . . . . . . . . . . . 57 9.1.1 OS Installation Procedure . . . . . . . . . . . . . . . . . . . . . . . . . . . . . . . . . 57 9.1.1.1 Installation of the Basic Operating System from CD–ROM . . . . . . 9.1.1.2 Network configuration . . . . . . . . . . . . . . . . . . . . . . . . . . . . . . . . . . . 9.1.1.3 Start services (inetd) . . . . . . . . . . . . . . . . . . . . . . . . . . . . . . . . . . . . . 57 57 57 9.1.1.4 Additional client administration (NIS) . . . . . . . . . . . . . . . . . . . . . . . 9.1.1.5 Additional client administration (NFS) . . . . . . . . . . . . . . . . . . . . . . 9.1.1.6 Installation of the CGS Environment . . . . . . . . . . . . . . . . . . . . . . . . 9.1.1.7 CGS Server Configuration . . . . . . . . . . . . . . . . . . . . . . . . . . . . . . . . 57 58 58 60 9.2 CGS in a Box . . . . . . . . . . . . . . . . . . . . . . . . . . . . . . . . . . . . . . . . . . . . . . . . . 9.2.1 Linux + Oracle Installation . . . . . . . . . . . . . . . . . . . . . . . . . . . . . . . . 61 61 9.2.1.1 Installation of the Basic Operating System . . . . . . . . . . . . . . . . . . . 9.2.1.2 Oracle Installation . . . . . . . . . . . . . . . . . . . . . . . . . . . . . . . . . . . . . . . 9.2.1.3 Network configuration . . . . . . . . . . . . . . . . . . . . . . . . . . . . . . . . . . . 9.2.1.4 Start services (inetd) . . . . . . . . . . . . . . . . . . . . . . . . . . . . . . . . . . . . . 9.2.1.5 Additional administration (NIS) . . . . . . . . . . . . . . . . . . . . . . . . . . . . 9.2.1.6 CGS directory structure . . . . . . . . . . . . . . . . . . . . . . . . . . . . . . . . . . 9.2.1.7 Installation of the CGS Environment . . . . . . . . . . . . . . . . . . . . . . . . 61 61 61 61 61 62 62 9.2.2 Install TRDB . . . . . . . . . . . . . . . . . . . . . . . . . . . . . . . . . . . . . . . . . . . 9.2.3 Configure tnsnames.ora . . . . . . . . . . . . . . . . . . . . . . . . . . . . . . . . . . . 9.2.4 NTP Configuration . . . . . . . . . . . . . . . . . . . . . . . . . . . . . . . . . . . . . . 9.3 Deinstall Client . . . . . . . . . . . . . . . . . . . . . . . . . . . . . . . . . . . . . . . . . . . . . . . 9.3.1 Deinstall Client – client part . . . . . . . . . . . . . . . . . . . . . . . . . . . . . . . 9.3.2 Deinstall Client – server part . . . . . . . . . . . . . . . . . . . . . . . . . . . . . . . 9.3.3 Client reboot . . . . . . . . . . . . . . . . . . . . . . . . . . . . . . . . . . . . . . . . . . . 9.4 Add CGS User . . . . . . . . . . . . . . . . . . . . . . . . . . . . . . . . . . . . . . . . . . . . . . . . 9.5 Deinstall CGS User . . . . . . . . . . . . . . . . . . . . . . . . . . . . . . . . . . . . . . . . . . . . 9.6 Modify System Topology Table . . . . . . . . . . . . . . . . . . . . . . . . . . . . . . . . . . 9.7 Automatic MDB Installation . . . . . . . . . . . . . . . . . . . . . . . . . . . . . . . . . . . . . 10 DEINSTALLATION PROCEDURE . . . . . . . . . . . . . . . . . . . . . . . . . . . . . . . . . 10.1 Deinstall Users . . . . . . . . . . . . . . . . . . . . . . . . . . . . . . . . . . . . . . . . . . . . . . . . 10.1.1 Deinstall MDB Users . . . . . . . . . . . . . . . . . . . . . . . . . . . . . . . . . . . . . 10.2 Deinstall Databases . . . . . . . . . . . . . . . . . . . . . . . . . . . . . . . . . . . . . . . . . . . . 10.2.1 Deinstall MDB . . . . . . . . . . . . . . . . . . . . . . . . . . . . . . . . . . . . . . . . . . 10.2.2 Automatic Deinstallation of all MDB Users and the MDB . . . . . . . 10.2.3 Deinstall CGS Users . . . . . . . . . . . . . . . . . . . . . . . . . . . . . . . . . . . . . 10.2.4 Deinstall TRDB . . . . . . . . . . . . . . . . . . . . . . . . . . . . . . . . . . . . . . . . . 10.2.5 Deinstall Command History . . . . . . . . . . . . . . . . . . . . . . . . . . . . . . . 10.3 Deinstallation of CGS Clients . . . . . . . . . . . . . . . . . . . . . . . . . . . . . . . . . . . A DEFINITIONS . . . . . . . . . . . . . . . . . . . . . . . . . . . . . . . . . . . . . . . . . . . . . . . . . . . B CGS INSTALLATION WORK SHEET . . . . . . . . . . . . . . . . . . . . . . . . . . . . . . B.1 Network configuration . . . . . . . . . . . . . . . . . . . . . . . . . . . . . . . . . . . . . . . . . B.2 NIS Configuration . . . . . . . . . . . . . . . . . . . . . . . . . . . . . . . . . . . . . . . . . . . . . B.3 Oracle . . . . . . . . . . . . . . . . . . . . . . . . . . . . . . . . . . . . . . . . . . . . . . . . . . . . . . B.4 CGS Configuration . . . . . . . . . . . . . . . . . . . . . . . . . . . . . . . . . . . . . . . . . . . . B.5 Comercial Tools . . . . . . . . . . . . . . . . . . . . . . . . . . . . . . . . . . . . . . . . . . . . . . . B.6 Compiler . . . . . . . . . . . . . . . . . . . . . . . . . . . . . . . . . . . . . . . . . . . . . . . . . . . . 65 65 65 66 66 66 67 67 68 70 70 74 74 74 75 75 75 77 77 78 78 79 80 80 84 84 86 87 87 Figure 1. Example: CGS installed in one filesystem . . . . . . . . . . . . . . . . . . . . . . . . 9 Figure 2. Example: CGS distributed over different filesystems/hard disks, oracle tablespaces distributed over different hard disks . . . . . . . . . . . . . . . . . . . . . . . . . . . . . . . . . . . . . . 9 Dok.Nr./Doc. No.: CGS–RIBRE–SUM–0002 1 1.1 Ausgabe/Issue: Überarbtg./Rev.: 12 – Datum/Date: Datum/Date: Seite /Page: 1 Von/Of: 30.06.2014 – 87 INTRODUCTION Identification and Scope This document deals with the installation of the software subsystem Columbus Ground System – version 7 (CGS 7), end–user delivery configuration. 1.2 Purpose EADS SPACE Transportation - Bremen 2003 CGS 7 shall be installed or updated from former releases according to the installation procedure contained in this document. It also contains a short description of the installation of the operating system and necessary commercial products. In this issue of the installation document only one path of the possible installations according to different CGS platforms and different hardware architectures is described. Even this restriction will make several variants of installation procedures necessary. This will be mentioned in the appropriate parts of the document. But most of the times the most probable path through the installation for an average end user system has been selected. Please refer to the corresponding release notes for deviations from the installation procedure. The next section of this chapter will describe some conventions which will be used during the course of the installation procedure. Chapter 2 will point to all necessary documentation which shall be consulted to perform a correct installation procedure. Chapter 3 gives an overview about the configuration and the installation process. Please read Chapter 3 before starting the installation carefully because it gives a lot of hints and tips about the job, which are valuable to know in advance. Thereafter in chapters 4 to 5 the installation procedure follows which should be performed in sequence. Chapter 8 describes an update procedure, if an older CGS version already exists, and the old data shall be used in CGS 7. In this case the chapters 4 to 5 shall be skipped, and the installation shall be performed in the sequence as described in chapter 8. Chapter 9 gives an overview about administration utilities (e.g. install workstations, install users). Chapter 10 contains the description of the CGS 7 deinstallation. Appendix C contains a set of Installation Work Sheets which allows for a better planning of the CGS installation and to improve the maintenance of the system. The Installation Work Sheets can be filled before starting the installation. Dok.Nr./Doc. No.: CGS–RIBRE–SUM–0002 Ausgabe/Issue: Überarbtg./Rev.: 12 – Datum/Date: Datum/Date: Seite /Page: 2 Von/Of: 30.06.2014 – 87 1.3 Procedure Conventions This section describes how to install the software into its operating environment, including the detailed manual steps to be followed. The installation script will maintain the following conventions: Every machine interaction will be shown as an indented paragraph with extra space above and below, as depicted in the following paragraph. Machine prompts and messages will be kept in plain courier font: Machine prompt> Inputs of the user will be in bold courier font: EADS SPACE Transportation - Bremen 2003 Machine prompt>User‘s input<Return> Generic entries, which have to be filled out or replaced by the user, will be in bold italic courier font: disk description Comments within the machine interaction boxes, that will not be present on the screen, will be in italic courier font: ( A lot of output here ) If there is a lot of irrelevent or unimportant output between two user commands, such text is not included here but rather it is replaced by dots in a column, occasionally with a comment about how long the user can expect to wait or a description of which apparent ”errors” can be ignored. . ( 30 minutes ) Always before the user has to interact with the system, all actions to be performed will be described in detail in the section before the machine interaction. If there are actions which have to be performed only in certain circumstances, the text will be kept in a slight grey: Machine prompt> User’s input<Return> Within some programmes, two different kinds of user input are used: • enter The keyboard input has to be finished with the <Return>–key. Dok.Nr./Doc. No.: CGS–RIBRE–SUM–0002 • Ausgabe/Issue: Überarbtg./Rev.: 12 – Datum/Date: Datum/Date: Seite /Page: 3 Von/Of: 30.06.2014 – 87 type The keyboard input (a single keystroke) is processed as soon as you type a character. Single keys with a special meaning are surrounded by the up– and down–sign (< and >, respectively). Special keys which have to be pressed simultaneously will be included in one pair of up– and down–signs concatenated with a hyphen. Simultaneously means, that the keys have to be pressed in the sequence they appear from left to right, but that every key has to be kept down during the complete operation. Special keys which have to be pressed in a sequence will be included in a couple of up– and down–signs each and then be concatenated by hyphens externally. Sequentially means the key has to be pushed down and then released before the next key is pushed down. Examples: EADS SPACE Transportation - Bremen 2003 Keys with a special meaning: <Return> <Tab> Keys to be pressed simultaneously <Shift–Return> <Control–Backspace> Keys to be pressed sequentially <Escape>–<a> <Pause>–<o>–<”> Installations which are performed in a windowing environment are denoted with a table, in the first column enumerating the steps, in the second describing the steps including some lines to identify the window and in the last column the action to be executed by the user: Step # Installation Step Action 1 Window name Description Choices suggested choice<Return> In case the step is not always to be performed but only under certain circumstances, the step will be marked with a dash: 2– Window name Description Choices suggested choice<Return> Dok.Nr./Doc. No.: CGS–RIBRE–SUM–0002 2 2.1 Ausgabe/Issue: Überarbtg./Rev.: 12 – Datum/Date: Datum/Date: Seite /Page: 4 Von/Of: 30.06.2014 – 87 APPLICABLE AND REFERENCE DOCUMENTS Applicable Documents The following documents of the issue shown form a part of this document to the extend specified herein. In case of conflict this document supersedes the installation manuals mentioned herein. Suse Linux Enterprise Server 10 (SLES 10) Oracle11 Installation Guide Oracle11 Administrator’s Reference CGS User Manual MDA Administration Manual EADS SPACE Transportation - Bremen 2003 MDA Reference Manual 2.2 Reference Documents The documents specified in this section serve as reference material. Dok.Nr./Doc. No.: CGS–RIBRE–SUM–0002 3 Ausgabe/Issue: Überarbtg./Rev.: 12 – Datum/Date: Datum/Date: Seite /Page: 5 Von/Of: 30.06.2014 – 87 CONFIGURATION OVERVIEW This section first outlines some general considerations relating to the installation of the Operating System on Sun and Linux platforms. Some degree of common sense must be applied in order to tailor the procedure according to the disk capacity of the server and to the nature of the CGS configuration in which it is located. The product requiring the most effort to install is the Operating System Services product (Solaris and Linux). The installation procedure offers a large number of options with regard to the physical organization of the local disk, the particular software units which are to be installed and so forth. With a multi–server environment, Solaris or Linux must be installed on all servers, and users’ work areas will be distributed amongst the available total disk space. Careful consideration must be given to the geographical distribution of both software and user homes prior to installation taking place. EADS SPACE Transportation - Bremen 2003 Note: 3.1 If the number and sizes of partitions on a disk have been incorrectly defined, then the effort required to repartition the disk and correct the problem will be quite large. The CGS Server/Client Configuration No detailed guidance is given here as to how to plan or set up the hardware configuration at a CGS site. This configuration (the distribution of server and client machines on a local network) is a highly individual, site–specific concern. However, any of the following configurations may appear on a CGS site: • • • a single standalone machine • All installation steps are performed on this machine • The machine is actually configured as a server, but with no clients a single server and multiple clients • Most of the installation steps are performed on the server while only a few steps have to be performed on each client • All CGSI software is installed on the server, but also visible and in part installed on clients • For the clients, which are configured as standalone workstations but nevertheless connected as clients to the NIS and NFS, it has to be decided, which partitions have to be mounted from the server, and which parts of the software have to be installed locally on the internal disk, mostly the operating system. multiple servers • This is a more complex environment, requiring careful planning. The actual distribution of Operating System software, CGS software and user homes amongst the available servers should be given careful consideration: mistakes will be difficult to rectify at a later date! • Because the actual server/client configuration is very site specific, it is difficult to provide detailed guidelines as to how to achieve an optimum distribution. Nevertheless a few hints may be given here: EADS SPACE Transportation - Bremen 2003 Dok.Nr./Doc. No.: CGS–RIBRE–SUM–0002 Ausgabe/Issue: Überarbtg./Rev.: 12 – Datum/Date: Datum/Date: Seite /Page: 6 Von/Of: 30.06.2014 – 87 • Install the Operating System on all servers • Database Services will be installed on at least one server, but optionally on more than one server, depending on site–specific requirements • The CGS software needs to be installed on only one server • • Each machine in the network has the same logical filesystem by virtue of the mount/automount mechanism – thus assembly software installed on one server is automatically available to all clients of that server • As a consequence of this, the installation step concerned with creating CGS assembly homes in the filesystem need only be performed on the server designated to act as the CGS assembly file server • On sites where one CGS assembly is used very frequently it might be useful to install that assembly on more than one server, in order to reduce network traffic and load All machines (servers and clients) must reside in a single NIS domain (refer to sect. 3.2.6) Dok.Nr./Doc. No.: CGS–RIBRE–SUM–0002 Ausgabe/Issue: Überarbtg./Rev.: 12 – Datum/Date: Datum/Date: Seite /Page: 7 Von/Of: 30.06.2014 – 87 3.2 Preparation for Installation 3.2.1 Existing Operating System If an operating system is already installed on any disk server in the CGS configuration, make a full backup of all filesystems containing: • user and application data • installed software which is not part of CGS so that you are able to restore the data after finishing CGS installation in case some data got corrupt during the installation. EADS SPACE Transportation - Bremen 2003 3.2.2 Selection of Operating System Software The Solaris and Linux software provides the choice to install a minimum, optimum and maximum configuration. For CGS purposes and ease of installation the default configuration will be chosen. 3.2.3 Configuration Map Before the installation process can begin, the CGS System Administrator should define the CGS configuration that is to be established. This is necessary because the actual installation steps performed on a particular host will depend on the host type (server or client), and, if server, which roles that server is expected to fulfil. In particular, the installation script requires precise information on host type and server roles. Dok.Nr./Doc. No.: CGS–RIBRE–SUM–0002 Ausgabe/Issue: Überarbtg./Rev.: 12 – Datum/Date: Datum/Date: Seite /Page: 8 Von/Of: 30.06.2014 – 87 Defining a CGS configuration involves generating a configuration map (see the Installation Work Sheet B.1.4) which maps host type and server roles onto the hosts present in the local configuration. The table below shows an example of a typical configuration map. Service Host Name IP Address Mail Server cgs–s 149.243.228.1 Print Server cgs–s Printer: cgs_p % Boot Server EADS SPACE Transportation - Bremen 2003 % cgs–s (to boot diskless clients or front end equipment) Remark to boot front end processors % % NIS (Master) (Slaves) cgs–dbs 149.243.228.10 Oracle Server cgs–dbs exports Oracle S/W File Servers cgs–dbs exports GSAF_HOME USER_HOME cgs–s ( (CGS, , User directories,, ... ) % % The following should be noted: • any server is automatically a disk server • one of the disk servers must be a NIS master server, others can be NIS slave server • one disk server may optionally be a mail server • one disk server may optionally be an Oracle server • a client should not fulfil any kind of server role Important:Please use the Installation Work Sheet (appendix B) to plan your CGS installation. The data asked for is needed for a correct setup of your CGS system and will later support you during system maintainance. Most of the entries are referenced within the installation procedure. Some CGS related data must be filled in during the CGS installation. 3.2.4 Disk and Filesystems Disk partitioning and organization will depend on the number of disks supplied with the server on which CGS is to be installed: normally one or two disks will be available. The CGS software should be installed into one disk partition, which is specified as the partition used for ”CGS_HOME”. If more than one partition shall be used for the CGS system, the following is recommended: 1. Assign the users home directories to a separate partition. They should not be located below CGS_HOME. Dok.Nr./Doc. No.: CGS–RIBRE–SUM–0002 Ausgabe/Issue: Überarbtg./Rev.: 12 – Datum/Date: Datum/Date: Seite /Page: 9 Von/Of: 30.06.2014 – 87 2. Assign the Oracle installation and other commercial products to a separate partition. The Oracle installation should not be located within the CGS_HOME directory 3. Use one or more partitions for the Oracle datafiles. The partitions should be located at different hard disk for higher performance and security. / ... cgs home CGS products EADS SPACE Transportation - Bremen 2003 export User Home ... tools tablespaces Oracle Ada, ... Table– space Files exported to the CGS LAN Figure 1. Example: CGS installed in one filesystem / ... cgs users tools CGS User Home Oracle Ada, ... tablespaces u01 Table– space Files ... u02 u03 Table– space Files Table– space Files exported to the CGS LAN Figure 2. Example: CGS distributed over different filesystems/hard disks, oracle tablespaces distributed over different hard disks The CGS installation scripts will not automatically export the directories containing the CGS software (CGS_HOME), the user home directory and the directory containing the Oracle installation (’tools’). Any directories have to be exported manually. The mount of those exported file systems will be done by the automatic automounter facility /nfs/<host>. It can be decided to create a link in the root directory of the server and the clients from /nfs/<host>/<directory> to /<directory>. This is a matter of taste whether a path with /nfs/<host> is wanted. Important:The user home directories and the CGS directory ($CGS_HOME) will grow during operation. Especially the ’data’ directories of the products ’cgsi’, ’mda’, ’dbs’ and ’tev’ are Dok.Nr./Doc. No.: CGS–RIBRE–SUM–0002 Ausgabe/Issue: Überarbtg./Rev.: Seite /Page: 12 – 10 Datum/Date: Datum/Date: Von/Of: 30.06.2014 – 87 used to store temporary or permanent data files. This must be considered when planning the size of CGS partitions. Please refer to the CGS Installation Checklist. If a CGS configuration comprises more than one disk server, partitions for the assembly homes need to be created only on one server, which will then act as file server for the entire configuration. 3.2.5 Logical Directory Structure In any kind of server/client configuration [section 3.1], all disk partitions are physically located on the server and logically mounted onto the client workstations. All CGS hosts must have the same logical filesystem structure. The CGS installation scripts assume, that the CGS home directory is just the one mount point $CGS_HOME below which all the CGS assembly homes reside in individual directories (cgsi, css, mda, sde etc.). It also detects the mount point of the Oracle installation and of one user directory mount point. EADS SPACE Transportation - Bremen 2003 User home directories and directories containing commercial products (e.g. Oracle) should not be located below the CGS_HOME directory. Important:All clients in a CGS configuration must have the same logical file system. 3.2.6 Network Information Service Convention The use of NIS is recommended. Each CGS configuration will have one server acting as the NIS master server. It is recommended for large networks to introduce NIS slave servers which maintain copies of the NIS databases. The following databases must be established on the master server: • UNIX user information (passwd) • UNIX group information (group) • Host identifications (hosts) • Ethernet identifications (ethers) for diskless clients • a netgroup definition is recommended to establish an effective access control Important:For security reasons the NIS master files should be separated from the local user administration of the NIS master server. Section NO TAG describes how to create separate NIS data files. 3.2.7 User Accounts User home directories can in principal be placed anywhere. In case many users are expected for the CGS site, it is recommended that one or more disk partitions be created solely for user data. These should not be mounted below the CGS_HOME directory but in parallel (see example below). Users working on the same project, workpackage etc. are best assigned to the same partition. Dok.Nr./Doc. No.: CGS–RIBRE–SUM–0002 Ausgabe/Issue: Überarbtg./Rev.: Seite /Page: 3.3 Summary The installation process involves the following steps: 1.. Installation of Linux or Solaris at the CGS server – assignment of host information – assignment of disk information (for each disk present) – assignment of software information – installation of Linux or Solaris 2.. Boot of the server 3.. Oracle 11 installation 4.. CGS installation EADS SPACE Transportation - Bremen 2003 5.. Installation of the Master Test Processor 6.. Installation of workstations and further test nodes 12 – 11 Datum/Date: Datum/Date: Von/Of: 30.06.2014 – 87 Dok.Nr./Doc. No.: CGS–RIBRE–SUM–0002 Ausgabe/Issue: Überarbtg./Rev.: Seite /Page: 4 12 – 12 Datum/Date: Datum/Date: 30.06.2014 – Von/Of: 87 INSTALLATION PROCEDURE The administrator who installs CGS is expected to have basic knowledge of UNIX and UNIX administration. As far as the software is installed from scratch, there cannot be done any harm to the system in case of an error, besides of the loss of time. If you would like to modify an existing system already set up, be sure to have a most recent complete backup of your system, because acting as root may cause damage to the installed system in case of an error, even if taking the most rigid precaution. Please check the preconditions given in the CGS Installation Checklist before installing the CGS delivery. The CGS delivery comprises a CD–ROM with a mountable file system. All other software is either already installed at the receiving site or has to be provided by the customer. EADS SPACE Transportation - Bremen 2003 4.1 4.1.1 Linux Installation (CGS Server) Preliminary Information The figures to be used for the partition and the information to be entered during the installation are examples. They should be adapted to local needs. For this planning the Installation Worksheets from the Linux installation manual [AD NO TAG] shall be used before starting the installation. Additionally you should fill out the CGS Installation Work Sheets (Appendix B) which will contain the most important information about the CGS installation as there are network configuration, location and configuration of software products and user information. Think about the partitioning in advance. CGS has the following minimum requirements: Root area and operating system: 2 GByte SWAP: 1 GByte CGS: 3 GByte User and Data area: depending on your test environment Swap Space Requirements for Oracle: RAM Swap Space Between 1024 MB and 2048 MB 1.5 times the size of RAM Between 2049 MB and 8192 MB Equal to the size of RAM More than 8192 MB 0.75 times the size of RAM Please refer to the CGS Installation Checklist for minimum values of the system partitions. 4.1.2 Installation of the Basic Operating System Install SUSE Linux Enterprise Server 10 SP2 on your system. You can use the default configuration suggested by the SUSE installer, but you do not need to do so. Caution: CGS needs some additional SUSE packages or configurations, therefore follow the CGS installation steps carefully! To avoid possible problems with the window system, use kde (not gnome). After SUSE installation, login as root and start yast2. Dok.Nr./Doc. No.: CGS–RIBRE–SUM–0002 Ausgabe/Issue: Überarbtg./Rev.: EADS SPACE Transportation - Bremen 2003 Seite /Page: 12 – 13 Datum/Date: Datum/Date: 30.06.2014 – Von/Of: Step Configuration Step Action 1 Select System ––> Date and Time Select Region ––> Etc Select Time Zone ––> UTC Select Value for “Hardware Clock Set To” ––> UTC Accept 2 Select Software ––> Software Management Set Filter “Search” and search for packages: – itcl – openmotif–devel – openssh – openssh–askpass – a2ps For each click to install. Accept 3 Finish package installation. 87 (*) important: Due to daylight saving time problems (the days will be one hour longer or shorter respectively), please use UTC, if you want to let CGS run during these days (depending on time zone) 4.1.3 Network configuration Login as root on the CGS server. Start the YaST2 control center. Step Installation Step Action 1 YaST2 Control Center @ linux select Network Devices ––> Network Card Network card configuration 2 select “Traditional method with ifup” Next 3 Network cards configuration overview Edit 4 Network address setup select ’Static address setup’ IP Address <Your IP Address> Subnet mask: leave entry Host name and name server 5 Host name and name server configuration Host name <Your host name> Domain name: delete content – no domain name here delete all name server and domain search fields Next 6 Network address setup Routing Dok.Nr./Doc. No.: CGS–RIBRE–SUM–0002 Ausgabe/Issue: Überarbtg./Rev.: Seite /Page: 12 – 14 Datum/Date: Datum/Date: Von/Of: Step Installation Step Action 7 Routing configuration: Enter your default gateway IP address Check ’Enable IP forwarding Next 8 Network cards configuration overview Finish 4.1.4 30.06.2014 – 87 Start services EADS SPACE Transportation - Bremen 2003 In the still running YaST Control Center: Step Installation Step Action 1 YaST2 Control Center @ linux select System ––> System Services (Runlevel) Start/stop services 2 Enable at least by pressing ’Enable or Disable’ sshd Finish 4.1.5 4.1.5.1 NIS server Install the server as NIS server (*) important: CGS recommends to separate NIS master files in the directory /var/etc ! In the still running YaST Control Center, now configure NIS: Step Installation Step Action 1 YaST2 Control Center @ linux select Network Services ––> NIS Server NIS server 2 Network Information Service (NIS) Server Setup Check ’Initial and Setup NIS Master Server’ Next 3 Network Information Service –– Master Server Setup NIS Domain Name <Your Domain Name> Check ’This host is also a NIS client’ Check ’Allow changes to passwords Other global settings 4 NIS Master Server Details Setup YP Source directory /var/etc Leave other settings OK 5 The directory /var/etc does not exist. Create it? Yes 6 NIS Master Server Slaves Setup Next Dok.Nr./Doc. No.: CGS–RIBRE–SUM–0002 Ausgabe/Issue: Überarbtg./Rev.: Seite /Page: 12 – 15 Datum/Date: Datum/Date: Von/Of: Step Installation Step Action 7 NIS Server Maps Setup Check also auto.master, hosts, netgrp, passwd Next 8 NIS Server Query Hosts Setup Leave defaults Finish 30.06.2014 – 87 EADS SPACE Transportation - Bremen 2003 After that, copy or create the following files in or into the NIS maps directory (recommended is /var/ etc), which will be the NIS map directory on the master server. Please refer to the Installation Work Sheet B.2.2. In the konsole window enter the following commands: # # # # # # # cd /etc <Return> touch /var/etc/hosts<Return> cp auto.master /var/etc<Return> touch /var/etc/auto.home<Return> cp netgroup /var/etc<Return> touch /var/etc/rpc<Return> touch /var/etc/services<Return> Also, check the file /etc/yp.conf, whether the correct hostname is written. If not, change it to your NIS server hostname: # vi /etc/yp.conf (replace the IP address with your NIS server hostname) :wq After this change the directory information for the NIS administration files from /etc to /var/etc. Therefore change the variable YPSRCDIR in the file /var/yp/Makefile to /var/etc. Check also the setting of the variable of YPPWD_SRCDIR in /etc/sysconfig/ypserv to /var/etc : (*) important: CGS recommend to use the same directory for Your_NIS_PW_Directory and Your_NIS_Directory! # cd /var/yp <Return> # vi Makefile <Return> . . . . (perform the edits) YPSRCDIR =/var/etc ... (introduce auto.home in the make all list) :wq! <Return> Check the variable YPPWD_SRCDIR in the file /etc/sysconfig/ypserv: Dok.Nr./Doc. No.: CGS–RIBRE–SUM–0002 Ausgabe/Issue: Überarbtg./Rev.: Seite /Page: 12 – 16 Datum/Date: Datum/Date: 30.06.2014 – Von/Of: 87 # more /etc/sysconfig/ypserv ... YPPWD_SRCDIR=”/var/etc” ... EADS SPACE Transportation - Bremen 2003 Check the file /etc/nsswitch.conf for the correct information merging from local and NIS maps. For each map, nis has to be mentioned. There are three entries for passwd, shadow and group, which are commented out with the hash sign (#), which include nis. Please comment them in (i. e., remove the hash sign in front of the line. Comment out (i. e., introduce a hash sign at the first place) for the two other entries for passwd and group. For all other entries, replace ’files’ by ’files nis’: # cd /etc <Return> # cp nsswitch.conf nsswitch.conf.save <Return> # vi nsswitch.conf <Return> . . . (perform the edits) . passwd: files nis shadow: files nis group: files nis # passwd: compat # group: compat ... ... (for the rest of the lines, add a ’nis’ behind the word ’files’ :wq! <Return> 4.1.5.2 CGS NIS netgroup To ensure the correct work of CGS components it is mandatory that CGS users can execute commands remotely on all CGS hosts via ssh. For security reasons we recommend to define a netgroup which contains all CGS hosts. The file netgroup has following syntax: netgroupname (host,user,domain) (host2,user2,domain2) (...) After changing the file, the new definitions must be exported to the network. A proposal for the cgs netgroup is the name cgshosts. Dok.Nr./Doc. No.: CGS–RIBRE–SUM–0002 Ausgabe/Issue: Überarbtg./Rev.: Seite /Page: 12 – 17 Datum/Date: Datum/Date: Von/Of: 30.06.2014 – 87 # vi /var/etc/netgroup <Return> ( add a line containing the netgroup definition, e.g. . . CGS_Netgroup (Your_CGS_Server,,) (CGS_Host_1,,) (CGS_TestNode_1,,)... . Save and Exit vi ) :wq <Return> # cd /var/yp <Return> # make <Return> ... 4.1.6 Install NFS server EADS SPACE Transportation - Bremen 2003 In the still running YaST Control Center, now configure the server as NFS server: Step Installation Step Action 1 YaST2 Control Center @ linux select Network Services ––> NFS Server NFS server 2 Configuration of NFS server Check ’Start NFS server’ Next 3 Directories to export to the others “Add Directory” ––> <YourCGSHOME>, <YourToolsHOME>, Finish <YourUserHOME> for each directory “Add Host”: “Host Wild Card” ––> @<YourCGSNetgroup> “Options” ––> rw,sync 4 YaST Control Center Close Dok.Nr./Doc. No.: CGS–RIBRE–SUM–0002 Ausgabe/Issue: Überarbtg./Rev.: Seite /Page: 4.2 4.2.1 12 – 18 Datum/Date: Datum/Date: Von/Of: 30.06.2014 – 87 CGS Testnodes and Workstations Client Installation EADS SPACE Transportation - Bremen 2003 The Linux installation on Clients is described in chapter 9.1 starting on page 57. At this point, the installation could not be performed completely but if your CGS server has no graphic display it may be useful to install the operating system on a client and to run further installation steps from this workstation via remote login. Dok.Nr./Doc. No.: CGS–RIBRE–SUM–0002 Ausgabe/Issue: Überarbtg./Rev.: Seite /Page: 4.3 4.3.1 12 – 19 Datum/Date: Datum/Date: Von/Of: FAQ Xserver 1) You try to start a X–Application and get the error message: cannot connect to Xserver <yourhost>:0 EADS SPACE Transportation - Bremen 2003 a) the Xserver was started with the option “–nolisten tcp” (verify with: ps –ef | grep X) ––> in file /etc/sysconfig/displaymanager set the value for DISPLAYMANAGER_REMOTE_ACCESS=”yes” DISPLAYMANAGER_XSERVER_TCP_PORT_6000=”yes” ––> in file /etc/opt/kde3/share/config/kdm/kdmrc disable value ServerArgsLocal=–nolisten tcp ––> restart Xserver 30.06.2014 – 87 Dok.Nr./Doc. No.: CGS–RIBRE–SUM–0002 Ausgabe/Issue: Überarbtg./Rev.: Seite /Page: 4.4 12 – 20 Datum/Date: Datum/Date: Von/Of: 30.06.2014 – 87 Service Installation 4.4.1 Oracle 11 Installation on Linux It is recommended to use the Oracle Database Quick Installation Guide 11g Release 2 (11.2) fo Linux x86 for the intsallation. 4.4.1.1 Basic installation 4.4.1.1.1 Checking the requirements as described in Quick Installation Guide. Hint: look for correct swap size. EADS SPACE Transportation - Bremen 2003 4.4.1.1.2 Creating Required Operation System Groups and Users as root If user oracle is not already installed: # /usr/sbin/groupadd oinstall # /usr/sbin/groupadd dba # /usr/sbin/useradd –g oinstall –G dba oracle –d /home/oracle –m –p <password> 4.4.1.1.3 Start Oracle database automatically by system boot Start the Yast Control Center as root # yast2 & Install the package orarun Software –> Software Management Install orarun Enable database startup automatically at system boot System –> /etc/sysconfig Editor Productivity –> Databases –> Tools –> Oracle ORACLE_BASE –> DB START_ORACLE_DB START_ORACLE_DB_LISTERNER START_ORACLE_DB_EMANAGER START_ORACLE_DB_AGENT = <yourOracleBase> = = = = yes yes yes yes Change default oracle environment variables set by orarun in “/etc/profile.d/ oracle.sh”: Dok.Nr./Doc. No.: CGS–RIBRE–SUM–0002 Ausgabe/Issue: Überarbtg./Rev.: Seite /Page: 12 – 21 Datum/Date: Datum/Date: Von/Of: 30.06.2014 – 87 1. set ORACLE_HOME ($ORACLE_BASE/product/...) 2. set ORACLE_SID (name of your global database) 4.4.1.1.4 Install reqired Packages for Oracle Install Start the Yast Control Center as root # yast2 & Install the packages Software –> Software Management EADS SPACE Transportation - Bremen 2003 If not exists then install binutils compat–libstdc++ gcc gcc–c++ ksh libaio libaio–devel libelf libgcc libstdc++ libstdc++–devel make sysstat unixODBC unixODBC–devel Install glibc–2.4–31.63 glibc–devel–2.4–31.63. Caution: Oracle 11R2 requires SUSE package glibc–2.4–31.63 or higher version. The cause is a Novell bug #416838 in glibc–2.4–31.54 which is part of SLES 10 SP2. 4.4.1.1.5 Creating the oracle base directory # mkdir –p /<mount_point>/oracle # chown oracle:oinstall /<mount_point>/oracle # chmod 775 /<mount_point>/oracle 4.4.1.1.6 Configure the oracle User’s Environment Start a second shell tool console window. In the second shell window su to the user oracle with the command sux – oracle (recognising X–windows environment) # sux – oracle # xhost fully_qualified_host_name Dok.Nr./Doc. No.: CGS–RIBRE–SUM–0002 Ausgabe/Issue: Überarbtg./Rev.: Seite /Page: 12 – 22 Datum/Date: Datum/Date: Von/Of: 30.06.2014 – 87 Open the oracle users shell startup file .profile in any texteditor: > vi .profile Enter the following line in the shell startup file: umask 022 Save this file and enter the following command: > . ./.profile Set the display variable > export DISPLAY=local_host:0.0 EADS SPACE Transportation - Bremen 2003 Set the following variables: > export ORACLE_BASE=/<mount_point>/oracle > export ORACLE_SID=cgsdb Unset the following variables: > unset ORACLE_HOME > unset TNS_ADMIN 4.4.1.1.7 Installing the Oracle Software To start Oracle Universal Installer, enter the following command: > /<mount_point_CD>/database/runInstaller Now a windows based installation dialogue is started. The questions and answers are given in a command line mode. On the real screen, you have either to navigate to the correct answers or to enter them into the input field. In either case you have to press return at the end of your input. If you are not sure, leave the default selection. Step Installation Step Action 1 Configure Security Updates Deselect “I wish to receive security updates via My Oracle Support” Window “My Oracle Support .. Not Specified” pops up Select “Yes” Next 2 Download Software Updates Select “Skip software updates” Installation Option Select “Install database software only” Grid Installation Option Leave the default “Single instance database installation” * Next 3 4 Next Next Dok.Nr./Doc. No.: CGS–RIBRE–SUM–0002 Ausgabe/Issue: Überarbtg./Rev.: Seite /Page: 23 Datum/Date: Datum/Date: 30.06.2014 – 87 Von/Of: Step Installation Step Action 5 Product Languages Leave the default “English” Database Edition Select “Standard Edition One” ** Installation Location Leave the defaults Operating System Groups Leave the defaults Prerequisite Checks In case of warnings: Select “Fix & Check Again” Execute the script as root and press “OK” Next 10 Summary Install 11 Install Product Execute the script root.sh Finish OK 6 7 8 9 EADS SPACE Transportation - Bremen 2003 12 – 12 Next Next Next Next Close *) Project specific: For a RAC installation use the manual COL–CC–RIBRE–MA–0002 (chatpter 5) or Oracle Real Application Clusters Installation Guide. **) Project specific: CGS does work with all three Oracle editions. Patch the oracle boot file: # vi /etc/init.d/oracle Change the two calls (dbstart, dbshut need a parameter): “$ORACLE_HOME/bin/dbstart” to “$ORACLE_HOME/bin/dbstart $ORACLE_HOME” “$ORACLE_HOME/bin/dbshut” to “$ORACLE_HOME/bin/dbshut $ORACLE_HOME” Now the CD has to be ejected. In the root shell window, enter: # eject cdrom 4.4.1.2 Installation of Oracle patch No patch is available for Oracle 11.2.0.3 at this time. Dok.Nr./Doc. No.: CGS–RIBRE–SUM–0002 Ausgabe/Issue: Überarbtg./Rev.: Seite /Page: 4.5 4.5.1 12 – 24 Datum/Date: Datum/Date: 30.06.2014 – Von/Of: 87 CGS Delivery Installation Preparations Important:Before installing CGS, please check the Release Notes: Known Bugs and Workarounds, for workarounds, which have to be applied during the installation process. Additionally check wether all required patches are installed. You are still logged in as user root on the CGS Server. You have to decide now, which directory shall contain the CGS software. In the following this directory is called Your_CGS_HOME (see Installation Work Sheet in appendix B, item B.4.2). EADS SPACE Transportation - Bremen 2003 Note: If you have defined the CGS partitions during the OS installation, then they are already mounted. At first you have to create the CGS main group and the CGS administrator user who will be the owner of the CGS installation. For this purpose use the YaST2 tool. Start the YaST2 control center from the second left icon of the task bar at the bottom of the display. Step Installation Step Action 1 YaST2 Control Center @ linux Security and Users ––> User Management Edit and create groups 2 User and group administration select ’Groups’ Add 3 Add a new group Group name: cgs Group id (gid): 1000 Accept 4 Add a new group Group name: user Group id (gid): 100 Accept 5 User and group administration Select ’Users administration’ Add 6 Add a new user User: <yourAdminName> (e. g. cgsadmin) Enter a password: <YourAdminPassword> Re–enter the password for verification: <YourAdminPassword> Details... 7 Add/Edit User Properties – Details User ID (uid): 1000 Home directory: <YourHomeBase>/cgsadmin Login shell: /bin/csh Default group: cgs Additional group membership: un–check all Accept 8 The new user and group settings ... OK 9 YaST2 Control Center @ linux Close Dok.Nr./Doc. No.: CGS–RIBRE–SUM–0002 Ausgabe/Issue: Überarbtg./Rev.: Seite /Page: 12 – 25 Datum/Date: Datum/Date: Von/Of: 30.06.2014 – 87 As a final preparation, create the CGS home and TN home directory and change ownership to the CGS administrator: # mkdir <YourCGS_HOME> # chown cgsadmin:cgs <YourCGS_HOME> EADS SPACE Transportation - Bremen 2003 # mkdir <YourTN_HOME> Dok.Nr./Doc. No.: CGS–RIBRE–SUM–0002 Ausgabe/Issue: Überarbtg./Rev.: Seite /Page: 4.5.2 12 – 26 Datum/Date: Datum/Date: Von/Of: 30.06.2014 – 87 Load CGS Distribution EADS SPACE Transportation - Bremen 2003 Insert the basic CGS CD into the CD drive, mount it, create some directories and links and switch user to the newly created cgs admin user. Then set the environment variable GSAF_HOME, change directory to the CGS CD–ROM and call the installer: # # # # # # # > > > > mount /media/cdrom cd <YourCGS_HOME> mkdir gsaf tools chown cgsadmin:cgs gsaf tools ln –s <YourCGS_HOME>/gsaf /gsaf ln –s <YourCGS_HOME>/tools /tools sux – cgsadmin setenv CGS_HOME <YourCGS_HOME> setenv GSAF_HOME $CGS_HOME/gsaf cd /media/cdrom<Return> ./installer.sh<Return> Step Installation Step Action 1 CGS 7.X.X Installer Welcome... Install! 2 Done Exit After the exit, cd to another directory (e. g. to your home directory with cd) and within a root shell tool, unmount the CD: 4.5.3 4.5.3.1 > cd (within cgsadmin shell window) # eject cdrom (within root shell window) Configure Installation MDB SID Ranges You are still logged in as cgsadmin. Together with your CGS delivery you got a S/W delivery with the definition of your MDB instance. This is contained in a subdirectory named mdb_installations/ Your_Instance_Name. You have to copy the directory mdb_installations to the directory $CGS_HOME/etc/mda, where the installation script of MDB expects it to be: > cp –r SidRangeDelivery/mdb_installations $CGS_HOME/etc/mda Dok.Nr./Doc. No.: CGS–RIBRE–SUM–0002 Ausgabe/Issue: Überarbtg./Rev.: Seite /Page: 4.5.3.2 12 – 27 Datum/Date: Datum/Date: Von/Of: 30.06.2014 – 87 MDB Data Dictionary There are two options to install MDB data types: 1. Use the standard CGS data types. The standard CGS data types are already configured. 2. MDB data types are delivered by the element contractor (MDB SW Delivery). In the first case, you can use the default pathname to the dadi_export directory which contains the data dictionary. In the second case, you can copy the data dictionary to a different place, whereafter you have to enter this path to the install_mdb script, or you copy it to the predefined position $MDA_HOME, whereafter you can proceed as described in enumeration 1. The copy could work as following: EADS SPACE Transportation - Bremen 2003 > cd $GSAF_HOME/mda/config/mdb/install > zcat <YourDadiDeliveryLocation>/<YourDadiDeliveryFile>.tar.Z | tar –xvf – 4.5.3.3 Configurator Now use the just copied configurator to configure your CGS installation. Therefore change directory to /gsaf/config/bin and call the configurator: > /gsaf/config/bin/configurator.tcl &<Return> At first, a small window for the kind of configuration pops up. Please select “Configure a server”. At second, a small window for the initial configuration source pops up. Since you call it the first time, please select ’Guess from local system’. After that a configuration window will pop up with a menu at top level and the seven tabs Basic, CGS, Network, Topology, Oracle/MDB, TRDB and CMDH. You can select one after the other tab and fill in the necessary information. Help is available at the buttons with the question mark. You do not yet have to define the topology and can leave that tab empty. As much information as possible is already researched by the configurator. Please enter the missing information in the tabs Basic, CGS, Network, Oracle/MDB, TRDB and CMDH. In tab TRDB and CMDH, enter different values for Oracle sid and two task, if you want to have your TRDB and CMDH in an own oracle database. It is possible to put it also into the same database as MDB. In that case, you have to activate the check box “Use the same database for MDB, TRDB and CMDH” in tab Oracle/MDB. After you are finished with the filling of information, please select the menu choice File––>Save. This action will save your input to the file $CGS_HOME/etc/config/environment.xml, where you can load it later if you use the configurator for other purposes. After you saved your input, you have to create the so called dot files which is a collection of files which will be used by other applications and the CGS user login processes. Please select the menu choice Create––>Dotfiles which will create a number of files in the directory $CGS_HOME/etc/config. These files can later be recreated at any time when you use the configurator to change your system environment. Dok.Nr./Doc. No.: CGS–RIBRE–SUM–0002 Ausgabe/Issue: Überarbtg./Rev.: EADS SPACE Transportation - Bremen 2003 Seite /Page: 12 – 28 Datum/Date: Datum/Date: 30.06.2014 – 87 Von/Of: Step Installation Step Action Tab 1.1 CGS Configurator Please select the kind of configuration Configure a server 1.2 CGS Configurator Please select the source ... Guess from local system 2 In tab Basic enter your ’Target Site Name’, default is your NIS domainname Basic 2.1 You are logged in as YourCGSadminUser. If this user shall also be your CGS administration user, which is recommended, leave the check box for ’You will be the CGS Owner’ checked. In this case the next four lines cannot be changed and are greyed out. Basic 2.2 The next fields can also be left as is because the defaults are correct in most cases. Basic 3 Check your CGS_HOME, TN_BASE. CGS 3.1 Enter the Tools Directory, Mountpath can be left empty. /tools CGS 3.2 Enter PDF documentation viewer executable acroread CGS 3.3 If necessary (for compilation of Ada programs, e.g. for CSS simulation model development) enter the pointer to your Ada compiler YourADApath CGS 3.4 If necessary (for compilation of Ada programs using the Posix Library, e.g. for CSS simulation model development) enter the pointer to your Ada Posix Library YourFLORIST- CGS path 4 Check entries. If the NIS server is also file server, Oracle server, printserver and mailserver, leave checks. Network 5 Enter all your hosts (workstations and testnodes), also the server, if it should serve as testnode and workstation, in both lists. CGS server should be the NIS server, netgroup should be correct. Topology 6 If “Use the same database for MDB, TRDB and CMDH: yes” then you can skip the steps 7 and 8. Check and enter missing information according to your oracle installation. Change ORACLE_BASE and ORACLE_HOME accordingly. Enter the values ORACLE_SID and TWO_TASK which are needed for the MDB database. Oracle/MDB 7 Check and enter missing information according to your oracle installation. Change ORACLE_BASE and ORACLE_HOME accordingly. Enter the values ORACLE_SID and TWO_TASK which are needed for the TRDB database. TRDB Dok.Nr./Doc. No.: CGS–RIBRE–SUM–0002 Ausgabe/Issue: Überarbtg./Rev.: Seite /Page: 12 – 29 Datum/Date: Datum/Date: 30.06.2014 – 87 Von/Of: Step Installation Step Action Tab 8 Check and enter missing information according to your oracle installation. Change ORACLE_BASE and ORACLE_HOME accordingly. Enter the values ORACLE_SID and TWO_TASK which are needed for the CMDH database. 9 From the menu select ’Create ––> Dotfiles’ Create ––> Dotfiles 10 From the menu select ’File ––> Save’ File ––> Save 11 Save configuration to XML. leave default path and file name. Save CMDH EADS SPACE Transportation - Bremen 2003 Leave the configurator running. 4.5.4 Configure Host From the configurator, from the menu, select Configure ––> Host Configuration: 12 From the menu select ’Configure ––> Host Configuration’ Configure ––> Host Configuration A shell window appears, where you have to enter the root password: Please enter password for user root: Password: <YourRootPassword> A new graphical dialogue window appears: Step Installation Step Action 1 Leave all selections Install 2 Finished Quit An acknowledge window appears 3 Acknowledge OK To exit the shell window, enter the command exit within it: exit 4.5.5 Create MDB instance From the still running configurator, from the menu, select Install ––> Oracle MDB Instance: Dok.Nr./Doc. No.: CGS–RIBRE–SUM–0002 Ausgabe/Issue: Überarbtg./Rev.: Seite /Page: 13 12 – 30 Datum/Date: Datum/Date: Von/Of: From the menu select ’Install ––> Oracle MDB Instance’ 30.06.2014 – 87 Install ––> Oracle MDB Instance A shell window appears, where you have to enter the oracle owner password and then to confirm the creation of the data base with the values entered before: Password: <YourOraclePassword> ... (check output) Create Database [y]:<Return> ... (lasts some time, depending on hardware and) ... (tablespace size, 10 minutes to 5 hours) ...done EADS SPACE Transportation - Bremen 2003 14 Acknowledge OK To exit the shell window, enter the command exit within it: exit 4.5.6 Create TRDB instance If the TRDB shall install on the same host as the MDB instance then it is recommended to use the same database instance (same TWO_TASK and ORACLE_SID as MDB instance). If you do not have configured a own TRDB instance, skip this section! From the configurator, from the menu, select Install ––> Oracle TRDB Instance: 15 From the menu select ’Install ––> Oracle TRDB Instance’ Install ––> Oracle TRDB Instance A shell window appears, where you have to enter the oracle owner password and then to confirm the creation of the data base with the values entered before: Password: <YourOraclePassword> ... (check output) Create Database [y]:<Return> ... (lasts some time, depending on hardware and) ... (tablespace size, 10 minutes to 5 hours) ...done 16 Acknowledge To exit the shell window, enter the command exit within it: OK Dok.Nr./Doc. No.: CGS–RIBRE–SUM–0002 Ausgabe/Issue: Überarbtg./Rev.: Seite /Page: 12 – 31 Datum/Date: Datum/Date: Von/Of: 30.06.2014 – 87 exit 4.5.7 Create CMDH instance If the CMDH shall install on the same host as the MDB instance then it is recommended to use the same database instance (same TWO_TASK and ORACLE_SID as MDB instance). If you do not have configured a own CMDH instance, skip this section! From the configurator, from the menu, select Install ––> Oracle CMDH Instance: From the menu select ’Install ––> Oracle CMDH Instance’ EADS SPACE Transportation - Bremen 2003 17 Install ––> Oracle CMDH Instance A shell window appears, where you have to enter the oracle owner password and then to confirm the creation of the data base with the values entered before: Password: <YourOraclePassword> ... (check output) Create Database [y]:<Return> ... (lasts some time, depending on hardware and) ... (tablespace size, 10 minutes to 5 hours) ...done 18 Acknowledge OK To exit the shell window, enter the command exit within it: exit 4.5.8 Check Oracle instances (optional) In normal case you can skip this section, but in case of installation problems you should perform the following steps. As user oracle, check the file /etc/oratab, whether correct entries have been made. In case there is a * at the beginning, replace it with your oracle_sid. The N at the and can be replaced by a Y. If missing, insert entries for all kind of databases running on this workstation (TRDB, CMDH): > vi /etc/oratab (replace * with your ORACLE_SID) (replace N with Y) (if necessary insert entries for TRDB and CMDH) :wq Dok.Nr./Doc. No.: CGS–RIBRE–SUM–0002 Ausgabe/Issue: Überarbtg./Rev.: Seite /Page: 12 – 32 Datum/Date: Datum/Date: Von/Of: 30.06.2014 – 87 After the first installation there will be two files, listener.ora and tnsnames.ora in $ORACLE_HOME/ network/admin. Check both files. In the file listener.ora, add entries to the SID_LIST for each of your oracle instances not already mentioned: (SID_DESC = (GLOBAL_DBNAME = <YourDBName>) –– i. e. <sid.domain> (ORACLE_HOME = <same as above>) (SID_NAME = <YourTRDB–or–CMDH–SID>) ) EADS SPACE Transportation - Bremen 2003 In the file tnsnames.ora, add entries for each of your oracle instances not already mentioned: <YourTRDB–or–CMDH–SID> = ... –– i. e. all the same (SERVICE_NAME = <YourDBName>) –– i. e. <sid.domain> . ) ) Important:Observe the brackets! After you fixed the files, try to shutdown and restart the listener. As user oracle, call the commands lsnrctl stop and lsnrctl start: > lsnrctl stop ... > lsnrctl start ... > (some output) (some output, check for errors) In case of errors start the Oracle Net Configuration Assistant as user oracle: > netca & Select the following: – Listerner configuration; Next – Reconfigure; Next – LISTENER; Next – TCP; Next – Use the standard port number of 1521; Next – No; Next – Cancel Dok.Nr./Doc. No.: CGS–RIBRE–SUM–0002 Ausgabe/Issue: Überarbtg./Rev.: Seite /Page: 4.5.9 12 – 33 Datum/Date: Datum/Date: Von/Of: 30.06.2014 – 87 Configure the Oracle Enterprise Manager The Web–based Oracle Enterprise Manager Database Control (Database Control) is the primary tool for managing your Oracle database. By creating the database with the CGS configurator the Enterprise Manager is already installed. As user oracle you can find out the status and the URL of the Enterprise Manager as following: > export ORACLE_SID=<ORACLE_SID of MDB|TRDB|CMDH> > emctl status dbconsole As user oracle you can start the Enterprise Manager as following: EADS SPACE Transportation - Bremen 2003 > export ORACLE_SID=<ORACLE_SID of MDB|TRDB|CMDH> > emctl start dbconsole As user oracle you can stop the Enterprise Manager as following: > export ORACLE_SID=<ORACLE_SID of MDB|TRDB|CMDH> > emctl stop dbconsole 4.5.10 Oracle Automated Maintenance Tasks (optional) Automated maintenance tasks are tasks that are started automatically at regular intervals to perform maintenance operations on the database. Automated maintenance tasks run in maintenance windows, which are predefined time intervals that are intended to occur during a period of low system load. You can customize maintenance windows based on the resource usage patterns of your database, or disable certain default windows from running. You can also create your own maintenance windows. 4.5.10.1 Available Automated Maintenance Tasks Oracle Database has three predefined automated maintenance tasks: • Automatic Optimizer Statistics Collection – Collects optimizer statistics for all schema objects in the database for which there are no statistics or only stale statistics. The statistics gathered by this task are used by the SQL query optimizer to improve the performance of SQL execution. • Automatic Segment Advisor – Identifies segments that have space available for reclamation, and makes recommendations on how to defragment those segments. You can also run the Segment Advisor manually to obtain more up–to–the–minute recommendations or to obtain recommendations on segments that the Automatic Segment Advisor did not examine for possible space reclamation. Dok.Nr./Doc. No.: CGS–RIBRE–SUM–0002 Ausgabe/Issue: Überarbtg./Rev.: Seite /Page: • 12 – 34 Datum/Date: Datum/Date: Von/Of: 30.06.2014 – 87 Automatic SQL Tuning Advisor – Examines the performance of high–load SQL statements, and makes recommendations on how to tune those statements. You can configure this advisor to automatically implement SQL profile recommendations. 4.5.10.2 Performance Problems In case of performance problems during the activated DEFAULT_MAINTENCE_PLAN (default: Monday – Friday: starts 10:00 PM, duration 4 hours; Saturday and Sunday: starts 06:00 AM, duration 20 hours) you can change the DEFAULT_MAINTENACE_PLAN or disable all Automatic Maintenance Tasks. EADS SPACE Transportation - Bremen 2003 Change the DEFAULT_MAINTENANCE_PLAN: • Start Oracle Enterprise Manager • Select tab Server • Select Window Groups in Oracle Scheduler group • Select MAINTENANCE_WINDOW_GROUP • Select DEFAULT_MAINTENANCE_PLAN • Select Edit OTHER_GROUP contains the user processes. Decrease percentage of ORA$AUTOTASK_SUB_OLAN and increase percentage of OTHER_GROUPS (sum must be 100) • Select Apply Disable and Enable Automated Maintenance Tasks a) with the Enterprise Manager: • Start Oracle Enterprise Manager • Select tab Server • Select Automated Maintenance Tasks in Oracle Scheduler group • Select Configure • Select Disabled for all three Task Settings • Select Apply b) with a shell script: Execute the script $CGS_HOME/config/mdb/install/admin_scripts/oracle_auto_task_admin. Parameter: –h help –mdb Mission Database –rdb Result Database –cmh Command History –p <password> Oracle system password –l List Automated Maintenance Tasks –e Enable Automated Maintenance Tasks –d Disable Automated Maintenance Tasks Usage: oracle_auto_task_admin –h | [–mdb|–rdb|–cmh] –p <oracle_system_password> [–l|–d|–e] Dok.Nr./Doc. No.: CGS–RIBRE–SUM–0002 Ausgabe/Issue: Überarbtg./Rev.: Seite /Page: 12 – 35 Datum/Date: Datum/Date: 30.06.2014 – Von/Of: 87 4.5.11 Install and initialize the MDB From the still running configurator, from the menu, select Install ––> Install Mission Database: 19 From the menu select ’Install ––> Mission Database’ Install ––> Mission Database A shell window appears, where you have to enter whether you want to perform the installation, then the location of your data dictionary (dadi_export) and the instance range you want to create: EADS SPACE Transportation - Bremen 2003 ... Enter dadi export directory path name [$GSAF_HOME/mda/config/mdb/install/ dadi_export] : <Return> The following ranges can be installed for instance YOUR_MDB_INSTANCE_NAME: ... Enter the MDB instance range [0]: <Return> ( a lot of configuration informations ) Do you want to perform the installation ? [y] <Return> ( a lot of installation messages ) ... Installation of MDB successfully finished. The next step is to fill the MDB structures using “initialize_mdb”. 20 Acknowledge OK To exit the shell window, enter the command exit within it: exit After that, from the configurator, from the menu, select Install ––> Initialize Mission Database: 21 From the menu select ’Install ––> Initialize Mission Database’ Install ––> Initialize Mission Database A shell window appears, where you have to enter whether you want to perform the installation, then the owner name and the password of the MDB oracle user (use the defaults – simply press enter): Dok.Nr./Doc. No.: CGS–RIBRE–SUM–0002 Ausgabe/Issue: Überarbtg./Rev.: Seite /Page: 12 – 36 Datum/Date: Datum/Date: Von/Of: 30.06.2014 – 87 ... Do you want to perform the installation ? [y] ... ... (Lots of messages here) ... The MDB is initialized. The work with the MDB may now be started if the users are already installed. Otherwise users may be installed with the ’install_user’ script. 22 Acknowledge OK EADS SPACE Transportation - Bremen 2003 To exit the shell window, enter the command exit within it: exit 4.5.12 Install User If you has saved the CGS configuration as described in chapter 8, you should skip this section and go to section 8.2.4. CGS users are also users of the ORACLE database system. CGS supports only ORACLE nonquoted identifiers. Nonquoted identifiers can contain only alphanumeric characters from your datab ase character set and the underscore (_), dollar sign ($), and pound sign (#). Oracle Corporation strongly discourages you from using $ and #. (For more information see Oracle SQL Reference). It is necessary to set the CGS adminstration user’s environment as follows: Exit the configurator: From the menu select ’File ––> Exit’ 23 Exit the shell: > exit Open a new shell as CGS administation user Start the configurator: > $CGS_HOME/gsaf/config/bin/configurator.tcl & File ––> Exit Dok.Nr./Doc. No.: CGS–RIBRE–SUM–0002 Ausgabe/Issue: Überarbtg./Rev.: Seite /Page: 12 – 37 Datum/Date: Datum/Date: 30.06.2014 – Von/Of: 87 To install the user for CGS, the user has to exist already as Linux user. Follow the instruction of the operatin system manual. From the configurator, from the menu, select Install ––> User (complete): 24 From the menu select ’Install ––> User (complete)’ Install ––> User (complete) A shell window appears, where you have to enter some information: Enter the password for userroot: Password: <YourRootPassword> EADS SPACE Transportation - Bremen 2003 A new graphical dialogue window appears: Step Installation Step Action 1 Install CGS User Enter values for: Install User Name User Oracle Password (Leave other values) 2 (twice) Finished Quit 4.5.13 Install the TRDB From the still running configurator, from the menu, select Install ––> Test Result Database: 25 From the menu select ’Install ––> Test Result Database’ Install ––> Test Result Database A shell window appears, where you have to enter some information: Do you agree to proceed (YES/NO) ? YES . . (Information about the installation options) . You can either execute Step 1, Step 2 or all. Please enter (1 / 2 / ALL / EXIT ) : . . (some information) . TRDB installation complete 26 ALL Acknowledge To exit the shell window, enter the command exit within it: exit OK Dok.Nr./Doc. No.: CGS–RIBRE–SUM–0002 Ausgabe/Issue: Überarbtg./Rev.: Seite /Page: 12 – 38 Datum/Date: Datum/Date: Von/Of: 30.06.2014 – 87 4.5.14 Install the Command History Database (CMDH) From the still running configurator, from the menu, select Install ––> Command History: 27 From the menu select ’Install ––> Command History’ Install ––> Command History A shell window appears, where you have to enter some information: EADS SPACE Transportation - Bremen 2003 Do you agree to proceed (YES/NO) ? YES . . (Information about the installation options) . . (some information) . Command History Installation complete 28 Acknowledge OK To exit the shell window, enter the command exit within it: exit Exit the configurator by selecting the menu File ––> Exit: 29 Configurator File ––> Exit 4.5.15 Configure CSS (optional) 4.5.15.1 Ada Compiler The Ada compiler (i.e. for this CGS version GNAT 7.4.1, including Florist) needs to be installed/ mounted on all hosts intended to be used as compilation server for CSS. Furthermore the corresponding directories (i.e. ADA_HOME and FLORIST_PATH) must be specified via the Configurator (see chapter 4.5.3.3). The CSS Ada configuration file $HOME/.cgs/css/config/css_compile_servers specifies which processors can be used to compile simulation models. It is generated automatically when CSS is started and no such file exists right then, however it is possible to edit this file in order to add/remove hosts to/from the list of compilation servers. This file can be customized as follows: Dok.Nr./Doc. No.: CGS–RIBRE–SUM–0002 Ausgabe/Issue: Überarbtg./Rev.: Seite /Page: 12 – 39 Datum/Date: Datum/Date: Von/Of: 30.06.2014 – 87 # vi $HOME/.cgs/css/config/css_compile_servers ... #arch server . (change the Ada definitions to local needs, e.g.: linuxi cgs–s then save the file and exit the editor ) :wq <Return> Note: architecture of your simulation node (only linuxi supported in this CGS version) the host on which the Ada compiler will be executed arch EADS SPACE Transportation - Bremen 2003 server: A running CSS application consists of several system processes. Some of these processes start other processes via ssh login. For all CSS users ssh must be configured in a way that a login can be performed without the need to enter a password from host running proess to (–>) host running process as given in the following table: • HCI (ICP) –> CSS UI (if CSS UI started on remote host) • CIS (ICP) –> CSS UI (if CSS UI started on remote host) • ICP (standalone) –> CSS UI (if CSS UI started on remote host) • CSS UI –> ICP (standalone) • CSS UI –> CSS DB Server • CSS UI –> CSS CTG Server • CSS UI –> CSS Kernel • CSS UI –> CSS Logger Backend 4.5.15.2 System Topology Table Verify that in the System Topology Table (i.e. in file $CGS_HOME/local/config/SYSTEM_TOPOLOGY_TABLE there is an entry for CSS_01 referring to the correct simulation node. If not, add resp. update this entry. Dok.Nr./Doc. No.: CGS–RIBRE–SUM–0002 Ausgabe/Issue: Überarbtg./Rev.: Seite /Page: 5 12 – 40 Datum/Date: Datum/Date: Von/Of: 30.06.2014 – 87 CHECKOUT CONFIGURATION The CGS checkout software has to be configured now. It is necessary that the system consists at least of the CGS server and one test node. In quite small configurations these two nodes can also be on one machine. The first checkout configuration step is the generation of a system topology table. The best method to do that is to use the configurator as described in chapter 4.5.3 on page 26. 5.1 System Topology Table You are still logged in as the CGS Administrator. Change directory to /gsaf/config/bin and call the configurator: EADS SPACE Transportation - Bremen 2003 > cd /gsaf/config/bin<Return> > configurator.tcl<Return> Select the tab with the name ’Topology’. The CGS server is automatically selected if it is identical with the NIS server. This is the default. If you deselect the check box NIS server (change the colour from red to blue), you can enter another machine name and IP address. Note that in CGS the DB server should also be the NIS server. In the field CGS Hosts NIS Netgroup enter the netgroup of your CGS netgroup, e. g. cgshosts. For each workstation in your CGS network enter the hostname and the IP address (this is included automatically if possible) of the workstations where you would like to monitor and control the CGS system, so called HCI workstations. Note that also the test nodes and the DB server may be included here. For each test node enter hostname and IP address in the Test Node/Simulation Node area. Note that also HCI workstations and the DB server can work as test nodes. After all information is included, select from the menu Create ––> System Topology. The file SYSTEM_TOPOLOGY_TABLE is created in the directory $CGS_HOME/local/config. 5.2 Start CGS Daemon At this installation point you should start the CGS daemon, if you did not reboot the machine after the host configuration. The CGS daemon starts and stops all other CGS process on all CGS hosts. Check whether the daemon already runs, with the command: > ps –ef | grep cgs_daemon If it is not already running, start the daemon with the command start_cgs_daemon. If you get error messages, use the option –f for start_cgs_daemon: > $GSAF_HOME/cgsi/bin/common/start_cgs_daemon Dok.Nr./Doc. No.: CGS–RIBRE–SUM–0002 Ausgabe/Issue: Überarbtg./Rev.: Seite /Page: 5.3 12 – 41 Datum/Date: Datum/Date: Von/Of: 30.06.2014 – 87 NTP Configuration 5.3.1 Select the NTP Master CGS uses the host of the database server as NTP server by default. (The NTP server is the server all other clients are synchronized to.) This can be changed by the CGS Administrator by copying the file $CGS_HOME/gsaf/cgsi/config/cgs_startup.cfg to $CGS_HOME/etc and adapting it. Edit the line NTP_SERVER = DEFAULT and replace ’DEFAULT’ by the host name of your NTP master host: > cp $GSAF_HOME/cgsi/config/cgs_startup.cfg $CGS_HOME/etc > cd $CGS_HOME/etc > vi cgs_startup.cfg EADS SPACE Transportation - Bremen 2003 ( replace ’DEFAULT’ by the name of the NTP Server : . . . NTP_SERVER = Your_NTP Save and Exit vi ) :wq It is possible to have four different NTP configurations on a CGS machine. The choices are increasingly specific: 1.. default config directory as described above – $CGS_HOME/gsaf/cgsi/config 2.. installation central config directory – $CGS_HOME/etc 3.. CGS local config directory – $CGS_HOME/local/config 4.. host dependent config directory – $CGS_HOME/local/config/‘hostname‘ The TSS startup software looks into the directories in reverse order, that means, the most specific configuration will be used first, if present. Therefore, if you want to have one of the above specified configurations, copy the file cgs_startup.cfg to one of the directories under point 2 to 4 and edit it correspondingly. Important: do not change the file in location 1, because this will be overwritten by a possible patch. 5.3.2 Configure external time distribution If you want to use an external Master Time Unit (MTU) or synchronize the CGS system to a higher level time distribution in the network, then create a new NTP configuration file $CGS_HOME/local/etc/ server_configuration. Perform this on the CGS NTP master as the CGS administration user: Dok.Nr./Doc. No.: CGS–RIBRE–SUM–0002 Ausgabe/Issue: Überarbtg./Rev.: Seite /Page: 12 – 42 Datum/Date: Datum/Date: Von/Of: 30.06.2014 – 87 > cd $CGS_HOME/local/etc> > vi server_configuration<Return> ( Enter NTP server definitions as follows: # CGS NTP Configuration of the CGS NTP Master Host server IP_Address_of_MTU driftfile /etc/server.drift Save and Exit vi ) :wq 5.3.3 Start NTP Service EADS SPACE Transportation - Bremen 2003 Login as root on the CGS server and activate the NTP software: > su Password: Password # cd $CGS_HOME/gsaf/cgsi/bin/common # ./process_startup NTP . netntprc Finished # exit The NTP software will find the NTP server to synchronize to only, if you have installed the NTP–software and start the NTP–process on server before, or the CGS server is the NTP server too (default). 5.3.4 Time Synchronization of CGS environment (boot sequence) This section describe the boot sequence for time synchronization of your complete CGS environment. For correct time synchronization you need to start your time software on MTP server first, than you can start time software on all other hosts by booting. If you created a network of dependent NTP clients, you have to boot the machines from server to clients. 5.4 CGS addational configuration CGS provide an central tool to configure CGS applications. The “Configuration Editor” provides a tree like display of configuration parameters. The Tool can be started from the CGS start center (type cgs at command prompt). In start center goto CGS/Administration/Configuration and select Global,– Local,– or User Configuration. Dok.Nr./Doc. No.: CGS–RIBRE–SUM–0002 Ausgabe/Issue: Überarbtg./Rev.: Seite /Page: 5.5 12 – 43 Datum/Date: Datum/Date: Von/Of: 30.06.2014 – 87 Add CGS Processes on the CGS Server If the CGS server does provide a graphical display it can also perform tasks which are normally assigned to a CGS client workstation. To enable HCI, TSCV and/or TEV processes on the CGS server expand the system topology table as described in chapter 9.6 on page 70. 5.6 Installation of further CGS Hosts After the installation of the CGS server all other CGS hosts can be installed. 1.. Install the Master Test Processor (see section 9.1.1.6.1 starting at page 58) 2.. Install all other Test Nodes (see section 9.1.1.6.1 starting at page 58) 3.. Install all user workstations (see section 9.1 starting at page 57) EADS SPACE Transportation - Bremen 2003 Further CGS hosts can be added or removed at later time as described in chapter 9 on page 57 of this installation manual. 5.7 Project specific environment If CGS is used by a higher project or other software packages, which need a certain environment, all of this environment can be created by login scripts login.sh or login.csh, according to the used shell. These files have to be located in the directory $CGS_HOME/etc/project. Dok.Nr./Doc. No.: CGS–RIBRE–SUM–0002 Ausgabe/Issue: Überarbtg./Rev.: Seite /Page: 6 6.1 12 – 44 Datum/Date: Datum/Date: Von/Of: 30.06.2014 – 87 MDB ADAPTATION Example Database In CGS 7 no example data base is supported. 6.1.1 Import UCL Libraries EADS SPACE Transportation - Bremen 2003 The CGS system libraries must be loaded into the MDB. Therefore you have to create or to import a system tree within the Mission Database. Then create the CDU version which shall contain the system libraries and the enditems of the type UCL_SYSTEM_LIBRARY or UCL_USER_LIBRARY. The import can be done by the File–>Include functionality of the CLS Editor. Therefore click with the right mouse button into the CLS Editor window to get the pop–up menu. Then set the Body ID according to following table. At last compile the library using Command–>Compile and store it with Command–>Store&Quit. UCL libraries are located in the directory $CGS_HOME/gsaf/cgsi/lib/ucl but only the marked libraries should be imported (depending on the installed CGS Version): Library ID Enditem Type File chg. CPL_LIBRARY 5 UCL_SYSTEM_LIBRARY cpl_library_.ucl FWDU_LIBRARY 1 UCL_SYSTEM_LIBRARY fwdu_library_.ucl GRD_CONVERSION 11 UCL_SYSTEM_LIBRARY grd_conversion_.ucl GROUND_COMMON 254 UCL_SYSTEM_LIBRARY ground_common_.ucl GROUND_LIBRARY 2 UCL_SYSTEM_LIBRARY ground_library_.ucl GROUND_TO_OB_LIB 4 UCL_SYSTEM_LIBRARY ground_to_o_lib_.ucl GROUND_VALUES 8 UCL_SYSTEM_LIBRARY ground_values_.ucl IO_LIBRARY 255 UCL_SYSTEM_LIBRARY io_library_.ucl MATH_LIB 6 UCL_SYSTEM_LIBRARY math_lib_.ucl MATH_LIB_LONG 7 UCL_SYSTEM_LIBRARY math_lib_long_.ucl ONBOARD_LIBRARY UCL_SYSTEM_LIBRARY onboard_library_.ucl PACKET_LIBRARY 13 UCL_SYSTEM_LIBRARY packet_library_.ucl RAW_DATA_LIBRARY 12 UCL_SYSTEM_LIBRARY raw_data_library_.ucl TC_CONSTRUCTION 9 UCL_SYSTEM_LIBRARY tc_construction_.ucl SUPPORT_LIBRARY UCL_USER_LIBRARY support_library.ucl (body) support_library_.ucl (spec) FILE_IO_LIBRARY UCL_USER_LIBRARY file_io_lib.ucl file_io_lib._ucl (body) (spec) The marked libraries are changed from CGS V 6 resp. CGS V6 to CGS V 7. After import the CDU containing the libraries should be set to state ’FROZEN’ (refer to app. doc. NO TAG for details) Dok.Nr./Doc. No.: CGS–RIBRE–SUM–0002 Ausgabe/Issue: Überarbtg./Rev.: Seite /Page: 7 7.1 12 – 45 Datum/Date: Datum/Date: Von/Of: 30.06.2014 – 87 CGS API Libraries General The TES library is located under $GSAF_HOME/cgsi/lib: EADS SPACE Transportation - Bremen 2003 sun5_gnat/ $GSAF_HOME/cgsi/lib/api/ada/ linuxi_gnat/ 7.2 Installation of the CGS API Libraries If the CGS API libraries were not installed during the CGS installation they can be installed from CGS optional CD. Dok.Nr./Doc. No.: CGS–RIBRE–SUM–0002 Ausgabe/Issue: Überarbtg./Rev.: Seite /Page: 7.3 12 – 46 Datum/Date: Datum/Date: Von/Of: 30.06.2014 – 87 Usage of the CGS API Linux library EADS SPACE Transportation - Bremen 2003 The is a README file under $CGS_HOME/gsaf/cgsi/lib/ada which provides hints for using the CGS API library. Dok.Nr./Doc. No.: CGS–RIBRE–SUM–0002 Ausgabe/Issue: Überarbtg./Rev.: Seite /Page: 8 12 – 47 Datum/Date: Datum/Date: Von/Of: 30.06.2014 – 87 UPDATE PROCEDURE 8.1 Overview This section describes how to update from CGS Version 6 to CGS version 7. This update requires a new operating system SUSE SLES 10 and a new Oracle version 11.1. EADS SPACE Transportation - Bremen 2003 The S/W update is split into the following steps: • Save customer dependent configuration and data files • Deinstall the necessary CGS parts • Run selected chapters of the CGS installation procedure • Configure CGS • Restore customer dependent configuration and data files Important:CGS Version 7 does not support an update procedure from the CGS software older than version 6.1. During your work with CGS in the past, you have possibly produced same user data in the MDB, so that your present MDB consists of a mixture of delivered and user produced data. This user data has to be upgraded to be used in the new CGS version. Dok.Nr./Doc. No.: CGS–RIBRE–SUM–0002 Ausgabe/Issue: Überarbtg./Rev.: Seite /Page: 8.2 12 – 48 Datum/Date: Datum/Date: Von/Of: 30.06.2014 – 87 Save Configuration and Data Files In the following your backup directory is called YourCGS_SAVE with the environment variable $CGS_SAVE. Login as user Your_CGS_Admin, insert the new CGS delivery CDROM into the CD– ROM drive. Before backup can be started, select the menu item ’CGS Shutdown’ within the ’CGS Task Selector’ to terminate the currently running CGS processes. Stop the command history as follow: > /gsaf/dbs/bin/common/stop_cmd_history Important:Choose YourCGS_SAVE in a “save” directory (not below $GSAF_HOME) to pre- EADS SPACE Transportation - Bremen 2003 vent data loss after deinstallation. Login: Your_CGS_Admin <Return> Password: YourPassword <Return> > mkdir <YourCGS_SAVE> > setenv CGS_SAVE <YourCGS_SAVE> > mount /media/cdrom > cd /media/cdrom/gsaf/cgsi/util/common 8.2.1 Save Configuration Software Start the backup script. If you in doubt which data are to be save, save all. This backup data will not be restored automatically. > saveCGSconf Export Configuration Data ========================= The following commands will be executed. Please check the questions carefully. 8.2.2 TRDB Contents Export the TRDB contents: Dok.Nr./Doc. No.: CGS–RIBRE–SUM–0002 Ausgabe/Issue: Überarbtg./Rev.: Seite /Page: 12 – 49 Datum/Date: Datum/Date: Von/Of: 30.06.2014 – 87 TRDB –––– Do you want to save the TRDB content ? y <Return> ( export messages ) . Export terminated successfully without warnings. done. . . ( outputs of tar command ) done. EADS SPACE Transportation - Bremen 2003 T(est)R(esult)D(ata)B(ase) content is exported into YourCGS_SAVE/trdb.content.tar.Z 8.2.3 Command History Export the Command History contents: Command History ––––––––––––––– Do you want to save the Command History content? (y, n): Y <Return> Please select the default file name for the export files. The program cannot handel different file names. Export of command history table partitions Caution: It is not possible to export the active partition. For partition informations start list_partitions. Low value of date range [<first partition>]: <Return> High value of date range [<last partition>]: <Return> Export file [<export file name>]: <Return> Do you wish to start the export of partition range <first partition> .. <last partition> [y] ? <Return> . ( export messages ) Dok.Nr./Doc. No.: CGS–RIBRE–SUM–0002 Ausgabe/Issue: Überarbtg./Rev.: Seite /Page: 8.2.4 12 – 50 Datum/Date: Datum/Date: Von/Of: 30.06.2014 – 87 MDB Users If you want to keep the MDB data you should also export the list of all current installed MDB users and their privileges: EADS SPACE Transportation - Bremen 2003 MDB user –––––––– Do you want to save the MDB user list and privileges? (y, n): y <Return> This procedure lists all users that have access to the MDB. Enter oracle user name for the oracle installation account of the MDB [MDBinstance_ADM] : MDB owner <Return> Enter oracle password for the oracle installation account of the MDB [MDBinstance_ADM] : Password <Return> . The following users are currently installed: . . (list of MDB users and permissions) 8.2.5 MDB Contents If you want to keep the MDB data, you have to export the MDB: MDB ––– Do you want to save the MDB content ? (y, n): y <Return> Please select the default file name for the export file. The program cannot handel different file names. ______________________________________________________________________ This script will export tables of an ORACLE MDB–account ______________________________________________________________________ Do you wish to start the export [y] ? y Enter OWNER NAME of the Oracle MDB account [MDBinstance_ADM] : MDB_Owner <Return> Enter OWNER PASSWORD of the Oracle MDB account [MDBinstance_ADM] : word <Return> Pass- Dok.Nr./Doc. No.: CGS–RIBRE–SUM–0002 Ausgabe/Issue: Überarbtg./Rev.: Seite /Page: 12 – 51 Datum/Date: Datum/Date: Von/Of: 30.06.2014 – 87 Enter export file name [Your_CGS_Admin_HOME/export_MDB.MDB_Owner.date] : <Return> Creating MDB export parameter files for account MDB_Owner ... Finished ( export messages ) . ... Finished Stored in Your_CGS_Admin_HOME/export_MDB.MDB_Owner.date.0 ... Your_CGS_Admin_HOME/export_MDB.MDB_Owner.date.4 EADS SPACE Transportation - Bremen 2003 ... Finished export 8.2.6 Copy data into Backup Directory Save Checkout Configuration Files ================================= The following commands will be executed. Please check the results carefully. ... saveCGSconf finished successfully. 8.2.7 8.2.7.1 Save additional data Export TRDB Final Archive Files In addition to the upgrade tool of the TRDB, which is used in the saveCGSconf script, you may also export your data to the final archiving directories with the final archiving tool. This data can also be re– imported in CGS 7.0. Find out the FA_DEVICE_FILENAME > cgs & Navigate: Administration –> Configuration –> Global Configuration Navigate: DBS –> FA_SAS Notice FA_DEVICE_FILENAME Dok.Nr./Doc. No.: CGS–RIBRE–SUM–0002 Ausgabe/Issue: Überarbtg./Rev.: Seite /Page: 12 – 52 Datum/Date: Datum/Date: 30.06.2014 – Von/Of: 87 > cd <FA DEVICES> > tar cf FA_DEVICE_FILENAME.tar FA_DEVICE_FILENAME 8.2.8 Backup the CGS server At this point you should stop Oracle and backup the complete CGS and Oracle server including the user directories. It is recommended to create an additional backup of the just created backup directory $CGS_SAVE which should also include Add–on’s of your CGS installation (e.g. front end software, extensions of the database, special application software etc.) and user data which must be used on the new CGS installation. This second backup tape allows an easier restore of the current configuration. The next example shows how to save the $GSAF_HOME directory (and other) to the local default tape drive: EADS SPACE Transportation - Bremen 2003 > tar $GSAF_HOME ADD_on_Directories <Return> Remove CD from the drive: > eject <Return> 8.2.9 Backup the CGS Configuration The example below shows how to save the backup directory to the local default tape drive: > cd $CGS_SAVE/.. > tar czf CGS_SAVE.tar CGS_SAVE <Return> 8.3 Deinstallation Procedure Now the CGS installation can be deleted. It may be useful to take over the user home directories. Deinstall now the products: • MDB user (10.1.1 on page 74) • MDB (10.2.1 on page 75) • TRDB (10.2.4 on page 77) • Command History (10.2.5 on page 78) Dok.Nr./Doc. No.: CGS–RIBRE–SUM–0002 Ausgabe/Issue: Überarbtg./Rev.: Seite /Page: 8.4 8.4.1 12 – 53 Datum/Date: Datum/Date: 30.06.2014 – Von/Of: 87 Upgrade Installation Procedure Restore the Backup Directory Before the installation of CGS you have to restore the backup directory saved in 8.2.8 (on page 52). Login as CGS administrator and restore the files. The example shows the command reading the default tape at your server, then set an environment variable pointing to the restored directory: EADS SPACE Transportation - Bremen 2003 login: Your_CGS_Admin <Return> Password: Password <Return> > cd $GSAF_HOME <Return> > tar xv <Return> > setenv CGS_SAVE <Your_GSAFSave> <Return> 8.4.2 Install CGS delivery To install the CGS delivery please execute sections 4.4 to 4.5.4 of the CGS Delivery Installation. You do not have to recreate the users an directories which still exist. Moreover the environment variables of your CGS administrator should still be correct. 8.4.3 MDB Installation and Initialization, TRDB and Command History Installation Skip the following chapters and go on with chapter 4.5.11 to 4.5.14 from page 35 to 38. 8.4.4 MDB Data Upgrade / Import If you have kept your MDB data, you have to upgrade the saved MDB export file. Call the upgrade script: > cd $GSAF_HOME/mda/config/mdb/upgrade <Return> If your MDB export file is from CGS version 6.2 or later then you must skip the upgrade. > upgrade <Return> Do you wish to start the upgrade [y] ? <Return> Enter the ORACLE system–account’s password: passwd <Return> Enter temporary ORACLE account name to use for upgrade \(THIS USER MUST NOT BE INSTALLED BEFORE IN ORACLE!\) (Default MDB_UPGRADE): <Return> ... Enter the upgrade: <YourUpgradeAlternative> Dok.Nr./Doc. No.: CGS–RIBRE–SUM–0002 Ausgabe/Issue: Überarbtg./Rev.: Seite /Page: 12 – 54 Datum/Date: Datum/Date: 30.06.2014 – Von/Of: 87 Enter BASENAME of the datafiles generated by the export of the MDB (INCLUDING THE PATH BUT WITHOUT TRAILING .<number>): $CGS_SAVE/export_MDB.MDB_Owner.date <Return> ... ... Finished importing ... ... Finished update ... (lots of messages) (lots of messages) Dropping ... > import <Return> EADS SPACE Transportation - Bremen 2003 Enter OWNER NAME of the Oracle MDB account [MDBinstance_ADM] : MDB_OWNER <Return> Enter OWNER PASSWORD of the Oracle MDB account [MDBinstance_ADM] : Password <Return> Enter BASENAME of the datafiles (INCLUDING THE PATH BUT WITHOUT TRAILING ’.<number>’) <$HOME>/upgraded_<YourUpgradeMethod>.<date> <Return> The logging–file stores all display outputs during the script execution in the users HOME (<$HOME>) directory Default logging filename: import_to_MPS.<date>.log Enter logging–file name [import_to_MPS.<date>.log] : <Return> . . (lots of messages) . ... Finished import 8.4.5 MDB Users First, copy your old user configuration files from your save directory: > cp $CGS_SAVE/MDB_users.MDB_OWNER.lst $CGS_HOME/etc/mda > cp $CGS_SAVE/user_privileges.MDB_OWNER.xml $CGS_HOME/etc/mda Then start the CGS configurator: > /gsaf/config/bin/configurator.tcl & In configurator select Upgrade –> Install Exported MDB Users Dok.Nr./Doc. No.: CGS–RIBRE–SUM–0002 Ausgabe/Issue: Überarbtg./Rev.: Seite /Page: 8.4.6 12 – 55 Datum/Date: Datum/Date: Von/Of: 30.06.2014 – 87 Checkout Configuration First, copy your old configuration files from your save directory: > cd $CGS_SAVE <Return> > cp cgs_inst/cgshome/local/config/SYSTEM_TOPOLOGY_TABLE $CGS_HOME/local/ config/ <Return> > cp –R dbs $GSAF_HOME/dbs <Return> > cp hci/data/screen_setup_pool/* $HCI_HOME/data/screen_setup_pool/ <Return> EADS SPACE Transportation - Bremen 2003 Important:Don not use your old tscv_configuration_file.dat in $CGS_HOME/etc from CGS version 6.1! The structure changed, and you should copy the newly delivered tscv_configuration_file.dat.orig to tscv_configuration_file.dat or not restore the saved tscv_configuration_file.dat. Now follow section 5.2 on page 40 to start the CGS daemon. 8.4.7 TRDB data import To restore the data of the TRDB the TRDB–files have to be restored only. > cd $GSAF_HOME/dbs/util/common > upgrade_tool –import $CGS_SAVE/trdb.content 8.4.8 Command History data import To restore the data of Command History the Command–History–files have to be restored only. > cd $CGS_SAVE > $GSAF_HOME/dbs/util/common/command_history/import_partitions ... 8.4.9 (use your cmdh export file as input) Import TRDB Final Archiving Files > cd <FA DEVICES NEW> > tar xf FA_DEVICE_FILENAME.tar Dok.Nr./Doc. No.: CGS–RIBRE–SUM–0002 Ausgabe/Issue: Überarbtg./Rev.: Seite /Page: 8.5 12 – 56 Datum/Date: Datum/Date: Von/Of: 30.06.2014 – 87 Update CGS Hosts Now perform the changes also on all the clients. The work to be done depends on the role of the machine. Test nodes and workstations need only the SLES 8 SP3 installation, cgs–in–the–box machines need a deinstallation and reinstallation of the TRDB database also. Note: 8.6 The SYSTEM_TOPOLOGY_TABLE has to be copied to the local directory $CGS_HOME/local/config on a cgs–in–the–box machine again. Data Upgrade EADS SPACE Transportation - Bremen 2003 To ensure correct working of your CGS environment and avoid errors in your application after the upgrade please perform following tasks: • adapt your config files If you made special settings in different cgs config files you need to adapt them again. Do not copy the old files, because different config file content has been changed! • recompile SAS software with the new CGS API (see 7.3 on page 46) • replace UCL system libraries with the new versions (see 6.1.1 on page 44). The UCL libraries are stored in the directory $GSAF_HOME/cgs/lib/ucl as text files which can be imported via the File–>Include... menu of the CLS editor. • recompile your UCL APs (in window I_MDB:CDU Versions or I_MDB:CCU Versions select ’Command’–>’Tools’–>’CLS Batch Compiler...’) • generate new Scoe files (in CCU scope: select on an EGSE_TEST_CONFIGURATION enditem ’Tools’–>’Generate Scoe Files...’) Dok.Nr./Doc. No.: CGS–RIBRE–SUM–0002 Ausgabe/Issue: Überarbtg./Rev.: Seite /Page: 9 12 – 57 Datum/Date: Datum/Date: Von/Of: 30.06.2014 – 87 ADMINISTRATION 9.1 Add Additional Client If you would like to add an additional workstation client to your CGS network, which should be enabled to use CGS, you have to install the operating system according to CGS needs. We suggest to install the client machine as a standalone workstation which mounts the corresponding CGS filesystems from the CGS server. The machine must also be a member of the same NIS domain as the CGS master server. Note: EADS SPACE Transportation - Bremen 2003 9.1.1 ’Standalone’ does not mean without connection to a network. The standalone workstation may nevertheless be NIS and NFS client. OS Installation Procedure The following procedure is an example for the installation of a standalone client machine. Boot your OS from the delivery media, select the system parameters as shown in the following table and then reboot the workstation. 9.1.1.1 Installation of the Basic Operating System from CD–ROM Follow exactly the OS installation procedure in chapter 4.1.2 beginning on page 12. 9.1.1.2 Network configuration Follow exactly the basic network configuration in chapter 4.1.3 beginning on page 13. 9.1.1.3 Start services (inetd) Follow exactly the basic network configuration in chapter 4.1.4 beginning on page 14. 9.1.1.4 Additional client administration (NIS) In the still running YaST Control Center: Step Installation Step Action 1 YaST2 Control Center @ linux select Network Services ––> NIS Client NIS client 2 Configuration of NIS client Check ’Use NIS’ Check ’Start Automounter 3 Configuration of NIS client NIS domain: enter <YourNISdomain> Adresses of NIS servers: enter <YourNISserverIPaddress> Finish 4 The configuration of the NIS client will be saved Continue Dok.Nr./Doc. No.: CGS–RIBRE–SUM–0002 Ausgabe/Issue: Überarbtg./Rev.: Seite /Page: 9.1.1.5 58 Datum/Date: Datum/Date: Von/Of: 30.06.2014 – 87 Additional client administration (NFS) # mkdir <YourCGSBaseDir> EADS SPACE Transportation - Bremen 2003 12 – (same name as on CGS Server!) Step Installation Step Action 1 YaST2 Control Center @ linux select Network Services ––> NFS Client NFS client 2 “Add”: NFS Server Host Name ––> CGS Server Name Remote File System ––> <YourCGSBaseDir> Mount Point (local) ––> <YourCGSBaseDir> Options ––> default OK 3 Finish 9.1.1.6 Installation of the CGS Environment 9.1.1.6.1 Testnode # mkdir <TN_BASE> In the still running YaST Control Center: Step Installation Step Action 1 YaST2 Control Center @ linux select Network Services ––> NFS Server NFS server 2 select Start Next 3 “Add Directory” ––> “Directory to Export”: testnode directory (<TN_BASE>) to export 4 “Add Host” ––> “Host Wildcard”: @cgshosts “Options”: rw,sync 9.1.1.6.2 Configure host on client Log in as cgs admin user on client. Finish Dok.Nr./Doc. No.: CGS–RIBRE–SUM–0002 Ausgabe/Issue: Überarbtg./Rev.: Seite /Page: 12 – 59 Datum/Date: Datum/Date: Von/Of: 30.06.2014 – 87 EADS SPACE Transportation - Bremen 2003 > setenv CGS_HOME /<YourCGSBaseDir>/cgs > cd $CGS_HOME/gsaf/config/bin > configurator.tcl Step Installation Step Action 1 CGS Configurator Please select the kind of configuration Configure a client 2 CGS Configurator Please select the source ... Load from file... 3 Load Configuration from XML Select ’environment.xml’ Open 4 CGS Configurator From the menu select Configure ––> Host Configuration Tab A shell tool window appears, where you have to enter the root password: Please enter password for user root: Password: <YourRootPassword> A new graphical dialogue window appears: Step Installation Step Action 1 Leave all selections, then... Install 2 Finished Quit An acknowledge window appears 3 Acknowledge OK To exit the shell window, enter the command exit within it: exit Go on within the CGS configurator. Now, if you have a CGS–in–the–box machine, create an own topology table with help of the tab ’Topology’, then with the ’Create ––> System Topology’ menu entry, save the topology table to the file system. After that, in a shell tool window as the CGS administrator, copy the topology table to the correct place: > cp $GSAF_HOME/config/SYSTEM_TOPOLOGY_TABLE $CGS_HOME/local/config<Return> Exit the configurator by selecting the menu File ––> Exit: Dok.Nr./Doc. No.: CGS–RIBRE–SUM–0002 Ausgabe/Issue: Überarbtg./Rev.: Seite /Page: 5 9.1.1.7 12 – 60 Configurator Datum/Date: Datum/Date: Von/Of: 30.06.2014 – 87 File ––> Exit CGS Server Configuration Now the new CGS client workstation must be introduced to the NIS domain. Perform the steps of this section as user root on the NIS master server. First add the new CGS workstation to the hosts database. Then expand the CGS netgroup and distribute the NIS maps to the network: Login: root Password: RootPassword (ON THE SERVER!) EADS SPACE Transportation - Bremen 2003 # vi Your_NIS_Directory/hosts . ( add line with IP address and hostname of client ) . . Client_IP_Address Client_Name :wq # vi Your_NIS_Directory/netgroup . ( append the line containing the CGS netgroup with ) . . (Client_Name,,) :wq Login as user root on the CGS server. Create the client testnode directory, which will be mounted: # mkdir /<TN_BASE>/’client_name’ Start YaST Control Center, now configure NFS: Step Installation Step Action 1 YaST2 Control Center @ linux select Network Services ––> NFS Client NFS client 2 “Add” the new client testnode directory: fill in data for “NFS Server Hostname” ––> client_name “Remote File System” ––> testnode directory on client “Mount Point” ––> /<TN_BASE>/’client_name’ Finish Reboot client. Dok.Nr./Doc. No.: CGS–RIBRE–SUM–0002 Ausgabe/Issue: Überarbtg./Rev.: Seite /Page: 9.2 12 – 61 Datum/Date: Datum/Date: Von/Of: 30.06.2014 – 87 CGS in a Box CGS provides the possibility, that a node can work almost independent from the CGS network and server and using only the central MDB, COMMAND_HISTORY, and NFS server. Proconditions are: • local oracle installation • CGS_HOME subdirectory local is really local • local TRDB installation • local NTP master 9.2.1 9.2.1.1 Linux + Oracle Installation Installation of the Basic Operating System EADS SPACE Transportation - Bremen 2003 Follow exactly the OS installation procedure in chapter 4.1.2 beginning on page 12. 9.2.1.2 Oracle Installation Install oracle as described in chapter 4.4.1 starting with page 20. Take all the same pathnames as on the server. 9.2.1.3 Network configuration Follow exactly the basic network configuration in chapter 4.1.3 beginning on page 13. 9.2.1.4 Start services (inetd) Follow exactly the basic network configuration in chapter 4.1.4 beginning on page 14. 9.2.1.5 Additional administration (NIS) In the still running YaST Control Center: Step Installation Step Action 1 YaST2 Control Center @ linux select Network Services ––> NIS Client NIS client 2 Configuration of NIS client Check ’Use NIS’ Check ’Start Automounter 3 Configuration of NIS client NIS domain: enter <YourNISdomain> Adresses of NIS servers: enter <YourNISserverIPaddress> Finish 4 The configuration of the NIS client will be saved Continue Dok.Nr./Doc. No.: CGS–RIBRE–SUM–0002 Ausgabe/Issue: Überarbtg./Rev.: Seite /Page: 9.2.1.6 62 Datum/Date: Datum/Date: Von/Of: 30.06.2014 – 87 CGS directory structure # mkdir <YourExternCGSBaseDir> EADS SPACE Transportation - Bremen 2003 12 – (not same name as on CGS Server!) Step Installation Step Action 1 YaST2 Control Center @ linux select Network Services ––> NFS Client NFS client 2 “Add”: NFS Server Host Name ––> CGS Server Name Remote File System ––> <YourCGSBaseDir> Mount Point (local) ––> <YourExternCGSBaseDir> Options ––> default OK 3 Finish # mkdir <YourCGSBaseDir> (same name as on CGS Server!) # cd <YourCGSBaseDir> # chown cgsadmin:cgs . # sux – cgsadmin ... > cp –R <YourExternCGSBaseDir>/local <YourCGSBaseDir> > cd <YourCGSBaseDir> > ln –s <YourExternCGSBaseDir>/bin bin > ln –s <YourExternCGSBaseDir>/doc doc > ln –s <YourExternCGSBaseDir>/etc etc > ln –s <YourExternCGSBaseDir>/gsaf gsaf > ln –s <YourExternCGSBaseDir>/patches patches > ln –s <YourExternCGSBaseDir>/tools tools 9.2.1.7 Installation of the CGS Environment 9.2.1.7.1 Testnode # mkdir <TN_BASE> In the still running YaST Control Center: Dok.Nr./Doc. No.: CGS–RIBRE–SUM–0002 Ausgabe/Issue: Überarbtg./Rev.: Seite /Page: 12 – Datum/Date: Datum/Date: 63 Von/Of: 30.06.2014 – 87 Step Installation Step Action 1 YaST2 Control Center @ linux select Network Services ––> NFS Server NFS server 2 select Start Next 3 “Add Directory” ––> “Directory to Export”: testnode directory (<TN_BASE>) to export 4 “Add Host” ––> “Host Wildcard”: @cgshosts “Options”: rw,sync 9.2.1.7.2 Finish Configure host on box EADS SPACE Transportation - Bremen 2003 Log in as cgs admin user on box. > setenv CGS_HOME /<YourCGSBaseDir>/cgs > cd $CGS_HOME/gsaf/config/bin > configurator.tcl Step Installation Step Action 1 CGS Configurator Please select the kind of configuration Configure a box 2 CGS Configurator Please select the source ... Load from file... 3 Load server configuration from XML Select ’environment.xml’ Open 4 Change all parameters which are different from the server configuration 5 Save box configuration to XML File ––> Save As... 6 Save box configuration to XML Leave the default environment.<hostname>.xml Save 7 Create the Dotfiles Create ––> Dotfiles 8 CGS Configurator From the menu select Configure ––> Host Configuration tabs with differences A shell tool window appears, where you have to enter the root password: Please enter password for user root: Password: <YourRootPassword> A new graphical dialogue window appears: Tab Dok.Nr./Doc. No.: CGS–RIBRE–SUM–0002 Ausgabe/Issue: Überarbtg./Rev.: Seite /Page: 12 – 64 Datum/Date: Datum/Date: Von/Of: Step Installation Step Action 1 Leave all selections, then... Install 2 Finished Quit 30.06.2014 – 87 An acknowledge window appears Acknowledge 3 OK To exit the shell window, enter the command exit within it: EADS SPACE Transportation - Bremen 2003 exit Go on within the CGS configurator. Now, if you have a CGS–in–the–box machine, create an own topology table with help of the tab ’Topology’, then with the ’Create ––> System Topology’ menu entry, save the topology table to the file system ($CGS_HOME/local/config/SYSTEM_TOPOLOGY_TABLE). Now the new CGS box workstation must be introduced to the NIS domain. Perform the steps of this section as user root on the NIS master server. First add the new CGS workstation to the hosts database. Then expand the CGS netgroup and distribute the NIS maps to the network: Login: root Password: RootPassword (ON THE SERVER!) # vi Your_NIS_Directory/hosts . ( add line with IP address and hostname of client ) . . Client_IP_Address Client_Name :wq # vi Your_NIS_Directory/netgroup . ( append the line containing the CGS netgroup with ) . . (Client_Name,,) :wq Dok.Nr./Doc. No.: CGS–RIBRE–SUM–0002 Ausgabe/Issue: Überarbtg./Rev.: Seite /Page: 9.2.2 12 – 65 Datum/Date: Datum/Date: Von/Of: 30.06.2014 – 87 Install TRDB Important:Its also posible to delete all users from the menu, select Deinstall ––> The configurator must work on box configuration file environment.<hostname>.xml (not on server configuration file envirnment.xml). Precondition for a CGS in the box is a seperated TRDB also on the server, which has been created in an own oracle instance. Therefore enter in the configurator a different oracle SID and TWO_TASK variable as for the MDB. After that, create an own oracle instance and the TRDB on the CGS–in–the–box machine, as described in chapter 4.5.6 + 4.5.13. 9.2.3 Configure tnsnames.ora EADS SPACE Transportation - Bremen 2003 Copy the entries for MDB and CMDH from $ORACLE_HOME/network/admin/tnsnames.ora on server into $ORACLE_HOME/network/admin/tnsnames.ora on this box. 9.2.4 NTP Configuration CGS uses the host of the database server as NTP server by default. (The NTP server is the server all other clients are synchronized to.) If the server ntp master has to be changed, refer to chapter 5.3.1 on page 41. If the CGS–in–the–box should have an own NTP master, you have to change the following. Copy the file $GSAF_HOME/cgsi/config/cgs_startup.cfg to $CGS_HOME/local/config and adapt it. Edit the line NTP_SERVER = DEFAULT and replace ’DEFAULT’ by the host name of your NTP master host: > cp $GSAF_HOME/cgsi/config/cgs_startup.cfg $CGS_HOME/local/config > cd $CGS_HOME/local/config > vi cgs_startup.cfg ( replace ’DEFAULT’ by the name of the NTP Server : . . . NTP_SERVER = Your_NTP Save and Exit vi ) :wq Dok.Nr./Doc. No.: CGS–RIBRE–SUM–0002 Ausgabe/Issue: Überarbtg./Rev.: Seite /Page: 9.3 12 – Datum/Date: Datum/Date: 66 Von/Of: 30.06.2014 – 87 Deinstall Client To deinstall a client workstation, you have to execute (in principle) the client installation procedure in reverse direction. Your CGS system is down. 9.3.1 Deinstall Client – client part First remove the client to be deinstalled from the system topology table by means of the configurator.tcl. Secondly login at the host to be deinstalled as user root and execute the script deinstall_host. This resets the system files to their original state. Be sure not to be in the Openwindows window manager, because this will also be deleted by this script. EADS SPACE Transportation - Bremen 2003 Login: cgsadmin Password: Password % su Password: RootPassword If you deinstall a conventional CGS client workstation, use the parameter ––client: # $GSAF_HOME/cgsi/util/common/deinstall_host ––client ... Host deinstallation finished # If you deinstall a CGS–in–the–box client workstation, use the parameter ––box: # $GSAF_HOME/cgsi/util/common/deinstall_host ––box ... Host deinstallation finished # You may also remove all the links to the automounted CGS directories which will not be visible anymore after you will have rebooted the machine later. 9.3.2 Deinstall Client – server part At last update the hosts database if the client is removed from the CGS network. Login at the NIS master server as user root and remove IP address and hostname from the file hosts. Remove the host definition from the CGS netgroup. Then export the NIS maps: Login: root Password: RootPassword Dok.Nr./Doc. No.: CGS–RIBRE–SUM–0002 Ausgabe/Issue: Überarbtg./Rev.: Seite /Page: 12 – 67 Datum/Date: Datum/Date: Von/Of: 30.06.2014 – 87 Remove client from host table: # vi Your_NIS_Directory/hosts . ( remove IP address and hostname ) . :wq <Return> Remove client from netgroup: EADS SPACE Transportation - Bremen 2003 # vi Your_NIS_Directory/netgroup <Return> . ( remove the node definition from the line of the . CGS netgroup ) . :wq <Return> Announce the changed NIS maps in NIS domain. # cd /var/yp <Return> # /usr/ccs/bin/make <Return> . # exit <Return> 9.3.3 Client reboot The last step to be independ of CGS environment is to reboot your client: # reboot 9.4 Add CGS User The following procedure creates a user account which is authorized to use each CGS product. Perform the user installation at the NIS master server. At first, create as root the unix user with your preferred creation procedure. Take care that the same group is assigned to the user as to the cgs administration user (e. g. cgs). You can use graphical tools like yast2 or admintool. Assign the following properties to the user: Login shell: /bin/csh Default group: cgs Dok.Nr./Doc. No.: CGS–RIBRE–SUM–0002 Ausgabe/Issue: Überarbtg./Rev.: Seite /Page: 12 – 68 Datum/Date: Datum/Date: Von/Of: 30.06.2014 – 87 Now create the new unix user as a CGS user. Therefore as cgsadmin use the configurator in $GSAF_HOME/config/bin: # exit % $GSAF_HOME/config/bin/configurator.tcl From the menu, select Install ––> Install User: 9 From the menu select ’Install ––> Install User’ Install ––> Install User EADS SPACE Transportation - Bremen 2003 A shell window appears, where you have to enter some information: Enter the password for userroot: Password: <YourRootPassword> A new graphical dialogue window appears: Step Installation Step Action 1 Install CGS User Enter values for: Install Finished Quit Oracle System Password User Name User Oracle Password (twice) (Enter other values as the user should get privileges) 2 You may leave the configurator with the menu choice File ––> Exit. 9.5 Deinstall CGS User The complete deinstallation of a CGS user requires two deinstallation steps: • CGS environment • UNIX environment Start the configurator if not already done (see also chapter 4.5.3.3): > $CGS_HOME/gsaf/config/bin/configurator.tcl &<Return> From the configurator, from the menu, select Deinstall ––> User: 10 From the menu select ’Deinstall ––> User’ Deinstall ––> User Dok.Nr./Doc. No.: CGS–RIBRE–SUM–0002 Ausgabe/Issue: Überarbtg./Rev.: Seite /Page: 12 – 69 Datum/Date: Datum/Date: Von/Of: 30.06.2014 – 87 A shell window appears, where you have to enter some information: ====================== DEINSTALL USER START, use cgsadmin as CGS Administrator ====================== Name of user to deinstall: <YourUserName> Deinstall MDB user (y/n) [y]> y Remove Oracle user (y/n) [y]> y Remove CGS directory structure for user which contains TEV result files and others (y/n) [y]> y EADS SPACE Transportation - Bremen 2003 Remove user privileges (y/n) [y]> y continue ? (y/n) [y]> y Please enter <YourUserName>’s Password: <YourUserNamePassword> Deinstall MDB user: Delete privilege <Number> synonyms has been dropped Revoke R_<MDB owner> from OPS$<YourUserName> Revoke R_<role of Temp–MDB owner> from OPS$<YourUserName> Remove Oracle user: drop user OPS$<YourUserName> 11 Acknowledge OK To exit the shell window, enter the command exit within it: exit Important:Its also posible to delete all users from the menu, select Deinstall ––> Alll Users The next step deinstalls the user as UNIX user. Make sure that no important data is located the home directory of the user. Please start the YaST2 tool as user root: # yast2 Dok.Nr./Doc. No.: CGS–RIBRE–SUM–0002 Ausgabe/Issue: Überarbtg./Rev.: Seite /Page: 12 – 70 Datum/Date: Datum/Date: Von/Of: 30.06.2014 – 87 EADS SPACE Transportation - Bremen 2003 The YaST2 window appears. Follow the procedure: Step Installation Step Action 1 YaST2 Control Center @ linux Select fifth tab: Security and Users Security and Users 2 YaST2 Control Center @ linux click on ’Edit and create users’ Edit and create users 3 You have installed an NIS master server. Select ’NIS (/var/etc directory)’ OK 4 User and group administration leave ’User administration’ Select the user to be deleted and click on delete button Delete 5 Delete the user <CGS_User> Check ’delete home directory...’ click on OK button OK 6 User and group administrationl Finish 7 The new user and group settings ... OK 8 YaST2 Control Center @ linux Close 9.6 Modify System Topology Table For this task you may use the configurator.tcl in $GSAF_HOME/config/bin. 9.7 Automatic MDB Installation Besides the manual installation of the MDB software and database structure (as described in chapter 4.5.11), the initialization of the MDB and the installation of the CGS Administrator as a MDB User it is possible to perform these steps automatically as described below. Important:Its also posible to delete all users from the menu, select Deinstall ––> This automatic installation also installs all MDB and Oracle users in case that an automatic deinstallation has been performed as described in chapter 10.2.2. To do this the file named MDB_users.lst which is located in the home directory of the CGS administrator after the automatic deinstallation, will be used. DO NOT DELETE THIS FILE. You also have to consider that only default Oracle user rights are restored. So you have to assign other Oracle privileges manually! To install the MDB at first edit two files in $GSAF_HOME/mda/config/mdb/install/admin_scripts install_mdb.input and initialize_mdb.input, and two files in $GSAF_HOME/mda/config/oracle_env install_user1.input and install_user2.input. Include in the files in the following sequence: Description for install_mdb.input: Example y y Dok.Nr./Doc. No.: CGS–RIBRE–SUM–0002 Ausgabe/Issue: Überarbtg./Rev.: EADS SPACE Transportation - Bremen 2003 Seite /Page: 12 – 71 Datum/Date: Datum/Date: 30.06.2014 – Von/Of: 87 <full_dadi_export_path> <INSTANCE_NAME> <INSTANCE_SEQUENCE_NO> <system_user_password> /gsaf/mda/config/mdb/install/dadi_export MASTER01 0 manager Description for initialize_mdb.input: Example y <logfile> <MDB_OWNER> <MDB_OWNER_PW> y initialize_mdb.log MASTER01_ADM MASTER01_ADM Description for install_user1.input: Example <admin_user_name> <admin_user_name_pw> <Oracle_System_pw> <MDB_PRIVILEGE> <MDB_TABLESPACE> <TEMP_TABLESPACE> cgsadmin cgsadmin manager 2 TS_MPS TEMP Description for install_user2.input: Example y <logfile> <MDB_OWNER> <MDB_OWNER_PW> <MDB_TEMP_OWNER> <MDB_TEMP_OWNER_PW> ops$<admin_user_name> <admin_user_password> <MDB_PRIVILEGE> y install_cgsadmin.log MASTER01_ADM MASTER01_ADM MASTER01_TMP MASTER01_TMP ops$cgsadmin cgsadmin CONFIGURATION_MANAGER Some example files are included in the delivery. You may use them and adapt them to your needs. Note that the passwords are included in readable form. If you do not want anybody to know the passwords, be careful and delete the files after the installations. Moreover, old log files in the home directory of the installing userare renamed. For a collection of instance names see the subdirectory $CGS_HOME/ etc/mda/mdb_installations. The instance names are the same as all the subdirectories herein with a .<number> at the end. After finishing the edit of the files, call the script install_complete_mdb. This script will use the just edited files as input files. You will see a lot of output, which also will be written into the log files. After the installation check the log files for error messages. Dok.Nr./Doc. No.: CGS–RIBRE–SUM–0002 Ausgabe/Issue: Überarbtg./Rev.: Seite /Page: 12 – 72 Datum/Date: Datum/Date: Von/Of: 30.06.2014 – 87 EADS SPACE Transportation - Bremen 2003 > cd $GSAF_HOME/mda/config/mdb/install/admin_scripts <Return> > vi install_mdb.input <Return> perform your edits :wq<Return> > vi initialize_mdb.input <Return> perform your edits :wq<Return> > cd $GSAF_HOME/mda/config/oracle_env <Return> > vi install_user1.input <Return> perform your edits :wq<Return> > vi install_user2.input <Return> perform your edits :wq<Return> > cd $GSAF_HOME/mda/config/mdb/install/admin_scripts <Return> > install_complete_mdb <Return> ... (a lot of installation messages) ... The MDB and the temporary MDB structures are installed. The next step is the filling of the structures with data by ’initialize_mdb’. ... (a lot of initialization messages) ... ... The MDB is initialized. The work with the MDB may now be started if the users are already installed. Otherwise users may be installed with the ’install_user’ script. ... . (some messages) ... This procedure installs a new MDB user. ... ... . (a lot of installation messages) ... The user is successfully installed. Dok.Nr./Doc. No.: CGS–RIBRE–SUM–0002 Ausgabe/Issue: Überarbtg./Rev.: Seite /Page: 12 – 73 Datum/Date: Datum/Date: Von/Of: 30.06.2014 – 87 Maybe some error message appear at this place because some users should be installed but the user list is not present. These messages can be ignored. EADS SPACE Transportation - Bremen 2003 Note: Several messages will be displayed indicating: stty: : Inappropriate ioctl for device These messages can be ignored! Dok.Nr./Doc. No.: CGS–RIBRE–SUM–0002 Ausgabe/Issue: Überarbtg./Rev.: Seite /Page: 12 – 74 Datum/Date: Datum/Date: Von/Of: 30.06.2014 – 87 10 DEINSTALLATION PROCEDURE This chapter describes the deinstallation of CGS. For the full deinstallation of CGS, you have to deinstall the CGS users, the MDB and the entire CGS software. At last you have to reset your UNIX system files. Login as the CGS Administrator on the CGS server: EADS SPACE Transportation - Bremen 2003 Login: Your_CGS_Admin <Return> Password: YourPassword <Return> . . (open a shell tool) . First select the menu item ’CGS Shutdown’ within the ’CGS Task Selector’ to terminate the running CGS processes. 10.1 Deinstall Users 10.1.1 Deinstall MDB Users Note: Instead of performing the next step manually, you can also perform an automatic deinstallation as descibed in chapter 10.2.2 You have to remove all MDB users. Execute the script deinstall_all_users: > cd $GSAF_HOME/mda/config/oracle_env <Return> > deinstall_all_users <Return> ___________________________________________________________________________ This procedure de–installs all users of a specific MDB. ___________________________________________________________________________ ... ... (some messages and user input for logging file here) ... Enter OWNER NAME of the Oracle MDB account [MPS] : MDB_Owner <Return> Enter OWNER PASSWORD of the Oracle MDB account [MPS] : Password <Return> Enter OWNER NAME of the temporary Oracle MDB account [MPS_EXPORT] : Temp_MDB_Owner <Return> Enter OWNER PASSWORD of the temporary Oracle MDB account [MPS_EXPORT] : Password <Return> Enter Oracle SYSTEM Password: OracleSystemPassword <Return> Dok.Nr./Doc. No.: CGS–RIBRE–SUM–0002 Ausgabe/Issue: Überarbtg./Rev.: Seite /Page: . . 12 – 75 Datum/Date: Datum/Date: Von/Of: 30.06.2014 – 87 (lots of messages) 10.2 Deinstall Databases 10.2.1 Deinstall MDB Note: Instead of performing the next step manually, you can also perform an automatic deinstallation as descibed in chapter 10.2.2 EADS SPACE Transportation - Bremen 2003 To deinstall MDB, you have to execute deinstall_mdb: > cd $GSAF_HOME/mda/config/mdb/install/admin_scripts <Return> > deinstall_mdb <Return> .... (some messages and user input for logging file here) ... ... Enter OWNER NAME of the Oracle MDB account [MPS] : MDB_Owner <Return> Enter OWNER PASSWORD of the Oracle MDB account [MPS] : Password <Return> Enter OWNER NAME of the temporary Oracle MDB account [MPS_EXPORT]: Temp_MDB_Owner <Return> Enter OWNER PASSWORD of the temporary Oracle MDB account [MPS_EXPORT] : Password <Return> Enter system password: <YourSystemPassword> <Return> Start de–installation. . . (deinstallation messages, ca. 2 minutes ) . The MDB and the temporary MDB are successfully de–installed. 10.2.2 Automatic Deinstallation of all MDB Users and the MDB To deinstall all MDB users and the MDB itself at first edit the files $GSAF_HOME/mda/config/ oracle_env/list_mdb_users.input, $GSAF_HOME/mda/config/oracle_env/deinstall_all_users.input and $GSAF_HOME/mda/config/mdb/install/admin_scripts/deinstall_mdb.input. Note that the log files you include in the files must not exist in the home directory of the executing user. Include in the files in the following sequence: Description for list_mdb_users.input: Example <MDB_OWNER> MPS Dok.Nr./Doc. No.: CGS–RIBRE–SUM–0002 Ausgabe/Issue: Überarbtg./Rev.: EADS SPACE Transportation - Bremen 2003 Seite /Page: 12 – 76 <MDB_OWNER_PW> MPS Description for deinstall_all_users.input: Example y <logfile> <MDB_OWNER> <MDB_OWNER_PW> <MDB_TEMP_OWNER> <MDB_TEMP_OWNER_PW> <Oracle_System_pw> y deinstall_all_users.log MPS MPS MPS_EXPORT MPS_EXPORT manager Description for deinstall_mdb.input: Example y <logfile> <MDB_OWNER> <MDB_OWNER_PW> <MDB_TEMP_OWNER> <MDB_TEMP_OWNER_PW> <Oracle_System_pw> y deinstall_mdb.log MPS MPS MPS_EXPORT MPS_EXPORT manager Datum/Date: Datum/Date: Von/Of: 30.06.2014 – 87 Important:If your MDB contains delivered data types (MDB SW delivery) this data types must be saved too. Follow the MDB SW Installation Manual delivered with this data types, section ”Administration Software”. Copy the created files to the save directory. Important:During the deinstallation a file named MDB_users.lst which is located in the home directory of the CGS administrator after the automatic deinstallation, will be used. DO NOT DELETE THIS FILE. Note: Several messages will be displayed indicating: stty: : Inappropriate ioctl for device Ignore messages These messages can be ignored! hostname:Your_CGS_Admin 3: cd $GSAF_HOME/mda/config/mdb/install/ admin_scripts<Return> hostname:Your_CGS_Admin 4: deinstall_all_auto<Return> ___________________________________________________________________________ This procedure de–installs all users of a specific MDB. ___________________________________________________________________________ ... (some messages and user input for logging file here) ... ... ... . (lots of messages) ... Start de–installation. Dok.Nr./Doc. No.: CGS–RIBRE–SUM–0002 Ausgabe/Issue: Überarbtg./Rev.: Seite /Page: 12 – 77 Datum/Date: Datum/Date: Von/Of: 30.06.2014 – 87 ... ... ( a lot of deinstallation messages, ca. 20 minutes ) ... The MDB and the temporary MDB are de–installed. Check Logfile (...) for possible errors 10.2.3 Deinstall CGS Users You may deinstall each installed CGS user (except Your_CGS_Admin). For each user (except Your_CGS_Admin) perform the deinstallation as shown in section 9.5 (on page 68). 10.2.4 Deinstall TRDB EADS SPACE Transportation - Bremen 2003 Now you have to deinstall the TRDB database: Start the configurator if not already done (see also chapter 4.5.3.3): > $CGS_HOME/gsaf/config/bin/configurator.tcl &<Return> From the configurator, from the menu, select Deinstall ––> Test Result Database: 9 From the menu select ’Deinstall ––> Test Result Database’ Deinstall ––> Test Result Database A shell window appears, where you have to enter some information: Do you agree to proceed (YES/NO) ? YES <Return> . . (Information about the deinstallation options) . You can either execute Step 1, Step 2 or all. Please enter (1 / 2 / ALL / EXIT ) : . . (lots of messages) . TRDB deinstallation complete. 10 ALL <Return> Acknowledge To exit the shell window, enter the command exit within it: exit OK Dok.Nr./Doc. No.: CGS–RIBRE–SUM–0002 Ausgabe/Issue: Überarbtg./Rev.: Seite /Page: 12 – 78 Datum/Date: Datum/Date: Von/Of: 30.06.2014 – 87 10.2.5 Deinstall Command History Now you have to deinstall the Command History database: Start the configurator if not already done (see also chapter 4.5.3.3): > $CGS_HOME/gsaf/config/bin/configurator.tcl &<Return> From the configurator, from the menu, select Deinstall ––> Command History: From the menu select ’Deinstall ––> Command History’ 11 Deinstall ––> Command History EADS SPACE Transportation - Bremen 2003 A shell window appears, where you have to enter some information: Do you agree to proceed (YES/NO) ? YES <Return> . (lots of messages) . . deinstallation complete. 12 Acknowledge OK To exit the shell window, enter the command exit within it: exit 10.3 Deinstallation of CGS Clients Now all client workstations could be deinstalled as described in chapter 9.3. Note: In case of a complete deinstallation you do not need to update the SYSTEM_TOPOLOGY_TABLE in the step above. Dok.Nr./Doc. No.: CGS–RIBRE–SUM–0002 Ausgabe/Issue: Überarbtg./Rev.: Seite /Page: A DEFINITIONS EADS SPACE Transportation - Bremen 2003 Not applicable 12 – 79 Datum/Date: Datum/Date: Von/Of: 30.06.2014 – 87 Dok.Nr./Doc. No.: CGS–RIBRE–SUM–0002 Ausgabe/Issue: Überarbtg./Rev.: Seite /Page: 12 – 80 Datum/Date: Datum/Date: 30.06.2014 – 87 Von/Of: B CGS INSTALLATION WORK SHEET Please fill in here necessary data for CGS installation: *) do NOT write your passwords down here B.1 Network configuration B.1.1 Subnet Mask (255.255.255.0) : EADS SPACE Transportation - Bremen 2003 ( Specify how much of the address space is reserved for subdividing the network into sub–networks. ) B.1.2 Network Address . . . . . . . . . : ( All CGS nodes should be located in the same LAN segment, that means they have the same network address – e.g. 149.243.228.x ) B.1.3 Default Router IP Address Host Name : : ( The router connects the CGS LAN segment to other LAN segments. The default router is used by default to send IP packets to other network segments. CGS does not need a default router if all nodes used by CGS are located in the local LAN segment. ) Dok.Nr./Doc. No.: CGS–RIBRE–SUM–0002 Ausgabe/Issue: Überarbtg./Rev.: Seite /Page: 12 – 81 B.1.4 Server This table contains an overview of services which are recommended or needed by CGS. All services can be executed by one server or can be distributed over different servers: EADS SPACE Transportation - Bremen 2003 Service Host Name IP Address Remark Mail Server . . . Print Server . . . . . . . . . Boot Server . . . (boot di (b diskless kl clients li front end equipment) . . . NIS Master . . . Oracle Server . . . File Servers . . . (CGS, User (CGS U didi rectories, rector es, ... ) . . . . . . Datum/Date: Datum/Date: Von/Of: 30.06.2014 – 87 Dok.Nr./Doc. No.: CGS–RIBRE–SUM–0002 Ausgabe/Issue: Überarbtg./Rev.: Seite /Page: 12 – 82 Datum/Date: Datum/Date: Von/Of: B.1.5 Test Nodes, Simulation Nodes Host Name IP Address CGS Services EADS SPACE Transportation - Bremen 2003 (TES, SAS, CSS, ...) . . . . . . . . . . . . . . . . . . . . . . . . . . . 30.06.2014 – 87 Dok.Nr./Doc. No.: CGS–RIBRE–SUM–0002 Ausgabe/Issue: Überarbtg./Rev.: Seite /Page: 12 – 83 Datum/Date: Datum/Date: 30.06.2014 – 87 Von/Of: B.1.6 Client Workstations EADS SPACE Transportation - Bremen 2003 Host Name IP Address CGS Services (HCI, Adapter address TSCV, TEV, SAS, TES, ...) (if diskless client) . . . . . . . . . . . . . . . . . . . . . . . . . . . . . . . . . . . . . . . . . . . . . . . . . . . . . . . . . . . . . . . . . . . . . . . . Dok.Nr./Doc. No.: CGS–RIBRE–SUM–0002 Ausgabe/Issue: Überarbtg./Rev.: Seite /Page: 12 – 84 Von/Of: B.2 NIS Configuration B.2.1 Domainname : B.2.2 Location of NIS master files User data : (Your_NIS_PW_Directory) Other data EADS SPACE Transportation - Bremen 2003 (Your_NIS_Directory) : (For security reasons the ’/etc’ files should not be used as NIS master files. The actual location is given by the commands ’grep ^PWDIR /var/yp/Makefile’ for the user database and ’grep ^DIR /var/yp/Makefile’ for all other NIS data files. The recommended location is ’/var/etc’ for all NIS files. – see chapter 4.1.5 on page 14 for more information) B.3 Oracle B.3.1 Oracle Owner Name (oracle) Password* Home directory : : : B.3.2 Oracle Group Group (dba) : B.3.3 Installation Directory Mount Point : ( The directory used for the Oracle installation. Oracle will append this path with it’s own directory structure – e.g. /tools ) B.3.4 Home Directory ORACLE_HOME = ( The directory containing the Oracle S/W, formed by the Oracle Mount Point extend by ’app/oracle/product/7.3.2’ – e.g. /tools/app/oracle/product/7.3.2 ) B.3.5 Instance Name ORACLE_SID = (This name is used to identify your oracle instance – e.g. ’cgs’ ) B.3.6 Location of Oracle Documentation Datum/Date: Datum/Date: : 30.06.2014 – 87 Dok.Nr./Doc. No.: CGS–RIBRE–SUM–0002 Ausgabe/Issue: Überarbtg./Rev.: Seite /Page: 12 – 85 Von/Of: B.3.7 Control File Mount Points (OracleTablespaceLocation) First : Second : Third : ( Location of Oracle control files. For higher security this files should be distributed over different hard disks – e.g. /tools/data/u01, /tools/data/u02, /tools/data/u03 ) EADS SPACE Transportation - Bremen 2003 B.3.8 Connect Variable TWO_TASK B.3.9 Passwords of Oracle administration users Admin. Server * SYSTEM * SYS * TNS Listener * Datum/Date: Datum/Date: = : : : : 30.06.2014 – 87 Dok.Nr./Doc. No.: CGS–RIBRE–SUM–0002 Ausgabe/Issue: Überarbtg./Rev.: Seite /Page: 12 – 86 Datum/Date: Datum/Date: Von/Of: B.4 CGS Configuration B.4.1 CGS Netgroup Netgroup (cgshosts) : ( It is recommended to define a netgroup, which contains all CGS hosts. This netgroup allows a simple setup of remote access rights within the CGS system – use a name in lower case like e.g.: cgs_hosts ) B.4.2 CGS Directory: CGS_HOME = ( directory which shall contain your CGS software, e.g. /gsaf ) EADS SPACE Transportation - Bremen 2003 B.4.3 User Directories USER_HOME : ( directory which shall contain the User Home Directories, e.g. /users ) B.4.4 CGS Administrator Name (cgsadmin) Password * Home Directory : : : TN_Base (/testnode) : ( The user who is the owner of the CGS installation. ) B.4.5 Archiving Directory: ( This directory contains the local archiving directory of each Test Node. On the CGS server this directory contains the mount points to all Test Node archiving directories – default: /testnode ) B.4.6 CGS Tablespaces: Location : ( The tablespace files should be located at one or more seperated filesystems/hard disk, you should use the location of the Oracle control files, see B.3.7. The tablespace files must be visible only on the Oracle Server ) B.4.7 Final Archive Devices First Second ( CGS uses one or two MO drives for final archiving. Specify the device/filesystems of the MO drives here ) :/dev/dsk/ :/dev/dsk/ 30.06.2014 – 87 Dok.Nr./Doc. No.: CGS–RIBRE–SUM–0002 Ausgabe/Issue: Überarbtg./Rev.: Seite /Page: 12 – 87 Von/Of: B.5 Comercial Tools B.5.1 PDF–Documentation Viewer : ( CGS contains the online manuals also in PDF format. Please enter here the location were AcrobatReader shall be installed – e.g. ’$GSAF_HOME/acroread’ ) B.6 Compiler B.6.1 Ada (GNAT): ADA_PATH ( This compiler is needed to compile the CGS–API for Linux. EADS SPACE Transportation - Bremen 2003 *) do NOT write your passwords down here ) Datum/Date: Datum/Date: = 30.06.2014 – 87