1
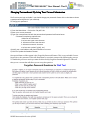
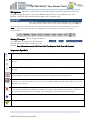
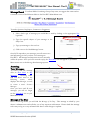
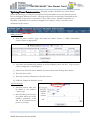
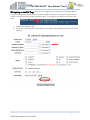
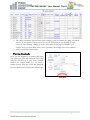
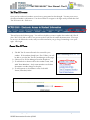
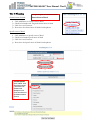
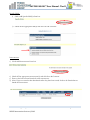
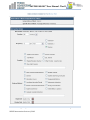
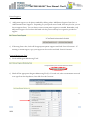
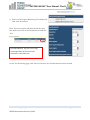
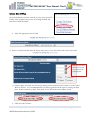
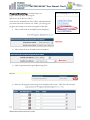
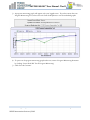
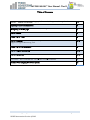
WCPSS EASi RtI™ User Manual- Tier II
Table of Contents
Easi RtI™ General Information: Logging In, Passwords, Navigation, Message Board
2-5
Updating Parent Communication
6
Navigating to the RtI page: Student Search, Viewing Caseloads
7
Tier II Process:
8
Create Tier II Team
9
Tier II Planning: General Area of Need, Specific Area of Need, Skills, Interventions, Parent
Supports, Progress Monitoring Tool
10-14
Create Tier II Plan Document
15
Tier II Progress Monitoring
16-17
Tier II Plan Review
18-20
Documents -RtI Documents List- Saving and Printing Documents
21
Teacher Notes-Logging Out of the System
22
Public Consulting Group, Inc. –WCPSS EASi RtI™ User Manual
WCPSS Intervention Services 6/2013
Page 1
WCPSS EASi RtI™ User Manual- Tier II
EASi RtI™ General Information:
The Name:
Electronic Access to Student Information (EASi).
Security:
All EASi RtI™ information is confidential. The server uses Secure Socket Layer (SSL)
technology to encrypt all information as it flows across the Internet. This is the same technology
that online merchants and banks use to protect your credit card number and other sensitive
information.
Please adhere to the following procedures to ensure security:
Do not give your account name or password to anyone.
Do not write your password down where it can be seen by others.
Do not save documents or reports to an unsecured computer.
Always log off of EASi RtI™ and close your browser when you are finished.
Note: Easy504™ will automatically log you out of the system after a period of inactivity.
Logging into the System:
1) Open up your web browser and
enter in the WCPSS EasyIEP™
login URL:
https//go8.pcgeducation.com/ncwcpss.
a. Or: access the site by going to the WCPSS Intranet page, click on Business
Applications and then on the EASi link.
b. Or: on the WCPSS Intranet page, go to Staff Links and click on the EASi link.
2) Enter your username - (First Name <space> Last Name), for example: “Susan Smith”-Exactly
how your name is in Oracle.
3) Enter your password. For users who have never logged into EASi, the initial password is the
user’s employee ID number. This should be changed the first time the user logs in.
4) Click the “Login” button.
Note: Your username is not case sensitive but your password is.
Note: EASi RtI™ is a web-based system. You can gain access using your name and password through any
Internet service provider on any computer with Internet access.
Public Consulting Group, Inc. –WCPSS EASi RtI™ User Manual
WCPSS Intervention Services 6/2013
Page 2
WCPSS EASi RtI™ User Manual- Tier II
Changing Passwords and Updating Your Personal Information
The first time you login to EasiRtI™ you should change your password. Please click on the How to choose
a good password hyperlink if you need help.
To change your password:
1) From the Main Menu – Click on the “My Info” tab.
2) Enter your current password.
3) Type your new password in both the password and password verification boxes.
a. Password complexity requirements:
i. Minimum of 8 characters
ii. At least one upper case character
iii. At least one lower case character
iv. At least one numeric character
v. At least one symbol (!,@,#,$, etc)
4) Verify your e-mail address and phone numbers are correct.
5) Click the ‘Update the Database’ button.
One special feature of the system is the Forgot My Password Feature. This is very valuable if a user
forgets his or her password. This will allow them to reset their password by following the process.
To enable this process to work you must click the Set My Forgotten Password Question. This will
take you to a screen that will allow you to set up the question.
Public Consulting Group, Inc. –WCPSS EASi RtI™ User Manual
WCPSS Intervention Services 6/2013
Page 3
WCPSS EASi RtI™ User Manual- Tier II
Navigation:
Easi RtI™ is menu bar driven with tabs along the top of the screen, which are used to
navigate through the system. Clicking the different tabs moves the user to different parts of the
database. End users will primarily use the Students tab to complete work.
Note: The appearance of the menu bar and some of the buttons in Easi RtI™ can vary depending on the type of
computer you use as well as which browser. Regardless, the site still functions the same way. Another
common layout is:
Saving Changes:
After a change is made it is
very important to click the ‘Save and Continue’
button at the bottom of each screen to save the
changes. Any information entered will be lost if the User forgets to click ‘Save and Continue’.
Important Symbols:
A help Icon. You can click on this to get more information about a particular field.
Radial buttons. When you see this there are often several answers linked together in such a way that only one can be
selected.
A check box. This will allow you to select multiple answers for one question or occasionally indicate the completion
of a task.
Spell Check Icon. When filling out a text field, this icon will be placed in the bottom right corner. Once you have
finished filling out the field, you can click this button and it will check the field for spelling errors.
Calendar button. It is most frequently placed next to date fields. Clicking this button will open a calendar. When
placed next to a date field, the User can select a date in the calendar, and that date will automatically fill in the date
field in the proper format.
Incomplete/Noncompliant ‘X’. If a page has not been filled out to the proper standards, this red ‘X’ will appear next
to the page title that needs to be addressed. In addition, for a page that is incomplete/noncompliant will show an
error message explaining the issue it is finding. This message can be found in red at the top of the page.
Indicates a required field that must be filled out.
Indicates section is completed according to standard.
Public Consulting Group, Inc. –WCPSS EASi RtI™ User Manual
WCPSS Intervention Services 6/2013
Page 4
WCPSS EASi RtI™ User Manual- Tier II
Message Board:
To inform Public Consulting Group of any issue, we suggest that users send us
a message via one of the following links on the EasyIEP™ Main Menu page:
To send a Question, Bug Report, Comment or Suggestion:
1) Select which type of message you would like to send by clicking on the appropriate blue
hyperlink.
2) Type the specific subject of your message in the
Subject box.
3) Type your message to the text box.
4) Click once on the ‘Send Message’ button.
Once PCG responds to your message, you will receive an email informing you that you have a new message in
EasyIEP™. All messages and responses are sent internally
within the system. Once you have received a reply, the ‘New Mail’ icon will appear on your Main
Menu screen next to the Message Board message options.
Accessing
Your Messages:
To access your new message
click on ‘New Mail’ or ‘My
Messages’.
Choosing either
link will direct users to the
following
screen,
which
displays New Messages, as well
as stores a user’s Previous
Messages.
Once you have read all new
messages, you will no longer
see the ‘New Mail’ icon on your
Main Menu screen.
Message of the Day:
Below the Message Board you will find the Message of the Day. This message is edited by your
district’s administrators and will alert you of any important information. Please check this message
each time you log in to stay informed with district wide changes or updates.
Public Consulting Group, Inc. –WCPSS EASi RtI™ User Manual
WCPSS Intervention Services 6/2013
Page 5
WCPSS EASi RtI™ User Manual- Tier II
Updating Parent Communication:
This page is used to document any contact (letters,
phone calls, meetings, etc.) between you and the Parents/Guardians or any non-parental contacts
such as the Regular Education Teacher. This page is also used to record contacts initiated from the
parent/guardian to the teachers or the district. If you add a contact, EasyIEP™ will link it to a
document. Individuals do not need to be assigned to the student’s team/s to be able to enter
information in this section.
Adding Contacts:
1) From the main ‘Contacts’ page, click either the ‘Add a Contact’ or ‘Add a Non-Parent
Contact’ button, as appropriate.
2) Your name will automatically populate in the Person Making Contact text box. Type over your
name to change this to another person.
3) Select Person Contacted, Contact Method, and Contact Result from the drop-down menus.
4) Enter the Contact Date.
5) Enter any necessary information in the Notes section.
6) Click the ‘Update the Database’ button.
Tips for this page:
1) Potential contacts must first
be added to the student’s
“Team” page.
2) All information entered into
the system will be part of the
student’s permanent record
and can be requested by the
parent or attorneys.
Public Consulting Group, Inc. –WCPSS EASi RtI™ User Manual
WCPSS Intervention Services 6/2013
Page 6
WCPSS EASi RtI™ User Manual- Tier II
Navigating to the RtI Page: Once you have logged in, you will be sent to the Main Menu
Screen. Remember that the EasyIEP™ system is Student focused, so every data entry process you
will do on the site will always start with the student. To navigate to the RtI Process, follow these
steps:
1) Click on the ‘Students’ Tab
2) Fill out the search criteria for the student you are going to be working with, then click ‘View
Students’.
Public Consulting Group, Inc. –WCPSS EASi RtI™ User Manual
WCPSS Intervention Services 6/2013
Page 7
WCPSS EASi RtI™ User Manual- Tier II
3) The “Select a Student” page will then open containing a list of students who meet your search
criteria. If your search criterion does not fit any of the students in our database you will
receive an error message. Simply go back to the student search page and broaden your
criteria. Once you are looking at the “Select a Student” list, simply click on the student’s
name to access their information.
Viewing Caseloads:
Once you are assigned to a student’s RtI team
you will have a ‘View My Caseload’ button that
will take you directly to your entire caseload.
Within two simple clicks you can enter a
student record. Click the ‘View My Caseload’
button at the bottom of the Student Search page.
Public Consulting Group, Inc. –WCPSS EASi RtI™ User Manual
WCPSS Intervention Services 6/2013
Page 8
WCPSS EASi RtI™ User Manual- Tier II
RtI Tier II Process:
Once you have selected a student, notice that top navigation bar has changed. You may now access
the selected student’s information. Use the scroll bar to navigate to the right until you find their ‘RtI
Tier II Process’ tab. Click on it.
This will open the following page. You will now be able to create or update the student’s RtI Tier II
plan. We at PCG like to refer to our process as the TurboTax of student documentation. The steps
are set up to be followed in order, and you will be notified as you go along if something is not quite
right. Let’s begin.
Create Tier II Team
1) The RtI Tier II team will need to be created for your
student. If the student already has a Tier II Plan, you will
be able to view his/her Tier II Case Manager on this page.
2) Choose a Tier II Case Manager from the dropdown.
3) To add school or district staff to the student’s team, click
‘Add Team Members’. Only team members can finalize
documents or make changes to the plan.
4) To add a parent to the student’s team, click ‘Add
Parent/Guardian/Other’
Public Consulting Group, Inc. –WCPSS EASi RtI™ User Manual
WCPSS Intervention Services 6/2013
Page 9
WCPSS EASi RtI™ User Manual- Tier II
Tier II Planning
General Areas of Need:
1)
2)
3)
4)
A separate plan is created for each
General Area of Need.
Click Add/Remove General Area of Need
Check boxes beside each Targeted General Area of Need
Click ‘Save and Continue’
Now select the General Area of Need from dropdown
Specific Area of Need:
1)
2)
3)
4)
Click Add/Remove Specific Area of Need
Check boxes beside Specific Area of Need
Click ‘Save and Continue’
Now select the Specific Area of Need from dropdown
Prioritize Specific
Areas of Need. Each
checked area needs
a Tier II Plan. For
students with
multiple areas of
need, select the most
foundational skill to
work on.
Public Consulting Group, Inc. –WCPSS EASi RtI™ User Manual
WCPSS Intervention Services 6/2013
Page 10
WCPSS EASi RtI™ User Manual- Tier II
Specific Skills:
1) Click ‘Add Specific Skill(s) from List.
2) Check off the appropriate skill(s) and click ‘Save & Continue’
Interventions:
1) Click ‘Add Interventions from List’
2) Check off the appropriate intervention(s) and click ‘Save & Continue’
3) Enter in the Intervention Details for each intervention.
4) Note: If you ever need to edit these details after they have been saved, click on the Details button
beside the Intervention.
Public Consulting Group, Inc. –WCPSS EASi RtI™ User Manual
WCPSS Intervention Services 6/2013
Page 11
WCPSS EASi RtI™ User Manual- Tier II
Public Consulting Group, Inc. –WCPSS EASi RtI™ User Manual
WCPSS Intervention Services 6/2013
Page 12
WCPSS EASi RtI™ User Manual- Tier II
Parent Supports:
1)
Add parent supports to the plan as needed by clicking either ‘Add Parent Supports from List’ or
‘Add Custom Parent Supports’. Depending on your specific area of need, there may be a list you can
choose supports from. You can always create custom parent supports as needed. Remember, only
add parent supports if it has been discussed with the parent and they have agreed to provide the
support.
2) If choosing from a list, check off the appropriate parent supports and click ‘Save & Continue’. If
entering a custom support, type your support in the text box and click ‘Save & Continue’
Progress Monitoring Tool
1) Click ‘Add Progress Monitoring Tools’
2) Check off the appropriate Progress Monitoring Tool(s). For each tool, select an assessment area and
score type from the dropdowns, then click ‘Save & Continue’.
12
Public Consulting Group, Inc. –WCPSS EASi RtI™ User Manual
WCPSS Intervention Services 6/2013
Page 13
WCPSS EASi RtI™ User Manual- Tier II
3) Enter in your Progress Monitoring Tool details and
click ‘Save & Continue’
Note: If you ever need to edit these details after they
have been saved, click on the Details button beside the
Tool.
Recommendation: Set your Tier II long
term target dates for the end of the
semester or end of the year.
On the Tier II Planning page, click ‘Save & Continue’ once all information has been entered.
Public Consulting Group, Inc. –WCPSS EASi RtI™ User Manual
WCPSS Intervention Services 6/2013
Page 14
WCPSS EASi RtI™ User Manual- Tier II
Create Tier II Plan
Once all the details have been entered, you can create your Tier
II Plan. This completes the process of creating the draft and
final Tier II Plan document.
1) Select the appropriate area of need.
2) Enter in a plan begin date, date the parent will receive a copy of the plan, and a plan review date.
Make sure the review
date is no more than
6-8 weeks from the
plan begin date.
3) Create a draft and final Tier II Plan by clicking ‘Create Draft RtI Tier II Plan’ or ‘Create Final
RtI Tier II Plan’. It is recommended that you always generate a draft prior to creating the final
plan. Drafts remain for 30 days. Final plans are not deleted from the student record.
1) Click ‘Save & Continue’
Public Consulting Group, Inc. –WCPSS EASi RtI™ User Manual
WCPSS Intervention Services 6/2013
Page 15
WCPSS EASi RtI™ User Manual- Tier II
Progress Monitoring:
(Completed by person
progress monitoring before Assessing the
Effectiveness of the RtI Tier II Plan)
Once you have finalized your Tier II Plan, and implemented
your intervention for at least 6 to 8 weeks, you can log your
progress monitoring scores and create graphs of the data.
1) Select a General Area of Need from the dropdown.
2) Select a Specific Area of Need from the dropdown
3) Click ‘Log’ beside the Progress Monitoring Tool
4) Enter in your progress monitoring scores with date and a status. Click ‘Save & Continue’
Public Consulting Group, Inc. –WCPSS EASi RtI™ User Manual
WCPSS Intervention Services 6/2013
Page 16
WCPSS EASi RtI™ User Manual- Tier II
5) A progress monitoring graph will appear with your logged scores. If you have more than one
Progress Monitoring Tool, select each tool from the dropdown to see the individual graphs.
6) To print out the progress monitoring graph and scores, create a Progress Monitoring document
by clicking ‘Create Draft RtI Tier II Progress Monitoring’
7) Click ‘Save & Continue’
Public Consulting Group, Inc. –WCPSS EASi RtI™ User Manual
WCPSS Intervention Services 6/2013
Page 17
WCPSS EASi RtI™ User Manual- Tier II
Tier II Plan Review
Once you have collected all your progress monitoring data, the team
will review the results and make a decision
1.
Select an area of need from the dropdown. Once selected, the page
will display all progress monitoring graphs with scores for that area
of need.
Public Consulting Group, Inc. –WCPSS EASi RtI™ User Manual
WCPSS Intervention Services 6/2013
Page 18
WCPSS EASi RtI™ User Manual- Tier II
2. Summarize the results and list any special factors. Based on the data, select a decision from the
dropdown.
3.
Your next fields will depend on the decision the team makes.
All draft documents
must be finalized to
save the
information
permanently to the
student record.
Generate a draft to
check for accuracy
and completeness.
Then finalize the
document.
a. If the decision is to Exit Plan:
i. Select an exit reason and enter the exit date.
ii. Create a Draft or Final Tier II Plan Review document by clicking ‘Create Draft
Tier II Plan Review or ‘Create Final Tier II Plan Review’
iii. Click ‘Save & Continue’
iv. You will be taken back to the Tier II Process.
Public Consulting Group, Inc. –WCPSS EASi RtI™ User Manual
WCPSS Intervention Services 6/2013
Page 19
WCPSS EASi RtI™ User Manual- Tier II
b. If the decision is to continue the current RtI Tier II intervention plan
i. Enter a date the team will reconvene to review progress
ii. Create a Draft, or Final Tier II Plan Review document by clicking ‘Create Draft
Tier II Plan Review or ‘Create Final Tier II Plan Review
iii. Click ‘Save & Continue’
iv. You will be taken back to the Tier II Process.
c. If the decision is to update/modify intervention plan
i. Create a Draft or Final Tier II Plan Review document by clicking ‘Create Draft
Tier II Plan Review or ‘Create Final Tier II Plan Review
ii. Click ‘Save & Continue’
iii. You will be taken back to the Tier II Process. Team needs to update the plan on
the Tier II Planning link and finalize the updated plan.
d. If the decision is to continue interventions and submit a Tier III Request:
i. Answer the Parent Contact question and enter the rationale for moving to Tier
III.
ii. Create a Draft or Final Tier II Plan Review document by clicking ‘Create Draft
Tier II Plan Review or ‘Create Final Tier II Plan Review’
iii. An alert will be sent to the Tier III Facilitator for this school that a Tier III
Request has been submitted.
iv. Click ‘Save & Continue’
This appears automatically. There
must be a plan and review to move
from Tier II to Tier III.
Public Consulting Group, Inc. –WCPSS EASi RtI™ User Manual
WCPSS Intervention Services 6/2013
Page 20
WCPSS EASi RtI™ User Manual- Tier II
Documents Tab:
The Documents page allows you to create various types of documents and letters. You can select the
type of document you would like to create by clicking on the dot next to the document/letter name. A
[Draft] document with no system errors must be completed before Final document can be created. All
Drafts will print with a “Proposed” watermark on each page except for the Signature page. Drafts are
saved in Easi RtI™ for 30 days and Final Documents remain in the system permanently.
All [Draft] and [Final] documents created for the student are listed at the bottom of the screen in the
Documents Created field. [Draft] documents will have (Draft) in the Status column while [Final]
documents will (Final) in this column. To view these documents, click on the blue hyperlink.
RtI Document List:
Saving/Printing Documents
All documents, once finalized, are saved on the student’s permanent record and can be viewed under the
Student’s document tab. Documents are saved in PDF format and can be saved to other files, if needed.
Documents can be
printed by:
Print
documents
from the
student’s
document tab.
Batch print
documents by selecting the My Documents Tab when viewing the Main Menu screen.
Public Consulting Group, Inc. –WCPSS EASi RtI™ User Manual
WCPSS Intervention Services 6/2013
Page 21
WCPSS EASi RtI™ User Manual- Tier II
Teacher Notes
Use the Teacher Notes to communicate information about the student’s performance. Teacher
notes are visible to other users at the building level.
Logging Out of the System:
From the Main Menu:
To log out of EasiRtI:
1) Click the “Log Out” tab at the left of the menu bar.
2) After you log out, close your browser using one of the following:
a) Click on File in the upper left hand corner of your screen and then choose Exit.
b) Mac users - Click the X in the upper left hand corner of your screen.
c) PC users – Click the X in the upper right hand corner of your screen.
* You can log out from any part of the system.
* You do not have to go back to the Main Menu.
* You must log out of Easi RtI™ and close your browser if you:
* Step away from your computer.
* Finish using the system.
* Leave for the day.
** Always Log Out and Exit the Browser: If you do not Log Out and close your browser, anyone can
access information in Easi RtI™ or record information under your log-in name.
Public Consulting Group, Inc. –WCPSS EASi RtI™ User Manual
WCPSS Intervention Services 6/2013
Page 22