1
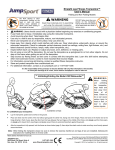
** Installing Stabilizer Handle **
WARNING: If you have handle
legs attached, do NOT attempt to
use the rebounder without the rest
of the handle pieces properly
installed first.
Handle legs
LEG-A-20167-00
1) The 2 handle legs will be installed in place of the normal legs at the 2 locations shown above. Turn trampoline upside-down, fit leg
socket over stud on trampoline frame, and install leg hardware, as shown on previous page. There are only 6 sets of leg hardware, and the
hardware may be inside the 2 leg pieces you are not using. Be sure the Fitness Trampoline logo is centered between the 2 handle legs.
Top handle
HAN-A-20164-00
CAUTION
Avoid Injury.
Small thumb screws
SCR-P-11706A
Exercise handle bar (when
attached to the rebounder) is
not designed to support your
entire weight. It is to aid
with balance and provide
exercise versatility.
Right side
handle
HAN-P-20169-00
2) Connect side handles to top handle, and secure with small
thumb screws to create a “top assembly”.
Left side
handle
HAN-P-20170-00
Large thumb
screws
SCR-P-11707A
3)
Lower top assembly into handle legs. You may have to
rotate entire top assembly 180 degrees for holes to line up. Adjust
height as necessary, before securing with large thumb screws.
Your exercise handle bar
is now installed!
To remove the handle, follow the installation
instructions in reverse order.
3