1
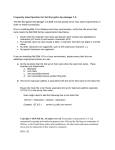
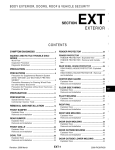
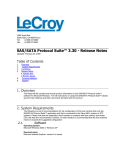
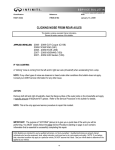
Version: ED2-1.2.1 EN
E-Detective
User Installation Guide
定興實業有限公司
Decision Computer International Co., Ltd.
E-Detective Installation Guide
ED2-1.2.1
Table of Contents
Subject
Page
Chapter 1: Appliance Deployment ............................................................................................. 2
Chapter 2: System Installation ................................................................................................... 6
Chapter 3: Remote System Setup ............................................................................................. 8
Chapter 4: Local System Setup .............................................................................. 11
Mirror Mode Setup ................................................................................................. 12
Sniffer Mode Setup ................................................................................................ 13
Appendix A:Q&A.................................................................................................................... 14
Decision © All rights reserved.
1
E-Detective Installation Guide
ED2-1.2.1
Chapter 1: Appliance Deployment
E-Detective system sniffs or captures Internet network packets, analyzes, decodes and
reconstructs the raw data into original content format. The best way to obtain the entire
Internet traffic of a network is to deploy the E-Detective system by using a Port Mirroring
Switch or Hub at the network Gateway/Router where Internet taffic is going in and out. It can
also be depoloyed to capture traffic at certain subnetwork and not the entire network.
3 Modes of Deployment:
1. Mirror Mode – Most recommended
Mirror Mode means the E-Detective system collects/captures data by mirror or broadcast
function provided by a port mirroring switch (normally a Layer 2 switch) or Ethernet hub. In
terms of Mirror Mode, it uses two NIC cards to operate, one is for data collecting/ capturing,
and the other is for system management. The following diagram shows the concept of how this
mode is operated. The NIC card (labelled Number 1) with port “eth0” is connected to the top
HUB/Swith to capture the data. The NIC card (labelled Number 2) with port “eth1” for
management (system web/telnet access) can be connected to the HUB or Switch. The default
IP address of management port is 192.168.1.60. We suggest that you deploy this mode if the
data flow in your network environment is large.
Decision © All rights reserved.
2
E-Detective Installation Guide
ED2-1.2.1
ED-FX 08
ED-FX10
ED-FX 30 MBX
Decision © All rights reserved.
ED-FX50
3
F
E-Detective Installation Guide
ED2-1.2.1
2. Broadcast Mode
Network equipment like hub provides broadcast function that allows E-Detective systems
to collect/capture data. This mode uses only one and the same NIC card to capture data
and to manage the system. The default IP address for the management port is
192.168.1.60. If the data flow of your network environment is small, you may deploy this
mode.
ED-FX 08
ED-FX10
ED-FX 30 MBX
Decision © All rights reserved.
ED-FX50
4
F
E-Detective Installation Guide
ED2-1.2.1
3. Bridge Mode
Deployment of Bridge Mode means that all Internet traffic will need to pass through
E-Detective system being going in or out from the network. This mode uses two NIC
cards to operate in the ED system. This mode of operation is deployed for special
network environment.
ED-FX 08
ED-FX10
ED-FX 30 MBX
Decision © All rights reserved.
ED-FX50
5
F
E-Detective Installation Guide
ED2-1.2.1
Chapter 2: System Installation
Please follow the steps for system installation:
1. Switch on the power supply of the E-Detectiv system. Insert the ED System Installation CD
into the CD ROM drive of the system.
2. Enter BIOS Setup and set boot from CD-ROM.
st
Change 1 Boot Device to CD-ROM
Change 2
nd
Boot Device to Hard Disk
Save the new setting in BIOS Setup and restart the system. The system will boot
from the inserted CD.
3. The below message will appear during the installation process. If you would like to install
E-Detective system, please input y and press enter. If not, input n and press Enter to exit the
setup.
Now install E-Dtective (Normal)? (y/n) : y
4. When the installation process complete, the below message will appear. For normal
hardware system, please input y and press Enter to disable ACPI package. If not just press
enter to skip this step.
Do you want to disable ACPI (y/n)? : y
5. Setup System Management. Chose the network card interface for management, input the IP
for the management port, netmask, broadcast and gateway address. Press Enter after you
have input the information. The system will prompt to make sure that you input the correct
information. Input y and press Enter if the information you input is correct. Input n and press
Enter to rekeyin the information.
Setting management device…
Choice device (/eth0/eth1): eth0
IP (192.168.1.60): 192.168.1.210
Netmask (255.255.255.0): 255.255.255.0
Broadcast (192.168.1.255): 192.168.1.255
Gateway (192.168.1.1): 192.168.1.1
You have entered the following network information:
Device: eth0
IP: 192.168.1.60
Decision © All rights reserved.
6
E-Detective Installation Guide
ED2-1.2.1
Netmask: 255.255.255.0
Broadcast: 192.168.1.255
Gateway: 192.168.1.1
Is the information correct? (y/n): y
6. Setup Capturing Port. Choose the network card interface for data capturing/ collecting.
Confirm the port for capturing by input y and press Enter. To reset, input n and press Enter.
Settting Capture Device….
Choice device (/eth0/eth1): eth1
You have entered the following network information:
Device: eth1
Is the information correct? (y/n): y
7. After setup the information for management and capture port, the system will need to be
rebooted. Input y and press Enter to reboot the system. If reset of information is need, input n
and press Enter.
Reboot system now? (y/n) : y
Notes:
Please take out the Installation CD from the CD-ROM when the system is rebooted. You may
st
also reset the BIOS to boot choice to allow it to 1 boot from Hard Disk. If not, the system will
reboot from the CD for installation process.
If you would like to change the Network Setup again, you can enter into the web management
from web browser to resetup the IPs.
Decision © All rights reserved.
7
E-Detective Installation Guide
ED2-1.2.1
Chapter 3: Remote Setup
Before you enter into the E-Detective system management site, please ensure that your
PC is installed with JAVA JRE 1.5.0 version or above. If not, the system page will not be
able to display properly.
Step 1
The default IP address for the system management is 192.168.1.60. Please open a web
browser such as IE, and input the address https://192.168.1.60 and press enter. The following
page will appear. For IE, security alert may pop out. Click on Yes to continue.
E-Detective default system login Username: root
Decision © All rights reserved.
8
Password: 000000
E-Detective Installation Guide
ED2-1.2.1
The following security warning will pop out due to browser is browsing SSL encrypted
(E-Detective) website. Please click on Always. For subsequent pop out, please click on Yes
and Always.
Decision © All rights reserved.
9
E-Detective Installation Guide
ED2-1.2.1
After login to the system management web page of E-Detective system, please proceed to
[SETTING Network Set] to setup the new network information.
(Please refer to E-Detective User Manual for more details on the setup through webpage
interface)
Decision © All rights reserved.
10
E-Detective Installation Guide
ED2-1.2.1
Chapter 4: Local Setup
Before proceed to Local Setup, please login to E-Detective system web management System Setting Edit Password and setup Console’s admin password.
There are two types of Local Setup that can be carried out:
By using SSH/Telnet Method:
Using Putty, input E-Detective system IP address, Port 22 and Connection type – SSH to
connect to the system.
By connecting a Monitor and Keyboard to the system:
Please connect the E-Detective system with a Monitor and Keyboard, press Alt+F2
simultaneously will bring you to the login page.
Decision © All rights reserved.
11
E-Detective Installation Guide
ED2-1.2.1
Login with username: admin and the password you have set for the E-Detective system for
Console. After successfully login, input command SetIP.
The screen will show the following page. Proceed to the setup of the system as esplained
below.
Function Code Function Mode
SetIP Details
1.
Mirror mode
Mirror mode setup, input 1 and press enter button.
2.
Sniffer mode
Sniffer mode setup, input 2 and press enter button.
q:
Quit
Quit the interface, key in q and press enter button.
(A) Mirror Mode Setup
1. Setup management device:
Key in the network interface for management and press Enter, ex: eth0
Then, key in the IP address of eth0, Netmask, Broadcast and Gateway address.
To confirm the setup is correct, please enter Yes and press Enter button. If not, key in No
to reset the information.
2. Setup capture device:
After the setup of management port, then setup capturing port such as eth1.
Decision © All rights reserved.
12
E-Detective Installation Guide
ED2-1.2.1
3. Finished:
After the system completed the Network Setup, it will reboot for the setup to be activated.
(B) Broadcast/ Sniffer Mode Setup
1. Setup management IP:
Key in the network interface for management and press Enter, ex: eth0
Then, key in the IP address of eth0, Netmask, Broadcast and Gateway address.
To confirm the setup is correct, please enter Yes and press Enter button. If not, key in No
to reset the information.
2. Finished:
After the system completed the Network Setup, it will reboot for the setup to be activated.
Decision © All rights reserved.
13
E-Detective Installation Guide
ED2-1.2.1
Appendix A:
:Q&A
The system is not capturing any data (cannot see data being displayed at Content
Monitoring menu of the web management interface) although there are online
activities like web browsing, chats, emailing etc. What can I do?
Answer:
1. Please make sure that the system is registered. If registration has been done
successfully, [OpenRaw] process will be activated.
Please input the following commands at local host.
edetective:/# ps –x | grep OpenRaw
[This “|“ is “Shift”+”\”]
If OpenRaw is running correctly, you can see the following message:
./OpenRaw -t /datas/rawdata -i ethX
./OpenRaw -t /datas/rawdata -i ethX
./OpenRaw -t /datas/rawdata -i ethX
./OpenRaw -t /datas/rawdata -i ethX
./OpenRaw -t /datas/rawdata -i ethX
./OpenRaw -t /datas/rawdata -i ethX
./OpenRaw -t /datas/rawdata -i ethX
2. Please verify at the local monitor that the system detect PCI WatchDog Card when the
system startup.
Please input the instruction at local host.
edetective:/# lspci –n | grep 6666
[This “|“ is “Shift”+”\”]
If PCI WatchDog Card is installed correctly, you can see the following message:
Class 1180: 6666:4100 (rev 02)
3. Please verify that there is IP address in “Online IP List.”
Note: Local host means you should connect the monitor and keyboard directly to E-Detective
system.
How to change IP?
Answer:
Locally: Please refer to installation guide chapter 4: Local Setup
Remotely: Please refer to installation guide chapter 3: Remote Setup.
Decision © All rights reserved.
14
E-Detective Installation Guide
ED2-1.2.1
How to install E-Detective system? Which mode should I use?
Answer:
Please refer to Chapter 2: System Installation. The most common mode of operation is mirror
mode deployment.
Note: You will need a port mirroring switch or a hub to deploy mirror mode operation.
How to capture Internet traffic from different domain?
Answer:
Please refer to E-Detective System User Manual – Chapter 2 – System Setting – Domain.
What I am unable to burn backup data into CD?
Answer:
st
Please ensure that the CD/DVD Burner is connected to IDE 2 of the system motherboard, 1
slot of 2
nd
bus wire.
Why all displayed FTP upload/download files ended up with *.txt extention?
Answer:
Please right-click and select “save file as” and saved the files to your desktop PC. Then modify
the correct extension such as *.jpg, *.pdf, *.rar…etc in order to open the files.
Why MSN, ICQ, AOL data is not captured?
Answer:
Please open port 1863 and 5190 on firewall.
Decision © All rights reserved.
15
E-Detective Installation Guide
ED2-1.2.1
Why I cannot access E-Detective web management interface?
Answer:
Please login with https:// instead of http:// because it uses port 443. For example:
https://192.168.1.60.
If Proxy server is used at the company internet gateway, I will only see IP address
of Proxy server being recorded?
Answer:
Yes, if E-Detective system is deployed in front of proxy server and behind modem router.
Why those forwarding items in E-mail records cannot be forwarded after the
setup?
Answer:
All the settings will be activated after one hour, and all the columns “Sender”, “Receiver” and
“Topic” should fit the forwarding rules.
Why alert E-mail is not sent although setup has been completed?
Answer:
For Alert without content, alert email will only be sent out in every hour basis. Please ensure
that all fields are filled in correctly.
Why I cannot open email directly in POP3/SMTP?
Answer:
Please delete all the update package of “Outlook Express” in “Add/Remove Program” in
“Control Panel”.
Decision © All rights reserved.
16