1
Setup Guide
Disclaimer
The information in this document is subject to change without notice and does not represent a
commitment on the part of Native Instruments GmbH. The software described by this document is subject to a License Agreement and may not be copied to other media. No part of this
publication may be copied, reproduced or otherwise transmitted or recorded, for any purpose,
without prior written permission by Native Instruments GmbH, hereinafter referred to as Native
Instruments.
“Native Instruments”, “NI” and associated logos are (registered) trademarks of Native Instruments GmbH.
Mac, Mac OS, GarageBand, Logic, iTunes and iPod are registered trademarks of Apple Inc.,
registered in the U.S. and other countries.
Windows, Windows Vista and DirectSound are registered trademarks of Microsoft Corporation
in the United States and/or other countries.
All other trade marks are the property of their respective owners and use of them does not imply any affiliation with or endorsement by them.
Document authored by: Native Instruments GmbH
TRAKTOR software version: 2.6 (10/2012)
Special thanks to the Beta Test Team, who were invaluable not just in tracking down bugs, but
in making this a better product.
Contact
Germany
Native Instruments GmbH
Schlesische Str. 29-30
D-10997 Berlin
Germany
www.native-instruments.de
USA
Native Instruments North America, Inc.
6725 Sunset Boulevard
5th Floor
Los Angeles, CA 90028
USA
www.native-instruments.com
© Native Instruments GmbH, 2012. All rights reserved.
Table of Contents
Table of Contents
1
Welcome to the TRAKTOR KONTROL Z2 Setup Guide .................................................... 7
1.1
1.2
2
Software Installation ................................................................................................. 9
2.1
2.2
2.3
3
What Is Included in the Box? ...................................................................................................... 7
Document Conventions ............................................................................................................... 8
Read Before Installing ................................................................................................................ 9
Installation on Mac OS X ............................................................................................................ 9
2.2.1
Locate and Start the Installation Program ................................................................. 9
2.2.2
Select the Components to Install ............................................................................... 10
2.2.3
Enter Your Password .................................................................................................. 12
2.2.4
Complete the Installation .......................................................................................... 12
Installation on Windows ............................................................................................................. 14
2.3.1
Locate and Start the Installation Program ................................................................. 14
2.3.2
Confirm the Features to Install .................................................................................. 14
2.3.3
Confirm the Application Installation Path ................................................................. 16
2.3.4
Select Your Hardware Drivers .................................................................................... 17
2.3.5
Complete the Software Installation ........................................................................... 17
Product Activation With Service Center ...................................................................... 19
3.1
3.2
Activating Your Product Online ................................................................................................... 19
3.1.1
Start Service Center ................................................................................................... 19
3.1.2
Log In Into Your User Account .................................................................................... 20
3.1.3
Activate the Product .................................................................................................. 21
3.1.4
Finish the Online Activation ....................................................................................... 22
Updating Your Product ............................................................................................................... 23
3.2.1
Select Updates .......................................................................................................... 23
3.2.2
Download the Updates ............................................................................................... 24
3.2.3
Open Your Download Folder ....................................................................................... 25
TRAKTOR KONTROL Z2 - Setup Guide - 4
Table of Contents
3.3
4
3.2.4
Install the Updates .................................................................................................... 26
Activating Your Product Offline .................................................................................................. 26
3.3.1
Start the Offline Activation ........................................................................................ 27
3.3.2
Create the Activation Request File ............................................................................. 28
3.3.3
Enter the Serial Number ............................................................................................ 29
3.3.4
Transfer the Activation Request File .......................................................................... 30
3.3.5
Open the Activation Return File ................................................................................. 31
3.3.6
Finish the Offline Activation ...................................................................................... 32
Setting Up Your TRAKTOR KONTROL Z2 System ........................................................... 33
4.1
4.2
4.3
4.4
4.5
4.6
4.7
4.8
4.9
4.10
4.11
Before You Begin ........................................................................................................................ 33
Connecting the Power Supply ..................................................................................................... 33
Connecting the Device to Your Computer .................................................................................... 35
Connecting Headphones ............................................................................................................. 36
Connecting an Amplification System .......................................................................................... 37
Connecting a Microphone and Additional Equipment ................................................................. 39
Connecting Turntables ............................................................................................................... 40
4.7.1
Connect the Left Turntable ........................................................................................ 40
4.7.2
Connect the Right Turntable ...................................................................................... 43
4.7.3
Overview of Your TRAKTOR KONTROL Z2 Turntable Setup .......................................... 44
Connecting CD Players ............................................................................................................... 45
4.8.1
Connect the Left CD Player ........................................................................................ 46
4.8.2
Connect the Right CD Player ...................................................................................... 47
4.8.3
Overview of Your TRAKTOR KONTROL Z2 CD Player Setup .......................................... 48
Exemplary Setup Using Additional USB Equipment .................................................................... 48
Final Preparations ...................................................................................................................... 49
4.10.1 Put On a Control Vinyl or Insert a Control CD ............................................................. 49
4.10.2 Switch On Your Devices ............................................................................................. 50
Starting the TRAKTOR Software .................................................................................................. 50
TRAKTOR KONTROL Z2 - Setup Guide - 5
Table of Contents
4.12
4.13
4.14
Using the Setup Wizard to Configure Your TRAKTOR KONTROL Z2 System .................................. 51
Direct Mode Vs. TRAKTOR Mode .................................................................................................. 53
Calibrating TRAKTOR for Timecode Control ................................................................................. 55
5
What's Next? ............................................................................................................. 56
6
Troubleshooting and FAQ ........................................................................................... 57
6.1
Installation Folder Not Found by an Update Installer .................................................................. 57
6.2
User Account Control and Internet Security ................................................................................ 57
6.3
Audio Clicks and Drop-outs When Playing Tracks ....................................................................... 58
6.4
More Troubleshooting Resources ................................................................................................ 58
7
Support ..................................................................................................................... 59
7.1
7.2
7.3
Knowledge Base / Online Support / Readme ............................................................................... 59
Forum ......................................................................................................................................... 60
Updates ...................................................................................................................................... 60
TRAKTOR KONTROL Z2 - Setup Guide - 6
Welcome to the TRAKTOR KONTROL Z2 Setup Guide
What Is Included in the Box?
1
Welcome to the TRAKTOR KONTROL Z2 Setup Guide
Thank you for purchasing the TRAKTOR KONTROL Z2. On behalf of the entire Native Instruments team, we hope you are truly inspired by this product. This Setup Guide covers the following topics:
▪ How to install the TRAKTOR software on your computer (↑2, Software Installation)
▪ How to activate your TRAKTOR version using the Service Center application (↑3, Product
Activation With Service Center)
▪ How to connect the devices and get your TRAKTOR KONTROL Z2 system up and running
(↑4, Setting Up Your TRAKTOR KONTROL Z2 System)
▪ How to proceed once your TRAKTOR KONTROL Z2 system is up and running (↑5, What's
Next?)
▪ How to solve common problems (↑6, Troubleshooting and FAQ), and where to find further
product support (↑7, Support)
1.1
What Is Included in the Box?
The TRAKTOR KONTROL Z2 box contains the following items:
▪ The TRAKTOR KONTROL Z2
▪ A power cable
▪ A USB cable
▪ Two Control Vinyls
▪ Two Control CDs
▪ A registration flyer with your TRAKTOR SCRATCH PRO 2 software serial number, your
TRAKTOR KONTROL Z2 hardware serial number, and a link to the hardware registration
page, where you can register your hardware and download the TRAKTOR software
▪ A safety instructions flyer
▪ A TRAKTOR sticker sheet
TRAKTOR KONTROL Z2 - Setup Guide - 7
Welcome to the TRAKTOR KONTROL Z2 Setup Guide
Document Conventions
1.2
Document Conventions
This document uses particular formatting to point out special facts and to warn you of potential issues. The icons introducing the following notes let you see what kind of information can
be expected:
Whenever this exclamation mark icon appears, you should read the corresponding note
carefully and follow the instructions and hints given there if applicable.
This light bulb icon indicates that a note contains useful extra information. This information may often help you to solve a task more efficiently, but does not necessarily apply to
the setup or operating systems you are using; however, it's always worth a look.
Furthermore, the following formatting is used:
▪ Text appearing in (drop-down) menus (such as Open…, Save as…) and paths to locations
on your hard drive or other storage devices is printed in italics.
▪ Text referring to elements appearing on the screen (labels of buttons, controls, text next
to checkboxes, etc.) is printed in light blue. Whenever you see this formatting applied,
you will find the same text appearing on your computer screen.
▪ Text referring to elements printed on hardware is formatted orange. Whenever you see this
formatting applied, you will find the same text appearing on the hardware.
▪ Important names and concepts are printed in bold.
►
Single instructions are introduced by this play button type arrow.
→
Results of actions are introduced by this smaller arrow.
TRAKTOR KONTROL Z2 - Setup Guide - 8
Software Installation
Read Before Installing
2
Software Installation
2.1
Read Before Installing
Before starting the TRAKTOR software installer, here are some points to be aware of:
▪ Make sure you have downloaded the TRAKTOR software to your computer by following the instructions on the registration page:
www.native-instruments.com/go-z2
If you have already registered your device but need to download the installer again, you
can find the relevant downloads in the "My Account" section of the NI website:
https://www.native-instruments.com/en/my-account/my-products-serials
▪ Please carefully review the installer screens and the suggested installation paths in order to
avoid that any unwanted folders are created on your hard disk.
▪ Moving any folders related to Native Instruments software after installation is not recommended. Future software updates rely on the directory locations set during initial installation.
2.2
Installation on Mac OS X
At the end of the installation process, you will need to restart your computer. Please save your
work and close all applications before proceeding.
2.2.1
1.
2.
3.
Locate and Start the Installation Program
Locate and unpack the downloaded installer package file on your computer.
Double-click the Traktor 2 Installer.mpkg file to start the installation procedure.
Follow the on-screen instructions.
TRAKTOR KONTROL Z2 - Setup Guide - 9
Software Installation
Installation on Mac OS X
2.2.2
Select the Components to Install
After you have accepted the software license agreement, the installer window displays the
components available for installation.
There is no dedicated entry for your TRAKTOR KONTROL Z2 in the components selection
screen as the Z2 does not require a dedicated driver under MAC OS X. It is recommended
to keep all remaining drivers selected unless you have a specific reason to deselect one
(such as if the driver is already installed on your computer, or you are very sure you will
never use the device with TRAKTOR).
This installer screen also contains information about how much disk space the individual components will use.
The components selection screen of the installation program.
TRAKTOR KONTROL Z2 - Setup Guide - 10
Software Installation
Installation on Mac OS X
Basic Installation: This installs the TRAKTOR software along with its documentation. This component cannot be deselected. It also installs the Service Center application (required for activation of your product) and the Controller Editor application, which allows you to configure the
controllerʼs MIDI assignments for using the controller with other applications than TRAKTOR.
Audio 8/4/2 DJ Drivers: This installs drivers for the AUDIO 8 DJ, AUDIO 4 DJ and AUDIO 2 DJ
audio interfaces by Native Instruments. If you do not intend to use any of these audio interfaces, you can deactivate the checkboxes.
Traktor Kontrol S4: This installs the driver for the TRAKTOR KONTROL S4 controller. If you do
not intend to use a TRAKTOR KONTROL S4 controller on your computer, you can deactivate
the checkbox.
Traktor Kontrol S2: This installs the driver for your TRAKTOR KONTROL S2 controller. If you do
not intend to use a TRAKTOR KONTROL S2 controller on your computer, you can deactivate
the checkbox.
Traktor Audio 2/6/10 Drivers: This installs the drivers for the TRAKTOR AUDIO 2, TRAKTOR
AUDIO 6 and TRAKTOR AUDIO 10 audio interfaces by Native Instruments. If you do not intend to use any of these audio interfaces, you can deactivate the checkboxes.
Traktor Kontrol X1: This installs the driver for the TRAKTOR KONTROL X1 controller. If you do
not intend to use a TRAKTOR KONTROL X1 controller on your computer, you can deactivate
the checkbox.
Background Components
These components are not displayed in the installer window, but are installed depending on
your system configuration:
Controller Editor: The Controller Editor application allows you to configure your controller for
use as a MIDI controller with applications other than the TRAKTOR software. This component
will automatically be installed unless a newer version of Controller Editor already exists on your
computer.
Service Center: The Service Center application is required for activation of the TRAKTOR software. It will be installed independent of the selected drivers (unless a newer version of Service
Center already exists on your computer).
TRAKTOR KONTROL Z2 - Setup Guide - 11
Software Installation
Installation on Mac OS X
It is strongly recommended to install the TRAKTOR software to the default location. If you still
need to change the install location, click on the folder icon in the Location column and select
the desired folder.
►
After you have customized the installation as required, click Continue and then follow the
on-screen instructions.
2.2.3
Enter Your Password
Before installing the selected components, the installer will prompt you to enter your Mac OS X
password. This is a standard behavior on Mac OS X that makes sure you are aware of the
changes the installer is about to make.
The Mac OS X user account you are using needs to have Administrator privileges.
The Mac OS X password prompt.
►
To proceed, enter your password and click OK.
→
The selected components will be installed.
2.2.4
Complete the Installation
After the components have been installed, you need to restart your computer.
TRAKTOR KONTROL Z2 - Setup Guide - 12
Software Installation
Installation on Mac OS X
The final screen of the installation program.
►
On the last screen of the installation program, click Restart to restart your computer and
complete the software installation.
→
Your computer will immediately restart.
►
After your computer has restarted, continue reading in chapter ↑3, Product Activation
With Service Center of this Setup Guide for information about product activation.
TRAKTOR KONTROL Z2 - Setup Guide - 13
Software Installation
Installation on Windows
2.3
Installation on Windows
If you are installing the TRAKTOR software on Windows Vista or Windows 7, you may need to
turn off Windows User Account Control (UAC) before you can proceed. In addition to this, it
may be necessary to disable your anti-virus software during installation. For further information
on this, please refer to ↑6.2, User Account Control and Internet Security.
2.3.1
1.
2.
3.
Locate and Start the Installation Program
Locate and unpack the downloaded installer package file on your computer.
Double-click the Traktor 2 Setup.exe file to start the installation procedure.
Follow the on-screen instructions.
2.3.2
Confirm the Features to Install
After you have accepted the software license agreement, the installer window displays the features available for installation.
TRAKTOR KONTROL Z2 - Setup Guide - 14
Software Installation
Installation on Windows
The components selection screen of the installation program.
Basic Installation: This installs the TRAKTOR software along with its documentation. This component cannot be deselected.
Background Components
These components are not displayed in the installer window, but are installed depending on
your system configuration:
Controller Editor: The Controller Editor application allows you to configure your controller for
use as a MIDI controller with applications other than the TRAKTOR software. This component
will automatically be installed unless a newer version of Controller Editor already exists on your
computer.
Service Center: The Service Center application is required for activation of the TRAKTOR software. It will be installed independent of the selected drivers (unless a newer version of Service
Center already exists on your computer).
TRAKTOR KONTROL Z2 - Setup Guide - 15
Software Installation
Installation on Windows
►
Click Continue and then follow the on-screen instructions.
2.3.3
Confirm the Application Installation Path
The software installation path screen of the installation program.
It is strongly recommended to install the TRAKTOR software to the default location. If you still
need to change the install location, click Change to open a Folder Selection dialog and select
the desired destination folder.
You will be asked to select and confirm an installation path for the TRAKTOR software.
►
Click Next to proceed.
TRAKTOR KONTROL Z2 - Setup Guide - 16
Software Installation
Installation on Windows
2.3.4
Select Your Hardware Drivers
After defining/confirming the program's installation path, you will be presented with a driver
selection screen. It is recommended to select all drivers from the driver selection screen unless
you have a specific reason to deselect a driver (such as if the driver is already installed on your
computer, or you are very sure you will never use the device with TRAKTOR).
1.
2.
Make sure to select the TRAKTOR KONTROL Z2 driver from the driver selection screen.
Click Next to proceed.
2.3.5
Complete the Software Installation
Once you have selected the driver and confirmed your selection, you will be forwarded to the
last screen of the installation program.
The final screen of the installation program.
TRAKTOR KONTROL Z2 - Setup Guide - 17
Software Installation
Installation on Windows
►
On the last screen of the installation program, click Finish to complete the installation
and exit the installation program.
►
Continue reading in chapter ↑3, Product Activation With Service Center of this Setup
Guide for information about product activation.
TRAKTOR KONTROL Z2 - Setup Guide - 18
Product Activation With Service Center
Activating Your Product Online
3
Product Activation With Service Center
This section uses a placeholder name ("NI Product") on all screenshots. The relevant section
on your screen will display the name of the Native Instruments product you are activating.
3.1
Activating Your Product Online
Skip to chapter ↑3.3, Activating Your Product Offline if your computer is not connected to the
Internet.
3.1.1
Start Service Center
1.
Locate the Service Center application on your hard disk. During installation, a folder labeled Native Instruments was created in the Applications (Mac OS X) / Program Files (Windows) folder. Within this folder, a subfolder labeled Service Center holds the corresponding application.
2. Double-click the Service Center application to start the activation procedure.
It is necessary to activate your Native Instruments product in order to use its full functionality.
TRAKTOR KONTROL Z2 - Setup Guide - 19
Product Activation With Service Center
Activating Your Product Online
3.1.2
Log In Into Your User Account
The log-in screen of Service Center.
►
Log in with your e-mail address and Native Instruments password.
►
If you do not have a Native Instruments account yet, click on Create new User Account.
Fill in the address form. The password will be sent to you via e-mail.
TRAKTOR KONTROL Z2 - Setup Guide - 20
Product Activation With Service Center
Activating Your Product Online
3.1.3
Activate the Product
The product activation screen of Service Center.
1.
2.
Enter the software serial number in the number field. The software serial number is located on the registration flyer, which you can find in your TRAKTOR KONTROL Z2 product
box.
Click Activate to proceed.
TRAKTOR KONTROL Z2 - Setup Guide - 21
Product Activation With Service Center
Activating Your Product Online
3.1.4
Finish the Online Activation
Service Center confirming the product activation.
Service Center confirms that the product has been activated successfully. A search for updates
will start automatically.
▪ If updates for any of the activated products are available, the button in the bottom right
corner of the screen reads Update. To download the updates, click the Update button and
proceed with chapter ↑3.2, Updating Your Product.
▪ If no updates are available, the button in the bottom right corner of the screen reads Exit.
You can click it to close Service Center.
TRAKTOR KONTROL Z2 - Setup Guide - 22
Product Activation With Service Center
Updating Your Product
3.2
Updating Your Product
3.2.1
Select Updates
The product update screen of Service Center.
1.
2.
3.
In Service Center, click the Update tab to view a list of available updates.
Select the updates you want to download by checking the checkboxes on the left. We recommend downloading all preselected updates.
Click Download. The download will start.
TRAKTOR KONTROL Z2 - Setup Guide - 23
Product Activation With Service Center
Updating Your Product
3.2.2
Download the Updates
The product update in progress.
Depending on the file size and the speed of your internet connection, downloading the files
may take a while. We strongly recommend that you always install the latest updates.
TRAKTOR KONTROL Z2 - Setup Guide - 24
Product Activation With Service Center
Updating Your Product
3.2.3
Open Your Download Folder
Service Center confirming all updates were downloaded, and offering to open the download folder.
After all files have been downloaded successfully, you will be asked to open the download folder.
►
Click Yes to open the download folder.
►
After the download folder has opened, you can quit Service Center by clicking Exit.
TRAKTOR KONTROL Z2 - Setup Guide - 25
Product Activation With Service Center
Updating Your Product
3.2.4
1.
2.
3.
3.3
Install the Updates
Launch the first installer file from the download folder.
Follow the instructions of the Installation Wizard.
Proceed until you have installed all updates.
Activating Your Product Offline
If the computer you want to use Native Instruments products on is permanently not connected
to the internet, you can activate the products utilizing the Offline activation procedure. Note
that you will need a second computer that is connected to the internet.
TRAKTOR KONTROL Z2 - Setup Guide - 26
Product Activation With Service Center
Activating Your Product Offline
3.3.1
Start the Offline Activation
The internet connection screen of Service Center.
1.
2.
Start Service Center. If no internet connection is detected, you will be redirected to the
Internet connection screen pictured above.
In the Continue without connection to the internet area at the bottom of the screen, click
Offline. You will be forwarded to the Activate screen.
TRAKTOR KONTROL Z2 - Setup Guide - 27
Product Activation With Service Center
Activating Your Product Offline
3.3.2
Create the Activation Request File
The offline activation screen of Service Center.
►
On the Activate screen, click Create. The Activate screen will display fields in which to
enter the serial number (see next step).
TRAKTOR KONTROL Z2 - Setup Guide - 28
Product Activation With Service Center
Activating Your Product Offline
3.3.3
Enter the Serial Number
The product activation screen of Service Center.
1.
2.
3.
Enter the software serial number in the number field. The software serial number is located on the registration flyer, which you can find in your TRAKTOR KONTROL Z2 product
box.
Click Create to save the Activation Request File (ActivationRequestFile.html). A Save File
dialog will open and let you select a target folder.
Save the Activation Request File to the desired target folder.
TRAKTOR KONTROL Z2 - Setup Guide - 29
Product Activation With Service Center
Activating Your Product Offline
3.3.4
Transfer the Activation Request File
The offline activation procedure.
1.
2.
3.
4.
Copy the Activation Request file to a portable storage device and transfer it to a computer
with internet connection.
Open the Activation Request file by double-clicking it.
Follow the instructions on the Service Center product activation web page. As a new Native Instruments user you will need to create a new account before you can log in.
Transfer the Activation Return file back to your audio computer.
TRAKTOR KONTROL Z2 - Setup Guide - 30
Product Activation With Service Center
Activating Your Product Offline
3.3.5
Open the Activation Return File
The offline activation screen of Service Center.
1.
2.
On your audio computer, start Service Center again. In the Continue without connection to
the internet area at the bottom of the screen, click Offline.
Select the Activate tab and click Open to load the Activation Return file.
TRAKTOR KONTROL Z2 - Setup Guide - 31
Product Activation With Service Center
Activating Your Product Offline
3.3.6
Finish the Offline Activation
Service Center confirming the product activation.
After you have opened the Activation Return file, Service Center confirms that the product has
been activated successfully. You can quit Service Center by clicking Exit.
►
To obtain updates for your products, log in under HYPERLINK "https://co.native-instruments.com/?id=updates" www.native-instruments.com/updates using your Native Instruments user account information. Download all relevant updates from the Personal Update
Manager to your internet computer, transfer them to your music computer utilizing portable storage media, and install them.
TRAKTOR KONTROL Z2 - Setup Guide - 32
Setting Up Your TRAKTOR KONTROL Z2 System
Before You Begin
4
Setting Up Your TRAKTOR KONTROL Z2 System
This chapter covers how to connect the devices and get your TRAKTOR KONTROL Z2 system
up and running.
4.1
Before You Begin
Before connecting the devices, and setting up your TRAKTOR KONTROL Z2, here are some
points to be aware of:
▪ Make sure that you have installed the hardware driver with the TRAKTOR software installer before you connect the Z2 to your computer! For this, please follow the instructions
specific to your operating system in chapter ↑2, Software Installation.
▪ The Z2 may not work properly connected to a USB hub! Connect it directly to a USB port
on your computer.
▪ The Z2 — in combination with a power amplifier, speakers, or headphones — can produce sounds in decibel ranges that may cause hearing damage. Also, switching off the device with the volume control set to a high level may damage your loudspeakers. Always
make sure the volume faders on the Z2 are set to minimum before connecting the power
supply, connecting external equipment, playing music, or switching the device on/off.
Once everything is connected and set up, gradually raise the volume while music is playing until you reach the desired listening level.
4.2
Connecting the Power Supply
To connect the power supply:
TRAKTOR KONTROL Z2 - Setup Guide - 33
Setting Up Your TRAKTOR KONTROL Z2 System
Connecting the Power Supply
1.
Connect the male plug of the power cable to a power outlet.
2.
Connect the female plug at the end of the power supply's cable to the power supply connector on the rear panel of your TRAKTOR KONTROL Z2.
TRAKTOR KONTROL Z2 - Setup Guide - 34
Setting Up Your TRAKTOR KONTROL Z2 System
Connecting the Device to Your Computer
4.3
Connecting the Device to Your Computer
To connect the TRAKTOR KONTROL Z2 to your computer:
1.
2.
Connect the device end (square plug) of the included USB cable to the USB socket on
the rear panel of your Z2.
Connect the computer end (flat rectangle plug) of the USB cable to an available USB 2.0
port on your computer.
Windows Vista and Windows 7 Users Only: Completing the Device Driver Installation
Upon detection of the new hardware, Windows completes the device driver installation:
▪ A message reading “Installing device driver software” will be displayed.
▪ After device driver installation has finished, Windows will display “Your devices are ready
to use.”
TRAKTOR KONTROL Z2 - Setup Guide - 35
Setting Up Your TRAKTOR KONTROL Z2 System
Connecting Headphones
During hardware installation, a Windows message may call attention to the fact that the hardware driver has not passed Windows Driver Signing. This is an expected behavior and does not
indicate a problem. Nonetheless, you need to turn off Windows User Account Control (UAC)
before you can proceed. See chapter ↑6.2, User Account Control and Internet Security in this
Setup Guide for detailed information on how to turn off UAC. In addition to turning off UAC, it
may be necessary to disable your anti-virus software during installation.
Windows XP Users Only: Completing the Device Driver Installation
Upon detection of the new hardware, Windows completes the device driver installation:
1.
2.
→
4.4
Windows XP will identify the TRAKTOR KONTROL Z2. Choose No if Windows asks you to
search the internet for a driver.
During device driver installation, a Windows message may call attention to the fact that
the driver has not passed Windows Logo Testing. This is an expected behavior and does
not indicate a problem. To proceed, click Continue Anyway.
Your computer will display a “New Hardware found” message. Subsequently, another
message reading “Your devices are ready to use” will notify you that the device driver installation was completed successfully.
Connecting Headphones
Before putting on headphones, always make sure the headphone volume control (HP VOLUME knob on the Z2's top panel) is set to minimum! Later on, slowly increase the headphone volume while music is playing until it reaches the desired listening level.
To connect your headphones to the TRAKTOR KONTROL Z2:
TRAKTOR KONTROL Z2 - Setup Guide - 36
Setting Up Your TRAKTOR KONTROL Z2 System
Connecting an Amplification System
►
4.5
Connect your headphones to one of the PHONES sockets on the front panel of the device;
use the left socket if your headphones use a 3.5mm jack, or the right socket for a 6.3mm
jack.
Connecting an Amplification System
Switch off your amplification system (active speakers or power amplifier), and set the volume faders on the Z2 to minimum before you proceed. Later on, slowly increase the volume while music is playing until a desired listening level is reached.
To connect your power amplifier or active speakers to the TRAKTOR KONTROL Z2:
TRAKTOR KONTROL Z2 - Setup Guide - 37
Setting Up Your TRAKTOR KONTROL Z2 System
Connecting an Amplification System
►
Connect the MAIN OUT outputs on the back panel of the TRAKTOR KONTROL Z2 to the
inputs of your amplification system using matching cables. You can use either the XLR
outputs on the left side of the MAIN OUT section, or the RCA outputs on the right side of
the MAIN OUT section to connect your power amplifier or active speakers.
You can use the 1/4" BOOTH outputs to connect a second pair of control speakers to the
Z2. These outputs have a separate volume control knob (the BOOTH knob) on the mixer's
top panel.
TRAKTOR KONTROL Z2 - Setup Guide - 38
Setting Up Your TRAKTOR KONTROL Z2 System
Connecting a Microphone and Additional Equipment
4.6
Connecting a Microphone and Additional Equipment
Before connecting a microphone or other equipment to the AUX / MIC section on the back
of the Z2, always make sure the VOLUME knob in the AUX / MIC section of the Z2's top
panel is set to minimum! Later on, slowly increase the volume until a desired volume level
is reached.
To connect a microphone or additional line level equipment to the Z2:
►
Connect the 1/4" MIC input on the back panel of the TRAKTOR KONTROL Z2 to your microphone using a matching cable. Additional line level equipment (such as a synthesizer)
is connected to the RCA AUX inputs to the left of the MIC input.
TRAKTOR KONTROL Z2 - Setup Guide - 39
Setting Up Your TRAKTOR KONTROL Z2 System
Connecting Turntables
4.7
Connecting Turntables
If you want to use CD players instead of turntables, you can skip this chapter and continue
reading in chapter ↑4.8, Connecting CD Players. Please note:
▪ We assume that, when viewed from the DJ's position, one turntable is placed on the left
of your DJ mixer, while the other turntable is placed on the right. Therefore, in this Setup
Guide, the left and right turntables are labeled L and R, respectively.
▪ We assume that you have already connected your turntables to power outlets, but did not
switch them on yet. If your turntables are switched on, switch them off before proceeding.
4.7.1
Connect the Left Turntable
To connect the left turntable:
TRAKTOR KONTROL Z2 - Setup Guide - 40
Setting Up Your TRAKTOR KONTROL Z2 System
Connecting Turntables
1.
Connect the left and right audio output cables of the left turntable (L) to the PHONO A
RCA inputs of the Z2's INPUT section.
TRAKTOR KONTROL Z2 - Setup Guide - 41
Setting Up Your TRAKTOR KONTROL Z2 System
Connecting Turntables
2.
Attach the ground wire of turntable L to the ground screw above.
3.
Make sure the phono/line switch for channel A (on the Z2's top panel) is set to PH for
phono amplification.
Notice that the TRAKTOR button next to the switch is unlit. This means that channel A is
operating in Direct mode and that the channel will bypass the TRAKTOR software for
stand-alone operation. For controlling TRAKTOR with Timecode media, you will need to activate TRAKTOR mode later on. You will find further information on the Z2's operation
modes later in this document and in the TRAKTOR KONTROL Z2 Manual.
TRAKTOR KONTROL Z2 - Setup Guide - 42
Setting Up Your TRAKTOR KONTROL Z2 System
Connecting Turntables
4.7.2
1.
Connect the Right Turntable
Connect the left and right audio output cables of the right turntable (R) to the PHONO B
RCA inputs of the Z2's INPUT section.
TRAKTOR KONTROL Z2 - Setup Guide - 43
Setting Up Your TRAKTOR KONTROL Z2 System
Connecting Turntables
2.
Attach the ground wire of turntable R to the ground screw above.
3.
Make sure the phono/line switch for channel B (on the Z2's top panel) is set to PH for
phono amplification.
Notice that the TRAKTOR button next to the switch is unlit. This means that channel A is
operating in Direct mode and that the channel will bypass the TRAKTOR software for
stand-alone operation. For controlling TRAKTOR with Timecode media, you will need to activate TRAKTOR mode later on. You will find further information on the Z2's operation
modes later in this document and in the TRAKTOR KONTROL Z2 Manual.
4.7.3
Overview of Your TRAKTOR KONTROL Z2 Turntable Setup
TRAKTOR KONTROL Z2 - Setup Guide - 44
Setting Up Your TRAKTOR KONTROL Z2 System
Connecting CD Players
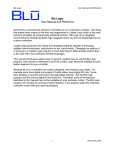
TRAKTOR KONTROL Z2 turntable setup.
→
4.8
After you have connected the second turntable, your TRAKTOR KONTROL Z2 system is
complete and should be connected as depicted above. If you want to add CD players to
your setup, read chapter ↑4.8, Connecting CD Players first. Otherwise please continue
reading in chapter ↑4.10, Final Preparations.
Connecting CD Players
Please note:
▪ We assume that, when viewed from the DJ's position, one CD player is placed on the left
of your DJ mixer, while the other CD player is placed on the right. Therefore, in this Setup
Guide, the left and right CD players are labeled L and R, respectively.
▪ We assume that you have already connected your CD players to power outlets, but did not
switch them on yet. If your turntables are switched on, switch them off before proceeding.
TRAKTOR KONTROL Z2 - Setup Guide - 45
Setting Up Your TRAKTOR KONTROL Z2 System
Connecting CD Players
4.8.1
Connect the Left CD Player
1.
Connect the left and right audio output cables of the left CD player (L) to the LINE A RCA
inputs of the Z2's INPUT section.
2.
Make sure the phono/line switch for channel A (on the Z2's top panel) is set to LN for line
level amplification.
Notice that the TRAKTOR button next to the switch is unlit. This means that channel A is
operating in Direct mode and that the channel will bypass the TRAKTOR software for
stand-alone operation. For controlling TRAKTOR with Timecode media, you will need to activate TRAKTOR mode later on. You will find further information on the Z2's operation
modes later in this document and in the TRAKTOR KONTROL Z2 Manual.
TRAKTOR KONTROL Z2 - Setup Guide - 46
Setting Up Your TRAKTOR KONTROL Z2 System
Connecting CD Players
4.8.2
Connect the Right CD Player
1.
Connect the left and right audio output cables of the right CD player (L) to the LINE B
RCA inputs of the Z2's INPUT section.
2.
Make sure the phono/line switch for channel B (on the Z2's top panel) is set to LN for line
level amplification.
Notice that the TRAKTOR button next to the switch is unlit. This means that channel A is
operating in Direct mode and that the channel will bypass the TRAKTOR software for
stand-alone operation. For controlling TRAKTOR with Timecode media, you will need to activate TRAKTOR mode later on. You will find further information on the Z2's operation
modes later in this document and in the TRAKTOR KONTROL Z2 Manual.
TRAKTOR KONTROL Z2 - Setup Guide - 47
Setting Up Your TRAKTOR KONTROL Z2 System
Connecting CD Players
4.8.3
Overview of Your TRAKTOR KONTROL Z2 CD Player Setup
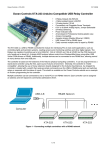
TRAKTOR KONTROL Z2 CD player setup.
→
4.9
After you have connected the second CD player, your TRAKTOR KONTROL Z2 system is
complete and should be connected as depicted above. Please continue reading in chapter
↑4.10, Final Preparations
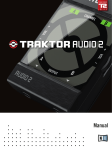
Exemplary Setup Using Additional USB Equipment
Notice that you can connect additional USB equipment via the Z2's USB hub to your computer. The exemplary setup below depicts a Z2 turntable setup with NI's TRAKTOR KONTROL F1
and TRAKTOR KONTRO X1 controllers connected to the USB hub.
TRAKTOR KONTROL Z2 - Setup Guide - 48
Setting Up Your TRAKTOR KONTROL Z2 System
Final Preparations
TRAKTOR KONTROL Z2 turntable setup with additional USB equipment connected to the Z2's USB hub.
4.10
Final Preparations
Before you can start using your TRAKTOR KONTROL Z2 system, you need to take some finals
steps.
4.10.1
Put On a Control Vinyl or Insert a Control CD
►
If you are using turntables to control TRAKTOR, put a Control Vinyl on each of your turntables.
►
If you are using CD players to control TRAKTOR, insert a Control CD into each of your CD
players.
TRAKTOR KONTROL Z2 - Setup Guide - 49
Setting Up Your TRAKTOR KONTROL Z2 System
Final Preparations
4.10.2
Switch On Your Devices
It is recommended to switch on the devices in the following order:
1. Computer/soundcard
2. Turntables / CD players
3. TRAKTOR KONTROL Z2
4. Amplification system (active speakers or power amplifier with passive speakers)
Later on, when the software is running and you have loaded tracks to TRAKTOR's Decks, gradually raise the volume controls while music is playing until a comfortable listening level is
reached.
Before putting on headphones, always make sure the headphone volume control is set to
minimum! Then, while playing music, slowly increase the headphone volume until it reaches the desired listening level.
4.11
Starting the TRAKTOR Software
After successful installation, you will find the TRAKTOR software installation folder on your
hard drive, containing the application and the documentation resources. If you installed using
the default settings, these folders can be found here:
▪ Mac OS X: Macintosh HD/Applications/Native Instruments/Traktor 2/
▪ Windows: C:\Program Files\Native Instruments\Traktor 2\
To start TRAKTOR:
►
Double-click the Traktor application icon in the installation folder, or, on Windows, one of
its aliases/shortcuts created during the installation procedure (for example on your desktop).
→
The TRAKTOR window with the Setup Wizard's start screen in front of it will open. Configure TRAKTOR using the Setup Wizard as instructed in ↑4.12, Using the Setup Wizard
to Configure Your TRAKTOR KONTROL Z2 System.
TRAKTOR KONTROL Z2 - Setup Guide - 50
Setting Up Your TRAKTOR KONTROL Z2 System
Using the Setup Wizard to Configure Your TRAKTOR KONTROL Z2 System
4.12
Using the Setup Wizard to Configure Your TRAKTOR KONTROL Z2
System
The Setup Wizard will help you to configure your TRAKTOR KONTROL Z2 system.
1.
On the Welcome screen, click Next to proceed.
TRAKTOR KONTROL Z2 - Setup Guide - 51
Setting Up Your TRAKTOR KONTROL Z2 System
Using the Setup Wizard to Configure Your TRAKTOR KONTROL Z2 System
2.
With TRAKTOR KONTROL Z2 connected to your computer, the Setup Wizard will automatically configure a TRAKTOR software setup optimized for your TRAKTOR KONTROL Z2 system. Click Finish to confirm.
TRAKTOR KONTROL Z2 - Setup Guide - 52
Setting Up Your TRAKTOR KONTROL Z2 System
Direct Mode Vs. TRAKTOR Mode
→
Once you have confirmed the selection, TRAKTOR will start with two Track Decks A and
B with Scratch Control enabled, and two Remix Decks C and D in Internal Playback mode
(i.e., with Scratch Control disabled). Also, the TRAKTOR Layout will be set to Essential,
i.e., TRAKTOR's Mixer will not be visible on the user interface. You can always change
the Layout of the user interface with the Layout selection menu in TRAKTOR's header.
To change the Deck Flavors, click on the Deck letter in a Deck's upper right corner and
select a Flavor from the drop-down menu:
We strongly advice to stick to the default configuration when using TRAKTOR with the Z2.
Once you know you're way around the software, you can still change the Deck Flavors, Layout, and internal routing. Refer to the TRAKTOR Manual for further information.
4.13
Direct Mode Vs. TRAKTOR Mode
After closing the Setup Wizard, TRAKTOR's upper Decks A and B will look like this:
TRAKTOR KONTROL Z2 - Setup Guide - 53
Setting Up Your TRAKTOR KONTROL Z2 System
Direct Mode Vs. TRAKTOR Mode
Both Decks in Direct Thru mode in TRAKTOR.
This is because the Z2's channels were set to Direct mode during connection of your turntables / CD players (see also ↑4.7, Connecting Turntables and ↑4.8, Connecting CD Players). In
Direct mode, a channel bypasses the TRAKTOR software and sends the channel input directly
to the main outs. This is the mode for stand-alone operation, or classical DJing with a turntable and a mixer if you like.
Pressing the TRAKTOR button next to the phono/line switch on the Z2's top panel switches the
relevant channel from Direct mode to TRAKTOR mode.
The lit TRAKTOR button next to the phono/line switch of channel A indicating the channel operates in TRAKTOR mode.
In TRAKTOR mode, TRAKTOR's Decks become enabled and the input signals coming from the
Z2's channel inputs are sent to the TRAKTOR software. This is the mode for controlling TRAKTOR using Timecode vinyl/CDs.
As you can see, TRAKTOR's Decks have become enabled with the Z2's channels being switched to TRAKTOR mode.
TRAKTOR KONTROL Z2 - Setup Guide - 54
Setting Up Your TRAKTOR KONTROL Z2 System
Calibrating TRAKTOR for Timecode Control
Naturally you can also run a "hybrid" mode, i.e., one turntable is playing records in Direct
mode while the other is used to control TRAKTOR with a Timecode record in TRAKTOR mode.
For further information on using the Z2 as a stand-alone mixer vs. using the Z2 with TRAKTOR, please refer to the tutorial chapters of the TRAKTOR KONTROL Z2 Manual.
4.14
Calibrating TRAKTOR for Timecode Control
TRAKTOR will automatically calibrate your system for Timecode control as soon as you put the
needle on the Control Vinyl or play the Control CD for the first time. TRAKTOR will analyze position and tempo of the Timecode source, along with the signal quality.
►
Click on the Deck platter of a Track Deck to display the Scope panel.
If the signal quality is sufficient, your Timecode medium will be detected. Subsequently the
signal meter to the right of the scope will fill up completely, and the scope will show two nice
circles. If you have a track loaded on the associated Deck, it will start playing. A Deck that has
been calibrated successfully should look like the one depicted below.
Successful calibration of Deck A in TRAKTOR.
TRAKTOR KONTROL Z2 - Setup Guide - 55
What's Next?
5
What's Next?
▪ For information on how to operate the Z2 and how to use it with the TRAKTOR software,
please refer to the TRAKTOR KONTROL Z2 Manual. You can access the TRAKTOR KONTROL Z2 Manual via the Open Manual… entry from the Help menu in the TRAKTOR software.
▪ For information on all TRAKTOR features, refer to the TRAKTOR Manual and the TRAKTOR
Getting Started. You can access these via the Open Manual… entry from the Help menu in
the TRAKTOR software.
TRAKTOR KONTROL Z2 - Setup Guide - 56
Troubleshooting and FAQ
Installation Folder Not Found by an Update Installer
6
Troubleshooting and FAQ
This section contains some of the most frequently asked questions and answers along with references to Knowledge Base articles for additional details. In order to find an article, please visit the Native Instruments website, navigate to the Knowledge Base in the Support section and
enter the article number in the search field.
6.1
Installation Folder Not Found by an Update Installer
If you have manually moved the location of a Native Instruments application on your hard
drive, the installer, upon attempting to run an update, will display an error message and abort
the installation. You can correct the application path in Service Center from the Overview tab.
If an application cannot be found, a Locate button will appear on this tab. Click this button
and browse to the actual location of the application.
6.2
User Account Control and Internet Security
User Account Control (UAC) and any installed Internet security or anti virus software should
temporarily be disabled for installing the TRAKTOR software, as they may interfere with the installation. If you are concerned about the safety of your files, disconnect your computer from
the network during installation.
To open the UAC configuration options in Windows 7 or Vista:
1.
2.
3.
Click on the Start button from the task bar, then enter UAC in the search field and press
[Enter]. Disable the check box for User Account Control in Windows Vista, or set the UAC
slider all the way to the bottom in Windows 7.
Check the Internet security or anti virus software's documentation for instructions on how
to temporarily disable their protection services.
Once the installation is complete, make sure to re-enable User Account Control and your
Internet security / anti virus software.
TRAKTOR KONTROL Z2 - Setup Guide - 57
Troubleshooting and FAQ
Audio Clicks and Drop-outs When Playing Tracks
6.3
Audio Clicks and Drop-outs When Playing Tracks
If you hear clicks and/or drop-outs when a track is playing, you might need to increase the latency setting of your TRAKTOR KONTROL Z2. To learn how to do this, please refer to the
TRAKTOR KONTROL Z2 Manual, which thoroughly describes the TRAKTOR KONTROL Z2 Control
Panel — the tool that allows you to adjust the audio interface settings.
6.4
More Troubleshooting Resources
If none of the suggestions in this chapter covers your problem, the TRAKTOR 2 Manual provides more detailed information on the topics discussed in this Setup Guide. Also check if the
Knowledge Base has an answer:
http://www.native-instruments.com/knowledge/
TRAKTOR KONTROL Z2 - Setup Guide - 58
Support
Knowledge Base / Online Support / Readme
7
Support
7.1
Knowledge Base / Online Support / Readme
To open the Knowledge Base / Online Support Form:
►
Open the Service Center application and click on the Support button in the upper right
corner. Here you will find direct links to the Native Instruments Online Knowledge Base
and the Online Support Form.
The Online Knowledge Base gathers useful information about your Native Instruments product
and can be of great help to solve possible issues you may encounter when working with Native
Instruments products.
If no Knowledge Base entry matches your problem, or if the matching entry does not solve the
problem, you can use the Online Support Form to contact the Technical Support team at Native Instruments. The Online Support Form will ask you to enter information about your hardware and software setup. This information is essential for our support team to be able to provide you with quality assistance.
When communicating with the Native Instruments support team, keep in mind that the more
details you can provide about your hardware, your operating system, the version of the software
you are running, and the problem you are experiencing, the better they will be able to help you.
In your description, you should mention:
▪ How to reproduce the problem
▪ What you have already tried to fix the problem
▪ A description of your setup, including all hardware
▪ The brand and specifications of your computer
When installing new software or software updates, a Readme file is included that contains late
breaking news and new information that was not yet included in the documentation. Please
open and read this Readme file before contacting Technical Support.
TRAKTOR KONTROL Z2 - Setup Guide - 59
Support
Forum
7.2
Forum
In the Native Instruments User Forum you can discuss product features directly with other
users and with experts moderating the forum:
http://www.native-instruments.com/forum.
7.3
Updates
Whenever you encounter problems, it is recommended that you first download and install any
available software updates. Updates are released regularly to fix known problems and to continuously improve the software. The version number of your software is displayed in the About
dialog for any Native Instruments application. This dialog can be opened by clicking on the NI
logo in the upper right corner of the user interface. Alternatively, you can find the version numbers of all installed Native Instruments applications when showing the details for an application within the Overview tab of the Service Center. Updates are available on the Update tab in
Service Center or on our website under:
http://www.native-instruments.com/updates
TRAKTOR KONTROL Z2 - Setup Guide - 60