1
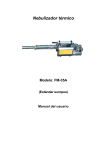
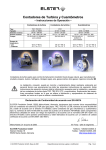
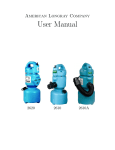
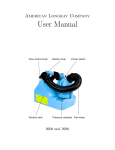
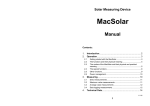
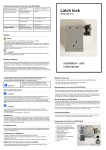
Longray
User Manual
gas valve
on/off
accelerator
adjust knob
air pump
solution tap
solution drain
solution tank
LR-TS75L
c 2015 Longray. All rights reserved.
fuel tank
Contents
1 Warnings
2
2 Warnings for indoor operation
3
3 Tech specs
Flow rates . . . . . . . . . . . . . . . . . . . .
4
4
4 Operation
First-time setup
To start spraying
Spraying tips . .
To stop spraying
5
5
5
7
8
.
.
.
.
.
.
.
.
.
.
.
.
.
.
.
.
5 Storage
.
.
.
.
.
.
.
.
.
.
.
.
.
.
.
.
.
.
.
.
.
.
.
.
.
.
.
.
.
.
.
.
.
.
.
.
.
.
.
.
.
.
.
.
.
.
.
.
9
6 Troubleshooting
10
Engine does not start . . . . . . . . . . . . . 10
Engine starts, but does not spray fog . . . . . 16
7 Appendix
19
Adjusting the accelerator . . . . . . . . . . . 19
Schematics . . . . . . . . . . . . . . . . . . . 21
1
1
Warnings
• After spraying, use water to clean the solution
tank and pipeline. This is especially important
for corrosive chemicals.
• Strongly corrosive chemicals (such as peroxyacetic
acid) may damage the unit. Limit to occasional
use.
• Do not use fogger near flammable surroundings.
Never run the unit in the presence of an open
flame.
• Do not leave a running fogger unattended.
• Wear ear protection.
• Some components can get hot while spraying.
• Let the unit cool down before adding more solution or fuel. Do not transport or pack the unit
while it is hot.
2
2
Warnings for indoor operation
• In closed spaces, operator should wear a breathing mask.
• Some aerosol carriers at high concentrations become flammable. Do not exceed these limits per
1000 m3 .
Special carriers
Nebal
Glyzerine
Ekomist
Ethylengkole
UK2-spezial
VK1
Nevolin/nevocol
3.0L
2.5L
2.0L
2.0L
2.0L
1.5L
1.5L
Fuels and white oils
Vegetable Oil
Diesel/Heating Oil
Kerosene
Petropal
Shell Risella
2.5L
2.0L
2.0L
2.0L
1.5L
The special carriers volume must be calculated
accurately according to the rooms volume.
3
3
Tech specs
Exact specifications depend on altitude and temperature.
Solution flow rate
Solution capacity
Solution pressure
Fuel engine
Fuel consumption
Fuel capacity
Fuel pressure
Fuel type
Batteries
Dimensions
Weight, empty
27 gal/hr
1.3 gal
0.2 bar
25.2 hp
0.4-0.5 gal/hr
0.4 gal
0.1 bar
gasoline
4 x 1.5V
51.4 x 11.4 x 14.2 in
23.4 lb
Flow rates
Exact flow rate depends on carrier viscosity, which depends on temperature.
Nozzle diameter (mm)
Flow rate (L/h)
Flow rate (gal/h)
4
2.0
42
11
3.0
60
15.6
3.5
65
17
4
Operation
First-time setup
1. Install 4 x 1.5V batteries into the battery compartment at the base of the nozzle.
2. Shut the gas valve by pressing down.
3. Check the ignition by pumping. You should hear
a buzzing sound, “ta ta ta ...”
To start spraying
1. Fill the fuel tank using the included fuel funnel.
Fill to full capacity. Tip: Tighten the lid lightly,
to not damage the rubber seal inside the lid.
2. Fill the solution tank using the included solution
funnel. Fill to about two-thirds full.
5
3. Turn the solution tap to the OFF position.
off
clean
4. Open the gas valve by pulling up.
6
on
5. Gently and slowly push and pull the air pump.
6. Wait 1 minute for the unit to warm up.
7. Clear the area out to 2 meters in front of the
nozzle.
8. To start spraying, turn the solution tap to the
ON position.
Spraying tips
Spray behind you as you walk into the wind. Keep
nozzle at least 2 meters away from objects.
7
To stop spraying
1. Turn the solution tap to CLEAN position. This
releases the solution pressure.
off
clean
on
2. Once the spray dies down, turn the solution tap
to OFF.
3. Shut the gas valve by pressing down.
4. Empty the solution tank and rinse with clean
water.
8
5
Storage
If you will not be using the machine for a while:
1. Rinse the solution tank using clean water.
2. Rinse the solution feed using clean water.
3. Remove the batteries.
9
6
Troubleshooting
Engine does not start
1. Check fuel tank level. Ensure it is 1/3 to 2/3
full.
2. Check ignition system. Remove the ignition
cap and press the cap to the metal body.
Without touching the metal body, start pumping.
If you can hear a sound like “Ta Ta Ta”, then
the ignition system is functioning properly. Otherwise, replace the batteries.
3. Clean the air intake. Take apart the air intake assembly in the back of the machine. Clean
the spacer plates. Use a soft cloth to wipe the
diaphragm. The engine will not start if the diaphragm is wet.
10
4. If the diaphragm was dry, skip to the next step.
If the diaphragm was wet, decrease the accelerator setting. See Appendix. Through trial
and error, find a setting that is low enough that
the diaphragm isn’t wetted during startup, but
not so low that the engine won’t start. You will
need to dry the diaphragm in between tests.
5. Check and clean swirl pole. Unscrew the
swirl pole. Check that the two needles at the
end of the swirl pole are clean, sharp-edged, and
symmetrical:
11
1
2
3
4
6. Check one-way diaphragm for fitting/damage.
Detach the rubber tube from the diaphragm.
Inspect the diaphragm.
12
Good
Bad
Do not re-screw the one-way diaphragm too tightly.
7. Check pump seal for fitting/damage.
8. Check large rubber O-ring for fitting/damage.
13
9. Clean fogging tube. Remove any deposited
carbon.
10. Check gas injection. Remove ignition voltage
cap, two screws, and the swirl pole..
14
Insert finger into the swirl pole cavity, and begin
pumping.
Increase the accelerator setting until you can feel
the gas spray.
15
Engine starts, but does not spray fog
1. Check solution tank pressure. With the engine running and the solution tap in the ON position, remove the solution lid and place your
palm over the opening.
If you can feel pressure, contact technical support. If there is no pressure, continue to the
next step.
2. Clean the solution line. Remove and clean
the connecting screw.
16
3. Check the one-way diaphragm. Detach the
rubber tube from the diaphragm.
Inspect the diaphragm.
Good
Bad
4. Clean the solution filter.
17
5. Clean the nozzle. Wait for fogging tube to
cool. Carefully unscrew the nozzle. Clean out
any clogs.
18
7
Appendix
Adjusting the accelerator
The notch at the top of the dial points to the current setting, here ”0”. The higher the setting, the
higher the gas feed rate.
• Do not use a setting above 4 unless specifically instructed.
• While adjusting, stay at least 2 meters away
from the front of the unit.
If the accelerator is too low, the engine may not
start. The accelerator is too high if:
19
• You can hear the engine pop noise as you pump
the machine, or
• Gas wets the diaphragm.
20
Schematics
(Page intentionally left blank.)
21
22
23
TS-75L
2
143
146
144
145
134
135
133
123
124
54
132
125
126
73
127
129
74
128
75
130
78
77
76
95
96
97
98
99
79
82
83
88
87
84
86
81
6
80
6
69
72
70
71
85
24
73
74
75
72
142
143
141
140
139
138
137
136
110
109
112
115
114
113
116
118
117
120
121
107
119
106
90
122
105
91
104
103
92
54-60
93
102
101
95
100
96
97
98
99
67
66
68
69
70
71
25
94
108