1
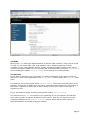
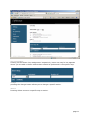
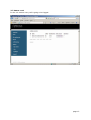
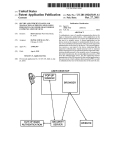
spiderstar VoIP Interface
Version 4.0
User manual
© 2009 Vanillatech GmbH
Contents
1 Introduction ........................................................................ 3
2 Setup ................................................................................. 4
2.1 on an existing VMWare Server or -Player........................... 4
2.2 on an existing Linux server.............................................. 4
3 Features ............................................................................. 5
3.1 Logon ........................................................................... 5
3.2 General settings............................................................. 5
3.3 DIDs............................................................................. 6
3.4 Services........................................................................ 6
3.5 Users............................................................................ 8
3.6 Callrouting .................................................................. 10
3.7 Status->cdr................................................................. 13
4 Special applications............................................................ 14
4.1 special applications....................................................... 14
4.2 voicemailmenu............................................................. 14
4.3 transfer....................................................................... 14
4.4 conference rooms......................................................... 14
4.5 database connection to cdr............................................ 14
4.6 branch offices .............................................................. 14
4.7 Time based routing....................................................... 14
4.8 Sending faxes.............................................................. 14
page 2
1 Introduction
With spiderstar VoIP Interface, you can turn any server into a multi-functional
communications center in moments; our software provides you with an immediatelydeployable VoIP server which is fully-customizable via an easy-to-use web-interface.
Available functions include fax mode, voicemail and customizable voice menus.
Why use spiderstar VoIP?
- Complete VoIP telephony system (SIP Protocol) with unlimited number of users (3
subscribers offered free of charge)
- Possibility of connecting to internet telephone services
- Voice messages forwarded via email or made accessible through a voicemail system
- Fully-integrated fax server (fax/email gateway) for both incoming and outgoing faxes –
inclusive of T.38 support (error-free, internet-based faxing)
- Menu-driven operation via a web-interface
- Multilingual: German, English, Spanish and French languages available at present
- WLAN-optimized: make calls over currently-laid wiring
- Connect your home office/other location to your main office via almost any DSL
connection using a VPN
- Simple video conferencing
- Hold telephone conferences in up to five conference rooms simultaneously
- Define preferred ‘hold’ music with a personally-chosen MP3
- Easy creation of voice menus (e.g. ‘Choose 1 for general information, 2 for…’)
- Interface adaptable to every specific requirement
page 3
2 Setup
2.1 on an existing VMWare Server or -Player
To install the spiderstar VoIP Interface on a VMWare Server you need to download the
recent VMWare Image at
http://download.spiderstar.com/vmware
After unpacking the image it can be started automatically with a VMWare player or it can
easily be imported in an existing VMWare server. After running the image it will
automatically download the recent version of spiderstar VoIP Interface (on port 80) and
save it to the VMWare image. Because of this please be aware that the VMware image
already has internet access on first boot.
When the download has finished you will be able to do settings directly on the vmware
console, e.g. changing the ip address.
2.2 on an existing Linux server
For setting up spiderstar VoIP Interface on an existing Linux server please download the
recent version of the software with the following command
wget http://download.spiderstar.com/linux/spiderstar-latest.tar.gz
and store it in the root directory of your server.
After unpacking the archive
tar xfz /spiderstar-latest.tar.gz
please copy the init script that you can obtain at
http://download.spiderstar.com/linux/startup-script/spiderstar
in the following directory
/etc/init.d/
If you want to start the voip server automatically on system boot please set the
appropriate links, e.g.
ln -s /etc/init.d/spiderstar /etc/rc3.d/S30spiderstar
ln -s /etc/init.d/spiderstar /etc/rc0.d/K10spiderstar
page 4
3 Features
3.1 Logon
The system can be accessed using the web interface. Therefore enter the system's ip
address in the web browser. Having entered the username and password in the logon
screen press ok to enter the configuration menu.
If you logon the first time the username will be ‘Administrator’ and the password is
‘9999’.
3.2 General settings
A new nameserver can be set in the section ‘general settings’ as well as a new
smarthost.
A nameserver is needed e.g. for sending voicemails to the specified email address and
for registering with ip gateways.
The FQDN is the dns name or the external ip address that points to your spiderstar.net
pbx system. For example a FQDN/extern ip address is needed by some ip gateways to
allow registering behind a nat firewall. You will have to try out wheather your provider
will need this to be set or not.
To reload settings that you made e.g. in the section ‘msn’, you will have to use the
‘reload settings’ button in ‘general settings’.
Using the button ‘software update’ you are able to update your pbx system with service
packs you received from the support.
To upload your individual music on hold you are able to upload an mp3 file (up to 10 MB)
using the function ‘add mp3’. Music on hold is played automatically while transferring a
caller or placing someone on hold. You can upload multiple files that are going to be
played one after the other.
page 5
3.3 DIDs
Menu point PSTN allows the administration of external DID numbers. These will be saved
in a list. To use those DIDs your VoIP gateway has to support signaling of those
numbers. If your voip gateway doesn’t support signaling of DIDs incoming calls will be
routed to the base number of your provider that is automatically inserted in Callrouting
when enabling the option allow incoming in the settings of a VoIP gateway.
3.4 Services
If you want to connect to an ip gateway for calling participants in the whole world you
will have to enter these gateways in the sip gateways section below the Services menu
point.
For adding a new server please press add new server. After that enter the name of the
gateway, the servers ip address or dns name, username and password for connecting to
the server. Signaling is either SIP or IAX2. Please consult your carrier what type of
signaling to use.
If you also want to accept incoming calls please enable allow incoming.
You need to set NAT=yes to connect to an ip gateway if you are behind a firewall and
don’t have a public ip address assigned to your server. Also you will have to set your
external ip address in the general settings section. Some carriers also require a
NAT=fromdomain and a NAT=fromuser setting.
page 6
Also some gateways have the possibility to redirect calls. If you want to enable this
feature check allow forwarding. Be very careful with that since the pbx system will dial
every number your recipient redirected his phone to. E.g. if your recipient set his phone
to a premium service your pbx will dial this number and you will have to pay for this.
Below the sip servers you will find a section called callrouting table. Using this
section you can define what service should be using dialing what number.
The area code defines the digits that should be dialed for the specified service. E.g. if you
define ‘0’ as area code every number beginning with ‘0’ is dialed with the specified
gateway.
crop first.. .digits means that the first ‘n’ digits of your number are going to be
cropped from the dialed number. E.g.: if you dial the number 0043 12345 on your phone
and crop the first 2 digits the number 4312345 is going to be dialed.
If you define a number in add prefix a prefix is added before the dialed number. e.g. if
you dial the number 0043 12345 on your phone and add the prefix 01080 the number
01080004312345 is going to be dialed.
provider is the ip gateway you had entered in the sip gateways section before.
page 7
3.5 Users
Using the users section you can define internal participants that are able to connect to
the pbx using sip procotol.
username
login name for the web configuration panel.
internal number
The number where the user can be reached internally. This number is used in the
‘callrouting’ section. The internal number of the user ‘Administrator’ is the number for the
voicemail menu.
numeric password
Password for the user that is used to authentify at the voicemailmenu and to identify the
users sip phone.
email address
email address of the pariticipant where voicemails and fax2emails should be routed to.
internal voicemailbox on absence
The voicemailbox will answer on internal calls if the sip phone isn't logged on.
internal voicemailbox no response
The voicemailbox will pickup if the user doesn't answer after ‘n’ seconds.
voicemailbox internal on busy
The internal voicemailbox will pickup if the user is busy.
voicembailbox internal always
The internal voicemailbox will pickup always (no internal calls will be accepted).
callgroup
An incoming call on a phone that belongs to a callgroup can be picked up by another user
how belongs to the same callgroup. The user can do this by dialing *8 on his phone.
Send voicemails
Defines whether the system should send voicemails to the user’s email address in case
someone left a voicemail message. If not checked the user will only be able to get his
voicemails using the voicemail menu.
Say callerid / announce time
Defines whether user hears the callerid respectively the calling time when checking his
voicemailbox.
Store no voicemails
If set there will be no voicemails stored on the server and user will not be able to retrieve
his voicemails with the voicemail menu.
Billing account
Account for that user that will be stored in the db for every call. Important for later
billing.
page 8
CLIP
Callerid presentation. The callerid that will be displayed on the called phone when making
phone calls.
Direct connection
If checked the server tries to make direct connections between users and speech is not
routed through the server (allow reinvite).
DTMF-Mode
If set to digital DTMF tones will be transmitted using the RFC2833 standard. Otherwise
they will be transmitted via audio.
NAT-Mode
If set the user will be regarded as ‚behind a firewall’. This is only useful if your voip
server is located outside the firewall.
Port
Port for sip users. Default is 5060.
Qualify
Sometimes it is necessary that the status (online/offline) of a user is checked
periodically.
Codecs
Defines the possible codecs and speech compression for the given user. Alaw and ulaw
(g711) define uncompressed speech processing while g729 uses compression. Please
note that g729 requires the purchase of an appropriate license.
page 9
3.6 Callrouting
Using the callcouting section you can define what should happen when a call is received.
Every did and every ip gateway (where accept incoming is flagged) will be listet in that
section.
Below every entry you have the possibility to define new assignments. Every assignment
is one step in the callrouting table. And in every step you are enabled to do different
actions like ‘call’ a participant or let answer the voicemailbox.
page 10
new assignment
Clicking on the button ‘new assignment’ respectively ‚insert new step’ a box appears
where you are able to define what actions should be performed in the specific step.
change
pressing the change button allows you to change a specific action.
delete
Pressing delete removes a specific step or action.
page 11
You can choose among the following actions:
Call
Voicemail
forward
voicemail menu
fax
conference
break
special
application
ivr
The action ‘call’ dials a specific internal pariticipant who was
entered in the ‘users’ section. This can be an ip address, the
internal number of a participant, or the participants name.
If you want to enter an ip address you will have to enter the ip
address as the ‘name’ of the user in the ‘users’ section.
If you specify a ‘duration’ only the participant is only called the
time you entered (in seconds). After that time the next step will be
performed.
If no other step is available the caller will hear a busy tone.
If you select voicemail the caller will be connected to the
voicemailbox of the specified internal user.
Using the action ‘forward’ you can forward a user to a given numer
To listen to your voicemails from remote you can call your
voicemail menu.
Having set the ‘fax’ action, incoming faxes will be redirected to the
users email address. So ‘internal number’ is the internal number of
the user the fax should be sent to by email (.pdf attachment).
5 conference rooms enable participants to meet each other
virtually.
break causes the pbx system to wait ‘n’ seconds before doing the
next step.
If you have spezial requirements the support may help you
realizing these requirements using special applications.
Using an ivr (interactive voice response) menu a user specific
announcement can be uploaded as wav file. With the ‚dimension’ it
is possible to define how many options the caller are given. A
dimension of ‚0’ means that there is only the uploaded
announcement played back to the user and after that the caller is
redirected to the next step.
If the user is enabled to select an option by pressing a number on
his phone (dimension > 0) there will be new numbers available in
the callrouting section – automatically named IVRx-n whereas x ist
he number of the ivr menu (automatically assigned) and n ist he
possible option for the user. Below these newly generated
numbers new steps can be assigned.
page 12
3.7 Status->cdr
In the cdr section every call is going to be logged.
page 13
4 Special applications
4.1 special applications
Some callrouting require spezial data to be entered in the callrouting table. For more info
contact the support.
4.2 voicemailmenu
To contact the voicemailmenu to record your unavailable message you have to set an
internal number for the user ‘Administrator’. This is the internal base number for the
voicemail menu. (Default: 11). The voicemail menu of a given user can be reached then
by dialing [Administrator number][user]. So e.g. if Administrator has number 11 and
user has number 25 his voicemailmenu can be reached dialing 1125.
4.3 transfer
To transfer a user please press ‘#’ after that the number the call should be transferred
to.
4.4 conference rooms
To connect to a conference room dial ‘*’ and after that the room number (1-5). If you
want to invite users to a conference dial the user and after that tranfer him or her to ther
conference room pressing ‘#*’ and after that the room number.
4.5 database connection to cdr
The cdr database can be accessed using ODBC for postgresql. Therefor connect to the the
server and enter user postgres, password postgres and database cdrdb. The postgresql
db listens on port 5433.
4.6 branch offices
To interconnect 2 pbxes do the following:
- add a new ip gateway and enable incoming calls on both machines with same
username/password.
- Enter one callrouting table on both machines.
- Add one user (sip) on both machines who has the same username as the user defined
in the ip gateway section. Also ensure that the passwords are identical.
4.7 Time based routing
To define a timebased routing please use the ‚Special application’ function in callrouting.
As Command please enter ‚GotoIftime’ and as argument use ‚[Time]|*|*|*?duo,[user],1’.
e.g. 9:00-17:00|*|*|*?duo,23,1
In this case a call would be directed to user 23 if it is e.g. 10:00 am. I fit is later, e.g.
06:00 pm the call would be directed to the next step in callrouting.
4.8 Sending faxes
The server supports faxes with T.38 protocol. This protocol has to be supported by your
carrier. If not the usual g711 codec will be used and transmission failures will be likely.
On your spiderstar VoIP Interface there is a fully integrated smtp server installed. This
server is responsable for sending and receiving faxes. To send a fax please create a new
Email and address it to fax@[ip address of your server].
To get this working please configure your default SMTP Server to rely mails to this server
or use the integrated smtp server as default mailserver for your email client.
Enter the complete fax number in the subject line of your Email and attach a pdf
document to it.
page 14
After sending this email the server will start connecting to the remote fax machine
immediately.
page 15