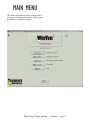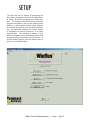
1
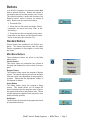
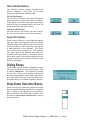
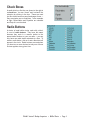
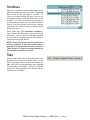
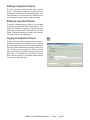
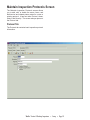
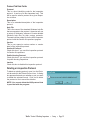
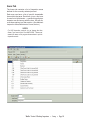
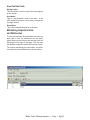
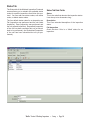
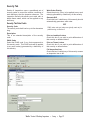
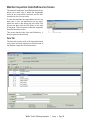
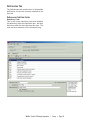
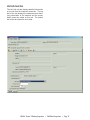
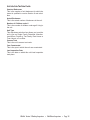
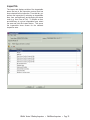
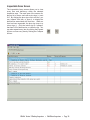
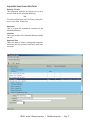
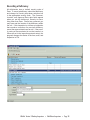
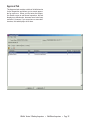
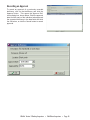
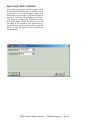
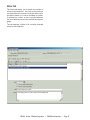
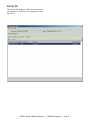
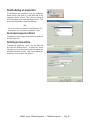
WinTen² Section 8
Desktop Inspections
Preliminary User Manual
User Manual Edition:
11/15/2004
We are your inside track for making your job easier!
Tenmast Software
132 Venture Court, Suite 1
Lexington, KY 40511
www.tenmast.com
Support:
Marketing:
Fax:
(877) 359-5492
[email protected]
(877) 836-6278
[email protected]
(859) 367-7480
WinTen² Section 8 Desktop Inspections
Preliminary User Manual
User Manual Edition: 11/15/2004
Copyright © 2001-2004 Tenmast Software. All rights reserved.
This manual, as well as the software described in it, is furnished under license and may
be used and/or copied only in accordance with the terms of such license. The content
of this manual is furnished for informational use only, is subject to change without notice,
and should not be construed as a commitment by Tenmast Software. Tenmast Software
assumes no liability for any errors or inaccuracies that may appear in this manual.
Except as permitted by such license, no part of this publication may be reproduced,
stored in a retrieval system, or transmitted, in any form or by any means, electronic,
mechanical, recording, or otherwise, without the prior written permission of Tenmast
Software. Permission to produce copies for official use is expressly granted to organizations and individuals with a current Update and Support Agreement with Tenmast Software for the maintenance and support of Tenmast Software’s WinTen² Section 8 Desktop
Inspections program.
Any references to company, housing authority, or individual names or identities in examples or screen images are for demonstration purposes only and are not intended to refer
to any actual organization or person.
CONTENTS
Introduction . . . . . . . . . . . . . . . . . . . . . . . . . . . . . . . . . . . . . . . . . . . . . . . . . . . . . . 1
WinTen² Basics . . . . . . . . . . . . . . . . . . . . . . . . . . . . . . . . . . . . . . . . . . . . . . . . . . . . . . . . . . . . . . . . . . 2
Program Overview . . . . . . . . . . . . . . . . . . . . . . . . . . . . . . . . . . . . . . . . . . . . . . . . . 9
The Inspection Life Cycle . . . . . . . . . . . . . . . . . . . . . . . . . . . . . . . . . . . . . . . . . . . . . . . . . . . . . . . . . 10
Main Menu . . . . . . . . . . . . . . . . . . . . . . . . . . . . . . . . . . . . . . . . . . . . . . . . . . . . . . 13
Setup . . . . . . . . . . . . . . . . . . . . . . . . . . . . . . . . . . . . . . . . . . . . . . . . . . . . . . . . . . . 15
Setup Screen . . . . . . . . . . . . . . . . . . . . . . . . . . . . . . . . . . . . . . . . . . . . . . . . . . . . . . . . . . . . . . . . . . . 16
Browse Inspectors Screen . . . . . . . . . . . . . . . . . . . . . . . . . . . . . . . . . . . . . . . . . . . . . . . . . . . . . . . . . 17
Maintain Inspectors Screen . . . . . . . . . . . . . . . . . . . . . . . . . . . . . . . . . . . . . . . . . . . . . . . . . . . . . . . . 18
Browse Inspection Protocols Screen . . . . . . . . . . . . . . . . . . . . . . . . . . . . . . . . . . . . . . . . . . . . . . . . . 19
Maintain Inspection Protocols Screen . . . . . . . . . . . . . . . . . . . . . . . . . . . . . . . . . . . . . . . . . . . . . . . . 22
Maintain Inspection Items/Deficiencies Screen . . . . . . . . . . . . . . . . . . . . . . . . . . . . . . . . . . . . . 28
Schedule Inspections . . . . . . . . . . . . . . . . . . . . . . . . . . . . . . . . . . . . . . . . . . . . . 33
Schedule Inspections Screen . . . . . . . . . . . . . . . . . . . . . . . . . . . . . . . . . . . . . . . . . . . . . . . . . . . . . . 34
Scheduling an Inspection . . . . . . . . . . . . . . . . . . . . . . . . . . . . . . . . . . . . . . . . . . . . . . . . . . . . . . 40
Scheduling a Batch of Inspections . . . . . . . . . . . . . . . . . . . . . . . . . . . . . . . . . . . . . . . . . . . . . . . 40
Scheduling a Vacant Unit Inspection . . . . . . . . . . . . . . . . . . . . . . . . . . . . . . . . . . . . . . . . . . . . . 41
Removing a Scheduled Inspection . . . . . . . . . . . . . . . . . . . . . . . . . . . . . . . . . . . . . . . . . . . . . . 43
Editing an Inspection Schedule . . . . . . . . . . . . . . . . . . . . . . . . . . . . . . . . . . . . . . . . . . . . . . . . . 44
Edit/Delete Inspections . . . . . . . . . . . . . . . . . . . . . . . . . . . . . . . . . . . . . . . . . . . . 45
Browse Inspections Screen . . . . . . . . . . . . . . . . . . . . . . . . . . . . . . . . . . . . . . . . . . . . . . . . . . . . . . . . 46
Printing Inspection Reports . . . . . . . . . . . . . . . . . . . . . . . . . . . . . . . . . . . . . . . . . . . . . . . . . . . . 48
Rescheduling an Inspection . . . . . . . . . . . . . . . . . . . . . . . . . . . . . . . . . . . . . . . . . . . . . . . . . . . . 50
Inspection Detail Screen . . . . . . . . . . . . . . . . . . . . . . . . . . . . . . . . . . . . . . . . . . . . . . . . . . . . . . . . . . 51
Rescheduling an Inspection . . . . . . . . . . . . . . . . . . . . . . . . . . . . . . . . . . . . . . . . . . . . . . . . . . . . 64
Deleting an Inspection . . . . . . . . . . . . . . . . . . . . . . . . . . . . . . . . . . . . . . . . . . . . . . . . . . . . . . . . 64
Reports . . . . . . . . . . . . . . . . . . . . . . . . . . . . . . . . . . . . . . . . . . . . . . . . . . . . . . . . . 65
Inspections Reports Screen . . . . . . . . . . . . . . . . . . . . . . . . . . . . . . . . . . . . . . . . . . . . . . . . . . . . . . . 66
Index . . . . . . . . . . . . . . . . . . . . . . . . . . . . . . . . . . . . . . . . . . . . . . . . . . . . . . . . . . . 69
INTRODUCTION
The WinTen² Section 8 Desktop Inspections program is designed for use on computers running
the Windows NT, 2000, or XP operating system.
The interface is designed in a Windows environment and includes point-and-click mouse actions,
pull-down menus, and Windows-based help functions. This manual contains all of the information
you need to use the WinTen² Section 8 Desktop
Inspections program (hereafter referred to as Section 8 Inspections or S8 Inspections).
Version Information
This is a preliminary user manual written as of
11/15/2004. Some sections of this manual may be
incomplete in regard to the program released as
of that date. Some sections may be inaccurate in
regard to later versions of the program. It does not
apply to previous versions of the program (including MS-DOS-based ones).
When Tenmast issues an update to a piece of software, we post a documentation update on our Web
site at www.tenmast.com. If you have a current
Update & Support Agreement for Section 8 Inspections, you may download both the updated program
and the updated documentation at no charge. See
the Client Service Area of our Web site for detailed
instructions.
Getting Help
Although we have made every effort to make
this manual as comprehensive as possible, no
document can cover all contingencies. If you
encounter problems with Section 8 Inspections,
please call the Tenmast Training & Support Department toll-free at (877) 359-5492 or send e-mail to
[email protected].
Revisions
To better serve our clients, we constantly update
our manuals, just as we constantly make improvements in our programs. If you find an error or
omission in this documentation or have a suggestion for improving it, please call the Tenmast
Marketing/Communication Services Department
toll-free at (877) 836-6278 or send e-mail to
[email protected].
WinTen² Section 8 Desktop Inspections • Introduction • Page 1
WINTEN² BASICS
The WinTen² programs are designed to provide
quick and easy access to commands and data
throughout Tenmast’s programs. In WinTen², you
can use the keyboard and/or the mouse to navigate
through programs and execute commands.
The WinTen² system consists of more than 20
independent housing authority data management programs that are capable of sharing data
with one another. Although each program has its
own unique functions and features, they all share
certain common ones. This introduction explains
these common functions and features and how to
use them.
Navigation
Mouse Actions
In many instances, this manual will instruct you
to “click” something in order to give the program
a command. This refers to executing a command
with your mouse. These are the different ways in
which you may need to “click” to execute a command:
Click or Point-and-Click
Position the mouse pointer over the indicated
object on the screen, then press and release the
left mouse button once.
Double-Click
Position the mouse pointer over the indicated object
on the screen, then quickly press and release the
left mouse button twice.
the mouse pointer
Right-Click
Position the mouse pointer over the indicated
object on the screen, then press and release the
right mouse button once.
Drag and Drop
Position the mouse pointer over the indicated
object on the screen, then press and hold down
the left mouse button. While still holding down the
button, move the mouse pointer to where you want
to place the object and then release the button.
WinTen² Section 8 Desktop Inspections • WinTen² Basics • Page 2
Keyboard Actions
There also are many ways to issue commands in
the WinTen² programs with your keyboard. When
the manual instructs you to “press” a key or keys,
it is referring to the keys on your keyboard. The
manual indicates a key by enclosing it in less-than
and greater-than signs. For example, <Enter>
means “the Enter key.”
Moving Focus
When you first enter a screen, “focus” will be on a
particular button or data field. Focus is shown by a
dotted line around the inside of a button (as shown
at right) or a flashing cursor in a data field. When
a button has focus, you can activate it by pressing
<Enter>, which will have the same effect as if you
had clicked on it. When a data field has focus, you
can type data into it. You can move focus in either
situation by pressing <Tab>. If you are on a menu
of buttons, you can also move focus by using the
arrow keys.
with focus
Keyboard Shortcuts
Some commands have “keyboard shortcuts.” This
means you can execute the command through a
combination of keys. Keyboard shortcuts will use
a combination of a letter or number key plus either
the <Alt> (Alternate) or <Ctrl> (Control) key. The
manual abbreviates these commands in the format
<key+key>. For example, a command that you
give “by pressing <Alt+X>” is performed by holding
down <Alt> and pressing <X>.
The <Ctrl> and <Alt> keys are keys that modify
the way that the computer interprets other keys,
much like <Shift> does. When a key combination
includes one of these keys, it’s best to press and
hold the modifying key before pressing the other
key in the combination, because the modifying
key won’t type anything. To continue the previous
comparison, this is like using <Shift> to capitalize
the letter “a” while doing word processing. If you
pressed and held <A> before pressing <Shift>,
you’d type something like “aaaaaaaA.” However,
if you pressed and held <Shift> first, you’d just type
“A.” The same holds true for issuing commands
with key combinations that include <Alt> or <Ctrl>.
WinTen² Section 8 Desktop Inspections • WinTen² Basics • Page 3
without focus
Buttons
In all WinTen² programs, the screens contain buttons to access functions. Buttons are square or
rectangular and may contain pictures, text, or both.
This manual indicates a button with its name (“the
Reports button”) and/or a picture (as shown at
right). Buttons can be used in three ways:
1. Point-and-Click
2. Move focus to the button and press <Enter>
(remember, you move focus with <Tab> or the
arrow keys).
3. Press the key that corresponds to the underlined letter on the button (on the Reports button
shown to the right, this would be <R>).
Standard Buttons
Several buttons are standard in all WinTen² programs. This means they always have the same
function regardless of the program in which they
are found.
Main Menu Buttons
These standard buttons are found on the Main
Menu screen.
Version Button
This button opens an information box (shown at
far right) that displays the version date of the program.
Reports Button
The Reports button opens the program’s Reports
screen. The specific reports you can view and print
from this screen vary depending on the program in
question. Please see the appropriate chapter of
this manual for details.
Setup Button
The Setup button opens the program’s Setup
screen. This screen allows you to change the
basic information that the program uses to generate reports and/or track and present data. Please
see the appropriate chapter of this manual for more
details on setup specifics.
Exit Button
The Exit button shuts down the program and closes
all associated windows.
WinTen² Section 8 Desktop Inspections • WinTen² Basics • Page 4
Other Standard Buttons
The following buttons appear throughout the
WinTen² programs. They allow you to make
choices on screens and in dialog boxes.
OK and Yes Buttons
Click the OK or Yes button if you want to accept the
data presented or continue the action you started.
Some dialog boxes which only display information
without giving you command options will have OK
buttons that close them when clicked.
Cancel and No Buttons
Click the Cancel or No button if you want to abandon the current screen or the action you started.
Grayed Out Options
Some controls, buttons, or data fields may appear
light gray rather than appearing with their normal
full-color images (these buttons are colorized in the
WinTen² programs, even though they may appear
in black-and-white in this manual). This condition is referred to as “grayed out.” This indicates
that those options are disabled and cannot be
accessed at the present time. Grayed out options
will be their normal colors and accessible once the
program reaches a set of conditions that allows the
option to work again.
Dialog Boxes
Occasionally, a small window will appear on top of
the screen in which you’re currently working. This
is called a dialog box. The contents of a dialog
box will vary. Some contain pertinent information
and have a single button which makes them disappear, while others allow you to specify options for a
procedure that you’ve told the program to perform.
Drop-Down Selection Boxes
Some screens have a data entry field with a small
black downward-pointing triangle at its immediate
right. Clicking on this triangle opens a small list of
pre-set options for that data field’s contents. This
is known as a drop-down selection box. Click an
option to select it.
WinTen² Section 8 Desktop Inspections • WinTen² Basics • Page 5
Check Boxes
A small white box like the one shown to the right is
a check box. You can “check” and “uncheck” the
selection by clicking in the box. These are used
just like check boxes on pencil-and-paper forms —
they are simple yes-no conditions. In the example
at right, Receivables and Payables are checked
and Payroll is not checked.
Radio Buttons
A cluster of small white circles, each with a label,
is a set of radio buttons. They have this name
because they work in a manner similar to the
preset station buttons on your car radio — you can
only have one radio station selected at a time. To
select a radio button, click on it and a black dot will
appear in the circle. Radio buttons are used when
you have two or more choices but only one of those
choices applies at any given time.
WinTen² Section 8 Desktop Inspections • WinTen² Basics • Page 6
Scrollbars
Many times, a table of records holds more records
than the program can fit on the screen. The scrollbar is found on the right edge of the table. To
move up or down through the table, click on the
small black triangles at the top and bottom of the
scrollbar. The small box between the triangles is
a rough indicator of where you are within the table;
think of it as being similar to an elevator’s display
that shows how close to the top or bottom of the
building the car is.
Some tables also have horizontal scrollbars if
they contain more information than will fit across
the screen. You can use the small black triangles
at the bottom left and right corners of the table to
move from side to side within it.
NOTE: Some drop-down selection boxes have
vertical scrollbars if they have more options
than will fit in the selection box when it is open.
These function in exactly the same manner as
the scrollbars on tables of records.
Tabs
Some screens have lots of information that must
be divided to be easier to track and access. In the
WinTen² programs, these screens are divided into
tabs, which are so named because they resemble
the index tabs on file folders. Clicking on a tab will
change the data displayed on the screen and the
toolbar options available.
WinTen² Section 8 Desktop Inspections • WinTen² Basics • Page 7
WinTen² Section 8 Desktop Inspections • WinTen² Basics • Page 8
PROGRAM OVERVIEW
The WinTen² Section 8 Desktop Inspections program is designed to facilitate all aspects of Section
8 housing inspections under the HQS standards.
It draws data from the WinTen² Section 8 Tenant
and Landlord program in order to compile its database of Section 8 tenants, landlords, and units.
The program’s standard configuration includes the
complete set of HQS inspections requirements. If
your agency needs more detail or needs to fulfill
other inspection requirements, you can customize
the inspection protocols to suit your preferences
and needs.
WinTen² Section 8 Desktop Inspections • Program Overview • Page 9
THE INSPECTION LIFE CYCLE
The diagram on the facing page shows the life
cycle of a Section 8 inspection, from the initial identification of need through a passing result. Three
conditions can generate the need for an inspection: a request for lease approval (RFLA), a lease
anniversary, or a request for quality certification of
a Section 8 unit. Any of these conditions can generate a request for an inspection, which, in turn,
generates a scheduled inspection.
The WinTen² Section 8 Desktop Inspections program is designed to be used with handheld computers for a “paperless” system of inspection data
gathering. However, you can use more traditional
printed inspection forms and enter the data by
hand if you so choose. Depending on whether
you are using a hand-held unit or paper forms, the
method in which you record the results of the actual
inspection will differ.
If you are using a handheld unit, you will need
to send the data file for the scheduled inspection
from your workstation to the unit. This gives you
a blank “electronic form” on your handheld unit for
the inspection. Once you have sent the file to the
handheld unit, you can perform the inspection and
record its results. After performing the inspection,
you will retrieve the completed inspection form from
the handheld unit to your workstation to complete
the inspection process and save it in your inspection records.
If you are using a printed HQS form, print a blank
form and perform the inspection with it. When the
inspection is complete, sit down at your workstation
and enter the inspection’s results in the program to
save it in your inspection records.
Once the inspection has been performed and the
results are in the program’s inspection records, you
are ready to print. Your print run should include
notification letters for both the tenant and the landlord, as well as any reports or printed inspection
forms that you need.
If the unit passed the inspection, the inspection
cycle is now complete. If it failed, the notification
letters will inform the tenant and the landlord of
the critical deficiencies and the deadlines by which
these must be corrected. You also should schedule
a follow-up inspection within a reasonable period of
time after these deadlines.
WinTen² Section 8 Desktop Inspections • Program Overview • Page 10
Request for Lease Approval
Anniversary
Quality Certification
Inspection Request
Schedule Inspection
Using
Hand-Held
Device?
N
Y
Send Form to Handheld
Print Blank HQS Form
Perform Inspection
Perform Inspection
Retrieve Form from Handheld
Input Inspection Results
Print Letters and Reports
F
Pass or
Fail?
P
Inspection Cycle Complete
WinTen² Section 8 Desktop Inspections • Program Overview • Page 11
WinTen² Section 8 Desktop Inspections • Program Overview • Page 12
MAIN MENU
This screen is the starting point for using each of
the Section 8 Inspections functions. Each function
is detailed in its respective chapter.
WinTen² Section 8 Desktop Inspections • Main Menu • Page 13
WinTen² Section 8 Desktop Inspections • Main Menu • Page 14
SETUP
The first time you run Section 8 Inspections, the
first option you should select from the Main Menu
is Setup. All WinTen² programs have Setup functions. The settings in the Setup screen control the
program environment, and you can change many
aspects of the program through these settings.
You should take care to enter the proper information, as inaccurate settings can cause Section
8 Inspections to function incorrectly or to report
incorrect data. The individual in charge of your
WinTen² programs should periodically review each
program’s Setup to ensure that it is still correct. To
use the Setup functions, click the Setup button or
press <S> at the Main Menu.
WinTen² Section 8 Desktop Inspections • Setup • Page 15
Setup Screen
The Setup screen has four function areas,
accessed by a set of four buttons. Each of the
four primary setup function buttons opens a corresponding screen or dialog box for setting up that
aspect of the program.
This manual addresses the Maintain Inspectors
and Maintain Protocols functions.
The Settings function contains only your agency’s
contact or “return address” information.
For help on using the Maintain Form Letters function, please see the user manual for WinTen² Form
Letters.
WinTen² Section 8 Desktop Inspections • Setup • Page 16
Browse Inspectors Screen
The Section 8 Inspections program organizes
inspections by the inspector who is assigned to
perform them. The Browse Inspectors screen
opens when you click the Inspectors button on
the Inspection Setup Menu screen. This screen
displays a table of all inspectors currently set up
in the program and allows you to select an existing
inspector record for editing or deletion or to add
a new inspector. If you choose to edit or add an
inspector, the Maintain Inspectors screen opens.
WinTen² Section 8 Desktop Inspections • Setup • Page 17
Maintain Inspectors Screen
The Maintain Inspectors screen allows you to edit
the data for the currently selected inspector, or to
add a new inspector.
Maintain Inspectors Screen Data Fields
Inspector
This is a short code to identify the inspector. It can
be up to five characters long.
Inspector Name
This is the inspector’s full name.
System User
This is the computer user name this inspector uses
to log in to the Section 8 Inspections program.
Inactive
Check this box to remove this person from your list
of active inspectors.
WinTen² Section 8 Desktop Inspections • Setup • Page 18
Browse Inspection Protocols Screen
The heart of any system of inspections is the
inspection protocol: the set of criteria by which
the unit being inspected is judged. For Section 8
inspections, the inspection protocol is the Housing
Quality Standards (HQS). The HQS inspection
protocol can be divided into several levels and
sub-levels, as shown in the diagram below. Each
sub-level has a corresponding screen or dialog box
that allows the user to edit the elements of that sublevel. The first screen associated with the protocol
editing process is the Browse Inspection Protocols
screen, which you open by clicking the Protocols
button.
Each inspection protocol has multiple inspection
areas. In the case of HQS, these correspond to
the physical areas of a dwelling unit (bedrooms,
kitchen, etc.) and/or the unit’s overall qualities
(health & safety). Each area has one or more
“items,” which are individual attributes that must
be inspected (electrical hazards, floor condition)
for that area. Each item has one or more “deficiencies,” which are specific problems that the inspector
can identify with that item (broken or frayed wiring,
missing switch cover plate). The HQS protocol in
the WinTen² Section 8 Desktop Inspections program includes all of the inspectable
areas and items found on the HQS
inspection form.
Tenmast also extracted a detailed
list of deficiencies from the HQS definitions. By including a detailed set
of deficiencies for each inspectable
item, we have minimized the need
for the inspector to record separate
comments in order to accurately
record the deficiencies.
In addition, each protocol has its
own set of status codes, which
indicate a given inspection’s current
condition (passed, failed, requested,
scheduled).
Protocol (HQS)
Status Codes
Inspection Areas
Inspection Items
Inspection Deficiencies
WinTen² Section 8 Desktop Inspections • Setup • Page 19
The Browse Inspection Protocols screen is where
you can create a new inspection profile or edit the
areas, items, and deficiencies of an existing one.
This screen shows a table of all inspection protocols that are currently defined in the program. The
“default” inspection protocol is the Section 8 HQS
protocol. Many agencies will find this protocol sufficient without modification. However, some will want
to create their own inspection protocols or add their
own specialized criteria to the HQS inspection protocol. On the Browse Inspection Protocols screen,
you can also make a copy of an existing protocol,
which you can modify to suit your needs.
WinTen² Section 8 Desktop Inspections • Setup • Page 20
Adding an Inspection Protocol
To add a protocol, click the Add New Protocol
button. This opens the Maintain Inspection Protocols screen, described on the following pages. This
screen allows you to enter the basic settings for the
new inspection protocol and to add new areas.
Editing an Inspection Protocol
To edit an existing protocol, click on it in the table
of protocols and click the Edit Protocol button. This
opens the Maintain Inspection Protocols screen
with the selected protocol’s information in the data
fields. This screen allows you to add, edit, or delete
the areas, items, and deficiencies.
Copying an Inspection Protocol
Some users may want to develop their own protocols that are based on existing protocols. Copying
an existing protocol allows you to make changes to
the copy while maintaining the integrity of the original. To make a copy of a protocol, click on it in the
table of protocols and click the Copy Selected Protocol button. This opens the Copy Protocol wizard.
Enter the new protocol information and complete
the wizard to make the copy.
WinTen² Section 8 Desktop Inspections • Setup • Page 21
Maintain Inspection Protocols Screen
The Maintain Inspection Protocols screen allows
you to add, edit, or delete the areas, items, and
deficiencies and related status codes for a new or
existing protocol. It has four tabs: Protocol, Areas,
Status, and Severity. The screen always opens on
the Protocol tab.
Protocol Tab
The Protocol tab contains basic inspection protocol
information.
WinTen² Section 8 Desktop Inspections • Setup • Page 22
Protocol Tab Data Fields
Protocol
This is a short identifying code for the inspection
protocol. It can be up to ten characters long. This
will be used to select a protocol for a given inspection to follow.
Description
This is an extended description of the inspection
protocol.
Help File
This is the name of the standard Windows help file
that corresponds to the protocol. Agencies can use
a variety of third-party software to create detailed
Windows help files for their custom protocols.
Tenmast includes a help file for the HQS inspection
protocol with the Section 8 Inspections program.
Version
This is your agency’s version number or version
date for the inspection protocol.
Section 8 Protocol
Check this box if you use this inspection protocol
for Section 8 inspections.
Public Housing Protocol
Check this box if you use this inspection protocol
for public housing inspections.
Inactive
Check this box to disable this inspection protocol.
Deleting an Inspection Protocol
To delete an existing protocol, open it on the Protocol tab and click the Delete Protocol icon. A dialog
box appears that asks you whether or not you want
to delete the selected record. Click Yes to delete
the protocol or No to cancel the deletion.
NOTE: You cannot delete the HQS protocol that
is provided with the program.
WinTen² Section 8 Desktop Inspections • Setup • Page 23
Areas Tab
The Areas tab contains a list of inspection areas
defined for the currently selected protocol.
Each area can have a list of specific inspectable
items within that area. Each item, in turn, can have
its own list of deficiencies — specific things that an
inspector can find wrong with the item. We will discuss these options in a later section. (See Maintain
Inspection Items/Deficiencies Screen, below.)
CAUTION
For HQS inspection protocols, do not change the Area
Name if you want to print Form HUD-52580. These must
remain the same so the program knows where to put the
inspection results.
WinTen² Section 8 Desktop Inspections • Setup • Page 24
Areas Tab Data Fields
Display Order
This field sets the order in which the areas appear
on the screen.
Area Name
This is a five-character code for the area. In the
HQS inspection protocol, each area is assigned a
two-digit number.
Description
This is an extended description of the area.
Maintaining Inspection Items
and Deficiencies
To view and maintain the inspectable items for any
area (and, in turn, the deficiencies for any item),
select the area on the Areas tab and then click the
Edit button to the right of that area. This will open
the Maintain Inspection Items/Deficiencies screen.
For help on maintaining this information, see Maintain Inspection Items/Deficiencies Screen, below.
WinTen² Section 8 Desktop Inspections • Setup • Page 25
Status Tab
The Status tab of the Maintain Inspection Protocols
screen allows you to maintain the available status
codes for specific inspections that follow this protocol. You can add new status codes, edit status
codes, or delete status codes.
Status Tab Data Fields
The four default status codes for an inspection are
Fail (inspection was performed and the unit failed
inspection), Pass (inspection was performed and
the unit passed inspection), Requested (inspection
of the unit has been requested but not yet scheduled to be performed), and Scheduled (inspection
of the unit has been scheduled but not yet performed).
Description
This is an extended description of the inspection
status.
Status
This is the code that denotes the inspection status.
It can be up to ten characters long.
Fail Inspection
Check this box if this is a “failed” status for an
inspection.
WinTen² Section 8 Desktop Inspections • Setup • Page 26
Severity Tab
Section 8 Inspections uses a predefined set of
severity codes to record the relative conditions of
each deficiency that the inspector observes. The
Inspection Severity tab allows you to add, edit, or
delete these codes, which can be applied to any
deficiency.
Severity Tab Data Fields
Severity Code
The severity code itself can be up to five characters
long.
Description
This is an extended description of the severity
code.
PHAS Code
Select the PHAS code, if any, that corresponds to
this severity code. This PHAS code will be applied
to any work order(s) generated by a deficiency of
this severity.
Work Order Priority
Select the priority, if any, to be applied to any work
order(s) generated by a deficiency of this severity.
Generate WO
Check this box if a deficiency of this severity should
automatically generate a work order.
HINT
PHAS codes and work orders are typically used only for
public housing, not Section 8.
Print on Landlord Letters
Check this box if you wish to print deficiencies of
this severity on landlord letters.
Print on Tenant Letters
Check this box if you wish to print deficiencies of
this severity on tenant letters.
Fail Inspection Item
Check this box if a deficiency of this severity causes
an inspection item to fail.
WinTen² Section 8 Desktop Inspections • Setup • Page 27
Maintain Inspection Items/Deficiencies Screen
The Maintain Inspection Items/Deficiencies screen
allows you to add, edit, or delete the inspectable
items for any area within a protocol and the deficiencies for any of those items.
To view and maintain the inspectable items for any
area (and, in turn, the deficiencies for any item),
select the area on the Areas tab (see Areas Tab,
above) and then click the Edit button to the right
of that area. This will open the Maintain Inspection
Items/Deficiencies screen.
This screen has two tabs: Item and Deficiency. It
always opens on the Item tab.
Item Tab
The Item tab contains a list of all inspectable items
for the area currently selected on the Areas tab of
the Maintain Inspection Protocols screen.
WinTen² Section 8 Desktop Inspections • Setup • Page 28
Item Tab Data Fields
Display Order
This field sets the order in which the items appear
on the screen.
Map to 52580 Line
Select the line item of Form HUD-52580 to which
this item corresponds.
Item Number
This code identifies the item. It can be up to ten
numbers and/or letters.
In the HQS inspection protocol, each item is preassigned a specific item number.
CAUTION
For HQS inspection protocols, do not change the Item
Number if you want to print Form HUD-52580. These must
remain the same so the program knows where to put the
inspection results.
Description
This is an extended description of the item.
Help
Enter the identifier of the Help topic, if any, that corresponds to this item.
Answer Type
This is the set of results that are possible for the
item. When the inspector is conducting the inspection, one of these results will appear depending on
which deficiencies, if any, the inspector cites for
the item. The HQS inspection protocol uses Pass/
Fail results. The UPCS inspection protocol uses
NOD/OD/NA (No Observed Deficiency/Observed
Deficiency/Not Applicable) and Health & Safety
results. Both inspection protocols use Yes/No
answers (which have no deficiency codes) for
questions directed to tenants.
The “Check Box” answer type is used to indicate
whether or not the item exists. It is used for amenities in the HQS protocol.
A “Question (Free Form)” answer type allows you
to confirm that a question has been answered.
NOTE: The answer types you select for a given
item will apply to all deficiencies related to that
item. The deficiency types determine how the
deficiency is displayed on the inspection.
WinTen² Section 8 Desktop Inspections • Setup • Page 29
Deficiencies Tab
The Deficiencies tab contains a list of all possible
deficiencies for the item currently selected on the
Item tab.
Deficiencies Tab Data Fields
Deficiency Code
This is the unique identifying code that identifies
this deficiency within the inspection item. No other
deficiency within the item can have this code. The
code can be a maximum of five characters long.
WinTen² Section 8 Desktop Inspections • Setup • Page 30
Description
This is the extended description of the deficiency.
Help Index Name
This is the name under which this deficiency is
listed in the index of the Windows help file for this
protocol. If you do not have a Windows help file for
this protocol, leave this field blank.
Life Threatening
If the deficiency is considered life-threatening to
the unit’s residents, check this box. You can create
a report of all life-threatening deficiencies for each
unit.
Negative Codes Result in a Failure
If the deficiency being cited should generate a failure for the entire inspection, check this box.
Sev. Codes Not Allowed
Check all severity codes that are not applicable for
this deficiency.
WinTen² Section 8 Desktop Inspections • Setup • Page 31
WinTen² Section 8 Desktop Inspections • Setup • Page 32
SCHEDULE INSPECTIONS
The primary purpose of the WinTen² Section 8
Desktop Inspections program is to record the
results of your Section 8 unit inspections. It also
assists you in managing your inspection schedules. Scheduling an inspection is one way to begin
tracking that inspection. The scheduling task is
performed on the Schedule Inspections screen.
To enter this screen, click the Schedule button or
press <C> from the Main Menu.
WinTen² Section 8 Desktop Inspections • Schedule Inspections • Page 33
Schedule Inspections Screen
The Schedule Inspections screen is where you
schedule inspections for Section 8 tenants. The
top portion of the screen contains a table of all tenants who live in Section 8 units in the selected data
area. The tenant table can be sorted by tenant last
name, landlord last name, address, next inspection
date, or tenant social security number.
The bottom portion of the screen contains a table of
all currently scheduled inspections for the inspector
shown in the Inspector field near the middle of the
screen.
WinTen² Section 8 Desktop Inspections • Schedule Inspections • Page 34
Sort Order Options
You can change the sort order of the tenant table
at the top of the screen by clicking the drop-down
arrow after the Ordered By field and then clicking
Last Name, Landlord, Address, Next Inspection, or
SSN.
These options correspond to the column headers
of this table. You can also change the sort order by
clicking any column header itself.
Filtering the Data
If you are dealing with a large number of tenant
records, scrolling through the entire tenant table to
find a specific record may be rather time-consuming. The Schedule Inspections screen includes
a filtering feature that allows you to display only
tenant records that match a filtering criterion that
you select. This also allows you to set a filter criterion for adding a batch of inspections. (See Scheduling a Batch of Inspections, below.)
To filter the tenant records, first click the drop-down
arrow after the Filter field and then click the option
on which you wish to filter. (We discuss these
options below.) This causes a criterion field and
an Apply Filter button to appear to the right of the
Filter field.
To complete the filtering, enter your specific filter
criterion in the criterion field and then click the
Apply Filter button.
WinTen² Section 8 Desktop Inspections • Schedule Inspections • Page 35
Tenant Filtering Options
None
This option shows all records. You can also use
this option if you have filtered the records and now
want to see all of them again.
Month of Inspection
This is the month in which the tenant’s next inspection should take place, entered as a two-digit
number. Enter “01,” e.g., for January.
Date of Inspection
This is the date on which the tenant’s next inspection should take place, entered in MM/DD/YYYY
format.
Address Contains...
This option filters records for those whose unit
addresses contain a specific word or part of a
word. For example, filtering on “WOOD” will return
all units whose addresses include “Woodwind
Drive,” “Dogwood Lane,” “Woodhaven Road,” and
so forth.
City, State, Zip Contains...
This option filters records for those whose city,
state, and zip code fields contain a specific word/
number or part of a word/number. For example,
filtering on “405” would return all units with the zip
codes “40511,” “40512, “40585,” and so forth.
WinTen² Section 8 Desktop Inspections • Schedule Inspections • Page 36
Schedule Inspections Screen Data
Fields
Table Data Fields
Last Name
This is the tenant’s last name.
Landlord
This is the name of the tenant’s landlord. If the
landlord is an individual, only the person’s last
name appears.
Address
This is the street address of the unit.
Next Inspect
This is the next inspection date for the unit.
SSN
This is the tenant’s social security number.
Screen Data Fields
Search For
The Search For field lets you type a value and
press Enter to search for the first match in the
table. Your choices for the other option fields affect
the behavior of the Search For field.
You can search only for records that are currently
showing, based on the Filter field.
The value you search for must correspond to what
is in the Ordered By field. If you order by last name,
for example, you must type a tenant’s last name as
your search. If you order by SSN, you must type a
social security number as your search.
You can type the complete search value or only the
first few characters.
Activate the search by pressing Enter or clicking
the Go button.
The program will find the first match for what you
type. If the record you want is not the first match, it
should be nearby; press DownArrow to move down
the table one record at a time until you find the one
you want.
WinTen² Section 8 Desktop Inspections • Schedule Inspections • Page 37
Schedule Date
When you schedule an inspection, the inspection
will be scheduled to be performed on this date.
Schedule Time
When you schedule an inspection, it will be scheduled to be performed at this time.
Protocol
This drop-down selection box allows you to select
from all inspection protocols that are set up in the
program. When you schedule an inspection, the
definition for the selected protocol will appear in the
inspection file for that inspection.
Hint
Due to the flexible schedules of many housing inspectors,
you may be unable to schedule an exact time for the
inspection. We recommend scheduling an approximate
time.
Inspector
This drop-down selection box allows you to select
from all inspectors who are set up in the program.
When you schedule an inspection, the selected
inspector will be assigned to perform that inspection. The table at the bottom of the screen displays
only those inspections assigned to the selected
inspector.
WinTen² Section 8 Desktop Inspections • Schedule Inspections • Page 38
View Tenant Information Dialog Box
The View Tenant Information dialog box appears
when you click the Edit icon at the top of the screen
(above the tenant table). This dialog box displays
the tenant information that is contained in the
inspections database. When you are done editing,
click the OK button to save your changes and close
the dialog box or the Cancel button to close the
dialog box without saving your changes.
NOTE: In this dialog box, you can edit only the
next inspection date and time. All other data
must be edited in the Section 8 Tenant & Landlord program.
View Tenant Information Dialog Box Data
Fields
Tenant
This is the name of the tenant.
SSN
This is the tenant’s social security number.
Address
This is the full street address of the unit.
Phone
This is the tenant’s phone number.
Family Size
This is the number of residents in the tenant’s
family.
Number of Bedrooms
This is the number of bedrooms in the unit.
Contract Rent
This is the tenant’s contract rent.
Next Inspection Date
This is the date of the next inspection of the unit.
Time
This is the time of the next inspection of the unit.
WinTen² Section 8 Desktop Inspections • Schedule Inspections • Page 39
Scheduling an Inspection
To schedule an inspection, select the unit you want
to inspect by clicking on that unit in the table at the
top of the screen. Enter the date and time at which
to schedule the inspection and select the inspection protocol to use and the inspector who will perform the inspection in the appropriate data fields.
Then click the Add button. The selected tenant is
added to the inspection schedule with the selected
inspection date, inspection protocol, and inspector
and an inspection time of midnight (you will probably want to edit this inspection time).
Scheduling a Batch of Inspections
To schedule a batch of inspections, filter the table
of tenants to display all of the tenants you want to
schedule. Enter the date on which to schedule the
inspection, the inspection protocol to use, and the
inspector who will perform the inspection in the
appropriate data fields. Then click the Add Batch
button. Every tenant in the table of tenants is
added to the inspection schedule with the selected
inspection date, inspection protocol, and inspector
and an inspection time of midnight (you will probably want to edit this inspection time). Typically,
you will use this function to schedule inspections
for every tenant whose next inspection falls in a
specific month or on a specific date.
WinTen² Section 8 Desktop Inspections • Schedule Inspections • Page 40
Scheduling a Vacant Unit
Inspection
The Schedule Inspections screen shows only units
that are currently occupied by tenants. At times,
you may need to inspect an unoccupied unit. To do
this, enter the date and time at which to schedule
the inspection and select the inspection protocol to
use and the inspector who will perform the inspection in the appropriate data fields. Then click the
Add Vacant Unit Inspection icon (near middle left
of the screen). This opens the Vacant Unit Information dialog box. Enter all of the data that you
have available in the data fields and click the OK
button.
Vacant Unit Information Dialog Box
This dialog box allows you to enter the tenant and
unit information for a vacant unit for which you are
scheduling an inspection.
WinTen² Section 8 Desktop Inspections • Schedule Inspections • Page 41
Vacant Unit Information Dialog Box Data
Fields
First Name
This is the first name of the prospective tenant.
Last Name
This is the last name of the prospective tenant.
Tenant SSN
This is the prospective tenant’s social security
number.
Address
This is the vacant unit’s street address.
Hint
You can click the Get Unit button to select the unit from the
Browse Housing Units screen. If you do so, the unit fields
on the Vacant Unit Information dialog box will populate
automatically based on the unit you choose.
City
This is the city in which the vacant unit is located.
State
This is the state in which the vacant unit is located.
Zip
This is the vacant unit’s zip code.
County
This is the county (or parish, for Louisiana) in which
the vacant unit is located.
Phone
This is the phone number at which the prospective
tenant can be reached.
Bedrooms
This is the number of bedrooms in the unit.
Census Tract
This is the unit’s census tract code.
Unit Type
This drop-down selection box allows you to set the
unit’s type as Single Family Detached, Manufactured Home, Duplex or Two Family, Row House or
Town House, or Low Rise.
Landlord Name
This is the name of the unit’s landlord.
Landlord SSN
This is the social security number (or employee
identification number) of the unit’s landlord.
Landlord Address
This is the street portion of the landlord’s mailing
address.
City
This is the city portion of the landlord’s mailing
address.
State
This is the state portion of the landlord’s mailing
address.
Zip
This is the landlord’s zip code.
Phone
This is the landlord’s phone number.
WinTen² Section 8 Desktop Inspections • Schedule Inspections • Page 42
Removing a Scheduled Inspection
To remove an inspection from the list of scheduled
inspections at the bottom of the screen, select it in
the table of inspections by clicking on it. Then click
the Delete Inspection icon. A dialog box appears
that asks you whether or not you want to delete the
inspection record. Click Yes to delete the inspection or No to return to the Schedule Inspections
screen.
WinTen² Section 8 Desktop Inspections • Schedule Inspections • Page 43
Editing an Inspection Schedule
To edit an inspection’s schedule, select that inspection in the table at the bottom of the screen and
click the Review/Edit Selected Inspection icon
(near the middle left, just above the bottom table).
This opens the Review/Edit Schedule dialog box
for the selected inspection.
Review/Edit Schedule Dialog Box
This dialog box allows you to edit the scheduling
information for the selected inspection. The top
of the screen displays the tenant’s name and the
unit’s address, which you cannot edit. To change
the inspection’s schedule, edit the data fields you
want to change and click the OK button. Click the
Cancel button to exit without changing the inspection’s schedule.
Review/Edit Schedule Dialog Box Data Fields
Inspector
This drop-down selection box allows you to change
the inspector assigned to perform the inspection,
selecting from the list of inspectors currently set in
the program.
NOTE: If you change the assigned inspector,
the inspection will not appear in the table of
scheduled inspections when you return to the
Schedule Inspections screen because it will
have moved to the new inspector’s schedule.
To see it, you must change the selected inspector in the Inspector drop-down selection box on
the Schedule Inspections screen.
Scheduled Date
This is the date for which the inspection is scheduled.
Scheduled Time
This is the time for which the inspection is scheduled.
Inspection Type
This field allows you to specify whether the inspection is an initial inspection, a recertification, or a
special inspection of some type.
WinTen² Section 8 Desktop Inspections • Schedule Inspections • Page 44
EDIT/DELETE
INSPECTIONS
Once you have scheduled an inspection, you can
view, edit, or delete it. To perform any of these
functions, click the Edit button or press <E> at the
Main Menu.
WinTen² Section 8 Desktop Inspections • Edit/Delete Inspections • Page 45
Browse Inspections Screen
The first thing you see when you choose to view,
edit, or delete an inspection is the Browse Inspections screen. This screen displays a table of all
inspections that are assigned to, or were performed
by, the inspector whose name appears in the View
field. To change the inspector whose inspections
are displayed, use the View field drop-down selection box at the upper left corner of the screen.
WinTen² Section 8 Desktop Inspections • Edit/Delete Inspections • Page 46
Browse Inspections Screen Table Columns
The table of existing inspections displays several
key pieces of information by which you can identify
the inspection that you want to examine.
Inspection Date
This field displays the date on which the unit’s last
inspection was performed.
Status
This is the inspection’s status: Requested, Scheduled, Pass, Fail, or a custom status defined in the
inspection protocol setup.
Address
This is the street address of the unit.
Tenant Name
This is the name of the tenant who occupies the
unit.
Landlord Name
This is the name of the unit’s landlord.
Schedule Date
This field displays the date on which the unit’s next
inspection is scheduled.
WinTen² Section 8 Desktop Inspections • Edit/Delete Inspections • Page 47
Printing Inspection Reports
To print one or more reports on an inspection,
select it and click the Print icon. This opens the
Print Inspection Reports dialog box. From here,
you can choose to print any combination of five
reports on the selected inspection.
Print Inspection Reports Dialog Box
The Print Inspection Reports dialog box contains
five check boxes, which allow you to select the
reports you want to print for the selected inspection. To preview reports, check the boxes that
correspond to the reports you want and click the
preview icon. To print reports, check the boxes
that correspond to the reports you want and click
the print icon. Click the Exit icon to close the dialog
box.
WinTen² Section 8 Desktop Inspections • Edit/Delete Inspections • Page 48
Inspection Reports
General Inspection Form — Summary
This report shows every failed area and item in the
selected inspection, with status codes for each.
General Inspection Form — Details
This report shows every area, item, and deficiency
in the inspection protocol for the selected inspection, with status codes for each. This specifically
includes passed items.
HQS Inspection Form — HUD-52580
This option produces an official HQS inspection
form (Form HUD-52580) for the selected inspection.
CAUTION
This option will not work properly if the inspection protocol
used for this inspection has a different number of areas
from the HQS protocol. You may, however, use a modified
HQS protocol with additional items or deficiencies and still
print the HQS inspection form.
Landlord Results Letter
This option produces a landlord notification letter
detailing the results of the inspection. If the inspection has not yet been performed, this will produce
an empty notification letter with no deficiency notifications.
Tenant Results Letter
This option produces a tenant notification letter
detailing the results of the inspection. If the inspection has not yet been performed, this will produce
an empty notification letter with no deficiency notifications.
WinTen² Section 8 Desktop Inspections • Edit/Delete Inspections • Page 49
Rescheduling an Inspection
To reschedule an inspection from the Browse
Inspections screen, select it and click the Reschedule Current Inspection icon. This opens the
Reschedule Inspection Wizard.
Hint
You can also access this wizard from the Wizards icon on
the Main tab of the Inspection Detail screen.
Reschedule Inspection Wizard
Complete the three steps of the wizard to reschedule the inspection
Editing an Inspection
To edit an inspection, select it and click the Edit
button. This opens the Inspection Detail screen for
the selected inspection. This screen allows you to
edit the selected inspection’s record.
WinTen² Section 8 Desktop Inspections • Edit/Delete Inspections • Page 50
Inspection Detail Screen
Editing an inspection on the Browse Inspections
screen opens it on the Inspection Detail screen.
This screen contains all data for the selected
inspection. It is divided into five tabs: Main,
Inspect, Approval, Notes, and Activity. It always
opens on the Main tab. The Main tab has two subtabs, General and Unit Info.
General Sub-Tab
The General Sub-tab contains general information
on the inspection.
General Sub-Tab Data Fields
Inspection Protocol
This field identifies the inspection protocol that the
inspection will use.
Inspector
This drop-down selection box allows you to select
the inspector who will be assigned to perform the
inspection.
WinTen² Section 8 Desktop Inspections • Edit/Delete Inspections • Page 51
Tenant
This is the name of the tenant whose unit the
inspection is for. You cannot edit this field.
Inspection Type
This field allows you to specify whether the inspection is an initial inspection, a recertification, or a
special inspection under HQS.
Status
This drop-down selection box allows you to set the
inspection’s status. Your options in this selection
box depend on the status codes that are available
for the selected inspection protocol. In the standard HQS protocol, the standard status codes are
Requested, Scheduled, Fail, and Pass.
Hint:
Deleting an Inspection
To delete an inspection, open it on the Main tab
and click the Delete button. A dialog box opens
that asks you to confirm your intention to delete
the selected inspection record. Click Yes to
delete the inspection or No to abort the deletion.
Requested Date
This is the date on which the inspection was
requested.
Schedule Date
These two fields are the date and time at which
the inspection was scheduled to be performed, if it
already has been scheduled.
Inspection Date
This is the date on which the inspection was performed, if it already has been performed.
Hint
If an inspection is scheduled but the inspector has not
performed it yet, the Schedule Date, Start, and End fields
should be left blank.
Start
This is the time at which the inspection was begun,
if it already has been performed.
End
This is the time at which the inspection was finished, if it already has been performed.
WinTen² Section 8 Desktop Inspections • Edit/Delete Inspections • Page 52
Unit Info Sub-Tab
The Unit Info sub-tab displays detailed information
on the unit that the inspection examines. The top
half of the tab displays the addresses and identifying information of the landlord and the tenant,
which cannot be edited on this tab. The bottom
half of the tab shows the unit’s data.
WinTen² Section 8 Desktop Inspections • Edit/Delete Inspections • Page 53
Unit Info Sub-Tab Data Fields
Voucher Bedrooms
This is the number of unit bedrooms for which the
tenant is qualified to receive Section 8 rent subsidies.
Actual Bedrooms
This is the actual number of bedrooms in the unit.
Number of Children under 6
This is the number of children under age 6 living in
the unit.
Unit Type
This drop-down selection box allows you to set the
unit’s type as Single Family Detached, Manufactured Home, Duplex or Two Family, Row House or
Town House, or Low Rise.
Census Tract
This is the unit’s census tract code.
Year Constructed
This is the year in which the unit was constructed.
Last Inspection Date
This is the date on which this unit’s last inspection
took place.
WinTen² Section 8 Desktop Inspections • Edit/Delete Inspections • Page 54
Inspect Tab
The Inspect tab displays a table of the inspectable
areas that are in the inspection protocol that has
been selected for this inspection. From this tab, you
perform the inspection by selecting an inspectable
area, item, and deficiency and changing the status
code (e.g. from Pass to Fail). To inspect an item
and deficiency in a given inspectable area, select
the area and click the Inspect button. This opens
the Inspectable Items screen for the selected
inspection area.
WinTen² Section 8 Desktop Inspections • Edit/Delete Inspections • Page 55
Inspectable Items Screen
The Inspectable Items screen allows you to view
every item and deficiency within the selected
inspection area. The main area of the screen displays a list of items, each with a plus sign (+) next
to it. By clicking the plus sign next to an item, you
can “expand” that item, or open it, to display the
deficiencies associated with that item. When an
item has been expanded, the plus sign turns to a
minus sign (-). Click the minus sign to “collapse”
that item’s list of deficiencies, or close the list. You
can also expand every item by clicking the Expand
All icon or close every item by clicking the Collapse
All icon.
WinTen² Section 8 Desktop Inspections • Edit/Delete Inspections • Page 56
Inspectable Items Screen Data Fields
Severity / Result
This drop-down selection box allows you to set a
severity code for the selected deficiency.
Hint
The remaining fields appear only if the Severity / Result field
is set to some “failed” severity code.
Comment
This is a short (60 characters) comment on the
selected deficiency.
Location
This is the location of the selected deficiency within
the unit.
Approval Date
This is the date on which a subsequent inspection
confirmed that the selected deficiency has been
corrected.
WinTen² Section 8 Desktop Inspections • Edit/Delete Inspections • Page 57
Recording a Deficiency
All deficiencies have a default severity code of
Pass. To record a deficiency, select that deficiency
and change its Severity drop-down selection box
to the appropriate severity code. The Comment,
Location, and Approval Date data fields appear
when you set the deficiency’s Severity to something other than Pass. Record any comment you
may have and the location of the deficiency within
the unit. If this inspection is a follow-up inspection
that records a correction of a previous deficiency,
record the approval date here as well. If the severity code you have selected is one that results in a
failure (as set in the inspection protocol setup), the
program changes the status of the item, area, and
inspection to Fail.
WinTen² Section 8 Desktop Inspections • Edit/Delete Inspections • Page 58
Approval Tab
The Approval tab contains a table of all deficiencies
for the inspection and allows you to record approvals for each one. When you first enter the Inspection Detail screen to add a new inspection, this tab
displays no deficiencies, because none have been
recorded. However, if you record one or more deficiencies, this tab displays all of them.
WinTen² Section 8 Desktop Inspections • Edit/Delete Inspections • Page 59
Recording an Approval
To record an approval of a previously recorded
deficiency, click on that deficiency and click the
Approve button. This opens the Approve Deficiency dialog box, shown below. Enter the approval
date and the name of the individual who approved
the corrected deficiency in the data fields and click
the OK button, or click the Cancel button to cancel
approval.
WinTen² Section 8 Desktop Inspections • Edit/Delete Inspections • Page 60
Approving an Entire Inspection
If you have an inspection that has a large number
of corrected deficiencies and no remaining uncorrected ones, you may find it easier to approve all
deficiencies at once than to individually approve
each one. To do this, click the Approve All button.
This opens the Approve All Deficiencies dialog
box, shown below. Enter the approval date and
the name of the individual who approved all of
the deficiencies in the data fields and click the OK
button, or click the Cancel button to cancel the
mass approval.
WinTen² Section 8 Desktop Inspections • Edit/Delete Inspections • Page 61
Notes Tab
The Notes tab allows you to record any number of
notes on the inspection. Any note you record here
can be marked for inclusion on tenant and/or landlord failure letters, or it can be included on neither.
If included on a letter, a note is printed between
the list of deficiencies and the second failure paragraph.
The tab displays a table of all currently recorded
notes for the inspection.
WinTen² Section 8 Desktop Inspections • Edit/Delete Inspections • Page 62
Activity Tab
The Activity tab displays a table that summarizes
the inspection, including any re-inspections resulting from it.
WinTen² Section 8 Desktop Inspections • Edit/Delete Inspections • Page 63
Rescheduling an Inspection
To reschedule an inspection from the Inspection
Detail screen, first open it on the Main tab of the
Inspection Detail screen. Then click the Wizards
icon drop-down arrow and click Reschedule. This
opens the Reschedule Inspection Wizard.
Hint
You can also access this wizard from the Reschedule Current Inspection icon on the Browse Inspections screen.
Reschedule Inspection Wizard
Complete the three steps of the wizard to reschedule the inspection
Deleting an Inspection
To delete an inspection, open it on the Main tab
and click the Delete button. A dialog box opens
that asks you to confirm your intention to delete the
selected inspection record. Click Yes to delete the
inspection or No to abort the deletion.
WinTen² Section 8 Desktop Inspections • Edit/Delete Inspections • Page 64
REPORTS
Information needs to be summarized and presented
in an easy-to-understand form so the reader can
make informed decisions. The Inspections Reports
screen is where Section 8 Inspections turns all
of its data into meaningful reports. You enter this
screen by clicking the Reports button or by pressing <R> at the Main Menu.
WinTen² Section 8 Desktop Inspections • Reports • Page 65
Inspections Reports Screen
The Inspections Reports screen is divided into two
halves. The left half contains a set of radio buttons
that allow you select a report to produce. The right
half contains the formatting options for the currently
selected report. As you move between selections
on the left half of the screen, the options on the
right half of the screen change to reflect the options
for your current selection. However, some options
are common to every report.
WinTen² Section 8 Desktop Inspections • Reports • Page 66
Standard Report Options
The following formatting options are common to
every report that the Section 8 Inspections program
produces. These allow you to filter the report data
to only include certain inspection records. They
are mutually inclusive. For example, if you select a
specific date range, a specific inspector, and a specific inspection protocol, the report will only include
those inspections which that inspector performed
using that protocol between those dates.
Select Date Range
All reports produced by the Section 8 Inspection
program cover inspection activity for a specific date
range. These two data fields allow you to specify
the starting and ending dates for this date range.
Selected Inspectors
This option allows you to report on inspections performed by all inspectors or only those performed by
a specific inspector.
Select Inspection Protocols
This option allows you to report on inspections performed under all protocols or only those performed
under a specific protocol.
Report-Specific Options
The following report options are only available for
certain reports. Like the standard report options,
they allow you to filter the report data to include
only certain inspection records.
Select Status Codes
This option allows you to report on inspections with
all statuses or only those with a specific status.
Use Detail Form
Some reports have both short and long forms.
These reports print in their short forms unless you
check this box.
WinTen² Section 8 Desktop Inspections • Reports • Page 67
Available Reports
All of the following reports or sets of reports will
only include data on inspections that match the
specified options.
Activity Log
The Activity Log report is a summary of all inspection activities for inspections matching the criteria
you selected.
Requested Inspections
The Requested Inspections report is a summary
of all requested inspections that match the criteria
you selected.
Scheduled Inspections
The Scheduled Inspections report is a summary
of all scheduled inspections that match the criteria
you selected.
Rescheduled Inspections
The Rescheduled Inspections report is a summary
of all follow-up inspections that are scheduled to be
performed within the selected range of dates and
that match the other selected options.
General Inspection Form — Summary
The General Inspection Form (Summary) option
produces a report that lists every area and item in
the inspection protocol for a selected inspection.
HQS Inspection Forms
This option produces an official HQS inspection
form (Form HUD-52580) for a selected inspection.
Hint
For the Requested Inspections report, the range of dates is
based on requested date.
For the Scheduled Inspections report, the range of dates is
based on scheduled date.
For the Rescheduled Inspections report, the range of dates
is based on follow-up date.
For all other reports, the range of dates is based on inspection date.
CAUTION
This option will not work properly for any inspection that has
a different number of areas from the HQS protocol. You
may, however, use the report for a modified HQS protocol
with additional items or deficiencies.
WinTen² Section 8 Desktop Inspections • Reports • Page 68
INDEX
A
M
adding batches of inspections 40
adding individual inspections 40
approving deficiencies 59, 60
approving inspections 59, 61
main menu 13
B
N
notes 62
R
batch adding inspections 40
removing a scheduled inspection 43
reports 48, 65
rescheduling an inspection 50, 64
D
deficiencies
approving 60
maintaining 28
recording 58
deleting inspections 45, 64
S
E
editing an inspection schedule 44
editing inspections 45
I
inspections
activity 63
approving an entire inspection 61
approving deficiencies 60
deleting 45, 64
editing 45
editing an inspection schedule 44
inspectable items 56
inspection life cycle 10
notes 62
recording deficiencies 58
removing a scheduled inspection 43
rescheduling an inspection 50, 64
scheduling 33
scheduling individually 40
scheduling in batches 40
vacant unit inspections 41
inspection items
inspecting 56
maintaining 28
inspection protocols
maintaining 19
inspectors
maintaining 17
item deficiencies
maintaining 28
scheduling inspections 33
adding batches 40
adding individually 40
editing an inspection schedule 44
rescheduling an inspection 50
Section 8 Inspections
inspection life cycle 10
introduction 1
main menu 13
program overview 9
setup 15
setup 15
T
tenant information 39
V
vacant unit inspections 41
WinTen² Section 8 Desktop Inspections • Index • Page 69