1
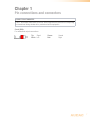
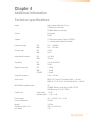
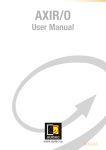
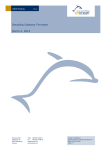
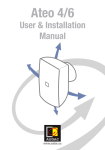
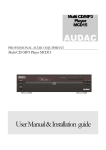
CMP30
User Manual
www.audac.eu
2
Index
Introduction
4
Precautions
5
Safety requirements Caution servicing
EC Declaration of Conformity Waste of Electrical and Electronic Equipment (WEEE)
Caution
Class 1 laser product
5
5
5
6
6
6
Chapter 1: Pin connections and connectors Connection standards
7
Chapter 2: Front & rear panel
Front panel overview
8
7
Front panel description
Functions overview
Rear panel overview
Rear panel description
8
8
11
13
13
Chapter 3: Quick start guide
14
Chapter 4: Additional information
15
Technical specifications
Notes
15
16
3
Introduction
Digital audio source - CD, MP3 & Tuner
The CMP30 is an All-In-One audio source device which accommodates three different
kinds of audio sources into one single device.
It combines a CD-Player, MP3-player and AM/FM tuner into one single rack space 19”
housing. On the front side is a CD slot, an USB slot and a SD/MMC memory card slot provided.
This makes it possible to play regular audio CD’s as well as MP3 files from either CD’s, USB
memory sticks or SD/MMC memory cards.
On the rear side of the device are three stereo outputs provided. Two of them are dedicated
to the tuner and CD/MP3 function, while the third output is a variable output. Because of
the two separate stereo outputs, the tuner and CD/MP3 player can operate simultaneously.
This feature can be useful for applications such as Multi-Zone systems where multiple audio
sources are required at the same time.
The variable output has a volume control function and carries the signal from the CD/MP3
player when a track is playing, but when the CD/MP3 has ended, the variable output will
automatically switch to tuner function.
4
Precautions
READ FOLLOWING INSTRUCTIONS FOR YOUR OWN SAFETY
ALWAYS KEEP THESE INSTRUCTIONS. NEVER THROW THEM AWAY
ALWAYS HANDLE THIS UNIT WITH CARE
HEED ALL WARNINGS
FOLLOW ALL INSTRUCTIONS
NEVER EXPOSE THIS EQUIPMENT TO RAIN, MOISTURE, ANY DRIPPING OR SPLASHING
LIQUID. AND NEVER PLACE AN OBJECT FILLED WITH LIQUID ON TOP OF THIS DEVICE.
DO NOT PLACE THIS UNIT IN AN ENCLOSED ENVIRONMENT SUCH AS A BOOKSHELF
OR CLOSET. ENSURE THERE IS ADEQUATE VENTILATION TO COOL THE UNIT. DO NOT
BLOCK THE VENTILATION OPENINGS.
DO NOT STICK ANY OBJECTS THROUGH THE VENTILATION OPENINGS.
DO NOT INSTALL THIS UNIT NEAR ANY HEAT SOURCES SUCH AS RADIATORS OR
OTHER APPARATUS THAT PRODUCE HEAT
DO NOT PLACE THIS UNIT IN ENVIRONMENTS WHICH CONTAIN HIGH LEVELS OF DUST,
HEAT, MOISTURE OR VIBRATION
THIS UNIT IS DEVELOPED FOR INDOOR USE ONLY. DO NOT USE IT OUTDOORS
PLACE THE UNIT ON A STABLE BASE OR MOUNT IT IN A STABLE RACK
ONLY USE ATTACHMENTS & ACCESSORIES SPECIFIED BY THE MANUFACTURER
UNPLUG THIS APPARATUS DURING LIGHTNING STORMS OR WHEN UNUSED FOR LONG
PERIODS OF TIME
ONLY CONNECT THIS UNIT TO A MAINS SOCKET OUTLET WITH PROTECTIVE
EARTHING CONNECTION
CAUTION - SERVICING
This product contains no user serviceable parts. Refer all servicing to
qualified service personnel. Do not perform any servicing (unless you
are qualified to)
EC DECLARATION OF CONFORMITY
This product conforms to all the essential requirements and further
relevant specifications described in following directives: 2004/108/EC
(EMC) and 2006/95/EC (LVD)
5
WASTE ELECTRICAL AND ELECTRONIC EQUIPMENT (WEEE)
The WEEE marking indicates that this product should not be disposed
with regular houshold waste at the end of its working life. This regulation
is created to prevent any possible harm to the environment or human
health.
This product is developed and manufactured with high quality materials
and components which can be recycled and/or reused. Please dispose
this product to your local collection point or recycling centre for electrical
and electronic waste. This will make to sure that it will be recycled
on an environmentally friendly manner, and will help to protect the
environment in which we all live.
CAUTION
The symbols shown are internationally recognized symbols that warn about potentional
hazards of electrical products. The lightning flash with arrowpoint in an equilateral
triangle means that the unit contains dangerous voltages. The exclamation point in
an equilateral triangle indicates that it is necessary for the user to refer to the users
manual.
These symbols warn that there are no user serviceable parts inside the unit. Do not
open the unit. Do not attempt to service the unit yourself. Refer all servicing to qualified
personnel. Opening the chassis for any reason will void the manufacturer’s warranty. Do
not get the unit wet. If liquid is spilled on the unit, shut it off immediately and take it to a
dealer for service. Disconnect the unit during storms to prevent damage.
CLASS 1 LASER PRODUCT
This product is equipped with an optical unit containing a Class 1 laser. Improper use can result in hazardous radiation exposure. This product should not be
adjusted or repaired by anyone except properly qualified service personnel.
6
Chapter 1
Pin connections and connectors
CONNECTION STANDARDS
The in- and output connections for AUDAC audio equipment are performed corresponding
to international wiring standards for professional audio equipment.
Cinch (RCA):
For unbalanced output connections:
Tip: Signal White: Left Sleeve:
Red: Ground
Right
7
Chapter 2
Front & rear panel
Front Panel overview
Front panel description
Function rotary dial (FUNCTION):
The function rotary dial allows to switch the device between Tuner, CD or USB & SD/MMC
operation mode by pressing a short term. It will switch between the several modes in this
sequence. By rotating this dial, the output volume for the ‘Variable audio output’ can be
adjusted.
By pressing and holding this button, the playback mode will be switched between ‘Single
Play’ and ‘Normal Play’ mode. In ‘Normal play’ mode, the next track will automatically
start playing when the current track is finished. In ‘Single play’ mode, the player will fall
into stop mode after the current track being finished, waiting for a ‘Play’ command (press
the Play button) before playing the next track. In situations where the device is used for
music, usually the ‘Normal Play’ mode will be desirable, while in other situations such as
educational purposes, houses of worships or gym’s the ‘Single Play’ mode can provide
great user convenience.
LCD Display:
The LCD Display shows the current operation mode of the unit. It shows which radio
station is playing, which audio track is playing, which functions are enabled, …
CD Slot:
Audio CD’s shall be inserted into this drive. The drive will load the CD automatically when
it is inserted into this slot. Only use CD’s with normal round shape and with normal size
(12 cm). Always check if the CD slot is empty before inserting a CD and don’t force the
CD into the slot when it doesn’t accept the CD automatically. When a CD is inserted, the
device will automatically start playing it.
CD Eject button (EJECT):
This button shall be pressed to remove the CD from the drive. After this button being
pressed, the CD will be ejected from the drive and can be taken out by the user. If the CD
is not taken within ~10 seconds, the CD will be automatically inserted to the drive again.
8
Play / Pause button (PLAY/PAUSE):
• CD, USB & SD/MMC mode:
Press: The music from the CD or USB & SD/MMC can be started and paused with this
button. When a track currently is playing, it will be paused after pressing this button and
the current position (Track no and time) will be shown on the display. It will resume to play
after pressing this button again.
• Tuner mode:
Press & Hold: By pressing and holding this button, the current chosen radio frequency will
be stored on ‘Position 1’ of the selected band.
Stop button (STOP):
• CD, USB & SD/MMC mode:
The currently playing track will be stopped when pressing this button. After pressing ‘Play’
again, it will resume to play at the absolute beginning of the inserted data carrier.
• Tuner mode:
Press & Hold: By pressing and holding this button, the current chosen radio frequency will
be stored on ‘Position 2’ of the selected band.
Tuning down / CD-Mp3 Track selection down (
):
• CD, USB & SD/MMC mode:
In CD or USB & SD/MMC mode, the playing track and position in the track can be selected
with this button.
Press: By pressing this button for a short term, the previous track will be selected
Press & Hold: By pressing and holding this button, the position in the currently playing
track can be selected (backwards). After the button is released the track will resume to
play from this point.
• Tuner mode:
In tuner mode, the desired radio station can be selected with this button.
Press: By pressing this button one single time, the previous radio station will be searched
in auto seek mode, and when used in manual seek mode the selected frequency will
decrease one step.
Press & Hold: By pressing and holding this button, the selection mode for the tuner will be
switched to manual seek mode and the frequency can be decreased by holding / pressing
this button. It will resume automatically to auto seek mode after about ~3 seconds.
Tuning up / CD-Mp3 Track selection up (
):
• CD, USB & SD/MMC mode:
In CD or USB & SD/MMC mode, the playing track and position in the track can be selected
with this button.
Press: By pressing this button for a short term, the next track will be selected
9
Press & Hold: By pressing and holding this button, the position in the currently playing
track can be selected (forward). After the button is released the track will resume to play
from this point.
• Tuner mode:
In tuner mode, the desired radio station can be selected with this button.
Press: By pressing this button one single time, the next radio station will be searched
in auto seek mode, and when used in manual seek mode the selected frequency will
increase one step.
Press & Hold: By pressing and holding this button, the selection mode for the tuner will be
switched to manual seek mode and the frequency can be increased by holding / pressing
this button. It will resume automatically to auto seek mode after about ~3 seconds.
Repeat (REP):
• CD, USB & SD/MMC mode:
With this button, the repeat mode can be selected between Repeat One (Repeats
currently playing track), Repeat Folder (Repeats all tracks in currently playing folder),
Repeat All (Repeats all tracks on inserted data carrier) and Repeat Off (Stops playing
after all tracks are played once) in this sequence. Press this button to toggle between the
different repeat modes.
• Tuner mode:
Press & Hold: By pressing and holding this button, the current chosen radio frequency will
be stored on ‘Position 3’ of the selected band.
Band select for the tuner (BAND):
• Tuner mode:
Press this button to select between the different tuner bands. The different tuner bands
are FM1 / FM2 / FM3 / MW1 / MW2 and will be selected in this sequence.
• CD, USB & SD/MMC mode:
Press this button to display the information of the ID3 tag of the current track. (Folder / File / Title / Artist / Album)
Press & Hold: By pressing and holding this button, the loudness can be switched On and
Off.
Equalizer select (Flat / Classic / Pop / Rock / Off ) (EQ):
Press this button to switch between different equalizer presets: Flat / Classic / Pop / Rock
/ Off. They will be selected in this sequence.
Search down (DIR -):
• CD, USB & SD/MMC mode:
Press this button to jump to a lower folder.
• Tuner mode:
Press: Press this button in tuner mode to select the previous programmed radio preset.
Press & Hold: By pressing and holding this button, the current chosen radio frequency will
be stored on ‘Position 5’ of the selected band.
10
Search up (DIR +):
• CD, USB & SD/MMC mode:
Press this button to jump to a higher folder.
• Tuner mode:
Press: Press this button in tuner mode to select the next programmed radio preset.
Press & Hold: By pressing and holding this button, the current chosen radio frequency will
be stored on ‘Position 6’ of the selected band.
Random play (RAND):
• CD, USB & SD/MMC mode:
Press this button to switch the random play mode (Shuffle) On and Off. When random play
is switched ON, tracks will be played in a random sequence.
• Tuner mode:
Press & Hold: By pressing and holding this button, the current chosen radio frequency will
be stored on ‘Position 4’ of the selected band.
Memory for the tuner frequency (MEMO):
When pressing this button, available radio stations will be searched and automatically
stored to the preset memory. The radio stations are stored in order of increasing
frequency, starting from Band 1 - Position 1 with subsequently the increasing frequencies
on the higher positions.
Manual position assignment of the preset frequencies can also be done by pressing and
holding the PLAY/PAUSE(1) – STOP(2) – REP(3) – RAND(4) – DIR-(5) – DIR+(6) buttons.
Mute (MUTE):
By pressing this button, the variable output and fixed CD/MP3 output can be muted /
unmuted. The fixed tuner output is not affected by the mute button. When the outputs are
muted, the message ‘MUTE’ will blink on the display.
USB connection port & SD/MMC card slot:
An USB storage device and/or an SD/MMC memory card can be inserted to these slots.
Tracks stored on here can be played through the CMP30 and it will automatically start to
play when the medium is inserted.
Power switch:
The device can be switched ON and Off using the power switch. When the device
is switched ON, the blue LED above the power button will illuminate. After powering
on, it takes about three seconds before the device being operational. The device will
automatically resume to its previous operation mode upon power on.
Functions overview
The CMP30 contains many buttons having different functions depending of the current
operation mode of the device and the way they are operated. For example, some buttons
have a different function in CD/MP3 mode or tuner mode, also depending if they are
pressed for a short term or pressed and hold for a few seconds.
Below table gives an overview for all the different functions which can be controlled,
indicating the differences between the different operation modes.
11
Control
Operation mode
Action
Function
Press
Change between Tuner / CD / SD/MMC Operation mode
All modes
Rotate
Change output volume for variable output
All modes
Press & Hold Change playback mode between single play and normal play
CD Eject button
All modes
Press
Play/Pause button
CD, USB & SD/MMC Press
Function rotary dial All modes
Tuner
Stop button
Rewind button
Pause & Resume to play the current track
Press & Hold Store current chosen radio frequency on Position 1
CD, USB & SD/MMC Press
Tuner
Remove inserted CD’s from the CD Drive
Stop to play the current track
Press & Hold Store current chosen radio frequency on Position 2
CD, USB & SD/MMC Press
Select previous track
CD, USB & SD/MMC Press & Hold Scan back position in currently playing track
Forward button
Tuner
Press
Tuner
Press & Hold Switch to Manual seek mode / decrease frequency
CD, USB & SD/MMC Press
Find previous radio station in Auto seek mode / decrease
frequency
Select next track
CD, USB & SD/MMC Press & Hold Scan forward position in currently playing track
Repeat button
Tuner
Press
Tuner
Press & Hold Switch to Manual seek mode / increase frequency
CD, USB & SD/MMC Press
Tuner
Band button
Find next radio station in Auto seek mode / increase frequency
Switch between different repeat modes (One / Folder / All / Off)
Press & Hold Store current chosen radio frequency on Position 3
CD, USB & SD/MMC Press
Display ID3 Information of current playing track (Folder / File / Title / Artist / Album)
Tuner
Press
Switch between different tuner bands (FM1 / FM2 / FM3 / MW1 / MW2)
All modes
Press & Hold Swith Loudness On / Off
EQ button
All modes
Press
DIR - button
CD, USB & SD/MMC Press
Jump to a lower folder
Tuner
Press
Select previously programmed radio preset
Tuner
Press & Hold Store current chosen radio frequency on Position 5
DIR + button
RAND button
Switch between different EQ presets (Flat / Classic / Pop / Rock / Off)
CD, USB & SD/MMC Press
Jump to a higher folder
Tuner
Press
Select next programmed radio preset
Tuner
Press & Hold Store current chosen radio frequency on Position 6
CD, USB & SD/MMC Press
Switch random play mode (Shuffle) On and Off
Tuner
Press & Hold Store current chosen radio frequency on Position 4
MEMO button
Tuner
Press
Automatically searching and storing radio stations
MUTE button
All modes
Press
Mutes / Unmutes variable & CD/MP3 output
Power ON
All modes
n/a
Automatically resumes the operation mode / track before
power down
Insert medium
All modes
n/a
Automatically starts to play the inserted medium (CD, USB, SD/MMC)
12
Rear Panel overview
Rear panel description
Power inlet:
The mains power supply (110~240V AC / 50~60 Hz) has to be applied to this AC power
inlet. The connection is made by an IEC C14 power connector which is fitted with a fuse.
When replacing the fuse, make sure that the value of the replacement fuse matches the
value of the original fuse. (T500mAL/250V)
RS232 control port:
The RS232 control port can be used for controlling the device through external hardware
such as audiovisual installations, home & industrial automation systems, computers, ... The complete commands list for controlling the CMP30 through RS232 can be
downloaded from the AUDAC website.
Variable audio output CD/MP3/Tuner:
The variable audio output can be switched between CD/MP3 or tuner mode and the
output level (volume) can be adjusted. The selection and volume adjustment should
be done using the rotary function dial. In most basic audio application where only one
simultaneous source is required (either CD/MP3 or tuner), the variable audio output will be
used.
Fixed audio output CD/MP3:
The signal on this output is dedicated to the CD/MP3 player, and has a constant line
output level (the volume is not adjustable). This output can be used for audio applications
where multiple sources are simultaneously used (CD/MP3 and tuner), such as Multi-Zone
audio applications.
Fixed Audio Output Tuner:
The signal on this output is dedicated to the tuner, and has a constant line output level
(the volume is not adjustable). This output can be used for audio applications where
multiple sources are simultaneously used (CD/MP3 and tuner), such as Multi-Zone audio
applications.
FM Antenna connection:
Connect the supplied FM antenna to those connectors to ensure a good FM reception. In
case of bad reception, the connection of an external outdoor antenna or cable distribution
can significantly improve the audio reception.
13
Chapter 3
Quick start guide
The CMP30 player is designed for installation into a rack (482 mm / 19”) with a height
of one single rack space (44.45 mm), but it can also be placed as a desktop unit. Before
using the device, the connections of the CMP30 should be made properly. The audio
output connections should be made with the RCA/Cinch connectors on the rear side of the
device. depending of the application, the variable either the fixed Audio outputs (or both)
should be used.
When the device is connected to a sound system where only one audio source will be
used at a time, the variable audio output should be used. When connecting the CMP30 to
a Multi-Channel amplifier or Pre-amplifier or when used in a Multi-Zone audio Matrix
system, its recommended to use the fixed audio outputs, so both CD/MP3 and Tuner
audio sources can be used simultaneous. After the audio connections are made, the
mains power should be connected to the IEC input connector and the FM antenna should
be connected to the provided connectors.
After all connections are made properly, the device can be switched on by pushing the
power button. After the power button is pressed, the device will start working after some
seconds.
To start playing music from CD/MP3, insert a CD, USB storage device or SD/MMC
memory card to the slots on front of the device. When the media is inserted, the device
will detect automatically and will start playing. You can select the playing tracks using the
control buttons on front of the device. For switching to settings of another media source,
press the function dial on front (The variable audio output will switch automatically to this
media source).
The preferred radio station can be selected by pressing the
and
buttons. When pressing those buttons one time, it will search automatically to the
previous or next radio station. When holding one of those buttons for three seconds, it will
return to manual seek mode and you can select the radio station manual.
14
Chapter 4
Additional information
Technical specifications
Inputs Audio compact disk slot (12 cm)
USB Memory stick input
SD/MMC Memory card input
Control Front panel
RS232
Outputs
2 x Fixed audio output (Tuner & CD/MP3)
1 x Variable audio output (Selectable)
Frequency range
FM
MW
87.5 ~ 108 MHz
522 ~ 1620 kHz
Channel step
FM
MW
50 kHz
9 kHz
Intermediate frequency FM
MW
10.7 MHz
455 kHz
Sensitivity
FM
MW
2 µV at 30 dB S/N
30 dB
Signal to noise ratio
FM
MW CD/MP3
> 60 dB
> 50 dB
> 80 dB
Frequency response
20 Hz - 20 kHz
Audio codec
MPEG 1/2/5 Layer 2/3 decoding (8 kHz - 48 kHz)
MWA V4, V7, V8, V9 (L1, L2) decoding (8 kHz - 48 kHz)
MP3/WMA compatible media
CD
SD/MMC Memory cards (up to 16 GB / FAT32)
USB Media (up to 16 GB / FAT32)
Output level
Fixed output -10 dB
Variable output -∞ dB ~ 0 dB
100 ~ 240 VAC / 50 ~ 60 Hz
10 Watt
Weight Dimensions (W x H x D) Unit height 3.82 Kg
482 x 44 x 330 mm
1 HE
Power supply Power consumption
15
Notes
16