1
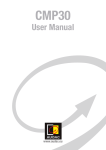
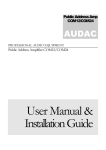
CMP30 Digital Audio Source AUDAC PROFESSIONAL AUDIO EQUIPMENT CMP30 Digital audio source – CD, MP3 & Tuner User Manual & Installation Guide AUDAC PROFESSIONAL AUDIO EQUIPMENT User Manual & Installation Guide AUDAC http://www.audac.eu [email protected] Index INTRODUCTION ..................................................................................................................................................................................................................... 3 ENVIRONMENT ...................................................................................................................................................................................................................... 4 SAFETY REQUIREMENTS ................................................................................................................................................................................................... 5 CAUTION – SERVICING ...................................................................................................................................................................................................... 5 OVERVIEW FRONT AND REAR PANEL .......................................................................................................................................................................... 6 FRONT PANEL OVERVIEW ................................................................................................................................................................................................ 6 FRONT PANEL DESCRIPTION .......................................................................................................................................................................................... 6 REAR PANEL OVERVIEW ................................................................................................................................................................................................ 10 REAR PANEL DESCRIPTION ........................................................................................................................................................................................... 10 GETTING STARTED ............................................................................................................................................................................................................ 12 ADDITIONAL INFORMATION .......................................................................................................................................................................................... 13 TECHNICAL SPECIFICATIONS ....................................................................................................................................................................................... 13 PERSONAL NOTES............................................................................................................................................................................................................... 14 2 Introduction This section briefly describes the possibilities of the CMP30 Digital Audio Source T he CMP30 is an All-In-One audio source device which accommodates three different kinds of audio sources into one single device. It combines a CD-Player, MP3-player and AM/FM tuner into one single rack space 19” housing. On the front side is a CD slot, an USB slot and a SD/MMC memory card slot provided. This makes it possible to play regular audio CD's as well as MP3 files from either CD's, USB memory sticks or SD/MMC memory cards. On the rear side of the device are three stereo outputs provided. Two of them are dedicated to the tuner and CD/MP3 function, while the third output is a variable output. Because of the two separate stereo outputs, the tuner and CD/MP3 player can operate simultaneously. This feature can be useful for applications such as Multi-Zone systems where multiple audio sources are required at the same time. The variable output has a volume control function and carries the signal from the CD/MP3 player when a track is playing, but when the CD/MP3 has ended, the variable output will automatically switch to tuner function. 3 1 Chapter Environment Do not place this unit in an enclosed environment such as a bookshelf or closet. Ensure that there is adequate ventilation to cool the unit. Do not place the unit in environments which contain high levels of dust, heat, moisture or vibration. Do not use the unit near water or other liquids. Make sure that no water or other liquids can be spilled, dripped or splashed on the unit. This unit was developed for indoor use only. Do not use it outdoors. Do not place objects on top of the unit. Place the unit on a stable base or mount it in a stable 19” rack. 4 Safety Requirements Always handle the unit with care. Only use a grounded socket outlet and a power cord with grounding plug to plug in the unit. This unit is not a toy. It should not be operated by children. Do not stick objects through the openings. Do not open the unit (risk for electrical shock). CAUTION – SERVICING This unit contains no user serviceable parts. Refer all servicing to qualified service personnel. Do not perform any servicing unless you are qualified to do so. Note This product conforms to the following European Standards: EN 50081-1: 1992, EN 50082-1: 1992, EN 60065: 19 5 2 Chapter Overview front and rear panel Front panel overview 1 2 4 3 Description 1. Function selection button (FUNCTION): The function selection button is a rotatable push dial. By pressing this button, the device will toggle between Tuner, CD or USB & SD/MMC operation mode. By rotating this button, the volume for the “Variable audio output” can be adjusted. 2. LCD Display: The LCD Display shows the current operation mode of the unit. It shows which radio station is playing, which audio track is playing, which functions are enabled, … 3. CD Slot: Insert CD’s in this slot. The drawer will load the CD automatically when it’s inserted into the slot. Don’t force the CD inside the slot when it doesn’t accept the CD automatically. 4. CD Eject button (EJECT): Press this button to eject the CD. 6 5 12 17 6 13 14 7 8 15 16 9 10 11 19 18 5. Play / Pause button (PLAY/PAUSE): The music from the CD or USB & SD/MMC can be started and paused with this button. Push this button once to start the music. After pushing it a second time, the music will pause, and the music will resume from this point after pushing it again. 6. Stop button (STOP): The music stops when this button is pushed. ): 7. Tuning down / CD-Mp3 Track selection down ( Tuner mode: In tuner mode, the desired radio station can be selected with this button. Press and hold: By pressing and holding this button, the mode will be set to manual seek mode and will return to automatic seek mode after three seconds. Press short term: By pressing this button for a short term, the frequency will decrease one step in manual seek mode, or will switch to the previous radio station in automatic seek mode. CD, USB & SD/MMC mode: In CD or USB & SD/MMC mode, the playing track can be selected with this button. Press and hold: By pressing and holding this button, you can scan back the track which is currently playing. After the desired section of the track is found, just release the button and it will resume play from this point. Press short term: By pressing this button for a short term, you can go back to the previous track. 8. Tuning up / CD-Mp3 Track selection up ( ): Tuner mode: In tuner mode, the desired radio station can be selected with this button. Press and hold: By pressing and holding this button, the mode will be set to manual seek mode and will return to automatic seek mode after three seconds. Press short term: By pressing this button for a short term, the frequency will increase one step in manual seek mode, or will switch to the next radio station in automatic seek mode. 7 CD, USB & SD/MMC mode: In CD or USB & SD/MMC mode, the playing track can be selected with this button. Press and hold: By pressing and holding this button, you can scan forward the track which is currently playing. After the desired section of the track is found, just release the button and it will resume play from this point. Press short term: By pressing this button for a short term, you can proceed to the next track. 9. Repeat (REP): With this button, the repeat mode can be selected between Off , Repeat one, Repeat folder. Press this button to toggle between the different repeat modes. 10. Band select for the tuner (BAND): Tuner mode: Press this button to select between the different tuner bands. The different tuner bands are FM1 – FM2 – FM3 – MW1 – MW2, and can be cyclically selected in this order by pressing the BAND button. CD, USB & SD/MMC mode: Press this button to display the information of the ID3 tag of the current track. (Folder – File – Title – Artist – Album) 11. Equalizer select (Flat / Classic / Pop / Rock / Off ) (EQ): Press this button to toggle between the equalizer settings: Flat – Classic – Pop – Rock - Off 12. Search down (DIR +): Tuner mode: Press this button in tuner mode to select the previous programmed preset frequency. CD, USB & SD/MMC mode: Press this button in MP3 mode to jump to a lower folder. 13. Search up (DIR -): Tuner mode: Press this button in tuner mode to select the next programmed preset frequency. CD, USB & SD/MMC mode: Press this button in MP3 mode to jump to a higher folder. 8 14. Random play (RAND): Press this button to switch the random play mode (Shuffle) On and Off. When random play is switched ON, the tracks in the current folder will be played in a random sequence. 15. Memory for the tuner frequency (MEMO): This button allows to store the current selected frequency to the preset memory. 16. Mute (MUTE): Press this button to mute the variable output immediately. When mute is on, the message “MUTE” will blink on the LCD display. 17. USB connection port Connect your USB storage device to this USB connection port, to make the CMP30 play the MP3 tunes stored on your USB storage device. 18. SD/MMC memory card slot Insert your SD / MMC memory card to this card slot, to make the CMP30 play your MP3 tunes stored on your memory card. 19. Power switch By means of the power switch, the device can be turned ON and OFF. When the device is switched on, the blue LED above the power button will illuminate. 9 Rear panel overview 1 2 3 4 6 5 Description 1. Power inlet: The mains power supply (110~240V AC / 50~60 Hz) has to be applied to this AC power inlet. The connection is made by an IEC power connector and is fitted with a fuse. When replacing the fuse, make sure that the value of the replacement fuse matches the value of the original fuse. (T500mAL/250V) 2. RS232 connection: The RS232 connection can be used to control the CMP30 through external hardware such as an home automation system or a computer. Connect your external control hardware to this port. The complete RS232 command instruction set and configuration information can be downloaded from the AUDAC website. 3. Variable Audio Output CD/MP3/Tuner: The signal on this output can be selected between CD/MP3 or Tuner. The output signal can be switched by pushing the function dial. This output should be used for most of the basic audio applications when only one output signal (Either CD/MP3 or Tuner) should be used at the same time. The level (volume) for the signal on this output can be adjusted by rotating the function dial. When a CD or MP3 is playing and the playing music is finished after a time, the signal present on this output will switch automatically to tuner. 4. Fixed Audio Output CD/MP3: The signal on this output is dedicated to the sound coming from the CD/MP3 player, and has a constant line output level (the volume is not adjustable). This output should be used for advanced audio applications where multiple sources (CD/MP3 and Tuner) are used at the same time (For example, Multi-Zone audio applications). 10 5. Fixed Audio Output Tuner: The signal on this output is dedicated to the sound coming from the Tuner, and has a constant line output level (the volume is not adjustable). This output should be used for advanced audio applications where multiple sources (CD/MP3 and Tuner) are used at the same time (For example, Multi-Zone audio applications). 6. FM Antenna connection: Connect the supplied FM antenna to those connectors to ensure a good FM reception. 11 3 Chapter Getting started The CMP30 player is designed for installation into a rack (482 mm / 19”) with a height of one single rack space (44.45 mm), but it can also be placed as a desktop unit. Before using the device, the connections of the CMP30 should be made properly. The audio output connections should be made with the RCA/Cinch connectors on the rear side of the device. depending of the application, the variable either the fixed Audio outputs should be used. When the device is connected to a sound system where only one audio source will be used at a time, the variable audio output should be used. When connecting the CMP30 to a Multi-Channel amplifier or Pre-amplifier or when used in a Multi-Zone audio Matrix system, its recommended to use the fixed audio outputs, so both CD/MP3 and Tuner audio sources can be used simultaneous. After the audio connections are made, the mains power should be connected to the IEC input connector and the FM antenna should be connected to the provided connectors. After all connections are made properly, the device can be switched on by pushing the power button. After the power button is pressed, the device will start working after some seconds. To start playing music from CD/MP3, insert a CD, USB storage device or SD/MMC memory card to the slots on front of the device. When the media is inserted, the device will detect automatically and will start playing. You can select the playing tracks using the control buttons on front of the device. For switching to settings of another media source, press the function dial on front (The variable audio output will switch automatically to this media source). and buttons. When The preferred radio station can be selected by pressing the pressing those buttons one time, it will search automatically to the previous or next radio station. When holding one of those buttons for three seconds, it will return to manual seek mode and you can select the radio station manual. 12 4 Chapter Additional Information CMP30 Technical specifications CMP30 Performance Frequency range Channel step Intermediate frequency Sensitivity Signal to noise ratio FM MW FM MW FM MW FM MW FM MW CD/MP3 87.5 ~108.0 Mhz 522 ~1620 kHz 50 kHz 9 kHz 10.7 MHz 455 kHz 2 µV at 30 dB S/N 30 dB >60 dB >50 dB >60 dB 20Hz – 20 kHz 110~240V AC / 50~60 Hz Frequency response Power supply Construction Construction Mounting Unit Height Dimensions (W x H x D) Color Net Weight Steel 19” Rack 1 HE 482 x 44 x 330 mm Black 3.82 Kg 13 Personal notes 14