1
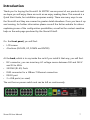
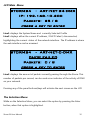
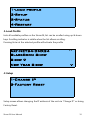
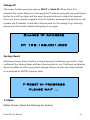
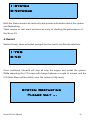
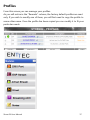
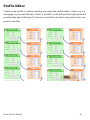
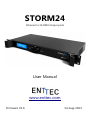
STORM24
Ethernet to 24 DMX Output ports
User Manual
www.enttec.com
Firmware V1.6
14-Aug-2013
This page intentionally left blank
Storm24 User Manual
2
Table of Contents
Package Contents................................................................................................................................ 4
Contacting ENTTEC.............................................................................................................................. 4
Warranty.................................................................................................................................................. 5
Glossary.................................................................................................................................................... 6
Introduction............................................................................................................................................ 7
Physical Features.................................................................................................................................. 8
Software Features................................................................................................................................ 8
Additional Features Available by Upgrade ..............................................................................8
Basic Concepts...................................................................................................................................... 9
Connector pin out................................................................................................................................ 9
Getting Started .................................................................................................................................. 10
Profiles................................................................................................................................................... 10
Factory Profiles................................................................................................................................... 11
The LCD Menu.................................................................................................................................... 11
LCD Main Menu .................................................................................................................... 12
The Selection Menu............................................................................................................... 12
1-Load Profile........................................................................................................................... 13
2-Setup....................................................................................................................................... 13
Change IP.................................................................................................................................. 14
Factory Reset............................................................................................................................ 14
3-Status...................................................................................................................................... 14
4-Restart.................................................................................................................................... 15
Web Interface...................................................................................................................................... 16
Profiles................................................................................................................................................... 17
Profile Editor........................................................................................................................................ 18
NMU ...................................................................................................................................................... 19
Updating the Application firmware............................................................................................ 20
Storm24 User Manual
3
Package Contents
When you open the packaging, you should find these items in the box:
•
Storm24 (pn:70050)
•
Straight connect Ethernet lead (pn:79102)
•
IEC power cord
•
User manual (pn: 50479)
•
CD (pn:79106)
If any of these items is missing please contact your local dealer.
Contacting ENTTEC
To contact us, please send an email to: [email protected]
Tel: +61 3 9763 5755 GMT+10
Fax: +61 3 9763 5688
To write us:
ENTTEC Pty Ltd
PO BOX 4051
RINGWOOD, 3134
AUSTRALIA
Storm24 User Manual
4
Warranty
ENTTEC warrants that the product it manufactures and sells will be free from
defects in materials and workmanship for a period of 1 year from the date of
shipment from an authorized ENTTEC wholesaler. If the device proves defective
within the respective period, ENTTEC will repair or replace the defective hardware
at its sole discretion. If the failure is due to an operator error the user accepts to
pay for any charge relating to the diagnosis of the hardware, faulty parts or
shipping from our factory.
ENTTEC makes no warranty of any kind, express or implied, including without
limitation the implied warranties of merchantability and fitness for a
particular purpose. In no event shall ENTTEC be liable for indirect, special or
consequential damages.
Opening the unit voids the warranty as described above.
As this product uses ethernet as a communication medium, we cannot
officially support applications where the Storm24 is used on an existing
computer network. We recommend you have a good knowledge of
networking infrastructure and IP networking.
Storm24 User Manual
5
Glossary
ACN:
Advanced Control Network.
Art-Net:
Artistic License network protocol. This is the Artistic License
DMX over ethernet protocol.
Channel:
On the front panel of the Storm24, the term Channel is
used synonymously with a DMX over Ethernet Stream or
Universe. It may at other times mean a single DMX address
or slot within a Stream or Universe.
Dimmer:
One discretely controlled device or parameter of a device
out of 512 possible in the DMX512 protocol. Also referred
to as “Address”, and in confusingly inopportune moments,
“DMX Channel” or “Output Channel”
DHCP:
Dynamic Host Configuration Protocol.
ESP:
Enttec Show Protocol. Enttec DMX over Ethernet protocol.
IP:
Internet Protocol.
KiNET:
Proprietary DMX over Ethernet type of protocol developed by
Philips Color Kinetics for their LEDs
LCD:
Liquid Crystal Display.
PC:
Personal Computer.
Stream:
A DMX-over-Ethernet Universe coming into or leaving the Storm
Universe:
512 addresses or slots' worth of control information as conveyed
by DMX512 protocol. A lighting system may have more than
512 discrete things to control, so multiple universes may be
required.
When this is the case, the Universe number will be
expressed in 0-255 form for ESP or 0-15 subnet and 0-15
universe # for Art-Net.
Storm24 User Manual
6
Introduction
Thank you for buying the Storm24. At ENTTEC we are proud of our products and
we hope you will enjoy them as much as we enjoy making them. This manual is a
Quick Start Guide, for installation purposes mainly. There are many ways to use
the Storm24 and they are covered in greater detail elsewhere. Once you have it up
and running, for further information please consult the Enttec website for videos
explaining some of the configuration possibilities, as well as the context-sensitive
help on the web page produced by the Storm24 itself.
On the front panel, you will find :
•
LCD screen
•
4 buttons (ESCAPE, UP, DOWN and ENTER)
At the back, which is to say inside the rack if you install it that way, you will find:
•
IEC connector, you can insert any AC voltage source between 100 and 260 V
and 50 to 60Hz
•
24 DMX (RJ-45) Ports
•
RJ45 connector for a 10Base-T Ethernet connection
•
RS232 port
•
2 x USB ports (un-used)
The unit has no power switch and can be left on continuously.
Storm24 User Manual
7
Physical Features
•
24 DMX ( RJ-45) ports
•
Gigabit Ethernet Connection
•
LCD display provide status information on system and data flow
Software Features
•
DMX refresh rate configurable for each port (1Hz -> 44Hz)
•
Break time configurable for each DMX port (88us to 1ms)
•
Mark After Break configurable for each DMX port
•
All configurations are made through web browser.
•
Graphical User Interface for creating and editing ports is flow-chart oriented
and documents data flow as you configure it.
•
Number of channels configurable for each port (1 to 512)
•
Supports numerous protocols for DMX over Ethernet:
•
ESP
•
Art-Net
•
StreamingACN
•
KiNet
Additional Features Available by Upgrade
•
Stream Auditor: A status monitoring screen that includes data throughput
statistics, DMX values in real time, and other information for troubleshooting,
available through web page
Storm24 User Manual
8
Limitations:
As the Storm24 is reliant on Ethernet, if you are using an existing computer
network and sharing the traffic between your lighting control system and other
functions, or if you are using multiple Storms, you might experience delays and a
drop in the update rate.
Basic Concepts
ENTTEC Storm24 is a standard Art-Net node. Because of this, you can use the
device with applications, consoles, desks, or controllers that are compatible with
Art-Net to distribute Art-Net data via Ethernet network.
With the default profile, each DMX Port is mapped to it's respective Art-Net
Universe, allowing you to directly plug-in Storm24 without any changes
configuration necessary.
Connector pin out
DMX pinout (RJ-45):
Pin1: Data +
Pin2: Data Pin7: Ground
RS232:
Pin 2: TX
Pin 3: RX
Pin 5: Ground
Storm24 User Manual
9
or
Getting Started
To begin your installation please follow these steps.
1. Unpack the unit from the box. Inspect the Storm24 for any damage that
might have occurred in shipping, and verify that it looks to be in good
condition before plugging it in to power.
2. The Storm24 occupies a single unit (1U) in a 19 inch rack. You may attach
it to the rack either at this time or later after configuring it, if desired.
3. Attach a power cord with mains voltage to the IEC input on the back.
4. Using an Ethernet Cat5, Cat5E or Cat6 cable, connect the Storm24 to an
Ethernet Network.
5. When the unit turns on, you will be able to see its initial IP address on the
LCD panel which looks like w.x.y.z, where each letter is a number between
0 and 255. Note that IP address down for later use.
Profiles
Profiles are essential to the operational philosophy of the Storm24. With a profile
selected, the device knows how to utilize the many resources it can make use of to
perform lighting control tasks.
Each Profile contains configuration information for some or all of the following:
DMX Ports
These are the physical OUTPUT DMX ports 1 to 24.
Ethernet Streams
These are the DMX over Ethernet universes. (Art-Net, ESP, KiNET, ACN)
Routing Diagram
The routing diagram is the visual representation of the Profile itself and it
tells the Storm24 how frames are moved or routed inside the routing engine, as
well as what to do with multiple sources of data that need to be merged, when
that option is engages. Other special operations can be part of a diagram as well,
such as Channel Shifter, Output Switch, etc .
Storm24 User Manual
10
Factory Profiles
The Storm24 has a set of factory profiles, to start you off. You're likely to see 2 or
more of the following:
•
Artnet -> DMX: This profile will take 24 Art-Net universes and convert them to
24 DMX signal on ports 1 to 24.
•
Ethernet to DMX: This profile will take 24 DMX over Ethernet signal using the
ESP protocol and convert them to 24 DMX signal on ports 1 to 24.
These profiles are just an example of what can be done with the Storm24, you can
modify the factory profiles to accommodate your particular need, or create your
own profile from scratch.
If you don't see any of the above, please contact [email protected] and we can
send them to you. After that, you're on your own to make and edit profiles to suit
your application!
You may select between existing profiles via the menu, but to edit them and make
new ones, you'll need to access the Storm24's web page. Read more about each of
these ways to interact with the Storm24 in the following sections of the manual.
The LCD Menu
The LCD Menu is navigated through the four panel buttons on the front of the
Storm24.
The Menu button acts as the “Back” button, which takes you to the previous
Menu/screen.
The Enter button goes into the selected option on the screen, and activating the
option.
The Top & Bottom button are used to navigate/scroll through the options on any
screen. The currently selected option is highlighted with a white background on
the screen.
Storm24 User Manual
11
LCD Main Menu
STORM24 - ART-NET-24-DMX
IP: 192.168.10.200
Packets: 25 / S
press a key to enter
Line1: displays the System Name and currently Selected Profile
Line2: displays either the current IP address / DHCP Failed / disconnected,
highlighting the current status of the network interface. The IP address is where
the web interface can be accessed.
STORM24 - ART-NET-0-DMX
DHCP FAILED
Packets: 0 / S
press a key to enter
Line3: displays the amount of packets currently passing through the Storm. This
number of packets per second, can be used as an indicator of the activity of DMX
on your network.
Pressing any of the panel buttons/keys will activate the next screen on the LCD
The Selection Menu
While on the Selection Menu, you can select the option by pressing the Enter
button, when that option is highlighted.
Storm24 User Manual
12
1-load profile
2-Setup
3-Status
4-Restart
1-Load Profile
Lists all available profiles on the Storm24, list can be scrolled using up & down
keys. Scrolling indicator is visible when the list allows scrolling.
Pressing Enter at the selected profile will activate the profile
Art-NET24-DMX24
BlackRoom Show
Show 9
New Year Show
^
v
2-Setup
1-Change IP
2-Factory Reset
Setup screen allows changing the IP address of the unit via “Change IP” or doing
Factory Reset.
Storm24 User Manual
13
Change IP
This screen further gives two options DHCP or Static IP. When Static IP is
selected, the screen allows you to change the IP address using the top and bottom
button to scroll the digits and the menu & enter buttons to select the segment.
Once you are on the last segment of the IP address, pressing the Enter button, will
activate the IP address. It will take a few seconds for the change to go through,
please wait 30 seconds, before attempting to try again.
Change IP Address
IP: 192.168.001.003
Factory Reset
Activating Factory Reset, leads to a simple prompt confirming your action. Once
confirmed, the Factory Reset will take a few seconds to run. It will end up deleting
all your profiles, as well as any saved settings. Please use this only when needed,
or as directed by ENTTEC support team.
F-Reset in progress
please wait ...
3-Status
Status Screen, allows the following two options:
Storm24 User Manual
14
1-System
2-Network
Both the Status screens are read-only and provide information about the system
and Networking.
These require no user-input and serve as a way of checking the performance of
the Storm 24.
4-Restart
Restart Screen, when activated, prompts for the user to confirm the selection.
1-YES
2-NO
Once confirmed, Storm24 will stop all stop the engine and restart the system.
While rebooting the LCD screen will change between a couple of screens, and the
LCD Main Menu will be visible, once the system is fully ready.
System Restarting
Please wait …
Storm24 User Manual
15
Web Interface
The Storm24 is configured, controlled and programmed through a web browser
interface running on a computer system located on the same Local Area Network.
Any modern web browser, such as Chrome, Firefox, Internet Explorer, Safari or
Opera, running under any operating system, including Windows XP or Vista, Mac
OS X or Linux can be used.
Throughout the Web Interface, helpful hints are displayed when a user hovers the
mouse over the “Help” icon ?
Storm24 User Manual
16
Profiles
From this screen you can manage your profiles.
As you will notice in the "Remarks" column, the factory default profiles are read
only. If you wish to modify one of them, you will first need to copy the profile to
some other name. Once the profile has been copied you can modify it to fit your
particular needs.
Storm24 User Manual
17
Profile Editor
Create a new profile or edit an existing one using the profile-editor. Opens up in a
new page in your web browser. Select a module on the left and the right panel will
provide help about that panel. Connect a module to another using wires from one
point to another.
Storm24 User Manual
18
NMU
NMU (Node Management Utility) is a free Windows and OSX application used to
manage compatible ENTTEC DMX over Ethernet nodes.
NMU will not directly allow you to configure the Storm24 itself, but it can help you
find your unit's IP address and then open a browser window to make the required
changes.
To employ the NMU, follow this set of instructions:
1. If you have not already done so, download and install the application from
the Enttec website www.enttec.com/nmu
2. Ensure that your Storm24 is hooked up physically by Ethernet cable to the
same physical network as the computer on which you will run the NMU.
3. Start the application.
4. Press the Discovery button.
5. Select Storm24.
6. An IP Address will be shown next to any Storm24 which are located.
7. Click on the link and open the browser window for that Storm24, if desired
Storm24 User Manual
19
Updating the Application firmware
You can update the firmware on the Storm24, via the web browser. Find new
firmware files (they are stored as *.bin files on the Enttec website). Download them
to your desktop and then follow instructions in the Storm24's web browser page,
under the Settings section
Note: While the firmware is being updated, please do not power off the unit,
please wait until the web-page is processing. (up-to 5 minutes)
If the web-page does not refresh automatically, please open the home page on
the browser manually, and verify that the update has succeeded.
Storm24 User Manual
20
The Wireit Library is distributed under the MIT License
Distributed under the MIT License : Copyright (c) 2007-2010, Eric Abouaf
<eric.abouaf at gmail> Permission is hereby granted, free of charge, to any person
obtaining a copy of this software and associated documentation files (the
"Software"), to deal in the Software without restriction, including without limitation the
rights to use, copy, modify, merge, publish, distribute, sublicense, and/or sell copies
of the Software, and to permit persons to whom the Software is furnished to do so,
subject to the following conditions: The above copyright notice and this permission
notice shall be included in all copies or substantial portions of the Software.
THE SOFTWARE IS PROVIDED "AS IS", WITHOUT WARRANTY OF ANY KIND,
EXPRESS OR IMPLIED, INCLUDING BUT NOT LIMITED TO THE WARRANTIES
OF MERCHANTABILITY, FITNESS FOR A PARTICULAR PURPOSE AND
NONINFRINGEMENT. IN NO EVENT SHALL THE AUTHORS OR COPYRIGHT
HOLDERS BE LIABLE FOR ANY CLAIM, DAMAGES OR OTHER LIABILITY,
WHETHER IN AN ACTION OF CONTRACT, TORT OR OTHERWISE, ARISING
FROM, OUT OF OR IN CONNECTION WITH THE SOFTWARE OR THE USE OR
OTHER DEALINGS IN THE SOFTWARE.
Storm24 User Manual
21