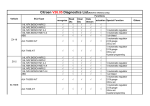
1
GENIUS
Handbook
Via Torino, 16 - 15020 GABIANO (AL) - ITALIA
E-mail: [email protected]
Release valid until version of Race EVO 7.00.415 Build 119
Version GOS Genius 4.024 Build 009
04th August 2008
GENIUS
HANDBOOK
04th AUGUST 2008
Handbook
1
1 INTRODUCTION
3
2 TECHNICAL SPECS
3
3 GENIUS BAG KIT
4
4 CONNECTIONS, PORTS AND LED
9
5 HARDWARE REQUIREMENTS
10
6 DRIVER INSTALL
10
7 BASIC TASKS
11
8 MAIN MENU
12
9 WORK MENU
13
9.1 ECU ID
13
9.2 Serial reading
15
9.3 Serial Writing
16
9.4 Diagnosis
18
9.5 Index
18
10 TOOLS MENU
20
10.1 Setup
20
10.2 Explore SD
22
10.3 Test
23
11 INFO MENU
23
11.1 Protocols
24
11.2 Info Genius
24
11.3 Features
25
12 STANDBY
25
13 PC CONNECTION
26
13.1 Hardware connection
26
13.2 Software connection
27
13.2.1 Join/Export file
28
13.2.2 File for the Technical Support
31
13.2.3 Update
32
13.2.4 File ID
33
13.2.5 Genius Info and protocols
34
14 AVAILABLE PROTOCOLS
36
15 WIRING LIST
39
APPENDIX A (Special Applications)
51
APPENDIX B (Specific Procedures)
53
APPENDIX C – VAG COUNTER RESET
58
Dimensione Sport s.r.l.
2
GENIUS
HANDBOOK
04th AUGUST 2008
1 INTRODUCTION
GENIUS is the first Touch&Map tool allowing the serial reading and programming of the memory of the
ECU (electronic control unit) managing the vehicle engine.
Its STAND ALONE conception and its TOUCHSCREEN panel make it a unique tool. Being an
INDEPENDENT tool, Genius does not need to be connected to a PC during the reading and the
programming procedures, thus avoiding dangerous blocks or slowdowns caused by the multitasking
operative system of the PC. Moreover it is a particular easy and user-friendly tool thanks to its practical
TOUCHSCREEN panel.
To grant the highest standards of safety, GENIUS is equipped with a battery which – should an
accidental disconnection from the OBDII socket happen during programming – allows to easily restore
the communication with the ECU, as all the DIMSPORT-branded serial programming protocols grant.
This new revolutionary tool supports CAN systems, too, other than K LINE, L LINE, and J1850.
Genius has a big memory capacity, supplied by a removable 256 Mbyte SD CARD (SECURE
DIGITAL), which can be expanded up to 1 Gbyte.
2 TECHNICAL SPECS
LCD 320 x 240 pixel DISPLAY, CCFL backlight, transflective TOUCHSCREEN with Touch Panel
512KByte PROTECTED FLASH MICROPROCESSOR MEMORY
16MByte RAM MEMORY
FILE ARCHIVE MEMORY IN 256 MByte SECURE DIGITAL expandable up to 1Gbyte
ALERT LED for SECURE DIGITAL, USB, POWER SUPPLY, DIAGNOSTIC LINE
Internal CLOCK with memory and and 3 volt Lithium battery
8.4 volt 600 mAh RECHARGEABLE internal battery
12 volts to 30 volts POWER SUPPLY TENSION
COMMUNICATION LINES with diagnostic port K LINE, L LINE, CAN2.0, J1850
USB CONNECTION TO PC
Dimensione Sport s.r.l.
3
GENIUS
HANDBOOK
04th AUGUST 2008
3 GENIUS BAG KIT
The GENIUS BAG includes all the components for the serial programming that are given to the
customer when purchasing Genius.
Here below you find the list of all components with its code
RIF.
CODE
DESCRIPTION
1
F32GENIUS
Genius – main device
2
F32GN008
Genius – Obd cable (K-CANBUS- J1850)
3
C32GNALIM12
12volt 110/240V PSU with international plug
4
F32GN002
Genius – Adaptor for compatibility with the old system FLASH 4
5
C32GNPEN
Genius – n.3 Pens for the TOUCH PANEL
6
C32GNUSB01
Genius – USB cable for PC connection
7
F32GN011
Universal wiring for serial programming
8
F32GN003
Genius – Wire to connect to the battery
9
C32GNVAL
Genius – Bag (picture of the full kit)
Dimensione Sport s.r.l.
4
GENIUS
HANDBOOK
04th AUGUST 2008
OPTIONAL
RIF.
CODE
DESCRIPTION
10
F32ALIM12V
PSU 12V SW for VAG TDI cable
11
F32CBATT
+12V battery cable for VAG TDI cable
12
F32FL003P
OBDII wire for PORSCHE M5.2.2
13
F32FL005
Race plug for VAG TDI ECU
14
F32FL002
BMW diagnostic connector + RJ45 wire’s adaptor for BMWload
15
F32FL004
Mercedes diagnostic connector
16
F32FL001
FIAT ALFA LANCIA diagnostic connector for serial communication
17
F32FL006
A cables for Bosch ME7.3.1, ME3.1, ME2.1, ME7.3H4 hybrid ECU
18
F32FL007
B cables for Bosch ME7.3.1, ME3.1, ME2.1, ME7.3H4 hybrid ECU
OPTIONAL CABLES 2008
RIF.
CODICE
DESCRIZIONE
10
F32ALIM12V
PSU 12V SW for VAG TDI cable
11
F32CBATT
+12V battery cable for VAG TDI cable
14
F32FL002
BMW diagnostic connector + RJ45 wire’s adaptor for BMWload
20
F32GN013
OBDII wire for PORSCHE M5.2.2
21
F32GN015
Race plug cable for VAG TDI ECU
22
F32GN014
Mercedes diagnostic connector cable
23
F32GN023
FIAT ALFA LANCIA diagnostic connector for serial communication
24
F32GN021
A cables for Bosch ME7.3.1, ME3.1, ME2.1, ME7.3H4 hybrid ECU
25
F32GN022
B cables for Bosch ME7.3.1, ME3.1, ME2.1, ME7.3H4 hybrid ECU
Dimensione Sport s.r.l.
5
GENIUS
HANDBOOK
2
1
4
1
3
5
This adaptor
must be used only
on Genius!
7
6
8
Dimensione Sport s.r.l.
04th AUGUST 2008
9
6
GENIUS
HANDBOOK
10
11
12
13
14
15
16
Dimensione Sport s.r.l.
04th AUGUST 2008
17
7
GENIUS
HANDBOOK
04th AUGUST 2008
20
18
22
21
23
24
25
Dimensione Sport s.r.l.
8
GENIUS
HANDBOOK
04th AUGUST 2008
4 CONNECTIONS, PORTS AND LED
Front Side
A) 1 USB port
B) 1 slot for SD Secure Digital card
C) 1 green LED for SD:
it is on and still when the SD card is plugged in
It blinks when file are being saved on the SD card
D) 1 green LED for USB:
it blinks when Genius is communicating with Race EVO
Back Side
E) 1 Diagnostic Port to plug the OBD cable or the universal wire for serial connection
F) 1 DC IN connector to connect to the 12 Volt 110/240 V PSU
G) 1 green LED “data transfer”: NOT YET FUNCTIONING
H) 1 red LED for ext power:
it’s ON when Genius is powered
Bottom Side
I) 1 RESET button (to be used ony upon request of the technical support– i.e Genius is not
responding -)
L) 1 button to open the SD reader (to be opened and removed ony upon request of the technical
support: with a tipped tool carefully press the hole marked in the picture below as far as the cover is
open. To remove the SD card press slightly the card as far as there is a click, then release the card.
Dimensione Sport s.r.l.
9
GENIUS
HANDBOOK
04th AUGUST 2008
The bottom part of Genius is equipped with:
M) 4 anti slide rubbers
N) 1 removable hand grip to hold Genius while working
5 HARDWARE REQUIREMENTS
•
RaceEVO, (always updated in manu Update --> Race Update)
•
1 USB port
•
Operating System Windows 2000 or XP
6 DRIVER INSTALL
After plugging for the first time Genius to the PC it is necessary to follow the procedure below:
1) Select “Yes, this time only” and click Next
Dimensione Sport s.r.l.
10
GENIUS
HANDBOOK
04th AUGUST 2008
2) Select “Install the software automatically (Recommended)” and click Next.
3) Click on “Continue Anyway” and then “Finish”.
Note
If you are using both devices 555Pro and Genius on the same PC, only after the first connection of
555Pro to PC you have to repeat the procedure of driver install for Genius.
7 BASIC TASKS
Once you got Genius the first operation you must accomplish is to leave it on charge 12h. this operation
must be repeated once a month.
It is possibile to recharge Genius after each modification connecting it to the PSU 12volt.
This procedure is necessary to charge completely the internal battery (8.4volt da 600 mah), this battery is
necessary for the data recovery after the loss of communication with the ECU.
Dimensione Sport s.r.l.
11
GENIUS
HANDBOOK
04th AUGUST 2008
8 MAIN MENU
The first screen will show us:
a) main menu
b) information bar with voltage, date and time
Main menu has four buttons WORK, TOOLS, INFO, STANDBY that leed to the most important sections of
work and information:
-
WORK to work
TOOLS to visualise files, Genius settings and test
INFO to get information about Geius and its protocols
STANDBY to set Genius in standby mode
To get details about each single process please see the related chapters.
WORK
WORK button gives acces to main work session,
through a second level menu Genius allows to manage the
IDentification (Chpt. 9.1 Pg. 11), READING (Chpt. 9.2 Pg. 13)
and WRITING (Chpt. 9.3 Pg. 14).
TOOLS
TOOLS button gives access to the functions of visualisation of files loaded on the memory SD through the
EXPLORE SD (Chpt. 10.2 Pg. 20). It is also possible to modulate the settings of display, language, date and
time of Genius thanks to SETUP menu (Chpt. 10.1 Pg. 18); and run functional TEST (Chpt. 10.3 Pg. 21) on
differents components like Ram, Display, Led and Battery.
INFO
INFO function gives all the information about Genius, Protocols and Features.
(Chpt. 11 Pg. 21).
STANDBY
Once selected STANDBY button Genius goes into sleeping mode.
To wake up Genius touch display once (Chpt. 12 Pg. 23).
Dimensione Sport s.r.l.
12
GENIUS
HANDBOOK
04th AUGUST 2008
9 WORK MENU
This menu gives access to main work session through some second-level menu that will lead to the
processes of IDentification, READING and WRITING.
9.1 ECU ID
This operation allows the identification of the electronic unit, after that it will be possibile get the
information necessary to download the correct setting file. To perform the IDdentification is possibile to
follow two different ways that have the same result:
A)
1. Follow the path and choose the correct selection
WorkVehiclesManufacturer/Model/TypeProtocol
2. Now the opening of the protocol will permit the IDentfication of the ECU.
Dimensione Sport s.r.l.
13
GENIUS
HANDBOOK
04th AUGUST 2008
3. After the selection of ID Genius will ask to switch on and off the dash-board and ECU information will
be displayed, it is possibile to save all the information of the ECU.
To get once again the information of the Identification just finished it is necessary open the file saved
inside the ID folder following Tools Explore SD ID folder.
See Chpt.10.2 Pg. 20
After this operation we know the ECU identification data and it is possibile to search for the correct
setting file inside Race database
B)
Follow the path suggested and select the correct protocol to use:
WorkProtocols
Dimensione Sport s.r.l.
14
GENIUS
HANDBOOK
04th AUGUST 2008
9.2 Serial reading
To get access to the Serial Reading it is necessary to follow the path below and choose the correct
selection depending on the vehicle WorkVehicleManufacturer/Model/TypeProtocol
Otherwise follow the path WorkProtocols but you must know which protocol is required
NOTE
Each time Genius reads the ECU it creates a file with HEADER.
For details see Chpt.9.3 Pg.15.
At the end of the reading it is necessary to load the read file into the PC.
For this operation follow the instructions at Chpt 13.2.1 Pg.26.
Once the protocol is opened it will be possibile to select Reading
1. Click on Raeding
2. After the visualisation of ID Genius will ask to switch on and off the dash-board (this procedure is
required to verify the data).The reading progress bar will be displayed. After the reading we will have the
file that is inside the ECU of the vehicle.
At the end of the reading it will be possibile
the saving of the file inside Genius.
Dimensione Sport s.r.l.
15
GENIUS
HANDBOOK
04th AUGUST 2008
9.3 Serial Writing
After the modification it will be possibile to load the modified file inside the ECU of the vehicle.
To get access to the Serial Writing process it is necessary to follow the path and choose the correct
selection depending on the vehicle WorkVehicleManufacturer/Model/TypeProtocol
Otherwise following the path WorkProtocols but you must know which protocol is required.
Once the protocol is opened it will be possibile to select Writing
1. After selecting Writing Genius will show the folder Write with all the file modified or original that have
been written or will be written inside ECU.
Then select the file to write and follow the procedure.
After selecting the file to write follow the procedure, in some cases Genius will ask to switch on and
off the dash-board, it depends on the vehice.
Dimensione Sport s.r.l.
16
GENIUS
HANDBOOK
04th AUGUST 2008
2. Once started the procedure ECU identification numbers will be read again.
If the data displayed don’t match with the hardware or software numbers click cancel and repeat the
procedure chosing the correct file.
If the data match proceed clicking on " OK ".
N.B.
Each time Genius reads an ECU it creates a file with HEADER, it is a file caracterised by all the
identification data (Manufacturer/Model/Type, date and time, protocol used etc.etc). this kind of code is
recognised by Race EVO also during the creation of the modified file. With this type of code Genius
won’t have any doubt before the writing of the file.
If a file without HEADER is going to be written inside the ECU Genius will ask ( to protect the ECU) if the
file chosen is the correct one.
For more details on how extract the HEADER from the file see Chpt.13.2.1 Pg.28.
If the programming is confirmed it is possibile to control
the programming procedure.
During this procedure do not perform any action on the vehicle or on Genius!!!
3. After programmig a message window will confirm the end of the procedure.
Switch off the dash-board and click on OK.
NOW THE ECU PROGRAMMING IS TERMINATED!
Dimensione Sport s.r.l.
17
GENIUS
HANDBOOK
04th AUGUST 2008
9.4 Diagnosis
In some serial protocols it is available the deleting errors function. After serial programming in some
ECU might happen ( it might not happen) that some check lights in the dash-board light on.
For this reason only on some serial protocols, like for example on the FLASH_0082 for ECU VAG
ME7.1.1, the deleting error function has been introduced.
1 – open protocol FLASH that has the deleting error procedure in this way
WorkVehiclesselect the correct vehicle
otherwise
Work Protocols select the protocol FLASH with the deleting error procedure
Select the button DIAGNOSIS and run the deleting procedure clicking on the button DEL ERRORS
After it will be necessary to follow the procedure required by Genius, switch on the dash-board, a window
with the processing bar will open then at the end of the procedure of errors deleting a message will ask
to switch off the dash-board.
9.5 Index
Once inside the Protocols window at the bottom there is the tool bar with two buttons “Information” and
the “Screwdriver”.
Dimensione Sport s.r.l.
18
GENIUS
HANDBOOK
04th AUGUST 2008
Information
This button allow the visualisation of all the
information about the selected protocol, it shows the
kind of line used by the protocol to communicate
with the ECU.
Screwdriver
This button open the Setup K-line window about the selected serial Protocol, it gives the opportunity to
modulate the transmission on the K-line.
NOTE
To manage these options it is strictly recommended the help of the technical support.
PULL UP
Selecting the “Screwdriver” and after the option Pull Up it is possibile to set the resistance of the serial
protocol. It is possibile check the resistance enabled on Genius, and verify the ch’ange, on status bar
(Es.Flash53).
Dimensione Sport s.r.l.
19
GENIUS
HANDBOOK
04th AUGUST 2008
SPEED
Selecting the “Screwdriver” and after Speed it is possibile to modify the communication speed of the
serial protocol. It is possibile check the resistance enabled on Genius, and verify the ch’ange, on status
bar (Es.Flash53).
10 TOOLS MENU
10.1 Setup
Menu Setup manage the Genius settings, it allows the setting of the screen, language, date and time.
Display
In this section it is possible to calibrate and modify the settings of the Genius display:
Dimensione Sport s.r.l.
20
GENIUS
HANDBOOK
04th AUGUST 2008
Touch Panel: it enables the calibrating of the Touch Panel. The procedure ask to touch with the pen the
four corners, suggested by the square, of the Touch Screen.
Brightness: it allows to choose the display brightness timing before it goes in standby.
Contrast:it allows to increase or decrease the screen contrast.
Language
In the section Language it is possible to select
the language for the Genius.
Dimensione Sport s.r.l.
21
GENIUS
HANDBOOK
04th AUGUST 2008
Date and Time
In the section Date and Time it is possibile
to modify day, month, year and date of Genius.
10.2 Explore SD
Explore SD allows to check what files are stored inside the SecurDigital, they are inside the three
different folders of the main functions of Genius.
- Folder ID has all the IDentification files saved
- Folder Read has all the Reading files saved
- Folder Write has all the files loaded that have to be written in the ECU
N.B.
Once inside one of these three folders it is possibile to check all the information of a single file. In this
way it is possible to verify the HEADER of the files created, checking if the file we are going to use is
correct.
Dimensione Sport s.r.l.
22
GENIUS
HANDBOOK
04th AUGUST 2008
10.3 Test
Test Menu allows to test different components of Genius in order to verify their status and functionality
With this tool it is possible to verify Ram, Display, Led and Internal Battery of Genius.
In ToolsTest menu two different kinds of Ram test are available, Ram Test2 is a more detailed and
deep analysis to run only after the request of the technical suport.
Following the instructions of the Ram test of Genius it is possibile to check the execution and final result,
after the Test Genius will ask to reset the system.
11 INFO MENU
Through this Menu it is possibile to verify the presence and functionality of Protocols, identity data and
features of Genius.
Dimensione Sport s.r.l.
23
GENIUS
HANDBOOK
04th AUGUST 2008
11.1 Protocols
Protocols section allows to check each single Serial Protocol, after selecting a Protocol and following the
instructions it will be possibile to read all the data of the selected protocol.
In the Protocol list, left side, it is shown the protocol status:
Protocol missing in Genius
Protocol not updated for the Genius version
In this case update Genius directly from the software
See Pg. 30
Protocol working
11.2 Info Genius
This function visualise all hardware and software informations of Genius.
Dimensione Sport s.r.l.
24
GENIUS
HANDBOOK
04th AUGUST 2008
11.3 Features
Selecting Features we will be able to check the Features Options enabled, how many Serial Points for
programming are still inside and what contract is enabled on Genius.
12 STANDBY
Selecting STANDBY it enables the sleeping modality.
To wake up Genius just touch the screen.
Dimensione Sport s.r.l.
25
GENIUS
HANDBOOK
04th AUGUST 2008
13 PC CONNECTION
13.1 Hardware connection
To connect Genius to PC read the following instructions:
1 – Tthe power supply must be correctly set on the 12V
The connector must be set with the poles +/- as required for Genius.
2 – Connect the power supply to Genius and to the electric current.
3 – Connect USB cable to Genius.
4 – Connect USB cable to PC.
Dimensione Sport s.r.l.
26
GENIUS
HANDBOOK
04th AUGUST 2008
13.2 Software connection
After the connections to power and USB it is possibile to start the software communication between
Genius and Race EVO. In order to run correctly this operation Genius must be set in main menu. After
the connection with Race EVO Genus will show the message of USB comunication.
EXPLORE
To explore SD memory and work directly from Race EVO with the files read out by Genius click on
GeniusExplore. SD memory directory and a work toolbar will open to allow the customer to work
and manage the files stored inside Genius.
ADVISE:
It is suggested to work only with the files coming from an IDentification, a Reading or a Writing saved
inside the folder File.
Enter inside the others folders only if requested by the technical staff.
Dimensione Sport s.r.l.
27
GENIUS
HANDBOOK
04th AUGUST 2008
13.2.1 Join/Export file
To export files of ECU inside Race EVO and manage the modifications it is necessary to know the
identification numbers of the ECU and download the correct setting file.
Once inside Race EVO open the corresponding setting file, it is possible to import the file read out
with Genius with the button Genius, this button allows to Import image from Genius.
Select the file from the folder Read of Genius and save it inside the corresponding setting file
selecting if it is an original or and already modified file.
Now it is possibile to load the file read from the vehicle and manage the modifications required.
For more informations about how to modify a file follow the instructions af Race Manual.
Dimensione Sport s.r.l.
28
GENIUS
HANDBOOK
04th AUGUST 2008
After modifications and saving of the file it is necessary to export the file on Genius, then select the
desired file to export and click on the button Genius.
From the Genius button select Write image to Genius, be sure that the file .MOD is saved with
name inside the folder “Write”.
In order to be sure that the selected file has been correctly saved o Genius open the connection
through the function Explore, open the folder File and check if inside the folder “Write” there is the file
.MOD just imported.
Now exit from the software connection with the PC and unplug all the hardware connections. Enter in
the vehicle with Genius and follow the instructions for the Serial Writing Chpt. 9.3 Pg. 13
Dimensione Sport s.r.l.
29
GENIUS
HANDBOOK
04th AUGUST 2008
It is possible to export or import file from Genius following another way that allows to work with files
also outside Race EVO.
To export ECU files inside Race EVO it is necessary a double click on Explore and click on File
folder, there are present the files saved inside ID,Read, Write folders.
Once inside Read folder we will have the possibility to choose which file export.
Follow the procedure:
o select the chosen file
o click on the button Save file on the Toolbar
o save the file, default folder is Upload
o choose to extract or not HEADER (YES / NO)
DON’T EXTRACT: the file of the vehicle with HEADER will be saved inside the folder. Following this
procedure during the writing of the modified file inside ECU the Genius will know that the chosen file
is correct for the ECU because the Genius will read the HEADER.
EXTRACT: the file of the vehicle without HEADER will be saved inside the folder and it can be
exported out of the Race. Inside the folder will be saved also the HEADER in *.txt with inside all the
instructions about the file read. Following this procedure during the writing of the modified file inside
ECU the Genius will ask to confirm if the file that we are writing is correct because inside the file
Genius won’t find the HEADER.
Now it is possibile to manage the file read out with Genius inside or outside Race EVO.
Dimensione Sport s.r.l.
30
GENIUS
HANDBOOK
04th AUGUST 2008
To import files inside Genius it is necessary to connect Genius and select the btutton Explore, open folder
FileWrite and click on the button Import File.
Select the file to import and click OK.
13.2.2 File for the Technical Support
The customer has to export the file for the technical Support from Genius in two different cases:
1) correct ECU setting file missing in databank
2) technical support requires the sending of Log files
1) DS File
If after the reading of the file the related setting file is not present in the Dimsport databank the file
cannot be loaded and opened in Race, but the DS file can be sent to the Technical Support.
This DS file will let the Technical Support to create a specific setting file for that ECU; after the
downloading of the specific setting file inside Race EVO the customer will be able to proceed with
modifications.
Follow the procedure:
- click on file for Support File DS
- select the correct file to send
Dimensione Sport s.r.l.
31
GENIUS
HANDBOOK
04th AUGUST 2008
2) Log file
Send these kind of files only after the request of the Technical Support, they need them to help the
customer during particolar or problematic situation.
Follow the procedure:
- click on file for Support File Log
- select the files required for the Techncal Support
13.2.3 Update
Update function allow to run several updates for the Genius tool.
-
Protocols Features
System Version
GOS Recovery
Protocols features
Clicking on Load ABL it is possibile to import the ABL file with the protocols features that the
customer has to enable on Genius.
System Version
After the connection of the PC to Internet the Update System function allows the updating of the
Genius Operative System. It is suggested to periodically run the Automatic update of the GOS
version in order to have always the last release available.
Selecting Automatic Race EVO will verify and compare the versions of all the files of the GOS
loaded on Genius with the last versions available. If there are some updates available they will be
downloaded and automatically installed on Genius.
Selecting Forced Race EVO will run the download of the last release of GOS available and will
perform the installation without comparing.
Dimensione Sport s.r.l.
32
GENIUS
HANDBOOK
04th AUGUST 2008
GOS Recovery
The function of GOS Recovery must be done only after the request of the Technical Support.
It is necessary to run the GOS Restoring after an interruption of data transfer during the Updating of
the GOS and Genius lose all the necessary information to run correctly the system.
Please contact the Technical Support if this problem happens.
13.2.4 File ID
Clicking on the button File ID is possible to visualise all the Identifications done and saved on
Genius. This option allows to see on the screen all the info of the file in order to find out on the
databank the corresponding setting file.
Dimensione Sport s.r.l.
33
GENIUS
HANDBOOK
04th AUGUST 2008
13.2.5 Genius Info and protocols
Under the “Help” of Race main menu there is Genius Setting option, clicking on this option with the
Genius connected to the USB port of PC and to Power Pack it is possible to check all the features
enabled on Genius.
This option allows to check all the features and contracts enabled on Genius. Bottom left there is one
of the most important data it is always required by the Technical Support: GOS Version (Genius
Operative System).
Serial Protocols Information button allows to check out all the serial protocols enabled.
Dimensione Sport s.r.l.
34
GENIUS
HANDBOOK
04th AUGUST 2008
List of enabled serial protocols classified by car and protocol:
protocols written in normal are enabled on Race, those written in bold are enabled on Genius.
With the button Features it is possible to verify the serials contract.
Once selected the Serial Protocol with the button Information u can see all the information about the
selected protocol for Genius and Race: protocol version – enabled for – communication line
Dimensione Sport s.r.l.
35
GENIUS
HANDBOOK
04th AUGUST 2008
14 AVAILABLE PROTOCOLS
T:TOTAL – P:PARTIAL - /: NOT POSSIBLE
ID GENIUS
FLASH_0001
Description
FIAT BOSCH ME 1.5.5 FAL
FLASH_0002
BMW SIEMENS MS41
READ
/
WRIT
T
K Line
X
CAN
J1855 Wires
8
P
P
X
5
5
FLASH_0003
BMW SIEMENS MS42
P
P
X
FLASH_0004
BMW SIEMENS MS43
P
P
X
5
FLASH_0005
BMW BOSCH DDE4.0
P
P
X
5
1
FLASH_0009
MINI SIEMENS EMS2
P
P
X
FLASH_0010
ROVER BOSCH DDE4.0
P
P
X
1
FLASH_0012
MERCEDES BOSCH EDC 15C6
T
T
X
6
1
FLASH_0013
RENAULT DCI BOSCH EDC 15C2
T
T
X
FLASH_0014
HYUNDAI/KIA CRDI BOSCH EDC 15C7
T
T
X
1
2
FLASH_0015
VAG TDI BOSCH EDC15VM+19
T
T
X
FLASH_0016
VAG TDI BOSCH EDC15VM+25
T
T
X
2
FLASH_0017
VAG TDI BOSCH EDC15P+
T
T
X
2
9
FLASH_0018
FIAT BOSCH ME73H4/21/31/731 FAL
T
T
X
FLASH_0019
CHRYSLER/JEEP CRD BOSCH EDC15C2
T
T
X
1
FLASH_0020
NISSAN TDDI BOSCH EDC15C2
T
T
X
1
7
FLASH_0021
FIAT BOSCH EDC15C5 FAL
T
T
X
FLASH_0022
FIAT BOSCH EDC15C6/C7 FAL
T
T
X
1
6
FLASH_0023
MERCEDES BOSCH CDI EDC15C5 EURO2
T
T
X
FLASH_0024
MCC SMART BOSCH EDC15C5
T
T
X
1
FLASH_0025
MCC SMART BOSCH MEG1.0/1.1
/
T
X
1
1
FLASH_0026
OPEL/SAAB BOSCH EDC15M
/
T
X
FLASH_0027
BMW 320D DDE3.0 136CV
P
P
X
1
FLASH_0028
VAG ME7.X 4Mbit
T
T
X
1
1
FLASH_0029
VAG ME7.X 8Mbit
T
T
X
FLASH_0030
VAG TDI BOSCH EDC15VM+25 8Mb
T
T
X
2
1
FLASH_0031
OPEL DTI 17 DELPHI
T
T
X
FLASH_0033
BMW BOSCH DME7.1
P
P
X
1
FLASH_0034
FAL MAGNETI MARELLI 4AF/59F/5AF/5NF
T
P
X
1
1
FLASH_0035
RENAULT SIEMENS SIRIUS 32/34
P
P
X
FLASH_0038
PSA HDI BOSCH EDC15C2
T
T
X
1
FLASH_0041
MERCEDES BOSCH ME2.8
/
T
X
1
1
FLASH_0047
LAND ROVER TD5 MEMS NNN PSOP 29F200BT
P
P
X
FLASH_0048
PORSCHE ME7.2
T
T
X
1
1
FLASH_0049
HONDA 1.7 CDTI BOSCH EDC15C7
T
T
X
FLASH_0050
BMW BOSH EDC16 C31
P
P
X
1
FLASH_0052
TOYOTA YARIS D-4D EDC 15C9 29F400BT
T
T
X
1
1
FLASH_0053
PORSCHE BOSCH ME7.8
P
P
X
FLASH_0054
HUNDAY/KIA CRDI 2900 DELPHI
P
P
X
1
FLASH_0055
RENAULT/NISSAN 1500 DCI DELPHI
P
P
X
1
FLASH_0056
FIAT-ALFA-LANCIA JTD BOSCH EDC16
T
T
X
FLASH_0057
RENAULT/DACIA/NISSAN DELPHI DCM1.2
P
P
X
FLASH_0061
FIAT/LANCIA MARELLI MJT 1300
P
P
X
FLASH_0062
PSA BOSCH ME7.4.4
P
P
X
FLASH_0064
BMW BOSCH EDC16+ C35
P
P
X
FLASH_0067
SUZUKI-OPEL MAGNETI MARELLI MJT 1300
P
P
X
FLASH_0068
VAG BOSCH EDC16 U/2.1
T
T
X
FLASH_0070
PSA BOSCH EDC16 C0/C3
P
P
X
Dimensione Sport s.r.l.
1
X
1
1
1
X
1
1
X
1
1
36
GENIUS
HANDBOOK
ID GENIUS
Description
04th AUGUST 2008
READ
WRIT
CAN
J1855 Wires
FLASH_0071*
RENAULT BOSCH EDC16 C0/C3
P
P
K Line
X
FLASH_0072
VAG EDC16+ U31/U34
P
P
X
X
1
X
1
1
FLASH_0073
VAG EDC16+ CP34
P
P
X
FLASH_0074
MEB BOSCH EDC16
T
T
X
X
1
X
4
1
FLASH_0075
PSA BOSCH EDC16+ CP34
P
P
X
FLASH_0076
FAL BOSCH EDC16+
P
P
X
FLASH_0077
KIA/HYUNDAI BOSCH EDC16+
P
P
X
1
1
FLASH_0078
CHRYSLER BOSCH EDC16
T
T
X
FLASH_0080
PORSCHE BOSCH M5.2.2
P
P
X
3
FLASH_0081
MERCEDES BOSCH EDC16+ CP32
P
P
X
FLASH_0082
VAG ME7.1.1 CAN
T
T
X
1
X
1
1
FLASH_0084
RENAULT SAGEM 3000
P
P
X
FLASH_0086
SUZUKI BOSCH EDC16 C0/C3
P
P
X
FLASH_0087
VAG BOSCH ME9.5 FSI
T
T
X
1
X
1
X
1
T
X
1
X
1
FLASH_0088
CHRYSLER BOSCH EDC16+
P
P
FLASH_0089
MERCEDES 3.0 CDI BOSCH EDC16+ CP31
P
P
FLASH_0090*
OPEL BOSCH EDC16C39
/
FLASH_0091
VAG BOSCH ME9.1TFSI
T
T
FLASH_0093
VOLVO BOSCH EDC16+ C31-6
P
P
FLASH_0094
LAND ROVER SIEMENS SID 201/204
/
P
FLASH_0095
FAL MARELLI MJD6F3 MPC563
T
T
X
1
X
4
X
X
1
1
FLASH_0095F
FAL MARELLI MJD6F3 MPC563
/
T
X
FLASH_0097
FORD BOSCH EDC16+ C34
P
P
X
1
X
1
FLASH_0100
RENAULT SIEMENS SID 301
P
P
FLASH_0104
OPEL MARELLI+6O203D
T
T
X
1
1
FLASH_0105
RENAULT BOSCH EDC16+C36
P
P
X
FLASH_0106
PSA SIEMENS SID803/803A/201
/
T
X
X
1
X
1
1
FLASH_0107
VAG BOSCH ME9.1.1 FSI
T
T
X
FLASH_0108
FAL MAGNETI MARELLI 4SF
P
P
X
T
T
X
P**
P
X
1
FLASH_0109
SSANGYONG DELPHI DCM
FLASH_0111
PSA BOSCH ME 7.4.5
1
1
X
1
FLASH_0112
SUZUKI DELPHI DCM1.2
P
P
X
FLASH_0113
OPEL MERIVA DTI DELPHI
T
T
X
1
1
FLASH_0120
MERCEDES SIEMENS 5WK9 SIM4LE
P
P
X
FLASH_0122
REANAULT MARELLI 5NR
T
T
X
FLASH_0123
VAG SIEMENS PPD1.XX
P
P
X
FLASH_0124
SSANGYONG DELPHI DCM3.2
T
T
X
FLASH_0126
CHEVROLET BOSCH EDC16+ C39
P
P
1
X
1
1
X
1
X
1
FLASH_0127
OPEL BOSCH EDC16+ C39
P
P
X
FLASH_0129
FAL BOSCH ME7.9.10
/
T
X
X
1
X
1
FLASH_0130
SAAB BOSCH EDC16+ C39
P
P
X
FLASH_0132
PORSCHE BOSCH ME7.8 MY>06/2004
/
T
X
X
1
X
1
FLASH_0133
MCCSMART/MITSUBISHICOLT BOSCH EDC16+C31
P
P
FLASH_0134
MCCSMART FORTWO BOSCH EDC16+ CP32
/
T
X
1
P
P
X
1
/ **
T
X
1
/ **
T
X
1
T
T
X
1
FLASH_0135
FO.MO.CO. VISTEON FORD/LASND ROVER
FLASH_0136
FAL BOSCH ME7.6.1
FLASH_0137
FAL BOSCH ME7.6.2
FLASH_0139
VAG BOSCH EDC16U/2.1 V10 M&S
Dimensione Sport s.r.l.
37
GENIUS
HANDBOOK
ID GENIUS
FLASH_0140
FLASH_0141
Description
VAG BOSCH EDC16+U31/U34 V10 M&S
HONDA BOSCH EDC16C1-7
04th AUGUST 2008
READ
WRIT
P
P
K Line
X
T
X
X
T
FLASH_0144
NISSAN QASHQAI BOSCH EDC16+ CP33
P
P
FLASH_0145
VAG BOSCH ME9.1.1 FSI V8/V10 M&S
T
T
CAN
J1855 Wires
1
1
1
X
X
1
FLASH_0149
MERCEDES SIEMENS SIM4LKE
P
P
FLASH_0150
PSA BOSCH EDC16+ CP39
P
P
X
1
1
1
FLASH_0151
RENAULT SIM32
P
P
X
FLASH_0152
FORD BOSCH EDC16C3
T
T
X
1
1
FLASH_0153
DODGE/JEEP/MITSUBISHI BOSCH EDC16+ U31
T
T
X
FLASH_0154
LAND ROVER FREELANDER BOSCH EDC16+ CP39
P
P
X
1
1
FLASH_0155
FORD SIEMENS SID803A/SID202
P
P
X
FLASH_0156
FORD SIEMENS SID206
P
P
X
1
1
1
FLASH_0157
FORD SIEMENS SID803
T
T
X
FLASH_0158
FORD SIEMENS SID804
T
T
X
* for a correct use of this protocol please check appendix “B”
** it could be necessary to read with Trasdata tool
Dimensione Sport s.r.l.
38
GENIUS
HANDBOOK
04th AUGUST 2008
15 WIRING LIST
Details of the wiring components are at Pag. 4-5-6-7-8 Chpt.3
WIRING 1:
1. CABLE OBD II K-CANBUS- J1850 (Rif.2)
WIRING 2:
1. CABLE OBD II K-CANBUS- J1850 (Rif.2)
Connecting directly to the ECU:
Cables 2008
1. CONNECTOR FOR ECU V.A.G (Rif.21)
1.
2.
3.
4.
Old cables
ADAPTOR FOR FLASH4 WIRING SYSTEM (Rif.4)
CONNECTOR FOR ECU V.A.G (Rif.13)
BATTERY CABLE (Rif.11)
PSU 12 volt (Rif.10)
WIRING 3:
Cables 2008
1. CABLE OBDII FOR PORSCHE M5.2.2 (Rif.20)
Old cables
1. ADAPTOR FOR FLASH4 WIRING SYSTEM (Rif.4)
2. CABLE OBDII FOR PORSCHE M5.2.2 (Rif.12)
WIRING 4:
1. CABLE OBD II K-CANBUS- J1850 (Rif.2)
Cables 2008
1. UNIVERSAL WIRING FOR SERIAL PROGRAMMING (Rif.7)
Old cables
1. ADAPTOR FOR FLASH4 WIRING SYSTEM (Rif.4)
2. UNIVERSAL WIRING FOR SERIAL PROGRAMMING (old cable with K-line only)
WIRING 5:
1. CABLE OBD II K-CANBUS- J1850 (Rif.2)
1. ADAPTOR FOR FLASH4 WIRING SYSTEM (Rif.4)
2. PLUG CABLE RJ45 (Rif.14)
3. BMW DIAGNOSTIC CONNECTOR (Rif.14)
WIRING 6:
1. CABLE OBD II K-CANBUS- J1850 (Rif.2)
Cables 2008
2. MERCEDES DIAGNOSTIC CONNECTOR CABLE (Rif.22)
Old cables
3. ADAPTOR FOR FLASH4 WIRING SYSTEM (Rif.4)
4. MERCEDES DIAGNOSTIC CONNECTOR (Rif.15)
Dimensione Sport s.r.l.
39
GENIUS
HANDBOOK
04th AUGUST 2008
WIRING 7:
1. CABLE OBD II K-CANBUS- J1850 (Rif.2)
Cables 2008
1. FIAT ALFA LANCIA DIAGNOSTIC CONNECTOR FOR SERIAL COMMUNICATION (Rif.23)
2. RED WIRE +12V
3. BLACK WIRE GND
1.
2.
3.
4.
Old cables
ADAPTOR FOR FLASH4 WIRING SYSTEM (Rif.4)
FIAT ALFA LANCIA DIAGNOSTIC CONNECTOR FOR SERIAL COMMUNICATION (Rif.16)
RED WIRE +12V
BLACK WIRE GND
WIRING 8:
1. CABLE OBD II K-CANBUS- J1850 (Rif.2)
2. BLUE WIRE
Cables 2008
1. FIAT ALFA LANCIA DIAGNOSTIC CONNECTOR FOR SERIAL COMMUNICATION (Rif.23)
2. RED WIRE +12V
3. BLUE WIRE
1.
2.
3.
4.
Old cables
ADAPTOR FOR FLASH4 WIRING SYSTEM (Rif.4)
FIAT ALFA LANCIA DIAGNOSTIC CONNECTOR FOR SERIAL COMMUNICATION (Rif.16)
RED WIRE +12V
BLUE WIRE
WIRING 9:
Cables 2008
1. CABLES A FOR BOSCH ME7.3.1, ME3.1, ME2.1, ME7.3H4 HYBRID ECU (Rif.24)
2. CABLES B FOR BOSCH ME7.3.1, ME3.1, ME2.1, ME7.3H4 HYBRID ECU (Rif.25)
3. BATTERY CABLE (Rif.11)
4. PSU 12 volt (Rif.10)
1.
2.
3.
4.
5.
Old cables
ADAPTOR FOR FLASH4 WIRING SYSTEM (Rif.4)
CABLES A FOR BOSCH ME7.3.1, ME3.1, ME2.1, ME7.3H4 HYBRID ECU (Rif.17)
CABLES B FOR BOSCH ME7.3.1, ME3.1, ME2.1, ME7.3H4 HYBRID ECU (Rif.18)
BATTERY CABLE (Rif.11)
PSU 12 volt (Rif.10)
Dimensione Sport s.r.l.
40
GENIUS
HANDBOOK
04th AUGUST 2008
WIRINGS COMPONENTS
WIRING 1:
2
WIRING 2:
This kind of ECU requires the OBDII connection, only in few cases there is no communication
between OBDII and ECU.
If there is not any possibility to connect through OBDII socket because there is not any kind of
communication with the ECU the only way to communicate is through CONNECTOR FOR ECU V.A.G.
(Old cable Rif.13 or cable 2008 Rif.21)
2
CAUTION: if it will be necessary to remove the ECU you can use the following wiring:
Dimensione Sport s.r.l.
41
GENIUS
HANDBOOK
Cables 2008
04th AUGUST 2008
When the software RaceEVO
shows you the message
Switch ON the dashboard you
must switch the red botton ,
than when the system ask you
to switch OFF the dashboard
you must switch another time
the red botton.
If you want you
can obtain
supply from
+12V battery
using the battery
connectors
21
Old cables
4
13
+
10
+
11
If you want you
can obtain
supply from
+12V battery
using the battery
connectors
When the software RaceEVO
shows you the message
Switch ON the dashboard you
must switch the red botton ,
than when the system ask you
to switch OFF the dashboard
you must switch another time
the red botton.
CAUTION: After any Read/Write operation with this wiring it’s necessary to make a diagnosis in order
to delete eventual errors inside the ECU ( Airbag light etc…..)
Dimensione Sport s.r.l.
42
GENIUS
HANDBOOK
04th AUGUST 2008
WIRING 3:
Cables 2008
20
Old cables
4
12
+
WIRING 4:
2
If there is not any communication with the
ECU through OBDII socket the only way to
communicate is through universal wiring as
explained below.
Or
(see next page)
Dimensione Sport s.r.l.
43
GENIUS
HANDBOOK
04th AUGUST 2008
Cables 2008
(ATTENTION for this wiring see Appendix A)
7
Old cables
(ATTENTION for this wiring see Appendix A)
4
+
WIRING 5:
2
For this wiring you could
find an OBDII socket or a
typical BMW load
connector
Or
4
+
14
Dimensione Sport s.r.l.
44
GENIUS
HANDBOOK
04th AUGUST 2008
WIRING 6:
2
For this wiring you could
find an OBDII socket or a
typical Mercedes
diagnosis connector
Or
Cables 2008
22
Old cables
4
15
+
WIRING 7:
2
For this kind of connection you
could find an OBDII socket or
a typical FIAT/ALFA/LANCIA
diagnosis connector
Or
(See next page)
Dimensione Sport s.r.l.
45
GENIUS
HANDBOOK
04th AUGUST 2008
Cables 2008
Connect to car
battery +12V
23
+
Connect to GND
Old cables
4
16
+
16
Connect to GND
16
Connect to car
battery +12V
Dimensione Sport s.r.l.
46
GENIUS
HANDBOOK
04th AUGUST 2008
WIRING 8:
This wiring is made up of connectors for serial Reading/Writing procedure and additional connectors that
allow you to communicate with particular ECU.
So we have two different type of wiring:
Wiring 8.1 (With OBDII connector)
2
+
+
16
CAUTION: We must put one endpoint of the blue wire in the OBDII blue connector, the other one must be
connected to the Pin 10 of the ECU.
Or
Wiring 8.2 (With FIAT-ALFA-LANCIA connector)
Cables 2008
23
Connect to car
battery +12V
Dimensione Sport s.r.l.
47
GENIUS
HANDBOOK
04th AUGUST 2008
Old cables
4
16
+
+
16
16
+
Connect to car
battery +12V
CAUTION: one endpoint of the blue wire must be connected to FIAT/ALFA/LANCIA blue connector, the
other one must be connected to the Pin 10 of the ECU, for what concern the red wire, one endpoint must be
connected to the +12V battery connector and the other one to the FIAT/ALFA/LANCIA red connector
WIRING 9:
CAUTION: for this wiring it’s necessary to remove the ECU, you can work using the following wiring (SINGLE
or DOUBLE)
Wiring 9.1 ( Single without blue wire)
Cables 2008
If you want you
can obtain
supply from
+12V battery
using the battery
connectors
24
Dimensione Sport s.r.l.
48
GENIUS
HANDBOOK
04th AUGUST 2008
Old cables
4
17
+
If you want you
can obtain
supply from
+12V battery
using the battery
connectors
11
10
Wiring 9.2 ( Double with blue wire)
Cables 2008
10
11
25
If you want you can
obtain supply from
+12V battery using the
battery connectors
Old cables
4
18
+
If you want you
can obtain
supply from
+12V battery
using the battery
connectors
Dimensione Sport s.r.l.
+
10
11
49
GENIUS
HANDBOOK
04th AUGUST 2008
CAUTION: in order to select the right wiring ( SINGLE or DOUBLE) please read the following indications:
Reprogramming through direct connection to the ECU :
The connection to the ECU is direct and it is obtained using the suitable cable, double or single connector,
with the white adapter RJ45, the supply power is obtained directly through the battery or from the electrical
network.Cables are divided into two main families:
SINGLE TYPE CABLE (WITHOUT BLUE WIRE):
supplied with a crocodile-clipped black wire that must
be connected to the ground pin of the ECU (aluminium
box).
We consider “single type” all the ECU with both
reading and writing pins on a single connector. In
order to identify a single type we must find the
numbers printed on the ECU. If the numbers are 253
and 254, only the right connector MUST BE USED
(Marked with RED lines) .
Make sure that pins 15, 32, 48 are communicating
between them by using a digital multimeter!
DOUBLE TYPE CONNECTOR (with external BLUE
WIRE):
supplied with a crocodile-clipped black wire that must be
connected to the ground pin of the ECU (aluminium box)
and an additional female pin-ending BLUE wire that must
be plugged to the LEFT connector located on the ECU
(other available connector).
We consider “double type” all the ECU with serial reading
and writing pins on both connectors. As for the single type
connector, power supply pins and diagnosis pins are
located on the right connector, whereas the pin which
enables the communication is located on the left
connector (marked in BLUE). The identification numbers
for this kind of ECU are 314 and 313.
For this kind of ECU, the double type connector must be
plugged into the RIGHT CONNECTOR and the blue wire,
which extends it self from the cable, must be connect to
the PIN 20 in the LEFT CONNECTOR.
CAUTION : For some ECU, as the ME7.3.1 the position
of the original connector does not correspond to the
position of the FLASH0018 cable. Do not force the
FLASH0018 cable into the ECU connector if the position
isn’t correct. On the contrary for ME3.1 and ME7.3H4 the position of the original connector and the position
of the FLASH0018 cable correspond.
Make sure that pins 17, 33, 49 in the right connector are communicating between them by using a digital
millimetre.
Dimensione Sport s.r.l.
50
GENIUS
HANDBOOK
04th AUGUST 2008
APPENDIX A (Special Applications)
FLASH_0076 (FAL BOSCH EDC16+)
A direct connection between OBDII socket and ECU is not possibile because there is no K-line.
To solve this problem it is necessary to connect directly to the PIN 25 in the ECU. You have to lift up the
connector then, by using the universal cable, you have to connect the K-line of the universal cable (yellow
wire) with one end of the blue connection wire. Then link the second end of the same blue connection wire to
PIN 25 of the ECU.
Old Cables
Or
Cables 2008
To create the connection we have chosen to connect the K-line (yellow wire of the universal cable) to PIN 43
using the blue wire, after we have connected with the clamps the red wire to the positive pole of the battery
(+12V) and the black wire to ground (GND).
Dimensione Sport s.r.l.
51
GENIUS
HANDBOOK
04th AUGUST 2008
FLASH_0093 (VOLVO BOSCH EDC16+ C31-6)
In Volvo cars that have ECU Bosch EDC16+ C31-6 the communication between PIN 7 of OBD II and PIN 43
of ECU is missing.
It is necessary to connect Genius with the connectors of the ECU following the instructions:
1 – Unplug the little connector of the ECU and dismantle warily the plastic protection as in the pictures
2 – In the connector look for the PIN 43 that alllows the communication with the ECU.
To create the communication we decided to connect the K-Line (yellow wire) of the universal wiring (Rif.7) to
the PIN 43 using the blu wire as in the pictures below, then we have connected the red wire to the positive
pole of the battery (+12V) and the black one to ground (GND) using little clamps.
Old cable
or cable 2008
Dimensione Sport s.r.l.
52
GENIUS
HANDBOOK
04th AUGUST 2008
APPENDIX B (Specific Procedures)
FLASH_0071 (RENAULT BOSCH EDC16 C0/C3)
FLASH_0071protocol for ECU Reanault Bosch EDC16 C0/C3 has been studied to solve the problem with
the injectors codification.
To work properly and manage a correct modification on ECU Reanault Bosch EDC16 C0/C3 it is
obbligatory to make the serial operations (reading and writing in ECU) with cold engine and it is
necessary to follow the sugested procedure:
1 – after connecting Genius to OBDII socket the first operation to do is the reading of injectors code:
open the protocol FLASH_0071 in this way
WorkVehiclesselect the correct vehicle
otherwise
Work Protocols select the protocol FLASH_0071
Select the button CODING and continue with the READING of the code
2 – A window will show the Informations of the, continue with the reading. Then you will have to save the
code file with name.
3 – after reading the injectors code it is possibile to read the whole file of ECU, export i tinto Race EVO and
manage the modifications.
Dimensione Sport s.r.l.
53
GENIUS
HANDBOOK
04th AUGUST 2008
4 – After the modifications you have to export the mod file from Race EVO into Genius in order to write in the
ECU. Follow the procedure for serial writing as described at pa. 13 Chp. 9.3
When you choose the correct .mod file to write a message will appear:
N.B.
It is necessary to read the injectors codes before writing procedure, If you do not have read out the injector
codes you MUST do it right now aborting the procedure of writing and following the instructions at pg.39
If you have already read the injectors codes click on Continue.
5 – When the Writing procedure is started follow the messages of switching ON/OFF as required.
Genius will automatically read the injectors codes setting it in RAM memory, then it will proceed with the
writing of .mod file until a message will appear:
Select Continue and Genius will proceed with writing back the injectors codes file.
At the end of writing will appear this message:
Dimensione Sport s.r.l.
54
GENIUS
HANDBOOK
04th AUGUST 2008
ATTENTION
If there are interruptions of communication during writing procedure, or something that blocks the correct
automatic writing procedure of injectors codes and the car does not start it will be necessary a manual
writing procedure of injectors codes. For this operation please read the following procedure:
1 – open protocol FLASH_0071 in this way
WorkVehiclesselect the correct car
otherwise
Work Protocols select the protocol FLASH_0071
Select the button CODING and run the WRITING procedure of codes
Now select the correct injectors codes file saved before inside the folder COD, if you are not sure of what file
choose please check the chassis number witten in the Information window.
To proceed please click on Continue.
After the end of writing injectors codes procedure Genius will display this message.
Dimensione Sport s.r.l.
55
GENIUS
HANDBOOK
04th AUGUST 2008
FLASH_0090 (OPEL BOSCH EDC16C39)
FLASH_0090 protocol for ECU Opel Bosch EDC16C39 cannot read the file inside the ECU but it has been
studied to run a verify between the file inside ECU and the original file present in the corresponding setting
file.
It is necessary follow the procedure:
1 - make Identification and with the ECU numbers search for the corresponding setting file in data bank.
2 - download the correct setting file in Race EVO, then export the .ORI file on Genius
3 - after connecting Genius to OBD II socket enter into the menu of the FLASH_0090 protocol in this way:
WorkManufacturerModelType select the corect vehicle
oppure
Work Protocols select the protocol FLASH_0090
4 - once entered in the menu protocol it is necessary to select the button Verification.
In the next window you have to select the file .ORI that you saved before in the folder Write, click on the
button Continue to run the Verification between the two files.
Dimensione Sport s.r.l.
56
GENIUS
HANDBOOK
04th AUGUST 2008
5 - now a sequence of messages will ask you to switch on and off the dash-board, follow the instructions
and the requests clicking on the button Continue until it will join the end of the verification.
If Verification is OK Genius will ask to execute the modification starting from the selected .ORI file.
Dimensione Sport s.r.l.
57
GENIUS
HANDBOOK
04th AUGUST 2008
APPENDIX C – VAG COUNTER RESET
VAG COUNTER RESET is an optional feature not included in any contract, in order to have it please contact
directly the commercial department.
Select TOOL SPECIAL COUNTER
READING
The first time you want to work with counters wuo will have to READ and WRITE a part of the FLASH and of
the MICROPROCESSOR.At the end of the reading save this file in Genius. The reading mode starts only if
the PATCH FILE is NOT found in the ECU.
Dimensione Sport s.r.l.
58
GENIUS
HANDBOOK
04th AUGUST 2008
If the PATCH FILE is already present in the ECU you can directly modify the counter by clicking on
READING button.
FIRST WRITING
In order to modify the counter the first time you have to program the ECU with the PATCH FILE. Select the
file read, correct the value for succeded writings and press OK. ATTEMPTED counter will be automatically
aligned with SUCCEDED.
Dimensione Sport s.r.l.
59
Via Torino, 16 - 15020 GABIANO (AL) - ITALIA
E-mail: [email protected]
http//www.dimsport.it
MANUAL VERSION 1.4
PRINTED ON 04th AUGUST 2008