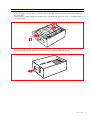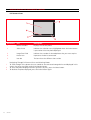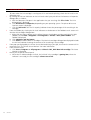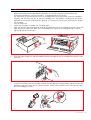
1
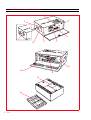
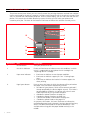
Edited/Published/Produced by:
Olivetti S.p.A.
Gruppo Telecom Italia
Via Jervis, 77
Ivrea (TO)
Italy
www.olivetti.com
Copyright © Olivetti, 2005
All rights reserved
Code: 516307
Date of publication: September, 2005
Trademarks: Microsoft and Windows are registered
trademarks of Microsoft Corporation.
Other trademarks and trade names may be used in this
document to refer to either the entities claiming the
marks and names or their products. Olivetti disclaims any
proprietary interest in trademarks and trade names other
than its own.
ENERGY STAR is a U.S. registered mark.
The ENERGY STAR program is an energy reduction plan introduced by the United States Environmental Protection Agency in response to
environmental issues and for the purpose of advancing the development and utilization of more efficient office equipment.
CONTENTS
1
GETTING STARTED . . . . . . . . . . . . . . . . . . . . . . . . . . . . . . . . . . 1
OVERVIEW . . . . . . . . . . . . . . . . . . . . . . . . . . . . . . . . . . . . . . . . . . . . . . . . 2
SAFETY INSTRUCTIONS . . . . . . . . . . . . . . . . . . . . . . . . . . . . . . . . . . . . . . . 3
INFORMATION ABOUT PRINT QUALITY AND THE WARRANTY . . . . . . . . . . 3
LOCATING YOUR PRINTER’S COMPONENTS . . . . . . . . . . . . . . . . . . . . . . . 4
PRINTER CONTROL PANEL . . . . . . . . . . . . . . . . . . . . . . . . . . . . . . . . . . . . . 6
LOADING PAPER . . . . . . . . . . . . . . . . . . . . . . . . . . . . . . . . . . . . . . . . . . . . 8
Loading Paper in the Paper Cassette . . . . . . . . . . . . . . . . . . . . . . . . . . 8
Loading a Single Sheet of Plain A4 Paper Folded
Vertically in the Middle . . . . . . . . . . . . . . . . . . . . . . . . . . . . . . . . . . . 8
POWERING YOUR PRINTER . . . . . . . . . . . . . . . . . . . . . . . . . . . . . . . . . . . . 9
Choosing the Power Source For Your Printer . . . . . . . . . . . . . . . . . . . 9
TURNING YOUR PRINTER ON AND OFF . . . . . . . . . . . . . . . . . . . . . . . . . . 10
Turning On Your Printer . . . . . . . . . . . . . . . . . . . . . . . . . . . . . . . . . . 10
Turning Off Your Printer . . . . . . . . . . . . . . . . . . . . . . . . . . . . . . . . . . 10
CONNECTING A DIGITAL CAMERA TO YOUR PRINTER . . . . . . . . . . . . . . 11
INSERTING AND REMOVING MEMORY CARDS . . . . . . . . . . . . . . . . . . . . 11
Inserting a Memory Card . . . . . . . . . . . . . . . . . . . . . . . . . . . . . . . . . 11
Removing a Memory Card . . . . . . . . . . . . . . . . . . . . . . . . . . . . . . . . 12
CARRYING YOUR PRINTER . . . . . . . . . . . . . . . . . . . . . . . . . . . . . . . . . . . 13
2
USING YOUR PRINTER WITHOUT A COMPUTER . . . . . . . . . 15
VIEWING PHOTOS ON YOUR PRINTER’S DISPLAY . . . . . . . . . . . . . . . . . . . 16
Full-Screen Views . . . . . . . . . . . . . . . . . . . . . . . . . . . . . . . . . . . . . . . 16
Thumbnail Views . . . . . . . . . . . . . . . . . . . . . . . . . . . . . . . . . . . . . . . 17
SELECTING AND PRINTING PHOTOS FROM YOUR MEMORY CARD . . . . . 17
PRINTING PHOTOS FROM YOUR PICTBRIDGE DIGITAL CAMERA . . . . . . . 18
SELECTING AND PRINTING PHOTOS FROM YOUR DPOF
DIGITAL CAMERA . . . . . . . . . . . . . . . . . . . . . . . . . . . . . . . . . . . . . . . . . . 18
SELECTING AND PRINTING PHOTOS FROM YOUR NON-PICTBRIDGE/DPOF
DIGITAL CAMERA . . . . . . . . . . . . . . . . . . . . . . . . . . . . . . . . . . . . . . 19
PRINTING PHOTOS FROM A BLUETOOTH PERIPHERAL . . . . . . . . . . . . . . . 19
CONTENTS
v
3
USING YOUR PRINTER FROM A COMPUTER . . . . . . . . . . . . .21
BEFORE YOU BEGIN . . . . . . . . . . . . . . . . . . . . . . . . . . . . . . . . . . . . . . . . 22
THE TOOLBOX . . . . . . . . . . . . . . . . . . . . . . . . . . . . . . . . . . . . . . . . . . . . 22
THE PRINTER STATUS MONITOR . . . . . . . . . . . . . . . . . . . . . . . . . . . . . . . 23
PRINTING . . . . . . . . . . . . . . . . . . . . . . . . . . . . . . . . . . . . . . . . . . . . . . . . 24
Printing From Your Application Using Print Properties . . . . . . . . . . . . 24
Printing with the Toolbox Print Photos Tool . . . . . . . . . . . . . . . . . . . . 25
TRANSFERRING FILES FROM A MEMORY CARD TO YOUR COMPUTER . . 26
4
THE INK CARTRIDGE . . . . . . . . . . . . . . . . . . . . . . . . . . . . . . .27
CHECKING INK LEVELS . . . . . . . . . . . . . . . . . . . . . . . . . . . . . . . . . . . . . . 28
REPLACING THE INK CARTRIDGE . . . . . . . . . . . . . . . . . . . . . . . . . . . . . . 29
ALIGNING THE INK CARTRIDGE . . . . . . . . . . . . . . . . . . . . . . . . . . . . . . . 31
Aligning the Ink Cartridge From the Toolbox . . . . . . . . . . . . . . . . . . 31
5
MAINTENANCE AND TROUBLESHOOTING . . . . . . . . . . . . . .33
CLEANING YOUR PRINTER . . . . . . . . . . . . . . . . . . . . . . . . . . . . . . . . . . . . 34
Cleaning the Printer Casing . . . . . . . . . . . . . . . . . . . . . . . . . . . . . . . 34
CLEANING THE INK CARTRIDGE NOZZLES . . . . . . . . . . . . . . . . . . . . . . . . 34
TROUBLESHOOTING . . . . . . . . . . . . . . . . . . . . . . . . . . . . . . . . . . . . . . . . 35
Problems During Printer Setup . . . . . . . . . . . . . . . . . . . . . . . . . . . . . 35
Problems When Powering On the Printer . . . . . . . . . . . . . . . . . . . . . 37
Printing Problems . . . . . . . . . . . . . . . . . . . . . . . . . . . . . . . . . . . . . . . 38
Meaning of the Indicators on the Control Panel . . . . . . . . . . . . . . . . 38
CLEARING PAPER JAMS . . . . . . . . . . . . . . . . . . . . . . . . . . . . . . . . . . . . . 39
6
TECHNICAL CHARACTERISTICS . . . . . . . . . . . . . . . . . . . . . . .41
GENERAL SPECIFICATIONS . . . . . . . . . . . . . . . . . . . . . . . . . . . . . . . . . . . 42
PRINTER SPECIFICATIONS . . . . . . . . . . . . . . . . . . . . . . . . . . . . . . . . . . . . 43
PAPER SPECIFICATIONS . . . . . . . . . . . . . . . . . . . . . . . . . . . . . . . . . . . . . 43
Supported Paper Types . . . . . . . . . . . . . . . . . . . . . . . . . . . . . . . . . . . 43
INDEX
vi
CHAPTER CONTENTS
. . . . . . . . . . . . . . . . . . . . . . . . . . . . . . . . . . . . . . . . .
45
1GETTING STARTED
OVERVIEW
SAFETY INSTRUCTIONS
INFORMATION ABOUT PRINT QUALITY AND THE WARRANTY
LOCATING YOUR PRINTER’S COMPONENTS
PRINTER CONTROL PANEL
LOADING PAPER
POWERING YOUR PRINTER
TURNING YOUR PRINTER ON AND OFF
CONNECTING A DIGITAL CAMERA TO YOUR PRINTER
INSERTING AND REMOVING MEMORY CARDS
CARRYING YOUR PRINTER
GETTING STARTED
1
OVERVIEW
Your compact, lightweight wireless mobile bubble ink-jet printer uses with a high-quality 3-colour print
cartridge to print borderless photographs in very high photo quality on photo or plain paper. With the
possibility of being operated with rechargeable batteries, and equipped with a wireless Bluetooth
interface, this printer becomes an inseparable companion during your moments of leisure.
You can enjoy your printer in the convenient PC-free or stand-alone mode, whereby you can print A6
size photographs by plugging your PictBridge, DPOF, or non-PictBridge/DPOF digital camera directly
into the printer’s USB interface without needing to connect the printer to a computer or even turn the
computer on. You can also insert your memory cards into the related slots on the printer, select and
directly print the photos that are stored in them. Furthermore you can print straight from your wireless
Bluetooth PC or mobile phone via the printer’s integrated Bluetooth interface.
You can also enjoy your printer connected to a personal computer via the printer’s second USB
interface. In this way, you can also work in the same way as in the PC-free mode but also take full
advantage of the document management and bundled software provided on the "Installation" CDROM that came with the product.
note: If you want to connect your printer to a personal computer, the computer must be running the
Microsoft Windows 98, SE, Me, 2000 or XP operating system, or MAC OS 10.3 or later.
2
CHAPTER 1
SAFETY INSTRUCTIONS
•
•
•
•
•
•
Carefully read and follow the information indicated below:
Connect the power cord to an electrical outlet that is near the product and easily accessible.
Do not use your printer near water, or with wet hands.
Do not expose your printer to rain or moisture.
Do not attempt to disassemble your printer.
Observe all warnings and instructions marked on your printer.
Read and understand all the documentation that came with your printer.
INFORMATION ABOUT PRINT QUALITY AND THE WARRANTY
To guarantee the correct operation of your printer and top quality printing, it is essential to use only
Olivetti original ink cartridges.
Olivetti declines any responsibility for damage to your printer caused by the tampering with, or refilling
of, the ink-jet cartridges. Such actions also imply forfeiture of the Warranty.
GETTING STARTED
3
LOCATING YOUR PRINTER’S COMPONENTS
1
2
3
6
4
5
4
7
8
10
9
11
12
4
CHAPTER 1
Reference
Part
Description
1
Control panel
Features the colour display, Bluetooth activity indicator, error LEDs
and a number of buttons and indicators that allow you to print
and customize print jobs. See "Printer Control Panel" for a
description of the functions available.
2
USB interface
Plug the USB cable from your digital camera to print photographs
directly from your camera.
3
Power connector
Connector into which you plug the printer’s external power
transformer or car lighter adapter, both of which provided in the
product packaging.
note: Plug the external power transformer into the printer first
and then into the electrical outlet.
4
Carry handle
Extract this handle to carry your printer wherever you go.
5
High-speed USB
interface
Plug the USB cable (not included) used for connection to your
personal computer. Plug the other end of the cable to the
computer.
6
Paper cassette
insertion slot
Insert here the 20-sheet paper cassette after sliding it off the rails
on the bottom of your printer.
7
Memory card slots
Insert your memory cards in these slots to read their contents and
select the pictures that you want to print. See "Inserting and
Removing Memory Cards". Can accommodate Compact Flash I,
II, Microdrive, SmartMedia, SecurDigital and MultiMedia cards,
Memory Sticks and xD-Picture cards.
8
Ink cartridge carrier
Holds the colour ink cartridge. For information on how to change
the ink cartridge, see "Replacing the Ink Cartridge".
9
Paper exit slot and
paper jam clearing
area
Slot from where the printed sheet of paper exits the printer. Also
used for clearing paper jams inside the printer. For information on
how to clear paper jams, see "Clearing Paper Jams".
10
Left inner cover
Closes the paper exit slot and ink cartridge carrier.
11
Battery compartment
Holds six 2-2.3 Ah rechargeable Nickel Cadmium (NiCd) or Nickel
Metal Hydride (NiMH) batteries that power the printer when the
external power transformer or car lighter adapter is not used.
12
Paper cassette
Holds up to 20 sheets of 280 gm2 photo paper. When not used,
the paper cassette can be secured underneath the printer.
GETTING STARTED
5
PRINTER CONTROL PANEL
The printer control panel allows you to manually control the printing of photos received from a digital
camera connected to the printer, stored in a memory card inserted in one of the printer’s memory card
slots, or received from a Bluetooth peripheral. With its colour display, you can also scroll and view the
photos. This console also includes buttons by means of which you can select your photos and
customise print jobs. The icons on the buttons illuminate to indicate the selection currently active.
1
2
3
12
4
5
11
6
10
7
8
9
Reference
Part
Description
1
On/Off Button
Turn your printer on or off.
2
Out of ink indicator
Flashes or illuminates to indicate an out ink condition, in which
case it is suggested that you replace the ink cartridge. See
"Replacing the Ink Cartridge".
3
Paper error indicator
•
•
•
4
6
CHAPTER 1
Page layout button
Illuminates to indicate an out of paper condition.
Illuminates to indicate a paper jam. See "Clearing Paper
Jams".
Illuminates to indicate the feed of an incorrect paper size
when printing.
Press to select the layout in which the photos will be printed on
the paper. Press this button sequentially to select:
• the index of your pictures, which will be correctly printed if
already compiled by the device (digital camera). If an index is
not provided by the device, the printer will create its own
index of pictures by it may not be complete.
• 4 borderless photos fitted on the page size
• 2 borderless photos fitted on the page size
• 1 photo with borders and fitted on the page size
• 1 borderless photo fitted on the page size
As you press this button, the icons illuminate to indicate the
corresponding page layout selected. If the icons do not illuminate,
there is no device connected to the printer. Borderless is not
available when using plain A4 paper folded vertically in the
middle.
Reference
Part
Description
5
Select button
Press to select the photo displayed on the LCD.
6
Copy selection
buttons
Press the Plus sign (+) button to increase the number of copies to
be made, press the Minus sign (-) button to decrease the number
of copies to be made. The number of copies selected is displayed
on the lower right side of the picture.
7
Cancel button
Press to immediately cancel a print job in progress, eject the paper
and to return all settings to their default values.
8
Print button
Press to print the photos selected. This button flashes during a
print job.
9
Navigation buttons
Press the four direction buttons to navigate through the pictures
stored on the storage device. The pictures are displayed on the
LCD as you press the related button. Press and hold down to scroll
through the different views.
10
Change view button
Press to toggle between full-screen and thumbnail picture views
on the colour display. This button does not illuminate.
11
Colour display
A 1.9", 65K colour Liquid Crystal Display (LCD) for previewing
and selecting your pictures.
12
Bluetooth activity
indicator
Illuminates when the printer is powered on, flashes when files are
being transferred from the Bluetooth peripheral to the printer.
GETTING STARTED
7
LOADING PAPER
The printer is equipped with a paper detection sensor that automatically detects whether the paper is
fed manually or from the paper cassette.
Loading Paper in the Paper Cassette
1
Open the paper cassette lid. Load up to 20 sheets of photo paper in the paper cassette bay with the
print or glossy side facing upward, adjusting the paper width guide accordingly. Close the paper
cassette lid.
2
Open the printer’s left outer door by pressing the upper centre part of the door to release it. Insert the
paper cassette into the insertion slot and press it firmly until it clicks into place.
Loading a Single Sheet of Plain A4 Paper Folded Vertically in the Middle
You can manually load a single sheet of A4 plain paper folded vertically, corresponding to a double A6
size format (105 x 297 mm).
1
2
8
Make sure that your printer is turned on and that the paper cassette is inserted. See “Turning On Your
Printer”.
Fold a sheet of plain A4 size paper vertically in the middle. Place the paper between the two paper
guides on the top of the paper cassette and feed the leading edge of the sheet into the insertion slot
until it is picked up by the printer’s feed mechanism.
CHAPTER 1
POWERING YOUR PRINTER
Choosing the Power Source For Your Printer
You can power your printer from the mains electrical power supply by using the transformer provided,
from your automobile battery by using the car lighter adapter provided, or with six 2-2.3 Ah
rechargeable Nickel Cadmium (NiCd) or Nickel Metal Hydride (NiMH) batteries that you can purchase
from electronic stores or from large retailers.
note: You can also order an Olivetti battery recharge kit by phoning a hot-line number listed in the
leaflet that came with the printer, provided in the printer software or in the Olivetti web site.
1
Mains Electrical Power Supply
Insert the transformer power jack into the printer’s power socket, then insert one end of the power
cord into the transformer and the other end to an electrical wall outlet.
1
12V Car Battery Power Supply
Plug one end of the car lighter adapter into the printer power socket and the other end into your
automobile’s cigarette lighter.
GETTING STARTED
9
1
2
Rechargeable NiCd or NiMH Batteries
Turn over your printer and then open and remove the battery compartment cover.
Insert six 2-2.3 Ah rechargeable Nickel Cadmium (Nicd) or Nickel Metal Hydride (NiMH) batteries in the
battery compartment, then replace and close the compartment cover.
TURNING YOUR PRINTER ON AND OFF
Turning On Your Printer
Press the ON/OFF button on the printer control panel.
The printer will execute a series of autodiagnostic tests aimed at detecting any possible system
malfunction. Any error detected at this time will be signalled by the control panel, or by the personal
computer if connected to the printer. See "Meaning of the Indicators on the Control Panel" for the
corrective actions in case any error is detected.
Upon the successful completion of the autodiagnostics, the printer’s idle screen is displayed on the
control panel LCD.
When you connect a non-PictBridge digital camera to the printer or insert a memory card in the
appropriate memory card slot, all of the icons on the control panel will illuminate. When you connect a
PictBridge digital camera only the Print button will turn off to indicate that printing is controlled directly
from the attached digital camera.
Turning Off Your Printer
To turn off your printer when you finished working with it, press the ON/OFF button on the control
panel. All the lights on the control panel, and the LCD, will turn off.
10
CHAPTER 1
CONNECTING A DIGITAL CAMERA TO YOUR PRINTER
1
2
3
Turn on your digital camera. Read your camera’s User’s Guide for more information.
With your printer powered on, plug one end of the digital camera’s USB cable to the USB connector on
the camera.
Open the printer’s left outer door by pressing the upper centre part of the door to release it. Plug the
other end of the USB cable into the printer’s USB connector.
note: When you connect a PictBridge digital camera to your printer, the print icon on the control panel
will turn off to indicate that printing will be controlled directly from the digital camera. Read your
camera’s User’s Guide for instructions on how to print your photos.
INSERTING AND REMOVING MEMORY CARDS
Your printer can read the following memory storage devices: Compact Flash I, II, Microdrive,
SmartMedia, SecurDigital and MultiMedia cards, Memory Sticks (Duo, Pro, Magic Gate) and xD-Picture
cards.
note: Adaptors for reading Mini SD and MS Pro memory cards can be purchased separately.
Your printer can recognize and print the following file formats stored on the memory cards: DCF, JPEG,
Extif and DPOF.
Inserting a Memory Card
Before inserting the memory card into its related slot, follow these insertion guidelines according to the
card that you are using:
• When inserting a CompactFlash card, make sure that the label is facing upward (if the label has an
arrow it needs to be pointing towards the printer) with the metal pinholes entering the printer first.
• When inserting a Multimedia and SecureDigital cards, make sure that the angled corner is on the
right and the metal contacts are facing downward.
• When inserting a SmartMedia card or a Memory Stick, make sure that the angled corner is on the
right and the metal contacts are facing upward.
• When inserting a xD-Picture Card, make sure the curved side of the card is facing you and the metal
contacts are facing downward.
note: It is important that you remember the correct orientation of the card when you insert it into the
printer as inserting it any other way could damage the card and the printer.
GETTING STARTED
11
1
2
Proceed as follows:
Open the printer’s left outer door by pressing the upper centre part of the door to release it, so you
can access the memory card slots.
Orient your specific memory card as indicated at the beginning of this section, carefully insert it into the
selected slot and then gently push it in until it stops.
The following figure shows an example of the insertion of a Compact Flash card.
note: The memory card does not go in all the way; do not try to force it in since doing so will damage
the card and the printer.
If the card is inserted correctly, an icon is displayed on the LCD indicating the total number of photos
stored on the memory card (only the compatible files are opened and counted).
Removing a Memory Card
1
12
Carefully pull the card completely out of its slot. To remove a Compact flash card, push the extraction
button located on the side of the insertion slot.
CAUTION: DO NOT remove the memory card while it is still being accessed either by the printer or
personal computer. Doing so could damage the photos stored on the card.
CHAPTER 1
CARRYING YOUR PRINTER
1
2
3
Extract the paper cassette from its insertion slot on the right side of the printer and close the printer’s
left outer door.
Slide the paper cassette along the cassette rails on the bottom of the printer until it is locked in place by
the securing clip.
Extract the handle on the top of the printer and carry the printer wherever you go.
GETTING STARTED
13
14
CHAPTER 1
2USING YOUR PRINTER
WITHOUT A COMPUTER
VIEWING PHOTOS ON YOUR PRINTER’S DISPLAY
SELECTING AND PRINTING PHOTOS FROM YOUR MEMORY CARD
PRINTING PHOTOS FROM YOUR PICTBRIDGE DIGITAL CAMERA
SELECTING AND PRINTING PHOTOS FROM YOUR DPOF DIGITAL CAMERA
SELECTING AND PRINTING PHOTOS FROM YOUR NON-PICTBRIDGE/DPOF DIGITAL CAMERA
PRINTING PHOTOS FROM A BLUETOOTH PERIPHERAL
USING YOUR PRINTER WITHOUT A COMPUTER
15
VIEWING PHOTOS ON YOUR PRINTER’S DISPLAY
Full-Screen Views
1
2
3
16
Reference
Part
Description
1
Browse window
Displays the current photo.
2
Select frame
Indicates the selection state, highlighted when the Select button
is pressed to select the photo displayed.
3
Image Total field
Indicates the number of selected photos that you want to print.
4
Device icon
Represents the device connected.
5
Icon bar
The bar where the different icons reside.
Navigating Through Full-Screen Views and Selecting Photos
To scroll through all the photos that are stored on the connected storage device and displayed in this
screen view, press the Right and Left Navigation button.
To select the photo displayed and that you want to print, press the Select button.
To deselect the photo displayed, press the Select button again.
CHAPTER 2
Thumbnail Views
7
Reference
Part
Description
1
Photo indicator
Indicates how many photos are stored on the connected device.
2
Select frame
Indicates that the photo was selected by using the Select button.
3
Browse frame
Highlights the current image as a result of the of the pressing of
the Navigation button.
4
Thumbnail grid
A total of 9 grids where the photos are displayed in miniature
format.
5
Image total field
Indicates the number of photos that you want to print.
6
Device icon
Indicates the device connected.
7
Icon bar
The bar where the different icons reside.
SELECTING AND PRINTING PHOTOS FROM YOUR MEMORY CARD
1
2
3
4
5
6
Open the printer’s left outer door by pressing the upper centre part of the door to release it, then insert
the memory card that you wish to print from into the related slot. The file transfer screen is displayed
on the LCD indicating that your printer is reading the compatible files stored on the connected memory
card.
A screen indicating the total number of compatible photos stored on the memory card is displayed on
the control panel LCD. If needed, press the Change View button to toggle between full-screen and
thumbnail screen views. See "Viewing Photos on Your Printer’s Display". An icon on the screen’s icon
bar will indicate the device connected.
Using the Right, Left, Up, Down Navigation button, scroll through the photos to position the
highlighted frame on the photo you wish to print.
Select the number of copies you want to print of the photos selected by pressing the plus (+) or minus
(-) button. A copy indicator is displayed on the bottom-right corner of the photo selected to indicate
the number of copies requested for that photo. The total number of photos selected is displayed on the
icon bar on the bottom of the screen.
Select the layout in which you wish to print the selected photos by pressing the Page Layout button the
number of times needed to select the required layout. You have the following possibilities:
– Print an index sheet of all the photos if "All photos" was selected (by clicking on the icon showing
the total number of photos stored on the memory card).
– Print 4 borderless photos fitted on the page size.
– Print 2 borderless photos fitted on the page size.
– Print 1 photo with borders and fitted on the page size.
– Print 1 borderless photo fitted on the page size.
Press the Print button to print the selected photos. The illuminated button icons will go off, the photo
processing screen is displayed on the LCD.
USING YOUR PRINTER WITHOUT A COMPUTER
17
Upon completion of the print job, the initial screen indicating the number of photos stored will be
redisplayed.
PRINTING PHOTOS FROM YOUR PICTBRIDGE DIGITAL CAMERA
1
2
3
Load the paper on which you want to print. For optimum results when printing photographs, use
photo paper. For information see "Loading Paper".
note: If the size of the paper loaded in the printer is different than the paper size selected from the
digital camera for printing and you begin to print, the printed output will be wrong.
Only a paper size smaller than the size selected from the digital camera will interrupt the print job and
cause the Print button on the control panel to illuminate. Load the correct paper and press the Print
button to resume printing.
Make sure your PictBridge digital camera is turned on and connected to the printer. For more
information, see "Connecting a Digital Camera to Your Printer".
Printing is managed directly by your camera, so read your camera’s User’s Guide for instructions on how
to print your photos.
During printing, the Print button will flash to indicate that a print job is under way.
SELECTING AND PRINTING PHOTOS FROM YOUR DPOF DIGITAL CAMERA
1
2
3
4
5
6
7
8
18
Your printer is capable of recognizing the DPOF information associated to picture files. In the case of a
DPOF digital camera, the printer will print the photos that you select directly from your camera.
note: Before proceeding, make sure that your digital camera is DPOF-complaint by reading the
camera’s User’s Guide.
Load the paper on which you want to print. For best results when printing photographs, use photo
paper. For information see "Loading Paper".
If the size of the paper loaded in the printer is different than the paper size selected from the digital
camera for printing and you begin to print, the printed output will be wrong.
Only a paper size smaller than the size selected from the digital camera will interrupt the print job and
cause the Print button on the control panel to illuminate. Load the correct paper and press the Print
button to resume printing
Make sure your DPOF digital camera is turned on and connected to the printer. For more information,
see "Connecting a Digital Camera to Your Printer".
If you associated DPOF information to the photo files stored in your camera’s memory, the printer will
automatically print the photos that you have selected. Read your camera’s User’s Guide for instructions
on how to select the photos you want to print.
If you did not associate DPOF information to the photo files, a screen indicating the total number of
photos stored in the digital camera’s memory is displayed on the control panel LCD. If needed, press
the Change View button to toggle between full-screen and thumbnail screen views. See "Viewing
Photos on the Control Panel LCD" for information regarding the views and indications displayed on the
LCD. An icon displayed on the screen’s icon bar will indicate the device connected.
Using the Right, Left, Up, Down Navigation button, scroll through the photos to position the
highlighted frame on the photo you wish to print.
Select the number of copies you want to print of the photos selected by pressing the plus (+) or minus
(-) button. A copy indicator is displayed on the bottom-right corner of the photo selected to indicate
the number of copies requested for that photo. The total number of photos selected is displayed on the
icon bar on the bottom of the screen.
Select the layout in which you wish to print the selected photos by pressing the Page Layout button the
number of times needed to select the required layout. You have the following possibilities:
– Print an index sheet of all the photos if "All photos" was selected (by clicking on the icon showing
the total number of photos stored on the memory card).
– Print 4 borderless photos fitted on the page size.
– Print 2 borderless photos fitted on the page size.
– Print 1 photo with borders and fitted on the page size.
– Print 1 borderless photo fitted on the page size.
Press the Print button on your printer’s control panel to print your photos. For more information see
“Printer Control Panel”.
CHAPTER 2
SELECTING AND PRINTING PHOTOS FROM YOUR NON-PICTBRIDGE/DPOF DIGITAL CAMERA
1
2
3
4
5
6
7
Load the paper on which you want to print. For optimum results when printing photographs, use
photo paper. For information see Loading Paper".
Make sure your digital camera is turned on and connected to the printer. For more information, see
"Connecting a Digital Camera to Your Printer".
A screen indicating the total number of photos stored in the digital camera’s memory is displayed on
the control panel LCD. If needed, press the Change View button to toggle between full-screen and
thumb-nail screen views. See "Viewing Photos on the Control Panel LCD" for information regarding
the views and indications displayed on the LCD. An icon displayed on the screen’s icon bar will indicate
the device connected.
Using the Right, Left, Up, Down Navigation button, scroll through the photos to position the
highlighted frame on the photo you wish to print.
Select the number of copies you want to print of the photos selected by pressing the plus (+) or minus
(-) button. A copy indicator is displayed on the bottom-right corner of the photo selected to indicate
the number of copies requested for that photo. The total number of photos selected is displayed on the
icon bar on the bottom of the screen.
Select the layout in which you wish to print the selected photos by pressing the Page Layout button the
number of times needed to select the required layout. You have the following possibilities:
– Print an index sheet of all the photos if "All photos" was selected (by clicking on the icon showing
the total number of photos stored on the memory card).
– Print 4 borderless photos fitted on the page size.
– Print 2 borderless photos fitted on the page size.
– Print 1 photo with borders and fitted on the page size.
– Print 1 borderless photo fitted on the page size.
Press the Print button on your printer’s control panel. The photos stored in the memory of your camera
will be printed.
PRINTING PHOTOS FROM A BLUETOOTH PERIPHERAL
1
2
3
4
Your printer is equipped with an integrated Class 2 Bluetooth component.
Its default address is 0000 so it can directly print any .JPEG transmitted from a Bluetooth mobile phone
or personal computer located within a maximum distance of 10 meters from the printer.
note: You can change your printer’s default Bluetooth address from your personal computer, if
connected to the printer.
Make sure that paper is loaded in the printer. For information see "Loading Paper".
Turn on your printer. See "Turning On Your Printer". Bluetooth capabilities are automatically activated
on your printer.
Turn on the Bluetooth peripheral that you want to print from and, from within a distance of 10 meters
from the printer, launch a Bluetooth discovery procedure directly from your peripheral. By activating
this procedure, your Bluetooth peripheral will search for another Bluetooth device in the vicinity (in this
case, your printer) with which it can share data. For information on how to launch a Bluetooth
discovery procedure, read your peripheral’s User’s Guide.
When your Bluetooth peripheral has discovered your printer, launch the print job directly from your
Bluetooth device. For instructions, read your peripheral’s User’s Guide.
The Bluetooth icon on the control panel will flash as the photos are being transferred from the
Bluetooth device to your printer for printing. The photos will be printed without borders, or with
borders if plain A4 size paper folded in the middle is loaded.
USING YOUR PRINTER WITHOUT A COMPUTER
19
20
CHAPTER 2
3USING YOUR PRINTER FROM
A COMPUTER
BEFORE YOU BEGIN
THE TOOLBOX
THE PRINTER STATUS MONITOR
PRINTING
TRANSFERRING FILES FROM A MEMORY CARD TO YOUR COMPUTER
USING YOUR PRINTER FROM A COMPUTER
21
BEFORE YOU BEGIN
1
2
3
This chapter outlines the basic operating information that will put you in the condition to start using
your printer when connected to a computer.
Before you begin:
Make sure that your printer and personal computer are connected properly and that the software on
the “Installation" CD-ROM was successfully installed on the computer as indicated in the Setup
Diagram provided with your printer.
Load the paper on which you want to print. For more information see “Loading Paper".
Make sure that the out of ink indicator on the control panel is not flashing, or not illuminated. If it is, it
is suggested that you replace the ink cartridge. For more information see “Replacing the Ink
Cartridge".
THE TOOLBOX
1
The Toolbox application allows you to control printing operations directly from a single user interface
on your computer monitor.
Included in the “Installation" CD-ROM, the Toolbox is installed automatically on your computer when
you install the software contained on this CD-ROM.
To access the Toolbox:
Right click your mouse button on the Olivetti icon on the Windows task bar and click on MY_WAY
Toolbox, or click Start > Programs or All Programs > Olivetti > MY_WAY Toolbox. The Toolbox is
displayed.
The main area of the Toolbox includes the icons representing the different tools available.
Clicking on this
Toolbox icon:
You can:
Print photos
•
•
•
•
•
•
Memory card file
transfer
22
CHAPTER 3
•
Browse your computer’s hard disk, the memory of the non-Pictbridge/DPOF
digital camera connected to your computer or the memory card inserted in your
printer to search for the folder containing photos to print.
Select all the photos stored in the folder or just the individual ones wanted, and
choose how may copies to print.
Select the type of paper to print on, and its size.
Select whether to print the photos on a single page, two on one page or four
on one page.
Print an index sheet of photos.
Print the photos you have selected.
Transfer the contents of the memory card inserted in the printer to a folder on
your computer. See "Transferring Files from Memory Card to your Computer".
The Toolbox main interface screen also provides links to Help, Solutions and assistance, and Settings.
Clicking on this
Toolbox link:
You can:
Help
•
Read more information on the currently displayed topic.
Solutions and
assistance
•
•
•
•
Clean and test the ink cartridge.
Automatically align the ink cartridges. See "Aligning the Ink Cartridge From the
Toolbox".
Find the address of the manufacturer’s web site, where you can access the
information needed to purchase new ink cartridges.
Access troubleshooting information.
Access contact information.
•
Change the Toolbox default settings.
•
Settings
THE PRINTER STATUS MONITOR
•
•
•
•
•
•
•
•
•
•
•
•
•
The Printer Status Monitor provides information on the current state of your printer. It is installed
permanently on your computer when you install the software contained on the "Installation" CD-ROM.
Displayed automatically at the beginning of a print job, the Status Monitor:
displays a graphical representation of the percentage of the print job already completed.
displays the page number being currently printed out of the total number of pages of the job.
displays the job title.
displays a graphical representation of the estimated amount of ink, in percentage, still available in the
cartridge.
allows you to cancel the print job.
provides you with the address of the manufacturer’s web site, where you can access the information
needed to purchase new ink cartridges.
The Status Monitor closes automatically at the end of the print or copy job, but you can close it to its
icon on the Windows task bar at any time.
If you decide to close the Status Monitor during a print or copy job, it will be automatically redisplayed
in the following conditions:
when the ink remaining in the cartridge is low, or when the cartridge is out of ink. A coloured
exclamation mark will indicate when the cartridge in a low ink condition and the importance of the
condition. Pop-ups will be displayed with the address of the manufacturer’s web site, where you can
access the information needed to purchase a new ink cartridge.
The Printer Status Monitor also displays error pop-ups when:
your printer runs out of paper.
a paper jam has occurred.
your printer is busy with another task.
your printer is not recognised.
the ink cartridge carriage is jammed.
your printer does not work (printer error).
In all of the above error conditions, you can choose whether to continue or cancel the print job by
clicking the related button on the screen.
USING YOUR PRINTER FROM A COMPUTER
23
PRINTING
Printing From Your Application Using Print Properties
1
2
3
4
24
With the document or photo open in the application that you are using, click File > Print to open the
Print dialogue box.
Click Preferences or Properties, depending on your operating system.
On the Paper/Quality tab, customise your print settings:
a Document type: define the characteristics of the document that you want to print. Select Auto
detection to have the printer automatically detect the characteristics of the document or Manual
selection to manually define the characteristics yourself.
If you select Manual selection, choose the characteristics of the document to be printed: Text
(black text or line art only), Mixed (combination of black text or line art and colour graphics or
photos), or Photo (colour photos only).
b Paper Setup: from the drop-down menus available, select the type of paper that you want to use
(Plain, Coated, Photo, Glossy, Cards) and its size.
• If you select Coated, Glossy, or Cards as the type of paper you will be using, the Borderless
checkbox is displayed so you can choose to print without borders.
• If you select Photo paper as your paper type, by default the Borderless checkbox will be
selected enabling you to print borderless photos on the selected media.
• If plain paper is selected the Manual Feed checkbox is already selected. In this case the printer
will not begin to print until you load the paper, and will automatically recognise the size of the
paper loaded. Plain A4 size paper folded in the middle can be fed only manually from the top of
the paper cassette.
note: If you load paper that is smaller than the selection made, the printer will eject the paper
prompting you to load paper corresponding to the selected size.
c Quality: define the quality of your printed output. Select between Speed (highest print speed,
lowest resolution), Normal (average print speed and resolution), High (low print speed, high
resolution) and Photo Quality (lowest print speed but with the highest print resolution).
• You can also select to print in Colour or in B/W (Black and white). By default the Colour radio
button is always checked, enabling full-colour printing. Select B/W when you need to print
shades of grey, or to continue to print when the colour cartridge is out of ink.
d By default, the Print Last Page First checkbox is selected so upon completion of the print job the
first page of your multiple-page document remains on top of the document. Click this checkbox to
deselect it if you want to print starting from the first page of your document.
e In the No. Copies box, use the up or down arrows to define the number of copies you want to
print.
f To return the different screen settings to their factory default values, click the Default button.
g On the bottom of the screen:
• Click the OK button con confirm the settings made and exit.
• Click the Cancel button to exit without saving the changes made.
• Click the ? button for information on the Paper/Quality tab.
Click the Layout tab to select the layout format of your printed output:
a The Single page per print radio button is selected by default. Your printer will print the individual
pages of the document, or your photos, on a single page layout.
b Click the Multiple pages per print radio button to fit the selected number of pages on a single
sheet of paper. By selecting this option:
• The Pages per print drop-down menu is displayed where you can select to print either 2, 3, 4
or 8 pages of your document on a single sheet.
• The Order drop-down menu is then displayed where you can select the order in which the
multiple pages will be fitted on the single sheet of paper. You can select between Left-to-right
down, Right-to-left down, Right-to-down left or Left-to-down right, depending on the
number of pages selected.
• By clicking the Borders checkbox, a frame is placed around the individual page images on the
single sheet of paper.
c Click the Poster radio button to expand the contents of a single page onto more than one sheet of
paper. The final output consists of your selected poster image distributed among the number of
pages defined:
CHAPTER 3
•
5
6
The Poster drop-down menu is displayed where you can select 2x1, 2x2, 3x3 or 4x4 to define
on how many sheets to fit the selected poster image.
• By clicking the Print Borders checkbox, the printer will automatically place a frame around
each individual image that your poster is composed of. An indication of the position of the
image in the poster is also provided.
d To restore the different settings to their factory default values, click the Default button.
e On the bottom of the screen:
• Click the OK button to confirm the settings made and exit.
• Click the Cancel button to exit without saving the changes made.
• Click the ? button for information on the Layout tab.
Click the Ink Levels tab to see the estimated amount of ink still available in the ink cartridge. This is
important information to consider before launching a lengthy print job.
a On the Ink Levels tab there is also the Launch Toolbox button, a direct link to the Toolbox
Maintenance screen that provides a user interface for the maintenance and troubleshooting of
your printer. See "The Toolbox" for more information.
b On the bottom of the Ink Levels tab:
• Click on the OK or Cancel button to exit.
• Click on the ? button for information on the Ink Levels tab.
Click the OK button in the Print dialogue box to start printing.
Printing with the Toolbox Print Photos Tool
1
2
3
4
5
6
Right click your mouse button on the Olivetti icon on the Windows task bar and click MY_WAY
Toolbox, or click Start > Programs or All Programs > Olivetti > MY_WAY Toolbox. The Toolbox is
displayed.
Click Print photos. The "My pictures" folder of your personal computer is opened by default if a
digital camera is connected; if a memory card is inserted, the folder with the contents of the memory
card is opened by default.
note: The printer directly prints the picture files stored on the memory card and therefore do not
remove the memory card from its slot while connection is in progress.
The pictures stored in the folder are displayed in thumbnails on the left of the dialogue box; the first
photo of the folder, or the photo that you click on, is displayed in a larger view on the right of the
screen. You can now select what to do:
a Click the Add All button to add all the photos in the folder to your selection of photos to print.
b Select the individual photos to print by clicking directly on the photo wanted. Define the number of
copies that you want to print of the photo selected by clicking on the plus (+) and minus (-) boxes
that appear on the selected photo. You can also select the number of copies by clicking on the copy
selection arrows on the bottom of the screen. The box on the upper part of the selected photo
indicates the number of copies chosen. Use the box’s side scroll bar or arrow buttons to move up
and down through the selection of photos available.
note: To remove all the photos from your print selection, click the Clear Selection button. To
remove single photo selections, click on the minus (-) box on the individual photos, or click the copy
selection arrows on the bottom of the screen, to decrease the number of copies to zero.
Click the Print button. The Print Photos dialogue box is displayed.
Personalise your print settings:
a Paper setup: from the drop-down menu select the paper that you loaded and define its size.
b Quality: define the quality of your printed output. Select between Speed (highest print speed,
lowest resolution), Normal (average print speed and resolution), High (low print speed, high
resolution) and Photo Quality (lowest print speed but with the highest print resolution).
c Select Layout: choose the layout that you prefer by clicking on the graphical representation of one
of the following options: Full Page, Two-in-One, Four-in-One and Index.
note: The Borderless layout is not available if Plain paper type is selected.
note: When the Two-in-One paper layout, if an A6 paper size is chosen, the printer will print two
wallet-sized pictures. When a Four-in-One paper layout is selected, if an A6 paper size is chosen,
the printer will print four passport sized pictures. When selecting an Index layout, all of the pictures
will be bordered.
note: When selecting an Index layout, all of the pictures will be bordered.
Click the Print button to start printing.
USING YOUR PRINTER FROM A COMPUTER
25
TRANSFERRING FILES FROM A MEMORY CARD TO YOUR COMPUTER
1
2
3
4
5
6
26
Insert into the corresponding slot on the printer, the memory card containing the files to transfer. See
"Inserting and Removing Memory Cards".
Right click your mouse button on the Olivetti icon on the Windows task bar and click MY_WAY
Toolbox, or click Start > Programs or All Programs > Olivetti > MY_WAY Toolbox. The Toolbox is
displayed.
Click the Memory Card File Transfer icon.
Click the Browse button and search for the folder on your computer in which to transfer the files.
Click the OK button once you have found the folder wanted.
Click the Transfer button to start the file transfer from the memory card to your computer.
note: To cancel the file transfer and return to the Toolbox’s main screen, click the Cancel button. For
information, click Help.
CHAPTER 3
4THE INK CARTRIDGE
CHECKING INK LEVELS
REPLACING THE INK CARTRIDGE
ALIGNING THE INK CARTRIDGE
THE INK CARTRIDGE
27
CHECKING INK LEVELS
1
2
3
4
5
28
To know when the ink cartridge is running out of ink and needs replacing, check the ink levels in the
following ways:
By viewing the ink level indicators on the Ink Levels tab of your print driver’s Preferences or Properties
dialogue box, as follows:
a With the document file open in the application that you are using, click File > Print. The Print
dialogue box is displayed.
b Click Preferences or Properties, depending on your operating system. The printer driver user
interface screen is displayed.
c Click the Ink Levels tab. The ink capacity indicator shows the percentage of ink remaining in the
cartridge.
From the Toolbox, by viewing the ink level indicators on the bottom of the Toolbox’s main screen or in
the New ink cartridges dialogue box:
a Right click your mouse button on the Olivetti icon on the Windows task bar and click MY_WAY
Toolbox, or click Start > Programs or All Programs > Olivetti > ANY_WAY Toolbox. The
Toolbox is displayed.
b Click Solutions and Assistance.
c Click Select to choose New ink cartridges. The New ink cartridges dialogue box displayed includes
the ink level indicator showing the amount of ink remaining in the cartridge.
From pop-ups displayed by the Printer Status Monitor during a print job, that show the amount of ink
remaining. See "The Printer Status Monitor" for more information.
From the Start menu:
a Click Start > Programs or All programs > Olivetti > MY_WAY New ink cartridge. The Status
Monitor is displayed.
Directly on the printer control panel:
a When the ink indicator begins to flash, the ink level in the cartridge is getting low; when the
indicator is on steady, the ink cartridge is almost out of ink.
CHAPTER 4
REPLACING THE INK CARTRIDGE
1
2
3
4
Before proceeding with the procedures indicated in this section, carefully read and follow the
information provided in "Safety Instructions" at the beginning of this manual.
For information on how to purchase new ink cartridges from the manufacturer, consult the Toolbox’s
Solutions and Assistance feature. To access the Toolbox, see “The Toolbox”. To guarantee the correct
operation of your printer and top quality printing, it is essential to use only the manufacturer’s original
ink cartridges.
Turn on the printer.
Make sure that paper is loaded. See "Loading Paper".
Open the printer’s right outer door by pressing the upper centre part of the door to release it, then pull
open the printer’s right inner door. The ink cartridge carrier moves to its loading position at the far
right-hand side of the carriage.
With your index finger, pull and rotate downward the top edge of the ink cartridge and remove it from
the carrier.
.
5
If you are installing a new ink cartridge, remove the cartridge from its box and then gently remove the
protection tape that covers the ink nozzles. DO NOT TOUCH THE CONTACTS or the ink nozzles. Hold
the ink cartridge by its sides.
THE INK CARTRIDGE
29
30
6
Hold the ink cartridge with its nozzles facing downward and its contacts facing the rear of the printer,
then insert the cartridge into the carrier from the bottom nozzle side first and with a rotating motion.
7
Push the ink cartridge firmly until it clicks into place.
8
Close the printer’s inner and outer doors.
9
If a new cartridge is installed, the printer will automatically perform a cartridge recognition procedure
which lasts at least 3 minutes. An ink cartridge alignment page will then be printed to indicate that the
newly installed ink cartridge was automatically aligned. For information see "Aligning the Ink
Cartridge".
CHAPTER 4
ALIGNING THE INK CARTRIDGE
The ink cartridge is automatically aligned by the printer whenever a new cartridge is installed.
However, you need to manually align the ink cartridge when the edges of the printed characters are
still not clear, or when the lines still appear wavy, even after cleaning the ink cartridge nozzles. See
“Aligning the Ink Cartridge From the Toolbox”.
Aligning the Ink Cartridge From the Toolbox
1
2
3
4
When the edges of the printed characters are still not clear, or when the lines still appear wavy, even
after cleaning the ink cartridge nozzles:
Right click your mouse button on the Olivetti icon on the Windows task bar and click on MY_WAY
Toolbox, or click Start > Programs or All Programs > Olivetti > MY_WAY Toolbox. The Toolbox is
displayed.
Click Solutions and Assistance and then Select the "Print the alignment page" option.
Click the Print button.
When the alignment page is printed, the ink cartridge has been aligned. Click Close to return to the
Toolbox main screen.
THE INK CARTRIDGE
31
32
CHAPTER 4
5MAINTENANCE AND
TROUBLESHOOTING
CLEANING YOUR PRINTER
CLEANING THE INK CARTRIDGE NOZZLES
TROUBLESHOOTING
CLEARING PAPER JAMS
MAINTENANCE AND TROUBLESHOOTING
33
CLEANING YOUR PRINTER
CAUTION: Do not clean the inside of your printer and do not use stain removers, acetone-based
products, liquid or aerosol cleaners. Doing so could damage your printer case.
Cleaning the Printer Casing
1
Clean the printer casing by using a soft dry cloth or moistened in warm water to wipe dust, dirt or
smears off the outer case of your printer only.
CLEANING THE INK CARTRIDGE NOZZLES
•
•
•
1
2
3
4
5
6
7
34
Clean the ink cartridge nozzles when:
White or colour lines appear in your printouts.
Colours fade, or do not print in parts or completely.
The vertical lines of your printout are jagged.
To clean the ink cartridge nozzles:
Make sure paper is loaded in the printer. See "Loading Paper".
Right click your mouse button on the Olivetti icon on the Windows task bar and click on MY_WAY
Toolbox, or click Start > Programs or All Programs > Olivetti > MY_WAY Toolbox. The Toolbox is
displayed.
Click Solutions and Assistance.
Select the "Clean and Test Nozzles" option.
Click the Print button. The printer automatically cleans the nozzles and prints a test page.
Check the quality of the printed output with the example displayed on the computer monitor. If you
are not satisfied with the quality of the printed output, click the Clean again button to repeat the
nozzle cleaning procedure.
When finished, click the Close button to return to the Toolbox main user interface screen.
CHAPTER 5
TROUBLESHOOTING
Problems During Printer Setup
1
2
3
Before reading this section:
Make sure the printer’s power transformer is properly connected to the printer and to a
working electrical outlet, or the car cigarette lighter adapter is properly connected, or the six
rechargeable 2-2.3 Ah Nickel Cadmium (NiCd) or Nickel Metal Hydride (NiMH) batteries are properly
inserted and fully charged.
If you are using your printer with a personal computer, make sure that you have turned on both your
printer and computer.
Make sure the computer’s operating system is Windows 98 SE, ME, 2000 or XP, or MAC OS 10.3 or
later.
Problem
Possible Cause
Your printer does not turn on.
•
Refer to the “Problems When
Powering On the Printer”
paragraph on the following
pages.
You insert the “Installation”
CD-ROM into your computer CD
drive and the installation
program does not start
automatically.
•
An operating system
incompatible with the CDROM software may be
running on the personal
computer.
1
Make sure the personal
computer is running
Windows 98 SE, ME, 2000 or
XP, or MAC OS 10.3 or later.
•
The auto-run feature is
disabled.
Your personal computer
cannot find setup.exe on the
CD-ROM.
1
Remove and replace the
“Installation” CD-ROM in the
CD drive with the written
label upwards.
Select Start > Run and then
click Browse.
Find the CD-ROM drive
identifier and click Open.
Select Setup and click Open.
The file setup.exe is displayed
in the dialogue box.
Click OK and then follow the
instructions displayed
•
Corrective Action
2
3
4
5
Your printer’s name is not
available when you select File >
Print from an application. The
printer is not shown in the
Printer folder on the Control
Panel.
•
When connecting the printer to
the computer with the USB
cable, the Plug and Play wizard
did not terminate.
•
The printer driver was not
installed correctly
1
2
The computer did not find
the printer driver.
1
2
3
Close all applications
currently open.
Reinstall the printer software
as instructed by the Setup
Diagram or as indicated in
the step above.
Remove the “Installation”
CD-ROM from the drive and
re-boot the computer.
Place the “Installation” CDROM in the drive with the
written label facing upwards.
Reinstall the printer software
as instructed in the Setup
Diagram or as indicated in
the step above.
MAINTENANCE AND TROUBLESHOOTING
35
Problem
Possible Cause
Corrective Action
When connecting your printer to
the computer with the USB
cable, the New Hardware Wizard
is not displayed on the
computer’s monitor.
•
The computer is running an
incompatible operating
system.
1
Make sure the computer is
running Windows 98 SE, ME,
2000 or XP, or MAC OS 10.3
or later.
•
The USB cable may not be
properly connected between
the printer and computer.
1
Turn off your printer and
computer, then unplug the
USB cable from these two
devices.
Reattach the USB cable to
the two devices by following
the instructions in the Setup
Diagram. Turn on the printer
first followed by the
computer.
2
•
The computer may not be
enabled for USB operation.
1
2
3
4
36
CHAPTER 5
Click Start > Settings >
Control Panel.
Double click on the System
icon.
Click on the Device
Manager or Hardware tab,
then click on the Device
Manager button.
Click the Plus (+) sign next to
the USB (Universal Serial Bus)
Controller option.
– If USB host controller and
USB root hub are present,
the USB is enabled.
– If they are not present,
read your computer
manual for information
on how to enable a USB
connection.
Problems When Powering On the Printer
Problem
Possible Cause
Corrective Action
The printer does not turn on
when you press the Power
ON/OFF button on the control
panel.
•
When the printer is
powered from the mains
through its transformer:
The transformer’s power cord
is not properly attached to
the printer and/or not
properly plugged into a
working electrical outlet.
1
When the printer is
powered from the car
battery through the car
lighter adapter:
The car lighter adapter is not
properly attached to the
printer and/or to a working
car cigarette lighter socket.
1
When the printer is
powered by rechargeable
batteries:
Six fully charged 2-2.3 Ah
Nickel Cadmium (niCd) or
Nickel Metal Hydride (NiMH)
batteries are not inserted, or
the batteries are not fully
charged.
•
Remove and reinsert the
batteries correctly, or
recharge the batteries.
Specific printer error as signalled
by the indicator.
•
Check the corrective action
for the corresponding
indicator that is explained in
"Meaning of the Indicators
on the Control Panel".
•
•
Individual indicators on the
control panel come on.
2
2
Unplug the transformer’s
power cords from the printer
and from the electrical outlet
and then plug them back in.
If the ON/OFF button is not
illuminated make sure that
the electrical outlet is
working by attaching
another appliance that you
know works into it and then
turn on the appliance.
Unplug the cigarette lighter
adapter from the printer and
from the car socket and then
plug it back in.
Make sure that the car
cigarette lighter socket is
working by attaching
another device (such as a
mobile phone) that you
know works into it and then
turn on the device.
MAINTENANCE AND TROUBLESHOOTING
37
Printing Problems
Problem
Possible Cause
Corrective Action
Your printer does not print when
you click on the Print icon on the
task bar of the application you
are using.
•
1
Your printer is not set as the
default printer.
2
•
Your printer is not properly
connected to the computer.
1
2
The printing stops in the middle
of a print job.
•
The paper is jammed.
1
2
Click Start > Settings >
Printers.
Right-click on your printer’s
icon and select Set as
Default.
Turn off your printer and
computer, and then unplug
the USB cable from these
two devices.
Reattach the USB cable, then
turn on the printer first
followed by your computer.
Clear the paper jam. See
"Clearing Paper Jams".
Press the Cancel button to
reset the error condition. The
print job continues from the
next page.
Horizontal streaks are printed.
•
The ink cartridge is dirty.
•
Clean the ink cartridge. See
"Cleaning the Ink Cartridge
Nozzles".
The printed characters are not
properly defined.
•
The ink cartridge is no longer
aligned.
•
Align the ink cartridge from
your computer. See
"Aligning the Ink Cartridge
From the Toolbox".
Meaning of the Indicators on the Control Panel
38
Problem
Possible Cause
Corrective Action
The out of ink icon on the
control panel is flashing.
•
The ink cartridge is almost
out of ink.
•
You can continue to print
until the icon is illuminated.
The out of ink icon on the
control panel is illuminated.
•
The ink cartridge is out of
ink.
•
Replace the ink cartridge. For
information, see "Replacing
the Ink Cartridge".
The paper error icon on the
control panel is illuminated.
•
You launched a print job and
there is no paper loaded in
the printer.
•
Load paper. For information
see "Loading Paper".
•
The size of the paper that is
loaded does not match the
paper size that you selected
from the Toolbox application
or from the PictBridgecompliant digital camera
connected to the printer.
•
Load the correct paper. For
information see "Loading
Paper".
•
A paper jam has occurred.
•
Clear the paper jam. For
information see "Clearing
Paper Jams".
CHAPTER 5
CLEARING PAPER JAMS
1
2
3
4
Open the printer’s right outer door by pressing the upper centre part of the door to release it, then pull
open the printer’s right inner door.
Firmly grasp the jammed paper and gently pull it out from where it jammed. If the paper tears, make
sure you remove all the torn pieces from the printer.
Close the printer’s left inner and outer doors.
Press the Cancel button on the control panel to clear the error condition.
note: If the paper jam occurred when printing without a computer, the print job will continue from the
next page.
If the jam occurred when using a computer, the pop-up screen displayed allows you to either continue
to print from the next page or to cancel the print job.
MAINTENANCE AND TROUBLESHOOTING
39
40
CHAPTER 5
6TECHNICAL
CHARACTERISTICS
GENERAL SPECIFICATIONS
PRINTER SPECIFICATIONS
PAPER SPECIFICATIONS
TECHNICAL CHARACTERISTICS
41
GENERAL SPECIFICATIONS
General Specifications
Display
1.9" colour Liquid Crystal Display for photo
preview and selection.
Dimensions and weight
•
•
•
•
Height: 90 mm
Width: 220 mm
Depth: 162 mm
Weight: 1.6 Kg
Power source
•
Power transformer plugged into a 100 - 240
Vac, 50-60 Hz electrical outlet.
Car cigarette lighter adapter plugged into a
12V automobile cigarette lighter.
Six 2-2.3 Ah rechargeable Nickel Cadmium
(NiCd) or Nickel Metal Hydride (NiMH)
batteries.
•
•
Power consumption
Maximum 35 W
Connectivity
•
•
Wireless Interface
•
Memory card interfaces
Can accept the following memory card types:
• Compact Flash I, II
• Microdrive
• SmartMedia
• SecureDigital (Mini SD adaptor sold separately)
• MultiMedia card
• Duo, Pro, Magic Gate Memory Sticks
• (MS Pro adaptor sold separately)
• xD-Picture card
Paper feed
•
•
Temperature ranges
42
High-speed USB 2.0 interface for the
connection of a personal computer.
PictBridge-compliant USB 1.1 for the
connection of a digital camera.
Automatic sheet feeder from a paper cassette
capable of holding up to 20 sheets of 280gr/m2
photo paper
Manual feed of a single sheet of plain A4 paper
folded vertically in the middle
•
Operating: 15 °C to 35 °C
Storage: -5 °C to +45 °C (without the ink
cartridge)
Transportation: -15 °C to +55 °C
Humidity ranges
•
•
•
Operating: 15% to 85%, non-condensing
Storage: 15% to 85%, non-condensing
Transportation: 5% to 95%, non-condensing
Software and documentation
•
•
•
•
Printer driver (WIN/MAC)
Toolbox (WIN/MAC)
User Documentation (WIN/MAC)
Additional software (WIN)
CHAPTER 6
•
•
Bluetooth 1.2 Class 2 for connection to
compatible PCs and mobile phones (Bluetooth
model only).
General Specifications
Minimum system requirements for the connected
personal computer
Operating system:
• Microsoft Windows 98 SE, ME, Pentium II 500
MHz, 128 MB RAM, 150 MB HDU
• Microsoft Windows 2000, Pentium III 650 MHz,
128 MB RAM, 200MB HDU
• Microsoft Windows XP, Pentium III 650 MHz,
256 MB RAM, 200MB HDU
• MAC OS 10.3 Power PC G4, 256 MB RAM,
500 MB HDU
Supported files type
DCF, JPEG, Exif, DPOF
PRINTER SPECIFICATIONS
General Specifications
Printing technology
Bubble ink-jet
Printing system
One, disposable 3-colour ink cartridge
Print resolution
•
•
•
1200 x 1200 dpi
4800 x 1200 dpi
1200 x 600 dpi (text-based documents only
received from a computer)
Print speeds
•
1 page/90 sec, very high quality resolution on
A6 size photo paper
1 page/60 sec, high quality resolution on A6
size plain paper
•
Margins
Borderless on photo, coated and glossy paper
PAPER SPECIFICATIONS
Supported Paper Types
Paper type
Paper weight
Maximum feed capacity
10x15 / 4"x6" and A6 Coated
paper
100 to 170 g/m
2
20 sheets
10x15 / 4"x6" and A6 Glossy
paper
160 to 180 g/m2
20 sheets
10x15 / 4"x6" and A6 Cards
paper
130 to 280 g/m2
20 sheets
10x15 / 4"x6" and A6 Photo
paper
170 to 280 g/m2
20 sheets
Dual A6 (A4 Plain paper sheet
folded vertically in the middle)
80 to 90 g/m2
Single sheet manual feed
TECHNICAL CHARACTERISTICS
43
Supported Paper Formats and Sizes
Format
4x6" cards
Size
102 x 152 mm
A6 cards
105 x 148.5 mm
Dual A6 (Folded A4)
105 x 297 mm
10 x 15 cards
105 x 150 mm
note: All of the above paper sizes are automatically detected by the printer.
44
CHAPTER 6
INDEX
A
F
M
Aligning the ink cartridge
from the toolbox 31
Formats supported 43, 44
Memory card 5, 22
card interfaces 42
B
Battery 5
Bluetooth 7, 19
C
Cancel button 7
Carrying your printer 13
Change view button 7
Checking ink levels 28
Cleaning the ink cartridge
nozzles 34
Your Printer 34
Full-Screen Views 16
Views Browse window 16
Views Device icon 16
Views Icon bar 16
Views Image Total field 16
Views Select frame 16
G
General Specifications 42
Connectivity 42
Memory card interfaces 42
Minimum system
requirements 43
Paper feed 42
Software and documentation
42
Wireless Interface 42
Maintenance 33
Meaning of the LED
indicators 38
Minimum system
requirements 43
N
Navigation buttons 7
Nozzles check the quality 34
Ink Cartridge 34
O
Out of ink indicators 6
Clearing paper jams 39
Colour displa 7
Connecting a digital camera
to your printer 11
H
Help 23
Control panel 5,6
Bluetooth 7
Cancel button 7
Change view 7
Colour display 7
Copy selection buttons 7
Navigation buttons 7
Out of ink indicators 6
Page layout 7
Paper error indicator 6
Print button 7
Meaning of the LED Indicators
38
High-speed USB 2.0 42
Connectivity 42
Interface USB 5
Humidity ranges 42
I
Ink cartridge 5
Status Monitor 23
Aligning 31
Aligning from the Toolbox 31
Checking levels 28
Replacing 29
Inserting a memory card 11
Copy selection buttons 7
L
E
Error paper jam has occurred
38
Paper size 38
Loading Paper 9
Paper cassette 8
Single sheet 8
P
Page layout 7
Paper
Cassette 5
Error indicator 6
Exit slot 5
Jam clearing area 5
Feed 42
Specifications 43
Supported 43, 44
Personalise your print
settings 25
Power connector 5
Powering your printer 9
12V car battery power supply
9
Mains electrical power supply
9
Rechargeable NiMH or Nicd
batteries 10
Print button 7
Print photos 22
Printer Specifications 43
INDEX
45
Printing Photos
From a Bluetooth peripheral
19
from your DPOF digital camera
18
from your non-Pictbridge/
DPOF digital camera 19
from your pictbridge digital
camera 18
Printing
From your application using
print properties 24
With the Toolbox print photos
tool 25
Toolbox 22
Help 23
Memory card file transfer 22
Print photos 22
Settings 23
Solutions and assistance 23
Transferring files from a
memory card to your
computer 26
Troubleshooting 33, 35
Turning
Off your printer 10
On your printer 10
Paper Jams 39
Problem
During printer setup 35
Printing 38
When powering on the
printer 37
R
Removing a memory card 12
Replacing the ink
cartridge 29
S
Selecting and printing photos
from your memory card
17
Software and documentation
42
Solutions and assistance 23
Status monitor 23
Error pop-ups 23
W
Wireless interface 42
T
Thumbnail views 17
Browse frame 17
Device icon 17
Icon bar 17
Image total field 17
Photo indicator 17
Select frame 17
Thumbnail grid 17
46
INDEX
U
USB High-speed interface 5
USB 2.0 High-speed 42
Code: 516307