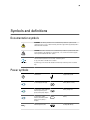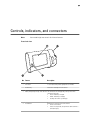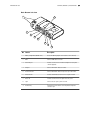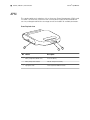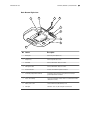
1
Connex® Spot Monitor
Directions for use
© 2015 Welch Allyn. All rights are reserved. To support the intended use of the product described in this publication,
the purchaser of the product is permitted to copy this publication, for internal distribution only, from the media
provided by Welch Allyn. No other use, reproduction, or distribution of this publication, or any part of it, is permitted
without written permission from Welch Allyn. Welch Allyn assumes no responsibility for any injury to anyone, or for
any illegal or improper use of the product, that may result from failure to use this product in accordance with the
instructions, cautions, warnings, or statement of intended use published in this manual.
Welch Allyn, Connex, SureTemp, FlexiPort, and SureBP are registered trademarks of Welch Allyn.
EcoCuff is a trademark of Welch Allyn.
LNCS, ReSposable , SET, LNOP, and Masimo are registered trademarks of Masimo Corporation. Possession or
purchase of a Masimo SpO2-equipped device does not convey any express or implied license to use the device with
unauthorized sensors or cables which would, alone or in combination with this device, fall within the scope of one or
more of the patents relating to this device.
For Masimo patent information, please visit www.masimo.com/patents.htm.
NellcorTM SpO2 Patient Monitoring System with OxiMaxTM Technology and NellcorTM SpO2 OxiMaxTM Technology
are registered trademarks of COVIDIEN LP Covidien Holdings Inc.
Braun and ThermoScan are registered trademarks of Braun GmbH.
Nonin is a registered trademark of Nonin Medical, Inc.
The Bluetooth® word mark and logos are registered trademarks owned by BluetoothSIG, Inc. and any use of such
marks by Welch Allyn is under license.
Software in this product is Copyright 2015 Welch Allyn or its vendors. All rights are reserved. The software is
protected by United States of America copyright laws and international treaty provisions applicable worldwide. Under
such laws, the licensee is entitled to use the copy of the software incorporated with this instrument as intended in
the operation of the product in which it is embedded. The software may not be copied, decompiled, reverseengineered, disassembled, or otherwise reduced to human-perceivable form. This is not a sale of the software or
any copy of the software; all right, title, and ownership of the software remain with Welch Allyn or its vendors.
This product may contain software known as “free” or “open source” software (FOSS). Welch Allyn uses and
supports the use of FOSS. We believe that FOSS makes our products more robust and secure, and gives us and our
customers greater flexibility. To learn more about FOSS that may be used in this product, please visit our FOSS
website at www.welchallyn.com/opensource. Where required, a copy of FOSS source code is available on our FOSS
website.
For patent information, please visit www.welchallyn.com/patents.
For information about any Welch Allyn product, contact your local Welch Allyn representative: www.welchallyn.com/
about/company/locations.htm.
DIR 80019224 Ver. M Revised 2015-10
Welch Allyn, Inc.
4341 State Street Road
Skaneateles Falls, NY 13153 USA
www.welchallyn.com
This manual applies to
901058 Vital Signs Monitor Core.
Regulatory Affairs Representative
Welch Allyn Limited
Navan Business Park
Dublin Road
Navan, County Meath
Republic of Ireland
iii
Contents
Introduction ............................................................................................. 1
Intended use ........................................................................................................ 1
Contraindications ................................................................................................. 1
Symbols and definitions ......................................................................... 3
About warnings and cautions ................................................................ 7
General warnings and cautions ............................................................................ 7
Controls, indicators, and connectors ................................................... 13
Setup ...................................................................................................... 19
Supplies and accessories ................................................................................... 19
Connect the battery ........................................................................................... 19
Mount the monitor ............................................................................................. 20
Attach the probe well and temperature probe ................................................... 21
Remove the temperature probe and probe well ................................................ 22
Connect the NIBP hose ..................................................................................... 22
Disconnect the NIBP hose ................................................................................. 22
Connect the SpO2 cable .................................................................................... 22
Disconnect the SpO2 cable ............................................................................... 22
Attach an accessory ........................................................................................... 22
Detach an accessory .......................................................................................... 23
Disconnect AC power ........................................................................................ 23
Startup .................................................................................................... 25
Power ................................................................................................................. 25
Login methods ................................................................................................... 30
Profiles ............................................................................................................... 31
Common screen functionality ............................................................................ 35
Primary screens ................................................................................................. 36
Pop-up screens .................................................................................................. 39
Navigation .......................................................................................................... 39
Patient data management .................................................................... 43
Load patient data with the barcode scanner ...................................................... 43
Add a patient ...................................................................................................... 43
Manage patient records ..................................................................................... 44
Modifiers ............................................................................................................ 45
Patient list .......................................................................................................... 45
iv
Contents
Connex® Spot Monitor
Alarms .................................................................................................... 47
Vital sign summary view .................................................................................... 47
Alarm limits ........................................................................................................ 47
Alarm reminder signal ........................................................................................ 47
Alarm types ........................................................................................................ 47
Alarm notification locations ................................................................................ 48
Icons on the Home tab ...................................................................................... 48
Reset (pause or turn off) audio alarms ............................................................... 50
Adjust vital sign alarm limits .............................................................................. 51
Modify audio alarm notification .......................................................................... 51
Alarm messages and priorities ........................................................................... 52
Nurse Call ........................................................................................................... 53
Patient monitoring ................................................................................ 55
Required parameters ......................................................................................... 55
Intervals ............................................................................................................. 56
NIBP ................................................................................................................... 59
Temperature ...................................................................................................... 62
SpO2 .................................................................................................................. 71
Modifiers and manual parameters ..................................................................... 76
Configuration tool ............................................................................................... 77
Custom scoring .................................................................................................. 77
Advanced settings ............................................................................................. 77
Maintenance and service ...................................................................... 79
Perform periodic checks .................................................................................... 79
Replace the monitor battery .............................................................................. 79
Replace the APM work surface battery ............................................................. 80
Cleaning requirements ....................................................................................... 81
Troubleshooting .................................................................................... 87
NIBP messages ................................................................................................. 87
SpO2 messages ................................................................................................. 93
Temperature messages ................................................................................... 104
Patient and clinician data messages ................................................................ 113
Radio messages ............................................................................................... 115
Connectivity messages .................................................................................... 120
System messages ........................................................................................... 121
Software update messages ............................................................................. 124
Bluetooth® messages ..................................................................................... 125
APM messages ................................................................................................ 125
Specifications ...................................................................................... 129
Physical specifications ..................................................................................... 129
Environmental specifications ........................................................................... 136
Monitor radio .................................................................................................... 136
Bluetooth® module .......................................................................................... 137
Configuration options ....................................................................................... 138
Standards and compliance ................................................................. 139
General compliance and standards .................................................................. 139
General radio compliance ................................................................................. 140
Directions for use
Contents
v
Guidance and manufacturer's declaration ........................................ 145
EMC compliance .............................................................................................. 145
Emissions and immunity information ............................................................... 145
Appendices .......................................................................................... 149
Approved accessories ...................................................................................... 149
Warranty .......................................................................................................... 157
vi
Contents
Connex® Spot Monitor
1
Introduction
This manual describes the capabilities and operation of the Connex Spot Monitor
(monitor). The information, including the illustrations, pertains to a monitor configured
with noninvasive blood pressure (NIBP), body temperature, pulse oximetry (SpO2), and
pulse rate. If your monitor configuration lacks any of these options, some information in
this manual might not apply.
Before using the monitor, read the sections of the manual that pertain to your use of the
monitor.
Intended use
The Connex Spot Monitors (monitor) are intended to be used by clinicians and medically
qualified personnel for monitoring of noninvasive blood pressure, pulse rate, noninvasive
functional oxygen saturation of arteriolar hemoglobin (SpO2), and body temperature in
normal and axillary modes of neonatal, pediatric and adult patients.
The most likely locations for patients to be monitored are general medical or surgical
floors and general hospital and alternate care environments.
This product is available for sale only upon the order of a physician or licensed health
care professional.
Contraindications
This system is not intended to be used:
•
on patients connected to heart/lung machines
•
on patients being transported outside a healthcare facility
•
near an MRI machine
•
in a hyperbaric chamber
•
near flammable anesthetics
•
near electro-cauterization devices
For contraindications of SpO2 sensors, consult the sensor manufacturer's directions for
use.
2
Introduction
Connex® Spot Monitor
3
Symbols and definitions
Documentation symbols
WARNING The warning statements in this manual identify conditions or practices that
could lead to illness, injury, or death. Warning statements appear with a grey background in
a black and white document.
CAUTION The caution statements in this manual identify conditions or practices that could
result in damage to the equipment or other property, or loss of data. This definition applies
to both yellow and black and white symbols.
Follow instructions/directions for use (DFU) -- mandatory action.
A copy of the DFU is available on this website.
A printed copy of the DFU can be ordered from Welch Allyn for delivery within 7 calendar
days.
Power symbols
Power button
Equipotential ground
(on the display) Power plug
Battery absent or faulty
(on the monitor, green indicator)
Alternating Current power
present, battery fully charged
Battery charge level
(on the monitor, amber
indicator) Alternating Current
power present, battery is
charging
Battery
Alternating Current (AC)
Rechargeable battery
4
Connex® Spot Monitor
Symbols and definitions
Rated power input, DC
Rated power input, AC
Lithium-ion battery
Direct current (DC)
Connectivity symbols
Bluetooth®
Ethernet RJ-45
USB
Nurse call
Wireless signal strength
• Best (4 bars)
• Good (3 bars)
• Fair (2 bars)
• Weak (1 bar)
• No signal (no bars)
• No connection (blank)
Miscellaneous symbols
Manufacturer
Defibrillation-proof Type BF
applied parts
Product Identifier
Serial number
Reorder number
China RoHS markings for control
of pollution caused by electronic
information products. XX
indicates Environmentally
Friendly Use Period in years.
Do not reuse
Recycle the product separate
from other disposables
Nonionizing electromagnetic
radiation
Call for maintenance
Directions for use
Symbols and definitions 5
Light below
FCC ID
IPX1
Prescription only
The identification number
assigned by the Federal Trade
Commission
IC ID
Industry Canada identification
number. The equivalent
governing body to the FCC in the
United States
This end up
Fragile
European Community
Representative
Meets essential requirements of
European Medical Device
Directive 93/42/EEC
IP = International Protection
Marking
X = No object ingress rating
Australian Regulatory
Compliance Mark
1 = Protected against vertically
dripping water
Intertek ETL Listed Mark
indicating successful
independent safety testing
Recycle
Temperature range
Global Trade Identification
Number
Stacking limit by number
Keep dry
Humidity range
Screen symbol
Process indicator for activities like acquiring measurements and
connecting to a laptop
6
Symbols and definitions
Connex® Spot Monitor
7
About warnings and cautions
Warning and caution statements can appear on the monitor, on the packaging, on the
shipping container, or in this document.
The monitor is safe for patients and clinicians when used in accordance with the
instructions and the warning and caution statements presented in this manual.
Before using the monitor, familiarize yourself with the sections of this directions for use
that pertain to your use of the monitor.
WARNING The warning statements in this manual identify conditions or
practices that could lead to illness, injury, or death.
CAUTION The caution statements in this manual identify conditions or
practices that could result in damage to the equipment or other property, or
loss of patient data.
General warnings and cautions
WARNING Patient injury risk. Many environmental variables, including
patient physiology and clinical application, can affect the accuracy and
performance of the monitor. The clinician must verify all vital signs
information before treating the patient. If there is any question about the
accuracy of a measurement, verify the measurement using another
clinically accepted method.
WARNING Patient injury risk. To ensure data integrity and patient
confidentiality, save readings and clear the monitor's display between
patients.
WARNING Personal injury risk. The power cord is the disconnect device to
isolate this equipment from supply mains. Position the equipment so that it
is not difficult to reach or disconnect the cord.
WARNING Patient injury risk. Damaged cords, cables, and accessories can
affect patient and operator safety. Never lift the monitor by the power
supply cord or patient connections. Routinely inspect the AC power cord,
blood pressure cuff, SpO2 cable, and other accessories for strain relief
wear, fraying, or other damage. Replace as necessary.
WARNING Patient injury risk. During defibrillation, keep discharge paddles
away from the monitor ECG lead wires, electrodes, any other monitor
sensors, and other conductive parts in contact with the patient.
8
About warnings and cautions
Connex® Spot Monitor
WARNING Patient injury risk. Any external compression of the blood
pressure hose or cuff may cause patient injury, system errors, or inaccurate
measurements.
WARNING Patient injury risk. Wash hands to reduce the risk of crosscontamination and nosocomial infection.
WARNING Patient injury risk. Do not place the monitor in any position that
might cause it to fall on the patient.
WARNING Patient injury risk. Verify patient identity on the monitor after
manual or barcode entry and before printing or transferring patient records.
Failure to identify the correct patient can result in patient injury.
WARNING Equipment failure and patient injury risk. Do not cover the air
intake or exhaust vents on the rear and base of the monitor. Covering
these vents could cause overheating of the monitor or muffling of alarms.
WARNING This equipment is not suitable for use in the presence of
electro-surgery.
WARNING For operator and patient safety, peripheral equipment and
accessories that can come in direct patient contact must comply with all
applicable safety, EMC, and regulatory requirements.
WARNING Equipment damage and personal injury risk. When transporting
the monitor on a mobile stand, properly secure all patient cables and cords
to keep them clear of the wheels and to minimize trip hazards.
WARNING Equipment damage and personal injury risk. No modifications
to the monitor are allowed by anyone other than a qualified Welch Allyn
service representative. Modification of the monitor could be hazardous to
patients and personnel.
WARNING Fire and explosion hazard. Do not operate the monitor in the
presence of a flammable anesthetic mixture with air, oxygen, or nitrous
oxide; in oxygen-enriched environments; or in any other potentially
explosive environment.
WARNING Fire and shock hazard. Only connect LAN cables contained
within the perimeter of a single building. Conductive LAN cables spanning
multiple buildings may introduce fire or shock hazards unless they are fitted
with fiber optic cables, lightning arresters, or other applicable safety
features.
WARNING Electric shock hazard. This equipment must only be connected
to a supply mains with protective earth.
WARNING Electric shock hazard. Do not open the monitor or attempt
repairs. The monitor has no user-serviceable internal parts. Only perform
routine cleaning and maintenance procedures specifically described in this
manual. Inspection and servicing of internal parts shall only be performed
by qualified service personnel.
Directions for use
About warnings and cautions
9
WARNING Electric shock hazard. All signal input and output (I/O)
connectors are intended for connection of only devices complying with IEC
60601-1, or other IEC standards (for example, IEC 60950), as applicable to
the monitor. Connecting additional devices to the monitor may increase
chassis or patient leakage currents. To maintain operator and patient
safety, consider the requirements of IEC 60601-1-1. Measure the leakage
currents to confirm that no electric shock hazard exists.
WARNING Explosion or contamination hazard. Improper disposal of
batteries may create an explosion or contamination hazard. Never dispose
of batteries in refuse containers. Always recycle batteries accord ing to
local regulations.
WARNING Use the monitor only as described in this directions for use. Do
not use the monitor on patients as described in the Contraindications.
WARNING Alarm limits are patient- or facility-specific. The clinician must
set or verify alarm limits appropriate for each patient. Each time the
monitor is powered on, you must check that the alarm settings are
appropriate for your patient before you start monitoring.
WARNING Inaccurate measurement risk. The monitor is not intended for
use during patient transport outside of the medical facility. Do not use the
monitor to take measurements on any patient in transit.
WARNING Inaccurate measurement risk. Do not connect more than one
patient to a monitor.
WARNING Inaccurate measurement risk. Dust and particle ingress can
affect the accuracy of blood pressure measurements. Use the monitor in
clean environments to ensure measurement accuracy. If you notice dust or
lint build-up on the monitor's vent openings, have the monitor inspected
and cleaned by a qualified service technician.
WARNING Inaccurate measurement risk. Do not expose to temperatures
higher than 122º F (50º C).
WARNING Inaccurate measurement risk. Do not use the monitor on
patients who are on heart-lung machines.
WARNING Inaccurate measurement risk. Do not use the monitor on
patients who are experiencing convulsions or tremors.
10
Connex® Spot Monitor
About warnings and cautions
WARNING Liquids can damage electronics inside the monitor. Prevent
liquids from spilling on the monitor.
If liquids are spilled on the monitor:
1.
2.
3.
4.
Power down the monitor.
Disconnect the power plug.
Remove battery pack from the monitor.
Dry off excess liquid from the monitor.
Note
If liquids possibly entered the monitor, remove the monitor
from use until it has been properly dried, inspected, and
tested by qualified service personnel.
5. Reinstall battery pack.
6. Reconnect the power plug.
7. Power on the monitor and verify that the monitor functions normally before
using it.
WARNING The monitor may not function properly if dropped or damaged.
Protect it from severe impact and shock. Do not use the monitor if you
notice any signs of damage. Qualified service personnel must check any
monitor that is dropped or damaged for proper operation before putting the
monitor back into use.
WARNING Defective batteries can damage the monitor. If the battery
shows any signs of damage or cracking, it must be replaced immediately
and only with a battery approved by Welch Allyn.
WARNING Personal injury risk. Improper handling of the battery can lead
to heat generation, smoke, explosion or fire. Do not short-circuit, crush,
incinerate, or disassemble the battery. Never dispose of batteries in refuse
containers. Always recycle batteries according to national or local
regulations.
WARNING Use only Welch Allyn approved accessories, and use them
according to the manufacturer’s directions for use. Using unapproved
accessories with the monitor can affect patient and operator safety and can
compromise product performance and accuracy, and void the product
warranty.
WARNING Wall mounted equipment and accessories must be installed in
accordance with accompanying instructions. Welch Allyn is not responsible
for the integrity of any installation not performed by authorized Welch Allyn
service personnel. Contact an authorized Welch Allyn service
representative or other qualified service personnel to ensure professional
installation for safety and reliability of any mounting accessory.
WARNING Welch Allyn is not responsible for the integrity of a facility's
power. If the integrity of a facility's power or protective earth conductor is
in doubt, always operate the monitor on battery power alone when it is
attached to a patient.
CAUTION Electric shock hazard. Do not sterilize the monitor. Sterlizing the
monitor could damage the device.
Directions for use
About warnings and cautions
11
CAUTION United States Federal law restricts this monitor to sale,
distribution, or use by or on the order of a physician or licensed healthcare
professional.
CAUTION Electromagnetic interference risk. The monitor complies with
applicable domestic and international standards for electromagnetic
interference. These standards are intended to minimize medical equipment
electromagnetic interference. Although this monitor is not expected to
present problems to other compliant equipment or be affected by other
compliant devices, interference issues still may occur. As a precaution,
avoid using the monitor in close proximity to other equipment. In the event
that equipment interference is observed, relocate the equipment as
necessary or consult manufacturer's directions for use.
CAUTION Do not move the stand while the power source is plugged into
the mains outlet.
CAUTION Do not sterilize the monitor. Sterilizing the monitor could harm
the device.
CAUTION Use only a Class I (grounded) AC power cord to charge the
power source for the monitor.
CAUTION Do not use a long press of
to power down the monitor when
it is functioning normally. You will lose patient data and configuration
settings.
CAUTION Never move the monitor or mobile stand by pulling on any of
the cords. This may cause the monitor to tip over or damage the cord.
Never pull on the power cord when disconnecting the cord from the mains
outlet. When disconnecting the power cord, always grasp the attachment
plug. Keep the cord away from liquids, heat, and sharp edges. Replace the
power cord if the strain relief, cord insulation, or metal prongs are damaged
or begin to separate from the attachment plug.
CAUTION Use only the Welch Allyn USB client cable to connect a laptop
computer to the USB client port. Any laptop connected to the monitor must
be running on a battery, a 60601-1 compliant power supply, or a 60601-1
compliant isolation transformer.
CAUTION If the touchscreen is not responding properly, refer to the
troubleshooting section. If the problem cannot be resolved, discontinue use
of the monitor and contact an authorized Welch Allyn service center or
qualified service personnel.
12
About warnings and cautions
Connex® Spot Monitor
13
Controls, indicators, and connectors
Your model might not contain all of these features.
Note
Front-Left view
No. Feature
Description
1
LCD screen
7" color touchscreen provides a graphical user interface.
2
Thermometry
Secures the SureTemp unit to the monitor
3
Battery charge and power-up status indicator The LED indicates the charging and power-up status when
connected to AC power:
• Green: The battery is charged.
• Amber: The battery is charging.
• Flashing: the monitor is powering up.
4
Power button
Blue button on lower-left corner of the monitor.
• Powers on the monitor
• Places into Sleep mode, except when an alarm condition is
active (brief press)
14
Connex® Spot Monitor
Controls, indicators, and connectors
No. Feature
Description
•
Wakes up the monitor from Sleep mode
Directions for use
Controls, indicators, and connectors
Back-Bottom-Left view
9
1
8
7
6
5
4
3
2
No. Feature
Description
1
Battery compartment (behind cover)
Houses the battery (captive screw secures cover to monitor)
2
NIBP
Connects NIBP cable to monitor
3
USB client port
Provides a connection to an external computer for testing and
software upgrades
4
USB port
Connects APM work surface to monitor
5
Power connection
Connects APM work surface or any accessory to the monitor
6
Ethernet RJ-45
Provides a hardwired connection to the computer network
7
Nurse call
Provides a connection to a hospital nurse call system
8
SpO2
Connects chosen SpO2 system to monitor
9
Thermometry
Configuration shown features SureTemp module and probe
connection port
15
16
Connex® Spot Monitor
Controls, indicators, and connectors
APM
This section applies only to devices with an Accessory Power Management (APM) stand.
The APM is an accessory stand with work surface, power supply for enhanced device
run time, and organizational bins to arrange sensors and cables for available parameters.
Front-Top-Left view
1
2
No. Feature
3
Description
1
Battery compartment (behind cover)
Houses the battery
2
Battery charge status indicator
Indicates charge level of battery
3
Light power switch
Powers light under APM work surface
Directions for use
Controls, indicators, and connectors
Back-Bottom-Right view
1
2
3
4
5
6
7
8
9
No. Feature
Description
1
Printer port
Connect a printer (future use)
2
USB ports (2)
Connect optional accessories
3
USB cable
Connects APM work surface to monitor
4
APM power cable
Connects APM work surface to monitor
5
Power connection
Provides an external AC power connection
6
Ground lug (equipotential terminal)
Provided for electrical safety testing and for connecting a
potential-equalization conductor
7
Recess for mounting
Secures the APM work surface when it is mounted on the APM
stand (with 4 screws)
8
Battery cover screw
Secures APM work surface battery cover
9
APM light
Illuminates accessory bins and path for APM stand
17
18
Controls, indicators, and connectors
Connex® Spot Monitor
19
Setup
Supplies and accessories
For a list of all approved supplies and accessories, see Approved Accessories in the
Appendices.
WARNING Patient injury risk. Clean all accessories, including cables and
tubes, before storing the accessories on the device or cart. This helps
reduce the risk of cross contamination and nosocomial infection. Refer to
'Clean the equipment' in "Maintenance and service" for directions.
Connect the battery
This procedure applies to first-time setup of the monitor. The battery is inserted in the
battery compartment when you receive a new monitor. However, it is not connected.
WARNING Personal injury risk. Improper handling of the battery can lead
to heat generation, smoke, explosion, or fire. Do not short-circuit, crush,
incinerate, or disassemble the battery. Never dispose of batteries in refuse
containers. Always recycle batteries according to national or local
regulations.
WARNING
Use only Welch Allyn approved accessories, and use them according to the
manufacturer’s directions for use. Using unapproved accessories with the
monitor can affect patient and operator safety and can compromise product
performance and accuracy, and void the product warranty.
1. Turn the monitor screen down to access the battery cover.
2. Locate the battery cover, indicated by
on the back of the monitor.
3. Using a double-slotted screwdriver, loosen the captive screw at the base of the
battery cover, and then remove the cover.
4. Remove the battery to access the battery connection port on the monitor.
5. Insert the battery connector into the battery connection port on the monitor.
6. Insert the battery into the battery compartment.
7. Replace the battery cover, and then tighten the captive screw at the bottom of the
battery cover.
Note
Do not over-tighten the screw.
Connex® Spot Monitor
20 Setup
Mount the monitor
The Connex Spot Monitor can be mounted on either the MS3 Connex Spot Classic
Mobile Stand, Accessory Power Management (APM) stand, or wall mount. When
mounted on an MS3 stand, a separate power supply is required. This power supply
connects directly to the mains outlet. Follow the assembly instructions or directions
for use included with your stand or wall mount. If you have an APM stand, follow all
instructions regarding the equipotential terminal.
Connect AC power to a power source
You can use the monitor with power from the mains outlet. Battery power can be used
after charging the battery.
Refer to the AC power directions in the Instructions for use that accompanied the
stand to which you are mounting your monitor.
Connect AC power to APM and monitor
To connect the monitor to the APM stand, refer to the APM Assembly instructions.
Directions for use
Setup
Connect AC power to MS3 Classic stand and monitor
This section applies only to devices with Classic (MS3) stands.
1. Thread the power cable from the power supply through one of the spaces next to
the pole to reach the monitor.
2. Attach the power supply to the underside of the basket using the 2 Phillips screws
provided.
3. Connect the power cable to the monitor.
4. Connect the power cord to the mains outlet.
5. Power up the monitor.
Attach the probe well and temperature probe
1. Align the slots on the monitor and probe well, and slide the probe well onto the
monitor.
The probe well snaps into place when it is fully seated.
2. On the underside of the probe well, attach the SureTemp probe connector.
3. Insert the SureTemp probe into the probe well.
4. In the compartment to the left of the probe well, insert a Welch Allyn probe cover
carton.
Additional cartons of probe covers can be stored in the lower compartments of the
cart if a cart is used.
21
22
Connex® Spot Monitor
Setup
Remove the temperature probe and probe well
Follow these steps to disconnect the probe cable and remove the probe well.
1. On the underside of the probe well, press the spring tab on the SureTemp probe
connector and pull it out of the probe well.
2. Remove the SureTemp probe from the probe well.
3. Grasp the probe well and pull it up to remove it from the monitor.
Connect the NIBP hose
1. Place your thumb and forefinger on the hose connector spring tabs and squeeze
firmly.
2. Align the hose connector with the hose connector port on the bottom of the monitor.
3. Insert the hose connector, pressing firmly until both of the spring tabs click into
place.
Disconnect the NIBP hose
1. Place your thumb and forefinger on the hose connector spring tabs.
Note
Always grasp the hose by the connector spring tabs. Do not
pull on the hose itself.
2. Squeeze and pull the spring tabs until the connector releases.
Connect the SpO2 cable
WARNING Patient injury risk. Do not use a damaged sensor or pulse
oximetry cable or a sensor with exposed electrical or optical components.
1. On the bottom of the monitor, align the SpO2 cable connector with the cable
connector port.
2. Insert the cable connector, pressing firmly until the connector is seated.
Disconnect the SpO2 cable
1. Place your thumb and forefinger on the Sp02 cable connector. Do not grasp the
cable.
2. Pull the Sp02 cable connector out of the connector port.
Attach an accessory
CAUTION Accessories attached to this monitor must run on battery
power. Do not use any accessory's external power supply when it is
attached to the monitor.
To attach an accessory to the monitor, follow the Directions for use that
accompanied the accessory.
Directions for use
Setup
23
CAUTION Connect cables in a manner that minimizes
entangling.
Detach an accessory
To detach an accessory from the monitor, follow the instructions that accompanied
the accessory.
Disconnect AC power
CAUTION Never move the monitor or mobile stand by pulling on any of
the cords. This may cause the monitor to tip over or damage the cord.
Never pull on the power cord when disconnecting the cord from the mains
outlet. When disconnecting the power cord, always grasp the attachment
plug. Keep the cord away from liquids, heat, and sharp edges. Replace the
power cord if the strain relief, cord insulation, or metal prongs are damaged
or begin to separate from the attachment plug.
1. Grasp the attachment plug.
2. Pull the attachment plug from the mains outlet.
24
Setup
Connex® Spot Monitor
25
Startup
Power
The Power button, located on the lower-left corner of the monitor, performs multiple
functions.
•
Powers up the monitor
•
Wakes the monitor from Sleep mode
•
Opens a pop-up dialog with controls to sign out, power down, and enter Sleep mode
(except when an alarm condition is active)
CAUTION Do not use a long press of the Power button to power down
the monitor when it is functioning normally. You will lose patient data and
configuration settings. Touch the Settings > Device tabs to power down
the monitor.
The LED in the center of the power plug symbol indicates the battery charging status.
•
Green indicates that AC power is present and that the battery is fully charged.
•
Amber indicates that AC power is present and that the battery is charging.
Power up the monitor
The monitor runs a brief diagnostic self-test each time it powers up. If an alarm situation
occurs, the alert appears in the Status area.
WARNING To ensure patient safety, listen for two audible indicators (a
beeper and a speaker tone) and watch for visual alerts at power-up at least
once daily. Correct any system errors before using the monitor. In addition
to the audible indicators, the screen Status area displays color coding,
icons, and messages that help you to distinguish clinical priority and
actions, if needed.
Type of alert
Color
High Alarm
Red
Medium Alarm
Flashing amber
26
Connex® Spot Monitor
Startup
Type of alert
Color
Low Alarm
Steady amber
Very Low Alarm
Cyan
Information message
Blue
WARNING Steady amber indicates a low-level alarm. Flashing amber
indicates a medium-level alarm. Flashing red indicates a high-level alarm.
WARNING Always observe the monitor during power-up. If any display
fails to illuminate properly, or if a system fault code or message displays,
inform qualified service personnel immediately, or call your nearest Welch
Allyn Customer Service or Technical Support facility. Do not use the
monitor until the problem is corrected.
CAUTION Always use the monitor with an adequately charged and
properly functioning battery.
CAUTION During intervals monitoring, keep the monitor connected to AC
power at all times.
CAUTION Use only a Class I (grounded) AC power cord to charge the
battery for this monitor.
Press
to power up the monitor.
When the device is powering up, the LED flashes until the monitor displays the
Welch Allyn logo and a power-up tone sounds.
A pop-up screen appears, depending on your configuration and functionality.
•
On initial power-up, the monitor prompts you to set the language, date, and time.
See “Change the language” and “Set the date and time” for directions.
•
If your facility has chosen a login format, then the first image you see is the login
screen.
•
If your facility has not chosen a login format, then the first image you see is the
Home tab.
•
If Bluetooth® is enabled, a list of paired devices and the option to add a new device
is available.
Bluetooth® wireless technology
Bluetooth wireless technology is available in the Office profile.
Bluetooth status
A monitor with Bluetooth wireless technology displays the status between the monitor
and the laptop in the Status area.
Image
Description
No image
Bluetooth radio is OFF
Directions for use
Startup
Image
Description
Bluetooth icon appears in Status area
Bluetooth radio is ON
Bluetooth icon is blinking on / off slowly
The monitor is pairing with the laptop
Bluetooth icon is blinking on / off quickly
The monitor is connecting with the laptop
Bluetooth icon appears with a border around the icon in
the Status area
The monitor and the laptop are connected and the
monitor is ready to transmit data
27
In order to transmit data, you must first pair and then connect the monitor and the
laptop.
Pair devices with Bluetooth wireless technology
When a monitor with Bluetooth wireless technology powers on and there are laptops
already paired with the monitor, a pop-up screen appears showing the laptops available
for connection with the monitor. Follow the directions below to pair an additional device
with the monitor.
1. Touch
.
2. Touch Add new device.
3. In your Bluetooth program manager on your laptop task bar, select the monitor from
the list of available devices.
A message appears indicating that the monitor has been discovered and displays a
confirmation number on both the laptop and monitor screens.
4. Confirm that the numbers match on the laptop and on the monitor, and then touch
Accept.
A message appears indicating that the monitor and laptop are paired.
5. Touch OK.
A screen appears that allows you to change the laptop name to a preferred name.
6. Enter the preferred name, and then touch Save.
The new name appears in the list of paired devices.
Connect devices with Bluetooth wireless technology and download data
1. In the Bluetooth connection screen, select a laptop from the list of paired devices.
The Bluetooth icon in the Device Status area quickly blinks on and off as the monitor
and laptop are connecting.
When the monitor and the laptop connect, an information message briefly appears
that names the connected laptop. When the message disappears, the name of the
connected laptop appears on the top left of the screen, and the Bluetooth connected
icon appears in the connection area.
2. As the laptop downloads data, the progress indicator spins in the connection area.
The Bluetooth connection remains active until the download is complete. After a
successful download, the system clears data from the monitor and disconnects the
monitor from the laptop.
28
Connex® Spot Monitor
Startup
3. Repeat the process as needed, or touch Cancel to dismiss the Bluetooth connection
screen.
Rename a laptop
You can rename a paired laptop from a system or generic name to a specific name.
1. Select the arrow button to the right of the laptop name you want to edit in the paired
list.
A screen appears that allows you to change the laptop name to a preferred name.
2. Enter the name, and then touch Save.
The new name appears in the list of paired devices.
Set the date and time
Depending on your facility's configuration, the date and time may already be set. If the
time is set in the network configuration, the network time overrides any manual time
that is set.
1. Touch the Settings tab.
2. Touch the Date / Time vertical tab.
3. Touch either the ▲ or ▼ keys or the the key pad, set the date and time.
4. Touch Set Time.
You must touch Set Time when setting the date, time, or both the date and time.
The date and time stamps on saved patient measurements
will adjust when you change the date and time settings.
Note
Change the language
Refer to “Advanced Settings” in the Service manual for instructions on how to change
the language.
Power down the monitor
If you power down the monitor using the
button, patient measurements are retained
in the monitor memory for a maximum of 24 hours. These saved measurements are
available for recall or electronic transmission to the network. This method also ensures
that any configuration settings you have changed and saved will be maintained at the
next startup.
1. Press
.
If there is a software update available, then a system message asks if you want to
upgrade the software.
2. If you want to upgrade the software, touch OK.
3. If there is no system message, a dialog box appears with options.
•
Sign out (if you signed in with a Clinician ID)
•
Power down
•
Sleep
•
Cancel
Directions for use
Startup 29
4. Touch one of the options.
The monitor will either sign you out as a clinician so that another clinician can sign in,
power down, go into Sleep mode, or return to the prior screen, depending on the
option you choose. The battery continues to charge when in Sleep mode.
Reset the monitor
1. If the monitor stops functioning, press and hold
of the monitor, to reset the monitor.
, located on the lower-left corner
2. If there is a prompt with options to power down, Sleep, or Cancel, continue to press
.
The monitor performs a power reset.
CAUTION Do not use a long press of
to power down the monitor when
it is functioning normally. You will lose patient data and configuration
settings. See “Power down the monitor” to power down the monitor.
Sleep mode
After a configurable amount of time, the monitor enters sleep mode. Different types of
inactivity have different time delays.
•
When a configurable amount of time has passed since the last screen press
•
The sensor modules are not being used to capture vitals
•
If the monitor does not have an active alarm
The monitor does not enter sleep mode when it is in Intervals monitoring.
Three situations cause the monitor to leave sleep mode.
•
The power button is pressed.
•
The screen is tapped.
•
An alarm occurs.
Enter Sleep mode
1. Press
.
2. If there is no system message, a dialog box appears with options.
•
Sign out (if you signed in with a Clinician ID)
•
Power down
•
Sleep
•
Cancel
3. Touch Sleep.
The monitor enters Sleep mode.
Connex® Spot Monitor
30 Startup
Exit Sleep mode
1. Press either
or tap the screen.
The Login dialog box appears.
2. If you are the current user and are in a facility-specific login format, use the scanner
or keypad to enter your ID and password.
If you are logging back into the monitor, the monitor returns to the screen that
previously was visible, keeps the patient's context, and maintains the vital signs that
could have been previously captured.
3. If you are a new user, use the barcode scanner or keypad to enter your ID and
password.
Login methods
You can sign in to the monitor in two ways:
•
By signing in on the login screen if your facility has chosen a login format.
•
By signing in on the Clinician tab if your facility has not chosen a login format.
Sign in using the login screen
1. Using the keyboard or the barcode scanner, enter your ID and password in the
respective fields, and then touch Sign in.
The Profile selection area becomes active and contains from one to three profiles.
2. From the profiles displayed for your level of permissions, select the desired profile.
The Home tab for the chosen profile appears.
Sign in using the Clinician tab
1. Touch the Settings > Clinician tabs.
2. Using the keyboard or the barcode scanner, enter your ID and password in the
respective fields, and then touch Sign in.
Directions for use
Startup
31
The Clinician ID appears in the Clinician ID field on this tab and in the Status area on
the Home tab.
Use a barcode scanner
The monitor enables the scanning of patient and clinician barcodes to enter ID
information. The barcode scanner (scanner) supports linear and two-dimensional
barcodes.
If you have not done so previously, use the instructions provided with the scanner to
attach the scanner to the monitor.
Note
Refer to the manufacturer's instructions to ensure that the scanner is set
to USB Com Emulation mode. Confirm the type of EMR version being used
by your facility.
1. Remove the scanner from its holder.
2. Hold the scanner approximately 6 inches (15.4 cm) from the barcode and squeeze
the scanner trigger so that the light from the scanner appears on the barcode.
Once the scanner completes a successful barcode reading, the ID appears in the
targeted area (Patient frame, data field, or Device Status area). See the additional
notes below.
If the scanner has difficulty reading the barcode, slowly adjust the distance and the
angle between the scanner and the barcode while squeezing the scanner trigger. If it
continues to have difficulty, verify that the barcode is as flat as possible.
Note
You can scan a patient's barcode from the Home tab. The scanned ID
appears in the Patient frame on the Home tab.
Note
Scanning a clinician ID while the Clinician ID pane is open places the
scanned ID into the Clinician ID section of the Device Status area. Touch
OK to return to the Home tab and to begin obtaining patient
measurements.
Profiles
The monitor offers multiple profiles, including Spot, Office, and Intervals.
Spot profile
The Spot profile is optimized for rapid multi-patient vitals capture with custom and
additional parameters, facility-specific login format, vital sign capture, and multiple
patient review.
The Spot profile Home tab displays the following parameters and features:
•
NIBP
•
Pulse rate
•
Respiration rate
•
Temperature
•
SpO2
•
Custom scores
•
Additional parameters
32
Connex® Spot Monitor
Startup
•
WiFi and ethernet capability
Configurable parameters can be accessed in the Spot profile on the Home tab by
touching relative parameter.
Office profile
The Office profile is optimized for ambulatory vitals capture with external patient context
and optional Bluetooth® functionality.
The Office profile Home tab displays the following parameters and features:
•
NIBP
•
Pulse rate
•
Temperature
•
SpO2
•
BMI
•
Height, weight, pain
•
USB and Bluetooth® capability
Startup
Directions for use
Intervals profile
The Intervals profile is optimized for unattended episodic interval monitoring of a single
patient with single patient review and alarms.
The Intervals profile Home tab displays the following parameters and features:
•
NIBP
•
Pulse rate
•
Respiration rate
•
Temperature
•
SpO2
•
Alarms
•
Custom scores
•
Additional parameters
•
WiFi and ethernet capability
Configurable parameters can be accessed in the Intervals profile on the Home tab by
touching relative parameter.
33
34
Connex® Spot Monitor
Startup
Profile feature comparison
The monitor offers multiple profiles, including Spot, Office, and Interval.
Profile feature comparison
The following table compares the features of the profiles.
Feature
Spot
Office
Intervals
Configure and use interval
timing setting
X
Observe and configure alarm
limits
X
Observe and respond to
physiological alarms
X
Access Alarms tab
X
Take NIBP, SpO2,
X
temperature, and pulse rate
readings
X
X
Change patient type (adult,
pediatric, neonate)
X
X
X
View and enter manual
temperatures (height,
weight, pain, respiration,
temperature and BMI)1
X
X
X
Save currently displayed data X
to device memory
X
X
Save patient data
X
X
X
Review patient data
X
X
X
Access Patients tab
X
X
X
Access Review tab
X
X
X
Access Settings tab
X
X
X
1Braun IR thermometers configured to work with the monitor transfer temperature data automatically to the
temperature frame. You can enter the temperature manually if you take a patient temperature with a
thermometer that is not connected to the monitor, and you have selected temperature as one of the four
manual parameters to display.
Directions for use
Startup 35
Select a profile from the log in area
If your facility has configured the Connex Spot Monitors with a facility-specific format,
the Log in screen appears when the monitor is powered up
1. Sign in to the monitor.
The Profile selection screen appears and displays up to three profiles.
2. Touch the desired profile.
The Home tab appears for the chosen profile.
If you change the profile while acquiring patient measurements or while unsaved patient
measurements are displayed, the measurements are deleted.
Change a profile
1. Touch the Settings tab.
2. Touch the Profiles vertical tab.
3. Touch the desired profile.
The corresponding Home tab appears.
Profiles cannot be changed while acquiring patient measurements or while unsaved
patient measurements are on the screen.
Common screen functionality
Many parameter areas on the screen allow you to enter data. Touch an icon to perform
the function noted.
Icon
Description
Numeric keypad for entering numeric information.
Alphanumeric keyboard for entering both alpha and
numeric information.
Shift key enters the next letter touched as uppercase.
Data field in which data is entered.
Back key to delete data starting at the right side of the
data being entered.
Next key captures the data entered, clears the data field,
and advances to the next data field for data entry.
36
Connex® Spot Monitor
Startup
Icon
Description
OK key captures entered data and closes keypad or
keyboard being used to enter data.
Cancel key closes the keypad or keyboard without
capturing entered data.
Alpha key in the upper-left corner returns the keyboard to
the basic alpha layout.
Symbol key in the upper-left corner changes the keyboard
from the basic alpha layout to the symbols and special
characters layout.
Diacritical marks key in the upper-left corner changes
the keyboard from the basic alpha layout and displays
diacritical marks for the selected language.
Primary screens
The monitor has primary screens and pop-up screens.
The primary screens have three sections:
Item
Description
1 Status
Status area appears at the top of the screen and includes information regarding system-wide
features.
2 Content
The Content area displays information determined by the primary — or global — navigation
tab chosen at the bottom of the screen. The content area also might have vertical tabs on the
left side of the screen that relate to the primary navigation tab chosen. It also can display
summary information on current vital signs.
Directions for use
Startup 37
Item
Description
3 Primary navigation Based on which profile is in use, the primary navigation tabs for that profile appear at the
bottom of the screen.
Battery status
The battery status indicator displays the state of the battery.
The battery status is represented by icons in the upper-right corner of the monitor
display. The status represents several possible situations.
•
The monitor is connected to a power source and the battery is charging or is fully
charged. The estimated charge rate is displayed as a percentage of capacity.
•
The monitor is not connected to a power source and is running on battery power.
The estimated charge time remaining, representing all available batteries in the
monitor and stand, is shown by a series of 1–4 bars and hours/minutes:
•
The monitor is connected to a power source but the battery does not maintain a
charge (or has been removed).
Bars
Description
4
Running on battery, battery charge is high; 76% - 100%; display time remaining (HH:MM)
3
Running on battery, battery charge is medium; 51% - 75%; display time remaining (HH:MM)
2
Running on battery, battery charge is low; 26% - 50%; display time remaining (HH:MM)
1
Running on battery, battery charge is very low; 11% - 25%; display time remaining (HH:MM)
When the battery is not being recharged and power becomes low, an amber, low-priority
alarm appears in the Status area.
Note
Monitor the remaining battery charge in the battery status indicator and
plug the monitor into a power outlet as soon as you are able.
If the low-priority alarm is dismissed or if you take no action to charge the battery, a red,
high-priority alarm appears and sounds when battery power is critically low. Plug the
monitor into a power outlet immediately to prevent the monitor from powering down.
38
Connex® Spot Monitor
Startup
Alarm and information messages
The Device Status area provides alarm and information messages that are either
temporary or exist as long as the condition to which the message applies remains. Alarm
or information messages may also include controls or behavior that you can use to
manage alarm and information messages.
When the monitor detects an alarm condition, the vitals frame relating to the alarm
flashes and an alarm message appears. When multiple alarms occur, the highest priority
message appears first. You can cycle through each alarm message by touching the
multiple alarm toggle.
Information messages instruct you to interact with the monitor in a specific way or
provide information that does not require action. You can dismiss an information
message by selecting the control associated with the message or waiting for the
message to time out.
Screen lock mode
The screen lock blocks the display of patient information and prevents any input, which
may be useful when cleaning the display.
The screen locks when any of the following occur:
•
You touch Display lock.
•
There is no interaction with the monitor for the period specified in the Settings tab.
An authorized person can access the Advanced Settings tab to set or change the
time specified for the screen lock to be triggered.
Lock the screen
Follow these steps to touch the screen without activating the controls.
1. Touch the battery icon in the Status area or touch the Settings tab.
2. Touch the Device vertical tab.
3. Touch Display lock.
The screen can also be configured to automatically lock after a pre-determined time of
inactivity. See “Configuration Settings” for further directions.
Unlock the screen
If a Clinician ID login format has been configured for your site, follow the
steps below. Otherwise, simply touch the lock icon to unlock the screen.
1. Using the barcode scanner or keypad, enter your ID or scan your ID and password.
2. Follow the onscreen prompts to unlock the screen.
A user logs on to the device, by either scanning or manually entering their ID and
password. When a new user attempts to log onto the device, a dialog box appears:
"Would you like to log the current user, XXX, out?"
If the new user selects No, then the initial user remains logged on. The new user can
use the device, but the initial user is shown as logged on. If the new user selects OK,
then the initial user is logged out, and the new user is logged on and taken to the Home
screen.
Directions for use
Startup
39
Manual entry and parameter modifiers
You can change parameters manually by toggling between parameter values or using a
pop-up screen to enter specific values.
Change a parameter unit
The units of measure for NIBP can be manually changed on the Home tab.
Touch the NIBP frame.
The NIBP changes between SYS/DIA and MAP.
Note
An authorized person can change the temperature unit of
measure in Advanced settings.
Change a frame manually
1. Press and hold a frame, such as NIBP.
A pop-up dialog box appears.
2. Manually enter the value.
3. Touch OK.
The manual value appears in the frame on the screen.
Pop-up screens
When a pop-up screen appears, you cannot access any buttons or controls on the screen
behind the pop-up. The specified action on the pop-up screen must be accomplished or,
if allowed, actively dismissed or canceled, before other screens become active.
There are instances when multiple, layered pop-up screens occur. In these instances,
only the top pop-up screen is accessible. The specified action on the top pop-up screen
must be accomplished or, if allowed, actively dismissed or canceled, before the pop-up
screen behind becomes active.
Navigation
There are four types of navigation in the monitor:
•
Primary tabs
•
Vertical tabs
•
Command buttons
•
Shortcuts
Primary tabs
The primary tabs at the bottom of the screen enable you to switch between tabs and
change the controls in the content area on the monitor. The profile you choose
determines which tabs are available. The tab you choose determines what information
appears on the screen. The five primary tabs are
•
Home
40
Connex® Spot Monitor
Startup
•
Patient
•
Alarms
•
Review
•
Settings
Vertical tabs
The vertical tabs on the left side of the screen enable you to navigate to additional areas
of a primary tab. The vertical tabs displayed are determined by the primary tab chosen.
Command buttons
Command buttons, such as the Start Intervals button, enable you to navigate and
perform actions.
Shortcuts
Shortcuts provide an efficient means of navigation. For example, touching the battery
area in the status bar enables you to navigate to Settings [Settings > Device > Date/
Time] and displays more information about that portion of the monitor.
Home tab
The Home tab displays patient information.
•
Status area, including alarm status and battery status
•
Patient area, including name and ID
•
NIBP
•
SpO2
•
Pulse rate
•
Temperature
•
Action area, including Clear and Save
Patient tab
The Patient tab may contain the Patient Summary screen or the Patient List.
•
Patient name
•
Patient location
•
Patient ID
•
Patient type
•
Action area, including OK and Cancel.
Directions for use
Startup 41
Alarms tab
The Alarms tab contains vertical tabs.
•
General
•
NIBP
•
Pulse rate
•
SpO2
•
Temperature.
The General tab contains parameter controls for alarm limits, volume controls, audio
controls, and alarm reset.
Review tab
The Review tab displays patient data that has been previously captured. Data can be
viewed for a single patient or for multiple patients. The Review tab displays both core
and custom parameters and also provides controls.
•
Patient name
•
Date / Time
•
Core vital signs
•
Custom parameters
•
Controls, including View, Send and Delete
Settings tab
The Settings tab enables you to edit certain device functions. It contains vertical
navigation tabs.
•
Intervals
•
Profiles
•
Device
•
Date / Time
•
Clinician
•
Advanced (this vertical tab is password protected and available only to authorized
personnel)
Adjust screen brightness
The screen can be adjusted to 10 levels of brightness. Adjust screen brightness in the
Device tab in Settings.
1. On the Settings tab, touch Device.
2. In the Brightness area, touch ▲ or ▼ to brighten or dim the screen.
42
Startup
Connex® Spot Monitor
43
Patient data management
Patient data is managed through the Patient tab.
From the Patient tab, you can do the following:
•
Scan a patient ID with the barcode scanner and return an Admit/Discharge/Transfer
(ADT) patient name match.
•
Enter additional patient information.
•
Retrieve and use a patient list.
WARNING Patient injury risk. To ensure data integrity and patient
confidentiality, save readings and clear the monitor's display between
patients.
WARNING Verify patient identity on the monitor after manual or barcode
entry and before saving or transferring patient records. Failure to identify
the correct patient can result in patient injury.
Load patient data with the barcode scanner
You can use a barcode scanner to query existing patient records and perform an ADT
patient name match.
Note
If the monitor is connected to the network, the monitor can receive a
patient name from patient records associated with a scanned ID number.
WARNING Patient injury risk. Verify patient identity on the monitor after
manual or barcode entry and before printing or transferring patient records.
Failure to identify the correct patient can result in patient injury.
1. Confirm that you are on the Home tab.
2. Scan the patient's barcode with the barcode scanner.
The Patient ID appears in the Patient frame.
If a barcode scanner is not available or not functional, manually enter the patient
information using the screen keyboard.
Add a patient
Note
This option is available in the Spot and Intervals profiles.
44
Connex® Spot Monitor
Patient data management
1. Touch the Patient tab.
2. Touch
in any field and then enter patient information.
3. Touch Next to cycle through the patient data fields.
Note
You can use a barcode scanner to enter a patient ID in the
Patient ID field. Touch
the barcode, and touch OK.
in the Patient ID field, scan
4. Touch OK to save and return to the Home tab.
Manage patient records
Patient records can be sent to the network or deleted.
1. Touch the Review tab.
Note
Measurements that triggered a physiological alarm are
highlighted on this tab.
2. Select patients by touching the check box next to their names.
3. Touch Send to transmit the records to the network or Delete to permanently
remove the records as desired.
CAUTION Verify patient identity on the monitor after
manual or barcode entry and before transferring patient
records.
Note
The
icon indicates the records have been sent to the
network.
Note
You can configure the Intervals profile, to automatically send
measurements to the network.
Note
Patient measurements older than 24 hours are automatically
deleted from the patient records list on the Review tab.
Directions for use
Patient data management
45
Modifying the date and time on the device modifies the date
and time on all saved readings on the device.
Note
Modifiers
The Modifiers tab enables you to enter additional information for current measurements.
Set modifiers
1. Touch the Patient tab.
2. Touch the Modifiers tab.
3. Adjust the NIBP, SpO2, and temperature settings as required.
4. Touch OK to accept the changes and return to the Home tab or touch Clear to
delete all entries.
The Modifier settings clear after a power cycle, after you clear or save the Home tab,
or after you select a new patient.
Patient list
From the Patient List screen, you can do the following:
•
Retrieve a patient list from the network (for example, electronic medical records
(EMR) or a central station).
•
Select a patient from the list.
•
Manually create a patient record.
•
Search Patient List
Warning Patient injury risk. Verify patient identity on the monitor after
manual or barcode entry and before printing or transferring patient records.
Failure to identify the correct patient can result in patient injury.
Select a patient
The options for selecting previously stored patients from the List tab vary based on the
following conditions:
•
Active profile
•
Established patient context
•
Connection to a network
•
Connection to a central station
Based on the boldface text presented, follow the steps below that apply to your patient
and the device.
1. In all profiles but Office, when patient context has not been established on the
device:
a.
Touch the Patient tab.
The Patient List screen appears.
46
Connex® Spot Monitor
Patient data management
b. If the monitor is connected to the network, touch Retrieve list to update the
onscreen patient list.
The monitor retrieves the patient list from the network.
c.
Touch the patient's identifier (name, ID number, or location) you want to select.
Note
Patient data can be sorted in ascending or descending
order by selecting the heading row and touching ▲ or
▼. If a sort marker does not appear in a column, touch
the heading, and the ▲ appears.
d. On the Patient Summary screen, touch OK .
The selected patient's identifier appears on the Home tab.
Note
The Patient Summary screen is not editable; however,
the patient type can be changed.
Note
Patients can be filtered using the search field by entering
a patient identifier (name, ID number, or location).
2. In all profiles but Office, to establish a onetime patient context:
a.
Touch the Patient tab.
The List tab appears.
b. Touch New Patient to view patient summary screen.
c.
Touch
in any field, and then enter patient information.
d. Touch Next to cycle through the patient data fields.
e. Touch OK to save and return to the Home tab.
3. In all profiles but Office, when patient context has been established on the
device and you want to select a different patient (change patient context):
a.
Touch the Patient tab.
The Summary screen appears.
b. Touch the List button.
c.
If the monitor is connected to the network, touch Retrieve list to update the
onscreen patient list.
The monitor retrieves the patient list from the network.
d. Touch the patient identifier (name, ID number, or location) you want to select.
Note
Patient data can be sorted in ascending or descending
order by selecting the heading row and touching ▲ or
▼. If a sort marker does not appear in a column, touch
the heading, and the ▲ appears.
e. Touch OK on the Patient Summary screen.
The selected patient's identifier appears on the Home tab.
Note
All displayed patient measurements and configuration
settings are cleared.
47
Alarms
The monitor presents physiological alarms and technical alarms. Physiological alarms
occur when vital sign measurements fall outside of set alarm limits, but they occur only
in the Intervals profile. Technical alarms occur in all profiles.
If the alarm system is powered down, the alarm log is maintained on the monitor for 14
days.
Note
The three modes of data communication—USB, Ethernet, and IEEE 802.11
—are not intended for real-time alarms.
Vital sign summary view
At the top of the Alarms tab is a summary view of the core vital signs.
You cannot control any of the core vital sign parameters from the summary view.
Alarm limits
Default alarm limits are determined by the facility and are incorporated in the
configuration file. Only authorized facility personnel can edit these limits.
Alarm reminder signal
An alarm reminder signal appears for all alarms if the global alarm audio has been paused
or turned off. The reminder signal interval is the same as the alarm interval with which it
appears.
Alarm types
Type
Priority
Color
Alarm audio tone
•
•
•
NIBP or SpO2 limit exceeded
Some technical alarms
Pulse rate limit exceeded
High
Red
10-pulse tone
•
Some technical alarms
Medium
Amber
3-pulse tone
•
Temperature limit exceeded
Low
Amber
2-pulse tone or 1-pulse tone
48
Connex® Spot Monitor
Alarms
Type
•
Priority
Color
Alarm audio tone
Some technical alarms
Alarm notification locations
WARNING Patient injury risk. If you are relying on visual alarm
notifications, maintain a clear line of sight with the monitor and/or Nurse
Call. Set the volume as needed considering the environment and ambient
noise levels.
WARNING Patient injury risk. Do not set the alarm parameters to extreme
levels. Setting extreme parameters could render the alarm system useless,
causing the potential for patient injury.
Nurse Call
When the Nurse Call cable is connected and Nurse Call has been enabled, the monitor
immediately notifies the Nurse Call system when an alarm occurs. Nurse Call notification
settings are specified in the configuration settings.
Home tab
Home tab notifications
Notification
Description
Device Status area
The area changes color and displays a message with an accompanying status icon or
button. If the alarm tone is in a pause interval, a timer countdown appears.
If multiple alarms and information messages are active, the Device Status area shows the
highest priority alarm. If the alarms are equal in priority, the most recent alarm message
appears. You can cycle through the messages for each active alarm.
Parameter frame
The frame of the parameter brick flashes in the color of the alarm priority. Touch this area
to pause or turn off an alarm audio tone. Visual indicators and Nurse Call notification will
persist during an audio paused condition.
Alarm Limit control
The icon in this control indicates the status of the alarm limit settings. Red and amber
icons indicate measurements that have exceeded alarm limits.
Touch this control to navigate to a parameter-specific tab where you can modify alarm
limit settings.
Icons on the Home tab
Icons on the Home tab
Icons in parameter frames
The icons in the parameter frames indicate alarm notification settings. When alarm limits
are on, the icons will be gray until an alarm occurs. Then, the icons will change color to
indicate the priority of the alarm. Red icons represent high priority alarms, and amber
icons represent medium or low priority alarms.
Directions for use
Alarms
49
Icons in parameter frames
Icon
Name and status
Alarm off.
No visual or audio alarms or Nurse Call notification will occur for this parameter.
Alarm on.
Audio and visual notifications and Nurse Call are enabled.
Alarm audio off.
Only visual notifications, including Nurse Call, will occur.
Alarm audio paused.
The default audio pause alarm duration is 1 minute. The icon remains until the paused time counts
down to 0. Authorized personnel can configure this parameter.
Icons in the Device Status area
The icons in the Device Status area are black and white, but the background area
changes color to indicate the alarm priority. Messages accompany these icons. These
icons can be controls or status indicators.
Icons in the Device Status area
Icon
Name and status
Alarm active.
One or more alarms are active. Touch this icon to pause or turn off the audio tone.
Alarm audio off.
Audio signals are disabled, but alarm limits and visual alarm signals remain active.
Multiple alarms toggle.
Touch this icon to cycle through the messages for each active alarm.
Alarm audio paused.
The audio tone is paused for a period ranging from 90 seconds to 15 minutes. The icon remains
until the paused time counts down to 0. Touch this icon to reset the pause interval. The pause
interval is determined by settings in the Advanced tab.
50
Connex® Spot Monitor
Alarms
Reset (pause or turn off) audio alarms
Audio alarm characteristics
•
After you reset an audio alarm, some tones do not return, but others return after a
pause interval if the condition that caused the alarm persists. Settings in the
Advanced tab determine the length of the pause interval.
•
If a new alarm condition occurs during a pause interval, a new audio tone occurs.
Pause or turn off an audio alarm
1. In the Device Status area, touch
.
•
Visual indications remain in the parameter frame until the condition is corrected
or until the next measurement is taken.
•
In the Device Status area, if the icon changes to
and the message
remains, the timer counts down and the audio tone returns after a pause
again to restart the timer.
interval. You can touch
If you responded to an NIBP alarm and multiple NIBP limits have been
exceeded, the first audio tone and message go away, but another NIBP limit
message shows with a countdown timer. A new NIBP audio tone sounds after
the countdown unless you touch
message.
to dismiss each remaining NIBP limit
2. If multiple alarms are active, a multiple alarm toggle will appear in the Device Status
area. Respond to multiple alarms as follows:
a.
Touch
in the Device Status area. (See note below.)
b. Read the alarm message for the second alarm.
c.
Touch
.
d. Continue to touch multiple alarm toggle buttons and to reset tones until you
have read all of the messages.
Note
The multiple alarm toggle button will display the number
of active alarms inside the alarm icon. A set of dots
indicating the display order of alarms from highest (left)
to lowest (right) priority (as well as the most recent in
the case of multiple alarms of the same priority) will
appear below it.
Directions for use
Alarms
51
Adjust vital sign alarm limits
You can adjust vital sign alarm limits or turn off alarm limit checking for individual
parameters.
WARNING Alarm limits are user adjustable. All alarm limit settings should
take into account the patient's condition and acute care needs. Appropriate
alarm limits should be set accordingly for each patient.
CAUTION Loss of power will cause the monitor to return to default
settings. Each time you power up the monitor, you must set alarm limits
appropriate for your patient.
1. On the Home tab, touch the alarm limits control in the selected parameter frame. For
example, to adjust the NIBP alarm limits, touch
.
2. Adjust vital sign alarm limits.
•
To adjust a limit: Touch ▲ or ▼ or touch the keypad to set the desired upper and
lower alarm limits.
•
To turn alarm limits off or on for the vital sign: Touch
or
. This
button toggles to display the current alarm state.
If you turn off alarm limit checking for a vital sign, no visual or audio alarm signals
will occur for those limits. If alarm limit checking is off, the icon changes to
on the Home tab in the parameter frame.
Modify audio alarm notification
You can modify the volume of all audio alarms.
Note
If the Allow user to turn off general audio option has been selected in
Advanced settings, you can turn off audio alarms, but turning off alarms is
not recommended in some circumstances, such as unattended monitoring.
WARNING The alarm volume should be loud enough for you to hear it
from where you are. Set the volume considering the environment and
ambient noise levels.
As you set parameters on the Alarms tab, measurements appear across the top of the
tab.
1. Touch the Alarms tab.
2. On the General tab, modify audio alarm notifications.
•
To display alarm limits, in the Limits panel, select the Display alarm limits
checkbox.
•
To turn audio alarms on or off, select the Alarm audio on or Alarm audio off
button.
52
Connex® Spot Monitor
Alarms
If you turn off audio alarms, visual alarm signals still occur in the Device Status
area and on the Home tab in parameter frames.
The
in the Device Status area indicates alarm audio turned off, and a
similar bell will appear in the parameter frames
. If an alarm condition
occurs, the bell will be red or amber in the alarming frame, according to the
priority of the alarm, as shown here:
•
or
.
To modify the volume of audio alarms: Select the volume button next to either
High, Medium, or Low.
An audio tone sounds briefly to indicate the volume level.
Note
Periodically test the speaker by selecting different
speaker volumes and listening for the different tones.
3. To reset alarm settings to the original configuration, touch Alarm reset.
Alarm messages and priorities
The following table lists the physiological alarm messages and their priorities.
See “Troubleshooting” for technical alarm messages.
Physiological alarms
Alarm messages
Priority
Alarm limit exceeded. NIBP systolic HIGH.
High
Alarm limit exceeded. NIBP systolic LOW.
High
Alarm limit exceeded. NIBP diastolic HIGH.
High
Alarm limit exceeded. NIBP diastolic LOW.
High
Alarm limit exceeded. NIBP MAP HIGH.
High
Alarm limit exceeded. NIBP MAP LOW.
High
Alarm limit exceeded. Pulse rate HIGH.
High
Alarm limit exceeded. Pulse rate LOW.
High
Alarm limit exceeded. SpO2 HIGH.
High
Directions for use
Alarms
Alarm messages
Priority
Alarm limit exceeded. SpO2 LOW.
High
Alarm limit exceeded. Temperature HIGH.
High
Alarm limit exceeded. Temperature LOW.
High
53
Nurse Call
The monitor can be connected to a Nurse Call system through a cable that connects to
the Nurse Call connector.
When the Nurse Call cable is connected and Nurse Call is enabled, the monitor
immediately notifies the Nurse Call system when any alarm condition occurs that
exceeds the preset threshold. The Nurse Call system is also synchronized with the alarm
frame and audible alerts on the monitor.
Nurse Call thresholds are set in the configuration settings.
To connect the monitor to a Nurse Call system, you must have a cable that has been
adapted to your Nurse Call system (REF 6000-NC), rated 25V AC or 60V DC maximum at
1A maximum. For ordering information, see Approved Accessories in the Appendix.
WARNING Do not rely exclusively on Nurse Call for patient monitoring.
Although the Nurse Call option enables remote notification of an alarm
condition, it is not intended to replace appropriate bedside patient
monitoring by trained clinicians.
Note
When a patient alarm occurs, touching the alarm icon in the Device Status
area pauses the alarm tone for 1 minute, as specified in the default settings
in Advanced Settings, but the visual alarm indicator(s) on the monitor and
Nurse Call continue.
54
Alarms
Connex® Spot Monitor
55
Patient monitoring
Required parameters
If a parameter is required, a Skip button appears at the bottom of the parameters, and a
Next button appears in the lower-right corner of the screen. Parameters may require
three types of inputs.
•
Numerics
•
Drop-down lists
•
Parameter option buttons
If you choose not to record information for the parameter, a dialog box appears to
confirm that the parameter is not being recorded.
If you have a required modifier, such as height, weight, or pain, it will take priority over
other defined modifiers.
Once all parameters have been completed or skipped all required parameters, optional
parameters may appear. Once these have been completed or skipped, touching the Next
button returns you to the Home tab.
WARNING Many environmental variables, including patient physiology and
clinical application, can affect the accuracy and performance of the monitor.
You must verify all vital signs information before treating the patient. If
there is any question about the accuracy of a measurement, verify the
measurement using another clinically accepted method.
WARNING Patient injury risk. During defibrillation, keep discharge paddles
away from monitor sensors, and other conductive parts in contact with the
patient.
Complete required parameters
Required parameters appear before optional parameters.
1. From the Home tab, touch Next.
A pop-up screen appears with three parameters. The Next button is inactive and the
Cancel button is active.
2. Touch the first parameter and either manually enter the required information or enter
the data with the format presented.
The data is captured.
56
Connex® Spot Monitor
Patient monitoring
3. Proceed to the second and third parameters and enter the required information
either manually or enter the data with the format presented.
4. If there is a required parameter that you choose not to complete, then touch Skip.
An override dialog box appears explaining that it is a required parameter and the
EMR will note that it was not captured.
5. Touch Cancel, return and complete the parameter, or touch OK to continue to the
next parameter.
6. Once all parameters on the screen are completed or skipped, touch Next to proceed
to the next screen.
There may be several screens with required parameters.
7. Once all required parameters have been completed or skipped, optional parameters
may appear. Since optional parameters are not required, the Next button is active on
each screen with optional parameters. Complete the optional parameters as
appropriate for your patient.
8. When you are finished, touch Next.
A screen appears that gives you the option of sending data to a laptop, if it is
Bluetooth® enabled, or saving the data to the monitor.
9. Touch Save to save the data to the monitor. If you are connected to a laptop, the
data is downloaded automatically.
Intervals
The monitor can capture NIBP and SpO2 measurements automatically, based on
intervals you choose on the Settings tab.
In Settings, the Intervals tab provides all intervals features. You can access this tab from
the Office and Intervals profiles.
In the Intervals profile, you can set three types of intervals:
•
Automatic
•
Program
•
Stat
In the Office profile, you can set Averaging intervals.
You can do the following from the Intervals tab.
•
Configure intervals
•
Turn off intervals
When the measurement is complete, the frame for that parameter displays the
measurement until the next measurement is complete.
Note
During intervals, each automatic and manual save of patient measurements
clears all measurements from the Manual parameters frame.
The Intervals button changes to a timer, which counts down to the next automatic
measurement.
Automatic measurements continue until you turn off intervals.
Directions for use
Patient monitoring
57
WARNING Patient harm risk. Do not use intervals on neonates out of your
hearing range. Verify that the audio can be heard from where you intend to
be.
Automatic intervals
You can configure the monitor to take automatic NIBP measurements at consistent
intervals.
Note
An alarm does not turn off intervals. Subsequent automatic measurements
continue to occur as scheduled.
Start Automatic intervals
1. Place the proper cuff around the patient’s bare upper arm.
2. On the Home tab, touch
.
The vertical Intervals tab on the Settings tab appears.
3. Select Automatic.
4. Use the keypad to enter the length of time between NIBP measurements.
5. Touch Start intervals.
Program intervals
The monitor comes with six custom programs. One program is always available for you
to customize to meet your specific needs. If your facility does not configure all of the
remaining five programs, you can customize the remaining programs at any time.
The numbers below the program names indicate the length of time between each
interval in the cycle.
Start program intervals
You must be in either the Intervals or Office profile to access intervals.
1. Place the proper cuff around the patient’s bare upper arm.
2. On the Home tab, touch
.
The vertical Intervals tab on the Settings tab appears.
3. Select Program.
The preconfigured Program screen appears with the available programs and the
interval between measurements displayed to the right of the program.
4. Touch the program you want to use.
5. If you want to change the interval for the program selected, use the keypad to the
right of the program to enter the new interval.
6. Touch Start intervals.
58
Connex® Spot Monitor
Patient monitoring
Stat intervals
You can configure the monitor to take NIBP measurements continuously.
When you select Stat on the Intervals tab in Settings, the monitor takes repeated NIBP
measurements for 5 minutes, starting a new cycle each time the cuff deflates below
safe venous return pressure (SVRP) for 2 seconds.
WARNING Patient injury risk. If you use Stat mode repeatedly, periodically
observe the patient's limb to ensure that circulation is not impaired and that
the cuff remains in place. Prolonged impairment of circulation or improper
cuff position can cause bruising.
Current cuff pressures are not dynamically displayed during a Stat reading. The Home
tab displays the NIBP reading from the previous cycle until the current cycle finishes.
Note
Touch STOP to stop intervals. To restart intervals, go back to the Stat
intervals screen.
Start Stat intervals
1. Place the proper cuff around the patient’s bare upper arm.
2. On the Home tab, touch
.
The Intervals screen on the Settings tab appears.
3. Select Stat.
4. Touch Start intervals.
Averaging intervals
The averaging interval program enables you to record the patient's average NIBP
readings over a set period of time.
Start Averaging intervals
You must be in the Office profile to access Averaging intervals.
1. Place the proper cuff around the patient’s bare upper arm.
2. On the Home tab, touch
.
The vertical Intervals tab on the Settings tab appears.
3. Select Averaging.
The Averaging screen appears with the necessary parameters to establish the set
intervals for obtaining NIBP averages.
4. Using either the keypad or ▲ or ▼, set the necessary parameters to establish the
averaging intervals program desired.
5. Touch Start intervals.
Directions for use
Patient monitoring
59
NIBP
NIBP measurements
WARNING Patient injury risk. Do not install luer connectors on blood
pressure tubing. Using luer connectors in manual or automated blood
pressure systems creates the risk of inadvertent connection to intravenous
(IV) tubing, which can introduce air into the patient’s circulatory system.
WARNING Patient injury risk. Any external compression of the blood
pressure hose or cuff may cause patient injury, system errors, or inaccurate
measurements.
WARNING NIBP readings may be inaccurate for patients experiencing
moderate to severe arrhythmia.
WARNING Inaccurate measurement risk. Pulse rate measurements
generated through the blood pressure cuff or through SpO2 are subject to
artifact and might not be as accurate as heart rate measurements
generated through ECG or through manual palpation.
WARNING Use caution when measuring blood pressure using
oscillometric blood pressure devices in severely ill neonates and pre-term
infants because these devices tend to measure high in this patient
population.
WARNING Patient injury risk. Inaccurate measurement risk. Do not place
the cuff where it can disturb proper circulation. Do not place the cuff on
any area where circulation is compromised or on any extremity used for
intravenous infusions.
WARNING Possible measurement error. Use only Welch Allyn blood
pressure cuffs and accessories; substitution may result in measurement
error.
WARNING Inaccurate measurement risk. Ensure an airtight seal at all
connection points before use. Excessive leaking may affect readings.
WARNING Inaccurate measurement risk. Minimize cuff movement and
arm motion during readings. Excessive movement may alter readings.
WARNING Inaccurate measurement risk. Properly position the blood
pressure cuff to ensure blood pressure accuracy.
WARNING Inaccurate measurement risk. Only use the cuff when the
artery index marker falls within the printed range indicated on the cuff;
otherwise, erroneous readings will result.
CAUTION Inaccurate measurement risk. Any external compression of the
blood pressure hose or cuff may cause system errors or inaccurate
measurements.
Located in the upper-left corner of the Home tab, the NIBP frame contains data and
features relevant to noninvasive blood pressure measurement. The frame provides
different features, based on the profile you are using.
60
Connex® Spot Monitor
Patient monitoring
For information about obtaining blood pressure measurements, refer to Blood pressure
guidelines at www.welchallyn.com/.
NIBP measurement display
In all profiles, the frame can display systolic and diastolic measurements, and MAP
calculations. Authorized personnel can configure the default view in Advanced settings.
The last NIBP measurement remains on the screen unless you touch Save or Clear, or
until a new measurement is taken.
If any NIBP measurement is out of range or cannot be determined, the NIBP frame
shows a “++” or “- -” in front of the measurement. All other NIBP parameters display no
values.
View indicator
Touch the NIBP frame to toggle between views.
Buttons
Use the buttons on the right side of the frame to perform different tasks, depending on
the profile you are using. The availability of functions depends on which profile you
select. See the Profiles section for more information.
Technical alarms and NIBP measurements
A technical alarm stops any NIBP measurement. Once the alarm is resolved, the start
button appears and you can start a new NIBP measurement.
NIBP cuffs
Warning Patient injury risk. Use only blood pressure cuffs and hoses listed
as approved accessories to ensure safe and accurate NIBP measurements.
Warning Patient injury risk. Never use an adult or pediatric monitor setting
or cuff for an NIBP measurement on a neonatal patient. Adult and pediatric
inflation limits can be excessive for neonatal patients, even if a neonatal
cuff is used.
Warning Patient injury risk. The decision to use the device on pregnant or
pre-eclamptic patients is at the discretion of the trained clinician using the
equipment.
CAUTION Correct sizing of the blood pressure cuff is important for
accurate blood pressure readings. A cuff that is too small might provide
false high readings, while a cuff that is too large might provide false low
readings.
The monitor uses the oscillometric method to determine blood pressure; therefore, if the
cuff extends to the antecubital fossa (bend in the elbow), you can still acquire an
accurate blood pressure reading.
If you use a single tube NIBP cuff, you can take only a step blood pressure
measurement. The monitor will automatically default to Step BP.
Directions for use
Patient monitoring
61
Obtain a single NIBP measurement
1. Touch START to begin a single measurement.
The START button becomes an orange STOP button. NIBP always displays the
current inflation rate. When complete, the NIBP parameter displays the completed
NIBP measurement.
2. Touch Save to save the displayed measurement in the patient's record
The measurement will continue to be displayed until you save it or you start another
NIBP measurement.
Interval NIBP measurement
You must be in either the Intervals or Office profile to set intervals. Refer to the
“Intervals” section for directions on setting intervals.
While you are in the Intervals profile, touch Start on the Home tab to acquire a spot
NIBP measurement.
The default interval for NIBP measurements is 15 minutes. You can adjust this interval as
needed.
Stop automatic measurements
You must be in either the Intervals or Office profile to access intervals.
1. On the Home tab, touch
.
2. Touch Stop intervals.
Cancel a NIBP measurement
In the NIBP parameter, touch STOP.
The monitor cancels the NIBP measurement and an information message appears
informing you that the NIBP reading was stopped and that no reading was captured.
If intervals are turned on, the timer icon counts down to the next automatic
measurement.
Configure NIBP alarms
1. Verify that you are using the Intervals profile, which contains the Alarms tab.
2. Touch the Alarms tab.
3. Touch the NIBP vertical tab.
4. Using either the keypad or ▲ or ▼, enter the desired upper and lower alarm limits
for systolic and diastolic measurements, and MAP calculation.
5. Touch the Home tab.
The new alarm settings display in the Alarm Limit control button.
62
Connex® Spot Monitor
Patient monitoring
Temperature
Configure temperature alarms
You must be in the Intervals profile to set alarm limits.
1. Touch the Alarms tab.
2. Touch the Temperature vertical tab.
3. Using either the keypad or ▲ or ▼, enter the desired upper and lower alarm limits.
4. Touch the Home tab.
The new alarm settings appear in the Alarm Limit control button.
General temperature warnings and cautions
WARNING Patient injury risk: The decision to use this device with
children, or pregnant or nursing women is at the discretion of the trained
clinician using the equipment.
WARNING Inaccurate measurement risk. To ensure optimal accuracy,
always confirm that the correct mode and site are selected.
WARNING Patient injury risk. Do not exceed the recommended
temperature measurement durations in Direct mode. Continuous
measurement durations of 3 minutes at the oral and rectal sites and 5
minutes at the axillary site are recommended for accurate measurement.
Do not continuously measure beyond 10 minutes in any mode.
WARNING Patient injury risk. Always take a temperature measurement
with a single-use probe cover securely attached. Failure to use a probe
cover can cause patient cross-contamination and inaccurate temperature
readings.
WARNING Patient injury risk. Always remain with patient while measuring
temperature.
WARNING Patient injury risk. Inaccurate measurement risk. Do not use
the thermometer if you notice any signs of damage to the probe or the
instrument. If the thermometer probe is dropped or damaged, remove it
from service and have it inspected by a qualified service person.
Temperature frame
From the temperature frame you can measure patient temperature.
Located in the lower right corner of the Home tab, the temperature frame contains data
and features relevant to temperature measurement. The frame provides different
features based on the profile you are using.
Temperature measurement display
In all profiles, the frame displays the temperature in Celsius and Fahrenheit. You can
configure the default view in Advanced settings.
Directions for use
Patient monitoring 63
Site selection
Remove the temperature probe and touch the Temperature site control to toggle
between sites.
Icon
Description
Pediatric axillary
Adult axillary
Oral
Rectal. Monitors configured with the temperature module
and the red rectal probe well and probe default to the rectal
mode.
Ear mode. The monitor displays the ear mode when it
receives a temperature measurement from the ear
thermometer.
If a rectal probe is used, The rectal icon appears in the temperature brick and the Site
Selection feature is not available.
64
Connex® Spot Monitor
Patient monitoring
Temperature buttons
The buttons on the right side of the frame enable you to perform different tasks,
depending on the profile you are using. The profile you choose determines which
functions are available.
Icon
Button name
Description
Temperature alarm
Displays alarm limits and status.
Touch the button to display the Alarms
tab.
Direct mode
Touch the button to enter Direct mode.
SureTemp® Plus temperature module
The temperature module uses a thermistor thermometer design and a predictive
algorithm to calculate patient temperatures in the Predictive mode.
WARNING Patient injury risk. Do not exceed the recommended
temperature measurement durations in Direct mode. Continuous
measurement durations of 3 minutes at the oral and rectal sites and 5
minutes at the axillary site are recommended for accurate measurement.
Do not continuously measure beyond 10 minutes in any mode.
WARNING Patient injury risk. Inaccurate measurement risk. Oral/axillary
probes (blue ejection button at top of probe) and blue removable probe
wells are used for taking oral and axillary temperatures only. Rectal probes
(red ejection button) and red removable probe wells are used for taking
rectal temperatures only. Use of the incorrect removable probe well could
result in patient cross-contamination. Use of the probe at the wrong site
will result in temperature errors.
WARNING Patient injury risk. When taking rectal temperatures, insert the
probe tip a maximum of 5/8 inch (approximately 1.5 cm) inside the rectum
of adults and a maximum of 3/8 inch (approximately 1 cm) inside the
rectum of children to avoid the risk of bowel perforation.
WARNING Inaccurate measurement risk. Always take an axillary
temperature with direct contact between the probe cover and the skin.
Carefully place the probe in the axilla, avoiding contact with other objects or
material.
WARNING Patient injury risk. Always take a temperature measurement
with a Welch Allyn single-use probe cover securely attached. Failure to use
a probe cover can cause patient discomfort from a heated probe, patient
cross-contamination, and inaccurate temperature readings.
WARNING Inaccurate measurement risk. To ensure optimal accuracy,
always confirm that the correct mode and site are selected.
Patient monitoring
Directions for use
65
WARNING Never use a damaged temperature probe. The thermometer
consists of high-quality precision parts and should be protected from
severe impact or shock. Do not use the thermometer if you notice any
signs of damage to the probe or monitor. If the thermometer probe is
dropped or damaged, remove it from use and have it inspected by qualified
service personnel.
WARNING Inaccurate measurement risk. For rectal measurements, apply
a thin layer of lubricant to probe cover, if necessary, for patient comfort.
Use of excessive lubricant may affect reading accuracy.
CAUTION Inaccurate measurement risk. Patient activities such as
strenuous exercise, ingesting hot or cold liquids, eating, chewing gum or
mints, brushing teeth, or smoking may affect oral temperature
measurements for up to 20 minutes.
CAUTION Inaccurate measurement risk. Always use new probe covers
taken from the monitor's probe cover box holder to ensure accurate
temperature measurements. Probe covers taken from other places or that
haven't stabilized in temperature may result in inaccurate temperature
measurements.
CAUTION Probe covers are disposable, nonsterilized, and single-use.
Probes are also nonsterilized. Do not autoclave probes and probe covers.
Ensure that probe covers are disposed of according to facility requirements
or local regulations.
Temperature mode selection
The monitor with the temperature module takes a patient temperature in either
Predictive (Normal) or Direct mode. The default setting is the Predictive mode.
Predictive mode
WARNING Inaccurate measurement risk. To ensure optimal accuracy,
always confirm that the correct mode and site are selected.
WARNING Patient injury risk. Do not exceed the recommended
temperature measurement durations in Direct mode. Continuous
measurement durations of 3 minutes at the oral and rectal sites and 5
minutes at the axillary site are recommended for accurate measurement.
Do not continuously measure beyond 10 minutes in any mode.
Predictive mode is a one-time measurement that takes a temperature in approximately
6-15 seconds. Removing the probe from the probe well, loading a probe cover, and
holding the probe tip in place at the measurement site initiates a Predictive mode
measurement. The monitor sounds a tone to indicate the end of a predictive
measurement.
Direct mode
Direct mode provides continual temperature measurements. For oral and rectal
measurements, it is recommended to measure temperature until the temperature
stabilizes or for 3 minutes. For axillary measurements, it is recommended to measure
temperature until the temperature stabilizes or for 5 minutes. The monitor changes to
Direct mode approximately 60 seconds after the probe is removed from the probe well.
66
Connex® Spot Monitor
Patient monitoring
CAUTION The monitor does not retain Direct mode temperatures in
memory unless there is a physiological temperature alarm condition. If
there is a physiological temperature alarm condition, the monitor
automatically saves the measurement in the patient record. For
temperature measurements that are within normal range, it is important to
note the temperature before removing the thermometer probe from the
measurement site and then manually record it in the patient record. Once
the temperature probe is returned to the well, the temperature
measurement is removed from the Home tab
After 10 minutes of using the Direct mode, the monitor stops updating the
measurement, generates a technical alarm condition, and clears the measurement.
Take a temperature in the Predictive mode
WARNING Inaccurate measurement risk. To ensure optimal accuracy,
always confirm that the correct mode and site are selected.
CAUTION Probe covers are disposable, nonsterilized, and single-use.
Probes are also nonsterilized. Do not autoclave probes and probe covers.
Ensure that probe covers are disposed of according to facility requirements
or local regulations.
1. Remove the temperature probe from the probe well.
The monitor sounds a tone as it enters the ready state.
2. Insert the probe into a new probe cover and press the probe handle down firmly.
3. Touch Temperature site control to select the measurement site: oral, pediatric
axillary, or adult axillary.
4. Hold the probe tip in place at the measurement site.
While the measurement is being obtained, the temperature frame displays the
process indicator.
The monitor sounds a tone when the final temperature is obtained (in approximately
6 to 15 seconds). The temperature frame continues to display the temperature in
degrees Fahrenheit and degrees Celsius even after the probe is returned to the
probe well.
5. To switch to the Direct mode, touch Direct mode after you acquire the Predictive
mode measurement. The temperature frame in the lower-left corner changes to
"MODE: Direct..." as it switches to Direct mode.
The monitor sounds a tone at the start of a Direct mode measurement.
Take a temperature in the Direct mode
Direct mode displays the temperature of the probe as long as the probe tip remains in
place at the measurement site and remains within the operating patient temperature
range. The patient’s temperature will reach final equilibrium in approximately 3 minutes
at the oral and rectal measurement sites and approximately 5 minutes at the axillary site.
The monitor enters Direct mode by the following methods.
•
After you complete a Predictive mode measurement, touch to change from
Predictive to Direct mode. The temperature frame in the lower-left corner changes to
"MODE: Direct..." as it switches to the Direct mode.
Directions for use
Patient monitoring
•
Remove the probe from the probe well, load a probe cover, select a temperature
site, and expose the probe to ambient air for more than 60 seconds. The
temperature frame changes to "MODE: Direct...".
•
If you have a patient whose body temperature is below the normal temperature
range and you follow the previous step, the probe sensor identifies this condition
and turns off the probe preheater in order to accommodate the lower body
temperature measurement.
67
WARNING Inaccurate measurement risk. To ensure optimal accuracy,
always confirm that the correct mode and site are selected.
WARNING Patient injury risk. Do not exceed the recommended
temperature measurement durations in Direct mode. Continuous
measurement durations of 3 minutes at the oral and rectal sites and 5
minutes at the axillary site are recommended for accurate measurement.
Do not continuously measure beyond 10 minutes in any mode.
CAUTION Probe covers are disposable, nonsterilized, and single-use.
Probes are also nonsterilized. Do not autoclave probes and probe covers.
Ensure that probe covers are disposed of according to facility requirements
or local regulations.
1. Remove the temperature probe from the probe well.
The monitor sounds a tone as it enters the ready state.
2. Insert the probe into a new probe cover and press the probe handle down firmly.
3. Touch Temperature site control to choose from the measurement site: oral,
pediatric axillary, or adult axillary.
The temperature frame changes to Direct mode approximately 60 seconds after the
probe is removed from the probe well.
The monitor sounds a tone to indicate the start of a Direct mode measurement.
4. Hold the probe tip in place at the oral or rectal measurement site for a total of 3
minutes and at the axillary site for 5 minutes.
5. While the measurements are being obtained, the temperature frame displays the
patient's continuous temperature measurements in degrees Fahrenheit and degrees
Celsius.
Note
The monitor does not retain Direct mode temperatures in
memory. Therefore, it is important to note the temperature
before removing the probe from the measurement site and
then manually record it in the patient record.
6. Remove the probe after the temperature measurement is obtained and firmly press
the eject button on the top of the probe to release the probe cover.
7. Return the probe to the probe well to continue taking temperatures in the Predictive
mode.
68
Connex® Spot Monitor
Patient monitoring
Take a temperature at the rectal site
WARNING Patient injury risk. When taking rectal temperatures, insert the
probe tip only 5/8 inch (approximately 1.5 cm) inside the rectum of adults
and only 3/8 inch (approximately 1 cm) inside the rectum of children to
avoid the risk of bowel perforation.
WARNING Cross-contamination or nosocomial infection risk. Thorough
hand-washing greatly reduces the risk of cross-contamination and
nosocomial infection.
WARNING Patient injury risk. Do not exceed the recommended
temperature measurement durations in Direct mode. Continuous
measurement durations of 3 minutes at the oral and rectal sites and 5
minutes at the axillary site are recommended for accurate measurement.
Do not continuously measure beyond 10 minutes in any mode.
WARNING Inaccurate measurement risk. To ensure optimal accuracy,
always confirm that the correct mode and site are selected.
CAUTION Probe covers are disposable, nonsterilized, and single-use.
Probes are also nonsterilized. Do not autoclave probes and probe covers.
Ensure that probe covers are disposed of according to facility requirements
or local regulations.
1. Remove the rectal temperature probe from the rectal probe well.
The monitor sounds a tone as it enters the ready state. The Temperature Site
Control defaults to the rectal site.
2. Insert the rectal probe into a new probe cover and press the probe handle down
firmly.
3. Perform a rectal temperature measurement using medical best practices. While the
measurement is taking place, the temperature frame displays the process indicator.
4. The monitor sounds a tone when the final temperature is reached (in approximately
10 to 13 seconds). The temperature frame continues to display the temperature in
degrees Fahrenheit and degrees Celsius even after the probe is returned to the
probe well.
Note
To switch to the Direct mode, touch Direct mode after the
Predictive mode measurement is acquired. The temperature
frame (in the lower-left corner) changes to "MODE: Direct..."
as it switches to the Direct mode. The monitor sounds a
tone to indicate the start of a Direct measurement.
Note
The monitor does not retain Direct mode temperatures in
memory. Therefore, it is important to note the temperature
before removing the probe from the measurement site and
then manually record it in the patient record.
5. Remove the probe after the temperature measurement is complete and firmly press
the eject button on the top of the probe to release the probe cover.
6. Return the probe to the probe well.
Directions for use
Patient monitoring
69
Braun ThermoScan® PRO 6000 thermometer
The Braun ThermoScan Pro 6000 thermometer enables you to transfer an ear
temperature measurement to the monitor.
Read the thermometer manufacturer's directions for use before attempting to configure,
use, troubleshoot, or maintain the thermometer.
WARNING Liquids can damage electronics inside the thermometer.
Prevent liquids from spilling on the thermometer. If liquids are spilled on
the thermometer, dry off the thermometer with a clean cloth. Check for
proper operation and accuracy. If liquids possibly entered the thermometer,
remove the thermometer from use until it has been properly dried,
inspected, and tested by qualified service personnel.
CAUTION Probe covers are disposable, nonsterilized, and single-use. The
thermometer is also nonsterilized. Do not autoclave the thermometer and
probe covers. Ensure that probe covers are disposed of according to facility
requirements or local regulations.
CAUTION The thermometer has no user-serviceable parts. If service is
required, call your nearest Welch Allyn Customer Service or Technical
Support facility.
CAUTION Store the thermometer and probe covers in a dry location, free
from dust and contamination and away from direct sunlight. Keep the
ambient temperature at the storage location fairly constant and within the
range of 50°F to 104°F (10°C to 40°C).
Take a temperature at the ear site
WARNING Probe covers are single-use only. Re-use of a probe cover may
result in spread of bacteria and cross-contamination.
WARNING Inaccurate measurement risk. Use only Braun ThermoScan
probe covers with this thermometer.
WARNING Inaccurate measurement risk. Frequently inspect the probe
window and keep it clean, dry, and undamaged. Fingerprints, cerumen,
dust, and other contaminants reduce the transparency of the window and
result in lower temperature measurements. To protect the window, always
keep the thermometer in the accessory dock when the thermometer is not
in use.
CAUTION Inaccurate measurement risk. Before taking a temperature
measurement, make sure that the ear is free from obstructions and excess
cerumen build-up.
CAUTION Inaccurate measurement risk. The following factors can affect
ear temperature measurements for up to 20 minutes:
•
The patient was lying on his or her ear.
•
The patient's ear was covered.
•
The patient was exposed to very hot or very cold temperatures.
•
The patient was swimming or bathing.
•
The patient was wearing a hearing aid or an ear plug.
70
Connex® Spot Monitor
Patient monitoring
CAUTION Inaccurate measurement risk. If ear drops or other ear
medications have been placed in one ear canal, take the temperature in the
untreated ear.
Note
A temperature measurement taken in the right ear might differ from a
measurement taken in the left ear. Therefore, always take the temperature
in the same ear.
Note
When the monitor receives an ear temperature measurement, it displays
the measurement on the Home tab. If the Home tab already contains a
temperature measurement, the new measurement overwrites it.
To take a measurement and transfer it to the monitor:
1. Make sure that the monitor is powered on.
2. Remove the ear thermometer from the accessory dock.
3. Locate the probe cover box in the accessory dock.
4. Firmly push the probe tip into the probe cover box.
When the probe cover is in place, the thermometer turns on automatically.
5. Wait for the ready beep and three dashes to appear on the thermometer display.
6. Fit the probe snugly into the ear canal and then push and release Start.
•
If the probe is positioned correctly in the ear canal the ExacTemp light flashes.
When the thermometer detects an accurate measurement, the ExacTemp light
is continuously on, a long beep signals the end of the measurement, and the
display shows the result.
•
If the probe is positioned incorrectly in the ear canal or is moved during the
measuring process, the ExacTemp light goes out, a sequence of short beeps
sounds, and the error message POS (position error) appears.
7. When you are finished taking the temperature, press the ejector button to eject the
used probe cover.
8. Return the thermometer to the accessory dock.
The LED on the dock flashes while the measurement is being transferred.
After the transfer is complete, the temperature and the temperature scale appear on
the Home tab according to the monitor settings.
Note
Only the latest measurement is transferred to the monitor.
Note
Measurements that have already been transferred to the
monitor cannot be transferred again.
For more information about thermometer functionality, refer to the thermometer
manufacturer's directions for use.
Change the temperature scale on the ear thermometer
Refer to the thermometer manufacturer's directions for use to change between Celsius
and Fahrenheit.
Charge the ear thermometer battery
To charge the battery pack:
Directions for use
Patient monitoring
71
1. Place the thermometer in the accessory dock.
2. Make sure that the monitor is connected to AC power.
3. Make sure that the monitor is powered on.
The LED on the dock indicates the charging status of the battery pack:
•
Orange: The battery pack is charging.
•
Green: The battery pack is charged.
•
Not illuminated: The battery pack is not charging.
Note
The battery pack continues to charge while the monitor is in Display power
saving mode.
Note
It is strongly recommended that you use only the Welch Allyn rechargeable
battery pack in the thermometer because the dock cannot charge other
batteries.
SpO2
SpO2 and pulse rate monitoring continuously measures functional oxygen saturation of
arteriolar hemoglobin as well as the pulse rate in a patient through a pulse oximeter.
SpO2 measurements are updated each second ± 0.5 seconds.
The SpO2 sensors provided by Nonin, Masimo, and Nellcor for use with the monitor
have been tested for biocompatibility in accordance with ISO 10993.
SpO2 frame
The SpO2 frame displays data and the controls used in pulse oximetry measurements.
The frame provides a numeric view and a waveform view of SpO2 data. You can toggle
between views by touching the left side of the frame.
The SpO2 frame remains blank if no SpO2 measurement has been acquired.
SpO2 numeric view
The numeric view indicates the SpO2 saturation percentage and the pulse amplitude.
Features of this view differ, based on the type of sensor enabled and the profile
selected.
The SpO2 saturation percentage ranges between zero and 100. The SpO2 reading is
updated each second +/- 0.5 seconds.
Pulse amplitude
The pulse amplitude bar, shown when you are in the Spot profile, indicates the pulse
beat and shows the relative pulse strength. More bars illuminate as the detected pulse
gets stronger.
Level of perfusion
The level of perfusion (LofP) is a relative reading of pulse strength at the monitoring site.
The LofP is a numerical value that indicates the strength of the infrared (IR) signal
returning from the monitoring site. The LofP display ranges from .02 percent (very weak
pulse strength) to 20 percent (very strong pulse strength). The LofP is a relative number
72
Connex® Spot Monitor
Patient monitoring
and varies between monitoring sites and from patient to patient, as physiological
conditions vary.
Masimo displays the LofP as a numeric value and refers to it as Perfusion Index. Nonin
displays the LofP as a color value (yellow or red) only when the LofP is low, based on the
sensor's algorithm.
During sensor placement, the LofP can be used to evaluate the appropriateness of an
application site by looking for the site with the highest LofP number. Placing the sensor
at the site with the strongest pulse amplitude (the highest LofP number) improves
performance during motion. Monitor the trend of the LofP for changes in physiological
conditions.
SatSeconds™ alarm management
The SatSeconds feature is an SpO2 alarm management system available only with
monitors that are equipped with NellcorTM SpO2 OxiMaxTM Technology.
The SatSeconds feature is the product of the time and magnitude that a patient falls
outside of the SpO2 alarm limits. For example, three points below the alarm limit for 10
seconds equals 30 SatSeconds. An alarm is triggered only when a desaturation event
reaches the SatSeconds limit. The SatSeconds feature is clinician controlled and can be
set to 0, 10, 25, 50, or 100 SatSeconds. If a desaturation event resolves on its own
within the preset time, the clock will automatically reset and the monitor will not alarm.
Note
The SatSeconds feature has a built-in safety protocol that sounds an alarm
whenever three SpO2 violations of any amount or duration occur within a
1-minute period.
SpO2 waveform view
The waveform view shows the real-time SpO2 plethysmograph waveform. Authorized
personnel can select the waveform sweep speed in Advanced settings.
For additional normalization and waveform information, refer to the manufacturer's
Directions for use.
Interval SpO2 measurement
You must be in either the Intervals or Office profile to set intervals. Refer to the
“Intervals” section for directions on setting intervals. For a description of the effect on
displayed and transmitted SpO2 pulse rate values, refer to the SpO2 manufacture's
directions for use.
Measure SpO2 and pulse rate
The SpO2 sensor measures oxygen saturation and pulse rate. Oxygen saturation is
displayed as a percentage from zero (0) to 100%. The oxygen saturation and pulse rate
are updated and refreshed each second, ± 0.05 seconds.
WARNING Inaccurate measurement risk. Use only Masimo sensors and
accessories on Masimo-equipped monitors.
WARNING Inaccurate measurement risk. Use only Nellcor sensors and
accessories on Nellcor-equipped monitors.
Directions for use
Patient monitoring
73
WARNING Inaccurate measurement risk. Severe anemia may cause
erroneous SpO2 readings.
WARNING Inaccurate measurement risk. The pulse oximeter can be used
during defibrillation, but the readings may be inaccurate for up to 20
seconds.
WARNING Inaccurate measurement risk. Misapplied sensors or sensors
that become partially dislodged may cause either over or under reading of
actual arterial oxygen saturation.
WARNING Inaccurate measurement risk. Venous congestion may cause
under reading of actual arterial oxygen saturation. Therefore, assure proper
venous outflow from monitored site. Sensor should not be below heart
level (e.g. sensor on hand of a patient in a bed with arm dangling to the
floor).
WARNING Inaccurate measurement risk. Use only Nonin sensors and
accessories on Nonin-equipped monitors.
WARNING The pulsations from intra-aortic balloon support can increase
the pulse rate displayed on the monitor. Verify the patient's pulse rate
against the ECG heart rate.
WARNING Patient injury risk. Do not attempt to reprocess, recondition, or
recycle any sensors or patient cables. Doing so might damage electrical
components.
WARNING Patient injury risk. The pulse oximeter is NOT intended for use
as an apnea monitor.
WARNING Patient injury risk. To avoid cross contamination only use
Masimo single use sensors on the same patient.
WARNING Patient injury risk. Do not use tape to secure the sensor to the
site; this can restrict blood flow and cause inaccurate readings. Use of
additional tape can cause skin damage or damage the sensor.
WARNING Unless otherwise specified, do not sterilize sensors or patient
cables by irradiation, steam, autoclave or ethylene oxide. See the cleaning
instructions in the Directions for use for the Masimo re-useable sensors.
WARNING Patient injury risk. Loss of pulse signal can occur when the
patient has severe anemia or hypothermia.
WARNING SpO2 is empirically calibrated in healthy adult volunteers with
normal levels of carboxyhemoglobin (COHb) and methemoglobin (MetHb).
WARNING High-intensity extreme lights, such as pulsating strobe lights,
directed on the sensor may not allow the pulse oximeter to obtain vital sign
readings.
WARNING Pulse rate measurement might not detect certain arrhythmias
because it is based on the optical detection of a peripheral flow pulse. Do
not use the pulse oximeter as a replacement or substitute for ECG-based
arrhythmia analysis.
74
Connex® Spot Monitor
Patient monitoring
WARNING Use the pulse oximeter as an early warning device. As you
observe a trend toward patient hypoxemia, use laboratory instruments to
analyze blood samples to better understand the patient's condition.
WARNING The accuracy of SpO2 measurements can be affected by any
of the following:
•
elevated levels of total bilirubin
•
elevated levels of Methemoglobin (MetHb)
•
elevated levels of Carboxyhemoglobin (COHb)
•
hemoglobin synthesis disorders
•
low perfusion at the monitored site
•
the presence of concentrations of some intravascular dyes, sufficient to
change the patient's usual arterial pigmentation
•
patient movement
•
patient conditions such as shivering and smoke inhalation
•
motion artifact
•
painted nails
•
poor oxygen perfusion
•
hypotension or hypertension
•
severe vasoconstriction
•
shock or cardiac arrest
•
venous pulsations or sudden and significant changes in pulse rate
•
proximity to an MRI environment
•
moisture in the sensor
•
excessive ambient light, especially fluorescent
•
the use of the wrong sensor
•
a sensor applied too tightly
CAUTION If using pulse oximetry during full body irradiation, keep the
sensor out of the irradiation field. If the sensor is exposed to the irradiation,
the reading might be inaccurate or the unit might read zero for the duration
of the active irradiation period.
CAUTION The instrument must be configured to match your local power
line frequency to allow for the cancelation of noise introduced by
fluorescent lights and other sources.
CAUTION Exercise caution when applying a sensor to a site with
compromised skin integrity. Applying tape or pressure to such a site may
reduce circulation and/or cause further skin deterioration.
CAUTION If the Low Perfusion message is frequently displayed, find a
better perfused monitoring site. In the interim, assess the patient and, if
indicated, verify oxygenation status through other means.
CAUTION Circulation distal to the sensor site should be checked routinely.
Directions for use
Patient monitoring
75
CAUTION Do not modify or alter the sensor in any way. Alterations or
modification may affect performance and/or accuracy.
1. Verify that the sensor cable is connected to the monitor.
WARNING Patient injury risk. The sensor and extension
cable are intended only for connection to pulse oximetry
equipment. Do not attempt to connect these cables to a PC
or any similar device. Always follow the sensor
manufacturer's directions for care and use of the sensor.
2. Clean the application site. Remove anything, such as nail polish, that could interfere
with sensor operation.
Note
Do not use disposable sensors on patients who have allergic
reactions to the adhesive.
3. Attach the sensor to the patient according to the manufacturer's directions for use,
observing all warnings and cautions.
Note
If a sterile sensor is required, select a sensor that has been
validated for sterilization, and follow the sensor
manufacturer's directions for sterilizing the sensor.
Place the sensor and the NIBP cuff on different limbs to reduce unnecessary alarms
when you monitor these parameters at the same time.
Note
Consult the sensor manufacturer's instructions for selecting
the correct sensor.
4. Confirm that the monitor displays SpO2 and pulse rate data within 6 seconds after
connecting the sensor to the patient.
WARNING Patient injury risk. Incorrect sensor application or
excessive duration of sensor use can cause tissue damage.
Inspect the sensor site periodically as directed in the sensor
manufacturer's instructions.
While SpO2 is being measured, the displayed pulse rate is acquired from the sensor. If
SpO2 is not available, the pulse rate is acquired from NIBP. The monitor identifies SpO2
or NIBP as the pulse rate source.
An alarm sounds If you detach the sensor during a measurement in intervals mode.
If SpO2 is being measured continuously on a patient for an extended period, change the
sensor location at least every three hours or as indicated by the sensor manufacturer's
instructions.
Pulse rate frame
The pulse rate frame is located in the upper right of the Home tab. The pulse rate frame
displays data, information, and the controls used in reading pulse rates.
Typically, the pulse rate is derived from the SpO2 sensor. If SpO2 is not available, the
pulse rate is derived from NIBP or manually obtained.
The source of the pulse rate is displayed beneath the numeric representation of the
pulse rate.
76
Connex® Spot Monitor
Patient monitoring
WARNING Inaccurate measurement risk. Pulse rate measurements
generated through the blood pressure cuff or through SpO2 are subject to
artifact and might not be as accurate as heart rate measurements
generated through ECG or manual palpation.
Configure pulse rate alarms
You must be in the Intervals profile to configure the pulse rate alarms.
1. Touch the Alarms tab.
2. Touch the Pulse rate vertical tab.
3. Using either the keypad or ▲ or ▼, enter the desired upper and lower alarm limits.
4. Touch the Home tab.
The new alarm settings appear in the Pulse Rate Alarm Limit control button.
SpO2 alarms
SpO2 alarm signal delays
Alarm signal delays are built into the system and are not accessible by clinicians.
The lower range of signal delays is 50–98%. The upper range of signal delays is 52–
100%.
Refer to the SpO2 manufacturer's directions for use for additional information on alarm
signal delays.
Configure SpO2 alarms
1. Verify that you are using the Intervals profile, which contains the Alarms tab.
2. Touch the Alarms tab.
3. Touch the SpO2 vertical tab.
4. Using the keypad or ▲ or ▼, enter the desired upper and lower alarms limits.
5. Touch the Home tab.
The new alarm settings appear in the Alarm Limit control button.
Modifiers and manual parameters
Modifiers enable you to save additional information for the measurements for a specific
patient:
•
Standard modifiers are the same on all devices
•
Custom modifiers are specific to a facility or a unit; custom modifiers are set up
during the initial configuration requested by your facility.
Manual parameters are core measurements that you can enter physically on the monitor,
such as height, weight, temperature, and pain.
Directions for use
Patient monitoring
77
Enter manual parameters
CAUTION Weight scales attached to this monitor must be running on
battery power (battery type is specified in the weight scale manufacturer's
directions for use). Do not use the weight scale's external power supply.
Note
If an approved, battery-powered weight scale is attached to the monitor,
measurements from the weight scale populate fields in the Manual
parameter section. You can adjust weight and height measurements in this
section. BMI will remain the same until you return to the Home screen.
Note
Ensure that the current patient ID is correct before saving.
Note
Authorized personnel can select and configure Manual parameters with the
online configuration tool. Only four parameter types appear in Manual
parameters.
1. On the Home tab, press and hold the parameter desired.
2. Using either the keypad or ▲ or ▼, manually enter information for the parameter
chosen.
Ensure that the current patient ID is correct before saving.
Note
3. Touch Ok to capture the parameter that you entered..
4. Touch Save to save the data.
Note
During intervals, each automatic and manual save of patient measurements
clears all measurements from the Manual parameters frame.
Configuration tool
The configuration tool is a web-based tool on the Welch Allyn website. The configuration
tool enables you to set the device settings for your facility. For more information, visit
the Connex Spot Monitor page on the Welch Allyn website.
Custom scoring
WARNING Risk to patient safety. Custom scores and messages serve as
guides to your facility's protocols; do not substitute custom scores for
patient physiological alarms. Appropriate alarms settings must be set
and maintained to ensure patient safety.
Custom scoring is defined through the Configuration tool on the Welch Allyn web site.
The order in which the custom score parameters are entered in the Configuration tool is
the order in which they will appear in the custom scoring.
Custom scoring enables you to configure specific parameters, based on your institution’s
practice standards, that calculate scores for patient monitoring. These scores generate
messages regarding the patient status, based on the parameters chosen. These
messages are provided only as reminders.
Advanced settings
Consult the Connex Spot Monitor Service manual for Advanced settings.
78
Patient monitoring
Connex® Spot Monitor
79
Maintenance and service
Perform periodic checks
1. Verify the following at least daily.
•
The audio speaker tone, especially at startup
•
The touchscreen alignment
•
The date
•
The time
2. Visually inspect the following at least weekly.
•
The monitor for any damage or contamination
•
All cables, cords, and connector ends for damage or contamination
•
All mechanical parts, including covers, for integrity
•
All safety-related labeling for legibility and adhesion to the monitor
•
All accessories (cuffs, tubing, probes, sensors) for wear or damage
•
Documentation for current revision of the monitor
3. Visually inspect the following at least monthly
•
The mobile stand wheels for wear and faulty operation
•
The mounting screws on wall units or carts for looseness and wear
Update settings, replace items, or call for service as necessary, based on results from a
visual inspection. Do not use the monitor if you see any signs of damage. Qualified
service personnel must check any monitor that is damaged for proper operation before
putting the monitor back into operation.
Replace the monitor battery
WARNING Personal injury risk. Improper handling of the battery can lead
to heat generation, smoke, explosion or fire. Do not short-circuit, crush,
incinerate, or disassemble the battery. Never dispose of batteries in refuse
containers. Always recycle batteries according to national or local
regulations.
1. Turn the monitor upside down to access the battery cover.
2. Locate the battery cover, indicated by
.
3. Using a double-slotted screwdriver, loosen the captive screw at the base of the
battery cover, and then remove the cover.
80
Connex® Spot Monitor
Maintenance and service
4. Remove the old battery from the battery compartment.
5. Disconnect the battery connector from the battery connection port on the monitor.
6. Insert the battery connector for the new battery into the battery connection port on
the monitor.
7. Insert the new battery into the battery compartment.
8. Replace the battery cover, and then tighten the captive screw at the bottom of the
battery cover.
Note
Do not overtighten the screw.
Replace the APM work surface battery
Before removing the APM work surface battery, power down the monitor and
disconnect the power cord from the mains outlet.
Note
You do not have to remove the APM work surface from the stand to
remove the APM work surface battery.
1. Loosen the captive screw on the bottom of the APM work surface that secures the
battery cover.
2. Remove the battery cover and put it aside.
Directions for use
Maintenance and service
81
3. Gently lift the latch with one hand and pull the tab on the top of the battery with your
other hand to remove the battery from its slot.
4. Slide the new battery into the slot.
Note
Ensure that the tab is facing you on the top of the battery.
5. Replace the battery cover and tighten the captive screw on the bottom of the APM
work surface.
Cleaning requirements
This section presents procedures for cleaning the Connex Spot Monitor (including the
monitor, stand, APM work surface, accessories, and accessory basket and bins).
Welch Allyn has validated these instructions to be capable of preparing your Connex
Spot Monitor devices and above accessories for re-use. Clean on a routine basis
according to your facility's protocols and standards or local regulations. If the monitor is
on, lock the display.
WARNING Patient injury risk. Clean all accessories, including cables and
tubes, before storing the accessories on the device or stand. This helps
reduce the risk of cross contamination and nosocomial infection.
WARNING Electric shock hazard. Before cleaning the monitor, disconnect
the AC power cord from the mains outlet and the power source.
WARNING Electric shock hazard. DO NOT immerse or autoclave the
monitor or accessories. The monitor and the accessories are not heatresistant.
WARNING Liquids can damage electronics inside the monitor. Prevent
liquids from spilling on the monitor.
82
Connex® Spot Monitor
Maintenance and service
CAUTION Do not sterilize the monitor. Sterilizing the monitor could harm
the device.
If liquids are spilled on the monitor:
1.
2.
3.
4.
Power down the monitor.
Disconnect the power cord from the mains outlet and the power source.
Remove battery pack from the monitor.
Dry off excess liquid from the monitor.
If liquids possibly entered the monitor, remove the monitor
from use until it has been properly dried, inspected, and
tested by qualified service personnel.
Note
5. Reinstall battery pack.
6. Reconnect the power cord.
7. Power on the monitor and verify that the monitor functions normally before using it.
Prepare to clean the equipment
CAUTION Some cleaning agents are not appropriate for all components of
the device. Use only approved cleaning agents, and observe restrictions
noted for some components in the following table. Using unapproved
cleaning agents may cause damage to components.
CAUTION Do not use bleach solutions of any kind when cleaning metal
electrical contacts. They will damage the device.
Select a cleaning agent from the following table.
Section 1. Approved for all Connex Spot Monitor components
Cleaning agent
Additional information
Accel INTERVention
Accel TB
CaviWipes
Clinell® Universal Wipes
Oxiver TB
Sani-Cloth® Plus
Super Sani-Cloth®
70 percent isopropyl alcohol solution
Applied to a clean cloth
Directions for use
Maintenance and service
83
Section 2. Not approved for all Connex Spot Monitor components
Note
The following cleaning agents are NOT approved for cleaning Connex Spot
Monitors equipped with the Braun ThermoScan PRO 6000
Cleaning agent
Additional information
Cleancide
Clorox HealthCare Bleach Germicidal Cleaner
Sani-Cloth® Bleach
Not approved for cleaning the display
Super HDQ® L10
Dilution rate of ½ oz per gallon of water (1:256) applied to a
clean cloth
Tuffie5 Cleaning Wipes
Virex II (256)
Dilution rate of ½ oz per gallon of water (1:256) applied to a
clean cloth
10 percent bleach solution
(.5% - 1% sodium hypochlorite) applied to a clean cloth
Remove liquid spills from the monitor
Liquids can damage electronics inside the monitor. Follow these steps if liquids spill on
the monitor.
1. Power down the monitor.
2. Disconnect the power cord from the mains outlet and the power source.
3. Remove battery pack from the monitor.
4. Dry excess liquid from the monitor.
5. Reinstall battery pack.
6. Reconnect the power cord.
7. Power on the monitor and verify that the monitor functions normally before using it.
If liquids possibly entered the monitor, remove the monitor from use until it has been
properly dried, inspected, and tested by qualified service personnel.
Clean the equipment
The screen lock blocks the display of patient information and prevents any input, which
may be useful when cleaning the display.
Follow the cleaning agent manufacturer's instructions to prepare solution, if applicable,
and clean all exposed surfaces of the monitor, APM work surface, accessory bin(s) and
basket, cords and cables, and stand. Wipe all surfaces until no visible soil remains.
Change the wipe or cloth throughout the cleaning procedure as needed.
84
Connex® Spot Monitor
Maintenance and service
WARNING Electric shock hazard. Do not open the monitor or attempt
repairs. The monitor has no user-serviceable internal parts. Only perform
routine cleaning and maintenance procedures specifically described in this
manual. Inspection and servicing of internal parts shall only be performed
by qualified service personnel.
CAUTION Sterlizing the monitor could damage the device.
1. Disconnect the AC power cord from the mains outlet.
2. Wipe the top of the monitor.
3. Wipe the sides, front, and rear of the monitor.
4. Avoid residual film buildup on the LCD screen. After cleaning and disinfecting, wipe
the LCD screen with a clean cloth dampened with water, and then wipe the screen
dry with a dry clean cloth.
5. Wipe the bottom of monitor.
6. Wipe the APM work surface.
7. Wipe the accessory bins or basket.
8. Wipe the AC power cord and the APM work surface power/USB cable assembly.
9. Wipe the stand from top to bottom.
Dry the equipment
1. Allow all components except the LCD screen to air dry.
2. Wipe the LCD screen dry with a clean cloth.
Store the device
Store the device according to facility guidelines to keep the device clean, dry, and
ready for service.
Cleaning accessories
Accessories include components like blood pressure cuffs and hoses, SpO2 sensors and
cables, thermometers, and the barcode scanner. Follow accessory manufacturer’s
instructions for cleaning and disinfection.
For cleaning the wallboard and VESA mount use only 70 percent isopropyl alcohol
solution applied to a clean cloth.
For the Braun ThermoScan PRO 6000 thermometer, use only the approved cleaning
agents published in the manufacturer's instructions for cleaning. Unapproved
cleaning agents can damage the device and interfere with data transmission.
Clean the Braun ThermoScan PRO 6000 contacts
Debris that accumulates on the Braun ThermoScan PRO 6000 electrical contacts can
interfere with data transmission. Welch Allyn recommends cleaning the contacts on the
thermometer and the dock once every 4 months to maintain optimal performance.
Directions for use
Maintenance and service
CAUTION Do not use bleach solutions of any kind when cleaning metal
electrical contacts. They will damage the device.
1. Slightly dampen a cotton swab with 70% isopropyl alcohol.
2. Remove the thermometer from the dock and clean the metal electrical contacts on
the thermometer with the cotton swab.
3. Place the thermometer aside for 1 minute, allowing the contacts to air dry.
4. Clean the metal electrical contacts on the device dock with the cotton swab.
5. Allow the contacts to air dry for 1 minute.
6. Optional step to improve performance: On the dock only, apply DeoxIT Gold® to
the tip of each electrical contact. Do not apply DeoxIT Gold to the thermometer.
No drying time is required.
7. Return the Braun thermometer to the dock.
85
86
Maintenance and service
Connex® Spot Monitor
87
Troubleshooting
This section presents tables of technical alarm and information messages, as well as
problem descriptions that do not generate messages, to help you troubleshoot issues on
the monitor.
Note
Problem descriptions without messages appear at the end of this section.
When the monitor detects certain events, a message appears in the Device Status area
at the top of the screen. Below are the message types.
•
Information messages, which appear on a blue background.
•
Very low-priority alarms, which appear on a cyan background.
•
Low- and medium-priority alarms, which appear on an amber background.
•
High-priority alarms, which appear on a red background.
Technical alarm messages are low or very low priority unless noted in the Message
column.
Alarm logs are not viewable by clinicians. However, all logs are transferred to Welch
Allyn on a regularly scheduled basis. In the event of an unplanned power failure, all
information, including device logs and patient data, are retained on the system.
You can dismiss a message by touching the message on the screen or, for some
messages, you can wait for the message to time out.
To use these tables, locate the message that displays on the monitor in the left column
of the table. The remainder of the row explains possible causes and suggests actions
that can resolve the issue.
Note
Instructions to "Call for service" in the following tables mean that you
should contact qualified service personnel in your facility to investigate the
issue.
NIBP messages
Message
Possible cause
Suggested action
Alarm priority
User cancelled NIBP
reading.
The NIBP measurement was
cancelled by user
Clear the alarm and retry NIBP.
Information
NIBP not functional.
050002
The NIBP measurement is not
available
Internal malfunction. If the problem
persists, replace the module.
Medium
88
Connex® Spot Monitor
Troubleshooting
Message
Possible cause
Unable to determine
NIBP; check
connections; limit
patient movement.
050003
The NIBP measurement may be
Make sure the NIBP settings/patient Medium
inaccurate, patient motion
mode is appropriate. If the problem
occurred, or the settings for
persists, replace the module.
patient readings obtain might not
be accurate
Unable to determine
NIBP; check
connections; limit
patient movement.
050004
Excessive artifact, no blood
pressure parameters could be
calculated
Unable to determine blood pressure. Medium
Check connections; restrict patient
movement. If problem persists,
replace module
Unable to determine
NIBP; check inflation
settings. 050005
Low inflation on blood pressure
measurement attempt
Make sure the NIBP settings/patient Medium
mode is appropriate. If the problem
persists, replace the module.
Unable to determine
The NIBP tubing has a kink, or
NIBP; check connections there is a NIBP transducer
and tubing for kinks.
calibration failure
050006
Suggested action
Internal malfunction. If the problem
persists, replace the module.
Alarm priority
Medium
Unable to determine
NIBP; check
connections; limit
patient movement.
050007
The blood pressure measurement Make sure the NIBP settings/patient Medium
dumped too soon
mode is appropriate. If the problem
persists, replace the module.
Unable to determine
NIBP; check
connections; limit
patient movement.
050008
There were not enough steps on
the measurement attempt
Unable to determine
NIBP; check inflation
settings. 050009
There is invalid patient
Make sure the NIBP settings/patient Medium
information for the selected mode mode is appropriate. If the problem
persists, replace the module.
Unable to determine
NIBP; check
connections; limit
patient movement.
05000A
The re-inflation was too late on
the measurement attempt
Unable to determine blood pressure. Medium
Check connections; restrict patient
movement.
Unable to determine
NIBP; check inflation
settings. 05000B
There were many re-inflate
attempts on the measurement
attempt
Unable to determine blood pressure. Medium
Check connections; restrict patient
movement.
Unable to determine blood pressure. Medium
Check connections; restrict patient
movement.
Unable to determine
Couldn’t bleed pressure below
NIBP; check connections safe venous return pressure
and tubing for kinks.
05000C
Unable to release cuff pressure.
Check tubing for kinks and
connection integrity.
Medium
No display
The safety check failed on the
measurement attempt
Internal malfunction. If the problem
persists, replace the module.
Unable to determine
NIBP; check
connections; limit
The NIBP pressure is not stable
and the transducer zero value
cannot be set
The NIBP pressure is not stable and Medium
the transducer zero value cannot be
set. If problem persists, replace
module.
Directions for use
Troubleshooting
Message
Possible cause
Suggested action
Alarm priority
patient movement.
05000F
NIBP not functional.
050105
WACP message CRC mismatch on Internal malfunction. If the problem
NIBP module
persists, replace the module.
Very low
NIBP not functional.
050201
This message is not implemented Internal malfunction. If the problem
by the NIBP module
persists, replace the module.
Very low
NIBP not functional.
050202
This message is not supported by Internal malfunction. If the problem
the NIBP module
persists, replace the module.
Very low
NIBP not functional.
050203
The NIBP module has run out of
memory
Internal malfunction. If the problem
persists, replace the module.
Very low
NIBP not functional.
050205
The NIBP module has received a
invalid parameter
Internal malfunction. If the problem
persists, replace the module.
Very low
NIBP not functional.
050206
The parameter provided by the
Internal malfunction. If the problem
NIBP module is outside of the
persists, replace the module.
allowable range for the specified
message
Very low
NIBP not functional.
050207
The NIBP module message
requires an object, but did not
contain one
Internal malfunction. If the problem
persists, replace the module.
Very low
NIBP not functional.
050208
The NIBP module object provided Internal malfunction. If the problem
with the message could not be
persists, replace the module.
deserialized
Very low
NIBP not functional.
050209
The NIBP module object could not Internal malfunction. If the problem
be serialized
persists, replace the module.
Very low
NIBP not functional.
05020A
The NIBP module message is
performing a request or action
when the module state prohibits
the request or action.
Internal malfunction. If the problem
persists, replace the module.
Very low
NIBP not calibrated.
050503
Factory EEPROM checksum error
on NIBP. Units internal
configuration was corrupted
Internal malfunction. If the problem
persists, replace the module.
Very low
NIBP not functional.
050504
User EEPROM checksum error.
Configuration data which can be
set in the user's configuration
menu was damaged or lost on
NIBP
Calibrate the NIBP Module. If
problem persists, replace module.
Very low
NIBP not functional.
050505
Post failure of A/D convertor
Internal malfunction. If the problem
persists, replace the module.
Very low
NIBP not calibrated.
Calibrate the module.
050509
NIBP module calibration failure,
the calibration signature is zero
Calibrate the NIBP module.
Very low
89
90
Connex® Spot Monitor
Troubleshooting
Message
Possible cause
Suggested action
Alarm priority
Invalid algorithm. Select Invalid NIBP Algorithm. NIBP
correct algorithm and
component software tried to
retry. 05050A
configure the sensor in an illegal
manner
Verify the algorithm. If the problem
persists, replace the module.
Very low
NIBP not functional.
050513
Internal malfunction. If the problem
persists, replace the module.
Very low
Invalid NIBP initiation code
Invalid patient mode.
Invalid patient mode on NIBP. The Verify correct patient mode. If the
Select correct patient
NIBP component software tried to problem persists, replace the
mode and retry. 050514 configure the sensor in an illegal module.
manner
Very low
NIBP not functional.
050515
Invalid module configuration for
NIBP
Internal malfunction. If the problem
persists, replace the module.
Very low
NIBP not functional.
050516
NIBP module malfunction
Internal malfunction. If the problem
persists, replace the module.
Very low
Restore device to normal
temperature ranges and try again.
Very low
Ambient temperature
Ambient temp out of range on
out of range. Clear error NIBP
and retry. 050517
Low battery. Plug into
outlet. 050518
The NIBP module power rail is too Plug device into an AC outlet to
low
charge the battery.
Very low
Battery overcharged.
The NIBP module power rail is too Battery is overcharged. Remove from Very low
Disconnect from outlet. high.
charging source.
050519
NIBP not calibrated.
Calibrate the module.
050601
NIBP failed to load safety
Calibrate the NIBP module. If the
processors calibration record from problem persists, replace the
EEPROM
module.
Very low
NIBP not functional.
050602
NIBP safety processor failed ROM Internal malfunction. If the problem
checksum
persists, replace the module.
Very low
NIBP not calibrated.
Calibrate the module.
050603
NIBP safety processor not
calibrated, missing calibration
signature
Very low
Cuff pressure limits
exceeded. 050604
NIBP system failure. Overpressure Restrict patient movement.
Premature auto cycle
skipped. 050605
NIBP auto cycle skipped, SVRP
requirement not satisfied
Cuff pressure too high.
Clear error to retry.
050606
NIBP cuff pressure above SVRP for Verify cuff connections. If the
to long
problem persists, replace the
module.
Medium
NIBP not functional.
050607
NIBP cannot clear the failsafe
alerts
Internal malfunction. If the problem
persists, replace the module.
Very low
NIBP not functional.
050608
NIBP safety processor has stopped Internal malfunction. If the problem
responding
persists, replace the module.
Very low
Calibrate the NIBP module. If the
problem persists, replace the
module.
Medium
Cuff pressure is not below safety
Very low
return pressure long enough to allow
a cycle to occur.
Directions for use
Troubleshooting
Message
Possible cause
Suggested action
Alarm priority
Stat mode requested too NIBP excessive stat mode time.
Internal malfunction. If the problem
soon. Clear to retry.
The time between readings is less persists, replace the module.
050609
than one minute and the readings
plus time between readings result
in the device taking over 15
minutes to complete the averaging
cycle.
Very low
Unable to determine
NIBP transducers are not matched
NIBP; check connections
and tubing for kinks.
05060A
The transducer are above 5 mmHg
and the difference in pressure is
greater than 40 mmHg. Check cuff
for pinched or obstructed tubing. If
the problem persists, replace the
module.
Medium
NIBP not calibrated.
Calibrate the module.
05060B
Factory EEPROM checksum error
on NIBP. Units internal
configuration was corrupted
Calibrate the NIBP module. If the
problem persists, replace the
module.
Very low
NIBP not functional.
05060C
NIBP command not implemented
Internal malfunction. If the problem
persists, replace the module.
Very low
NIBP not functional.
05060D
NIBP wrong data count
Internal malfunction. If the problem
persists, replace the module.
Very low
NIBP not functional.
05060E
NIBP data range error
Internal malfunction. If the problem
persists, replace the module.
Very low
NIBP not functional.
05060F
NIBP no POST error to clear
Internal malfunction. If the problem
persists, replace the module.
Very low
NIBP not functional.
050610
NIBP cannot clear this POST error Internal malfunction. If the problem
persists, replace the module.
Very low
NIBP not functional.
050611
NIBP command not command type Internal malfunction. If the problem
persists, replace the module.
Very low
NIBP not functional.
050612
NIBP communication timeout
Internal malfunction. If the problem
persists, replace the module.
Very low
NIBP not functional.
050613
NIBP response header wrong
Internal malfunction. If the problem
persists, replace the module.
Very low
NIBP not functional.
050614
NIBP response checksum wrong
Internal malfunction. If the problem
persists, replace the module.
Very low
NIBP not functional.
050615
Too much NIBP data was received Internal malfunction. If the problem
persists, replace the module.
Very low
NIBP not functional.
050616
NIBP FPROM erase error
Internal malfunction. If the problem
persists, replace the module.
Very low
NIBP not functional.
050617
NIBP FPROM programming error
Internal malfunction. If the problem
persists, replace the module.
Very low
NIBP not functional.
050618
Invalid NIBP target pressure
Internal malfunction. If the problem
persists, replace the module.
Very low
91
92
Connex® Spot Monitor
Troubleshooting
Message
Possible cause
Suggested action
Alarm priority
Check cuff inflation
settings.
Cuff inflation target was
overridden due to max pressure
being too low
Change cuff inflation target or
maximum pressure so that the cuff
inflation target is at least 20 mmHg
lower than maximum pressure.
Information
Tube type does not
match device
configuration.
Switching to step BP
Change tube type to dual lumen or
change the algorithm configuration
to step BP
Information
NIBP not functional.
05FF01
Unrecognized WACP parameter
received from sensor
Internal malfunction. If the problem
persists, replace the module.
Very low
NIBP not functional.
05FF02
Timeout waiting for sensor
response
Internal malfunction. If the problem
persists, replace the module.
Very low
NIBP not functional.
05FF03
Error deserializing the WACP
Internal malfunction. If the problem
message received from the sensor persists, replace the module.
Very low
NIBP not functional.
05FF04
WACP stack send message failure Internal malfunction. If the problem
persists, replace the module.
Very low
NIBP not functional.
05FF05
Timeout waiting for asynchronous Internal malfunction. If the problem
sensor message
persists, replace the module.
Very low
NIBP not functional.
05FF06
One or more undetermined
numerics when reading status
indicates OK
Check connections. Restrict patient
movement.
Very low
NIBP not functional.
05FF07
Unrecognized sensor reading
status code
Internal malfunction. If the problem
persists, replace the module.
Very low
NIBP not functional.
05FF08
Sensor power up failure
Internal malfunction. If the problem
persists, replace the module.
Very low
NIBP not functional.
05FF09
WACP rendezvous failure
Internal malfunction. If the problem
persists, replace the module.
Very low
NIBP not functional.
05FF0A
Application firmware retrieval
error during POST
Internal malfunction. If the problem
persists, replace the module.
Very low
NIBP not functional.
05FF0B
Upgrade .pim file is corrupt
Internal malfunction. If the problem
persists, replace the module.
Very low
NIBP not functional.
05FF0C
Configured upgrade firmware
directory cannot be accessed
Internal malfunction. If the problem
persists, replace the module.
Very low
Device configuration
issue. 05FF0D
Configured parameter (NIBP or
Use configured parameters for
SpO2) used in Intervals is missing Intervals
Very low
NIBP not functional.
05FF0E
The NIBP sensor unexpectedly
reset
Clear the error and try again
Very low
NIBP not functional.
05FF0F
The NIBP sensor firmware failed
to upgrade
Internal malfunction. If the problem
persists, replace the module.
Very low
Directions for use
Troubleshooting
Message
Possible cause
Suggested action
Alarm priority
Tube type does not
match device
configuration.
The tube type settings and the
actual tube type do not match
Change the tube type setting to
match the actual tube type.
Information
SpO2 messages
General SpO2 messages
Message
Possible cause
Suggested action
Alarm priority
SpO2 not functional.
044800
The SpO2 power on self test
failed
Internal hardware malfunction in
SpO2 module. Replace the module.
Very low
SpO2 rebooting. 044900 The SpO2 module is rebooting
Informational error. The host
Very low
software is attempting to clear an
error by rebooting the SpO2 module.
No action required.
SpO2 rebooting. 044901 The SpO2 module stopped
sending data
Informational error. The host
Very low
software is attempting to clear an
error by rebooting the SpO2 module.
No action required.
SpO2 rebooting. 044902 SpO2 received a packet with bad Informational error. The host has
Very low
CRC from module
received a packet with bad CRC from
the SpO2 module. The packet in
question is ignored. No action
required.
SpO2 rebooting. 044903 The SpO2 power on self test
failed
Internal hardware malfunction in
SpO2 module. Replace the module.
Very low
SpO2 rebooting. 044904 The SpO2 power on self test
timed out
Internal hardware malfunction in
SpO2 module. Replace the module.
Very low
Alarm priority
Masimo messages
Message
Possible cause
Suggested action
Sensor not connected.
Clear to retry. 040600
The SpO2 cable is not connected
Connect SpO2 cable. If the problem Very low
is still present, replace the SpO2
sensor. If the problem is still present,
verify the module functionality by
replacing the sensor with an
applicable SpO2 tester. If the
message persists, replace the
module.
Replace the SpO2 cable. The SpO2 cable life has expired
040700
Replace the SpO2 cable. If the
Very low
problem is still present, verify
module functionality by replacing the
sensor with an applicable SpO2
93
94
Connex® Spot Monitor
Troubleshooting
Message
Possible cause
Suggested action
Alarm priority
tester. If the message persists,
replace the module.
Replace the SpO2 cable. The SpO2 cable is incompatible
040800
with the monitor
Replace the SpO2 cable. If the
Very low
problem is still present, verify
module functionality by replacing the
sensor with an applicable SpO2
tester. If the message persists,
replace the module.
Replace the SpO2 cable. The SpO2 cable is not recognized Replace the SpO2 cable. If the
Very low
040900
by the monitor
problem is still present, verify
module functionality by replacing the
sensor with an applicable SpO2
tester. If the message persists,
replace the module.
Replace the SpO2 cable. The SpO2 cable is defective
040a00
Sensor not connected.
Clear to retry. 040b00
Replace the SpO2 cable. If the
Very low
problem is still present, verify
module functionality by replacing the
sensor with an applicable SpO2
tester. If the message persists,
replace the module.
The SpO2 sensor is not connected Connect SpO2 sensor. If the problem Very low
to the monitor
is still present, replace the SpO2
cable. If the problem is still present,
verify the module functionality by
replacing the sensor with an
applicable SpO2 tester. If the
message persists, replace the
module.
The sensor has expired. The SpO2 sensor has expired
Replace the SpO2
sensor. 040c00
Replace SpO2 sensor. If the problem Very low
is still present, replace the SpO2
cable. If the problem is still present,
verify the module functionality by
replacing the sensor with an
applicable SpO2 tester. If the
message persists, replace the
module.
Incompatible sensor.
Replace the SpO2
sensor. 040d00
The SpO2 sensor is not recognized Replace SpO2 sensor. If the problem Very low
by the monitor
is still present, replace the SpO2
cable. If the problem is still present,
verify the module functionality by
replacing the sensor with an
applicable SpO2 tester. If the
message persists, replace the
module.
Incompatible sensor.
Replace the SpO2
sensor. 040e00
The SpO2 sensor is not recognized Replace SpO2 sensor. If the problem Very low
is still present, replace the SpO2
cable. If the problem is still present,
verify the module functionality by
replacing the sensor with an
applicable SpO2 tester. If the
message persists, replace the
module.
Directions for use
Troubleshooting
Message
Possible cause
Suggested action
Alarm priority
Replace the SpO2
sensor. 040f00
The SpO2 sensor is defective
Replace SpO2 sensor. If the problem Very low
is still present, replace the SpO2
cable. If the problem is still present,
verify the module functionality by
replacing the sensor with an
applicable SpO2 tester. If the
message persists, replace the
module.
Replace the SpO2
sensor. Replace the
SpO2 cable. 041000
There was a fault with the SpO2
sensor and cable.
Check the sensor and cable
Very low
connection. If the problem is still
present, replace the SpO2 sensor. If
the problem is still present, replace
the cable. If the problem is still
present, verify the module
functionality by replacing the sensor
with an applicable SpO2 tester. If the
message persists replace the
module.
Sensor not connected.
Clear to retry. 041100
An adhesive SpO2 sensor is not
connected
Connect SpO2 sensor. If the problem Very low
is still present, replace the SpO2
cable. If the problem is still present,
verify the module functionality by
replacing the sensor with an
applicable SpO2 tester. If the
message persists, replace the
module.
The sensor has expired. The adhesive SpO2 sensor is
Replace the SpO2
expired
sensor. 041200
Replace SpO2 sensor. If the problem Very low
is still present, replace the SpO2
cable. If the problem is still present,
verify the module functionality by
replacing the sensor with an
applicable SpO2 tester. If the
message persists, replace the
module.
Incompatible sensor.
Replace the SpO2
sensor. 041300
The adhesive SpO2 sensor is
incompatible
Replace SpO2 sensor. If the problem Very low
is still present, replace the SpO2
cable. If the problem is still present,
verify the module functionality by
replacing the sensor with an
applicable SpO2 tester. If the
message persists, replace the
module.
Incompatible sensor.
Replace the SpO2
sensor. 041400
The adhesive SpO2 sensor is not
recognized
Replace SpO2 sensor. If the problem Very low
is still present, replace the SpO2
cable. If the problem is still present,
verify the module functionality by
replacing the sensor with an
applicable SpO2 tester. If the
message persists, replace the
module.
Replace the SpO2
sensor. 041500
The adhesive SpO2 sensor is
defective
Replace SpO2 sensor. If the problem Very low
is still present, replace the SpO2
cable. If the problem is still present,
verify the module functionality by
replacing the sensor with an
95
96
Connex® Spot Monitor
Troubleshooting
Message
Possible cause
Suggested action
Alarm priority
applicable SpO2 tester. If the
message persists, replace the
module.
Searching for pulse
signal. 041800
SpO2 pulse search
Pulse search is part of normal
operation, and does not have an
associated corrective action.
Low perfusion index.
Clear to retry. 041a00
There is marginal SpO2 pulse
quality or artifact.
Reapply the sensor to a better
Very low
perfused monitoring site. Assess the
patient and, if indicated, verify
oxygenation status through other
means. If the problem is still present,
replace the SpO2 sensor. If the
problem is still present, replace the
cable. If the problem is still present,
verify module functionality by
replacing the sensor with an
applicable SpO2 tester. If the
message persists replace the
module.
Demo mode active.
041b00
The SpO2 parameter is in demo
mode
None.1
Sensor not connected.
Clear to retry. 041c00
Check the SpO2 sensor connection Check the sensor and cable
Very low
connection. If the problem is still
present, replace the SpO2 sensor. If
the problem is still present, replace
the cable. If the problem is still
present, verify the module
functionality by replacing the sensor
with an applicable SpO2 tester. If the
message persists replace the
module.
SpO2 rebooting. 041e00 There is an SpO2 raw queue
overrun
High
Very low
A malfunction is detected. There are Very low
two possible causes of these
failures. First, the power provided to
the board is out of specification. In
this case, the failure may be cleared
once the underlying cause is
removed. Second, the board has an
actual hardware failure and recovery
is not possible. It is recommended
that the SpO2 module be replaced,
and if problem is still present replace
the monitor's main board.
SpO2 rebooting. 041f00 There is an SpO2 hardware failure A malfunction is detected. There are Very low
two possible causes of these
failures. First, the power provided to
the board is out of specification. In
this case, the failure may be cleared
once the underlying cause is
removed. Second, the board has an
actual hardware failure and recovery
is not possible. It is recommended
that the SpO2 module be replaced,
and if problem is still present replace
the monitor's main board.
Directions for use
Troubleshooting
Message
Possible cause
SpO2 parameter
exception. 041900
Interference detected
SpO2 rebooting. 042000 There is an SpO2 MCU failure
Suggested action
Alarm priority
A malfunction is detected. There are Very low
two possible causes of these
failures. First, the power provided to
the board is out of specification. In
this case, the failure may be cleared
once the underlying cause is
removed. Second, the board has an
actual hardware failure and recovery
is not possible. It is recommended
that the SpO2 module be replaced,
and if problem is still present replace
the monitor's main board.
SpO2 rebooting. 042100 There is an SpO2 watchdog failure A malfunction is detected. There are Very low
two possible causes of these
failures. First, the power provided to
the board is out of specification. In
this case, the failure may be cleared
once the underlying cause is
removed. Second, the board has an
actual hardware failure and recovery
is not possible. It is recommended
that the SpO2 module be replaced,
and if problem is still present replace
the monitor's main board.
SpO2 not functional.
042200
There is an invalid SpO2 board
type
A malfunction is detected. There are Very low
two possible causes of these
failures. First, the power provided to
the board is out of specification. In
this case, the failure may be cleared
once the underlying cause is
removed. Second, the board has an
actual hardware failure and recovery
is not possible. It is recommended
that the SpO2 module be replaced,
and if problem is still present replace
the monitor's main board.
SpO2 rebooting. 042300 There is an invalid SpO2 master
control state
A malfunction is detected. There are Very low
two possible causes of these
failures. First, the power provided to
the board is out of specification. In
this case, the failure may be cleared
once the underlying cause is
removed. Second, the board has an
actual hardware failure and recovery
is not possible. It is recommended
that the SpO2 module be replaced,
and if problem is still present replace
the monitor's main board.
SpO2 rebooting. 042400 There is an SpO2 SRAM transfer
failure
A malfunction is detected. There are Very low
two possible causes of these
failures. First, the power provided to
the board is out of specification. In
this case, the failure may be cleared
once the underlying cause is
97
98
Connex® Spot Monitor
Troubleshooting
Message
Possible cause
Suggested action
Alarm priority
removed. Second, the board has an
actual hardware failure and recovery
is not possible. It is recommended
that the SpO2 module be replaced,
and if problem is still present replace
the monitor's main board.
SpO2 rebooting. 042500 There is an SpO2 SRAM task
queue overrun
A malfunction is detected. There are Very low
two possible causes of these
failures. First, the power provided to
the board is out of specification. In
this case, the failure may be cleared
once the underlying cause is
removed. Second, the board has an
actual hardware failure and recovery
is not possible. It is recommended
that the SpO2 module be replaced,
and if problem is still present replace
the monitor's main board.
SpO2 rebooting. 042600 There is an SpO2 database failure A malfunction is detected. There are Very low
two possible causes of these
failures. First, the power provided to
the board is out of specification. In
this case, the failure may be cleared
once the underlying cause is
removed. Second, the board has an
actual hardware failure and recovery
is not possible. It is recommended
that the SpO2 module be replaced,
and if problem is still present replace
the monitor's main board.
SpO2 rebooting. 042700 There is an invalid SpO2 flash
memory device
A malfunction is detected. There are Very low
two possible causes of these
failures. First, the power provided to
the board is out of specification. In
this case, the failure may be cleared
once the underlying cause is
removed. Second, the board has an
actual hardware failure and recovery
is not possible. It is recommended
that the SpO2 module be replaced,
and if problem is still present replace
the monitor's main board.
SpO2 rebooting. 042800 There is a problem with the SpO2 A malfunction is detected. There are Very low
analog ground
two possible causes of these
failures. First, the power provided to
the board is out of specification. In
this case, the failure may be cleared
once the underlying cause is
removed. Second, the board has an
actual hardware failure and recovery
is not possible. It is recommended
that the SpO2 module be replaced,
and if problem is still present replace
the monitor's main board.
SpO2 rebooting. 042900 There is a problem with the SpO2 A malfunction is detected. There are Very low
digital ground
two possible causes of these
failures. First, the power provided to
Directions for use
Troubleshooting
Message
Possible cause
Suggested action
Alarm priority
the board is out of specification. In
this case, the failure may be cleared
once the underlying cause is
removed. Second, the board has an
actual hardware failure and recovery
is not possible. It is recommended
that the SpO2 module be replaced,
and if problem is still present replace
the monitor's main board.
SpO2 rebooting. 042a00 There is a problem with the SpO2 A malfunction is detected. There are Very low
LED ground
two possible causes of these
failures. First, the power provided to
the board is out of specification. In
this case, the failure may be cleared
once the underlying cause is
removed. Second, the board has an
actual hardware failure and recovery
is not possible. It is recommended
that the SpO2 module be replaced,
and if problem is still present replace
the monitor's main board.
SpO2 rebooting. 042b00 There is a problem with the SpO2 A malfunction is detected. There are Very low
reference voltage
two possible causes of these
failures. First, the power provided to
the board is out of specification. In
this case, the failure may be cleared
once the underlying cause is
removed. Second, the board has an
actual hardware failure and recovery
is not possible. It is recommended
that the SpO2 module be replaced,
and if problem is still present replace
the monitor's main board.
SpO2 rebooting. 042c00 There is a problem with the SpO2 A malfunction is detected. There are Very low
DSP core voltage
two possible causes of these
failures. First, the power provided to
the board is out of specification. In
this case, the failure may be cleared
once the underlying cause is
removed. Second, the board has an
actual hardware failure and recovery
is not possible. It is recommended
that the SpO2 module be replaced,
and if problem is still present replace
the monitor's main board.
SpO2 rebooting. 042d00 There is a problem with the SpO2 A malfunction is detected. There are Very low
filtered input voltage
two possible causes of these
failures. First, the power provided to
the board is out of specification. In
this case, the failure may be cleared
once the underlying cause is
removed. Second, the board has an
actual hardware failure and recovery
is not possible. It is recommended
that the SpO2 module be replaced,
and if problem is still present replace
the monitor's main board.
99
100
Connex® Spot Monitor
Troubleshooting
Message
Possible cause
Suggested action
Alarm priority
SpO2 rebooting. 042e00 There is a problem with the SpO2 A malfunction is detected. There are Very low
DSP I/O voltage
two possible causes of these
failures. First, the power provided to
the board is out of specification. In
this case, the failure may be cleared
once the underlying cause is
removed. Second, the board has an
actual hardware failure and recovery
is not possible. It is recommended
that the SpO2 module be replaced,
and if problem is still present replace
the monitor's main board.
SpO2 rebooting. 042f00 There is a problem with the SpO2 A malfunction is detected. There are Very low
positive detector voltage
two possible causes of these
failures. First, the power provided to
the board is out of specification. In
this case, the failure may be cleared
once the underlying cause is
removed. Second, the board has an
actual hardware failure and recovery
is not possible. It is recommended
that the SpO2 module be replaced,
and if problem is still present replace
the monitor's main board.
SpO2 rebooting. 043000 There is a problem with the SpO2 A malfunction is detected. There are Very low
negative detector voltage
two possible causes of these
failures. First, the power provided to
the board is out of specification. In
this case, the failure may be cleared
once the underlying cause is
removed. Second, the board has an
actual hardware failure and recovery
is not possible. It is recommended
that the SpO2 module be replaced,
and if problem is still present replace
the monitor's main board.
SpO2 rebooting. 043100 There is a problem with the SpO2 A malfunction is detected. There are Very low
positive LED Voltage
two possible causes of these
failures. First, the power provided to
the board is out of specification. In
this case, the failure may be cleared
once the underlying cause is
removed. Second, the board has an
actual hardware failure and recovery
is not possible. It is recommended
that the SpO2 module be replaced,
and if problem is still present replace
the monitor's main board.
SpO2 rebooting. 043200 There is a problem with the SpO2 A malfunction is detected. There are Very low
LED drive voltage
two possible causes of these
failures. First, the power provided to
the board is out of specification. In
this case, the failure may be cleared
once the underlying cause is
removed. Second, the board has an
actual hardware failure and recovery
is not possible. It is recommended
Directions for use
Troubleshooting
Message
Possible cause
Suggested action
Alarm priority
that the SpO2 module be replaced,
and if problem is still present replace
the monitor's main board.
SpO2 rebooting. 043300 There is a problem with the SpO2 A malfunction is detected. There are Very low
positive preamp voltage
two possible causes of these
failures. First, the power provided to
the board is out of specification. In
this case, the failure may be cleared
once the underlying cause is
removed. Second, the board has an
actual hardware failure and recovery
is not possible. It is recommended
that the SpO2 module be replaced,
and if problem is still present replace
the monitor's main board.
SpO2 rebooting. 043400 There is a problem with the SpO2 A malfunction is detected. There are Very low
Sensor ID
two possible causes of these
failures. First, the power provided to
the board is out of specification. In
this case, the failure may be cleared
once the underlying cause is
removed. Second, the board has an
actual hardware failure and recovery
is not possible. It is recommended
that the SpO2 module be replaced,
and if problem is still present replace
the monitor's main board.
SpO2 rebooting. 043500 There is a problem with the SpO2 A malfunction is detected. There are Very low
thermistor
two possible causes of these
failures. First, the power provided to
the board is out of specification. In
this case, the failure may be cleared
once the underlying cause is
removed. Second, the board has an
actual hardware failure and recovery
is not possible. It is recommended
that the SpO2 module be replaced,
and if problem is still present replace
the monitor's main board.
SpO2 rebooting. 043600 There is a problem with the SpO2 A malfunction is detected. There are Very low
LED current
two possible causes of these
failures. First, the power provided to
the board is out of specification. In
this case, the failure may be cleared
once the underlying cause is
removed. Second, the board has an
actual hardware failure and recovery
is not possible. It is recommended
that the SpO2 module be replaced,
and if problem is still present replace
the monitor's main board.
SpO2 rebooting. 043700 There is a problem with the SpO2 A malfunction is detected. There are Very low
preamp
two possible causes of these
failures. First, the power provided to
the board is out of specification. In
this case, the failure may be cleared
once the underlying cause is
101
102
Connex® Spot Monitor
Troubleshooting
Message
Possible cause
Suggested action
Alarm priority
removed. Second, the board has an
actual hardware failure and recovery
is not possible. It is recommended
that the SpO2 module be replaced,
and if problem is still present replace
the monitor's main board.
SpO2 rebooting. 044200 The SpO2 module received a bad
packet
SpO2 parameter
exception 044e00
Low signal IQ
SpO2 parameter
exception 044f00
Low PR confidence
There is an internal software
Very low
malfunction in the main PCBA.
Update the software. If the problem
persists, replace the module.
SpO2 rebooting. 044300 The SpO2 module received an
invalid command
There is an internal software
Very low
malfunction in the main PCBA.
Update the software. If the problem
persists, replace the module.
SpO2 rebooting. 044400 The SpO2 module received a
command that would result in
more output than the baud rate
can support
There is an internal software
Very low
malfunction in the main PCBA.
Update the software. If the problem
persists, replace the module.
SpO2 rebooting. 044500 The SpO2 module received a
command that requires an
application that is not present
There is an internal software
Very low
malfunction in the main PCBA.
Update the software. If the problem
persists, replace the module.
SpO2 rebooting. 044600 The SpO2 module received a
command while still locked
There is an internal software
Very low
malfunction in the main PCBA.
Update the software. If the problem
persists, replace the module.
SpO2 parameter
exception. 045000
Low PI confidence
1Demo mode is reported when you plug a Masimo demo tool into the patient cable connector. This tools
simulates a patient being connected, and is only used in a development environment. Because this tool
simulates a patient without a patient actually being connected, it should NEVER be present in a clinical setting.
Nellcor messages
Message
Possible cause
Sensor not connected.
Clear to retry. 043800
The SpO2 sensor is not connected Connect SpO2 sensor. If the problem Very low
is still present, replace the SpO2
cable. If the problem is still present,
verify the module functionality by
replacing the sensor with an
applicable SpO2 tester. If the
message persists, replace the
module.
Suggested action
Alarm priority
Directions for use
Troubleshooting
Message
Possible cause
Suggested action
Alarm priority
Searching for pulse
signal 043900
None
None1
High
SpO2 interference
SpO2 module interference
detected. Clear to retry. detected.
043b00
Reapply the sensor to the patient. If Very low
the problem is still present, replace
the SpO2 Sensor. If the problem is
still present, replace the cable. If the
problem is still present, verify
module functionality by replacing the
sensor with an applicable SpO2
tester. If the message persists,
replace the module.
SpO2 rebooting. 043c00 SpO2 module hardware error
A module hardware error is
detected. Replace module.
Very low
SpO2 rebooting. 043d00 SpO2 module hardware error
A module hardware error is
detected. Replace module.
Very low
SpO2 rebooting. 043e00 SpO2 module software error
A module hardware error is
detected. Replace module.
Very low
SpO2 rebooting. 043f00 The SpO2 module received a bad
message
This error indicates a bug in the main Very low
board software. Call for service.
Replace the SpO2
sensor. 044000
Replace the SpO2 sensor. If the
Very low
problem is still present, replace the
SpO2 sensor. If the problem is still
present, replace the cable. If the
problem is still present, verify
module functionality by replacing the
sensor with an applicable SpO2
tester. If the message persists,
replace the module.
The SpO2 sensor is defective
SpO2 rebooting. 044100 The SpO2 module received a bad
message
1Pulse
This error indicates a bug in the main Very low
board software. Call for service.
search is a normal part of operation and does not have an associated corrective action.
Nonin messages
Message
Possible cause
Sensor not connected.
Clear to retry. 040100
The SpO2 sensor is not connected Connect SpO2 sensor, if the problem Very low
is still present, replace the SpO2
cable. If the problem is still present,
verify the module functionality by
replacing the sensor with an
applicable SpO2 tester. If the
message persists, replace the
module.
Searching for pulse
signal. 040200
None
Suggested action
None1
Alarm priority
High
103
104
Connex® Spot Monitor
Troubleshooting
Message
Possible cause
Suggested action
Alarm priority
SpO2 interference
The SpO2 interference detected.
detected. Clear to retry.
040400
Reapply the sensor to the patient. If Very low
the problem is still present, replace
the SpO2 Sensor. If the problem is
still present, replace the cable. If the
problem is still present, verify
module functionality by replacing the
sensor with an applicable SpO2
tester. If the message persists,
replace the module.
Low SpO2 perfusion
index. Clear to retry.
040500
Reapply the sensor to the patient. If Very low
the problem is still present, replace
the SpO2 Sensor. If the problem is
still present, replace the cable. If the
problem is still present, verify
module functionality by replacing the
sensor with an applicable SpO2
tester. If the message persists,
replace the module.
1Pulse
SpO2 marginal pulse quality or
artifact
search is a normal part of operation and does not have an associated corrective action.
Temperature messages
SureTemp messages
Message
Possible cause
Suggested action
Alarm priority
Temperature not functional.
30105
WACP message CRC
mismatch on
temperature module
Internal malfunction. If the problem
persists, replace the module.
Very low
Temperature not functional.
30201
This message is not
implemented by the
temperature module
Internal malfunction. If the problem
persists, replace the module.
Very low
Temperature not functional.
30202
This message is not
supported by the
temperature module
Internal malfunction. If the problem
persists, replace the module.
Very low
Temperature not functional.
30203
The temperature
module has run out of
memory.
Internal malfunction. If the problem
persists, replace the module.
Very low
Temperature not functional.
30205
The temperature
module received a
invalid parameter
Internal malfunction. If the problem
persists, replace the module.
Very low
Temperature not functional.
30206
The parameter provided Internal malfunction. If the problem
by the temperature
persists, replace the module.
module is outside of
the allowable range for
the specified message.
Very low
Temperature not functional.
30207
The temperature
module message
Very low
Internal malfunction. If the problem
persists, replace the module.
Directions for use
Troubleshooting
Message
Possible cause
Suggested action
105
Alarm priority
requires an object, but
did not contain one.
Temperature not functional.
30208
The temperature
Internal malfunction. If the problem
module object provided persists, replace the module.
with the message could
not be deserialized.
Very low
Temperature not functional.
30209
The temperature
Internal malfunction. If the problem
module object could not persists, replace the module.
be serialized.
Very low
Temperature not functional.
3020A
The temperature
Internal malfunction. If the problem
module message is
persists, replace the module.
performing a request/
action when the
module state prohibits
the request/action.
Very low
Temperature not functional.
3020B
The temperature
Internal malfunction. If the problem
module requested item persists, replace the module.
is not currently
available due to the
module state.
Very low
Temperature not functional.
30503
The temperature
Internal malfunction. If the problem
module factory
persists, replace the module.
settings, and
calibration information
is corrupt.
Very low
Temperature not functional.
30504
The temperature
module user settings
are corrupt.
Internal malfunction. If the problem
persists, replace the module.
Very low
Temperature not functional.
30509
The temperature
module calibration is
not set.
Internal malfunction. If the problem
persists, replace the module.
Very low
Temperature not functional.
3050C
The temperature
module error log is
corrupt.
Internal malfunction. If the problem
persists, replace the module.
Very low
Temperature not functional.
30516
A hardware
malfunction on the
temperature module
has been detected.
Internal malfunction. If the problem
persists, replace the module.
Very low
Temperature not functional.
30518
The temperature
module power rail is
too low.
Internal malfunction. If the problem
persists, replace the module.
Very low
Temperature not functional.
30519
The temperature
module power rail is
too high.
Internal malfunction. If the problem
persists, replace the module.
Very low
Temperature not functional.
3051A
The temperature
module reference
voltage circuit was
Internal malfunction. If the problem
persists, replace the module.
Very low
106
Connex® Spot Monitor
Troubleshooting
Message
Possible cause
Suggested action
Alarm priority
detected to be under
voltage or unstable.
Ambient temperature out of
range. Clear to retry. 30801
The temperature
module measurement is
below the allowable
temperature values and
beyond the low
ambient or patient
limits.
Verify conditions are greater than 50 °F or Very low
10 °C. If conditions are valid and the
problem persists, replace the probe. If the
problem still persists, replace the module.
Ambient temperature out of
range. Clear to retry. 30802
The temperature
module measurement is
above the allowable
temperature values and
beyond the high
ambient or patient
limits.
Verify conditions are less than 104 °F or Very low
40 °C. If conditions are valid and the
problem persists, replace the probe. If the
problem still persists, replace the module.
Temperature not functional.
30803
The temperature
module internal
calibration resistor
(RCAL) on the board is
damaged or
contaminated (pulse
too long).
Internal malfunction. If the problem
persists, replace the module.
Very low
Temperature not functional.
30804
The temperature
module internal
calibration resistor
(RCAL) on the board is
damaged or
contaminated (pulse
too short).
Internal malfunction. If the problem
persists, replace the module.
Very low
Temperature not functional.
30805
The temperature
Internal malfunction. If the problem
module internal circuit persists, replace the module.
validation resistor (PTB)
on the board is
damaged (value is
over).
Very low
Temperature not functional.
30806
The temperature
Internal malfunction. If the problem
module internal circuit persists, replace the module.
validation resistor (PTB)
on the board is
damaged (value is
under).
Very low
Ambient temperature out of
range. Clear to retry. 30807
The temperature
Verify conditions are greater than 50 °F or Very low
module A/D
10 °C. If conditions are valid and the
measurement timed out problem persists, replace the probe. If the
problem still persists, replace the module.
Replace temperature probe.
30808
The temperature
Probe malfunction. Replace the probe. If Very low
module probe was not the problem persists, replace the module.
characterized/
calibrated
Directions for use
Troubleshooting
107
Message
Possible cause
Suggested action
Alarm priority
Insert correct color-coded probe
well. 30809
The temperature
module is missing the
probe well
Insert the probe well
Very low
Temperature not functional.
3080A
The temperature
module has a problem
saving to the monitor
EEPROM in biotech
mode
Internal malfunction. If the problem
persists, replace the module.
Very low
Temperature not functional.
3080B
The temperature
Internal malfunction. If the problem
module error detection persists, replace the module.
mechanism detected an
error
Very low
Replace temperature probe.
3080C
The temperature
module probe error
detection mechanism
detected an error
Probe malfunction. Replace probe. If the
problem persists, replace the module.
Very low
Temperature not functional.
3080D
The temperature
module log error
detection mechanism
detected an error
Probe malfunction. Replace probe. If the
problem persists, replace the module.
Very low
Temperature not functional.
3080E
The temperature
Probe malfunction. Replace probe. If the
module calibration error problem persists, replace the module.
detection mechanism
detected an error
Very low
Connect temperature probe.
3080F
The temperature
module detected no
probe connected
Probe malfunction. Replace probe. If the
problem persists, replace the module.
Very low
Replace temperature probe.
30810
The temperature
Probe malfunction. Replace probe. If the
module cannot read the problem persists, replace the module.
probe EEPROM
correctly or the probe
left the factory without
being tested.
Very low
Temperature not functional.
30811
The temperature
module has an invalid
events index
Internal malfunction. If the problem
persists, replace the module.
Very low
Temperature not functional.
30812
There is a problem
Internal malfunction. If the problem
reading the
persists, replace the module.
temperature module
EEPROM or saving to
the monitor EEPROM in
biotech mode.
Very low
Replace temperature probe. Code The temperature
30813
module has a problem
reading the probe
EEPROM.
Probe malfunction. Replace probe. If the
problem persists, replace the module.
Very low
108
Connex® Spot Monitor
Troubleshooting
Message
Possible cause
Suggested action
Alarm priority
Temperature not functional.
30814
The temperature
Internal malfunction. If the problem
module TEMP CONFIG persists, replace the module.
ACQUIRE FAILURE
Very low
Temperature not functional.
30815
The temperature
Internal malfunction. If the problem
module TEMP CONFIG persists, replace the module.
RELEASE FAILURE
Very low
Temperature not functional.
30816
The temperature
Internal malfunction. If the problem
module TEMP CONFIG persists, replace the module.
INVALID PTR FAILURE
Very low
Temperature not functional.
30817
The temperature
Internal malfunction. If the problem
module internal error. persists, replace the module.
EEPROM not initialized
Very low
Unable to detect new
The temperature
temperature. Retry measurement. module heater
30818
indicates on when
turned off.
Probe malfunction. Replace probe. If the
problem persists, replace the module.
Very low
Unable to detect new
The temperature
temperature. Retry measurement. module heater
30819
indicates off when
turned on.
Probe malfunction. Replace probe. If the
problem persists, replace the module.
Very low
Temperature not functional.
3081A
The temperature
Internal malfunction. If the problem
module HTR_Q is on
persists, replace the module.
and HTRC is off but still
has voltage.
Very low
Temperature not functional.
3081B
The temperature
Internal malfunction. If the problem
module HTR_Q is tri- persists, replace the module.
stated with HTRC
enabled and has heater
power.
Very low
Temperature not functional.
3081C
The temperature
Internal malfunction. If the problem
module turned Q&C on persists, replace the module.
and the heater voltage
is not high enough.
Very low
Temperature not functional.
3081D
The temperature
Internal malfunction. If the problem
module heater
persists, replace the module.
hardware failsafe
should have turned off
but did not.
Very low
Replace temperature probe.
3081E
The temperature
Probe malfunction. Replace probe. If the
module probe is above problem persists, replace the module.
112°F or 43.3°C.
Very low
Replace temperature probe.
3081F
The temperature
module has excessive
heater energy
Probe malfunction. Replace probe. If the
problem persists, replace the module.
Very low
Temperature not functional.
30820
The temperature
module host interface
error
Internal malfunction. If the problem
persists, replace the module.
Very low
Directions for use
Troubleshooting
Message
Possible cause
Suggested action
Ambient temperature out of
range. Clear to retry. 30821
The temperature
module over ambient
45 °C temp
Verify conditions are less than 104 °F or Very low
40 °C. If conditions are valid and the
problem persists, replace the probe. If the
problem still persists, replace the module.
Ambient temperature out of
range. Clear to retry. 30822
The temperature
Verify conditions are greater than 50 F or Very low
module under ambient 10°C. If conditions are valid and the
temp
problem persists, replace the probe. If the
problem still persists, replace the module.
Temperature not functional.
30823
The temperature
module has an invalid
SureTemp algorithm
Internal malfunction. If the problem
persists, replace the module.
Very low
Temperature not functional.
30824
The temperature
module is over max
battery volts
Internal malfunction. If the problem
persists, replace the module.
Very low
Temperature not functional.
30825
The temperature
module is under min
battery volts
Internal malfunction. If the problem
persists, replace the module.
Very low
Temperature not functional.
30826
The temperature
module battery volts
not set
Internal malfunction. If the problem
persists, replace the module.
Very low
Temperature not functional.
30827
The temperature
module predict
algorithm is not set
Internal malfunction. If the problem
persists, replace the module.
Very low
Temperature not functional.
30828
The temperature
module ambient temp
is not set
Internal malfunction. If the problem
persists, replace the module.
Very low
Temperature not functional.
30829
The temperature
module has a nonresponsive probe. The
thermistor has pulled
away from the tip or
the heater is broken.
Probe malfunction. Replace probe. If the
problem persists, replace the module.
Very low
Temperature not functional.
3082A
The temperature
Probe malfunction. Replace probe. If the
module is experiencing problem persists, replace the module.
bad probe gain
Very low
Temperature not functional.
3082B
The temperature
Probe malfunction. Replace probe. If the
module has a bad probe problem persists, replace the module.
response value
Very low
Temperature not functional.
03C800
The temperature
module is not
functional
Internal malfunction. If the problem
persists, replace the module.
Very low
Temperature not functional.
03C900
Unable to deserialize
messages from the
temperature module
Internal malfunction. If the problem
persists, replace the module.
Very low
109
Alarm priority
110
Connex® Spot Monitor
Troubleshooting
Message
Possible cause
Suggested action
Alarm priority
Temperature not functional.
03CA00
Unsupported message Internal malfunction. If the problem
received from the
persists, replace the module.
Temperature module
Very low
Temperature not functional.
03CB00
Unable to send
message to the
Temperature module
Internal malfunction. If the problem
persists, replace the module.
Very low
Temperature not functional.
03CC00
Temperature module
communication times
out
Internal malfunction. If the problem
persists, replace the module.
Very low
Temperature not functional.
03CD00
Failed to upgrade the
temperature module
Internal malfunction. If the problem
persists, replace the module.
Very low
Temperature not functional.
03CE00
Unable to read PIM file Retry the device update.
Very low
Temperature not functional.
03CE01
Upgrade file directory
could not be accessed
Retry the device update
Very low
Direct mode reading timed out
Direct mode reading
times out
Direction mode reading times out
Information
Tissue contact lost.
Lost tissue contact
Check the tissue contact and try the
while attempting to
measurement again.
acquire a temperature
measurement or
acquired measurement
was performed with
limited tissue contact.
Information
Temperature module reset.
03D000
Temperature sensor
reset unexpectedly
None
Very low
Message
Possible cause
Suggested action
Alarm
priority
Temperature not functional.
3F0105
WACP message CRC
mismatch.
Internal malfunction. If the problem
persists, replace the module.
Very low
Temperature not functional.
3F0201
This message is not
implemented by the
module.
Internal malfunction. If the problem
persists, replace the module.
Very low
Temperature not functional.
3F0202
This message is not
supported by the
module.
Internal malfunction. If the problem
persists, replace the module.
Very low
Temperature not functional.
3F0203
The module has run out Internal malfunction. If the problem
of memory.
persists, replace the module.
Very low
Braun 6000 messages
Directions for use
Troubleshooting
Suggested action
Alarm
priority
Message
Possible cause
Temperature not functional.
3F0204
No parameter provided Internal malfunction. If the problem
for the specified
persists, replace the module.
message.
Very low
Temperature not functional.
3F0205
The parameter provided Internal malfunction. If the problem
is invalid for the
persists, replace the module.
specified message.
Very low
Temperature not functional.
3F0206
The parameter provided Internal malfunction. If the problem
is outside of the
persists, replace the module.
allowable range for the
specified message.
Very low
Temperature not functional.
3F0207
The message requires
an object, but did not
contain one.
Internal malfunction. If the problem
persists, replace the module.
Very low
Temperature not functional.
3F0208
The object provided
Internal malfunction. If the problem
with the message could persists, replace the module.
not be deserialized.
Very low
Temperature not functional.
3F0209
The object could not be Internal malfunction. If the problem
serialized.
persists, replace the module.
Very low
Temperature not functional.
3F020A
The message is
Internal malfunction. If the problem
performing a request/ persists, replace the module.
action when the
module state prohibits
the request/action.
Very low
Temperature not functional.
3F020B
The requested item is Internal malfunction. If the problem
not currently available persists, replace the module.
due to the module
state.
Very low
Temperature not functional.
3F0503
The factory settings,
and calibration
information is corrupt.
Internal malfunction. If the problem
persists, replace the module.
Very low
Temperature not functional.
3F0504
The user settings are
corrupt.
Internal malfunction. If the problem
persists, replace the module.
Very low
Temperature not functional.
3F0509
The calibration is not
set.
Internal malfunction. If the problem
persists, replace the module.
Very low
Temperature not functional.
3F050C
The error log is corrupt. Internal malfunction. If the problem
persists, replace the module.
Very low
Temperature not functional.
3F0516
A hardware
malfunction has been
detected
Internal malfunction. If the problem
persists, replace the module.
Very low
Temperature not functional.
3F0518
The module power rail Internal malfunction. If the problem
is too low.
persists, replace the module.
Very low
Temperature not functional.
3F0519
The module power rail Internal malfunction. If the problem
is too high.
persists, replace the module.
Very low
111
112
Connex® Spot Monitor
Troubleshooting
Possible cause
Temperature not functional.
3F051A
The reference voltage Internal malfunction. If the problem
circuit was detected to persists, replace the module.
be under voltage or
unstable.
Temperature not functional.
3F0821
The ambient
Verify conditions are less than 104°F or
Very low
temperature is too high 40°C. If conditions are valid and the
problem persists, replace the probe. If the
problem still persists, replace the module.
Temperature not functional.
3F0822
The ambient
Verify conditions are greater than 50°F or Very low
temperature is too low 10°C. If conditions are valid and problem
persists, replace the probe. If the problem
still persists, replace the module.
Temperature not functional.
3F0824
The battery is over the Internal malfunction. If the problem
maximum voltage
persists, replace the module.
Very low
Temperature not functional.
3F0833
The sensor not
functional
Internal malfunction. If the problem
persists, replace the module.
Very low
Temperature not functional.
3F0E04
Low battery
Recharge the battery. If the problem
persists, check the battery.
Very low
Unable to detect new
No temperature
temperature. Retry measurement. measurement was
available from the
thermometer at the
time it was docked.
Suggested action
Alarm
priority
Message
Very low
If a measurement should have been
Information
available, retry the measurement. If
problem the persists, replace the module.
Thermometer might be docked
improperly. Check contacts and
connections.
Communication failure The thermometer might be docked
with docked Braun
improperly. Check contacts and
connections. If problem the persists,
replace the module.
Information
Temperature not functional.
3FFF01
Unrecognized WACP
parameter received
from sensor
Internal malfunction. If the problem
persists, replace the module.
Very low
Temperature not functional.
3FFF02
Timeout waiting for
sensor response
Internal malfunction. If the problem
persists, replace the module.
Very low
Temperature not functional.
3FFF03
Error deserializing
WACP message
received from sensor
Internal malfunction. If the problem
persists, replace the module.
Very low
Temperature not functional.
3FFF04
WACP stack send
message failure
Internal malfunction. If the problem
persists, replace the module.
Very low
Re-dock Braun. 3FFF05
Anti-theft timer expired Re-dock the thermometer after taking a
measurement.
Very low
Directions for use
Troubleshooting
113
Patient and clinician data messages
Alarm
priority
Message
Possible cause
Suggested action
Unable to identify
clinician. No provider
configured at host.
Clinician authentication failure
Information status message; press OK button Information
to dismiss.
Unable to identify
clinician. Security
provider error.
Clinician authentication failure
Information status message; press OK button Information
to dismiss.
Unable to identify
clinician. User not
found.
Clinician authentication failure
Information status message; press OK button Information
to dismiss.
Unable to identify
clinician. Invalid ID or
system password.
Clinician authentication failure
Information status message; press OK button Information
to dismiss.
Unable to identify
clinician. Account
disabled/expired.
Clinician authentication failure
Information status message; press OK button Information
to dismiss.
Unable to identify
clinician. Password
expired/reset required.
Clinician authentication failure
Information status message; press OK button Information
to dismiss.
Unable to identify
clinician. Group
membership error.
Clinician authentication failure
Information status message; press OK button Information
to dismiss.
Unable to identify
Clinician authentication failure
clinician.
Touch Clear to delete all
data.
Information status message; press OK button Information
to dismiss.
Unable to identify
Patient authentication failure
patient.
Touch Clear to delete all
data.
Information status message; press OK button Information
to dismiss.
Database schema out of The database was cleared due to Information status message; press OK button Information
data; recreating.
a schema update
to dismiss.
Database is unreadable The database was unreadable
during startup;
during startup
recreating. 1F0001
Press OK button to dismiss.
Very low
Error accessing PDM
database; restarting
PDM. 1F0002
Press OK button to dismiss.
Very low
Database corrupted when device
is in operation
Maximum number of
Data was deleted as it contained Information status message; press OK button Information
patient records + Oldest more than 400 records
to dismiss.
record overwritten.
114
Connex® Spot Monitor
Troubleshooting
Alarm
priority
Message
Possible cause
Suggested action
No data saved.
A manual save is not allowed
Information status message; press OK button Information
to dismiss.
Save successful.
A manual record was saved
Information status message; press OK button Information
to dismiss.
Patient ID required to
save data.
A Patient ID is required to save
data
Information status message; press OK button Information
to dismiss.
Patient ID required to
start intervals.
A Patient ID is required to start
intervals
Information status message; press OK button Information
to dismiss.
Clinician ID required to
save data.
A Clinician ID is required to save
data
Information status message; press OK button Information
to dismiss.
Clinician ID required to
start intervals.
A Clinician ID is required to start
intervals
Information status message; press OK button Information
to dismiss.
Patient ID match
required to save data.
A Patient ID match is required to
save data
N/A
Information
Patient ID match
required to start
intervals.
A Patient ID match is required to
start intervals
N/A
Information
Clinician ID match
required to save data.
A Clinician ID match is required to N/A
save data
Information
Clinician ID match
required to start
intervals.
A Clinician ID match is required to N/A
start intervals
Information
Unable to auto save.
The device was unable to auto
save
Barcode scan not
accepted.
Barcode scanning is not available Information status message; press OK button Information
to dismiss.
Invalid NIBP interval
parameter during
interval capture.
An invalid interval parameter was Information status message; press OK button Information
to dismiss.
detected.
Save successful.
The auto save is successful in
Office Profile
Information status message; press OK button Information
to dismiss.
Information status message; press OK button Information
to dismiss.
Unsent records: N of M There are unsent records waiting Information status message; press OK button Information
when the device is powered down to dismiss.
Barcode scanning is not Barcode scanning is not available. Information status message; press OK button Information
available. Enter patient Enter patient information
to dismiss.
information manually. manually.
Directions for use
Troubleshooting
Alarm
priority
Message
Possible cause
Suggested action
Invalid SpO2 interval
parameter during
interval capture.
An invalid interval parameter was If SpO2 intervals are enabled and SpO2 clip
detected.
was removed, either stop the intervals or
reattach the SpO2 clip. Information status
message; press OK button to dismiss.
Information
Radio messages
Suggested action
115
Alarm
priority
Message
Possible cause
Radio not functional.
350001
Deserialization failure. There is a Check for a software update and apply it. Very low
software communication issue
If still present, replace the radio.
between the host and the radio
Radio not functional.
350002
Permissions. There is an internal
software error on the radio
Radio not functional.
350003
Unsupported operating system.
Check for a software update and apply it. Very low
There is an internal software error If still present, replace the radio.
on the radio
Radio not functional.
350004
Unknown. There is an internal
software error on the radio
Radio not functional.
350006
Invalid authentication. There is an Check for a software update and apply it. Very low
internal software error on the
If still present, replace the radio.
radio
Radio not functional.
350008
Unknown SDC Error. There is an
internal software error on the
radio
Radio not functional.
350009
Invalid SDC configuration. There is Check for a software update and apply it. Very low
an internal software error on the If still present, replace the radio.
radio
Radio not functional.
35000a
Invalid SDC profile. There is an
internal software error on the
radio
Check for a software update and apply it. Very low
If still present, replace the radio.
Invalid radio
configuration.
Reconfigure and try
again. 35000b
Invalid SDC WEP type. There is an
internal software error on the
monitor. Attempt to configure
settings that don't apply in current
authentication mode on radio
Check the radio configuration. If the
Very low
problem is still present, reset the radio to
factory defaults. If the problem persists,
check for software update and apply it. If
still present, replace the radio.
Invalid radio
configuration.
Reconfigure and try
again. 35000c
Invalid SDC EAP type. There is an
internal software error on the
monitor: attempt to configure
settings that don't apply in current
authentication mode on radio
Check the radio configuration. If the
Very low
problem is still present, reset the radio to
factory defaults. If the problem persists,
check for software update and apply it. If
still present, replace the radio.
Invalid radio
configuration.
Invalid SDC parameter. The Laird
SDK rejects a parameter being
configured.
Check the radio configuration. If the
Very low
problem is still present, reset the radio to
factory defaults. If the problem persists,
Check for a software update and apply it. Very low
If still present, replace the radio.
Check for a software update and apply it. Very low
If still present, replace the radio.
Check for a software update and apply it. Very low
If still present, replace the radio.
116
Connex® Spot Monitor
Troubleshooting
Message
Possible cause
Reconfigure and try
again. 35000d
Suggested action
Alarm
priority
check for software update and apply it. If
still present, replace the radio.
Radio not functional.
35000e
Unrecognized. There is a version Check for a software update and apply it. Very low
compatibility error if the radio or If still present, replace the radio.
the monitor adds new features
and software upgrade of the radio
fails after the monitor successfully
updates
Radio not functional.
35000f
No statistics file. There is an
internal software error on the
radio indicating a Linux kernel
error
Check for a software update and apply it. Very low
If still present, replace the radio.
Radio not functional.
350010
Missing interface. There is an
internal software error on the
radio indicating a Linux kernel
error or failure to initialize the
network interface
Check for a software update and apply it. Very low
If still present, replace the radio.
Radio not functional.
350011
Unknown interface. There is a
software communication issue
between the host and the radio
Check for a software update and apply it. Very low
If still present, replace the radio.
Invalid radio
configuration.
Reconfigure and try
again. 350012
Invalid WEP key length. WEP keys Check the radio configuration. If the
Very low
should be 10 or 26 characters
problem is still present, reset the radio to
long.
factory defaults. If the problem persists,
check for software update and apply it. If
still present, replace the radio.
Invalid radio
configuration.
Reconfigure and try
again. 350013
Not in EAP mode. There is an
internal software error on the
monitor: attempt to configure
settings that don't apply in current
authentication mode on radio
Check the radio configuration. If the
Very low
problem is still present, reset the radio to
factory defaults. If the problem persists,
check for software update and apply it. If
still present, replace the radio.
Invalid radio
configuration.
Reconfigure and try
again. 350014
Invalid inner EAP method. There is
an internal software error on the
monitor: attempt to configure
settings that don't apply in current
authentication mode on radio
Check the radio configuration. If the
Very low
problem is still present, reset the radio to
factory defaults. If the problem persists,
check for software update and apply it. If
still present, replace the radio.
Radio not functional.
350015
Out of memory. There is an
internal software error on the
radio
Check for a software update and apply it. Very low
If still present, replace the radio.
Radio not functional.
350016
Invalid log level. There is a
Check for a software update and apply it. Very low
software communication issue on If still present, replace the radio.
the radio
Radio not functional.
350017
Certificate path too long. There is Check for a software update and apply it. Very low
an internal software error on the If still present, replace the radio.
radio. The radio has a fixed path
length
Invalid radio
configuration.
Missing client certificate. The
Check the radio configuration. If the
Very low
radio attempted to configure for problem is still present, reset the radio to
an EAP mode that requires a client factory defaults. If the problem persists,
Directions for use
Troubleshooting
Alarm
priority
Message
Possible cause
Suggested action
Reconfigure and try
again. 350018
certificate and no certificate is
installed
check for software update and apply it. If
still present, replace the radio.
Invalid radio
configuration.
Reconfigure and try
again. 350019
Missing CA certification. The radio
attempted to enable server
validation and CA certification is
missing
Check the radio configuration. If the
Very low
problem is still present, reset the radio to
factory defaults. If the problem persists,
check for software update and apply it. If
still present, replace the radio.
Radio not functional.
35001e
MAC request failed. There is an
internal software error on the
radio indicating a Linux kernel
error or a failure to initialize the
network interface
Check for a software update and apply it. Very low
If still present, replace the radio.
Radio not functional.
35001f
Invalid power mode. There is an
internal software error on the
radio
Check for a software update and apply it. Very low
If still present, replace the radio.
Radio not functional.
350020
Post results missing. There is an
internal software error on the
radio
Check for a software update and apply it. Very low
If still present, replace the radio.
Radio not functional.
350021
Post results format. There is an
internal software error on the
radio
Check for a software update and apply it. Very low
If still present, replace the radio.
Radio not functional.
350025
Unrecognized component. There is Check for a software update and apply it. Very low
a version compatibility error if the If still present, replace the radio.
radio or the monitor adds new
features and software upgrade of
the radio fails after the monitor
successfully updates
Radio not functional.
350027
Missing release file. There is an
internal software error on the
radio with a missing file
Radio not functional.
350028
Not ready. Displays when logging Check for a software update and apply it. Very low
verbosity is turned on
If still present, replace the radio.
Radio not functional.
350029
Disconnected. There is a software Check for a software update and apply it. Very low
communication issue between the If still present, replace the radio.
host and the radio. Socket
connection is down
Invalid radio
configuration.
Reconfigure and try
again. 35002a
Invalid parameter. There is a
software issue on the monitor
while trying to configure radio
Radio not functional.
35002b
Timeout. There is a software
Check for a software update and apply it. Very low
communication issue between the If still present, replace the radio.
host and the radio
Check for a software update and apply it. Very low
If still present, replace the radio.
Check the radio configuration. If the
Very low
problem is still present, reset the radio to
factory defaults. If the problem persists,
check for software update and apply it. If
still present, replace the radio.
117
118
Connex® Spot Monitor
Troubleshooting
Suggested action
Alarm
priority
Message
Possible cause
Radio not functional.
35002c
Socket error. There is a software Check for a software update and apply it. Very low
communication issue between the If still present, replace the radio.
host and the radio
Radio not functional.
35002e
Cannot parse DHCP lease. There is Check for a software update and apply it. Very low
an internal software error on the If still present, replace the radio.
radio (error reading and converting
DHCP lease file)
Invalid radio
configuration.
Reconfigure and try
again. 350032
Invalid certificate password. The
radio is misconfigured with a
password that does not match the
certificate.
Check the radio configuration. If the
Very low
problem is still present, reset the radio to
factory defaults. If the problem persists,
check for software update and apply it. If
still present, replace the radio.
Radio not functional.
350033
Serialization failure. There is an
internal software error on the
radio or the monitor
Check for a software update and apply it. Very low
If still present, replace the radio.
Radio not functional.
350034
Missing PAC file. There is a
misconfiguration of the radio
(configured for EAP-FAST and
manual PAC but none supplied)
Check the radio configuration. If the
Very low
problem is still present, reset the radio to
factory defaults. If the problem persists,
check for software update and apply it. If
still present, replace the radio.
Invalid radio
configuration.
Reconfigure and try
again. 350035
Invalid PAC file password. There is
a misconfiguration of the radio
(configured for EAP-FAST and
manual PAC but password for PAC
is incorrect)
Check the radio configuration. If the
Very low
problem is still present, reset the radio to
factory defaults. If the problem persists,
check for software update and apply it. If
still present, replace the radio.
Radio not functional.
350036
Invalid BSSID format. There was Check for a software update and apply it. Very low
an internal software error on the If still present, replace the radio.
radio (related to AP scan feature,
may not occur with current Laird
software)
Radio not functional.
350037
Unknown certificate ID. There is
an internal software error on the
monitor: attempt to query a
certificate status for a certificate
that does not exist
Check the radio configuration. If the
Very low
problem is still present, reset the radio to
factory defaults. If the problem persists,
check for software update and apply it. If
still present, replace the radio.
Radio not functional.
350038
Certificate information absent.
The device queries certificate
status for a certificate that isn't
installed on the radio.
Check the radio configuration. If the
Very low
problem is still present, reset the radio to
factory defaults. If the problem persists,
check for software update and apply it. If
still present, replace the radio.
Radio not functional.
350039
Invalid sequence number. The
device queries certificate status
fragment that does not exist.
Check the radio configuration. If the
Very low
problem is still present, reset the radio to
factory defaults. If the problem persists,
check for software update and apply it. If
still present, replace the radio.
Invalid radio
configuration.
CCKM not allowed. There is an
Check the radio configuration. If the
Very low
attempt to use CCKM when not in problem is still present, reset the radio to
factory defaults. If the problem persists,
Directions for use
Troubleshooting
Alarm
priority
Message
Possible cause
Suggested action
Reconfigure and try
again. 35003c
WPA-Personal or WPA2Enterprise modes
check for software update and apply it. If
still present, replace the radio.
Radio not functional.
35003d
Send failure. The radio failed to
send a message to the host
Check for a software update and apply it. Very low
If still present, replace the radio.
Radio not functional.
35003e
Unable to store global
configuration settings to the
backup file
Check for a software update and apply it. Very low
If still present, replace the radio.
Radio not functional.
35003f
Configuration hookup. There is an Check for a software update and apply it. Very low
internal software error on the
If still present, replace the radio.
radio
Radio not functional.
350041
Unable to configure DHCP 60 on
the radio
Check the radio configuration. If the
Very low
problem is still present, reset the radio to
factory defaults. If the problem persists,
check for software update and apply it. If
still present, replace the radio.
Radio not functional.
350042
DHCP option corrupt. The DHCP
option file is not in the expected
format
Check for a software update and apply it. Very low
If still present, replace the radio.
Radio not functional.
350043
Cannot delete file. There is an
Check for a software update and apply it. Very low
internal software error on the
If still present, replace the radio.
radio (occurs for Option 60 upload
and factory default)
Radio not functional.
350046
Invalid SDC value. There is a
Check for a software update and apply it. Very low
software issue on the when trying If still present, replace the radio.
to configure the radio.
Unable to establish
No IP address after 30 seconds.
network
Unable to associate.
communications. Radio
out of network range.
350100
Check ESSID and radio mode settings.
Very low
Invalid radio
configuration.
Reconfigure and try
again. 350200
No IP address after 30 seconds.
Unable to authenticate
Check radio security settings.
Very low
Radio card DHCP
timeout. 350300
No IP address after 30 seconds.
Unable to obtain DHCP address.
Check DHCP server settings.
Very low
Lost network
Radio lost association
communications. Radio
out of network range.
350400
Ensure the access point is still powered
on and in range.
Very low
Radio not functional.
350500
Power cycle the device and re-enable the Very low
radio. If the problem persists, replace the
radio.
POST failure
Radio software upgrade The radio software upgrade failed. Restart the monitor.
failed. 350600
Information
119
120
Connex® Spot Monitor
Troubleshooting
Suggested action
Alarm
priority
Message
Possible cause
Certificate load
successful.
The radio customer certificate was None.
successfully loaded from the host
Information
Certificate load failed.
The radio customer certificate was Try again.
not loaded
Information
Connectivity messages
Message
Possible cause
Suggested action
Alarm
priority
Unable to obtain wired
device IP address.
210000
No wired connection
Verify DHCP functionality and configuration.
Very low
Network not found;
check network cable
connection. 210100
Lost ethernet DHCP address
Check wired connection into device then
verifiy DHCP functionality and configuration.
Very low
Unable to communicate Cannot communicate with NRS
with NRS. 360000
Verfiy NRS IP configuration and functionality. Very low
Communication error
with host. 1A0000
Communication timeout failure
with external Host
Verify the external host services are loaded
and started on the server. If the problem
persists, check for available software
upgrades of the monitor or the system.
Very low
Data rejected. CRC
mismatch. 1A0001
The WACP stack has detected a
CRC mismatch in the message
Check the data and try again. If the problem
persists, contact your system administrator.
Very low
Data rejected.
Unsupported message.
1A0002
External Host NACK - The host
does not support the message/
object.
Check the monitor and try again. If the
problem persists, contact your system
administrator.
Very low
Data rejected. Invalid
parameter. 1A0003
The message has an invalid
parameter.
Check the data and try again. If the problem
persists, contact your system administrator.
Very low
Data rejected.
Deserialize the object.
1A0004
The monitor failed to deserialize
the object.
Check the data and try again. If the problem
persists, contact your system administrator.
Very low
Data rejected.
Unsupported message.
1A0005
The host is in a state that cannot
accept the message.
Check the data and try again. If the problem
persists, contact your system administrator.
Very low
Add the patient ID to the record.
Very low
Data rejected. Patient ID The message has a missing
required. 1A0006
patient ID
Data rejected. Clinician The message is missing a clinician Add the clinician ID to the record.
ID required. 1A0007
ID
Very low
Data rejected. Time
mismatch. 1A0008
Very low
The message has a mismatched
time
Ensure that the clock on the monitor and the
server match.
Directions for use
Troubleshooting
121
Alarm
priority
Message
Possible cause
Suggested action
Unable to establish
network
communications.
1A0009
No network connection is
available
Connect the device to an active network so
that the clinician ID can be imported.
Very low
No connection for send. No connection for send.
None
Information
Send not successful.
None
Information
Send not successful.
Error in record. Try again Connectivity NACK recieved for
NRS/ECS/CS/NCE
NRS/ECS/CS/NCE NACK that is record
Information
specific and can be fixed by a clinician in the
next record
Send successful.
Data was successfuly sent over
USB/BT
None
Message
Possible cause
Suggested action
Alarm
priority
000001
System failure
Restart the monitor
N/A
000002
System failure
Restart the monitor
N/A
000003
System failure
Restart the monitor
N/A
000004
System failure
Restart the monitor
N/A
000005
System failure
Restart the monitor
N/A
000006
System failure
Restart the monitor
N/A
Internal hardware
failure.
The root file system is corrupted;
restart not possible
Restart the monitor. If the problem persists, N/A
replace the main PCBA.
Internal hardware
failure. 140100
EEPROM access failed. The device Reprogram the EEPROM. If the problem
boot is possible, but wired
persists replace the main PCBA.
communications are disabled
Internal hardware
failure.
SPL memory test failure, the
Restart the monitor. If the problem persists, N/A
monitor will sound an SOS pattern replace the main PCBA.
Internal hardware
failure. 1C1000
The monitor PIC communications Restart the monitor. If the problem persists, N/A
never starts or quits. The
replace the main PCBA.
communication won’t reasonably
recover at startup or during
operation
Information
System messages
Low battery 30 minutes The battery power is low
or less remaining.
1C1005
Connect the power supply to AC power to
charge the monitor.
Very low
Very low
122
Connex® Spot Monitor
Troubleshooting
Alarm
priority
Message
Possible cause
Suggested action
Low battery 5 minutes
or less remaining.
1C1006
The battery power is extremely
low
Connect the power supply to AC power to
charge the monitor.
High
Battery is critically low; The battery power is critically low Connect the power supply to AC power to
plug into outlet. Device
charge the monitor.
is shutting down.
1C1007
High
Update unsuccessful.
Reboot and retry.
1C1008
The software update failed
Restart the monitor. If the problem is still
present, replace the main PCBA.
Very low
Host battery not
charging. 1C100A
The host battery is not charging
Restart the monitor. If the problem is still Very low
present, check cable connections. If the
problem is still present, perform functional
checks for host. If the problem is still
present, replace battery. If the problem
persists, replace the main PCBA.
Factory default settings The factory configuration settings The monitor has been configured to factory Very low
now active. 3A0001
are active
defaults, any user settings have been reset.
Unable to read
Unable to load file from the
configuration from USB. external USB memory device.
3A0002
Retry the USB connection. If the problem is Very low
still present, check for a proper format of
the USB drive. If the problem is still
present, replace the USB device. If the
problem persists, replace the main PCBA.
Internal hardware
Power supply issue. The PMIC is
failure. Device will shut too hot
down. 1C100D
Check the operating environment
Very low
temperature. Allow the monitor to cool
down before operating again. If the problem
is still present, check the cable connections.
If the problem is still present, perform
functional checks for host. If the problem is
still present, replace the battery. If the
problem is still present, replace the main
PCBA.
Input voltage too low.
Device will shut down.
1C100C
Power supply issue. The PMIC
input voltage is too low
Check the operating environment
Very low
temperature. Allow the monitor to cool
down before operating again. If the problem
is still present, check the cable connections.
If the problem is still present, perform
functional checks for host. If the problem is
still present, replace the battery. If the
problem is still present, replace the main
PCBA.
Unexpected restart
occurred. 1C1012
The monitor unexpectedly
restarted
Continue normal operation
High
Audio system not
functional 1D0100
The speaker or audio codec is
faulty
Replace speaker. If the problem is still
present, replace the main PCBA.
Very low
CSM battery is not
installed. 1C100E
There is no battery in the monitor Check the monitor for a battery and install
one if it is missing. If the problem is still
present, perform diagnostic checks on the
Very low
Directions for use
Troubleshooting
Message
Possible cause
Suggested action
123
Alarm
priority
monitor. If the problem persists, replace the
main PCBA.
Device shutdown is not System shutdown failure
available at this time
Monitor cannot perform an immediate
shutdown. Disconnect AC power and
remove battery.
Information
No valid files found
No valid files were found on the
USB flash drive
Re-insert the USB flash drive with valid
files.
Information
Firmware update
successful.
The software successfully updated Information status message; press OK
button to dismiss.
Information
Audio alarms are off.
The monitor alarm audio is off
Information status message; press OK
button to dismiss.
Information
Advanced settings
unavailable.
The advanced settings are
unavailable because the monitor
is not in an idle state
Confirm that no sensors are attached to the Information
monitor, no alarms are active, and there is
no unsaved data in the Spot or Intervals
profile.
USB accessory
disconnected.
The USB device was disconnected Information status message; press OK
from the monitor
button to dismiss
Advanced settings
The Advanced settings code was
entered correctly
Save not successful.
The device configuration or logs Information status message; press OK
were not saved to the USB device button to dismiss
Information
Save successful.
The device configuration or logs
were saved to the USB device
Information status message; press OK
button to dismiss
Information
Software upgrade is
downloading. Do not
shutdown.
Cannot power down device as
software install is in progress
N/A
Information
Factory reset successful. The monitor was reset to factory
settings
Information status message; press OK
button to dismiss
Information
Factory reset failed.
Custom configuration
file not deleted.
The monitor factory reset has
failed.
Information status message; Exit Advanced Information
settings to dismiss.
Configuration upload
successful.
The device configuration has
successfully uploaded
Information status message; press OK
button to dismiss
Unable to load
configuration.
The device configuration was not N/A
successfully uploaded
Information
Information status message; Exit Advanced Information
settings to dismiss.
Information
Information
124
Connex® Spot Monitor
Troubleshooting
Software update messages
Message
Possible cause
Suggested action
Alarm
priority
Software Update:
The manifest file transfer timed Verify the connection and retry.
Manifest transfer timed out or connection was lost during
out. Verify connection download
and retry.
Information
Software Update:
Package file transfer
timed out. Verify
connection and retry
The package file transfer timed
Verify the connection and retry.
out or connection was lost during
download
Information
Software Update:
Invalid token file.
There was an invalid token file
Verify and update the token file.
Information
Software Update:
The manifest file was not found
Unable to find manifest on the server
file on server.
Verify the manifest file is on the server.
Information
Software Update:
The manifest file signature
Unable to verify
verification failed.
manifest file signature.
Regenerate the software package and retry. Information
Software Update:
The package file is corrupt, does
Package file corrupted. not have expected SHA256 hash
Regenerate package and
retry.
Regenerate the software package and retry. Information
Software Update:
The package file cannot be found Verify the package file is on the server.
Unable to find package
file.
Information
Software Update:
Installation failed.
Reboot and retry.
At least one of the sub systems
failed to install
Restart the monitor.
Information
Software Update:
Upgrade unsuccessful.
Insufficient disk space.
The partition is running out of
space
Free up adequate space needed to perform Information
the upgrade.
Software Update:
The current firmware version is
Try to update to an earlier software
Update unsuccessful.
lower than the one required by the package.
Incompatible firmware. token file
Software Update: SWUP SWUP NIBP is not functional
internal error
Software Update:
Manager internal error
Information
Information status message; click OK button Information
to dismiss.
The Software Update manager is Information status message; click OK button Information
not functional
to dismiss.
Radio software upgrade The radio software was not
failed. 350600
upgraded.
Check for software update and apply it. If Very low
message is still present, replace the radio.
Directions for use
Troubleshooting
Bluetooth® messages
Message
Possible cause
Suggested action
Alarm
priority
Bluetooth not functional. The monitor detected a Bluetooth Reboot the monitor. If the problem persists, Very low
370001
device that is not functional
replace the Bluetooth radio. If the problem
persists, replace the main PCBA.
Bluetooth not functional. The monitor cannot detect a
370002
Bluetooth module
Replace the Bluetooth radio. If the problem Very low
persists, replace the main PCBA.
Bluetooth device
connection successful
The Bluetooth device connected
None.
Information
Bluetooth device
disconnected
The Bluetooth disconnected
None.
Information
Message
Possible cause
Suggested action
APM not functional.
1C1001
The APM is detected as connected Restart the monitor and the APM. If the
Very low
but there is no communication
problem is still present, check the cable
through the APM serial port
connections from the monitor to APM. If the
problem still present, replace the APM. If the
message persists, replace the main PCBA on
the monitor.
APM not functional.
1C100B
The APM battery is installed, but
does not communicate with the
monitor
Perform diagnostic checks on the monitor. If Very low
the problem is still present, replace the APM
battery. If the problem still present, replace
the APM. If the message persists, replace
the main PCBA on the monitor.
APM battery is absent
or faulty. 1C100F
The APM battery is not installed
Ensure than an APM battery is installed, and Very low
install one if it is missing. If the problem is
still present, perform diagnostic checks on
the monitor. If the problem is still present,
replace the APM. If the message persists,
replace the main PCBA on the monitor.
The APM is
disconnected. 1C1002
The APM is unplugged from the
monitor while the monitor is
powered on
Restart the monitor and the APM. If the
Very low
problem is still present, check the cable
connections from the monitor to APM. If the
problem still present, replace the APM. If the
message persists, replace the main PCBA on
the monitor.
USB cable is
disconnected. 1C1003
The APM USB hub is unplugged
from the monitor while the
monitor is powered on
Restart the monitor and the APM. If the
Very low
problem is still present, check the cable
connections from the monitor to APM. If the
problem still present, replace the APM. If the
message persists, replace the main PCBA on
the monitor.
APM messages
Alarm
priority
125
126
Connex® Spot Monitor
Troubleshooting
Alarm
priority
Message
Possible cause
Suggested action
APM is plugged in.
The APM was plugged in while
the monitor is powered on.
Restart the monitor and the APM. If the
Information
problem is still present, check the cable
connections from the monitor to APM. If the
problem still present, replace the APM. If the
message persists, replace the main PCBA on
the monitor.
APM not functional.
1C1010
The APM USB hub is plugged in Restart the monitor and the APM. If the
Very low
while the monitor communication problem is still present, check the cable
cable is disconnected
connections from the monitor to APM. If the
problem still present, replace the APM. If the
message persists, replace the main PCBA on
the monitor.
APM not functional.
1C1004
The APM PIC cannot communicate Restart the monitor and the APM. If the
Very low
with the accelerometer
problem is still present, check the cable
connections from the monitor to APM. If the
problem still present, replace APM. If the
message persists, replace the main PCBA on
the monitor.
APM not functional.
1C1009
The APM PIC software update and Restart the monitor and the APM. If the
Very low
any retries have failed
problem is still present, check the cable
connections from the monitor to APM. If the
problem still present, retry the software
update. If still present, replace the APM. If
the message persists, replace the main PCBA
on the monitor.
APM not functional.
1C100B
The APM battery is not recharging Restart the monitor and the APM. If the
Very low
problem is still present, check the cable
connections from the monitor to APM. If the
problem still present, replace the APM. If the
message persists, replace the main PCBA on
the monitor.
APM not functional.
The APM USB changes from
unplugged to plugged after
monitor startup
Restart the monitor and the APM. If the
Information
problem is still present, check the cable
connections from the monitor to APM. If the
problem still present, retry the software
update. If still present, replace the APM. If
the message persists, replace the main PCBA
on the monitor.
Device is operating in
battery mode.
AC power cord has been
disconnected.
Information status message; press OK button Information
to dismiss.
Sleep mode is
unavailable. Intervals
monitoring is in
progress.
Sleep mode is not allowed when
intervals are in progress
Stop any active intervals.
Information
Clear all active alarms.
Information
Sleep mode is
Sleep mode is not allowed when
unavailable. An alarm is alarms are active
active.
Directions for use
Troubleshooting
127
Message
Possible cause
Suggested action
Alarm
priority
Display lock is
unavailable. Missing
patient context.
Lockout is not allowed without
active patient information
Enter patient information
Information
Power cable is
disconnected. 1C1011
The APM communication cable is Restart the monitor and the APM. If the
Very low
plugged in while the APM USB
problem is still present, check the cable
cable is disconnected
connections from the monitor to APM. If the
problem still present, retry the software
update. If still present, replace the APM. If
the message persists, replace the main PCBA
on the monitor.
128
Troubleshooting
Connex® Spot Monitor
129
Specifications
Physical specifications
Protection classifications, all monitor configurations
Characteristic
Specification
Electrical rating
100 – 240 V AC, 50 – 60 Hz, 0.8X– 1.5 A
Duty cycle
Continuous operation
Type of protection against electric shock
Class I internally powered
Degree of protection against electric shock, for parts
applied to patients
Type BF defibrillator proof
IEC EN 60601-1, 2nd and 3rd Editions
Recovery time following defibrillator discharge
Less than or equal to 15 seconds
Flammable anesthetics
WARNING Not suitable for use with
flammable anesthetics.
Degree of protection provided by the enclosure with respect IPX1 Protection against vertically falling drops of water
to harmful ingress of liquids
Height
Standard chassis: 6.3 in. (16.1 cm )
Extended chassis: 6.5 in. (16.6 cm ) with Braun
Extended chassis: 6.4 in. (16.6 cm ) with SureTemp
Width
Standard chassis: 9.2 in. (23.4 cm )
Extended chassis: 11.7 in. (29.8 cm ) with Braun
Extended chassis: 11.7 in. (29.8 cm ) with SureTemp
Depth
Standard chassis: 2.3 in. (5.8 cm )
Extended chassis: 4.4 in. (11.0 cm ) with Braun
Extended chassis: 4.2 in. (10.6 cm ) with SureTemp
Weight (including battery)
Standard chassis: 2.9 lb (1.3 kg )
Extended chassis: 3.7 lb (1.7 kg ) with Braun
Extended chassis: 3.5 lb in. (1.6 kg ) with SureTemp
130
Connex® Spot Monitor
Specifications
Protection classifications, all monitor configurations
Graphical display resolution
Dimensional outline
6.5 in. (W) x 4.1 in. (H) x 0.13 in. (D) (164.9 mm [H] x 103.8
mm [W] x 3.40 mm [D] )
Active area
6.1 in. (W) x 3.4 in. (H) (154.08 mm [W] x 85.92 mm [H])
Resolution
800 x 480 pixels
Pixel arrangement
RGB (red, green, blue)
Pixel size
63.2 µm (W) x 179 µm (H)
Luminance
530 cd/m2
Speaker volume
Minimum Output sound pressure
60 dB at 1.0 meter
Alarm and pulse tones
per IEC 60601-1-8
Pulse frequency (f0)
150 – 1000 Hz
Number of harmonic components in the range 300 Hz to
4000 Hz
minimum of 4
Effective pulse duration (td)
high priority: 75 –200 ms
medium and low priority: 125 – 250 ms
Rise time (tr)
10 – 20% of td
Fall time 1(tf)
tf < ts – tr
Note
1Prevents
The range of the relative sound pressure level of the harmonic components should be between a
minimum of at least 53 dBa and a maximum of at least 80 dBa at the pulse frequency.
overlap of pulses
Battery specifications
2 Cell battery specifications1
Hours of use
Continuous run time (Nellcor)
5.22
6 patients/hour - 41 patient cycles (Nellcor)
6.83
8 patients/hour - 54 patient cycles (Nellcor)
6.78
8 patients/hour - 55 patient cycles (Nonin)
6.90
Directions for use
Specifications 131
Hours of use
2 Cell battery specifications1
Acute care continuous 10 minute cycles - 49 patient cycles - BP, temp, SpO2, no radio, 8.22
no scanner (Nellcor)
Acute care continuous 10 minute cycles - 50 patient cycles - BP, temp, SpO2, no radio, 8.37
no scanner (Nonin)
Acute care continuous 10 minute cycles - 49 patient cycles - BP, temp, SpO2, no radio, 8.29
no scanner (Masimo)
Acute care continuous 10 minute cycles - 41 patient cycles - BP, temp, SpO2, radio,
scanner (Nellcor)
6.84
Acute care continuous 10 minute cycles - 41 patient cycles - BP, temp, SpO2, radio,
scanner (Nonin)
6.96
Acute care continuous 10 minute cycles - 41 patient cycles - BP, temp, SpO2, radio,
scanner (Masimo)
6.90
1
Nellcor is the default for these examples.
Nurse Call specifications
Nurse Call connection specifications
Nurse Call
25 V AC or 60 V DC maximum at 1A maximum
NIBP specifications
NIBP specifications
Cuff pressure range
Meets or exceeds IEC/ISO 80601-2-30 standards for cuff
pressure range
Systolic range
Adult: 30 to 260 mmHg (StepBP, SureBP)
Pediatric: 30 to 260 mmHg (StepBP, SureBP)
Neonate: 20 to 120 mmHg (StepBP)
Diastolic range
Adult: 20 to 220 mmHg (StepBP, SureBP)
Pediatric: 20 to 220 mmHg (StepBP, SureBP)
Neonate: 10 to 110 mmHg (StepBP)
Cuff Inflation Target
Adult:160 mmHg (StepBP)
Pediatric: 140 mmHg (StepBP)
Neonate: 90 mmHg (StepBP)
Maximum Target Pressure
Adult: 280 mmHg (StepBP, SureBP)
Pediatric: 280 mmHg (StepBP, SureBP)
Neonate: 130 mmHg (StepBP)
132
Connex® Spot Monitor
Specifications
NIBP specifications
Blood pressure determination time
Typical: 15 seconds
Maximum: 150 seconds
Blood pressure accuracy
Meets or exceeds ANSI.AAMI SP10:2002 standards for
noninvasive blood pressure accuracy (±5 mmHg mean error,
8 mmHg standard deviation)
Mean Arterial Pressure (MAP) range
The formula used to calculate MAP yields an approximate
value.
Adult: 23 to 230 mmHg (StepBP, SureBP)
Pulse rate range (using blood pressure determination)
Adult: 30 to 200 bpm (StepBP, SureBP)
Pediatric: 23 to 230 mmHg (StepBP, SureBP)
Neonate: 13 to 110 mmHg (StepBP)
Pediatric: 30 to 200 bpm (StepBP, SureBP)
Neonate: 35 to 220 bpm (StepBP)
Pulse rate accuracy (using blood pressure determination)
±5.0% (±3 bpm)
Overpressure cutoff
Adult: 300 mmHg ±15 mmHg
Pediatric: 300 mmHg ±15 mmHg
Neonate: 150 mmHg maximum
SureTemp Plus temperature module specifications
SureTemp Plus temperature module specifications
Temperature range
80°F to 110°F (26.7°C to 43.3°C)
Calibration accuracy
±0.2°F (±0.1°C) (Direct mode)
Braun ThermoScan Pro 6000 specifications
Braun ThermoScan PRO 6000 thermometer specifications (refer to Braun ThermoScan Pro 6000's
directions for use for additional information)
Temperature range
68°F to 108°F (20°C to 42.2°C)
Calibration accuracy
•
•
Display resolution
±0.4°F (±0.2°C) for temperatures ranging from 95.9°F to 107.6°F (35.5°C to
42°C)
±0.5°F (±0.25°C) for temperatures outside of this range
0.1°F or °C
Directions for use
Specifications 133
SpO2 specifications
Refer to sensor manufacturer's directions for use for additional information.
WARNING Functional testers cannot be used to assess the accuracy of a
pulse oximeter monitor.
While functional testers may be useful for verifying that the pulse oximeter sensor,
cabling, and monitor are functional, they are incapable of providing the data required to
properly evaluate the accuracy of a system's SpO2 measurements. Fully evaluating the
accuracy of the SpO2 measurements requires, at a minimum, accommodating the
wavelength characteristics of the sensor and reproducing the complex optical interaction
of the sensor and the patient’s tissue. These capabilities are beyond the scope of known
bench-top testers. SpO2 measurement accuracy can only be evaluated in vivo by
comparing pulse oximeter readings with SaO2 measurements obtained from
simultaneously sampled arterial blood made using a laboratory CO-oximeter.
Note
Contact the sensor manufacturer for further SpO2 clinical testing
information.
Note
Refer to sensor manufacturers' directions for use for further accuracy
information.
SpO2 specifications (Masimo specifications, see footnotes 1, 2, 3, 4, 5, and 6)
SpO2 performance measurement range
1 to 100%
Masimo SpO2 specifications
Accuracy specified when used with Masimo SET
pulse oximetry monitors or with licensed Masimo
SET pulse oximetry modules using PC series patient
cables, during no motion. Numbers present ± 1
standard deviation. Plus or minus one standard
deviation represents 68% of the population.
Masimo SpO2, No Motion
60 – 80 ± 3%, adults/pediatrics/infants
70 – 100 ± 2%, adults/pediatrics/infants; ± 3%,
neonates
Masimo SpO2, Motion
70 – 100 ± 3%, adults/pediatrics/infants/neonates
Masimo SpO2, Low perfusion
70 – 100 ± 2%, adults/pediatrics/infants/neonates
Perfusion
0.02 % to 20 %
Masimo pulse rate , No Motion
25 – 240 ± 3 bpm, adults/pediatrics/infants/
neonates
Masimo pulse rate, Motion
25 – 240 ± 5 bpm, adults/pediatrics/infants/
neonates
Masimo pulse rate, Low perfusion
25 – 240 ± 3 bpm, adults/pediatrics/infants/
neonates
Pulse rate
25 to 240 beats per minute (bpm)
134
Connex® Spot Monitor
Specifications
SpO2 specifications (Masimo specifications, see footnotes 1, 2, 3, 4, 5, and 6)
No motion: ± 3 digits
Motion: ± 5 digits
Saturation
Note
Saturation accuracy varies by sensor type. Refer
to the sensor Directions for use for additional
accuracy information.
60% to 70%
Adults, Neonates: ± 3 digits
Nellcor sensor accuracy guide7, 8
SpO2 measurement accuracy can only be evaluated
in vivo by comparing pulse oximeter readings with
SpO2 measurements obtained from simultaneously
sampled arterial blood made using a laboratory COoximeter. SpO2 accuracy was validated through
breathe-down-equivalent testing by Covidien using
electronic measurements to prove equivalence to
the Nellcor N600x predicate device. The Nellcor
N600x predicate device was validated by
performing human-subject, “breathe-down” clinical
trials.
Pulse rate
25 to 240 beats per minute (bpm) ± 3 digits (no
motion)
Saturation
70% to 100%
Adult, neonate: ± 3 digits
Note
Saturation accuracy varies by sensor type.
Low Perfusion: 0.02 % to 20 % ± 2 digits
Detected pulse rate
20 to 250 beats per minute (bpm) ± 3 digits
Nonin sensor accuracy guide
SpO2 accuracy testing is conducted during induced
hypoxia studies on healthy, non-smoking, light-todark-skinned subjects during motion and no-motion
conditions in an independent research laboratory.
The measured arterial hemoglobin saturation value
(SpO2) of the sensors is compared to arterial
hemoglobin oxygen (SaO2) value, determined from
blood samples with a laboratory co-oximeter. The
accuracy of the sensors in comparison to the cooximeter samples measured over the SpO2 range of
70 – 100%. Accuracy data is calculated using the
root-mean-squared (Arms value) for all subjects, per
ISO 9919:2005, Standard Specification for Pulse
Oximeters for Accuracy.
Perfusion
40–240 BPM. Adult/Ped = +/- 3 digits; Neonate =
+/- 3 digits
Pulse rate
18 to 321 beats per minute (bpm)
No motion (18 to 300 bpm): ± 3 digits
Motion (40 to 240 bpm): ± 5 digits
Saturation
Note
Saturation accuracy varies by sensor type.
70% to 100%
70% to 100%
Adult/Pediatrics
Neonates
No Motion
No Motion
Finger Clip: ± 3 digits
Directions for use
Specifications 135
SpO2 specifications (Masimo specifications, see footnotes 1, 2, 3, 4, 5, and 6)
Finger Clip: ± 2 digits
Flex: ± 3 digits
Flex: ± 3 digits
Soft Sensor: N/A
Soft Sensor: ± 2 digits
8000R: N/A
8000R: ± 3 digits
8000 Q: N/A
8000 Q: ± 4digits
Motion
Motion
Finger Clip: ± 3 digits
Finger Clip: ± 2 digits
Flex: ± 4 digits
Flex: ± 3 digits
Soft Sensor: ± 4 digits
Soft Sensor: ± 3 digits
Low Perfusion
Low Perfusion
All Sensors: ± 3 digits
All Sensors: ± 2 digits
1
SpO2, accuracy was determined by testing on healthy adult volunteers in the range of
60-100% SpO2 against a laboratory pulse oximeter. SpO2 accuracy was determined on
16 neonatal NICU patients ranging in age from 7-135 days old and weighing between 0.
5-4.25 kg. Seventy-nine (79) data samples were collected over a range of 70-100% SaO2
with a resultant accuracy of 2.9% SpO2.
2
The Masimo sensors have been validated for no motion accuracy in human blood
studies on healthy adult male and female volunteers with light to dark skin pigmentation
in induced hypoxia studies in the range of 70-100% SpO2 against a laboratory pulse
oximeter and ECG monitor. This variation equals plus or minus one standard deviation.
Plus or minus one standard deviation encompasses 68% of the population.
3
The Masimo sensors have been validated for motion accuracy in human blood studies
on healthy adult male and female volunteers with light to dark skin pigmentation in
induced hypoxia studies in the range of 70-100% SpO2 against a laboratory CO-oximeter
and ECG monitor. This variation equals plus or minus one standard deviation which
encompasses 68% of the population.
4
The Masimo SET Technology has been validated for low perfusion accuracy in bench
top testing against a Biotek Index 2 simulator and Masimo’s simulator with signal
strengths of greater than 0.02% and transmission of greater than 5% for saturations
ranging from 70–100%. This variation equals plus or minus one standard deviation which
encompasses 68% of the population.
5
The Masimo sensors have been validated for pulse rate accuracy for the range of
25-240 bpm in bench top testing against a Biotek Index 2 simulator. This variation equals
plus or minus one standard deviation which encompasses 68% of the population.
6
The following substances may interfere with pulse oximetry measurements:
•
Elevated levels of Methemoglobin (MetHb) may lead to inaccurate SpO2
measurements
•
Elevated levels of Carboxyhemoglobin (COHb) may lead to inaccurate SpO2
measurements
•
Severe anemia may cause erroneous SpO2 readings
•
Dyes, or any substance containing dyes, that change usual blood pigmentation may
cause erroneous readings
•
Elevated levels of total bilirubin may lead to inaccurate SpO2 reading
136
Connex® Spot Monitor
Specifications
7 Some models of commercially available bench-top functional testers and patient
simulators can be used to verify the proper functionality of Nellcor pulse oximeter
sensors, cables and monitors. See the individual testing device's operator's directions for
use for the procedures specific to the model of tester being used.
8
Many functional testers and patient simulators have been designed to interface with
the pulse oximeter's expected calibration curves and may be suitable for use with
Nellcor monitors and/or sensors. Not all such devices, however, are adapted for use with
the Nellcor OXIMAX digital calibration system. While this will not affect use of the
simulator for verifying system functionality, displayed SpO2 measurement values may
differ from the setting of the test device. For a properly functioning monitor, this
difference will be reproducible over time and from monitor to monitor within the
performance specifications of the test device.
Environmental specifications
Operating temperature
50°F to 104°F (10°C to 40°C)
Storage temperature
-4°F to 122°F (-20°C to 50°C)
Operating altitude
-1250 to 10,000 ft. (-381 m to 3,048 m)
Operating humidity
15% to 90% noncondensing
Storage humidity
15% to 95% noncondensing
Monitor radio
The monitor's radio operates on 802.11 networks.
Wireless network
interface
IEEE 802.11 a/b/g/n
Frequency
2.4 GHz frequency bands
5 GHz frequency bands
2.4 GHz to 2.483 GHz
5.15 GHz to 5.35 GHz, 5.725 GHz to 5.825Ghz
2.4 GHz channels
5 GHz
Up to 14 (3 non-overlapping); countrydependent,
Up to 23 non overlapping; country-dependent
Channels
Authentication/
Encryption
Wireless Equivalent Privacy (WEP, RC4 Algorithm); Wi-Fi Protected Access (WPA); IEEE 802.11i
(WPA2); TKIP, RC4 Algorithm; AES, Rijndael Algorithm; Encryption Key Provisioning; Static (40bit and 128-bit lengths); PSK; Dynamic; EAP-FAST; EAP-TLS; EAP-TTLS; PEAP-GTC 1 PEAPMSCHAPv2; PEAP-TLS;
Antenna
Ethertronics WLAN_1000146
Wireless data rates 802.11a (OFDM): 6, 9, 12, 18, 24, 36, 48, 54 Mbps
802.11b (DSSS, CCK): 1, 2, 5.5, 11 Mbps
802.11g (OFDM): 6, 9, 12, 18, 24, 36, 48, 54 Mbps
Directions for use
Specifications 137
802.11n (OFDM,HT20,MCS 0-7): 6.5,13,19.5, 26, 39,52, 58.5, 72.2 Mbps
Agency approvals
US: FCC Part 15.247 Subpart C, FCC Part 15.407 Subpart E
Europe: EN 300 328 (EDR) (v1.8.1), EN 300 328 (LE) (v1.8.1), EN 301 489-1 (v1.9.2), EN 301
489-17 (v2.2.1), EN 301 489-17 (v2.2.1), EN 62311:2008, EN 60950-1
Canada: (IC) RSS-210 standard. IC 3147A-WB45NBT based on FCC testing
Singapore: Complies with IDS standard
Protocols
UDP, DHCP, TCP/IP
Data transfer
protocols
UDP/TCP/IP
Output power
39.81mW typical, country-dependent
Ancillary IEEE
standards
802.11d, 802.11e, 802.11h, 802.11i, 802.1X
1One
time passwords are not supported.
Channel restrictions in the 5-GHz band are determined by country.
To ensure compliance with local regulations, be sure the correct country in which the
access point is installed is selected. This product can be used with the following
restriction(s):
Norway - Does not apply for the geographical area within a radius of 20 km from the
center of Ny-Ålesund.
France - Outdoor use is limited to 10 mW EIRP within the band 2454 to 2483.5 MHz.
Note
Effective Isotropic Radiated Power (EIRP).
Note
Some countries restrict the use of 5-GHz bands. The 802.11a radio in the
monitor uses only the channels indicated by the access point with which
the radio associates. The hospital IT department must configure access
points to operate with approved domains.
Bluetooth® module
Category
Feature
Implementation
Wireless
specification
Bluetooth
2.1 + EDR
Frequency
2.402 - 2.480 GHz
Maximum transmit power
Class 1
+8 dBm from antenna
Receive sensitivity
-89 dBm
Range
Circa 100 meters
Data rates
Up to 3 Mbps (over the air)
USB
Full speed USB 2.0
Host interface
138
Connex® Spot Monitor
Specifications
GPIO
Four configurable lines
(1.8V/3.3V configurable by VDD_PADS
HCI
Host Controller Interface over USB
HID proxy mode
Human Interface Device
EEPROM
2-wire
64K bits
Coexistence
802.11 (WiFi)
Three wire CSR schemes supported
(Unity-3, Unity-3e, and Unity+)
Supply voltage
Supply
5V ± 10%
Operational modes
Power consumption Current
Idle mode ~5 mA
File transfer ~58 mA
Antenna option
Internal
Multilayer ceramic antenna with up to 41% efficiency
Physical
Dimensions
8.5 × 13 × 1.6 mm (BT800 module)
16 × 43 × 11 (BT820 USB dongle)
Environmental
Miscellaneous
Approvals
Operating
-30 °C to 85 °C
Storage
-40 °C to 85 °C
Lead free
Lead-free and RoHS compliant
Warranty
1 year
Bluetooth
Controller subsystem approved
FCC / IC / CE
All BT800 series
Configuration options
The monitor is available in multiple configurations. See the Service manual for upgrade
options available for each configuration presented below
Model
Description
7100
Base. Includes NIBP, USB, and Ethernet connectivity.
7300
Same features as 7100. Includes Bluetooth® wireless technology
7400
Same features as 7100. Includes Masimo or Nellcor SpO2
7500
Same features as 7400. Choice of Masimo, Nellcor, or Nonin SpO2. WiFi built in.
139
Standards and compliance
General compliance and standards
The monitor complies with the following standards:
21 CFR Subchapter H – Medical Devices – US Food and Drug Administration
2002 No. 236 – Australian Therapeutic Goods Act
93/42/EEC – European Economic Community Medical Devices Directive
2007/47/EC – European Economic Community Medical Devices Directive 2007
Amendment
94/62/EC – European Economic Community Packaging Directive
2002/96/EC – European Economic Community Waste Electrical and Electronic
Equipment Directive
2006/66/EC – European Economic Community Batteries and Accumulators Directive
SOR/98-282 – Canadian Medical Devices Regulation
IATA DGR – International Air Transport Association Dangerous Goods Regulation
United Nations ST/SG/AC.10/11 – Manual of Tests and Criteria, Part III, Sub-Section 38.3
ANSI/AAMI SP10
AS/NZS 3200.1.01
ASTM D 4332, E 1104
CAN/CSA C22.2 NO.601.11 CAN/CSA-C22.2 NO.60601-1-2, CSA Z9919
EN 1060-1, 1060-3, 1060-42
EN/IEC 60601-1, 60601-1-2, 60601-1-8, 60601-2-30, 62304, 80601-2-30, 62366,
60601-1-6
EN/ISO 9919, 13485, 14971, 80601-2-56, 80601-2-61
ISTA 2A
UL 60601-11
Directive 2002/96/EC-WEEE:
Disposal of noncontaminated electrical and electronic equipment
This product and its accessories must be disposed of according to local laws and
regulations. Do not dispose of this product as unsorted municipal waste. Prepare this
product for reuse or separate collection as specified by Directive 2002/96/EC of the
European Parliament and the Council of the European Union on Waste Electronic and
1 Standard
is essentially the IEC 60601-1 General standard plus the listed country's National Deviations.
2 Non-Invasive
Sphygmomanometers – Part 1: General Requirements, Part 3. Supplementary
Requirements for Electro-Mechanical Blood Pressure Measuring Systems, Part 4: Test Procedures to
Determine the Overall System Accuracy of Automated Non-Invasive Sphygmomanometers.
140
Standards and compliance
Connex® Spot Monitor
Electrical Equipment (WEEE). If this product is contaminated, this directive does not
apply.
For more specific disposal or compliance information, see www.welchallyn.com/weee,
or contact Welch Allyn Customer Service at +44 207 365 6780.
General radio compliance
The wireless features of this monitor must be used in strict accordance with the
manufacturer’s instructions as described in the user documentation that comes with the
product.
This device complies with Part 15 of the FCC rules and with the rules of the Canadian
ICES-003 as described below.
Federal Communications Commission (FCC)
This device complies with part 15 of the FCC Rules. Operation is subject to the following
two conditions:
•
This device may not cause harmful interference.
•
This device must accept any interference received, including interference that may
cause undesired operation.
This equipment has been tested and found to comply with the limits for a Class B digital
device, pursuant to Part 15 of FCC Rules. These limits are designed to provide
reasonable protection against harmful interference in a residential installation. This
equipment generates, uses, and can radiate radio frequency energy. If not installed and
used in accordance with the instructions, it may cause harmful interference to radio
communications. However, there is no guarantee that interference will not occur in a
particular installation. If this equipment does cause harmful interference to radio or
television reception, which can be determined by turning the equipment off and on, the
user is encouraged to try and correct the interference by one or more of the following
measures:
•
Reorient or relocate the receiving antenna
•
Increase the distance between the equipment and the receiver
•
Connect the equipment to an outlet on a circuit different from that to which the
receiver is connected
•
Consult the dealer or an experienced radio/TV technician for help
The user may find the following booklet prepared by the Federal Communications
Commission helpful:
The Interference Handbook
This booklet is available from the U.S. Government Printing Office, Washington, D.C.
20402. Stock No. 004-000-0034504.
Welch Allyn is not responsible for any radio or television interference caused by
unauthorized modification of the devices included with this Welch Allyn product, or the
substitution or attachment of connecting cables and equipment other than specified by
Welch Allyn.
The correction of interference caused by such unauthorized modification, substitution, or
attachment will be the responsibility of the user.
Directions for use
Standards and compliance
141
Industry Canada (IC) emissions
This device complies with RSS 210 of Industry Canada.
Operation is subject to the following two conditions: (1) this device may not cause
interference, and (2) this device must accept any interference, including interference that
may cause undesired operation of this device.
L’utilisation de ce dispositif est autorisée seulement aux conditions suivantes: (1) il ne
doit pas produire de brouillage et (2) l’ utilisateur du dispositif doit étre prêt à accepter
tout brouillage radioélectrique reçu, même si ce brouillage est susceptible de
compromettre le fonctionnement du dispositif.
This Class B digital apparatus complies with Canadian ICES-003.
Cet appareil numérique de la classe B est conform à la norme NMB-003 du Canada.
RF Radiation Hazard Warning
Using higher gain antennas and types of antennas not certified for use with this product
is not allowed. The device shall not be co-located with another transmitter.
Cet avertissement de sécurité est conforme aux limites d'exposition définies par la
norme CNR-102 at relative aux fréquences radio.
This radio transmitter (Contains IC ID: 3147A-BT800) has been approved by Industry
Canada to operate with the antenna types listed in table above with the maximum
permissible gain and required antenna impedance for each antenna type indicated.
Antenna types not included in this list, having a gain greater than the maximum gain
indicated for that type, are strictly prohibited for use with this device.
Le présent émetteur radio (Contains IC ID: 3147A-BT800) a été approuvé par Industrie
Canada pour fonctionner avec les types d'antenne énumérés ci-dessous et ayant un gain
admissible maximal et l'impédance requise pour chaque type d'antenne. Les types
d'antenne non inclus dans cette liste, ou dont le gain est supérieur au gain maximal
indiqué, sont strictement interdits pour l'exploitation de l'émetteur.
Under Industry Canada regulations, this radio transmitter may only operate using an
antenna of a type and maximum (or lesser) gain approved for the transmitter by Industry
Canada. To reduce potential radio interference to other users, the antenna type and its
gain should be so chosen that the equivalent isotropically radiated power (e.i.r.p.) is not
more than that necessary for successful communication.
Conformément à la réglementation d'Industrie Canada, le présent émetteur radio peut
fonctionner avec une antenne d'un type et d'un gain maximal (ou inférieur) approuvé
pour l'émetteur par Industrie Canada. Dans le but de réduire les risques de brouillage
radioélectrique à l'intention des autres utilisateurs, il faut choisir le type d'antenne et son
gain de sorte que la puissance isotrope rayonnée équivalente (p.i.r.e.) ne dépasse pas
l'intensité nécessaire à l'établissement d'une communication satisfaisante.
This device complies with Industry Canada license-exempt RSS standard(s). Operation is
subject to the following two conditions: (1) this device may not cause interference, and
(2) this device must accept any interference, including interference that may cause
undesired operation of the device.
Le présent appareil est conforme aux CNR d'Industrie Canada applicables aux appareils
radio exempts de licence. L'exploitation est autorisée aux deux conditions suivantes : (1)
l'appareil ne doit pas produire de brouillage, et (2) l'utilisateur de l'appareil doit accepter
142
Standards and compliance
Connex® Spot Monitor
tout brouillage radioélectrique subi, même si le brouillage est susceptible d'en
compromettre le fonctionnement.
European Union
Czech
Welch Allyn tímto prohlašuje, ze tento RLAN device je ve shodě se základními požadavky a dalšími
příslušnými ustanoveními směrnice 1999/5/ES.
Danish
Undertegnede Welch Allyn erklærer herved, at følgende udstyr RLAN device overholder de
væsentlige krav og øvrige relevante krav i direktiv 1999/5/EF
Dutch
Bij deze verklaart Welch Allyn dat deze RLAN device voldoet aan de essentiële eisen en aan de
overige relevante bepalingen van Richtlijn 1999/5/EC.
English
Hereby, Welch Allyn, declares that this RLAN device is in compliance with the essential
requirements and other relevant provisions of Directive 1999/5/EC.
Estonian
Käesolevaga kinnitab Welch Allyn seadme RLAN device vastavust direktiivi 1999/5/EÜ põhinõuetele
ja nimetatud direktiivist tulenevatele teistele asjakohastele sätetele.
Finnish
Welch Allyn vakuuttaa täten että RLAN device tyyppinen laite on direktiivin 1999/5/EY oleellisten
vaatimusten ja sitä koskevien direktiivin muiden ehtojen mukainen.
French
Par la présente, Welch Allyn déclare que ce RLAN device est conforme aux exigences essentielles et
aux autres dispositions de la directive 1999/5/CE qui lui sont applicables
German
Hiermit erklärt Welch Allyn die Übereinstimmung des Gerätes RLAN device mit den grundlegenden
Anforderungen und den anderen relevanten Festlegungen der Richtlinie 1999/5/EG. (Wien)
Greek
ΜΕ ΤΗΝ ΠΑΡΟΥΣΑ Welch Allyn ΔΗΛΩΝΕΙ ΟΤΙ RLAN device ΣΥΜΜΟΡΦΩΝΕΤΑΙ
ΠΡΟΣ ΤΙΣ ΟΥΣΙΩΔΕΙΣ ΑΠΑΙΤΗΣΕΙΣ ΚΑΙ ΤΙΣ ΛΟΙΠΕΣ ΣΧΕΤΙΚΕΣ ΔΙΑΤΑΞΕΙΣ ΤΗΣ
ΟΔΗΓΙΑΣ 1999/5/ΕΚ
Hungarian
Alulírott, Welch Allyn nyilatkozom, hogy a RLAN device megfelel a vonatkozó alapvetõ
követelményeknek és az 1999/5/EC irányelv egyéb elõírásainak.
Italian
Con la presente Welch Allyn dichiara che questo RLAN device è conforme ai requisiti essenziali ed
alle altre disposizioni pertinenti stabilite dalla direttiva 1999/5/CE.
Latvian
Ar šo Welch Allyn deklarē, ka RLAN device atbilst Direktīvas 1999/5/EK būtiskajām prasībām un
citiem ar to saistītajiem noteikumiem.
Lithuanian
Šiuo Welch Allyn deklaruoja, kad šis RLAN device atitinka esminius reikalavimus ir kitas 1999/5/EB
Direktyvos nuostatas.
Malti
Hawnhekk, Welch Allyn, jiddikjara li dan RLAN device jikkonforma mal-htigijiet essenzjali u ma
provvedimenti ohrajn relevanti li hemm fid-Dirrettiva 1999/5/EC
Portuguese
Welch Allyn declara que este RLAN device está conforme com os requisitos essenciais e outras
disposições da Directiva 1999/5/CE.
Slovak
Welch Allyn týmto vyhlasuje, ze RLAN device spĺňa základné požiadavky a všetky príslušné
ustanovenia Smernice 1999/5/ES.
Slovene
Šiuo Welch Allyn deklaruoja, kad šis RLAN device atitinka esminius reikalavimus ir kitas 1999/5/EB
Direktyvos nuostatas.
Directions for use
Standards and compliance 143
Spanish
Por medio de la presente Welch Allyn declara que el RLAN device cumple con los requisitos
esenciales y cualesquiera otras disposiciones aplicables o exigibles de la Directiva 1999/5/CE
Swedish
Härmed intygar Welch Allyn att denna RLAN device står I överensstämmelse med de väsentliga
egenskapskrav och övriga relevanta bestämmelser som framgår av direktiv 1999/5/EG.
International radio compliance
Argentina
Autoridad Federal de
las Tecnologias de la
Informacion y las
Comunicaciones
(AFTIC)
Contiene Modulo CNC I.D. C-14141
Brazil
Agência Nacional de
Telecomunicações
(ANATEL)
Mexico
Instituto Federal de
Telecomunicaciones
(Federal
Telecommunications
Institute—IFETEL
Singapore
Infocomm
Singapore: Complies with IDS standard
Development
Authority of Singapore
(iDA)
“Este equipamento opera
em caráter secundário,
isto é, não tem direito a
proteção contra
interferência prejudicial,
mesmo de estações do
mesmo tipo, e não pode
causar interferência a
sistemas operando em
caráter primário.”
This product contains an Approved module, Model No. WB45NBT, IFETEL No.
RCPLAWB14-2006
新加坡资讯通信发
展管理局
South Korea
Korea
Communications
Commission (대한민
국 방송통 신위원
회) - KCC
Class A Equipment
(Industrial Broadcasting
& Communication
Equipment)
This equipment is Industrial (Class A)
electromagnetic wave suitability equipment and
seller or user should take notice of it, and this
equipment is to be used in the places except for
A급 기기 (업무용 방 home.
송통신기자재)
이 기기는 업무용(A급) 전자파적합기기로서
판 매자 또는 사용자는 이 점을 주의하시기
바라 며, 가정외의 지역에서 사용하는 것을
목적으로 합니다.
Taiwan
National
Contains NCC I.D.
Communications
Commission (國家通
訊傳播委員會) NCC
CCAB15LP3180T8
低功率電波輻射性電機管理辦法
第十二條 經型式認證合格之低功率射頻電
機,非經許可,公司、
商號或使用者均不得擅自變更頻率、加大功
率或變更原設計
之特性及功能。
第十四條 低功率射頻電機之使用不得影響飛
航安全及干擾合法
144
Connex® Spot Monitor
Standards and compliance
通信;經發現有干擾現象時,應立即停用,
並改善至無干擾
時方得繼續使用。
145
Guidance and manufacturer's declaration
EMC compliance
Special precautions concerning electromagnetic compatibility (EMC) must be taken for all
medical electrical equipment. This device complies with IEC EN 60601-1-2:2007.
•
All medical electrical equipment must be installed and put into service in accordance
with the EMC information provided in this Directions for use.
•
Portable and mobile RF communications equipment can affect the behavior of
medical electrical equipment.
The monitor complies with all applicable and required standards for electromagnetic
interference.
•
It does not normally affect nearby equipment and devices.
•
It is not normally affected by nearby equipment and devices.
•
It is not safe to operate the monitor in the presence of high-frequency surgical
equipment.
•
However, it is good practice to avoid using the monitor in extremely close proximity
to other equipment.
Emissions and immunity information
Electromagnetic emissions
The monitor is intended for use in the electromagnetic environment specified below. The customer or user of the monitor
should assure that it is used in such an environment.
Emissions test
Compliance
Electromagnetic environment - guidance
RF emissions
CISPR 11
Group 1
The monitor uses RF energy only for its internal function. Therefore, its
RF emissions are very low and are not likely to cause any interference
in nearby electronic equipment.
RF emissions
CISPR 11
Class B
Harmonic emissions
IEC 61000-3-2
Class A
The CSM is suitable for use in all establishments, including domestic
establishments and those directly connected to the public low voltage
power supply network that supplies buildings used for domestic
purposes.
146
Connex® Spot Monitor
Guidance and manufacturer's declaration
Electromagnetic emissions
Voltage fluctuations/
flicker emissions
IEC 61000-3-3
Complies
WARNING This equipment/system is intended for
use by healthcare professionals only. This
equipment/ system may cause radio interference or
may disrupt the operation of nearby equipment a. It
may be necessary to take mitigation measures, such
as re-orienting or relocating the monitor or shielding
the location.
a The monitor contains a 5-GHz orthogonal frequency-division multiplexing transmitter or a 2.4-GHz frequency hopping
spread-spectrum transmitter for the purpose of wireless communication. The radio is operated according to the
requirements of various agencies, including FCC 47 CFR 15.247 and R&TTE Directive (1995/5/EC). The transmitter is
excluded from the EMC requirements of 60601-1-2, but should be considered when addressing possible interference
issues between this and other devices.
Electromagnetic immunity
The monitor is intended for use in the electromagnetic environment specified below. The customer or the user of the
monitor should assure that it is used in such an environment.
Immunity test
IEC 60601 test level
Compliance level
Electromagnetic environment - guidance
Electrostatic discharge ±6 kV contact
(ESD)
± 8 kV air
IEC 61000-4-2
± 6 kV contact
± 8 kV air
Floors should be wood, concrete or ceramic
tile. If floors are covered with synthetic
material, the relative humidity should be at
least 30%.
Electrical fast
transient/burst
IEC 61000-4-4
±2 kV for power supply
lines
±1 kV for input/output
lines
±2 kV for power supply Mains power quality should be that of a typical
lines
commercial or hospital environment.
±1 kV for input/output
lines
Surge
IEC 61000-4-5
± 1 kV differential
mode
± 2 kV common mode
± 1 kV differential
mode
± 2 kV common mode
Voltage dips, short
interruptions and
voltage variations on
power supply input
lines
IEC 61000-4-11
>95% dip in 0.5 cycle
Mains power quality should be that of a typical
commercial or hospital environment.
Mains power quality should be that of a typical
commercial or hospital environment. If the user
60% dip in 5 cycles
60% dip in 5 cycles
of the monitor requires continued operation
30% dip for 25 cycles 30% dip for 25 cycles during power mains interruptions, it is
>95% dip in 5 seconds >95% dip in 5 seconds recommended that the monitor be powered
from an uninterruptible power supply or a
battery.
>95% dip in 0.5 cycle
Electromagnetic immunity
The monitor is intended for use in the electromagnetic environment specified below. The customer or the user of the
monitor should assure that it is used in such an environment.
Immunity test
IEC 60601 test level
Compliance level
Electromagnetic environment - guidance
Portable and mobile RF communications
equipment should be used no closer to any part
of the monitor, including cables, than the
recommended separation distance calculated
Directions for use
Guidance and manufacturer's declaration 147
Electromagnetic immunity
from the equation applicable to the frequency
of the transmitter.
Recommended separation distance
Conducted RF
IEC 61000-4-6
3 Vrms
150 kHz to 80 MHz
3 Vrms
Radiated RF
IEC 61000-4-3
3 V/m 80 MHz to 1 GHz 3 V/m
d= (1.17)
d= (1.17)
80 to 800 MHz
d= (2.33)
800 MHz to 2,5 GHz
whereP is the maximum output power rating of
the transmitter in watts (W) andd is the
recommended separation distance in meters
(m). Field strengths from fixed RF transmitters,
as determined by an electromagnetic site
surveya, should be less than the compliance
level in each frequency rangeb. Interference
may occur in the vicinity of equipment marked
with the following symbol:
Note1: At 80 MHz and 800 MHz, the higher frequency range applies.
Note 2: These guidelines may not apply in all situations. Electromagnetic propagation is affected by absorption and
reflection from structures, objects, and people.
aField strengths from fixed transmitters, such as base stations for radio (cellular/cordless) telephones and land mobile
radios, amateur radio, AM and FM radio broadcast, and TV broadcast cannot be predicted theoretically with accuracy. To
assess the electromagnetic environment due to fixed RF transmitters, an electromagnetic site survey should be
considered. If the measured field strength in the location in which the monitor is used exceeds the applicable RF
compliance level above, the monitor should be observed to verify normal operation. If abnormal performance is
observed, additional measures may be necessary, such as reorienting or relocating the monitor.
bOver the frequency range 150 kHz to 80 MHz, field strengths should be less than 3 V/m.
Recommended separation distances between portable and mobile RF communications
equipment and the monitor
The monitor is intended for use in an electromagnetic environment in which radiated RF disturbances are controlled. The
customer or user of the monitor can help prevent electromagnetic interference by maintaining a minimum distance
between portable and mobile RF communications equipment (transmitters) and the monitor as recommended below,
according to the maximum output power of the communications equipment.
Separation distance according to frequency of transmitter (m)
150 kHz to 80 MHz
Rated max. output
power of transmitter d= (1.17)
(W)
80 MHz to 800 MHz
800 MHz to 2.5 GHz
d= (1.17)
d= (2.23)
0.01
0.11667
0.23333
0.11667
148
Connex® Spot Monitor
Guidance and manufacturer's declaration
Recommended separation distances between portable and mobile RF communications
equipment and the monitor
0.1
0.36894
0.36894
0.73785
1
1.1667
1.1667
2.3333
10
3.6894
3.6894
7.3785
100
11.667
11.667
23.3333
For transmitters rated at a maximum output power not listed above, the recommended separation distanced in meters
(m) can be estimated using the equation applicable to the frequency of the transmitter, where P is the maximum output
power rating of the transmitter in watts (W) according to the transmitter manufacturer.
Note 1: At 80 MHz and 800 MHz, the separation distance for the higher frequency range applies.
Note 2: These guidelines may not apply in all situations. Electromagnetic propagation is affected by absorption and
reflection from structures, objects, and people.
149
Appendices
Approved accessories
The following tables list approved monitor accessories and applied parts. For information
about options, upgrades, and licenses, refer to the service manual.
WARNING Use only Welch Allyn approved accessories and applied parts,
and use them according to the manufacturer’s directions for use. Using
unapproved accessories with the monitor or applied parts can affect patient
and operator safety and can compromise product performance and
accuracy, and void the product warranty.
Accessories
Blood pressure accessories (latex-free)
Part number
Model
Description
4500-33
BP
FAST BP HOSE W FPORT, 8 FT
4500-34
BP
FAST BP HOSE W FPORT, 5 FT
4500-35
BP
FAST BP HOSE W FPORT, 10 FT
6000-30
BP
Single tube blood pressure hose (5 ft)
6000-31
BP
Single tube blood pressure hose (10 ft)
7000-33
BP
Neonatal blood pressure hose (10 ft)
5200-08
Calibration "T" connector
Masimo pulse oximetry (for use with devices with SpO2)
Part number
Model
Description
LNC-4
LNCS
4' Cable w/ MINID Connector
LNC-10
LNCS
10' Cable w/ MINID Connector
150
Connex® Spot Monitor
Appendices
Nellcor pulse oximetry
Part number
Model
Description
DS-100A
OxiMax
Durasensor adult oxygen transducer
DOC-10
OxiMax
Extension cable (10 feet)
DOC-8
OxiMax
Extension cable (8 feet)
DOC-4
OxiMax
Extension cable (4 feet)
Nonin pulse oximetry
Part number
Model
Description
6083-001
1m Nonin Extension Cable
6083-003
3m Nonin Extension Cable
SureTemp Plus thermometry
Part number
Description
02895-000
Oral probe and well kit (9ft. / 2.7M)
02895-100
Rectal probe and well kit (9ft. / 2.7M)
02894-0000
Oral probe well (blue)
02894-1000
Rectal probe well (red)
06138-000
Temperature calibration key
01802-110
9600 Plus Calibration Tester
Braun ThermoScan PRO 6000 thermometer and accessory dock
Part number
Description
106201
Pro 6000 tether w/6 ft cord
106204
Pro 6000 tether w/9 ft cord
106205
Pro 6000 battery door
104894
Pro 6000 rechargeable battery
105804
Braun PRO 6000 Thermometer DFU CD
Directions for use
Appendices
151
Mounting options
Part number
Description
7000-APM
Accessory Power Management (APM) — organized mobile stand
with battery and basket
7000-MS3
Connex Spot Classic Mobile Stand, MS3
Miscellaneous items
Part number
Description
104894
Pro6000 Rechargeable Battery
718584
Tether for PRO 6000 with 9 ft Cord
7000-APM
Connex Spot Accessory Power Mgt Stand
7000-MS3
Connex Spot Classic Mobile Stand MS3
7000-GCX
Connex Spot GCX VESA Wall Channel
BATT99
Lithium-ion battery 9 Cell — Extended Life
7000-100S
Carrying case, soft sided
PWCD-B
Line cord B, North America
PWCD-2
Line cord 2, Europe
PWCD-A
Line cord A, Denmark
PWCD-5
Line cord 5, Switzerland
PWCD-4
Line cord 4, United Kingdom
PWCD-6
Line cord 6, Australia/New Zealand
PWCD-66
Line cord 6, Australia/New Zealand —Orange
PWCD-C
Line cord C, China
PWCD-G
Line cord G, Argentina
PWCD-7
Line cord 7, South Africa
PWCD-N
Line cord N, India
PWCD-3
Line cord 3, Israel
PWCD-Y
Line cord Y, Italy
PWCD-K
Line cord K, South Korea
PWCD-T
Line cord T, Taiwan
152
Connex® Spot Monitor
Appendices
Part number
Description
PWCD-P
Line cord P, Thailand
PWCD-Z
Line cord Z, Brazil
6000-NC
Nurse call cable
7000-916HS
Jadak 2D Scanner
4500-925
USB cable for wired connectivity
7000-BOX
Connex Spot Packaging (Empty Box Set)
660-0321-00
Patch cable, 50'
660-0320-00
Patch cable, 100'
660-0138-00
Patch cable, 5'
6000-50
VSM 6000 USB Configuration Memory Stick
7000-PS
Connex Spot 35 Watt Power Supply
4600-90E
BP Accuracy, Variability Card
Part number
Description
S1-CSM
CSM, Comprehensive partnership program, 1 year
S1-CSM-2
CSM, Comprehensive partnership program, 2 years
S1-CSM-5
CSM, Comprehensive partnership program, 5 years
S1-CSM-C
CSM, Comprehensive partnership program, 1 years + Calibration
S1-CSM-2C
CSM, Comprehensive partnership program, 2 years + Calibration
S1-CSM-5C
CSM, Comprehensive partnership program, 5 years + Calibration
S2-CSM
CSM, Biomed partnership program, 1 year
S2-CSM-2
CSM, Biomed partnership program, 2 years
S2-CSM-5
CSM, Biomed partnership program, 5 years
S4-CSM
CSM, Warranty Extension, 1 year
S4-CSM-2
CSM, Warranty Extension, 2 years
S4-CSM-5
CSM, Warranty Extension, 5 years
Service
Directions for use
Appendices
153
Literature/Documentation
Part number
Description
7000-DFU-CD
Connex Spot CD Kit (Directions for use, Quick reference cards, Startup guide,
Service manual)
Applied parts
FlexiPort cuffs
Part number
Model
Description
Neo-1-1
Neo 1 with new fitting
Neo-2-1
Neo 2 with new fitting
Neo-3-1
Neo 3 with new fitting
Neo-4-1
Neo 4 with new fitting
Neo-5-1
Neo 5 with new fitting
Reuse-06
Reusable
CUFF, Welch Allyn, REUSABLE, SMALL INFANT
Reuse-07
Reusable
CUFF, Welch Allyn, REUSABLE, INFANT
Reuse-08
Reusable
CUFF, Welch Allyn, REUSABLE, SM CHILD
Reuse-09
Reusable
CUFF, Welch Allyn, REUSABLE, CHILD
Reuse-10
Reusable
CUFF, Welch Allyn, REUSABLE, SM ADULT
Reuse-11
Reusable
CUFF, Welch Allyn, REUSABLE, ADULT
Reuse-11L
Reusable
CUFF, Welch Allyn, REUSABLE ADULT LONG
Reuse-12
Reusable
CUFF, Welch Allyn, REUSABLE, LG ADULT
Reuse-12L
Reusable
CUFF, Welch Allyn, REUSABLE, LG ADULT LONG
Reuse-13
Reusable
CUFF, Welch Allyn, REUSABLE, THIGH
Soft-06
Disposable
CUFF, Welch Allyn, SMALL INFANT
Soft-07
Disposable
CUFF, Welch Allyn, INFANT
Soft-08
Disposable
CUFF, Welch Allyn, SMALL CHILD
Soft-09
Disposable
CUFF, Welch Allyn, CHILD
154
Connex® Spot Monitor
Appendices
Part number
Model
Description
Soft-10
Disposable
CUFF, Welch Allyn, SMALL ADULT
Soft-11
Disposable
CUFF, Welch Allyn, ADULT
Soft-11L
Disposable
CUFF, Welch Allyn, ADULT LONG
Soft-12
Disposable
CUFF, Welch Allyn, LG ADULT
Soft-12L
Disposable
CUFF, Welch Allyn, LG ADULT LONG
Soft-13
Disposable
CUFF, Welch Allyn, THIGH
ECOCUFF-09
Disposable
EcoCuff, Child, 1521 cm
ECOCUFF-10
Disposable
EcoCuff, Small Adult, 2028 cm
ECOCUFF-11
Disposable
EcoCuff, Adult, 2738 cm
ECOCUFF-12
Disposable
EcoCuff, Large Adult, 3345 cm
ECOCUFF-MLT
Disposable
ECOCUFF, MULTI PACK
Masimo pulse oximetry (for use with devices with SpO2)
Part number
Model
Description
LNCS-DCI
LNCS
Reusable finger sensor - Adult
LNCS-DCIP
LNCS
Reusable finger sensor - Pediatric
LNCS-ADTX
LNCS
Disposable adhesive finger sensor - Adult (20 per case)
LNCS-PDTX
LNCS
Disposable adhesive finger sensor - Pediatric (20 per
case)
LNCS-YI
LNCS
Multisite reusable sensor (1 sensor, 6 adhesive wraps)
LNCS-TC-I
LNCS
Reusable ear sensor
LNCS-Neo-L-3
LNCS
Disposable adhesive finger sensor - Neonate/Adult (20
per case)
Neo-Wrap-RP
LNCS
Replacement wrap for neonatal adhesives (100 per
case)
LNCS-Inf-3
LNCS
Disposable adhesive finger sensor - Infant (20 per case)
Inf-Wrap-RP
LNCS
Replacement wrap for infant adhesives (100 per case)
YI-AD
LNCS
Multisite adhesive wrap adult/pediatric/neonatal for YI
sensor (100 per case)
Directions for use
Appendices
Part number
Model
Description
YI-FM
LNCS
Multisite foam wrap adult/pediatric/neonatal for YI
sensor (12 per case)
155
Nellcor pulse oximetry
Part number
Model
Description
DS-100A
OxiMax
Durasensor adult oxygen transducer
D-YS
OxiMax
Dura-Y oxygen transducer (1 sensor, 40 wraps)
D-YSE
OxiMax
Ear clip (use with Dura-Y sensor)
D-YSPD
OxiMax
PediCheck pediatric spot check (use with DuraY sensor)
MAX-AI
OxiMax
OxiMax adult sensor (single use, case of 24)
MAX-PI
OxiMax
OxiMax pediatric sensor (single use, case of
24)
MAX-II
OxiMax
OxiMax infant sensor (single use, case of 24)
OXI-A/N
OxiMax
Oxiband adult/neonatal transducer (1 sensor,
50 wraps)
OXI-P/I
OxiMax
Oxiband pediatric/infant transducer (1 sensor,
50 wraps)
Nonin pulse oximetry
Part number
Description
3278-010
8000AP NONIN SPO2 SENSOR, ADULT, 2m
2360-010
8000AP NONIN SPO2 SENSOR, PEDIATRIC, 2m
0741-000
8000J NONIN ADULT FLEX SENSORS WITH 25 WRAPS
4097-000
8000JFW NONIN ADULT REPLACEMENT WRAPS 25/PACK
0740-000
8008J NONIN INFANT FLEX SENSOR WITH 25 WRAPS
4774-000
8008JFW NONIN INFANT REPLACEMENT WRAPS 25/PACK
0739-000
8001J NONIN NEONATAL FLEX SENSOR WITH 25 WRAPS
4777-000
8008JFW NONIN NEONATE REPLACEMENT WRAPS 25/PACK
7426-001
6000CA NONIN ADULT CLOTH DISPOSABLE 24/BX
156
Connex® Spot Monitor
Appendices
Part number
Description
7426-002
6000CP NONIN PEDIATRIC CLOTH DISPOSABLE 24/BX
7426-003
6000CI NONIN INFANT CLOTH DISPOSABLE 24/BX
7426-004
6000CN NONIN NEONATE CLOTH DISPOSABLE 24/BOX
Braun thermometry
Part number
Description
06000-005
Disposable probe covers (5,000 covers, packaged 200/box)
06000-801
Disposable probe covers (800 covers, packaged 200/box)
06000-800
Disposable probe covers (800 covers, packaged 200/box)
SureTemp Plus thermometry
Part number
Description
02895-000
Oral probe and well kit (9ft. / 2.7M)
02895-100
Rectal probe and well kit (9ft. / 2.7M)
05031-101
SureTemp Plus Disposable probe covers (1,000 covers, packaged 25/box)
05031-110
SureTemp PlusDisposable probe covers (10,000 covers, packaged 25/box)
Directions for use
Appendices
157
Warranty
Welch Allyn warrants the product to be free of defects in material and workmanship and
to perform in accordance with manufacturer's specifications for the period of two years
from the date of purchase from Welch Allyn or its authorized distributors or agents.
The warranty period shall start on the date of purchase. The date of purchase is: 1) the
invoiced ship date if the device was purchased directly from Welch Allyn, 2) the date
specified during product registration, 3) the date of purchase of the product from a
Welch Allyn authorized distributor as documented from a receipt from said distributor.
This warranty does not cover damage caused by: 1) handling during shipping, 2) use or
maintenance contrary to labeled instructions, 3) alteration or repair by anyone not
authorized by Welch Allyn, and 4) accidents.
The product warranty is also subject to the following terms and limitations: Accessories
are not covered by the warranty. Refer to the directions for use provided with individual
accessories for warranty information.
Shipping cost to return a device to a Welch Allyn Service center is not included.
A service notification number must be obtained from Welch Allyn prior to returning any
products or accessories to Welch Allyn's designated service centers for repair. To obtain
a service notification number, contact Welch Allyn Technical Support.
THIS WARRANTY IS IN LIEU OF ALL OTHER WARRANTIES, EXPRESS OR IMPLIED,
INCLUDING BUT NOT LIMITED TO THE IMPLIED WARRANTIES OF
MERCHANTABILITY AND FITNESS FOR A PARTICULAR PURPOSE. WELCH ALLYN'S
OBLIGATION UNDER THIS WARRANTY IS LIMITED TO REPAIR OR REPLACEMENT
OF PRODUCTS CONTAINING A DEFECT. WELCH ALLYN IS NOT RESPONSIBLE FOR
ANY INDIRECT OR CONSEQUENTIAL DAMAGES RESULTING FROM A PRODUCT
DEFECT COVERED BY THE WARRANTY.