1
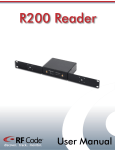
A750 Room Locator discover. track. monitor. User Manual Contents Preface Trademarks FCC Compliance CE Compliance Copyright Statement 4 4 4 5 5 A750 Room Locator 6 6 6 6 6 7 8 8 8 11 12 12 13 13 14 15 16 17 17 17 17 17 18 18 19 20 20 20 22 22 24 24 Warranty & Service 25 25 25 25 25 Overview Features Contents Requirements A750 Asset Tracking Process Notes for A750 Room Locator and Tag Deployment Installation and Configuration Hardware Installation Utility Software Installation Launching the Room Locator Utility Configuration Changing Location Code Configuring the Operation Mode Using Team Diagnostics Changing IR Output Intensity Changing IR Output Regions Resetting Device Settings Reading Settings from the Device Saving Device Configuration File Opening and Applying a Device Configuration File Setting a Password for the Device Turn Off/On Power LED Upgrade Device Firmware Optional System Status Tag Power Options Wiring Power Specifications Mounting Options Mounting Procedure Dismounting Procedure Environmental Limits Limited Standard Warranty Terms Standard Warranty Limitations Obtaining Service & Support RF Code Customer Support PN00901 REV03 A750 Room Locator User Manual 3 Preface Trademarks RF CodeTM and the RF Code logo are trademarks of RF Code, Inc All other product names are copyright and registered trademarks or trade names of their respective owners. Information in this document is provided solely to enable system and software implementors to use RF Code products. There are no express or implied copyright licenses granted hereunder to design or fabricate any integrated circuits or integrated circuits based on the information in this document. RF Code reserves the right to make changes without further notice to any products herein. RF Code makes no warranty, representation or guarantee regarding the suitability of its products for any particular purpose, nor does RF Code assume any liability arising out of the application or use of any product, and specifically disclaims any and all liability, including without limitation consequential or incidental damages. The user of this system is cautioned that any changes or modifications to this system, not expressly approved by RF Code, Inc., could void the warranty. FCC Compliance This equipment has been tested and found to comply with the limits for a Class A digital device, pursuant to Part 15 of the FCC Rules. These limits are designed to provide reasonable protection against harmful interference when the equipment is operated in a commercial environment. This equipment generates, uses, and can radiate radio frequency energy and, if not installed and used in accordance with the instruction manual, may cause harmful interference to radio communications. Operation of this equipment in a residential area is likely to cause harmful interference, in which case the user will be required to correct the interference at his own expense. RFCode is not responsible for any radio or television interference caused by using other than recommended cables and connectors or by unauthorized changes or modifications to this equipment. Unauthorized changes or modifications could void the user’s authority to operate the equipment. This device complies with Part 15 of the FCC rules. Operation is subject to the following two conditions: (1) this device may not cause harmful interference, and (2) this device must accept any interference received, including interference that may cause undesired operation. RF Code, Inc. 9229 Waterford Center Blvd. Suite 500 Austin, TX 78758 Telephone: 1-512-439-2200 Industry Canada Compliance Statement This Class A digital apparatus meets the requirements of the Canadian Interference-Causing Equipment Regulations. Avis de conformité à la réglementation d’Industrie Canada Cet appareil numérique de la classe A respecte toutes les exigences du Règlement sur le matériel brouilleur du Canada. The system is design to operate with RFCode Active Tags – Whose operating frequency is 433.92 MHz which have been certified or are in the certification process. These devices comply with part 15 of the FCC rules. Operation is subject to the following two conditions: (1) these devices may not cause harmful interference, and (2) these devices must accept any interference received, including interference that may cause undesired operation. a. FCC ID: P6F2005433 for beacon intervals greater than, or equal to 10 seconds. b. FCC ID: P6F433MHZ for the security tag with beacon intervals less than 10 seconds. PN00901 REV03 A750 Room Locator User Manual 4 This is a Class A product. In a domestic environment, this product may cause radio interference, in which case the user may be required to take adequate measures. This equipment complies with the requirements relating to electromagnetic compatibility, EN 55022 class A, the essential protection requirement of Council Directive 89/336/EEC on the approximation of the laws of the Member States relating to electromagnetic compatibility. Copyright Statement Copyright © 2009 RF Code, Inc. All Rights Reserved. This document, as well as the hardware and firmware described therein, are furnished under license and may only be used or copied in accordance with the terms of such license. The information in these pages are furnished for informational use only, are subject to change without notice, and should not be construed as a commitment by RF Code, Inc. RF Code assumes no responsibility or liability for any errors or inaccuracies that may appear in these pages. Every effort has been made to supply complete and accurate information. However, RF Code assumes no responsibility for its use, or for any infringements of patents or other rights of third parties, which would result. RF Code, Inc. 9229 Waterford Centre Blvd. Suite 500 Austin, TX 78758 www.rfcode.com PN00901 REV03 5 CE Compliance CE Compliance A750 Room Locator Overview The A750 Room Locator is an IR (infrared) transmitting unit used with IR-enabled active tags and RF readers to provide a method of locating and tracking tagged assets within a specified coverage area. Each Room Locator transmits an IR pulse pattern containing a unique location code. The strength of the IR transmissions can be manually adjusted, with typical coverage perimeters measuring up to 10 meters. The A750 has a discrete dome form factor that is 4.46 inches in diameter by 1.36 inches in depth. The A750 has a back plate that is used to mount the Locator unit to a ceiling or wall. Once the back plate is mounted, the Locator unit snaps onto the back plate. Similar to visible light, IR transmits within line-of-site. Additionally IR signals can bounce off of walls and ceilings, effectively flooding an entire room with the IR location code transmission. IRenabled tags receive incoming IR signals and periodically report their unique ID and current IR location code. Tag transmissions can be processed in real-time to quickly locate and identify tagged assets or personnel with room-level accuracy. Large populations of tags can be monitored using a single reader. Features • Ability to easily adjust the IR intensity and region coverage • Flexible deployment options for wall mount and ceiling mount • Field upgradable firmware • Enhanced power attachment options • Modern and visually pleasing enclosure • Designed to embed an IR Tag for system monitoring • Enhanced surge protection • Team Mode option for coordinating multiple A750 Locators operating in same location Contents • A750 Room Locator • Room Locator Utility CD • User Manual Requirements • Windows XP or Vista • Room Locator Utility PN00901 REV023 A750 Room Locator User Manual 6 A750 Room Locators and IR-enabled active tags allow for tracking assets at a room level accuracy. Each room locator transmits an IR signal containing a user assigned location code. With A750 Room Locators positioned to cover specific areas, such as rooms, closets or entire floors, the IR-enabled tags can report specific location data when it transmits it’s RF location payload to a reader. As an asset moves from one room to another it’s tag will transmit the new location code it received from the last seen A750. Each A750 Room Locator can be assigned a unique ID for distinct room locations. Larger rooms can have multiple A750’s installed for more complete IR coverage. When multiple A750’s are installed in the same area they can be configured in a Team Mode where they can synchronized with other A750’s to avoid transmitting their location code data at the same time. IR-enabled active tags receive location ID data and synchronize with the A750 Room Locators. Once a tag has synchronized with an A750, it knows that the same A750 will transmit its location data once every second. A moving tag will check the A750’s transmission every 3 seconds. If the tag fails to receive a signal at the expected time, it reverts back to search mode where it scans for an IR transmission over a one second period. When a tag has been stationary for at least 15 minutes and has and has not seen any A750s during that time, it will go into a “low power” mode and only check for A750s transmissions every 15 minutes. When a tag has been stationary for at least 1 minute and has seen the same A750 during that time, it will go into a “low power” mode and only check for A750s every 15 seconds. If a tag does not detect any A750 signal it is relayed to the reader as the reserved location code of zero. The Asset Tracking process is illustrated in Figure 1. The major components consist of the following: 1. A750 Room Locator – The A750 Room Locator periodically transmits a short burst of infrared pulses to report a location ID. This IR signal pulse is transmitted once every second which aids in avoiding interference with other devices that receive IR transmissions. The A750’s configuration settings such as location ID, LED intensity and enabling regions are performed using the Room Locator Utility (RLU). . 2. IR Signal – All IR-enabled active tags in a room look for the A750 IR signals at specific intervals. These intervals are based on the state of the tag (moving or stationary). Since the IR signals transmit by line of site or reflections, the proper placement of room locators and tags is essential to optimally detect the IR signals. For best results the room locators should be placed in a high open space. The tags should be mounted in a manner where the IR sensor is pointing toward a room locator whenever possible. In areas that may have many items blocking the IR transmissions, multiple A750’s can be used to increase the coverage area. 3. IR-Enabled Active Tags – Active tags are attached to assets to track the movement and current location of those assets. The tags relay an RF beacon to a reader that contains the A750 location identifier seen by the tag. The IR Series 1 (legacy) active tags communicate using the RF Code Treatment 04A protocol. IR Series 2 active tags communicate using the RF Code Treatment 04H protocol. 4. RF Reader – The RF reader receives data transmitted by the active tags, this includes the location code data that is received from the A750 devices. 5. Room Locator Utility – The (RLU) program is provided to allow configuration of the A750 Room Locator. This utility has a GUI interface to allow setting the A750’s location code, LED intensity levels and other locator parameters. Figure 1: A750 Asset Tracking Process PN00901 REV03 7 A750 Asset Process A750 AssetTracking TrackingProcess A750 Asset Tracking Process Notes for A750 Room Locator and Tag Deployment When deploying the A750 Room Locators and IR active tags, it is possible that other IR sources can interfere with the A750’s IR transmissions. If an interference occurs, the IR tag may not be able to successfully decode the IR signal. This will cause the tag to report a payload indicating that it does not detect a valid A750 signal. The tag’s RF signal will not be effected by any IR interference, however the IR location code will not be received. To avoid any IR interference refer to the following notes: • IR-enabled active tags are NOT designed to work outdoors. In direct sunlight, the IR tags will not detect the A750 transmissions. • Series 1 tags may be susceptible to some fluorescent lights sources. If the IR sensor of a Series 1 asset tag is pointed directly at a fluorescent light, the tag may not properly receive the A750’s IR signal. If fluorescent lights are present, Series 1 tags should be attached with the IR window facing away from the light source. Series 2 tags are designed to perform with very low interference with fluorescent lighting and will not required any specific orientation in typical lighting environments. • Do not cover the IR sensor on the tag label. This will affect the ability of the tag to read A750 signals. • The placement of tags within a room can affect the ability of the tag to decode infrared A750 signals. Where possible tags should be placed so that their IR sensor would typically be facing towards an A750 device, or have an unobstructed view of a surface; such as a wall, that will be illuminated by an A750. • A Room Locator’s transmissions can interfere with other Room Locators operating within the same location. The A750 Room Locators have a team operating mode to allow multiple room locators to synchronize their IR transmissions at unique times. Please refer to the Team Mode section of this document. • For all tags in general, the RF field of the tags are affected by large metal surfaces. Users should take caution when placing tags directly on metal surfaces that are large relative to the tag. This can cause a diminished readrange in some cases. Installation and Configuration To configure the A750 Room Locator you will need to use the Room Locator Utility (RLU) which is provided on the Room Locator CD that came with the A750 Room Locator. A USB Type A to mini-B cable (not provided) is needed to connect to the A750 Room Locator hardware to a Windows platform running the Room Locator Utility. When the A750 is connected using the USB cable, enough power is supplied to preform configuration of the unit but not enough to operate the A750 at full intensity. The A750 does not require full power for configuration but a dedicated power source is required for normal operating mode. The steps for this process are described below: Hardware Installation When first connecting the A750 Room Locator to a PC, the A750 driver will need to be installed. This is performed through the Found New Hardware Wizard that should automatically load when the Room Locator is connected to the PC. Follow the steps in the wizard to locate the driver software for the A750 Room Locator. This software is located on the Room Locator CD that came with the A750 Room Locator. 8 PN00901 REV03 If your computer does not have the correct driver installed, then it will not be able to recognize the A750 IR Room Locator. You will know when this happens if the A750 is not listed in Device Manager or if it is listed but shows an error. In these instances, you need to tell your PC where to find the driver. Be sure that the A750 is powered on. Otherwise, your computer will not see it at all. If the driver is installed properly, the entry will look like the A750 Room Locator under Ports below: The name of the drive file that you need to install is RFCUSB.inf and it can be found in any of the following locations: • In the Windows installation directory of the Room Locator Utility (RLU) • On the RLU CD that shipped with your A750 • In the Support area of the RF Code website (http://support.rfcode.com) under the heading Room Locator Utilities (http://support. rfcode.com/customer/portal/articles/716055-utilities-downloads) After obtaining the driver file, install it by performing the following steps: 1. Right-click Computer (or My Computer), left-click Properties, and then click Device Manager (or click Hardware and then Device Manager). 2. Under Ports, right-click the A750 IR Room Locator entry with the driver issue and then click Update Driver Software. PN00901 REV03 9 Driver Installation Driver Installation Issues 3. Click the Browse my computer for driver software option. 4. Point your computer to the location of the driver file (RFCUSB.inf ) and then click the Next button. The screenshot below shows the Windows Desktop as the location of the driver file. 10 PN00901 REV03 Installation Noe tFsoA r750 Roo& m LocConfiguration ao tA rnd Tag Depo lyment Figure 2: A750 Hardware Installation Wizard Utility Software Installation To install the Room Locator Utility insert the CD into the CD-ROM drive and click on Install Room Locator Utility to begin. If the CD autorun program does not launch the CD main menu, a Windows Explorer window can be used to browse to the CD drive and the RF Code Room Locator Utility CD Menu file should be double-clicked upon to start the autorun program. Alternatively, the Room Locator Utility can be installed directly by double clicking on the setup.exe file. This will launch the install wizard. Follow the prompts to install the utility. Figure 3: Room Locator Utility Installation Wizard PN00901 REV03 11 Launching the Room Locator Utility After installing the application from the CD, select Start > All Programs > RF Code > Room Locator Utility > Room Locator Utility to launch the application and display the main screen. The utility is used in conjunction with the A750 Room Locator. The A750’s USB cable needs to be plugged into an available USB port on the computer on which the utility software is running. Configuration In the configuration process there are three main functions that will be performed, setting the IR-emitted intensity level, configuring the device for Standalone or Team mode and setting the Room Locator location ID. The steps for initial configuration of an A750 Room Locator are described below: 1. Ensure that the A750 Room Locator is connected to the PC through the USB cable and launch the Room Locator Utility software. 2. The Room Locator Utility GUI will open and the Device Details section should display the status, model number, the version of the firmware installed on the device, and the device’s serial number. If the Status reports Disconnected, the device may need to be discovered by selecting the Device > Select device menu item. A window will appear. Click the Discover button. The utility will discover any A750’s that are connected to the computer. Select the device from the drop-down list and click the OK button (Figure 5). The A750 will display default values for location code and other settings set during manufacturing time. If the Utility does not show any A750’s connected, unplug the USB cable to the device(s), wait 10 seconds and plug the USB cable back into the device. The operating system may have not properly discovered the USB device being connected. Figure 4: Device Details 12 PN00901 REV03 3. Changing Location Code: Under the Settings section the Location Code field will determine what location code data will be transmitted from the A750 to any IR tags receiving it’s IR signal. The Tag Type can be set to Series 2 Only or Series 1 & 2, which determines what Series of tags the A750 will be setup to transmit to. A750’s set up for Series 2 Only tags can be configured to transmit location code values ranging from decimal 0001 to 9999. These location codes should always be referenced in four digit values since all four digits will distinguish the location code for these tag types. When the A750 device is set up for Series 1 & 2 tags, the location code can be set in a range from 001 to 757 octal values. Octal values are numbers that do not use digits “8” or “9” and will not be permitted in the location code field for this tag type setting. For example, a location code of “077” is a valid octal number where “187” is not valid since the second digit “8” is not permitted. The Series 1 & 2 tags will support up to 495 unique location codes on the A750. Series 1 & 2 location codes should always be referenced in three digit values. 4. Configuring the Operating Mode: The A750 Room Locators can be used in two operating modes depending on the room environment the IR tags will be operating within. a. In the simplest configuration, only one A750 Room Locator would be covering one room. This A750 device would typically be configured in the Standalone mode. One or more locators can be installed and configured in the Standalone mode when they are in physically separate areas and their IR transmissions do not interfere with each other. b. In cases where multiple A750 Room Locators are used in a single room or building the locators can be set to operate in a team mode configuration. In team mode, one A750 would act as a team leader and one or more locators will be configured as team members with an assigned role from 1 to 7. The team mode operation is required when two or more A750’s are used within an area where the IR transmissions could interfere with each other. When in team mode, all of the team members will synchronize to transmit their IR signals at their own unique assigned time frame. This alleviates corrupted IR transmissions due to cross talk. Additionally, a team member is not required to have direct visibility to the team leader. When in team mode all Room Locators transmit the synchronization data from the team leader. Doing so allows a team member to be synchronized by the team leader even though it is not directly visible by the leader. o setup a room locator in standalone mode, select the Team Leader/Standalone option in the Mode secT tion. Click the Apply Settings button and a confirmation message will appear indicating that the settings have been applied. Figure 6: Device Settings Applies PN00901 REV03 13 Noe tFConfiguration soA r750 Room Locao tA rnd Tag Depo lyment Figure 5: Device Discovery o setup a group of A750 Room Locators in team mode, first assign one device to be the Team Leader. T To do this select the Team Leader/Standalone option in the Mode section and click the Apply Settings button. This room locator will be the device the other team members will receive thier synchronization data from. nce you have established a Team Leader, you can configure one or more room locators to be Team MemO bers to cover a particular location area. Each additional room locator will have it’s team member role configured by selecting the Team Member option, and assigning a unique Team Member value from the Role drop-down list. Save the settings by clicking the Apply Settings button. When adding room locators be sure to keep a list of team member roles used to avoid any duplication. (Figure 7). Repeat this process selecting a different number for each successive A750 device you configure as a Team Member. Figure 7: Team Member Mode c. Using Team Diagnostics Mode: The Room Locator Utility contains a diagnostic feature to determine which of the Room Locator devices are visible to other devices in the team. This diagnostic option is accessed by browsing to Device > Team Mode diagnostics. A Team Mode Diagnostic Reporting screen will be displayed that will dynamically update with information received from all team members that are visible to the room locator that the Room Locator Utility is currently connected. When operating in Team Mode the A750 room Locators will transmit and receive IR signals from other A750 devices. It is possible that some florescent lighting can interfere with this communication. When deploying Room Locators in Team Mode it is important to use the Team Mode diagnostics while florescent lighting is switched on to determine the appropriate placement of A750’s for proper team communications. 14 PN00901 REV03 Noe tFConfiguration soA r750 Room Locao tA rnd Tag Depo lyment Figure 8: Team Mode Diagnostics Window The diagnostic report window displays information in a table about the A750 Room Locators that are visible to the room locator device connected to the RLU. A description of each column is listed in the table below: Reference Indicates the Team Mode role of that particular Room Locator device as determined by the connected Room Locator. The team leader role is indicated by an uppercase L. Location Code Indicates the location code that you have assigned to that particular device. Tag Type Indicates the Tag Type mode (Series 1 & 2 or Series 2) that has been assigned to that particular device. Role Indicates the role that you assigned to that particular device. If the device has been configured to be a Team Leader, an uppercase L will appear for that Leader Room Locator. Hop Count Indicates the number of IR communication hops between that particular device and the team leader. Visible Team Members Indicates the Team Members that are visible to that particular device. 5. Changing IR Output Intensity: The IR Output section allows for the room locators IR Output Intensity level to be set to range from 10% to 100%. To adjust the IR intensity level, drag the Intensity level slider to the right or left. The intensity level setting percentage is displayed as the bar’s position is changed. Also the intensity of the Room Locator’s image in the IR Output section is adjusted accordingly (Figure 7). Click the Apply Settings button to save these settings. The IR Output Intensity level applies to all regions of the A750 device. Intensity levels are not adjustable for the individual regions. PN00901 REV03 15 Figure 7: IR Output Intensity Level Slider 6. Changing IR Output Regions: The A750 Room Locators have nine sections of LEDS that can be individually turned on or off. To provide a more directional coverage of their IR transmissions, the Room Locators can be configured with one or more of these regions enabled. From the RLU the IR Output section displays a graphic representation of the Room Locator and the individual regions that can be selected. The proper orientation of the Room Locator can be determined by matching the “USB” text in the panel with the USB port on the physical device. When a region is displayed with a highlighted shade of color it indicates that region is enabled, if the absences of color is displayed in the region, it is disabled. By default, all IR Output regions are enabled. To enable or disable one or more regions, click on those regions selecting or deselecting until the sections are highlighted or cleared as needed. (Figure 8). At least one region of the Room Locator is required to be enabled. Click the Apply Settings button to save these settings. Figure 8: IR Output Enabled/Disabled Regions These are the minimally required steps for configuring the A750 Room Locator with the Room Locator Utility. Additional features of the Room Locator Utility to aid in the configuration of the Room Locators are described in the following sections. 16 PN00901 REV03 Please note that this action will remove any previous settings that were configured for the device. 8. Reading Settings from the Device: The Room Locator Utility has a feature that allows the utility to read the settings that have been previously set on an A750 device. This can be done by connecting the A750 to the computer that is running the Room Locator Utility, and selecting the Device > Read settings from device menu option. Upon choosing this option, the utility will read and display the settings that were previously set on this device. 9. Saving Device Configuration File: The Room Locator Utility allows saving a set of device settings for backup purposes. To save the currently connected Room Locator’s set of device settings, select the File > Save or File > Save As menu option. This will prompt a file browser window. Select a location and a name for this device configuration file and click the Save button (Figure 9). The Room Locator’s configuration file is saved with a .rlc extension. Figure 9: Save Device Configuration File 10. Opening and Applying a Device Configuration File: If a device configuration file for an A750 Room Locator has been saved, that file can be opened and applied to the original A750 device or to a different A750 Room Locator. This is performed by selecting the File > Open menu option and then the Apply Settings button. 11. Setting a Password for the Device: With the Room Locator Utility a password can be set as a security feature preventing the settings from being altered for a particular device without the password. This can be performed by selecting the menu option Device > Change password and entering in and confirming a password for the device. After clicking the OK button a message will appear indicating that the password has successfully been changed (Figure 11). Once the A750 device is disconnected or the Room Locator Utility has been exited, this password feature will take affect. A prompt to enter the password will appear when reconnecting the A750 unit with the Room Locator Utility (Figure 12). Please note if the password is forgotten or misplaced, the 14 digit serial number for the unit will need to be entered to access the settings in the Room Locator Utility. The Device > Change password menu option will need to be accessed and the new password will need to be entered and confirmed for the device. The password prompt can be removed for that particular device, by entering RFCODE (in all CAPS) as the password. This will reset the device password to the manufacturer default of RFCODE. PN00901 REV03 17 Noe tFConfiguration soA r750 Room Locao tA rnd Tag Depo lyment 7. Resetting Device Settings: The A750 Room Locator can be reset to a default location code of 0001 and IR Output settings of all regions enabled and the intensity level set to 100%. This is performed by selecting the menu item File > New and clicking on the Apply Settings button. The serial number is printed on the device on the inside of the A750 unit and also on the back of the mounting plate of the unit. If the serial number on the A750 unit does not match that of the mounting plate, the backing plate may not be the original plate for that unit, refer to the serial number printed on the locator dome unit as the correct serial number for the device. Figure 10: Password Successfully Applied Message Figure 11: Password Prompt 3. Turn Off/On Power LED: The A750 Room Locators have an LED visible next to the USB port that indicates that the unit is receiving power. This indicator LED can be turned on or off as desired through the Room Locator Utility. To do this access the Device > Turn off power LED menu option. This will turn off the green power indicator LED. A window will appear indicating that the device power LED setting has been changed. To turn the LED on, select Device > Turn on power LED. A message will appear indicating that the device power LED setting has been changed and the green LED will illuminate. If the Power LED is set to OFF, each time power is applied to the A750 Room Locator, the power LED will illuminate briefly. 4. Upgrade Device Firmware: To upgrade the firmware for the A750 unit, access the Device > Upgrade device firmware menu option. A dialog prompt will appear. Next click the Start button to begin the upgrade process (Figure 13). A message indicating the firmware upgrade is complete will be displayed (Figure 14). Click the Done button to finish this process. If the Room Locator already has the latest firmware installed, a message will display indicating that an upgrade is not necessary. Figure 13: Firmware Upgrade Prompt 18 PN00901 REV03 Optional System Status Optional Configuration SystemStatus TagTag Figure 14: Firmware Upgrade Complete Message Do not disconnect the device during the upgrade process. Doing so may cause problems with the device and its ability to upgrade the firmware properly. Optional System Status Tag The A750 Room Locator allows for an optional feature to assist in the monitoring of an A750 Room Locator device. This feature uses an RF Code M170 IR tag (not included in the A750 Room Locator; tag must be purchased separately) that can be attached to the mounting plate of the A750 unit (Figure 15). The Tag ID should be recorded and associated with the A750 unit’s location code. The tag will receive the IR location code of the attached A750 Room Locator and will beacon the A750 unit’s location code continuously. If the tag no longer beacon’s the location code of the unit that it is mounted in, the user will be able to infer that the A750 Room Locator is not operating correctly. Figure 15: M170 IR Tag (optional) Mounted on the A750 Room Locator Mounting Plate To mount the M170 IR Tag on the A750 Room Locator mounting plate, remove the liner backing of the tag adhesive and apply firmly to the surface of the mounting plate. The tag adhesive bonds when force is applied, rather than by air activation. The tag should be forcibly pressed down on the surface of the mounting plate with 15 pounds of force for more than two seconds. The ideal adhesive application temperature range is 60°F (21°C) to 100°F (38°C). Application is not recommended if the surface temperature is below 50°F (10°C) because the adhesive becomes too firm to adhere readily. PN00901 REV03 19 Power Options RF Code recommends the use of one of two main power options for the A750 Room Locator system: • 24V AC (minimum 12 Watt) OR • 12-24V DC (minimum 12 Watt) Connected by: • 2.1 mm x 5.5 mm barrel jack, any polarity OR • Screw clamp terminal with no polarity restrictions, wire size 16-30 AWG A standard 12 volt AC/DC power brick is supplied with the A750 Room Locator and can be used as a power source by connecting the power brick to the barrel jack of the A750 dome unit (Figure 16). Figure 16: Labeled Power Connectors The notch in the dome is the cutout for the power wire. Run this wire through the notch before attaching the dome to the mounting plate to ensure the best fit. Wiring Wire length can adversely affect the performance of the device if the wire gauge or thickness is not properly selected. It is recommended that a 24V AC or DC supply is used for long cable runs instead of 12V DC as the voltage will drop over the cable. Power Specifications Minimum voltage at the device is 10V DC or 14 VAC. The peak current is 1A. The average current is: • 75mA @ 12 VDC • 25mA @ 24V DC • 18mA @ 24V AC The average power is about 1 Watt 20 PN00901 REV03 Power Options Table of resistance per unit length vs Gauge (American Wire Gauge) This table can be used to calculate the maximum cable length using the equation V=I * R (voltage drop = peak current multiplied by total resistance) and the power specifications data above. Keep in mind that there are two conductors when calculating total resistance. AWG (Ω/km) (Ω/kFT) 12 13 14 15 16 17 18 19 20 21 22 23 24 5.2 6.6 8.3 10.4 13.2 16.6 21.0 26.4 33.3 42.0 53.0 66.8 84.2 1.6 2.0 2.5 3.2 4.0 5.1 6.4 8.1 10.2 12.8 16.1 20.4 25.7 When using conductors larger than 16 AWG, a splice to 16 AWG will be necessary to fit the wire into the screw down terminal block. 24V DC Table At 24 VDC, with a 1A peak current, 10V minimum at the device and a 0.75 safety factor, the allowable cable lengths are shown below: Two conductors are used. The table shows the length of the run of the two cables from the supply to the device. AWG LENGTH (in Feet) 12 13 14 15 16 17 18 19 20 21 22 23 24 3281 2625 2100 1641 1313 1029 820 648 515 410 326 257 204 PN00901 REV03 21 24V AC Table At 24 V AC, with a 1A peak current, 14V AC minimum at the device and a 0.75 safety factor the allowable cable lengths are shown below. Two conductors are used. The table shows the length of the run of the two conductors from the supply to the device. AWG LENGTH (in Feet) 12 13 14 15 16 17 18 19 20 21 22 23 24 2344 1875 1500 1172 938 735 586 463 368 293 233 184 146 Mounting Options RF Code recommends the use of one of three main mounting configurations: • Flush Ceiling Mount - The A750 unit mounted with the supplied mounting plate flush onto the ceiling. • Flush Wall Mount - The A750 unit mounted with the supplied mounting plate flush onto the wall (e.g. mounted on a single Gang outlet or junction box). • Bracket Mount - The A750 unit with mounting plate attached, connected to a bracket (such as a standard camera mount) attached to a solid surface. Mounting Procedure 1. The A750 unit ships with the A750 Room Locator dome separated from the base mounting plate. To mount the device, attach the mounting plate to the surface that is intended for mounting (e.g. Gang outlet or junction box) or to the bracket mount that will be used. There are several cut-out options on the plate allowing for various different types of mounting hardware. These cut-outs are labeled and described in the diagram below (Figure 17). 2. This step is OPTIONAL. Mount the M170 IR tag to the mounting plate in the location indicated by the tag placement indicator cut-outs making sure that the IR sensor of the tag is closest to the flat edge of the mounting plate (See Figures 15 and 17). The IR sensor on the tag MUST BE placed correctly with the sensor nearest to the flat edge of the mounting plate in order for this feature to work correctly. If the tag sensor is not placed in the correct position, it may not be able to sense the IR transmission of the A750 device and may not beacon its location code, preventing the proper monitoring of the device. 22 PN00901 REV03 Mounting Mounting Options Options Figure 17: Mounting Plate Cut-outs for Installation Hardware 3. Attach power wires to either barrel jack connector or screw terminal connector. Notice the notch in the dome of the unit. This provides as a channel for the power cord to fit through to ensure a flush mounting surface. Make sure that the power source is turned OFF or NOT plugged-in when you attach the power wires to the connector. Only turn power on or plug-in to wall terminal when you have completed the mounting procedure steps. 4. Align the dome holes with the four posts of the mounting bracket ensuring that the dome’s power wire cutout is in the same position as the flat-edge of the mounting plate. Apply slight pressure to the center of the dome until you hear the posts click into place. Be careful to only apply the amount of pressure needed to snap the dome securely onto the mounting plate. Using excessive force could result in cracking the dome and/or damaging internal components of the device. 5. Turn on the power to the device or plug the power brick into a wall outlet. Any IR tags that you have deployed in this area should now beacon the location code of this Room Locator. PN00901 REV03 23 Dismounting Procedure To separate the A750 Room Locator dome from the mounting plate when it has been mounted to a flat surface or bracket, gently squeeze the outside of the dome around the edges and pull STRAIGHT BACK from the wall or bracket. The dome will should separate from the mounting plate with a slight “clicking” noise. DO NOT twist the A750 dome or pry at an angle when removing it from the mounting base that has been attached to a surface or bracket. DO NOT use a sharp object to pry the dome from the base. These actions can result in damage to the device. Please take care to only apply the necessary force needed to remove the dome from the mounting plate. Applying too much force can cause the dome to crack or otherwise damage the dome. hen separating the mounting plate from the back of the A750 unit when it is NOT installed to a surface or mountW ing bracket, you will need to use a tool like a flat-head screw driver. Wedge the screw driver between the mounting plate and the A750 dome at the flat edge of the mounting plate where the notch for the power wire is located. Gently pry the plate apart from the dome around the edges until an audible “click” is heard for each of the four posts releasing (Figure 18). The mounting plate should now be separated from the dome. Please take care to only apply the necessary force needed to remove the mounting plate from the dome. Applying too much force can cause the dome to crack or otherwise damage the dome. DO NOT user your fingers to attempt to pry the mounting plate from the dome. The cut-out edges may be sharp and this action could result in injury. Figure 18: Removing the Mounting Plate When Not Installed to a Surface Environmental Limits The A750 unit is approved for use within the ranges set forth below. • Operation: -20 to +70 degrees Celsius • Humidity: 10% to 90% RH non-condensing • Input: 12 to 24 VDC 24 PN00901 REV03 Warranty & Service Limited Standard Warranty Terms F Code warrants its products to be free from defects in materials and workmanship for a period of 1 year (12 R months) for hardware and software from the date of purchase from RF Code. Its obligation under this warranty is limited to repairing or replacing, at its own sole option, any such defective products. This warranty does not apply to equipment that has been damaged by accident, negligence, or misapplication or has been altered or modified in any way. This warranty applies only to the original purchaser (end-user) and is not transferable. Standard Warranty Limitations xcept as provided herein, the entire liability of RF Code and its suppliers under this limited warranty will be that RF E Code will use reasonable efforts to repair or replace, without charge, all defective Products returned to RF Code by Customer, all as more particularly described in the End User Warranty. Except for the express warranties STATED HEREIN, RF Code makes no other representations or warranties and RF Code hereby disclaims all other warranties, express, implied, statutory, or otherwise, including without limitation, any warranty of merchantability, non-infringement of third party intellectual property rights, fitness for a particular purpose, performance, satisfactory quality, or arising from a course of dealing, usage or trade practice. Obtaining Service & Support in-warranty service, customers have several options. Customers having difficulty with RF Code products should For attempt to solve those problems through RF Code’s Technical Support Problem Escalation Process: irst, contact the RF Code representative or other distributor from whom the RF Code product was purchased for F information on how to obtain local support. Second, contact the RF Code Customer Support via e-mail. Third, contact the RF Code Customer Support via the Support Line. or product returns, the support engineer will give you a return material authorization (RMA) number. No returns F will be accepted without an RMA number. If the warranty expired, there is a charge for repair or replacement per RF Code’s out-of-warranty policy. For full details of the RF Code RMA policy, please review the “RF Code Warranty, RMA, and Extended Warranty Policy” document. RF Code Customer Support F Code Customer Support gives entitled customers and partners the ability to contact RF Code about installation R and usage-related questions as well as make defect inquiries about eligible products that are covered under RF Code warranty agreements. A team of technical specialists can be contacted electronically or via phone. he Support Line is available to provide General Support during normal business hours: Monday through Friday, T 8:00 am to 5:00 pm Central time, excluding national holidays. PN00901 REV03 E-mail: [email protected] Support form: http://www.rfcode.com Voice: 512.439.2244 or toll-free at 866.830.4578 A750 Room Locator User Manual 25 discover. track. monitor.