1
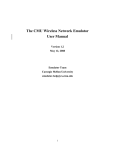
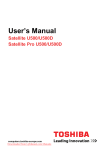
SV2000 IP Phone User Manual . User Manual of SV2000 IP Phone Content §1 ABOUT IP PHONE..........................................................................................- 1 §2 SAFETY PRECAUTIONS .................................................................................- 1 §3 USE INSTRUCTIONS ......................................................................................- 2 3-1 Unpacking............................................................................................. - 2 3-2 Description of Major Parts.................................................................... - 3 3-3 Description of Keys .............................................................................. - 4 3-4 Description of Interface Functions........................................................ - 5 §4 INSTALLATION OF IP PHONE .........................................................................- 6 4-1 Assembly of Parts ................................................................................. - 6 4-2 Installation Example ............................................................................. - 7 §5 SYSTEM FUNCTION CONFIGURATION............................................................- 8 5-1 Enter Into Configuration Menu............................................................. - 8 5-2 Phonebook ............................................................................................ - 8 5-3 Call Records.......................................................................................... - 9 5-4 User Settings....................................................................................... - 10 5-4-1 Network Settings ...................................................................................... - 11 5-4-1-1 Obtain IP Address Dynamically (DHCP).......................................... - 11 5-4-1-2 Set Static IP....................................................................................... - 11 5-4-1-3 Set PPPoE Dialing ............................................................................- 12 5-4-2 Phone Number ..........................................................................................- 13 5-4-3 Ring Tone Setting .....................................................................................- 14 5-4-4 Time Setting..............................................................................................- 14 - 5-5 System Settings................................................................................... - 14 5-5-1 SIP Server .................................................................................................- 15 5-5-2 MD Server ................................................................................................- 15 5-5-3 Advanced Settings ....................................................................................- 16 5-5-3-1 Port Settings......................................................................................- 16 5-5-3-2 Video Bit Rate Settings.....................................................................- 17 5-5-3-3 Video Format Settings.......................................................................- 18 5-5-3-4 Codec Settings ..................................................................................- 18 5-5-4 Language Settings.....................................................................................- 19 5-5-5 Reset to Factory Default ...........................................................................- 20 - 5-6 Status................................................................................................... - 21 §6 PARAMETER REVIEW ..................................................................................- 21 - -1- User Manual of SV2000 IP Phone §7 BASIC FUNCTIONS OF IP PHONE .................................................................- 21 7-1 Make A Call ........................................................................................ - 21 7-2 Answer A Call ..................................................................................... - 21 7-3 Hang Up.............................................................................................. - 22 7-4 Decline A Call..................................................................................... - 22 7-5 ADSL Dialing ..................................................................................... - 22 7-6 Redial.................................................................................................. - 23 7-7 Hand-free Mode.................................................................................. - 23 7-8 Mute Function..................................................................................... - 23 7-9 Video Mask Function.......................................................................... - 23 7-10 Adjust the Volume............................................................................. - 23 7-11 PIP Display Mode ............................................................................. - 24 7-12 Status Direction................................................................................. - 24 §8 EXTERNAL DEVICES ...................................................................................- 25 External Microphone and Loudspeakers................................................... - 25 §9 REMOTE NETWORK SETUP .........................................................................- 26 §10 REMOTE UPDATE OF IP PHONE SYSTEM SOFTWARE..................................- 26 §11 APPENDIX .................................................................................................- 27 11-1 Fault Diagnosis ................................................................................. - 27 11-2 List of Prompt Messages................................................................... - 28 11-3 Technical Parameters of IP phone ..................................................... - 30 - All rights reserved – Duplication is prohibited by Wintech Digital. All parts of the product, including accessories and software, are property of Wintech Digital Systems Co., Ltd. and shall not be reproduced, duplicated, extracted, or translated without permission of Wintech Digital Systems Co., Ltd. The product specifications and description mentioned in this manual are only for reference. The content of the manual may be modified as the product is updated from time to time without further notice. -2- User Manual of SV2000 IP Phone §1 About IP Phone IP phones employ TCP/IP protocol and communicate through Ethernet. In high performance communication networks, users can communicate with faraway relatives and friends via voice and video, enjoying the face-to-face conversation experience. §2 Safety Precautions Before you use the IP phone, please read through the User Manual and safety precautions carefully, so as to use the IP phone correctly. To avoid accident or performance failure, do not disassemble the phone and power adapter or modify the internal structure. Disassembling the phone or any of its accessories will automatically void the product warranty. Please place the IP phone on a flat and stable surface to ensure the safe and proper operation of the phone. Do not mount the IP phone in a dusty place, to avoid thermal accumulation and performance failure. Do not mount the IP phone in a place with high concentration of flammable gas, to avoid fire risk. Do not mount the IP phone in a damp place, to avoid short circuit or electrical leakage. Avoid extreme temperature; do not mount the IP phone in a place with sharp temperature fluctuation, to avoid performance failure. Keep the IP phone away from objects of direct solar and solar radiation, to avoid fire risk due to overheat. Do not collide, shock, or toss the IP phone. Particularly, do not apply excessive force to the camera and LCD to avoid damage. Please gently clean the camera or LCD with soft and clean cloth. Cleaning with rough material or strong force will either break or damage the device. Do not touch the power adapter during thunderstorms and lightening to avoid electric shock. Use only the power adapter shipped with the IP phone, and keep the power adapter at a ventilated location. -1- User Manual of SV2000 IP Phone Please unplug the power cord before a trip or when you will not use the IP phone for a long expanse of time. §3 Use Instructions 3-1 Unpacking Unpack the package and check the following components. If any of the specified components is missing or any quality defect in the phone or its accessories is found, please contact your local distributor immediately. ÂMain Unit (1) Â Power Adapter (1) Â Handset and Cord (1) Â Network Cable (1) *Fixing Screw (2) *Pad (2) * Product Description (1) *Product Warranty (1) -2- User Manual of SV2000 IP Phone 3-2 Description of Major Parts No. Name Function ① LED Indicates current status of the phone. ② Camera For video capture. ③ LCD For video display. ④ Phone Fork For call start and hang-up. ⑤ Handset Wedge For wall-mount installation. ⑥ Handset Microphone and speaker. ⑦ Loudspeaker Audio device, for voice output in hand-free mode. ⑧ Keypad Function keys. ⑨ Microphone For voice input in hand-free mode. -3- User Manual of SV2000 IP Phone 3-3 Description of Keys No. Name Function ⑴ Arrow Keys To choose menu items, or toggle the position of small pictures in picture-in-picture mode. ⑵ OK Key To confirm an operation. ⑶ Digit Keys To enter phone numbers, or enter text in menu options. ⑷ * Key To enter “x”. ⑸ # Key To enter the standard software board. ⑹ Red LED Light up when the handset is picked up. ⑺ Green LED To indicate network connection status; normally lights up when the connection is normal. ⑻ Orange LED Lights up when power is on; goes off when power is off. ⑼ F1 Key To check the current phone status. ⑽ F2 Key To view phone parameter setting information/ choose privacy. ⑾ F3 Key To choose Picture-In-Picture (PIP) mode. ⑿ ESC Key To exit the current menu interface. ⒀ BACK Key To erase the input before the cursor in the text field. -4- User Manual of SV2000 IP Phone ⒁ MENU Key To enter into phone setting menu. ⒂ +/- Key To adjust speaker volume. ⒃ VOX Key To use built-in loudspeaker and microphone. ⒄ RD Key Redial function: to redial the last phone number. ⒅ MUTE Key Mute function: to cut off local voice during session. 3-4 Description of Interface Functions No. Name Function ① Power Power jack, to connect the power adapter shipped with the phone. ② LAN RJ45 network port: to connect IP network. ③ Video Out RCA video output port: to output video information to the display unit connected to the phone. ④ Video In RCA video input port: to connect an external camcorder or video output device. ⑤ Speaker RCA audio output port: to output voice information to sound boxes connected to the phone. ⑥ MIC RCA/MIC audio input port: to connect an external microphone. Note: ① The A/V cables for external audio/video I/O are not included. ② When the “Video Out” port is connected to a TV, the image quality displayed on TV may be different from that shown on the LCD, depending on the TV system or model. -5- User Manual of SV2000 IP Phone §4 Installation of IP Phone 4-1 Assembly of Parts Before you assemble the IP phone, please verify the components and user manual are complete. Please follow the following steps to properly assemble your IP phone: ① Connect one end of the handset cord to the jack on the handset and the other end to the jack on the main body of the phone. ② Plug the output end of the power adapter to the “Power” jack on the phone. To avoid danger, before connect the power adapter to the power outlet, please verify that the power supply voltage matches that shown on the power adapter. ③ Connect the IP network cable to the “LAN” port on the rear end of the phone. -6- User Manual of SV2000 IP Phone 4-2 Installation Example The IP phone can be put on your desktop in the office or any place in your home; or, if you prefer, it can be mounted on a vertical surface (e.g., a wall), as shown in the following pictures: ① Stick the two pads into the two recesses on the rear part of the phone, as shown in the left picture. ② Take out the handset wedge from the handset, keep the tab of the wedge facing upwards as shown, then insert the wedge into the handset again. ③ At the altitude you prefer, mount the two fixing screws on the wall horizontally with 188mm spacing. ④ Finally, mount the phone onto the two screws as shown in the left picture. -7- User Manual of SV2000 IP Phone §5 System Function Configuration Before you use the product, you must configure IP address, phone number, and transmission mode, etc. according to the network condition and the user ID; otherwise the phone may not work. The functions and system configuration method of the IP phone are described in this section. 5-1 Enter Into Configuration Menu Power on the IP phone and adjust the LCD to an appropriate angle. Press the Menu button on the keypad to enter into the “Parameter Settings” screen; the LCD will display the main menu settings, shown as follows: For the user’s convenience, the IP phone software system provides two language options: Chinese and English. Hereunder the system is described with English as the language choice. You can set relevant parameters for “Phonebook”, “Call Records”, “User Settings”, “System Settings”, and “Status” with “W” and “X” arrow keys. 5-2 Phonebook Choose “Phonebook” with “S” and “T ” arrow keys on the keypad and press “OK” to enter into “Phonebook” menu. Then control the cursor to move between the phone list and the control button with “W” and “X” arrow keys. When the cursor stays on the phone list, select numbers with “S” and “T” arrow keys. Pressing “W” and “X” arrow keys could switch to the control buttons consisting of Call, Add, Edit, Delete and Return shown as follows. -8- User Manual of SV2000 IP Phone Call: directly call the phone number selected. Add: add new phone number. Edit: edit the phone number selected. Delete: delete the phone number selected. Return: back to the main menu. Tip: “#” button is used to switch among the input alphanumeric keys. “*” button is used as “.” when inputting IP address. 5-3 Call Records Choose “Call Records” with “S ” and “T ” arrow keys on the keypad and press “OK” to enter into “Call Records” menu shown as follows. Then enter the relevant page layout, such as missed, answered and dialed page. -9- User Manual of SV2000 IP Phone Here is an example of making a call, as shown below. Choose the cursor switching between the phone list and control buttons with “W” and “X” arrow keys. When the cursor stays on the phone list, select numbers with “S” and “T” arrow keys. Pressing “W” or “X” arrow keys could switch to control buttons consisting of Call Back, Detail, Delete, and Delete all. 5-4 User Settings Choose “User Settings” with “S” and “T ” arrow keys on the keypad and press “OK” to enter into “User Settings” menu shown as follows. “User Settings” menu provides four options: “Network Settings”, “Phone Number”, “Ring Tone Settings”, and “Time Settings”. Note: Setting the parameters in the “User Settings” option is the prerequisite for video session. Please verify network access information before use. If you do not know the network information, you can get help from your network service operator; or we recommend you check with a specialist or your local distributor for assistance. - 10 - User Manual of SV2000 IP Phone 5-4-1 Network Settings You must configure the IP address for your IP phone in accordance with your network configuration to ensure that the IP phone can connect to the network and communicate properly. If you know the network parameters, you can choose the appropriate network settings with the arrow keys and enter into the next menu level; or you can press “Return” to exit. 5-4-1-1 Obtain IP Address Dynamically (DHCP) You must configure IP address for your IP phone in accordance with the network configuration. If your access network is a DHCP network environment, you can choose “Obtain IP address dynamically (DHCP)” option with “S” and “T” arrow keys on the keypad and press “OK”. Then, move the cursor to “Save” option and press “OK” button encircled by the arrow keys on the keypad to save the setting and exit. 5-4-1-2 Set Static IP You must configure IP address for your IP phone in accordance with the network configuration. If your access network has definite IP address information, you must choose “Static IP” option in “Network Settings” menu to set network information. - 11 - User Manual of SV2000 IP Phone In the above picture, after you enter into “Static IP” menu, you can move the cursor to the required text fields with “S” and “T” arrow keys on the keypad and enter correct information with the digit keys. For instance, to enter “192.168.136.243” IP address, you can press digit keys as follows: ①⑨②*①⑥⑧*①③⑥*②④③. To modify a digit you have entered, you can use “W” and “X” keys to move the cursor immediately after the digit, and press “BACK” key to erase it, and then enter a new digit. After you enter the setting information, you can use“S” and “T” keys to move the cursor to “Save” option and then press “OK” key on the keypad to save the setting and exit; to abort the modification, you can press “ESC” key or choose the “Return” button to cancel the modification, then choose Save and Exit. Tip: “*” key can be used as “.” when you enter the IP address. 5-4-1-3 Set PPPoE Dialing If the IP phone is connected directly to an ADSL MODEM, you must choose “PPPoE” option and set the ADSL dialing information correctly to access the network; otherwise please skip this step and chose “Dynamic IP” or “Static IP” option. - 12 - User Manual of SV2000 IP Phone You must first confirm your ADSL user name and password. In the “System Settings” menu shown in the above picture, you can use “S” and “T” keys to move the cursor to “User Name” and “Password” fields and enter alphanumeric information with the keypad. After setting, choose “Save” to save the setting and exit; to cancel the modification or any entered information, press “Esc” key or choose “Return” button to cancel and exit. Note: In the case of ADSL access, you must perform ADSL dialing to connect to the network whenever the IP phone is powered on or the system restarts. Enter the “User Name” and “Password” information in the corresponding fields, move the cursor to “Save” option and press “OK” button encircled by the arrow keys on the keypad to save the setting and exit. Now, the configuration information in the IP phone is updated, you can close the page. 5-4-2 Phone Number Before you access the video communication network, the operator will assign you a fixed phone number with a password. This number is your call number for communication. If you can’t determine the phone number, please consult your video communication network operator. Use “S” and “T” keys on the keypad to move the cursor to the required option. Then enter “Phone Number” and associated password information with the digit keys. Choose “Save” button and press “OK” key to save the settings and exit. To cancel the modification or any entered information, press “ESC” key or choose “Return” to exit without modification, then click on “Save”. - 13 - User Manual of SV2000 IP Phone 5-4-3 Ring Tone Setting 5-4-4 Time Setting You can use arrow keys to select ‘Time Edit’. Move the cursor between ‘Set Time’ and ‘Set Date’. Choose “Save” or “Back” with “S” and “T” keys. When the cursor stays in the Time Edit field, press “W” and “X” keys to move. Use the “Volume” button to set the time (hour, minute and second) accordingly. Similarly, when the cursor stays in the Date Edit field, press “W” and “X” keys to move. Use the “Volume” button to set the date, month and year accordingly. When the setting is complete, move the cursor to “Save”, or press “Esc” or “Back” to cancel and exit. When your call is complete, the screen will display the call time, the call start time and end time. 5-5 System Settings The related system information has been set before the IP phone is shipped from the factory. You do not need to modify the settings unless you have special requirements. If the network has changed and the system settings need to be modified, please follow the instructions in this User Manual. - 14 - User Manual of SV2000 IP Phone 5-5-1 SIP Server SIP server is the core for terminal registration, management, and connection. Before you use the video communication platform provided by the network operator, you must set the SIP Server address and other related configuration information. As shown in the above picture, you can use “S” and “T” keys to choose the required text fields and set the parameters. Then, choose “Save” and press “OK” key to save the settings and exit. To cancel the modification and any entered information, press “ESC” key or choose “Return” to exit without modification. Note: To avoid communication failure, modify the settings only when it is absolutely necessary to do so. 5-5-2 MD Server The IP phone system software supports remote update. The MD Server is - 15 - User Manual of SV2000 IP Phone designed to enable the user to update the product in a timely fashion. During the update, the system will verify the product serial number and user password. If you are not sure about the information on your IP phone, please contact Wintech Digital or your distributor for further assistance. If you opt to use remote update service, you can use “S” and “T” keys to move to the required fields and enter the IP address of MD server and password information, as shown in the above picture. Next, choose “Save” to save the settings and exit. To cancel the modification and the entered information, you could press “ESC” key or choose “Return” button to exit, then click on “Save”. Note: “Product Serial Number” is provided by the manufacturer and cannot be modified by the user. The remote update method will be described in detail in §10 “Remote Update of System Software for IP Phone”. 5-5-3 Advanced Settings This function provides additional settings for A/V CODEC and the display effect. To ensure session and video quality, please do not modify those settings. 5-5-3-1 Port Settings “Port Settings” function is for professional communication technicians to perform network communication debugging. Do NOT modify those settings. If you have modified them by accident, please follow the instruction in “5-5-5 Reset to Factory Default” or contact Wintech Digital or your distributor for help. - 16 - User Manual of SV2000 IP Phone Note: To prevent communication interruption, please do not freely modify the settings. 5-5-3-2 Video Bit Rate Settings The network bandwidth has direct effect on image transmission and session quality. The IP videophone system permits the user to specify video bit rate in accordance with the available network bandwidth to achieve better communication result. If you don’t know your network bandwidth, please consult your network operator. You can use the “S” and “T” keys to choose the required video bit rate matching your bandwidth as shown in the above page. Press “OK” to confirm. Next, move the cursor to “Save” and press “OK” again to save the setting and exit. To cancel the modification and the entered information, you can press “ESC” or choose “Return” to exit, then click on “Save”. Note: 1. “Bit rate” refers to the maximum available data transmission rate of the IP network. 2. “Video bit rate” of IP phone is the standard video compression rate. It is the - 17 - User Manual of SV2000 IP Phone threshold of network bandwidth occupied by video information during network transmission. The higher the video bit rate is, the sharper the image will be, but the occupied bandwidth requirement will be higher as a result. If the video bit rate set for the IP phone is higher than the actual available network bandwidth, the display may be intermittent and accompanied with mosaics. We recommend you to set the video bit rate slightly lower than the available network bandwidth, to ensure a smooth and clear display. 5-5-3-3 Video Format Settings This function is designed to adapt power supply variations in different regions to eliminate any adverse effect of power supply on the video quality. You can modify the “Video System” parameter for your IP phone to match the power frequency specified by the local power utility. To do so, you can use “S” and “T” keys to choose the required option and press “OK” key to confirm; next, move the cursor to “Save” and press “OK” again to save the setting and exit. To cancel the modification, press “ESC” or choose “Return” to exit, before you choose “Save”, as shown in the following picture. Tip: If you are not sure about the local power supply standard, please consult your local power provider; or, you can observe the video result under the current power supply standard, and then choose another mode and compare the video results. This way, you can determine the parameter standard with the best video result, and then choose “Save” to save the setting and exit. 5-5-3-4 Codec Settings Important parameters of the IP phone have been set before the IP phone leaves the factory. We recommend that you do not modify the Codec settings if the A/V communication is normal. In addition, when the IP phone is ready for communication, - 18 - User Manual of SV2000 IP Phone the system takes the default A/V Codec as preference. As shown in the following picture, to change the default A/V Codec for the IP phone, you can use “S” and “T” keys to choose the required options and press “OK” to confirm; next, move the cursor to “Save” and press “OK” again to save the settings and exit. To cancel the modification, press “ESC” or choose “Return” to exit, before you choose “Save”. Tip: 1. When you choose H.264 CODEC (higher in compression rate), you could save the network bandwidth by 30%-50% with the same video quality, compared to that of H.263 CODEC. 2. Video system: NTSC refers to the video system standard of National Televsion Standards Committee (USA); PAL refers to Phase Alternate Line video system standard. 3. PAL is used in China. 5-5-4 Language Settings As shown below, you can use “S” and “T” keys to select the language. Then press “OK” to confirm. Next, move the cursor to “Save” and press “OK” again to save the settings and exit. To cancel the modification, press “ESC” or choose “Return” to exit, before you choose “Save”. - 19 - User Manual of SV2000 IP Phone 5-5-5 Reset to Factory Default After your modify the parameters of the IP phone, if you find the communication result is degraded but can’t return to the previous settings, you can use this function to reset to the factory default. As shown in the following picture, you can use “S” and “T” keys to choose “Reset to Factory Default” and then press “OK” key. A “×” will appear in the box. Next, you can choose “Save” and press “OK” to exit. The system will restart and the parameters will be reset to the factory default values. To cancel the operation, press “ESC” or choose “Return” to exit, before you choose “Save”. Note:If the factory default values do not match the current network configuration; you would need to modify them manually. If you have any doubt, please contact your distributor or network operator. - 20 - User Manual of SV2000 IP Phone 5-6 Status Use S and T keys to choose “Status” and then press “OK” key; then you can view the detailed parameter settings of your IP phone. This function is same as using F2 key. §6 Parameter Review After you set all parameters, please press “ESC” key to exit the main menu of settings. In Ready mode, when you press “F2”, the display will show the settings of important parameters of your IP phone, as shown in the right picture. Note: To close the display of parameter settings, press “F2” again. §7 Basic Functions of IP Phone 7-1 Make A Call When the IP phone is in Ready mode, you can pick up the handset or press ; (Hand-free) key, the IP phone will sound the dial tone and display a dial number in input field. As you enter the called number (IP address or number) with the digit keys, you can see the input on display. After you have entered the numbers, you can press “OK” key to make the call. When the called user answers, the communication will begin. If both you and the called user use IP phone, you can choose whether to transmit video to each other or not. 7-2 Answer A Call The IP phone will sound the ring tone and display the phone number at bottom left corner of the screen when it receives an incoming call in Ready mode. You can pick up the handset or press ; (Hand-free) key to answer the call. If both you and the called user use IP phone, you can choose whether to transmit video to each other or not. - 21 - User Manual of SV2000 IP Phone 7-3 Hang Up If you want to hang up during communication, you can put the handset back to the main body of the IP phone (press down the fork). If the IP phone is in hand-free mode, you can press ; (Hand-free) key again to terminate the session. 7-4 Decline A Call The IP phone will sound ring tone and display the phone number and the caller’s IP address in the center of the screen when it receives an incoming call in Ready mode. You can press “OK” to accept the call or “ESC” to decline the call. 7-5 ADSL Dialing If your IP phone is connected to the network through ADSL dial-up connection, you must perform ADSL dialing to connect to the network whenever the IP phone restarts (e.g., system restart after power outage or modification of system parameters). When the IP phone starts working normally, you can pick up the handset or press hand-free key. Then the IP phone enters into dialing mode and displays the page as shown in the following picture: You can press “OK” key to perform ADSL dialing. When the “Dial” prompt shown in above picture is replaced by “connection success” prompt, it indicates the ADSL dialing is successful and the IP phone has been connected to the network. Next, you can replace the handset and the dial tone and the prompt would disappear. Now, you can pick up the handset again and communicate with the IP phone. If the screen displays “disconnected” during ADSL dialing, it indicates the connection attempt has failed and you have to dial again. In that case, you have to replace the handset and pick it up again. When the screen displays “Dial” prompt, - 22 - User Manual of SV2000 IP Phone please perform ADSL dialing again. If the dialing fails several times, please check and make sure the ADSL dialing setting is correct. 7-6 Redial When the IP phone is in Ready mode, you can pick up the handset or press ; (Hand-free) key. Press RD key when you hear the dial tone. Now, the IP will make call to the previous saved phone number. 7-7 Hand-free Mode 1. When the IP phone is in Ready mode, you can press ; (Hand-free) key. When the IP phone sounds the dial tone, you can dial in hand-free mode. 2. You could press ; (Hand-free) key to activate hand-free mode during a session. When you replace the handset, the built-in microphone and loudspeaker in the IP phone begin to work and the hand-free mode is activated. When you pick up the handset again, hand-free mode will be cancelled. 7-8 Mute Function If you want to temporarily mute your voice during a session, you can press Mute key to activate Mute function. Press F1 to check the current status and display the Mute prompt. When you press Mute key again, the Mute function will be cancelled and the Mute prompt on the screen will disappear. Then the IP phone will resume its normal voice transmission. 7-9 Video Mask Function If you want to temporarily cancel the video transmission during a session, you can press F2 key to activate Video Mask function. Then your IP phone will display Mask indication and stop transmitting Video to the other party. When you press F2 key again, the Video Mask function will be cancelled and the Mask indication on the screen will disappear. The IP phone will resume its normal video transmission. 7-10 Adjust the Volume You can press + key to turn up/down the sound volume on your handset or the hand-free loudspeaker during a session. - 23 - User Manual of SV2000 IP Phone 7-11 PIP Display Mode If you want to view your own video shown to the other party during a session, you can press F3 key to enter into PIP display mode. A small window will appear on your display showing your own video captured by your IP phone. You can use S, T, X, and W arrow keys to adjust the display position of the small picture on the screen, as shown in the following illustrations. Pressing F3 key again will cancel the PIP display mode. 7-12 Status Direction During a session when you press F1, you will see the current status indication at the bottom of the screen. The status indication shows whether the network is connected, whether CODEC register is successful, whether it is in the mute mode and your privacy status. When the IP phone is idle, you could press F1 and see the current status direction at the bottom of the screen indicating whether the network is connected and the CODEC register is successful. - 24 - User Manual of SV2000 IP Phone §8 External Devices External Microphone and Loudspeakers Your IP phone can be used as a videoconference terminal. As shown in the following picture, you can connect microphone and loudspeakers to the corresponding ports on your IP phone to improve the effect of A/V capture and playback. If you would like to connect to an external display device and input video information from an external camcorder to use the IP phone as a videoconference terminal, you can connect the camcorder and display device to the corresponding ports on the IP phone (as shown in the following picture) to achieve larger display and more comprehensive and clearer videoconference environment. - 25 - User Manual of SV2000 IP Phone §9 Remote Network Setup Open the IE browser, type the IP address of IP phone into address URL, then press “Enter”. The parameter configuration menu of the IP phone will be displayed on the IE webpage. The setup process is the same as that on the IP phone system configuration menu. For instance, if the local IP phone is “192.168.10.99”, then“192.168.10.99” should be entered into the IE address’ URL. Press “Enter” to display the following webpage setup by IE browser. From a computer on the same network, user could use the IE browser in the system software to remotely access and set up an IP phone by following the procedures as follows: Both the IP phone and the computer are switched to the network to ensure mutual communication. Under LAN, the network settings configuration of the IP phone and the computer should be on the same network. §10 Remote Update of IP phone System Software IP phone can be connected to a remote server via Internet to download the most updated software. User should type the relevant configuration information into “MD Server” menu of telephone system configuration. After the system configuration is complete, the IP phone will automatically send request to the MD server every six hours for software update. The MD server will check if the software of the IP phone needs to be updated. If the software needs to be updated, the system will alert the user of the update. When you decide to receive the update, the system will restart and automatically download and install the latest software. If any accident occurs, such as an electricity outage, you do not need to worry because the update will start again next time. - 26 - User Manual of SV2000 IP Phone §11 Appendix 11-1 Fault Diagnosis While in use, if the IP phone does not work properly, please first try the following fault diagnoses and removal operations before you do anything else. If the faults fail to be removed, please contact your product distributor for further assistance. Phenomenon Removal Operation The power light does not come on. Please make sure that the power line has been connected or check whether the power adaptor is damaged. Please make sure that the network line has been properly connected to the IP phone. Please make sure that the network line has been properly connected to the internet equipment. Your outgoing call could not go through or you could not receive the incoming call information. If you are dialing the IP address, please make sure the IP address is correct. If the IP phone of the receiving party is connected within the Local Area Network (LAN) firewall system, it is possible that the connection could not be established. Please make sure that the configuration information of the service network is correct. Your call has gone through, but you could not see the picture of the other party. Your call has gone through, you could see the video of the other party, but could not hear any voice. When the IP phone is connected to the LAN or a system with a firewall, it is possible that the correct video signals could not be transmitted. The IP phone of the other party uses the shield function or the video camera is damaged. Please make sure that the microphone on the IP phone of the other party works properly. Please adjust the volume of your telephone receiver. - 27 - User Manual of SV2000 IP Phone After the IP phone is connected, you can see and hear the other party but you cannot be seen or heard. During the conversation, the video and the voice of the other party break off. Please make sure that the IP phone of the other party is not connected to the local area network (LAN) or to the operating system with firewall. Please make sure that the audio and video devices of the other party work properly. Please make sure that the IP phone is properly connected with the network and no accidental disconnection takes place. Please make sure that the other party does not accidentally disconnect from the network before your conversation is over. 11-2 List of Prompt Messages Prompt Messages Please input the telephone number! Delete this number? The Network is not connected. Please check! Dialing in process. Please wait! Connecting in process. Please wait! The remote is ringing. Please wait! Communication Videophone by The remote is busy. Please try again later! The remote is not responding. Please try again later! The remote is not registered. Please check the number! Your phone is not registered. Please check the settings! Unknown Error! The remote is not online! Time is up. Please hang up! The call is canceled Remote Upgrade There is a new firmware, you can update your phone now. Warning: be aware that incorrect firmware updating may permanently disable your phone! Updating software! - 28 - User Manual of SV2000 IP Phone Download! Burn flash! Software update success! ADSL Dial, please! Connecting in process. Please wait! Connection Success! PPPoE Disconnected! LOGOUT success! ADSL Dialing in process! Authorization failed! Disconnecting, please wait! Prompt Messages System Configuration :OK Audio Encoder: OK Audio Decoder: OK Audio Player: OK Initialization Vide Encoder: OK Vide Decoder: OK Network: OK Sip Stack: OK GUI: OK IME:OK - 29 - User Manual of SV2000 IP Phone 11-3 Technical Parameters of IP phone VOIP Protocol Network Protocol Video Standard Audio Standard Image Format Video Format Network Bandwidth Echo-Suppression Video Camera Display Screen Frame Rate Video Frequency Audio Frequency Start-up Display loopback Display Mode High Adaptability Appearance Indicator Light Maintenance Sleep Mode EMC/EMI Through Capability NAT SIP/SDP TCP/UDP/IP, PPPOE, HTTP, RTP/RTCP H.263, H264 G.711u、G.723.1 CIF NTSC 64/128/256/384/512/1024Kbps adjust automatically G.167 32 ms. No echo in hand-free mode. ≥ 300,000 pixel, 0.1Lux, Color standard lens(8MM) 5 inch LCD screen N 1-30 frame/second. Input:built-in host video camera (simulate drive) NTSC Output:built-in LCD (simulate drive) NTSC Manual connect an outside camera (simulate drive) Manual connect display (simulate drive) Automatic Gain Control (AGC), Automatic Noise Suppressor ANS, Echo-Suppression, Full Duplex Input:handle/built-in microphone, RCA audio input Output:handle/built-in speaker (hand-free), RCA stereo output Automatic Gain Control (AGC), Automatic Noise Suppressor ANS, Echo-Suppression, Full Duplex Loopback diagnosis Full screen; Display status information; PIP; Setting mode or Privacy shield mode In the 3-5% network lose-pack ratio, it can maintain basic image fluency and clear calling without obvious wobbling and noise. Indicates power status, network connection status and phone receiver pick up. HTTP software update on-line Starts automatic dormancy 60 seconds after hang up. Accords with the internal Green Sleep Mode. Accords with the standard CE attestation. Supports OUTBOUNDPROX & STUN; options available in the menu. - 30 - User Manual of SV2000 IP Phone Reliability Network interface Network Support Power Supply Uninterrupted calling for 48hrs in one sitting. RJ45 10/100M Base-T Ethernet DC+12V≈3A - 31 -