1
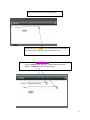
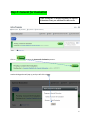
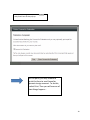
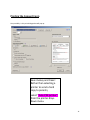
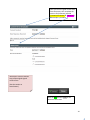
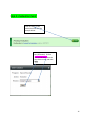
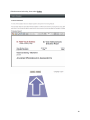
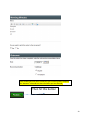
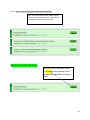
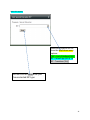
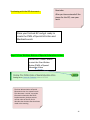
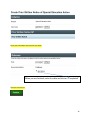
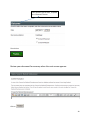
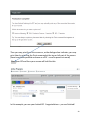
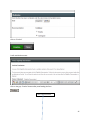
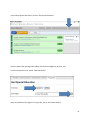
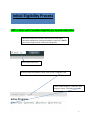
Initial Eligibility Process
STEP 1: Start with Consider Eligibility for Special Education
Select the student who has been referred for an initial special
education evaluation by entering the student’s name in the search
box at the top right of your screen and clicking enter:
Enter student name here
Directly under the student’s name, click on the “Programs” tab
Under “Active Programs,” select the “Start
Program” option. Screenshot is below:
1
Then you will see this small screen pop up:
You will click on the arrow on the right-hand side of this dialogue
box and choose an option from the drop-down menu.
You will choose “Special Education” from the drop-down
menu in Program. After doing this, another drop-down menu
appears, labeled Item. (See example below).
2
Select the “Consider Eligibility for Special Education” option from the drop-down
menu in Item. Your screen will look like the example below. You will click on Next.
The following screen will appear and you will now enter the start date of your initial referral.
Click inside the circle: Complete; start with Consent for Evaluation
Then click on the green Finalize button at the bottom right
3
(Note: when the screen first appears,
the green button at the bottom says
Save. Save as you work. After you
enter all the required information &
click the circle to Continue – Complete;
start with Consent for Evaluation, the
green button changes to the Finalize
option.)
Selecting the green Finalize
button brings up the dialogue
box you see below. You will click
on the gray Finalize button:
4
The screen will then look like this:
Select
5
Step 2: Consent for Evaluation
After closing the “Consider Eligibility for Special
Education event, you will then see this screen:
Click on
to start the Consent for Evaluation process:
Another dialogue box will pop up, and you will click on Next…
6
…which brings up the event. Now you can enter information:
Save as you enter
information
7
Complete all of the sections, as
seen in the example below:
Click on
8
and you will see this next screen:
Proof read the document….
9
After proofreading the form, click on Finalize
and you will see this box pop up:
At this point, you may choose to
print the form to send home for
parents to sign consent. To do this,
select Print. Then you will see one of
two things happen….
10
Printing the Consent Form
One possibility is this print dialogue box will pop up:
Save money and trees!
Rather than selecting a
printer to send a hard
copy to parents,
select “Cute PDF printer”
from the printer dropdown menu.
11
when the “Save As” box appears (see
below), you may save it to a
location of your choice.
Then you can email the parent the
consent form. Simply attach the
consent form to your email by
selecting the file from the location
you saved it in.
12
If the print dialogue box does not appear, then at this screen you will click where it says “Click here”
And then this print box should appear for you.
13
Once you receive signed consent back
from the parent, then complete the
sections at the bottom (entitled
“Consent to Evaluate” & “Outcome”).
An example is provided:
*Reminder: attach a scanned
copy of the original signed
consent form
(See the section on
Attachments)
Click on Save and then Close at the
bottom of the screen
14
Step 3: Evaluation Event
Click on Create on the
section that looks like the
example below.
Clicking on “Create” opens up a
box (see below). Choose
“Initial Evaluation” from the
drop-down menu, and select
Next:
15
Enter evaluation data from vision &
hearing screenings, classroom
observations, assessments, data
collection, and other sources of
information into the boxes provided
on this screen.
Reminder:
Attach your narrative report in
PDF format
(Please see the section on
Attachments)
16
enter the date
you completed
the evaluation
choose “Initial Evaluation Completed”
click Finalize
The next screen
will allow you to
review your
narrative for
accuracy
17
If the document looks okay, then select Finalize
18
This box will appear
Page 11 steps will work for printing the evaluation report. Please opt to print as a PDF and send via
email whenever possible to save trees and funds.
Click on
“Close
Evaluation”
Step 4: Eligibility Determination Event: Student Eligible
(See page __ of this manual for Student NOT Found Eligible)
19
Click on
in “Eligibility Determination” box (as seen below):
You will choose “Initial Eligibility Determination” from the drop-down menu and
hit Next:
The Eligibility
Determination event
will pop up:
20
To create the meeting notice, click on
21
Enter the date & time for the meeting, &
select invitees from drop-down menus:
If a staff member is not able to attend the meeting, then click in the box under “Absent?” and it
will generate an Excusal form for parents to sign.
After the Eligibility Determination meeting is held, complete the sections at the bottom, that look like
the example below:
22
Enter disability(ies) that were considered, type in meeting notes, complete
the “Outcome” section & save the information you have entered,
Then hit this button
23
Preview your documents for accuracy
Click on Finalize when everything looks ready
24
When this dialogue box pops up,
close the Eligibility Determination
STUDENT IS ELIGIBLE
Step 5: Consent for Initial Provision of Special Education &
Related Services
Click on “Create” in the box (like below) to create
the “Consent for Initial Provision of Special
Education & Related Services” if the student was
found eligible at the meeting
25
After you click on
“Create” it will bring
up a dialogue box like
this example:
Click on Next and
then….
26
Enter data into this event:
On the left side of the screen, you can see the option
to print the Initial Provision for parents to sign
27
After parents sign the
form, then complete the
“Outcome” section:
Once you finish, you click on
Proof read your document and choose Finalize
28
Then you will see this screen:
29
Click on Close Consent- Init Provision of Spec Ed & Related Svcs
Next you will complete the IEP, PWN for Sped
Action and the Medicaid forms – each of these
are separate events that look like this:
Step 6: Create the IEP Event
To start the IEP document, click
on Create on the section of the
screen that looks like this screen
shot:
30
When this appears,
Select what type of IEP it is
from the drop-down menu
options:
[ IEP – Early Childhood (3-5),
IEP – School Age (6-14) &
IEP - Transition (15+)]
& then click on Next after you
have selected IEP type
31
With the next screen (seen below), you can select the
meeting date listed if the IEP will be held the same
day/time as the Eligibility meeting,
or you can create a
new meeting
Next, make sure to indicate the
type of meeting. For both the
Eligibility & IEP select “Initial”
Then you will complete the IEP by
adding in your goals, service minutes,
accommodations, etc. Remember to hit
the green save button as you enter
your data.
32
For the “Consideration of Special Factors” (seen below), make sure to
attach additional items, if needed. For example, if the student has a
health care plan, please attach it to the IEP.
33
Need Help?
As you complete the IEP,
please take note that in each
section, there is a help section
on the right side (as seen
below).
These help sections offer useful tools
such as videos, district guidelines, state
guidelines, and information about
federal regulations. In the example,
below, the person selected state
regulations on ESY.
34
Continuing with the IEP document…
Reminder:
After you have entered all the
pieces for the IEP, save your
work.
Close your finished IEP and get ready to
create the PWN of Special Ed Action and
Medicaid events
Step 7: Prior Written Notice of Special Education Action
Click on the “Create” button
to start the Prior Written
Notice (PWN) of Special
Education Action
The Prior Written Notice of Special
Education Action is a separate event.
This document is critical; it provides
information about the date of IEP
implementation, the date parents
receive notice of the IEP, and it
describes the decisions that have been
made at the meeting.
35
Enter your information and save it as you work.
When you are finished, enter the date and click on “Completed”
Then you can click on:
36
Proof read your PWN document for accuracy, and then finalize it again when it is ready:
Close the event
37
Step 8: Create Consent for Medicaid Reimbursement
Click on Create
Click Next at this screen….
Printing Medicaid form for parent to sign: You may choose print from two different spots – for example,
you can print from the left side of the screen, next to Documents; or you can print from the right side of
the screen where the printer icon is located.
38
Once parents sign the form, complete
the “Outcome” section:
Then click on
Review your document for accuracy when the next screen appears:
Click on
39
Then close the event
Click on “Edit Draft” to review the IEP for accuracy.
40
Once parents have reviewed the IEP, necessary changes are made, and you are ready to “lock” the final
copy, first select the green Save button at the bottom:
(Note: the Convert button replaces the IEP with a different version)
Next, you will Validate the IEP:
If there are errors, this screen will pop up to let you know what to correct.
Also, any section(s) to be corrected will be in red:
After you have corrected any errors, then you will see this screen pop up:
41
Click on the gray Finalize button, and then you have one last opportunity to review the IEP before
locking it.
Click this button
42
Then you may print from this screen or, as the dialogue box indicates, you may
print later by selecting the Print command at the top or left part of the screen.
(Save trees when possible and save as a PDF – send to parent via email)
Close your IEP and then your screen will look like this:
In this example, you see your locked IEP. Congratulations – you are finished!
43
Step 4: Eligibility Determination Event:Student Found NOT Eligible
At Step 4 in the Initial Eligibility Process, if the student is found not eligible, then follow these steps:
Complete the Eligibility Determination questions (like seen below). For this example, this
student’s needs can be met in general education (Question 2)
44
Scroll down and click on the drop-down menu to indicate the
disabilities that were considered,
OR indicate if “No disabilities were suspected by the team”:
For this student, Speech or Language Impairment was considered:
45
Click on “No” in the part that asks if the student meets criteria for the disability
Complete the “Outcome” section:
enter date and indicate “Not Eligible”
46
Click on “Finalize”
Proof read the document:
Click on the gray “Finalize” button after proofreading the form
Then close the event
47
Under the student’s name, it will now
indicate “No Disability Determined”
Complete the PWN of Special Education Action (to indicate student is not eligible): click on “Create”
Click on “Next”
48
Complete the “Outcome” portion by entering date and clicking on “Completed”
Click on “Finalize”
Proofread the document:
49
Click on “Finalize”
“Close” the event
50
In the main programs tab section, click on “End Special Education”
Input the date of the meeting when student was found not eligible for services, and
from the drop-down menu choose “Does Not Qualify”
At the very bottom of the page on the right side, click on the button labeled:
51
Then “Special Education” will be listed under “Previous Programs.”
52
53