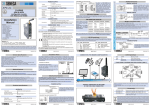
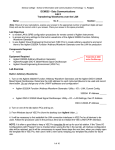
1
All the ports on your system are color coded to match the associated cable. An illustration has been provided for your reference. The location and availability of the ports may differ depending on the system you have selected. The number of ports are dependent upon the motherboard. DESKTOP Ports On/Off Switch On/Off Button By default, Nexlink systems are shipped under the “Balanced” Windows power plan. This power profile offers performance when you need it and saves power during periods of inactivity. This power profile will turn off your monitor after 10 minutes of inactivity and put your computer into sleep (S3) mode after 30 minutes. You may press any key on your keyboard to wake the system from sleep mode. In addition to those default settings, the following are also set: USB IEEE-1394 (FireWire) HDMI Port Ethernet E-SATA Audio-In (Yellow-Green) Mic-In (Light Pink) Line-In (Light Blue) SPDIF (Yellow) Serial (Teal) DVI-I (White) DVI-D (White) S-Video (Yellow) Parallel (Pink) Congratulations on the purchase of your Nexlink® System! Any Nexlink Desktop Computer bearing the ENERGY STAR Emblem is certified to comply with EPA ENERGY STAR requirements as configured when shipped by Seneca. Any changes you make to this configuration (such as installing additional expansion cards or drives) may increase the computer’s power consumption beyond the limits set by the EPA’s ENERGY STAR Computers program. • Turn off hard disk after 20 minutes of inactivity • USB selective suspend »» Allows an USB device driver which supports selective suspend to turn off the USB device it controls when the device is idle • PCI Express Link State Power Management »» Moderate power savings setting: Attempts to use the L0S state when link is idle • Processor power management »» Minimum processor state: 5% »» System cooling policy: Active »» Maximum processor state: 100% USER MANUAL system setup recovery This manual is your guide from setup to support. Please retain this manual along with the additional paperwork that was included with your computer. At the end of this manual is a list of support numbers and space to document important product codes and serial numbers for future reference. Notebook Ports AC Adapter On/Off Button USB Ethernet E-SATA HDMI warranty support IEEE-1394 (FireWire) Monitor (Dark Blue) Audio-In (Yellow-Green) 7401 Round Pond Road • North Syracuse, New York 13212 Monitor (Dark Blue) PS/2 Mouse (Green) Nexlink Desktops are factory shipped with default power management settings that have been selected for compliance with ENERGY STAR and are recommended by the ENERGY STAR program for optimal energy savings. Mic-In (Light Pink) Customer Care - 866.797.0904 PS/2 Keyboard (Purple) *NEX-PCANGELGUIDE* NEX-PCANGELGUIDE Power Supply NEXLINK-UM.0911 Please read this manual prior to using your computer Line-In (Light Blue) SPDIF (Yellow) SYSTEM SETUP RECOVERY RE-INSTALLING SUPPORT Before you are able to begin using your new computer system, you will be required to complete the following items: Software Recovery/Restore Options In the event of a hard drive or software failure, your computer has an integrated software program referred to as the Nexlink ® Recovery Center, that allows you to restore any factory loaded program, device driver, and/or recover your entire system back to the day you received it from the factory. In the event that you need to re-install a system device driver (e.g. Sound Card), or a factory loaded program (e.g. Microsoft Works) follow the steps listed below to begin the install process. It is easy to place a service request. Please call the toll free number from anywhere in the U.S., Canada, Mexico, or Puerto Rico to contact the Customer Care Center and place a service request. 1. For Windows®7 and Windows Vista®; while starting the computer, press the F8 key and follow steps 2–5. For Windows® XP, press the F10 key and the recovery process will automatically start. 1. Select “Hardware” from the welcome screen of the Nexlink Recovery Center. 4. Select the required driver and click “Next” to finish the installation. • Serial number of the equipment requiring service (if applicable). For easy reference, write your system number and order number in the designated box below 2. Select Repair Your Computer, this will launch the Nexlink Recovery Center. At the welcome screen select Next to enter the Nexlink System Recovery menu. Re-installing Factory Loaded Programs • Company name if applicable 1. From the welcome screen of the Nexlink Recovery Center, select “Programs.” • Contact name at the location 2. From this screen, select “Application recovery.” • Make and model of the equipment requiring service 3. Select the program you wish to reinstall. • Description of the problem (please provide as much detail as possible) Accepting the Microsoft End User Licensing Agreement When booting your system for the first time, you must first accept the Microsoft End User Licensing Agreement (EULA). This is done by selecting “Yes” when prompted to do so and following the on-screen instructions to complete the process. Registering your Computer System You must be connected to the Internet in order to complete this step. If you are not connected, you can skip this step and complete the registration at a later time. Follow the on-screen instructions to complete this process. CREATE YOUR BACKUP MEDIA IMMEDIATELY Recommended Media: Maxell or Fuji; CD-R or DVD-R NOT recommended: Staples or Sony; CD-RW or DVD-RW The creation of back-up media is extremely important and will be required in the event of a hard drive failure. Please follow the steps listed below in order to create your media: Backup Media For Windows®7 and Windows Vista® 1. From the Windows Start Button (located at the bottom left of your screen) select All Programs. 2. Select and open the Nexlink Recovery Center Folder. 3. Select Recovery Center. 4. There are two types of Recovery Media: Drivers/ Applications/No OS or Drivers/Applications/OS. 5. Select Factory Recovery External Media. 6. From the Create Your Recovery Discs screen, click Next to continue. 7. Click Create System Recovery Discs and click Next. 8. After you have created your back up, you will not be allowed back into the Recovery Media Creator program again. If you need to get back in, please call the Customer Care Center. 9. Once the process is complete, please store your backup media in a safe and secure place. Your recovery media will be used in the event your hard drive fails. 3. You can select a Recovery with Automatic Data Backup or a Full Factory Recovery (the Full System Recovery option will destroy all user data). 4. After the Full Recovery is complete, you will need to reinstall any programs that were installed after the system left the factory. 5. You will also need to reinstall operating system and application updates to the system as well. If you do not have access to your recovery media and/or the F8 or F10 recovery key, you can visit our Support Website at: http://drivers.senecadata.com/ to download the original device drivers. Your computer serial number is required and is located on the bar code label affixed to your system. Please note that Seneca is not responsible for issues related to this download. Re-installing Device Drivers 2. Select “Device driver recovery.” 3. Select the device you are having an issue with. 4. Follow the on screen instructions to complete the installation. WARRANTY For Warranty Support 866.797.0904 Warranty Statement Backup Media For Windows® XP 1. You will have the option to perform the activity now, or “Remind me later.” If the option of “Remind me later” is chosen, you can go to the media creator interface to create your back up media. Go to: Start \ Programs \ System Recovery \ Recovery Media Creator. Seneca Data Distributors, Inc. (“Seneca”) Warrants that the products it manufactures (The “Products”) purchased by you (The “Purchaser”) shall be free from defects in materials and will function substantially in accordance with the normal and customary use of the products (as such products are intended by Seneca to be used and in general are intended to be used by Seneca’s customers), when used in accordance with the products ordinary and customary use and in compliance with all instructions provided to the purchaser, from the date of purchase of the products, for the period specified on Seneca’s invoice, subject to all of the terms and conditions of this Limited Warranty (The “Limited Warranty”). 2. Once you have created your back up, you will not be allowed back into the Recovery Media Creator program again. If you need to get back in, please call the Customer Care Center. To view Seneca’s complete Limited Warranty statement visit http://www.senecadata.com/Limited-System-Warranty.aspx For ISO image press the Crtl/Shift/I when the recovery backup program starts. Call Toll Free: 866.797.0904 The following information is required: • Zip or postal code of the location requiring service • Phone number of the contact • Name and telephone number of the person placing the call (if different from contact name) Please keep this paperwork for the duration that you own this computer system. You should reference this manual before contacting support and during support incidents. Please use the space below to record the Date, Support Agent’s name, and the computer system issues that you are experiencing. Date:______________________________________________ Name:____________________________________________ Issue:_ ____________________________________________ __________________________________________________ Date:______________________________________________ Name:____________________________________________ Issue:_ ____________________________________________ __________________________________________________ SERIAL NUMBERS: System ID (S/N #): Order Number: