1
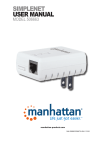
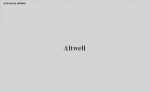
NetCamPro NAS Setup Manual 2015-03-14
Step by Step Guide to
Connect a D-Link DNS-320L NAS
to NetCamPro Camera(s)
Table of Contents
Introduction................................................................................................................................................2
NAS Considerations...................................................................................................................................3
Connection Protocol Options................................................................................................................3
Compatible NAS Devices.....................................................................................................................3
NAS Preparation....................................................................................................................................3
Factory Reset D-Link DNS-320L.........................................................................................................4
Networking Considerations........................................................................................................................5
Physical Connection and Location........................................................................................................5
Fixed IP Address....................................................................................................................................5
Address Discovery................................................................................................................................5
Static IP Addresses................................................................................................................................6
D-Link DNS-320L NAS Configuration.....................................................................................................7
Static IP Address....................................................................................................................................8
Camera Network Share.........................................................................................................................9
Camera and Viewer User IDs..............................................................................................................13
Camera User ID..............................................................................................................................13
Viewer User ID...............................................................................................................................17
NAS Final Touches..............................................................................................................................19
Automatic Power Fail Recovery.....................................................................................................19
FTP Server......................................................................................................................................20
Blocked ftp Clients.........................................................................................................................20
Admin Password.............................................................................................................................21
Camera Setup...........................................................................................................................................22
Local Mode .........................................................................................................................................22
Camera Admin Website.......................................................................................................................23
Samba..................................................................................................................................................24
Ftp........................................................................................................................................................26
Continuous Recording.........................................................................................................................28
Video Quality......................................................................................................................................29
Copyright (C) 2015 NetCamPro
https://go.netcampro.com
1
NetCamPro NAS Setup Manual 2015-03-14
Introduction
NetCamPro cameras are NAS (Network Attached Storage) compatible and will store motion activated
video clips or continuous video clips to a NAS. This can only be done if the camera is in Local mode
and does not work if Cloud mode is being used.
Using a NAS has advantages that may be desirable, depending on the situation:
1) NAS devices have enormous storage capacity measured in TB (terabytes) as opposed to the
camera's built-in micro SD drive which has it's capacity measured in GB (gigabytes). A TB is a
thousand times bigger than a GB.
2) A NAS can be hidden on your premises such that thieves would not be able to find and destroy
the evidence in a timely manner.
3) Many NAS devices can share the video files with other devices such as PCs, Macs, tablets,
smart phones, etc making access to the media by multiple users much simpler.
This guide provides a step by step procedure (with screen shots) for connecting any NetCamPro camera
to a D-Link DNS-320L NAS. Connecting to other NAS devices should be a similar process.
2
NetCamPro NAS Setup Manual 2015-03-14
NAS Considerations
Connection Protocol Options
There are two computer protocols that can be used to connect a NetCamPro camera to a NAS, each
with pros and cons as listed below. The best method should be chosen to suit the situation at hand.
In the first method the NAS replaces the built-in micro SD drive and uses the Samba protocol. In the
second method store and forward is used to send files to a local or remote server using FTP.
Samba
pro: Video clips can be retrieved using the “view record” function on the
NetCamProLive iPhone and Android Apps.
pro: Cyclic storage. If the NAS is full the camera will delete the oldest files to make
room for the new ones.
con: Camera(s) and the NAS must be on the same LAN (local area network).
con: If the camera cannot connect to the NAS when it needs to store a file, then
videos are lost.
FTP
pro: The NAS can be remotely located with files being sent directly over the Internet.
pro: Store and forward is used to overcome any connectivity outages. Should the
camera be unable to connect to the NAS, the video files will be kept on the camera's
internal micro SD and then forwarded when the connection is re-established.
con: If the NAS is full the latest video footage will be lost.
con: Video clips are not accessible through the NetCamProLive App.
Compatible NAS Devices
Any NAS that supports FTP or Samba should work with NetCamPro cameras. Our favourite device is
the D-Link DNS-320L which will be used as the example NAS machine in this manual.
NAS Preparation
A brand new D-Link DNS-320L is first prepared by updating the firmware with the latest version
posted on the dlink.com website. Then install new hard drive(s) in the bay(s) and format. You can
configure the DNS-320L to use one or two hard drives.
If you use two hard drives and they are the same size then you may choose a RAID-1 configuration.
3
NetCamPro NAS Setup Manual 2015-03-14
With RAID-1 all the files are mirrored. That is the video data is written to both drives at the same time.
Should one of the hard drives fail, the other will automatically step in and provide the data. Use RAID1 if you want the highest degree of reliability that can be attained with the DNS-320L.
There are various quality levels with hard drives which is generally reflected in their price. Generally
speaking mechanical NAS hard drives should be replaced every 3 years.
Factory Reset D-Link DNS-320L
To factory reset the DNS-320L locate the small hole on the bottom of the machine marked “reset”.
After the DNS-320L has been powered on for at least one minute insert an unfolded paper clip or tiny
screw driver in the hole. Push gently until you feel a click and then hold for 10 seconds. Then release
the button. The blue power light should be flashing. Give the DNS-320L two minutes to reset itself and
reboot.
4
NetCamPro NAS Setup Manual 2015-03-14
Networking Considerations
Physical Connection and Location
While NetCamPro cameras can connect using WiFi or Ethernet, NAS devices generally only connect
using an Ethernet cable. For most people this would imply that the NAS physically has to go near the
router – which is often where a thief would look for recording devices.
The DNS-320L is such a small and compact device that it can go anywhere there is a power outlet.
Furthermore it can be setup to automatically recover itself after a power interruption making it a device
that you rarely, if ever, have to attend to. So our recommendation is to locate your NAS in a closet,
back bedroom, corner of the basement, or other obscure location. Ethernet can be run through your
exiting 120VAC wiring back to the router using AV500 Ethernet over Power devices such as the DLink DHP-501AV - making the NAS a tough thing to find in a hurry.
Fixed IP Address
If the NAS and cameras are on the same LAN, the NAS will need a fixed IP address. This can generally
be done in two ways. One is to configure the NAS with a “static IP address”. The other is to configure
your router to assign the NAS the same “reserved IP address” using DHCP.
The reserved IP address approach is the most desirable, but involves logging into your router and
associating the MAC number of the NAS with a reserved LAN IP address. Whenever your NAS
connects the router will give it the same LAN IP address every time. Furthermore it will not assign that
LAN IP address to any other device. It is outside of the scope of this manual to describe how to assign
a reserved LAN IP address as pretty much every router is different. You will have to refer to the
specific instructions for your router.
The static IP address does not involve configuring your router. However it does put network access
restrictions on the NAS. Specifically a device that is not assigned a LAN IP address by a router through
DHCP is often seen as a rogue device and blocked from accessing the Internet. Usually this is not a
problem as the devices on your LAN (cameras, PCs, Macs, etc) will be able to access the NAS locally
without restrictions, but remote access of the NAS may not be possible when a static IP address is used.
Address Discovery
To discover the address of your NAS you generally can use software that comes with the NAS or
alternatively the method described here. Before configuring your camera(s) it is a good idea to validate
that the NAS is at the IP address that you think it should be after it has been rebooted.
5
NetCamPro NAS Setup Manual 2015-03-14
To discover the addresses of the devices on your LAN you can use a smart phone that is connected via
WiFi. Install the application “Fing” (available for free for Android and iPhone). Run Fing and it will
report all the devices on your network. To find your DNS-320L look for an entry that reads “DLINKXXXXXX”. Where XXXXXX is the last 6 characters of the MAC number printed on the bottom of the
NAS. XXXXXX is comprised of numbers and the letters A thru F. Make a note of the IP address of the
DNS-320L displayed on the left side of the Fing listing as you will need it in the next steps.
Static IP Addresses
If you decide you do not want to configure your router and would rather use a static IP address for your
NAS, then be aware that choosing the wrong static IP address for your NAS could well make it
inoperable. If this happens you will need to perform a factory reset on the NAS – which is described for
the DNS-320L in another section of this manual.
To pick a suitable static IP address use the Fing application (described above) on a smart phone to scan
your network. Inspect the IP addresses displayed and observe the pattern. LAN IP addresses are often
of the form “192.168.0.*” or “192.168.1.*” for home and small business routers. * is an integer from 1
to 255. The “.1” address is typically for the router itself. Larger LANs will use “10.*.*.*” and
“172.*.*.*” network addresses.
The first part of picking a static IP address is to observe the first 3 numbers used for the IP address of
all the other devices on your LAN. Your new static IP address must have these same first 3 numbers or
your NAS will become inaccessible.
The second part of picking a new static IP address is to decide what the last number will be. It cannot
be the same as that used for any other device on your network. It also cannot be a value that the router
might assign to a new future added device such as a smart TV or visiting smart phone.
Most routers have a range that they use when assigning the last number of an IP address for a new
device. Often it starts at 10. You can easily determine where the addresses start by looking at the Fing
display. The router itself is typically “1”. If the next device is at “10” then you know that the router will
not assign any new devices a 2, 3, 4, 5, 6, 7, 8, or 9 value as the last number of their IP address. If the
new device is at “100” (another common configuration) then the router will never assign the values 2
thru 99 to a device – making them safe to use.
So to be perfectly clear suppose that Fing shows that all the IP address on your LAN start with
“192.168.0.” and the next IP address after “192.168.0.1” is “192.168.0.10” then you are free to choose
“192.168.0.2”, “192.168.0.3”, “192.168.0.4”, “192.168.0.5”, “192.168.0.6”, “192.168.0.7”,
“192.168.0.8”, or “192.168.0.9” as the static IP address for your NAS.
Note that you must manage the static IP addresses in your network yourself. If you have more than one
NAS, for example, you cannot put them on the same static IP address. If your first NAS is assigned
“192.168.0.3” as it's static IP address then best to assign “192.168.0.4” to the second NAS, and so on.
6
NetCamPro NAS Setup Manual 2015-03-14
D-Link DNS-320L NAS Configuration
Enter the NAS's IP address as the website URL using a browser on any machine connected to the same
LAN as the NAS. The internal NAS admin website is best viewed on a larger screen device. In the
screen shots below the DNS-320L has been assigned an IP address of 192.168.0.95 by the router's
DHCP server.
When asked to login enter the NAS admin credentials. After a factory reset the user is admin and the
password is blank. You should see the home page. Click on the Management button.
7
NetCamPro NAS Setup Manual 2015-03-14
Static IP Address
If you are assigning your NAS a static IP address then follow these steps. If your router is assigning a
reserved IP address you may skip this step.
Click the Management button then the Network Management button. Then click the LAN Setup
menu, the LAN word (which will turn red when clicked) and then the Setup button.
In his example the static IP address for the NAS that we have chosen is 192.168.0.7. For home and
small business networks 255.255.255.0 is the typical subnet mask. Normally the router's IP address (in
our case 192.168.0.1) can be used as the gateway IP address and DNS1. Enter this information in the
Step 1 page. Click the Next button. Ensure the information is correct on the Step 2 page and click the
Finish button.
Reboot the NAS and login to its admin website at the new static IP address.
8
NetCamPro NAS Setup Manual 2015-03-14
Camera Network Share
In the following section we are going to setup a share for one camera. If you wish to add more cameras
then each one must have it's own share as well.
Click on the Management button, then the Account Management button, then the Network Shares
link, and then the New button.
On the Welcome to Network... page Click the Next button:
Click on the volume_1 text (not the checkbox or the folder icon) then click on New:
9
NetCamPro NAS Setup Manual 2015-03-14
Enter a unique name for the folder where the media files from the camera will be kept. This should be
something descriptive if you have more than one camera. In this example we will use “Front_Door”.
Click the checkbox beside Front_Door and then click the Next button on the Step 1 page. Click the
Next button on the Step 2 page.
10
NetCamPro NAS Setup Manual 2015-03-14
Click the Next button on the Step 2-1 page . Then click Next again on the Step 3 page.
Click the Next button on the Step 3-1 page. Click the Next button on the Step 3-1-1 page.
11
NetCamPro NAS Setup Manual 2015-03-14
And lastly click the Finish button on the Step 4 page:
12
NetCamPro NAS Setup Manual 2015-03-14
Camera and Viewer User IDs
Next we will create a user ID for the camera that has read/write permissions for the Front_Door share.
This user ID will have a quota of 500GB. As well we will create a “viewer” user ID that has read-only
permission for the Front_Door share. The viewer user ID may look at the videos but may not edit or
delete them.
If the camera connects to the DNS-320L using Samba then this 500GB will be used in a cyclic fashion.
When the 500GB fills up, the oldest videos will be removed automatically by the camera to make room
for the new videos.
If the camera connects to the DNS-320L using FTP then when this 500GB fills up all new videos will
be lost as there will be no place to write the files. You will need to periodically maintain the NAS
(perhaps every month) by removing old videos and ensuring there is sufficient room for all the new
videos that will accumulate until the next time you get chance to check in on the disk usage.
Camera User ID
Click on the Management button then the Account Management button. Then click on
Users/Groups followed by the Create button. Click the Next button on the Welcome to the User...
page.
13
NetCamPro NAS Setup Manual 2015-03-14
Click the Next button on the Step 1 page. On the Step 2 page enter CAM01 for the User Name. Enter
the password that the camera will be required to use when storing video files on the NAS. Then click
the Next button.
To generate a strong password you can use this free online tool:
https://www.ravenshoeinfotech.com/extras/memorablepasswordgenerator.php
Make sure to write down the CAM01 password that you select as you will need that same password to
configure the camera.
14
NetCamPro NAS Setup Manual 2015-03-14
On the Step 3 page click the Next button. On the Step 4 page click Deny Access for the volume_1
(entire hard drive) share and Read/Write for the Front_Door share. Then click the Next button.
On the Step 4-1 page click the Next button. On the Step 5 page set the Quota Amount to 500000 and
click the Next button.
15
NetCamPro NAS Setup Manual 2015-03-14
On the Step 6 page click the Finish button:
16
NetCamPro NAS Setup Manual 2015-03-14
Viewer User ID
To add a NAS user that has read only permission to the video files click the Management button then
the Account Management button and then the Create button. On the Step 1 page click the Next
button.
On the Step 2 page enter viewer as the User Name and enter a strong password in the provided boxes.
Then click the Next button.
On the Step 3 page click the Next button. On the Step 4 page click Deny Access for the volume_1
share (entore hard drive) and Read Only for the Front_Door share. Then click the Next button.
17
NetCamPro NAS Setup Manual 2015-03-14
Click the Next button on the Step 4-1 page. Leave the quota at 0 on the Step 5 page and click the Next
button.
On the Step 6 page click the Finish button:
18
NetCamPro NAS Setup Manual 2015-03-14
NAS Final Touches
Automatic Power Fail Recovery
To ensure that the DNS-320L automatically recovers itself after a power interruption follow this
procedure:
Click on the Management button then the System Management button and then the Power
Management menu item. Then click on the Power Recovery Settings menu. Next to Power Recovery
click Enable and then click the Save Settings button.
19
NetCamPro NAS Setup Manual 2015-03-14
FTP Server
Out of the box the DNS-320L NAS has the FTP server turned off. To turn it on click on the
Management button, then the Application Management button, and then the FTP Server menu.
Scroll down (if need be) and click on the FTP Server Status text to open the fold-out. If the Status is
Stopped then click on the Start FTP Server button at the bottom of the fold-out.
Blocked FTP Clients
When setting up your NAS you may accidentally have the credentials wrong. If this is done repeatedly
then the NAS will add the device to the Block IP List and will not allow it to connect.
20
NetCamPro NAS Setup Manual 2015-03-14
Admin Password
If your DNS-320L is brand new – good idea to set an admin password. Click the Management button
then the Account Management button and the Admin Password menu item. Leave the Password
field blank and enter a new password twice in the provided boxes.
To generate a strong password you can use this free online tool:
https://www.ravenshoeinfotech.com/extras/memorablepasswordgenerator.php
21
NetCamPro NAS Setup Manual 2015-03-14
Camera Setup
Local Mode
Your NetCamPro camera must be in Local mode to work with a NAS. All NetCamPro cameras are
shipped from the factory in Local mode. If you are not sure if your camera is in Local mode then you
can either perform a factory reset or use the wizard to put it in Local mode.
The factory reset procedure is described in the Cloud Mode Setup Manual found in the
Support/Downloads section of our website https://go.netcampro.com/support/downloads/
If the camera is mounted to a telephone pole or in an otherwise difficult to access location, using the
wizard to modify the camera's configuration file would be the easiest way.
https://cloud.netcampro.com/wizard.php.
Note that a factory reset will remove any WiFi configuration that the camera may have. Changing a
camera to Local mode using the wizard, on the other hand, will leave the WiFi settings intact.
22
NetCamPro NAS Setup Manual 2015-03-14
Camera Admin Website
Each NetCamPro camera has its own website with functions for configuring the camera. You can
connect to this website with a browser on a device (Android, iPhone, Windows, Mac, or Linux) that is
connected to the same LAN as the camera. If your phone is on its data plan, it will not be able to
connect. But if your phone is on the same WiFi network as the camera then it will be able to connect.
Use the camera's LAN IP address as the URL. How to discover the camera's IP address is described in
the Cloud Mode Setup Manual found in the Support/Downloads section of our website
https://go.netcampro.com/support/downloads/.
In this case the IP address of the camera is 192.168.0.80. As shipped from the factory the credentials
are admin/admin. Click the Settings button and enter the login info when prompted.
23
NetCamPro NAS Setup Manual 2015-03-14
If you accidentally click Enter button instead of the Settings button, the camera video feed is shown
instead of the settings page. Just click on the Setting menu item found along the top of the page.
Samba
To connect the camera to the NAS using Samba follow these steps. The key parameters from the DNS320L NAS setup described above are summarized in the table below. The actual values will vary for
your particular setup. The NAS Remote Path is made from the NAS Host and NAS Share Name by
re-formatting as shown.
NAS Host
192.168.0.95
NAS Share Name
Front_Door
NAS Remote Path
//192.168.0.95/Front_Door
User ID
CAM01
Password
ginger78stones
Click on the Storage menu then the Storage Setup menu. Click on the NAS radio button and enter the
parameters as shown.
24
NetCamPro NAS Setup Manual 2015-03-14
Click the Apply button. The message “* Storage setup accepted successfully!” Should appear at the top
left of the page after a couple of seconds.
Make a motion in front of the camera that is sufficient to trigger it to record. Wait one minute and click
on Browse Storage. The file counts should not be zero.
Setup of Samba is now complete.
25
NetCamPro NAS Setup Manual 2015-03-14
FTP
To connect a NetCamPro camera to a NAS using FTP follow these steps. The key parameters from the
DNS-320L NAS setup described above are summarized in the table below. The actual values will vary
for your particular setup.
In our example case the NAS Host is on the same LAN as the camera, which can access the NAS by
specifying the IP address. In other situations the FTP server may be in another physical location
accessible through the Internet and will have a name rather than an IP address.
FTP Host
192.168.0.95
Share Name
Front_Door
Port
21
User ID
CAM01
Password
emerald78sparkle
21 is the preferred port number for FTP. If the FTP server is being accessed over the Internet then it
may only be accessible on port 21. This is because many routers have special handling for the FTP
protocol over port 21 only. On other ports FTP does not work as expected. If the camera and FTP server
are on the same LAN then this restriction does not apply and any unassigned port number can be used.
Click on the Task menu and then the Task Management sub-menu. Click checkbox 11 and then click
the Apply button. The message “* Task setup successfully!” Should appear in the upper left corner of
the page.
26
NetCamPro NAS Setup Manual 2015-03-14
Click on the text “Send files in storage to FTP server” and fill in the required information. Click the
Apply button and the message “” should appear in the upper left of the page.
The camera will write motion activated video clips to the built-in 8GB micro SD and then send them to
the specified FTP server. Once a file has been moved, it is deleted from the micro SD. This store and
forward mechanism is used to overcome Internet outages. The camera will repeatedly try to connect to
the FTP server during an Internet outage while accumulating video files locally for later transmission.
27
NetCamPro NAS Setup Manual 2015-03-14
Continuous Recording
To make the camera record continuous video to the NAS then follow these steps. The camera will write
1 minute video clips back to back. Click on Tasks then Task Management. Click checkbox 10 then
click Apply. The message “* Task Setup Successfully!” will appear in the upper left of the page.
28
NetCamPro NAS Setup Manual 2015-03-14
Video Quality
NetCamPro cameras have the video stream “tuned down” when in Local mode to save space on the
micro SD. But if a camera is writing to a NAS where there is lots of storage space you may wish to
increase the video quality by following these steps.
Click Camera to expose the fold-out menu and then click Stream Setup. On the Primary Stream
increase the Frame Rate to 18 and MJPEG Quality to 90. Click the Apply button at the bottom of the
page.
29