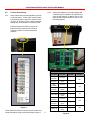
1
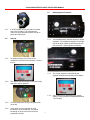
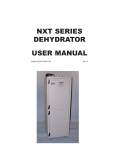
CO30/60K
CABLE DRYER
USER MANUAL
Bulletin AE01B-A0545-001
© 2008-2010 CommScope, Inc. All rights reserved.
Rev: C
(11/10)
CO30K/CO60K SERIES CABLE DRYER USER MANUAL
Table of Contents
Section 1
General Information . . . . . . . . . . . . . . . . . . . . . . . . . . . . . . . . . . . . . . . 4
1.1
Introducing CO30K/CO60K Series Cable Dryer . . . . . . . . . . . . . . . . . . . . . . . . 4
1.1.1
For dry air cable pressurization . . . . . . . . . . . . . . . . . . . . . . . . . . . . . . . . . . . . 4
1.1.4
Electrical Connections . . . . . . . . . . . . . . . . . . . . . . . . . . . . . . . . . . . . . . . . . . 4
1.1.5
Standard Low-Pressure Alarm . . . . . . . . . . . . . . . . . . . . . . . . . . . . . . . . . . . . 4
1.1.6
Air Distribution . . . . . . . . . . . . . . . . . . . . . . . . . . . . . . . . . . . . . . . . . . . . . . . 4
1.1.7Features: . . . . . . . . . . . . . . . . . . . . . . . . . . . . . . . . . . . . . . . . . . . . . . . . . . 4
1.1.8
Cable Dryer . . . . . . . . . . . . . . . . . . . . . . . . . . . . . . . . . . . . . . . . . . . . . . . . 4
Section 2
Installation . . . . . . . . . . . . . . . . . . . . . . . . . . . . . . . . . . . . . . . . . . . . . 5
2.1
2.2
2.3 2.4
2.5
2.6
2.7
2.8
2.9
Section 3
Controls and Displays . . . . . . . . . . . . . . . . . . . . . . . . . . . . . . . . . . . .
3.1
3.2
3.3
Section 4
10
Monitor Controls . . . . . . . . . . . . . . . . . . . . . . . . . . . . . . . . . . . . . . . . . . . . . 10
Microprocessor Control Keys . . . . . . . . . . . . . . . . . . . . . . . . . . . . . . . . . . . . 10
Digital Display Window . . . . . . . . . . . . . . . . . . . . . . . . . . . . . . . . . . . . . . . . 10
Operation . . . . . . . . . . . . . . . . . . . . . . . . . . . . . . . . . . . . . . . . . . . . . . 11
4.1
4.2
4.2.1
4.2.2
4.3
4.3.1
4.3.2
4.3.3
4.4
4.5
Section 5
Unpack CO30K/CO60K Series Cable Dryer and Inspect for Shipping Damage . . . . 5
Place the CO30K/CO60K Series Cable Dryer . . . . . . . . . . . . . . . . . . . . . . . . . . 5
Install Tubing Lines . . . . . . . . . . . . . . . . . . . . . . . . . . . . . . . . . . . . . . . . . . . 5
Connection Procedure . . . . . . . . . . . . . . . . . . . . . . . . . . . . . . . . . . . . . . . . . 5
Electrical connections: . . . . . . . . . . . . . . . . . . . . . . . . . . . . . . . . . . . . . . . . . 6
Start Up: . . . . . . . . . . . . . . . . . . . . . . . . . . . . . . . . . . . . . . . . . . . . . . . . . . . 7
Setting System Pressures: . . . . . . . . . . . . . . . . . . . . . . . . . . . . . . . . . . . . . . . 7
Connect Alarm Wiring: . . . . . . . . . . . . . . . . . . . . . . . . . . . . . . . . . . . . . . . . . 8
Filter bowls: . . . . . . . . . . . . . . . . . . . . . . . . . . . . . . . . . . . . . . . . . . . . . . . . 9
Control Status and Programming . . . . . . . . . . . . . . . . . . . . . . . . . . . . . . . . . . 11
Familiarize yourself with the Displays . . . . . . . . . . . . . . . . . . . . . . . . . . . . . . . 11
The Main Menu . . . . . . . . . . . . . . . . . . . . . . . . . . . . . . . . . . . . . . . . . . . . . . 11
The Program Mode Submenu . . . . . . . . . . . . . . . . . . . . . . . . . . . . . . . . . . . . 11
Pressure Monitoring and Control . . . . . . . . . . . . . . . . . . . . . . . . . . . . . . . . . 13
Monitor Duty Cycles . . . . . . . . . . . . . . . . . . . . . . . . . . . . . . . . . . . . . . . . . . 13
Display of System Pressure . . . . . . . . . . . . . . . . . . . . . . . . . . . . . . . . . . . . . 13
Alarm Conditions . . . . . . . . . . . . . . . . . . . . . . . . . . . . . . . . . . . . . . . . . . . . 13
Programming Procedure . . . . . . . . . . . . . . . . . . . . . . . . . . . . . . . . . . . . . . . 13
Shutdown Procedure . . . . . . . . . . . . . . . . . . . . . . . . . . . . . . . . . . . . . . . . . . 13
CO30K/CO60K Schematic . . . . . . . . . . . . . . . . . . . . . . . . . . . . . . . . . . . . . . 14
Maintenance . . . . . . . . . . . . . . . . . . . . . . . . . . . . . . . . . . . . . . . . . . . 15
5.1
Annual service: . . . . . . . . . . . . . . . . . . . . . . . . . . . . . . . . . . . . . . . . . . . . . 15
5.3Dryer: . . . . . . . . . . . . . . . . . . . . . . . . . . . . . . . . . . . . . . . . . . . . . . . . . . . 15
2
CO30K/CO60K SERIES CABLE DRYER USER MANUAL
Section 6
In Case of Difficulty . . . . . . . . . . . . . . . . . . . . . . . . . . . . . . . . . . . . . . . 17
Section 7
Parts Replacement and Overhaul . . . . . . . . . . . . . . . . . . . . . . . . . . . . . 19
7.1
7.2
7.3
7.4
7.5
Parts Replacement Procedures . . . . . . . . . . . . . . . . . . . . . . . . . . . . . . . . . .
Unit Shutdown and Removal . . . . . . . . . . . . . . . . . . . . . . . . . . . . . . . . . . . . Service Panel Removal . . . . . . . . . . . . . . . . . . . . . . . . . . . . . . . . . . . . . . . .
Replace Compressor Control PCB . . . . . . . . . . . . . . . . . . . . . . . . . . . . . . . .
Replace Microprocessor Board . . . . . . . . . . . . . . . . . . . . . . . . . . . . . . . . . . .
20
20
20
20
20
Section 8
Specifications . . . . . . . . . . . . . . . . . . . . . . . . . . . . . . . . . . . . . . . . . .
21
Section 9
Customer Support . . . . . . . . . . . . . . . . . . . . . . . . . . . . . . . . . . . . . . .
22
9.1
9.2
24 Hour Technical Service Hotline . . . . . . . . . . . . . . . . . . . . . . . . . . . . . . . . . 22
Free Loaner Program . . . . . . . . . . . . . . . . . . . . . . . . . . . . . . . . . . . . . . . . . 22
3
CO30K/CO60K SERIES CABLE DRYER USER MANUAL
1.1.7
Section 1
General Information
1.1
Introducing CO30K/CO60K Series Cable
Dryer
1.1.1
For dry air cable pressurization
Now technicians and managers can be assured
of reliable pressurization of underground cables.
The CO30K/CO60K Cable Air Dryer from
Andrew uses proven, patented membrane drying
technology for a consistent, precise supply of
dry air.
1.1.2
The CO30K/CO60K Cable Air Dryer comes in
a standalone, compact, unobtrusive enclosure,
delivering reliably dry air in a more scientific,
efficient, and quiet method. The CO30K/CO60K
is the sensible choice to extend cable life and
avoid costly service interruptions from moisture
ingress.
1.1.3
Front Mounted Controls and Status
Indicators
The CO30K/CO60K registers both metric and
Imperial units. It provides a digital display of
system pressure and alarm conditions. A 3/4
inch NPT port is provided for connection to the
cable system.
1.1.4
Electrical Connections
The CO30K/CO60K North America Vac input is
208 Vac 3 phase 60 Hz. Each unit is supplied
with a terminal strip for mains power connection
located behind the service panel on the back of
the compressor chassis.
1.1.5
Standard Low-Pressure Alarm
The CO30K/CO60K Cable Air Dryer includes
an alarm package that provides programmable
low-pressure and high-pressure alarms. It also
includes a high-humidity alarm factory set at >
3% relative humidity, and a power failure alarm.
1.1.6
Air Distribution
A single 3/4 inch NPT port is included to facilitate
connection to the dry air distribution system.
4
Features:
•
Exceptional performance—dew point as
low as –50° F, –45° C
•
Quiet, cool rotary screw compressor
eliminates water level and filtration
concerns associated with water seal
compressors
•
Fully automatic with regulated output
•
Unobtrusive appearance
•
Easy setup and direct access
•
Patented membrane drying eliminates
drying media
•
Integrated ATS interface
1.1.8
Cable Dryer
The patented drying system begins at the
compressor, where filtered ambient air is
compressed. The compressed air is then routed
through the filter bowls where the bulk liquid
water is removed by the water separator. The
saturated air then passes through a coalescing
filter for the removal of additional water and
then into the carbon bed filter for removal of
any coolant vapor. The air is them passed
to the patented membrane cartridge where
the remaining water is removed by pressure
differential.
The water separated in the filters is routed
through drain lines for disposal.
The membrane tube separates moisture from air
by a pressure differential across semi-permeable
fibers. The water vapor and a small amount of
the air permeate through the filter walls leaving
the exiting air with a reduced water vapor
content of -45°C (-50°F) dewpoint. The air that
permeates through the fiber purges the water
vapor out of the tube’s vent ports.
This patented drying process contains no
moving parts, thus reducing maintenance and
increasing reliability.
CO30K/CO60K SERIES CABLE DRYER USER MANUAL
Section 2
Installation
2.1
Unpack CO30K/CO60K Series Cable Dryer
and Inspect for Shipping Damage
Carefully remove packing from CO30K/CO60K Cable
Dryer. Locate the compressor owner’s manual, startup kit and the install kit (shown on left side of Cable
Dryer)
Note: Locate CO30K/CO60K Cable Dryer
as close as possible to AC mains and air
distribution panel
Check the CO30K/CO60K Series Cable Dryer
for shipping damage such as dents or loose
parts.
If there is anything loose, refer to the piping
schematic Figure 10 or the wiring schematic
Figure 12 for proper placement.
If there is damage or if there are any other
problems, contact Andrew Technical Service.
Telephone numbers are listed in Customer
Support Section 10.
2.2
Place the CO30K/CO60K Series Cable Dryer
The CO30K/CO60K Series Cable Dryer are
designed to be mounted to the floor.
5
2.3 Install Tubing Lines
CO30K/CO60K Series Cable Dryer output line
marked “OUTPUT” to the distribution panel and
transmission lines.
Verify tubing between dryer module and
compressor is secure.
2.4
Connection Procedure
A single ¾”NPT air outlet is located on the left
side of the dryer module. A barbed fitting is
included in the install kit along with 25 feet of ¾”
braided hose.
CO30K/CO60K SERIES CABLE DRYER USER MANUAL
2.5
Electrical connections:
Note: A licensed electrician should perform
all electrical mains connections.
Note: The Compressor has a power
up alarm and will activate the alarm for
approximately 10 second when the AC mains
power is turned on. The alarm will sound
each time the main is removed and restored.
2.5.1
2.5.2
The Terminals for the AC mains is located
behind a panel on the back of the compressor
chassis. Knockouts are provided for access and
a strain relief is recommended.
AC mains connections are located in the lower
right corner of the electrical compartment. The
compressor is designed to operate on 208 Vac 3
PH 60 Hz.
6
2.6.3
It is also possible to remove the white intake
filter located to the right of the electrical
compartment and checking the fan rotation
against the arrows on the fan enclosure.
2.6.4
If fan rotation is backwards, have the electrician
change the AC mains wire sequence on the
terminal strip.
2.5.5
Verify to 9-pin connector is fully seated into the
socket on the compressor.
2.5.6
Connect the dryer module to 115Vac. This will
provide power for the control board and all of the
alarms including the humidity bypass.
CO30K/CO60K SERIES CABLE DRYER USER MANUAL
2.5.7
If an ATS system is used, the cable is located
next to the air outlet. This is designed to
connect to an ATS300 and requires 115Vac to
switch the Cable Dryer.
2.6
Start Up:
2.6.1
To operate the dryer, the E-Stop on the
compressor must be in the on position. Twist to
turn on.
2.6.2
2.7
Setting System Pressures:
2.7.1
The membrane dryer requires 90 psig for proper
operation. The regulator and gauge on the right
side of the dryer module control the pressure in
the membrane. Adjust regulator for 90 psig.
2.7.2
The out put pressure is controlled by the
regulator located on the left side of the chassis.
2.7.3
Out put pressure is displayed on the system
display. Out put pressure is adjustable between
1 and 30 psig.
The display should illuminate and will eventually
display the system pressure.
2.6.3
Turn the compressor on buy turning the switch
on the left.
2.6.4
At this point it is very important to verify
the direction of the cooling fan. Air should
be flowing out of the vent on the top of the
compressor chassis.
7
CO30K/CO60K SERIES CABLE DRYER USER MANUAL
2.8
Connect Alarm Wiring:
2.8.1
Alarm outputs are jumpered together to provide
a summary alarm. Connect the summary alarm
to reporting system to provide a contact closure
on alarm. If an open circuit on alarm is desired,
Change the alarm jumpers to normally closed.
If discrete alarms are desired, remove the
jumpers at the terminal strip and connect
monitoring system to terminal strip alarm
contacts.
2.8.2
Alarms are indicated on the main display and
a terminal strip is located on the top left of the
dryer module chassis. All alarms are for C dry
contacts and will accept either an Vac or Vdc
monitoring system.
JP2
JP3
JP4
JP5
JP6
JP7
Table 1 Terminal strip
Figure 5
Locate the terminal strip on top of the dryer module and
connect the alarm wiring to terminals shown in figure 5.
8
Function
Terminal
Symbol
High
Pressure
Common
-
High
Pressure
Normally
Open
+
High
Humidity
Common
-
High
Humidity
Normally
Open
+
Excess Run
Common
-
Excess Run
Normally
Open
+
Low
Pressure
Common
-
Low
Pressure
Normally
Open
+
Power Fail
Common
-
Power Fail
Normally
Open
+
Figure 6
Jumper
JP7
JP2
JP4
JP6
JP6
CO30K/CO60K SERIES CABLE DRYER USER MANUAL
2.9
Filter bowls:
2.9.1
The filter bowls are located on the lower left
of the dryer module and provide 3 stages of
filtration prior to the membrane dryer.
2.9.2
The filters are, from right to left, a bulk water
separator, a coalescing filter and a carbon bed
filter.
2.9.3
At the bottom of each bowl is a 1/4 turn valve
that controls the flow of the condensate. The
valves are factory set but the output flow should
be verified periodically to ensure the valves are
not clogged. Continuous flow is required.
2.9.4
Tubing is included with the install kit to connect
each of the filter bowls to a floor drain of other
liquid removal device.
9
CO30K/CO60K SERIES CABLE DRYER USER MANUAL
Section 3
Controls and Displays
This section explains the functions of the
controls and displays used for operation and
programming of the controller.
3.1
Monitor Controls
Fuse
On the controller PCB.
3.2
Microprocessor Control Keys
SELECT
ENTER
3.3
Digital Display Window
The window displays three types of information:
System Status Information. Displays system
pressure and total run time.
Alarm Condition Display. A flashing display
indicates that an alarm condition exists. The
display is factory set for English language and
English units. It can also be set for metric units.
Advances display (scrolls ahead) to
the next display or program mode
without changing the values in the
microprocessor memory.
Enters into the microprocessor memory
the values displayed in the window and
advances display (scrolls ahead) to the
next program or display mode.
Numerically increase displayed settings
in display window. When depressed
longer than 1/2 second scrolling will
occur at a faster rate.
Numerically decrease displayed settings
in display window. When depressed
longer than 1/2 second scrolling will
occur at a faster rate.
VIEW
LOG
Used to allow the user quick access to
the system event log. After depressing
this button, the most recent event will
be displayed. The up and down arrow
buttons may be used to browse the log.
10
CO30K/CO60K SERIES CABLE DRYER USER MANUAL
Section 4
Operation
4.1
Control Status and Programming
CO30K/CO60K Series Cable Dryer have
a microprocessor based control board for
monitoring and control of the controller and
setting the programmable alarms. It comes
factory set for English language and English
units. Figure 9 shows the various modes, which
maybe viewed, in the display window. Main
Menu displays are shown in the first column.
Program Mode Submenu displays are shown in
the second column.
4.2
Familiarize yourself with the Displays
4.2.1
The Main Menu
First, become familiar with the Main Menu.
Turn the controller. Upon power up the system
will do a set of internal diagnostics and mean
while display as follows: “X controller revision
XX.X.” If a power-up test failure is detected the
following is displayed: “system pressure XXX.X
psig (kPa).
1.
Press the
button and the display will
indicate “PROGRAM MODE”.
2.
Press the
button again and the Total
Run Time will appear as “XXXX.X HOURS” and
indicate total hours since initial turn-ON.
4.2.2
The Program Mode Submenu
If your monitor is equipped with all options, all
of the screens shown in the flow chart will apply.
The modes pertaining to high-pressure, high
humidity (fixed at 7.5% R.H.) and excess run
time, as well as multi-channel manifold capability
are options.
1.
Press the
key and proceed from system
pressure to [PROGRAM MODE].
2.
Press the
key and proceed to the
Program Mode Submenu. [COMPON 0.5] will
now appear on the display. At this point, the
display will be as follows, prompting the user for
a new password: “default password is “111111”.
The following sections describe the various
programmable functions and the associated
sub-functions in detail.
3.
SET DATE (month) 2
digits for month of the year.
values = “01 - 12”
4.
SET DATE (day)
2 digits for day of the month.
values = “01 - 31”
SELECT
ENTER
SELECT
SELECT
3.
SELECT
Press
and you will return to system
pressure, or, if the excess run alarm has been
purchased, “CLEAR RUN TIME” will appear.
This feature is used to clear the alarm by
SELECT
pressing the
[COMP5.0 psig].
key and proceeding back to
11
CO30K/CO60K SERIES CABLE DRYER USER MANUAL
5.
SET DATE (DOW)
2 digits for day of week.
values = “00 - 99”
6.
SET DATE (year)
2 digits for year.
values = “00 - 99”
7.
SET TIME (hour)
2 digits for hour of the day.
values = “00 - 23”
8.
SET TIME (minutes)
2 digits for minutes of the hour.
values = “00 - 59”
9.
LOW PRESSURE ALARM
Set this the desired low pressure alarm
threshold. Format is XX.X psig (kPa). Values
=“0.1 - 15.0”.
10.
HIGH PRESSURE ALARM
Set this to the desired high pressure alarm
threshold. Format is XX.X psig (kPa). Values
=0.1 - 16.0 ”
NOTE Must be set below primary
compressor ON set point.
11.
COMP OVERHAUL TIME
Factory only setting 3000 hours.
12.
KEYPAD INACTIVITY
Format is XX seconds. Factory set for 45
seconds.
13.
SYSTEM PRESSURE HI RES
If set to “YES”, this setting will display system
pressure two decimal places of resolution. Set
to “NO” except when system pressures are very
low or the ON and OFF pressure differential is
very small.
15.
ENTER NEW PASSWORD
The factory set password is “111111”. User
many enter a new password and depress
“ENTER” or depress the “SELECT” button to
cancel the change.
12
CO30K/CO60K SERIES CABLE DRYER USER MANUAL
4.3
Pressure Monitoring and Control
4.4
Programming Procedure
4.3.1
Monitor Duty Cycles
Some system components, however, have
lower pressure ratings. Using the procedures
described below, CO30K/CO60K Series Cable
Dryer can be programmed for any start/stop
pressure combination in the 13.8 - 206.8 kPa
(2.0 - 30.0 psig) range.
Use the SELECT key to advance through
the series of prompts without changing the
programmed values. If you change a value and
want to save it to memory, use the ENTER key,
which will also advance you to the next feature.
With the “PROGRAM MODE” prompt displayed
SELECT
4.3.2
Display of System Pressure
The monitor output pressure SYSTEM
PRESSURE 0.0 psig is the initial display as
power is applied to the unit.
in the display window, press the
key to
precced to the first programmable feature.
4.5
Shutdown Procedure
As shown in Figure 9, Main Menu, pressing the
When removing your monitor or Cable Dryer
from service, you may need a substitute dry
air source. Call Andrew Technical Service.
Telephone numbers are listed in Customer
Support section 10.
Before turning OFF the unit, notify personnel
that alarms may be activated.
To shut down the CO30K/CO60K Series Cable
Dryer, turn air compressor OFF than unplug 115
Vac plug from the back of the module and close
the isolation shutoff valves located in the output/
input lines to retain system pressure.
Disconnect by unscrewing the poly tube
compression fittings located at the back or top of
the units.
SELECT
Key will display “PROGRAM MODE” on
the display window.
4.3.3
Alarm Conditions
Alarm conditions, except high humidity, are
defined by the programmed settings entered into
the microprocessor as described below. Alarm
contacts are included in the unit and wiring
terminals are located on the back of the monitor.
When an alarm condition exists, the normally
open contacts are closed, thereby activating a
remote alarm (not included). Also, the alarm
condition will flash continually on the display
window until the alarm condition is corrected. In
the case of the excess run alarm, the alarm must
be cleared as described in the programming
section.
13
14
WHITE
SOLENOID
BLACK
WHITE
IEC
BLACK
E1 CHASSIS
GND
MOMENTARY
SWITCH
WHITE
GREEN
BLACK
BLACK
39
6
40
40
1
5
1
GRN/YLW
1
2
5
1
11
6
P4
POWER
P5
SOL
DISPLAY
P1
2
6
2
DISPLAY CABLE
5
SERIAL
P2
9
***
P3
KEYPAD
CABLE
1
1
1
ATS
CONTROLLER
1
TB3
GREEN
BROWN
PINK
TAN
BLACK
BLACK
BLACK
RED
GRAY
ORANGE
YELLOW
PURPLE
GRN
RED
BLK
Figure 10 CO30K/CO60K Schematic
1
P6
P7
P8
P9
COMP1 COMP2 COMP3 COMP4
AE01J-A1998-001
MICROPROCESSOR
CONTROLLER
2
1
1
KEYPAD
P2
P13
HUM
P12
TEMP
P11
ALARM OUT
P10
LED1
1
1
1
1
1
P1
CNTRL
DISPLAY
P1
1
1
39
1
DISPLAY
1
AE01J-A1998-101
BLACK
BLACK
HUMIDITY
SENSOR
1 PURPLE
2 2 YELLOW
3 3 ORANGE
TB1
RED
GREEN
BROWN
ALARM TERMINALS
10 10 BLACK
9 9
7 7
8 8
6 6
4
4 GRAY
5 5
1
CO30K/CO60K SERIES CABLE DRYER USER MANUAL
CO30K/CO60K SERIES CABLE DRYER USER MANUAL
Section 5
Maintenance
5.0
The cable dryer requires maintenance
semiannually and/or after each 3000 hours of
operation to ensure continued reliable operation.
WARNINGS Service personnel
should observe all safety regulations.
Do not perform maintenance on
equipment without first turning OFF
the main power supply. Under certain
conditions, dangerous potentials may
exist when the main power supply
controls are in the off position. Only
qualified technicians should attempt
to effect maintenance or repairs on
electrical equipment.
5.1
Annual service:
5.1.1
See compressors manufactory manual
compressor maintenance. You will also need
Compressor Filter and Oil Kit COK3060-KITIRPM for this maintenance.
5.3
Dryer:
5.3.1
Turn compressor off and allow air back pressure
gauge to reach 0 psig.
5.3.2
Remove drain lines from metal filter bowls and
than remove the metal filter bowls.
5.3.3
Replace filter elements with elements from the
Filter Element Replacement Kit COK3060-KITELMNT
5.3.4
Replace metal filter bowls.
5.3.5
Turn compressor on and verify flow from filter
bowl drain lines.
5.3.6
Filter bowl drains are factory set and should not
require adjustment.
5.3.7
Return Dryer to service.
15
CO30K/CO60K SERIES CABLE DRYER USER MANUAL
Notes
16
CO30K/CO60K SERIES CABLE DRYER USER MANUAL
Section 6
In Case of Difficulty
If you experience difficulty with your monitor or
Cable Dryer, use the troubleshooting procedures
described below. Perform the tests, inspections
and corrective actions corresponding to the
problem in the order listed. See pages 7-10
for piping connections and Figure 10 for wiring.
Section 8 lists replaceable parts.
Andrew Technical Service. If you can
not correct the problem or if there are other
difficulties, contact the Andrew Technical Service
nearest you. Telephone numbers are listed on
page 22.
NOTE: Run the Cable Dryer to dry it out
prior to connecting it to the system. Run it
until the high humidity alarm clears (if so
equipped). The drying process should take
about 45 minutes, if the membrane dryer was
not saturated. If the membrane dryer was
saturated, drying may take up to 48 hours.
WARNING: High voltage exists
inside the units. Disconnect the units
whenever performing troubleshooting
operations.
Table 4 Troubleshooting Procedure
Problem/Condition
Solution
Check AC voltage connection to the unit.
Check circuit and breaker, push to reset.
Controller display is blank.
If problem persists, disconnect controller from
ac power, open top cover and check for loose
connections (refer to the wiring diagram). Close front
door, reconnect power and turn ON unit. if problem
is not corrected, contact Andrew Technical Service for
assistance.
NOTE: This problem can be caused by a lightning
induced power surge. The controller is equipped
with surge protectors which may cause the fuse to
blow when a surge is encountered.
Check power cord to verify it is plug in correctly.
Display is blank.
Low pressure alarm on display.
Check the 6 pin power connector is plug into the
controller board correctly.
WARNING: High voltage is present inside
the enclosure and on the power supply
board at this point.Failure to comply may
result in INJURY or DEATH.
Verify that the Low Pressure Alarm Set Point is below
the compressor ON set point. Isolate the low pressure
condition by checking all fittings with soapy water.
Make sure that all system tubing is properly seated
in the fittings. Check for loose interface points and
holes in the transmission lines. Correct any conditions
that exist where pressure is leaking. If the condition
persists, call Andrew Technical Service for assistance.
17
CO30K/CO60K SERIES CABLE DRYER USER MANUAL
Problem/Condition
High Pressure alarm on display.
Solution
Verify the compressor turn OFF and high pressure
alarm settings as shown in Sections 4.2.2. The
High Presssure Alarm set point must be above the
compressor OFF set point
The High Pressure Alarm can be triggered by ambient
temperature rises. If this is a reoccurring problem,
the set points should be adjusted to increase the
differential between compressor OFF and High
Pressure Alarm values. Contact Andrew Technical
Service for further assistance.
Check the Cable Dryer for build-up of water in the filter
bowls.
Humidity alarm on display.
CAUTION: The humidity sensor is light
sensitive. DO NOT remove it from the brass
fitting when the monitor is powered up.
Unit turns on for only a few seconds, and then shuts
OFF.
If there is a build-up of water in the water filter bowl,
use a soapy water solution to check for leaky fittings in
the Cable Dryer. If no leak can be found, the problem
is probably with the compressor. Rebuild kits for each
monitor are specified in Section 8. The unit may also
be returned to Andrew for repair. Contact Andrew
Technical Service for further assistance.
Note: Once the problem has been corrected, run
the Cable Dryer off line until the humidity alarm
clears. If the membrane dryer has been saturated,
this process can take up to 48 hours of continuous
running.
Check the Vac voltage supply to the unit
18
CO30K/CO60K SERIES CABLE DRYER USER MANUAL
Section 7
Parts Replacement and Overhaul
Check website for latest updates to
the manual and parts lists.
Andrew Cable Dryers have been designed to provide
many years of trouble-free service and will require minimal maintenance. The display panel on the monitor
contains, as one of the standard features, a reading of
actual compressor run hours.
All designs, specifications and availability of
products and services presented in this bulletin
are subject to change without notice.
The following is a list of the replacement kits for the
CO30K/CO60K Cable Dryer:
Air Filters
CO30K Filter Elements
CO60K Filter Elements
CO30K-KIT-ELMNT
CO30K-KIT-ELMNT
Compressor
Ingersoll Oil/Filter Kit
CO3060K-KIT-IRPM
CoolantCO3060K-KIT-COOLNT
Oil Separator
Replacement Module Kits
Oil Separator
Oil Separator Kit
AE01K-A0862-030 or -060
AE01J-A2061-030 or -060
AE01J-A0863-030 or -060
19
NOTICE:
To provide continuous
reliable operation the Cable Dryer must be
overhauled every 3000 hours of compressor
operation. The monitor overhaul kit,
listed below, contains all necessary parts.
Alternatively, you may send your Cable Dryer
to Andrew for overhaul.
CO30K/CO60K SERIES CABLE DRYER USER MANUAL
7.1
Parts Replacement Procedures
7.5
Replace Microprocessor Board
WARNING Disconnect electrical
power from the unit before removing
the doors and replacing. Failure
to comply may result in INJURY or
DEATH.
When the controller run time reaches 3000
hours, it will be necessary to rebuild the
compressor and replace the hoses, clamps,
water and coalescent filter elements.
The microprocessor board assembly includes
the display, the microprocessor, compressor
pressure sensor, the processor containing the
microprocessor programming, as well as other
electronic components. A component failure on
the microprocessor circuit card will necessitate
replacement of the entire circuit board assembly.
To remove the microprocessor circuit board
assembly, controller service panel on the unit.
Disconnect the wiring from the microprocessor
or circuit board being careful to note the location
of each wire as it is removed. Remove the
hardware which secures the board to the door
panel, and remove the microprocessor circuit
board. Install the replacement microprocessor
circuit card assembly by reversing the above
process.
7.2
Unit Shutdown and Removal
In order to perform parts replacement on the
XT Series DryLine® Cable Dryer, it will be
necessary to turnoff the unit and remove them
from service. As this is done, one or more of the
alarms may be activated. Personnel who may
be monitoring these alarms should be informed
prior to the units being turned OFF. It will also
be necessary to close off the transmission
lines connected to the controller to avoid losing
pressure in these lines. Once these steps have
been taken, turn OFF the power to both units,
disconnect the alarm connections and unplug
the unit. The units can now be moved to a
suitable work table for parts replacement.
7.3
Service Panel Removal
Carefully loosen the screws on the service panel
that needs to be removed. You have one for the
Output Regulator, one for the Controller Board,
and one for the Back Pressure Regulator.
7.4
Replace Compressor Control PCB
The compressor control PCB controls the
compressor ON/OFF cycles, controller the
compressor current sensing. To remove the
control PCB, open the controller service panel.
Disconnect the cable connectors from the four
locations on the PCB. Remove the hardware
which screw the control PCB to the service
panel. Install the replacement control PCB by
reversing the above process.
20
CO30K/CO60K SERIES CABLE DRYER USER MANUAL
Section 8
Specifications
Table 8 Specifications for Monitor CO30K/CO60K Series
Output capacity
849,000 SLPD (30,000 SCFD) /
1,698,000 SLPD (60,000 SCFD)
Electrical power requirements
208 Vac, 60 Hz, 3 phase (compressor)
115 Vac, 60 Hz, single phase (controller module)
Length, cm (in)
125 (49)
Exposed width, cm (in)
92 (36)
Exposed height, cm (in)
107 (42)
Dew point, nominal, ° C (° F)
-45 (-50)
Output pressure
13.8 - 206.8 kPa (2.0 - 30.0 psig)
Low-pressure alarm
Programmable
High-humidity alarm
> 3 % relative humidity, factory set
Power fail alarm
Loss of input power
21
CO30K/CO60K SERIES CABLE DRYER USER MANUAL
Section 9
Customer Support
9.1
24 Hour Technical Service Hotline
Andrew maintains a Technical Service Hotline
for assistance with product repairs and service.
Andrew Corporation
3 Westbrook Corporate Center, Suite 900
Westchester, IL 60154 USA
A CommScope Company
Telephone: 708/349-3300
FAX (U.S.A.): 1-800-349-5444
Customer Support Center
International
I
Internet: www.commscope.com
From North America
Telephone: 1-800-255-1479
Telephone: +1-779-435-6500
22
9.2
Free Loaner Program
Andrew maintains a repair center for
pressurization equipment. Free loaner units are
available for use while your equipment is being
repaired by Andrew. Call our Technical Service
Hotline for details.
CO30K/CO60K SERIES CABLE DRYER USER MANUAL
23
CO30K/CO60K SERIES CABLE DRYER USER MANUAL
24