1
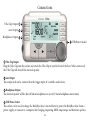
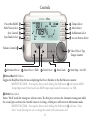
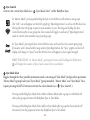
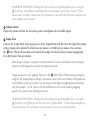
OWNER’S MANUAL VERSION 1.2.2
© 2011 Peterson Electro-Musical Products, Inc.
11601 S. Mayfield Avenue, Alsip IL 60803-2476 USA 1-708-388-3311
www.petersontuners.com
www.bodybeat.net
Table Of Contents
FCC Statements ..........................................................................................................................................................3
Warranty .................................................................................................................................................................. 4
Included Items / Charging .................................................................................................................................. 5
Connections ............................................................................................................................................................ 6
Controls ............................................................................................................................................................... 7 - 13
Basic Functions ........................................................................................................................................................ 14
LCD Areas ..................................................................................................................................................... 14 - 15
Presets ............................................................................................................................................................... 16 - 18
Selecting A Voice .............................................................................................................................................. 19 - 20
Vibe Clip .................................................................................................................................................................... 20
Tuning Reference Tone .................................................................................................................................... 21 - 22
USB Functions ......................................................................................................................................................... 23
Syncing To MIDI Clock ......................................................................................................................................... 23
MIDI Tempo Maps ................................................................................................................................... 23- 25
Updating Firmware ................................................................................................................................................ 26 - 27
Creating Groups ............................................................................................................................................... 28 - 29
Joining A Group .............................................................................................................................................. 30 - 31
Managing Groups .................................................................................................................................................... 31
Appendix A - Subdivisions ....................................................................................................................................
Appendix B - Accent Patterns ................................................................................................................................
Appendix C - Practice Patterns ..............................................................................................................................
Appendix D - Dance Patterns ..............................................................................................................................
-2-
32
33
34
35
FCC Statement
This device complies with Part 15 of the FCC Rules. Operation is subject to the following two conditions:
1.
2.
This device may not cause harmful interference, and
This device must accept any interference received, including interference that may cause undesired
operation.
Note: This equipment has been tested and found to comply with the limits for a Class B digital device, pursuant to Part 15 of the FCC Rules. These limits are designed to provide reasonable protection against harmful
interference in a residential installation. This equipment generates, uses and can radiate radio frequency
energy and, if not installed and used in accordance with the instructions, may cause harmful interference
to radio communications. However, there is no guarantee that interference will not occur in a particular
installation. If this equipment does cause harmful interference to radio or television reception, which can be
determined by turning the equipment off and on, the user is encouraged to try to correct the interference by
one or more of the following measures:
•
•
•
Increase the separation between the equipment and receiver
Connect the equipment into an outlet on a circuit different from that to which the receiver is connected.
Consult the dealer or an experienced radio/TV technician for help.
Caution
Any changes or modifications not expressely approved by the party responsible for compliance could cause
the module to cease to comply with FCC rules part 15, and thus void the user’s authority to operate the
equipment.
-3-
Warranty
We warrant this product to be free of defects in materials or workmanship for a period of ONE year after
delivery to the original purchaser. Our obligation under this warranty is limited to the replacement or
repair of any part or parts which prove upon our examination to be defective.
This warranty does not apply to damage resulting from transportation, misuse, abuse, or alteration. The
complete unit must be returned to our factory, transportation charges prepaid. In order to speed the
return of the unit to you, it is recommended that for all repairs, other than those required as a result of
shipping damage, you deal directly with our factory. In case of damage in shipment, a claim should be
filed with the carrier. Be sure to include a brief description of the difficulty you are experiencing and your
return address. Many issues can easily be resolved by utilizing the extensive knowledge base and Helpdesk
utility on our website at http://www.bodybeat.net/helpdesk.
The above warranty is contingent upon registration within 10 days of the date of receipt of the product by
the original purchaser. The warranty conveys specific legal rights to the purchaser; other rights vary from
state to state and internationally.
Register on-line at: http://www.bodybeat.net/warranty
-4-
Thank you for your purchase of the Peterson BodyBeat Sync BBS-1. Please take the time to read this
instruction manual so that you may get the most out of it. This metronome represents the ultimate in
musical tempo monitoring devices. As a fully featured metronome, it is capable of transmitting the beat by
visual, aural and tactile means. Wireless functionality allows two or more BodyBeat Syncs to work in synchronicity with one another, allowing the networking of multiple units on stage, in the recording studio,
band room or anywhere the precise synchronization of a performance and its performers is required.
Included Items
1 BodyBeat Sync Metronome
1 Vibe Clip
1 Owner’s Manual
1 3.7V Lithium Ion Battery
1 Mini USB Cable
USB/Power Socket
Power
The BodyBeat Sync contains a powerful internal rechargeable Lithium Ion battery. Before initial use, this
battery will need to be installed and charged fully, using either a USB power adapter, or by connecting
the BodyBeat Sync to a computer USB port via the USB cable. The BodyBeat Sync will not run off of USB
power alone. Charging time is approximately 1.5 hours.
Battery Conservation
The BodyBeat Sync will power off after 10 minutes of inactivity if the metronome is not running. In
addition, the LCD backlight will turn off after 10 seconds of inactivity. If the battery voltage becomes too
low, the BodyBeat Sync will power off to protect its Lithium Ion battery.
-5-
Connections
Vibe Clip Output
Aux Output
Headphone Output
USB/Power Socket
Vibe Clip Output
Plug the Vibe Clip into this socket and attach the Vibe Clip to your belt to feel the beat. When connected,
the Vibe Clip will shut off the internal speaker.
Aux Output
This output jack can be connected to the trigger input of a suitable audio device.
Headphone Output
The internal speaker will be shut off when headphones are used. (3.5mm headphone connection).
USB/Power Socket
This socket can be used to charge the BodyBeat Sync’s internal battery; power the BodyBeat Sync from a
power supply; or connect to a computer for charging, importing MIDI tempo maps and firmware updates.
-6-
Controls
Preset/Bar/MIDI
Pitch/Voice Select
Sync Control
Sync Mode Select
Tempo Select
Meter Select
Subdivision Select
Accent Pattern Select
Volume Control
Previous Preset
Value Wheel / Tap
Tempo Control
Store Preset / Shift
Next Preset
Panel Lock
Start/Stop - On/Off
Preset/Bar/MIDI Select
Toggles the BodyBeat Sync between displaying the Preset Number or the Bar/Measure counter.
SHIFT FUNCTION - Pressing this button while holding the Shift button will activate MIDI Tempo Map mode if there have been MIDI tempo maps loaded into memory via USB.
Pitch/Voice Select
Enters “Pitch” mode for tuning to a reference note. The first press activates the chromatic tuning note while
the second press activates the variable Concert A setting. A third press will return to Metronome mode.
SHIFT FUNCTION - Pressing this button while holding the Shift button will enter “Voice
Select” mode allowing the user to change the sound of the metronome click.
-7-
Sync Control
Activates the current Sync Mode (see
‘Sync Mode Select’ ) of the BodyBeat Sync.
In “Master Mode”, pressing and holding the Sync Control Button will initiate a new group.
The “O.R.” icon will appear on the LCD signifying “Open Registration” as well as the Wireless Icon.
During this time the group is open for new members to join. Pressing and holding the Sync
Control button after a new group has been created will toggle in and out of “Open Registration” mode to control when members may join the group.
In “Sync Mode”, pressing the Sync Control Button once will search for the nearest open group.
If a master unit is found within range and in Open Registration, the “Sync” graphic on the LCD display will change to “Sync’d” and the Wireless Icon will appear to show signal strength.
SHIFT FUNCTION - In “Master Mode”, pressing this button while holding the Shift button
will display the number of Sync’d units connected to your Master.
Sync Mode Select
Toggles through the three possible metronome modes consisting of “Solo Mode” (independent operation),
“Master Mode” (group leader) and “Sync Mode” (group member). “Master Mode” and “Sync Mode” then
require pressing the SYNC button to activate the selected mode. (see
‘Sync Control’ )
Pressing and holding Sync Mode Select while in Master Mode after a group is established will destroy the group and return the BodyBeat Sync to Solo Mode.
Pressing and holding Sync Mode Select while in Sync Mode after a group has been joined will disconnect from the group and return the BodyBeat Sync to Solo Mode.
-8-
POWER ON FUNCTION - Holding this button while turning the BodyBeat Sync on using the
Start/Stop - On/Off button will display the current firmware version for 4 seconds. ( If this function does not work, it means that you’re firmware is even older than this feature and you will need to update your firmware )
Volume Control
Adjusts the volume of either the on-board speaker or headphones for all audible output.
Tempo Select
Activates the Tempo Mode. Subsequent presses of the Tempo Button will alter the active digit of the tempo
setting. Tempo can be adjusted by whole beats per minute or 1/10th beats per minute. Once selected,
the
Value Wheel will increment or decrement the tempo value by the desired amount ranging from
10 to 280 Quarter Notes per minute.
Note: Tempo is always set in quarter notes per minute. Be sure to calculate the correct tempo for meters in which the quarter note does not represent one beat.
Tempo can also be set by “tapping” the beat on the
Value Wheel. When entering a tempo by using the Tap Tempo feature, each tap is assumed as 1 beat of the current Meter setting unless an Accent Pattern is selected, in which case you may enter the tempo by tapping the accented beats only. For example - in 7/8 with a 2-2-3 Accent Pattern you can set the tempo by tappping quarter note, quarter note, dotted quarter note.
POWER ON FUNCTION - Holding this button while turning the BodyBeat Sync on using the
Start/Stop - On/Off button will start the unit in “Update Mode” . Do this before attempting to load new firmware. You will need to restart the unit to return it to normal operation.
-9-
Meter Select
Activates the Meter Mode. Subsequent presses of the Meter Button will toggle between the
Beats Per Measure setting (numerator) and the Beat Value setting (denominator). The active component
will flash with the Meter icon. Once selected, the
Value Wheel will increment or decrement the active
component.
The Beats Per Measure parameter can be adjust from 1 to 12. Adjusting the Beats Per Measure parameter will clear any active Accent Pattern as the list of available Accent Patterns is dependent
on Beats Per Measure.
The Beat Value parameter has a list of possible values consisting of 2,4,8,16. Adjusting the
Beat Value parameter will reset any Subdivision setting as the list of available Subdivisions is dependent on the Beat Value.
Subdivision Select
Activates the Subdivision Mode. Once selected, the
the list of available subdivisions.
Value Wheel will increment or decrement through
Note: The list of available subdivisions is dependent on the Beat Value chosen within the Meter
setting. For a complete list of available subdivisions relative to the Meter setting, see
Appendix A. - Subdivisions
Accent Pattern Select
Activates the Accent Pattern Mode. Once selected, the
Value Wheel will increment or decrement
through the list of available Accent Patterns. Accent Patterns help in counting complex Meters by dividing
the total Beats Per Measure into different combinations of 2 and 3 counts.
-10-
Note: The list of available Accent Patterns is dependent on the Beats Per Measure Value chosen
within the Meter setting. Since the list of available Accent Patterns consists of every
possible combination of 2 and 3 that will add up to the current Beats Per Measure, there are no
Accent Patterns available for Meters with a Beats Per Measure setting of 1-3. For a complete list of available Accent Patterns relative to the Meter setting, see Appendix B. - Accent Patterns.
SHIFT FUNCTION - Pressing this button while holding the Shift button will toggle between “Normal” and “Accents Only” modes. In “Accents Only” mode, the dashes between the numbers will disappear, signifying that the unaccented beats will not be heard. When there is no accent pattern selected, toggling to “Accent Only” mode will result in only the downbeat of each bar being heard.
Value Wheel / Tap Tempo Control.
Turning the wheel will alter the value of whatever parameter has been selected using the right row of
buttons
- . Rotating the wheel clockwise increments the value while counter-clockwise decrements
the value. If a parameter has not recently been selected or changed ( within 8 seconds ), the Value Wheel
will affect the tempo setting as default. Pressing in or down on the wheel repeatedly will set the tempo via
Tap Tempo Mode. For more information on Tap Tempo see
Tempo Select.
Note: When editing preset parameters, the “E” icon will appear at the top of the LCD to signify that a preset has been edited but not stored. Your changes will be lost if the preset is not stored.
Previous Preset / Previous Bar / Seek
Steps backwards through the list of 100 available user presets when the Preset is displayed on the LCD.
Steps backwards through the bars or measures of a preset or MIDI tempo map when Bar is displayed on
the LCD. This button is also used to step backwards through voices when in Voice Selection Mode .
-11-
SHIFT FUNCTION: - If Bar is currently displayed on the LCD, pressing this button once while holding the Shift button
will ‘seek’ backwards to the last bar or measure the user started from.
Pressing again while holding shift will return to Bar 1.
Store Preset / Shift
Stores the current settings ( Tempo, Meter, Subdivision, Accent Pattern ) to the desired Preset location.
Pressing Store will clear the display, leaving only the word Preset and a flashing number that is selectable
from 1 to 100. Pressing Store again will save all settings to the selected number location. This allows for
easy copying of presets by selecting a previously stored preset, pressing store, and saving to a new location.
SHIFT FUNCTION: - If pressed and held before pressing another button, this button is used to alter the function of other controls on the BodyBeat Sync. See “SHIFT FUNCTION” within each button description.
Next Preset / Next Bar / Seek
Steps forwards through the list of 100 available user presets when the Preset is displayed on the LCD. Steps
forwards through the bars or measures of a preset or MIDI tempo map when Bar is displayed on the LCD.
This button is also used to step forwards through voices when in Voice Selection Mode
.
SHIFT FUNCTION: - If Bar is currently displayed on the LCD, pressing this button once while holding the Shift button
will ‘seek’ forwards to the last bar or measure the user started from.
Pressing again while holding shift will return to Bar 1.
-12-
Panel Lock
Sliding this switch to the right will disable all of the controls on the BodyBeat Sync to prevent the
accidental alteration of any settings during use. A “locked” icon will be revealed on the switch as well as on
the LCD display. Sliding the switch back to the left will reveal an “unlocked” icon and will re-enable the
controls for use. When locked, the “locked” icon will flash when any button is pressed to remind the user
that the panel has been locked.
The Panel Lock switch does not disable the ability to power the unit on or off or to adjust the volume. Powering the unit off does, however, require the use of the Shift Key to avoid accidentally turning the unit off during normal operation. See
Start/Stop On/Off.
Start / Stop - On / Off
Starts and Stops the Metronome both in normal Metronome Preset mode and in MIDI Tempo Map
Playback mode. When the unit is off, pressing and holding this button for 2 seconds will power the unit
on.
SHIFT FUNCTION: - When the unit is on, pressing and holding this button for 2 seconds while holding the Shift button
will power the unit off.
Note: The BodyBeat Sync can start in different modes of operation by holding other buttons while powering on. See sections entitled “POWER ON FUNCTION” in
Sync Mode Select and
Tempo Select.
-13-
Basic Metronome Functions
LCD Display Areas
Preset / Voice / Bar / Note Display - In normal metronome operation, these three digits will display
either the bar counter or the current active preset. In tuning mode, the right-most digit will display
the note letter along with the sharp and flat symbol while the left-most digit will display the octave
number. In voice select mode, the center digit will display voice numbers 1-4. Practice Patterns beyond preset 100 will display as 3 digit alphanumeric abbreviations. In the event that a problem occurs
with your BodyBeat Sync‘s software, this area may also be used to display an error code. A list of error
codes can be found at www.BodyBeat.net.
Tempo / Concert A Display - In normal metronome operation, these four digits will display the beats
per minute of the active preset or tempo map in 1/10th BPM resolution from 10-280. Note the decimal point. In Tuning mode, the Concert A reference will be displayed in 1/10th Hz resolution from
390Hz to 490Hz.
Sync Mode Display - Displays the current sync mode. The
has successfully joined a group.
will appear in Sync mode when the unit
Meter Display - The meter or time signature of the active preset or tempo map is displayed here. The
Beats Per Measure (numerator) range is 1-12, while the Beat Value (denominator) can be either 2,4,8
or 16.
-14-
Accent Pattern Display - Displays the accent pattern of the active preset. If no accent pattern is selected
or there are no available accent patterns for the current meter setting, this section will not be visible.
A combination of and icons that add up to the current Beats Per Measure parameter is displayed.
When the metronome is playing, an underline travels through the pattern, left to right, to signify
which section is currently playing. Accent Patterns are not selectable in either Tempo Map playback or
Practice Pattern modes.
Available Accent Patterns are dependant upon the current Beats Per Measure parameter of the Meter setting. For more about Accent Patterns, see Appendix B - Accent Patterns
Conductor Bars / Updating Display - In normal metronome operation, these five bars will animate a
“rise and fall” that coincides with the beat, much like a conductor’s downbeat motion. If the tempo
becomes too fast to visually convey the beat, the conductor bars will conduct the whole measure as
one revolution. When updating firmware via the USB port, the updating label is displayed while the
bars animate to signify the progress of the update.
Subdivision Display - Displays the subdivision of the active preset. Subdivisions will always display
correctly notated as one whole beat of the current meter or time signature. Subdivisions are not
selectable in either Tempo Map playback or Practice Pattern modes.
Available Subdivisions are dependant upon the current Beat Value parameter of the Meter setting. For more about Subdivisions, see Appendix A - Subdivisions
Icon / Status Display
MIDI Indicator - When playing back a MIDI Tempo Map, the MIDI icon will appear as well as the
number ( 1 - 9 ) of the tempo map being played. When the BodyBeat Sync is receiving MIDI Clock via
the USB port, only the MIDI icon will display.
Open Registration Icon - Appears when a BodyBeat Sync in Master Mode starts a new group or
reopens an existing group. Members can only join when this icon is displayed on the Master.
Edited Icon - Appears when a preset parameter has been edited but not yet saved.
-15-
Wireless Indicator - The Wireless Indicator will appear when in any other mode than Solo Mode.
While in Master Mode, it indicates that there is an active group led by that unit. In Sync Mode, it
displays the various levels of signal strength being received from the master.
Panel Lock Icon - This icon appears when the Panel Lock Switch has been set to the “lock” position,
disabling most controls. When a button is pushed and the panel has been locked, the icon will flash to
remind the user that the panel has been locked.
Note: The Panel Lock Icon will also flash when a unit has been “sync’d” and a
button is pressed to indicate that the metronome settings of a sync’d unit cannot be
altered.
Battery Level Indicator - Displays the amount of battery life remaining in the rechargeable Lithium Ion
battery. When the unit is charging, the battery indicator will animate.
Presets
The BodyBeat Sync’s default preset memory is loaded with the same preset in all 100 preset locations. This
default preset consists of the following parameters:
Tempo: 120 bpm
Meter or Time Signature: 4/4
Subdivision: Quarter Note
Accent Pattern: None
Above Preset 100 are 14 Practice Patterns. These patterns generally span 2 bars or measures and only allow
tempo alteration and storing. Meter is fixed and uneditable. Subdivisions and Accent Patterns are not used.
For more detail on Practice Patterns, see Appendix C - Practice Patterns
-16-
Creating and Storing Presets -If the Preset / Voice / Bar / Note Display is not currently displaying the Preset
Preset button until it does so. To create a preset, you may simply edit the current setlabel, press the
tings or use the Next and Previous buttons to navigate to a new preset location. Access the various settings
within a preset by pressing the corresponding button ( Tempo,
Meter,
Subdivision,
Accent ).
Then, adjust the value of that setting by rotating the
Value Wheel.
Tempo - Press the Tempo Button one or more times to toggle between adjusting in whole number increments and 1/10th increments. Tempo range is from 10 - 280 quarter notes per minute.
Rotate the value wheel to change.
Meter - Press the Meter Button one or more times to toggle between adjusting the Beats Per
Measure parameter ( 1 - 12 ) and the Beat Value parameter (2,4,8,16). Rotate the value wheel to change.
Subdivision - When the Beat Value parameter of the Meter is adjusted, the Subdivision will reset
to the first subdivision in the list of available subdivisions for that meter, which is always one whole, unsubdivided beat for that meter. Rotate the value wheel to change. Selectable values are always represented on the display as a correctly notated full beat of the selected meter.
See Appendix A - Subdivisions
Accent Pattern - When the Beats Per Measure parameter of the Meter is adjusted, the Accent
Pattern will reset to NO Accent Pattern, as the list of available Accent Patterns has changed. Rotate the value wheel to change.
You will notice the
icon will appear in the Icon / Status Display when you have changed a setting within
a preset. This signifies that the preset has been edited, but not yet stored. Navigating away from this preset
will discard the changes you may have made and revert to the unedited preset. The
will disappear as
the preset is no longer edited and all changes have been lost.
-17-
Store Button. All settings
Once you are satisfied with the changes you have made to a preset, press the
on the LCD display will disappear leaving only a flashing Preset label and a preset location number. At this
point you may choose a different location to save your new preset using the
Previous and
Next
buttons, or you may continue to store the preset in its existing location. Pressing the
Store Button
again will store the preset into the location you have chosen, the LCD display will return to its normal state
and the
will no longer be displayed.
Note: This makes it very easy to copy presets. Simply locate the preset you would like to copy, press Store, and choose a new location number to copy it to.
Edited Icon
Store Button
Navigate through your stored Presets by using the Next and Previous buttons. Holding either
button will gradually increase the rate of selection in the respective direction.
-18-
Selecting a Metronome Voice
The BodyBeat Sync has four available voices, or sets of sounds for metronome playback when using the
BodyBeat Sync as an audio metronome. Each voice or sound set has three distinct parts, each playing a
different role within the rhythmic pattern. The available metronome voices are 1.) Rimshot, 2.) Clave,
3.) Wood Block and 4.) Beep.
To change the metronome voice, press and hold the
Shift button and then press the
Pitch/Voice button. The Preset / Voice / Bar / Note Display will change to Voice and display a number from 1
to 4. Use the
Previous and
Next buttons to select a voice. Voices can be changed while the
metronome is playing.
Pitch /Voice Button
Shift Button
Note: Voice selection has no effect on the Vibe Clip when using the BodyBeat Sync as a tactile, pulsating metronome.
-19-
Each voice has a high, medium and low voice part. The highest pitched part within the voice represents
the downbeat of the bar or measure. The medium pitched part is heard when an accent pattern is active,
and will represent the accented beats within the measure. The lowest pitched voice part indicates a normal
beat. Subdivisions are also represented using the lowest pitch, but are played at a slightly lower volume
than normal beats.
Note: When using the BodyBeat Sync with the Vibe Clip as a tactile, pulsating metronome, the voice parts are instead felt as levels of intensity. High, medium and low intensity vibrations
correspond to the high, medium and low pitches within the voices.
Using the BodyBeat Sync with the Vibe Clip
The BodyBeat Sync can be used as a tactile, pulsating metronome with the help of the Vibe Clip. The
built-in speaker will automatically be silenced as well as the Headphone Output. The Vibe Clip allows the
rhythm to be transmitted from the BodyBeat Sync to the user invisibly and silently via vibration. Apply the
Vibe Clip to one of the following areas:
1.
2.
3.
4.
5.
Waist area along the belt-line.
Hip area near the pelvic bone
Nape of the neck
Shoe top
Sleeve or pocket
Note: Be sure that the correct ( capsule ) side of the Vibe Clip is facing the body. If the vibration is
too intense, turn the capsule away from the body.
-20-
Tuning Reference Tones
The BodyBeat Sync can be used to generate a tuning reference tone through the on-board speaker or
headphones. The Concert A setting can be adjusted from 390-490Hz in 1/10th Hz increments. Chromatic
pitches from C1 to C8 can be generated based on the Concert A setting. The BodyBeat Sync is set at
A = 440Hz as default.
Press the
Pitch/Voice Button once. All metronome settings will disappear and the Note Label will begin flashing. The BodyBeat Sync will emit a reference tone equal to the chromatic pitch and octave number
that is displayed in the Preset / Voice / Bar / Note Display area. Use the Value Wheel
to adjust the chromatic
pitch to your preference.
Pitch /Voice Button
Note: Tuning Reference Tones will also be transmitted from a Master when used in a group.
-21-
Pitch/Voice Button a second time. The Concert A label will flash indicating that you can now
Press the
adjust the Concert A Hertz setting from 390-490Hz. Use the
Value Wheel to adjust. The chromatic
reference tones will vary in pitch based upon the Concert A setting you have chosen.
Pitch /Voice Button
Value Wheel
Note: Pressing the
Start/Stop button at any time while in Tuning Mode will revert back to Metronome Mode and begin playing the current Metronome settings. Also, pressing any
button related to the metronome function will revert to Metronome mode.
-22-
USB Functions
Other than the hardware control interface, the BodyBeat Sync’s metronome can be driven by two
additional methods with the help of the USB port located on the right side of the unit.
Receiving MIDI Clock - Connect the BodyBeat Sync to a computer using the provided mini USB cable.
After the system recognizes and installs the device automatically, select USB Audio Device as the MIDI
output port to transmit a MIDI clock signal. When this signal is present, the tempo setting on your BodyBeat Sync cannot be adjusted because it is under the control of your MIDI capable software.
Note: Meter, Subdivision and Accent Pattern can all be adjusted when syncing to a MIDI clock signal. MIDI clock will only affect the BPM or Tempo of your unit and is not capable of setting more complex parameters such as Beats Per Measure, or Beat Value. You will need to manually set these parameters for the BodyBeat sync to count correctly in respect to your MIDI software.
Importing MIDI files as Tempo Maps - The BodyBeat Sync is capable of storing nine MIDI Tempo Maps
in its local memory. A MIDI Tempo Map is a MIDI file that has been imported into the BodyBeat Sync
via the BodyBeat Sync USB software. Once imported, only the number of bars, meter changes, and tempo
changes are stored in the BodyBeat Sync memory. All instrument, track and pitch information is ignored.
It is then referred to as a MIDI Tempo Map. Up to 999 bars can be stored in each of nine memory
locations.
MIDI Tempo Maps can also be created from scratch using a free online tool. To download the latest
version of the USB software and obtain further instruction on how to import MIDI files as MIDI Tempo
Maps, or to design your own Tempo Maps, visit http://www.bodybeat.net/.
-23-
Connect your BodyBeat Sync to a computer using the provided mini USB cable. After the
computer recognizes and installs the device automatically, open the BodyBeat Sync USB software. ( Select
USB Audio Device as both the MIDI In and MIDI Out Devices in Windows XP Only ) For each of the 9
memory slots, you may browse to the location in which you saved a MIDI tempo map and select the .MID
file.
Count In: Set a number of bars to count in
for each tempo map by using the up and down
arrows or simply typing in the number. The
BodyBeat Sync will count the specified number of bars in the same meter and tempo of the
current bar when play is pressed. The count
in bars will be shown as negative numbers.
You may set count in from 0-8 bars ( 0 for no
count in ).
Loop: Checking this box will continuously
loop your MIDI tempo map until it is manually stopped. This makes it easy to rehearse
short multi-bar patterns that contain meter
and/or tempo changes. Once you have finished selecting MIDI tempo maps, press the button labeled “Sync” to transfer MIDI
tempo map data to your BBS-1. You may archive and recall an entire bank ( all 9 slots ) of MIDI tempo
maps into one “backup” file using the “Load File” and “Save File” buttons. Pressing “Clear All” will remove
all MIDI tempo map files from all 9 locations.
-24-
Selecting a MIDI Tempo Map - Once you have imported a MIDI Tempo Map into at least one memory slot
of the BodyBeat Sync, press the
Preset/MIDI Button while holding the
Shift Key. The
icon
will appear along with a number if there is at least one MIDI Tempo Map stored on the device. Use the
Value Wheel to select the tempo map you wish to play. Locations without MIDI Tempo Maps will not
be selectable.
Preset/MIDI Button
Shift Button
Value Wheel
Press the
Start/Stop Button to play and pause your MIDI Tempo Map. The Preset / Voice / Bar / Note
Display will show the current bar of the Tempo Map. The
Previous and
Next Buttons can be used
Shift Button to “seek”
to navigate through the bars of the tempo map. Combine this with the use of the
to the last starting point, or to skip back to the beginning of the tempo map.
Note: Currently, the BodyBeat Sync will not play transitional tempo changes that occur
gradually over multiple bars. The tempo change will happen only at the downbeat of each bar.
-25-
Updating The Firmware - Turn off your BodyBeat Sync and connect it to a computer using the provided
Tempo Select Button, then press and hold the
Start / Stop - On
mini USB cable. Press and hold the
/ Off Button to power the unit on. The BodyBeat Sync will load into Update Mode, and the Updating Icon
will appear in the lower right corner of the LCD display.
Tempo Select
Plugging the BBS-1 into the USB port may automatically turn the unit on in some cases.
Holding down the
Tempo Select Button when this happens will result in the BBS-1 loading into
Update Mode as well.
Note: You will need to have downloaded and installed the BodyBeat Sync USB software for your particular Operating System as well as downloaded the latest firmaware *.bin file. The latest ver
sions of both will always be available at the following locations.
USB software: http://www.bodybeat.net/syncUSBpc or http://www.bodybeat.net/syncUSBmac
Latest Firmware: http://www.bodybeat.net/syncfirmware
-26-
After the computer recognizes and installs the device automatically, open the BodyBeat Sync
USB software ( Select USB Audio Device as both the MIDI In and MIDI Out Devices in Windows XP
Only ). A “Load” button will become active. Press the “Load” button to browse to the location in which
you saved your downloaded firmware update and select the file. BodyBeat Sync firmware files will always
have the extension .BIN.
Once you have selected the firmware file,
press the Update button to allow the software
to be transferred to the BBS-1 hardware.
When the transfer has finished the BodyBeat
Sync USB software will notify you that the
update is complete. You will need to reboot
your BBS-1 by turning it off and then back
on.
This process must be repeated for every
BodyBeat Sync in your group. A bodyBeat
Sync with older firmware will not synchronize to a designated “Master” that has a
newer version of firmware.
Note: Holding the
‘Sync Mode Select’ button while turning the BodyBeat Sync on using the
Start/Stop - On/Off button will display the current firmware version for 4 seconds. ( If this function does not work, it means that you’re firmware is even older than this feature and you will need to update your firmware )
-27-
Creating, Joining and Managing Groups
The BodyBeat Sync has the ability to form synchronized, wireless groups of unlimited members. Any
BodyBeat Sync can either function as a “Master” or leader of the group, or as a “Sync” unit or member.
Creating or joining a group is simple. Once a group is formed, each member or leader of the group will
remember its group and its role within the group even when shut off and on.
By default the BodyBeat Sync is set to “Solo” mode. This means that the wireless circuitry is not active and
the unit is not searching for a group or communicating with other units.
Creating a Group - Press the
Mode Button to cycle through the 3 basic modes of function. When the
Sync Mode Display reads “Master”, you are ready to create a group.
Mode Button
-28-
Sync Button. You will see the Wireless Icon animate as your unit is creating a new
Press and hold the
group. When the group is ready for members to join, the
icon will appear signifying
Open Registration.
Sync Button
At this point, any BodyBeat Sync within range is able to join your group. Pressing and holding the
Sync Button subsequently ( on the Master unit ) will switch in and out of Open Registration mode allowing new members to join, or closing your group so no further members can join. Pressing and holding
the
Sync Mode Button will break the group and return to Solo Mode. Any members who are a part of
the group will be “un-syncd”.
SHIFT FUNCTION: Pressing and Holding the
Shift Button and pressing the
will display the number of units currently sync’d to the master.
Sync Button Note: As long as the unit stays in Master Mode, it can be powered off and on and it will retain all group information. At the next power on, it will automatically recreate the same group
and any prior members will automatically rejoin if they are on and within range.
-29-
Mode Button to cycle through the 3 basic modes of function. When the
Joining a Group - Press the
Sync Mode Display reads “Sync”, you are ready to join an existing group. Be sure there is a unit set to Master
Mode, and in Open Registration.
Mode Button
Press ( do not need to hold ) the
is trying to locate a group.
Sync Button. You will see the
Sync Button
-30-
Wireless Icon animate as your unit
When a group is found, your BodyBeat Sync will join the nearest group or group with the strongest signal.
the Wireless icon will stop animating and will display the signal strength of the nearest Master unit.
A will be added to the
icon to read
. Your BodyBeat Sync is now a member of the group
and under control of the group’s Master unit.
At this point, all controls on the SYNC’D unit are locked with the exception of the Volume Control and
the Power On/Off Button. You may also change the Metronome voice while SYNC’D. When any other
control is pressed, the LCD display will flash the locked icon as well as the Sync’d icon to remind you that
you are SYNC’D and unable to change settings.
Sync Mode Button will break away from the group and return to Solo Mode.
Pressing and holding the
Simply returning to Sync Mode and pressing the Sync Button again will “re-sync” to the same Master
unless there is a closer Master in Open Registration.
Note: As long as the unit stays in Sync Mode, it can be powered off and on and it will retain all group information. At the next power on, it will automatically try to join the same group
if the original Master unit is on and within range. Since the group has already been formed
prior, the Master unit does not need to be in Open Registration.
Managing Groups - Since the BodyBeat Sync operates on a network protocol similar to home WiFi, there
is no danger of interference between multiple groups in the same proximity. Each group is unique and will
operate independently, even in the same room.
In Master Mode, any of the previously discussed Metronome functions will be shared with the group.
Syncing to MIDI clock, or playing MIDI Tempo Maps will transmit to any unit that has joined the group.
-31-
Appendix A - Subdivisions
The available list of subdivisions varies upon the Beat Value parameter of the Meter setting. Subdivisions
will always be notated correctly as one whole beat of the selected meter. The following chart shows the
available subdivisions in relation to meter. The Beats Per Measure parameter does not affect subdivisions
and is shown in grey.
-32-
Appendix B - Accent Patterns
The available list of accent patterns varies upon the Beats Per Measure parameter of the Meter setting.
Accent Patterns will always be notated as a combination of 2 and 3 counts that add up to the Beats Per
Measure parameter of the selected meter. The last accent pattern in each list is shown as - - - - - - and
signifies no Accent Pattern AND no accented downbeat.
Example:
Note: Holding the Shift Button and pressing Accent Pattern will toggle between “Normal” and
“Accents Only” modes. In “Accents Only” mode, the dashes between the numbers will disappear, signifying that the unaccented beats will not be heard.
-33-
with
sounds like
Appendix C - Practice Patterns
There are 14 additional Presets beyond the initial 100 user definable memory locations in the BodyBeat
Sync that are named rather than numbered. These additional presets are two bar patterns in which only
the tempo setting is editable / storeable. Subdivision and Accent Pattern are not applicable to these
patterns, and do not appear on the LCD display.
2 - 3 Son Clave
3 - 2 Son Clave
2 - 3 Rumba Clave
3 - 2 Rumba Clave
2 - 3 Cascara with Rumba Clave Accents
3 - 2 Cascara with Rumba Clave Accents
2 - 3 Bossa Nova Clave
3 - 2 Bossa Nova Clave
2 - 3 6/8 Son Clave and Bell Pattern
3 - 2 6/8 Son Clave and Bell Pattern
2 - 3 6/8 Rumba Clave and Bell Pattern
3 - 2 6/8 Rumba Clave and Bell Pattern
Samba Agogo A - B Direction
Samba Agogo B - A Direction
-34-
Appendix D - Dance Patterns
At the very end of the Preset List are 14 more practice patterns geared toward dance instruction. They are
numbered 1-14 “D”. These patterns are notated in the way in which they correspond to the bars and time
signatures of the related musical genre. The accented step does not always fall on the downbeat.
Rumba, Bolero, Nighclub
Waltz, Viennese Waltz, Polka
Foxtrot 1
American Tango
Foxtrot 2
Mambo
Cha Cha
Salsa & Bachata
Samba
Merengue & 4 Count Hustle
Swing 1
3 Count Hustle
Swing 2
Country 2 Step
-35-
In addition to this owner’s manual, the official BodyBeat website at www.bodybeat.net contains a complete
FAQ section and a library of video tutorials.
© 2011 Peterson Electro-Musical Products, Inc.
11601 S. Mayfield Avenue, Alsip IL 60803-2476 USA 1-708-388-3311
www.petersontuners.com
www.bodybeat.net