1
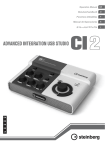
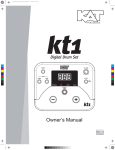
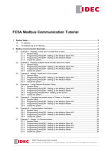
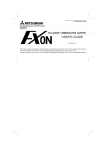
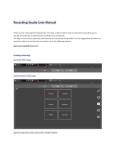
®
Electronic Drum/Percussion Pad Sound Module
ktmp1
Owner’s Manual
INFORMATION FOR YOUR SAFETY!
PRECAUTIONS
This device complies with Part 15 of the FCC Rules.
Operation is subject to the following two conditions:
(1) this device may not cause harmful interference, and
(2) this device must accept any interference received,
including interference that may cause undesired operation.
PLEASE READ CAREFULLY BEFORE PROCEEDING
Please keep this manual in a safe place for future reference.
Power Supply
Please connect the designated AC adaptor to an AC outlet of
the correct voltage.
FCC COMPLIANCE NOTICE
Do not connect it to an AC outlet of voltage other than that for
which your instrument is intended.
This equipment has been tested and found to comply with the
limits for a Class B digital device, pursuant to Part 15 of the FCC
rules. These limits are designed to provide reasonable protection
against harmful interference in a residential installation. This
equipment generates, uses and can radiate radio frequency
energy and if not used in accordance with the instructions, may
cause harmful interference to radio communications and there
is no guarantee that interference will not occur in a particular
installation. If this equipment does cause harmful interference
to radio or television reception, which can be determined by
turning the equipment off and on, the user is encouraged to
try to correct the interference by one or more of the following
measures: reorient or relocate the receiving antenna, increase
the separation between the equipment and receiver, connect
the equipment into an outlet on a circuit different from that of
the receiver. Consult the dealer or an experienced radio/TV
technician if help is needed with interference.
Unplug the AC power adaptor when not using the instrument,
or during electrical storms.
Connections
Before connecting the instrument to other devices, turn off the
power to all units. This will help prevent malfunction and / or
damage to other devices.
Location
Do not expose the instrument to the following conditions to
avoid deformation, discoloration, or more serious damage:
•
•
•
•
•
NOTE: FMIC will not be responsible for unauthorized equipment
modifications that could violate FCC rules, and/ or void product
safety certifications.
Direct sunlight
Extreme temperature or humidity
Excessive dusty or dirty location
Strong vibrations or shocks
Close to magnetic fields
Interference with other electrical devices
Radios and televisions placed nearby may experience
reception interference. Operate this unit at a suitable distance
from radios and televisions.
CAUTION
The normal function of the product may be disturbed by
Strong Electro Magnetic Interference. If so, simply reset
the product to resume nor ration by following the owner’s
manual. In case the function could not resume, please use
the product in other location.
Cleaning
Clean only with a soft, dry cloth.
Do not use paint thinners, solvents, cleaning fluids, or chemicalimpregnated wiping cloths.
Handling
Do not apply excessive force to the switches or controls.
CAUTION
Do not let paper, metallic, or other objects into the instrument. If
this happens, unplug the AC adaptor from the wall outlet. Then
have the instrument inspected by qualified service personnel.
Changes or modifications not expressly approved by the
party responsible for compliance could void the user’s authority to operate the equipment.
Disconnect all cables before moving the instrument.
1
Contents
1. Overview
3
2. Panel Description
3
2.1 Front Panel Description
3
2.2 Rear Panel Description
4
3. Basic Operations
5
3.1 Adjust the pad voice tuning
5
3.2 Adjust the reverb level
5
3.3 Assign an instrument to a pad
5
3.4 Adjust the panning of pad voices
6
3.5 Adjust the sensitivity of a pad
6
3.6 Adjust the level of a pad
6
3.7 Adjust the midi note of a pad
7
3.8 Assign a pad to HI-HAT pad control
7
4. Appendixes
8
4.1 Voice List
8
4.2 MIDI Implementation Chart
9
2
1. Overview
The KAT KTMP1 is a self-contained electronic percussion instrument with four drum pads, 50 sounds, audio and
trigger I/O. The product is mountable using the included Module Mount or a standard snare drum stand for use in
drum, percussion, and other performance setups.
The following is a list of the key features of the design:
• Portable compact drum pad unit with 50 high quality sounds
• Affordable and extremely versatile
• Four natural feel velocity sensitive rubber pads
• Hi-Hat and Bass Drum Pedal input allows you to play this as a drum kit
• Sounds can be tuned to your preference as well as panning and reverb control
• USB and MIDI output allows for PC connectivity to play parts right into your DAW or trigger external sound sources
• Ideal for stage and studio use
2. Panel Description
2
3
4
1
5
6
7
8
2.1 Front Panel Description
1.
Power Button:
2.
3.
Indicates the mode you want to adjust
Volume knob:
8.
Select the (mode) parameter you want to adjust
Mode LED Display:
7.
2-Digi-LED
[SELECT +] and [SELECT -] buttons:
6.
Adjust the parameters, such as voice number, level, pan, tune, reverb, sensitivity, midi note
LED Display:
5.
Indicates the pad you want to adjust
[Value +] and [Value -] buttons:
4.
Press the button to turn the power on/off
Drum Pad LED Display:
Adjust the main volume
Drum Pads:
4 drum pads
3
AUTO POWER OFF:
The digital drum will automatically turn off the power if there is no operation after 30 minutes.
Press the [SELECT +] and [SELECT -] buttons and then turn on the power to switch off the auto power off function. It will display “oF” briefly.
2.2 Rear Panel Description
10
9
11
14
12
13
9.
[PHONE] Jack:
Connect to headphone.
10. [LINE OUT] Output:
Connect to external AMP.
11. [HI-HAT PEDAL] Jack:
Connect to a HI-HAT Pedal controller. (KAT KT-HC1 Pedal - Sold Seperately)
12. [KICK] Jack:
Connect to external kick trigger using 1/4 mono cable.
13. [KICK SEL] Switch:
Select the kick style, piezo or switch. (KAT Bass Drum Trigger - Sold Seperately)
14. [MIDI OUT] Jack:
Connect to other MIDI DEVICE.
15. [USB] Jack:
Connect to a computer that utilizes USB 2.0 (Note - USB 3.0 may not be compatible.)
16. [DC IN] Jack:
DC IN 9V
4
15
16
Typical Plug-in Scenarios
Electrical Power
Supply
(supplied)
USB 2.0 Data
Output
Headphones
MIDI Output to
Computer via Auido
Interface,
Keyboard
Controller,
Pad Controller,
Drum Machine
Hi-Hat Controller
Pedal (KT-HC1 sold
separately)
Speakers, PA,
Mixing
Console,
Direct Box,
Monitors
Bass Drum Trigger
Pedal
(sold separately)
5
3. Basic Operations
3.1 Adjust the pad voice tuning
Press: [SELECT+] or [SELECT-] button to select the tune mode, the TUNE LED will light up, when striking a
pad, the 2-Digi-LED will display the tune level, press the [VALUE +] or [VALUE -] to adjust the tune level.
[-4,-3,-2, -1, 00, 01, 02,03,04]
The display is:
3.2 Adjust the reverb level
Press: [SELECT+] or [SELECT-] button to select the reverb mode, the REVERB LED will light up, the
2-Digi-LED will display the reverb level, press [VALUE +] or [VALUE -] to adjust the reverb level. [0~10]
The display is:
3.3 Assign an instrument to a pad
Press: [SELECT+] or [SELECT-] button to select the pad assign mode, the ASSIGN LED will light up, when
striking a pad, the 2-Digi-LED will display the voice number, press [VALUE +] or [VALUE -] button to adjust
the voice number. [1~48, H1, H2] - *This is a cyclical menu.
The display is:
Note: the midi note will change according to the voice number.
6
3.4 Adjust the panning of the pad voice
Press: [SELECT+] or [SELECT-] button to select the pan mode, the PAN LED will light up, when striking
a pad, the 2-Digi-LED will display the pan level, press the [VALUE +] or [VALUE -] to adjust the pan level.
[L4,L3,L2, L1, C, R1, R2,R3,R4]
The display is:
3.5 Adjust the sensitivity of a pad
Press: [SELECT+] or [SELECT-] button to select the sensitivity mode, the SENSITIVITY LED will light up,
when striking a pad, the 2-Digi-LED will display the sensitivity level, press the [VALUE +] or [VALUE -]
to adjust sensitivity level. [1~8]
The display is:
3.6 Adjust the volume level of a pad
Press: [SELECT+] or [SELECT-] button to select the level mode, the LEVEL LED will light up, when striking
a pad, the 2-Digi-LED will display the volume level, press [VALUE +] or [VALUE -] button to adjust the level.
[0~10]
The display is:
7
3.7 Adjust the midi note of a pad
Press: [SELECT+] or [SELECT-] button to select the midi note mode, the MIDI NOTE LED will light up,
when striking a pad, the 2-Digi-LED will display the midi note number, press the [VALUE +] or [VALUE -] to
adjust the midi note number. [00~99]
The display is:
Note: the midi note will change according to the voice number.
3.8 Assign a pad to HI-HAT pad control
1. Enter HI-HAT function:
1.1 Strike a pad (PAD1-4) to be assigned.
1.2 Press [SELECT+] or [SELECT-] button to enter [ASSIGN] mode, the [ASSIGN] LED will light up;
1.3 Press [VALUE+] or [VALUE-] button to select voice number (from 1 to 48,H1,H2).
The pad will be assigned to HI-HAT pad when the voice number is H1 or H2.
The open and close sounds of the Hi-Hat can now be controlled using the KAT KT-HC1
Hi-Hat Controller Pedal. (KT-HC1 Hi-Hat Controller - Sold Seperately)
2. When many pads are assigned to HI-HAT, The HI-HAT function only responds to the last pad
that you assigned. The other pads respond to “Open Hi-HAT” when struck.
8
4. Appendixes
4.1 Voice List
Voice List:
No.
Name
Midi Note
1
2
3
4
5
6
7
8
9
10
11
12
13
14
15
16
17
18
19
20
21
22
23
24
25
Acoustic Bass Drum 1
Acoustic Bass Drum 2
Dance Bass Drum 2
Snare 1
Snare 2
Rap Snare
Cross Stick 1
Crash 1
Ride 1
Tom 1
Cross Stick 2
Finger Snaps
Wet Claps
Dry Claps
Triangle Hi
Triangle Muted
Cowbell Hi
Cowbell Mid
Cowbell Low
Timbale High
Timbale Rimshot
Timbale Low
Conga High Open
Conga Low Open
Conga Slap
36
36
36
38
38
40
40
49
51
48
40
26
39
39
81
80
56
57
55
64
65
66
63
67
62
9
No.
Name
26
27
28
29
30
31
32
33
34
35
36
37
38
39
40
41
42
43
44
45
46
47
48
H1
H2
Bongo High Slap
Bongo High
Bongo Low
Bongo Low Slap
Cascara
Maracas
Vibraslap
Tabla High
Tabla Tap
Tabla Low
Shaker High
Shaker Mid
Sleigh Bells
Whistle
Chimes
Tambourine
Claves
High Effects 1
Low Effects 1
Timpani
Disk Jockey 1
Disk Jockey 2
Disk Jockey 3
Acoustic Hi-Hat
Rap Hi-Hat
Midi Note
60
59
61
50
31
70
58
93
94
95
82
83
84
72
85
54
75
76
77
89
90
91
92
46
46
4.2 MIDI Implementation Chart
Function
Transmitted
Recognized
Basic
Channels
Default
Changed
10ch
10ch
MODE
Default
Messages
Altered
x
x
x
x
x
x
Note
Number
True Voice
notes that the pads
are assigned
notes that the pads
are assigned
Velocity
Note On
Note Off
99H,V=1-127
99H,V=0
•
•
After
Touch
Key’s
Ch’s
x
×
x
x
Pitch Bend
×
×
Control
×
•
Program Change
×
×
System Exclusive
×
×
System
Common
x
x
×
x
x
x
System
Clock
Real Time Commands
x
×
x
x
Aux
Local On/Off
Messages All Notes Off
Active Sensing
Reset
x
x
x
×
x
x
x
x
120
Song Position
Song Select
Tune
Remarks
All Sound Off
• : YES
× : NO
10
®
KATPERCUSSION.COM
©2013 KAT® Percussion. KAT® Percussion is a registered trademark of Alternate Mode, Inc.,
and is used herein under license. All rights reserved. All specifications are subject to change without notice.