1
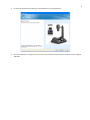
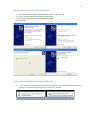
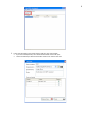
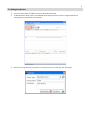
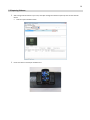
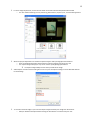
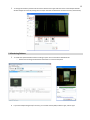
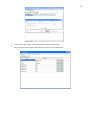
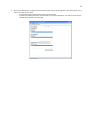
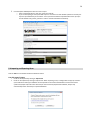
Software Version 1.1 User Manual eDEC Digital Forensics Sales Inquiries [email protected] www.edecdigitalforensics.com Tel: +1 (805) 962-‐3080 Fax: +1 (805) 962-‐3086 Table of Contents Support Inquiries [email protected] www.edecdigitalforensics.com/support Tel: +1 (805) 962-‐3080 1. Introduction ............................................................................................................................................... 2 1.1 Eclipse Overview ................................................................................................................................................................ 2 2. Requirements ............................................................................................................................................. 2 2.1 System Requirements: ....................................................................................................................................................... 2 2.2 Software Requirements: .................................................................................................................................................... 2 2.3 Power Requirements: ........................................................................................................................................................ 2 2.4 Environment Requirements:.............................................................................................................................................. 2 3. Supported Operating Systems .................................................................................................................... 2 4. Software and Hardware Setup .................................................................................................................... 3 4.1 Software Download ........................................................................................................................................................... 3 4.2 Software Installation .......................................................................................................................................................... 3 5. Examination Process................................................................................................................................... 7 5.1 Adding New Case ............................................................................................................................................................... 7 5.2 Adding New Devices .......................................................................................................................................................... 9 5.3 Capturing Evidence .......................................................................................................................................................... 10 5.4 Reviewing Evidence ......................................................................................................................................................... 13 5.4 Importing and Exporting Cases ........................................................................................................................................ 16 6. Warranty and Updates ............................................................................................................................. 17 6.1 Eclipse Hardware ............................................................................................................................................................. 17 6.2 Eclipse Software............................................................................................................................................................... 17 2 1. Introduction 1.1 Eclipse Overview The Eclipse screen capture kit is designed for efficiency and ease-‐of-‐use when conducting manual examinations. Eclipse hardware combines a high-‐resolution camera that allows you to adjust focus and lighting while fine-‐tuning the captured image. The high quality stand is designed for stability and holds devices in place, allowing you to navigate quickly while recording evidence. Intuitive software allows you to efficiently take screen shots, record video and audio, organize and annotate evidence. Customizable, professional reports can be easily generated for evidence presentation. The Eclipse Package Includes: 2. Requirements Eclipse Hardware Unit USB Cable Software Security Dongle Quick Start Guide 2.1 System Requirements: 2.2 Software Requirements: 2.3 Power Requirements: 2.4 Environment Requirements: 1 Ghz 32-‐bit (x86) processor 512 MB of system memory USB 2.0 interface (preferably on board) High-‐Speed Updated Windows Media Player Web Browser: Internet Explorer 7 or above, Mozilla Firefox, or Google Chrome USB 2.0 High-‐Speed Powered 480Mbps Ambient temperature: 32°F -‐ 120°F Storage temperature: 0°F -‐ 120°F Do not subject Eclipse hardware to excessive shock or vibration 3. Supported Operating Systems Windows XP Windows 7 32bit Windows 7 64bit must run Parallels Workstation 3 4. Software and Hardware Setup 4.1 Software Download ● Visit http://www.edecdigitalforensics.com/support to download the latest version of Eclipse software. Please login using the following credentials: • Username: [input the serial number on the yellow sticker on the bottom of your hardware unit] Password: [input the last 8 digits of your software license number] After logging in to the site, click the link to download the latest version of the software. Take note of the username and password for the FTP site. You will need to enter these to download the software. 4.2 Software Installation ● ● ● Unpack the compressed file in a local drive (preferably the C drive) Click on Setup.exe to run the installer, follow all prompts If any of the prerequisite components are missing please download them by following Eclipse setup instructions (some components may require you to restart your computer or the Eclipse installation process) Please Note: • Disable UAC on Windows 7 for the Eclipse program to run. Open up Control Panel and type in “UAC” into the search box. You will see a link for “Change User Account Control settings.” Then restart the computer. • If you are a Windows 7 64bit user, you MUST install Parallels Workstation and install Windows XP or Windows 7 32bit in order to operate Eclipse o If the Virtual Machine has an error when trying to run Eclipse, look to see if the USB has been added into the Virtual Machine. Add the device, and then try running Eclipse again. 4 When installing the fddshow prerequisite, as with all the other components, please make sure to leave all default settings! Click Next until you come to the final page of the fddshow installation • Click Finish to exit the fddshow setup You do not need to Run any of the components following the Setup Wizard 5 • Continue the Eclipse Setup by clicking the Install button on the prompted menu • Once the Installation is complete click Finish and connect the Eclipse camera to your computer with the supplied USB cable 6 Eclipse Camera Installation for Windows XP users 1. 2. 3. 4. When the Found New Hardware Wizard appears, select “Yes, this time only” Select “Install the software automatically” and click Next The wizard will search and find Huaqi Digital Lab DL-‐800C Click Finish Eclipse Camera Installation for Windows 7 32bit Users Once you have connected the Eclipse camera to your computer with the supplied USB cable, there will be a pop-‐up on the bottom right hand corner of your screen, as shown 7 • To install the Windows Mediaplayer plugin for Firefox and Chrome, go to the Start Bar and locate the Eclipse folder under All Programs. This plugin is for Firefox or Chrome users to view the final report that include .avi files. 1. Select Windows Mediaplayer plugin for Firefox and Chrome and the setup window will pop up 2. Select Next and accept the terms in the License Agreement 3. Select Next, then click on Install 4. Once the installation is complete, select Finish 5. Examination Process At this time, make sure the Software Security Dongle is inserted into a USB port and then open the Eclipse program. On a Virtual Machine, you may have to add the USB device. 5.1 Adding New Case ● ● Open Eclipse Software to begin the process of creating a case Click Add New Case Multiple devices can be input under a single case, Add New Devices after creating your case 8 • Input case information in the preset fields or add your own custom fields If you check the Report box, the custom field will show on the final report Leave unchecked if you wish for this field to remain as an internal case note 9 5.2 Adding New Devices • • Once your case is added, click Open to enter the Device & Evidence tab To add information about a device, click Add New Device (Eclipse evidence capture is categorized by device, multiple devices can be added in this window) • Select from a range of Device Type options or click the pencil icon to create your own device type 10 5.3 Capturing Evidence • After saving all of the devices in your case, click Open to begin the evidence capture process for the selected device Click the Capture Evidence button • Center the device in the Eclipse hardware unit 11 ● Manually adjust the Eclipse camera lens to obtain the best aperture and focus setting • To adjust the height of the camera turn the dial on the upright bar counter-‐clockwise and pull the camera hardware up or down to your desired height before turning back the dial to tighten into place 12 • For more image adjustments, use the controls shown on the left side of the Eclipse Recorder window o For more advanced settings such as positioning, white balance, exposure, etc., click the Settings button • When the proper adjustments are made click Capture Image to take a photograph of the evidence o Enter the Evidence Description and click Save to save the image and continue your case o The Capture Image hotkeys (Ctrl + R) can be used to quickly photograph evidence • The Capture Image hotkey will not show a preview of the image Video Capture includes sound recording. Be sure to turn your microphone settings on under Windows Volume Control Settings • To include an external image in your case click Import Image and select your image from the browser o Add your Evidence Description before clicking the Save button to continue with your case 13 • To enlarge the evidence preview click the Preview button at the upper left-‐hand corner of the Eclipse Recorder window. Adjust the screen by moving the bar and/or maximize the window to see the full screen (shown below) 5.4 Reviewing Evidence • To review the captured evidence before creating a report return to the Device & Evidence tab o Double click the image to edit device information or to remove the photo ● If you have multiple images and/or avi. files, you can filter them by Date, Evidence Type, and File Type 14 • • To edit Evidence Type categories click Administrator from the header toolbar Select the Preferences tab and click Add Preference to add your own Evidence Type 15 • When your investigation is complete select the Review tab on the top of the page where you will be given a set of options to include in your report o Check each box that you wish to be shown in your final report o To export the evidence items that were selected in the “Devices & Evidence” tab, make sure the “Export selected evidence items” box is checked. 16 • Click the Export HTML Report button to create a report o Select a local destination to save your report and click OK o If you are attempting to view your HTML report on a Firefox or Chrome browser please ensure that your report is exported directly to the C Drive. Once you have located the exported folder ensure you open the file labeled index_Firefox_Chrome in order to view all multimedia successfully. 5.4 Importing and Exporting Cases Click the File from the header toolbar for additional actions Case File Import/ Export • • Cases can be exported by clicking on Export Case Cases can be imported by clicking on Import Case. When importing a case, a dialogue box will pop up and ask if you would like to backup your database and will provide a link of where the database can be found and the specific file (Eclipse.edf) to be saved. Once Eclipse has successfully imported the database, Eclipse may automatically restart and load your imported database 17 6. Warranty and Updates 6.1 Eclipse Hardware If within one (1) year from the date of purchase, the product fails due to a defect in material or workmanship, eDEC Digital Forensics will repair if possible or replace it free of charge. This warranty applies only to the original purchaser and is not transferable. eDEC DIGITAL FORENSICS WILL NOT BE LIABLE FOR INCIDENTAL OR CONSEQUENTIAL DAMAGES TO PURCHASER, OR ANY OTHER PARTY, FOR ANY LOSS, DAMAGE, INJURY OR EXPENSE OF ANY KIND OR NATURE CAUSED DIRECTLY OR INDIRECTLY BY THE PRODUCT OR THE FAILURE OF THE PRODUCT TO OPERATE PROPERLY. SOME STATES DO NOT ALLOW THE EXCLUSION OR LIMITATION OF INCIDENTAL OR CONSEQUENTIAL DAMAGES, SO THE ABOVE LIMITATION OR EXCLUSION MAY NOT APPLY TO YOU. THIS WARRANTY IS IN LIEU OF ALL OTHER EXPRESS OR IMPLIED WARRANTIES. ALL IMPLIED WARRANTIES, INCLUDING THE WARRANTY OF MERCHANTABILITY AND THE WARRANTY OF FITNESS FOR A PARTICULAR PURPOSE, ARE HEREBY MODIFIED TO EXIST ONLY AS CONTAINED IN THIS LIMITED WARRANTY, AND SHALL BE OF THE SAME DURATION AS THE WARRANTY PERIOD STATED ABOVE. SOME STATES DO NOT ALLOW LIMITATIONS ON THE DURATION OF AN IMPLIED WARRANTY, SO THE ABOVE LIMITATION MAY NOT APPLY TO YOU. The warranty does not apply to: (a) damage caused by accident, abuse, in handling, dropping; (b) acts of God; (c) units which have been subject to unauthorized repair, opened, taken apart or otherwise modified; (d) units not used in accordance with directions; (e) damages exceeding the cost of the product; (f) depreciated or loss of charge time; (g) the finish on any portion of the product, such as surface scratches and/or weathering, as this is considered normal wear and tear. Some states do not allow a limitation of damages so the foregoing limitation may not apply to you. This warranty gives you specific legal rights and you may also have other rights, which vary from state to state. Warranty service is available by mailing postage prepaid to the authorized service facility provided. Warranty does not cover the cost of postage to send the product in for service. Purchaser is responsible for safely sending the product to repair facility. Please be sure to wrap the product securely when mailing to avoid shipping damage. A valid copy of original invoice and Return Merchandise Authorization (or RMA) are required for all warranty services. Please contact [email protected] in order to obtain an RMA. 6.2 Eclipse Software Periodic updates for the purchased version will be available online to download at www.edecdigitalforensics.com/support. New software versions will be available for purchase.