1
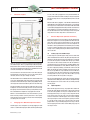
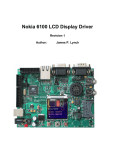
website:
6175 Longbow Drive, Suite 200
USA
Boulder, Colorado
Sharing
2 0 0 8 . 0 7 . 0 1Ingenuity
sparkfun.com
zip code:
80301
303
284.0979 [ general ]
443.0048
P
F
MP3 Development Platform
W W W. S P A R K F U N . C O M
Table Of Contents
1
1
Overview..........................................................................1
2
Main Features.................................................................1
3
Hardware Layout.............................................................2
4
Charging Your MP3 Development Board.......................2
5
General Operation (Default Firmware)...........................2
SparkFun’s new MP3 development platform allows everyone from
the curious to the experienced embedded engineer to write their
very own code for an MP3 player. With an on-board accelerometer,
FM transmitter, micro SD card, navigation switch and tri-color LED,
there are endless possibilities for creative programming. The MP3
comes with a USB bootloader to make loading code easier and
faster, and some basic firmware to help get your ideas flowing. Also,
use the provided SparkFun code libraries to make coding easier
and faster; or feel free to create our own libraries and share them
with other programmers to collaboratively make the coolest MP3
software out there!
5.1 Loading Songs Onto The MP3 Player...........................2
5.2 Playlist Operation.........................................................2
5.3Accessing The Settings Menu......................................2
5.3.1Volume....................................................................2
5.3.2Radio Power............................................................2
5.3.3Radio Channel.........................................................2
6
USB Bootloader...............................................................3
7
Writing Your Own Firmware...........................................3
8
Structures And Variables In The Main Code.................4
8.1 Structures....................................................................4
8.2Global Variables...........................................................4
9
Main Code Operation......................................................4
9.1Initialize Port Functions................................................4
9.2Initialize Peripheral Devices.........................................4
2
Overview
Main Features:
Phillips ARM7 LPC2148
Micro SD Card with FAT16 support
132x132 Full Color LCD
NS32 FM Transmitter
MMA7260 Triple Axis Accelerometer
USB Jack
Headphone Jack
Tri-Color LED
Navigation Switch
On/Off Switch
9.3Read Filenames from the SD Card...............................4
9.4 Populate the Playlist and Settings Menu......................4
9.5Is USB Plugged In?.......................................................4
9.6 Has a Button Been Pressed or Screen Been Rotated?..4
10
MP3 Peripheral Libraries................................................6
10.1 Keil/LPC2148 Libraries................................................6
10.2GNU General Public License Code................................6
10.3General Definition Libraries..........................................6
10.4 Peripheral Component Libraries...................................6
MP3DevPlatformV1_UG_rev1_080701
1/7
MP3 Development Platform
2008.07.01
3
Hardware Layout
Figure 1
Accelerometer orientation:
on a PC; if the cable is plugged into a non-powered USB Hub, the
charge current will be much lower resulting in a longer charge time.
The typical charge time for a fully depleted battery will be around
4.5 hours.
When the USB cable is plugged in, a red LED will be illuminated near
the On/Off switch. This LED will start to blink if there is an error during
the charge process. If this behavior is observed, the USB cable should
be immediately unplugged and the battery should be checked for any
faulty conditions (i.e. shorted or stripped wires, bad terminals, etc…).
The red LED should turn off after a full charge; however it may take
longer than the 4.5 hour charge time for the LED to turn off.
5
General Operation (Default Firmware)
The default firmware that comes loaded on the MP3 Development
Board serves to give the user a basic platform from which to create
better, more creative and user friendly interfaces. The code should
give the user an idea about how to use each of the components on
the board, as well as provide low-level functionality such as viewing
a play-list, selecting and playing songs, using the accelerometer to
change screens, enabling and using the FM transmitter, and using
the tri-color LED.
5.1
Loading songs onto the MP3 Player
The accelerometer is oriented such that the x-axis will be along the
horizontal plane of the board, the y-axis is on the vertical plane of
the board, and the z-axis goes “through” the board.
To load songs onto your MP3 player simply connect a USB cable
(with a microUSB connector on one side) from your computer to the
USB jack on the MP3 player. As long as the MP3 player is powered
on, the PC will recognize a removable drive and open up a window
that contains the files currently located on the SD card. (USB mass
storage will work on any operating system, including Windows, Mac
OS X and most distributions of Linux.) With this window open, you
are able to simply drag and drop your MP3 files onto the SD card.
NOTE: You will be able to drag and drop any kind of file onto the
SD card, not just MP3 files. If you load files that are not MP3 files
onto the player, these file names will show up on the playlist during
normal operation. If you try to “play” these files as MP3’s, you may
encounter problems with the operation of the player.
The FM transmitter has an embedded antenna located behind the LCD
screen. This should provide ample range; however if a greater range
is desired an external antenna may be used by simply adding a wire to
the through-hole header located directly above the transmitter chip.
After you’ve loaded the MP3 files onto the SD card, simply unplug the
USB cable from the MP3 player. After a moment, the SparkFun logo
will be displayed on the screen and then the user will be presented
with the playlist.
The FM transmitter will only transmit audio while there are no
headphones connected to the audio jack. This is because the audio
data going to the FM transmitter must be specially filtered, and the
filter is disabled when headphones are plugged into the board.
5.2
There are several key components worth discussing pertaining to
the hardware layout. There is a programming header, along with a
debug header; neither of which come populated on the board. Rather
than using the programming header, the user should load new code
to the SD card through the on-board USB port.
While it is recommended that the user writes firmware to put the
device into sleep mode to conserve power, there is also a power
switch located next to the battery connector which will completely
shut down power to the board.
4
Charging Your MP3 Development Board
The MP3 player can be charged at any time by plugging in a USB
cable. It is recommended to plug the USB cable into a powered port
MP3DevPlatformV1_UG_rev1_080701
Playlist Operation
When the MP3 player first starts up, the playlist will be visible. The
playlist will simply display the filenames of all the files presently
on the SD card, regardless of if they are actually MP3 files or not.
The display will show up to 15 songs at a time, along with the title
of the current menu at the top of the screen. The black navigation
switch on the bottom of the MP3 player can be used to navigate
the list by moving the switch left and right. By pressing the button
“in,” you will start the current song, or stop the song if one is being
played. When a song is finished playing the next song on the list
will start playing; this will continue until the MP3 player plays the
last song on the list.
2/7
MP3 Development Platform
2008.07.01
WARNING: In order to obtain the list of files, the default firmware simply
collects all of the characters of all of the filenames on the SD card and puts
them into an array located in the RAM of the MP3 player. There is a chance
that if there are too many files on the SD card, or that if the filenames
simply have too many characters in them, the filename array will overrun
the program memory and cause the MP3 player to crash before it even
starts up. While we have yet to see this behavior, it is a known possibility.
So, if you don’t like it….you’ll have to write your own code and fix it!!
5.3
Accessing the Settings Menu
One of the many cool things about the MP3 development board is the
presence of the triple axis accelerometer. Find some clever ways to use it
for user input and navigation purposes! We decided to use it to allow the
user to gain access to the settings menu. If you want to change the volume,
turn on the FM transmitter, or change the channel the transmitter is tuned
to then you’ll need to access this menu. In order to see the menu, simply
hold the MP3 player upright so the screen is oriented with playlist title at
the top of the screen and then rotate the MP3 player counter-clockwise
somewhat quickly. If done correctly, the playlist will disappear and the
settings menu will take its place. Make sure to hold the MP3 player in
the new orientation, or the settings menu will disappear and be replaced
with the playlist again.
5.3.1 Volume
To change the volume, press the middle button of the nav. switch while
the Settings Menu is active and “VOLUME” is highlighted. Doing so will
open the volume menu; in this menu the current volume setting will be
displayed. To increase or decrease the volume, use the forward and back
buttons on the nav. switch. Once the volume is at your desired level, press
the middle button again to return to the settings menu.
5.3.2 Radio Power
By selecting the “Radio Power” option on the settings menu, the
corresponding menu will be opened. This menu allows the user to turn
on and off the FM transmitter. Once turned on, the transmitter will begin
transmitting on the FM channel selected in the Radio Channel option.
However, because of hardware limitations music can only be transmitted
as long as there are no headphones plugged in to the headphone jack.
5.3.3 Radio Channel
The radio channel menu allows the user to select which FM radio channel
the transmitter will broadcast on. A decimal point is not shown, but the
last digit of the displayed number is the number that would typically fall
behind the decimal point. For example, 973 is the same as 97.3. Once
you’ve selected the appropriate radio channel, press the middle button
on the nav. switch to return to the settings menu.
6
USB Bootloader
The USB Bootloader is a nifty little trick that SparkFun has started using on
most of our ARM based projects. In case you are unfamiliar, a bootloader
is what takes your code and programs it onto the microprocessor. There
are several advantages to using the USB Bootloader. First of all, it means
you don’t have to have an ARM programmer to be able to load code onto
your board; you don’t need to access any special pin out either. Your code
will be loaded by simply putting a firmware file onto the SD card; this is
MP3DevPlatformV1_UG_rev1_080701
done by plugging a miniUSB cable into the USB connector on the
MP3 player and your PC. Once the USB cable is connected, and the
MP3 player is powered ON, a removable drive will be available on
your computer. You don’t even have to take your board out of the
enclosure to put new code on it! Once you copy your firmware file into
the removable drive, the code will be placed onto the SD card. When
you unplug the USB cable the bootloader will grab the new firmware
file from the SD card and load the code onto the microprocessor.
Presto! Your new code is up and (hopefully) running.
There are, however, several limitations to using the bootloader.
Because the code for the bootloader takes up some of the memory
of the ARM, the main code must be compiled and loaded in a
manner that will not overwrite any of the bootloader code. This
can be accomplished by changing the linker script file used in the
makefile. In order to function correctly, the origin of the ROM should
be set to 0x10000. The good news is, this is already done for you
as long as you use the included Makefile and main_memory_block.
ld file which can be found in the “Main” folder of the example code
available online.
After using the included makefile to compile your project, a file named
FW.SFE will be created. This is the file that needs to be loaded onto
the SD card for your code to run. When the bootloader starts it will
look for a file with this name on the SD card, if it is not there then
no new code will be loaded. NOTE: If your linker file did not instruct
the makefile to locate the code at 0x10000, then the new code will
not run, regardless of whether or not it’s named FW.MPDEV.
7
Writing Your Own Firmware
The point of owning one of SparkFun’s MP3 Development boards is
not to use it the way it’s been given to you. Instead we hope that you
will hack up our code, or even start from scratch to create your very
own operating system for the player. In this section we’ll go over how
the main code works and give an in depth explanation on all of the
functions of the included libraries (all of the code and libraries can
be downloaded from the MP3 Development Board product page of
the SparkFun website). By no means should you feel limited to the
libraries we’ve given you; in fact we would encourage you to create
your own. However, this should provide you with a good starting point
for adding some cool stuff to your player.
8
Structures and Variables in the Main Code
8.1
Structures
In this section I’ll explain the variables to be used in the main MP3
code. First let’s look at the available structures. The structures
available to the main code are defined in the setup.h file (located in
the Main directory). There are three structures: SongStruct, FileStruct
and DisplayStruct. SongStruct will contain critical information about
the currently selected song. The display name, the file name, the file
handle, the file size, the file type will all be available from this struct.
The songs buffered data will also get placed in this struct before
being sent to the MP3 player. The display struct contains information
about each menu. Most of the components of this struct are self
explanatory: the current row and column keep track of where the
3/7
MP3 Development Platform
2008.07.01
next character will be written on the LCD; the orientation determines
which side of the LCD will be the “top” of the menu, text and back
color define the color of the text and background of the menu. Total
pages define how many screens are on each menu. For example,
if there are more than 15 songs on the SD card, it will take more
than one page to display all of the songs. So when the user scrolls
to the bottom of the page, and keeps scrolling down, a new page
will be displayed. Current Page keeps tabs on what page the user
is currently on. Notice that the Display Struct also has a FileStruct
named list in it. This “list” contains the options of the menu. So, for
the Playlist, “list” contains all of the filenames; but in the Settings
Menu, “list” contains the different settings options. Current Index
is used to keep track of which item in the list is currently selected.
Finally the title indicates the name of the menu.
8.2
Figure 2
Global Variables
The structures are used to govern the vital information to the operation
of the system. However there are also several flags used in the main
code to keep track of important events. The button pressed tells the
code if the nav. switch has been pressed, and if so which direction
it was pressed. The update screen flag monitors the position of the
accelerometer, and if the player is tilted too much then the flag is
activated and the screen will rotate. Prev position and Cur position
are used to hold the accelerometer data. File is open is used to keep
track of if a song is being played; when a song finished, the song is
over flag gets set telling the player to go to the next song.
The current_song SongStruct is used to keep track of information
regarding the…current song. File_manager is the DisplayStruct that
describes the playlist menu, while the settings_menu DisplayStruct
has all of the information for the Settings Menu. The pointer to a
DisplayStruct named current_display is used to keep track of which
menu is currently being displayed on the screen.
Finally, volume_setting, radio_channel and radio_enable are all of
the variables that can be accessed and changed by the end user
from the Settings menu.
9
Main Code Operation
The easiest way to explain the operation of the firmware is to show
a flowchart, and then we’ll go into the details of each block. After
a brief overview of how the main firmware operates, we’ll take a
more in depth look at the libraries used to carry out many of the
functions used in the main code. Take a look at figure 2 below, and
then continue reading for a summary of what the code is doing in
each block of the firmware.
9.1
Initialize Port Functions
As with most embedded applications, the first thing we do is initialize
the ports; this means we have to tell the ARM which pins are going
to be used for inputs, and which ones are used for outputs. Also, the
interrupts (used to run code based on certain events) are configured.
One interrupt will be triggered at a rate of 40 Hz, while another
interrupt will be triggered whenever the DREQ pin goes high. We’ll go
over what these interrupts do in the “Has a button been pressed…?”
block. The first block of code will also initialize the SD card.
MP3DevPlatformV1_UG_rev1_080701
9.2
Initialize Peripheral Devices
OK, so the ARM and all of its ports have been initialized. But there’s
a lot more stuff on the MP3 Development board! So now the main
firmware goes through and initiates all of the peripheral devices;
this includes the LCD, the MP3 decoder and the FM transmitter.
This is done by calling several functions that belong to each of the
peripheral devices libraries, which we’ll go over when we talk about
all of the libraries.
9.3
Read Filenames from the SD Card
Now that everything is initialized, we can start the actual code. The
first thing we need to do is see what is on the SD card. I chose to
do this by getting all of the characters in the names of all of the files
on the card. After I have these characters, I put them into an array of
filenames locally. This will allow me to access the filenames without
having to read from the SD card. Then I assign this array of filenames
to the “list” in the file_manager structure. Now I have my playlist!
4/7
2008.07.01
WARNING: There is a major fault with this code. Because I dynamically
create an array without knowing how many characters there are in
the filenames of the SD card, there is a chance that I’ll end up creating
a HUGE array to fit all of the characters. If the array is too big, then it
will overwrite some of the actual code space. I know, I know…this
is bad. But think of it as your first project!
9.4
Populate the Playlist and Settings Menu
It’s Showtime! The boring stuff is taken care of, now let’s get
something onto the screen. Remember the DisplayStructs we talked
about? We’ve got to put some data into them, and then we’ll have
our menus ready to display. There are two DisplayStructs in the
example firmware; the file_manager and the settings_menu. First
let’s talk about the file_manager.
The file_manager is essentially going to be our playlist. We’ve put
the filenames into the “list” component of the struct already. Now
we just assign how many pages it will take to display the amount of
filenames we have; set the orientation and desired LCD colors along
with the current row, column and index values. Then we just give the
struct a title to be displayed on the top row, in this case we assigned
the “welcome” string which contains the text “Song List:\n\r”.
The function named fillSettings() will perform the same process
described above to populate the settings_menu struct. If you look
at the function, you’ll notice that first we assign the text strings to
the “list.” In the playlist, the “list” contained the filenames, but in
the settings menu we’ll populate the list with the settings options.
Then we just make the same assignments to the struct that we did
for the file_manager.
Now that we’ve populated the DisplayStructs, we just call the function
printMenu and pass it the address of the display struct we want
displayed. Presto! The menu is displayed in the proper orientation
with the title at the top and the list under that, and the first row is
highlighted. Let’s start using this thing!
9.5
Is USB Plugged In?
Alright, now that we’re actually displaying something to the user; it’s
time to start working with the user interface. At this point we’re in an
endless loop where the actions are determined solely on the user input.
The first thing that’s done is to check and see if the user has plugged
in a USB cable. This will allow the user to plug in a cable at any point
during the operation of the device and load new music (or firmware)
to the device. If we see a USB cable plugged in, we’re going to display
a message to the user on the screen notifying them that a cable is
plugged in. Then, as soon as the cable is unplugged the device is going
to reset itself. The reset must be performed in order to create the new
playlist if there are any new files, or if new firmware has been loaded
then the reset will allow the bootloader to load the new code.
9.6
Has a Button Been Pressed or Screen Been Rotated?
The next thing we do is look to see if a button has been pressed or if
the screen has been rotated. But all the code does is check the status
of a couple flags. How do the flags get set? Remember back in the
initialization process when we created a timer based interrupt that
was activated at a 40 Hz rate? It’s checking to see if a button gets
MP3DevPlatformV1_UG_rev1_080701
MP3 Development Platform
pressed, and it’s checking to see if the screen has been rotated. If
either of these has happened, then the interrupt routine appropriately
sets each flag.
So let’s say that neither of these things have happened, no button
press and the screen hasn’t rotated. We still may have something to
take care of. Specifically, if we were playing a song, and it’s over, we
need to start the next song. So, if the button press or screen rotation
hasn’t happened, we check to see if the song was playing, and if it
was and it’s over, then we load the next song and start playing it. We
also update the screen with the currently playing song, and refresh
the page if it needs to be changed.
What if a button is pressed? The interrupt is going to assign button_
pressed with either UP_BUT, DWN_BUT or MID_BUT depending
on how the button was pressed. Three functions, handleUpButton,
handleDownButton and handleMiddleButton are called based on the
value of button_pressed. Up and Down do the same thing no matter
what menu is currently being display, they highlight the current or
previous row, and load the next page or previous page if it is needed.
The middle button is a little more complex because it does something
different depending on the current state of the MP3 player.
If the Song List is currently being displayed, the action of the middle
button is straightforward. If a song is not being played, then the
currently selected song starts playing, but if a song is already being
played, then the button acts as a stop button. So how do we actually
start playing the song? Well there’s another interrupt routine that is
responsible for this. The interrupt is triggered when it sees the DREQ
pin go high. By reading the datasheet for the VS1002 MP3 decoder,
you’ll see that the DREQ pin goes high whenever the MP3 decoder is
ready for more data. So whenever this pin goes high, the code gets
interrupted and we send more song data to the MP3 player. We’ll go
over how to send data to the MP3 player in the library section.
If the settings menu is being displayed, then the middle button performs
a different set of functions. Pressing the middle button on the settings
menu will activate the currently selected settings option and allow the
option to be changed. This means you can increase the volume, change
the radio channel of the FM transmitter, or turn the FM transmitter
on or off.
Finally, if no button has been pressed, but the screen has been rotated,
this means that we need to change the screen and rotate the orientation
of the display. If the screen has been rotated to the left, then we’ll
change the current_display pointer to the settings menu and orient
the screen appropriately. On the other hand if the screen has been
rotated to an upright position, then the Song List is loaded into the
current_display pointer and the display is re-oriented to the normal
position.
As a side note, if you’re new to code you may be wondering what
exactly an interrupt is. The principle is fairly straightforward, even
though using them correctly can sometimes be a bit of a challenge.
The idea is, sometimes you need to exercise a portion of code when
a certain event happens. If you want to be continuously running code,
but you want to force the code to run some other routing when
certain events happen, then you’ll have to interrupt your main code.
By running an interrupt service routine, you will stop your main code
5/7
2008.07.01
wherever it may be and run your interrupt function; when the interrupt
is finished with it’s code then the main code will continue exactly
where it left off. And don’t worry; it won’t forget the values of any of
the variables unless you overwrite them in your interrupt routine.
After having updated the screen, the main loop of the firmware is
completed and return to the beginning of the loop where we checked
to see if the USB cable was plugged in. After looking at the code,
you’ve probably noticed by now that there have been quite a few
functions called that don’t reside in the main code. These functions
reside in the included libraries of the MP3 Development Board
example firmware which will be explained in the next section.
10
MP3 Development Platform
10.3 General Definition Libraries
There are two general definition libraries. These are used to define
memory structures, as well as pin definitions for the MP3 player.
setup.h
MP3Dev.h
MP3 Peripheral Libraries
When you first open up the main code for the MP3 development
platform, you’ll notice there are a whole bunch of included libraries
needed to compile the code. These libraries contain many of the
functions used to make the MP3 player operate with the example
code. There are several key libraries used to run the peripheral
components like the LCD screen, the MP3 decode, the accelerometer
and the FM transmitter. We’ll go over each of the functions in the
library and how you can use them. Remember though, you aren’t
limited to what’s included in these libraries; go off and write more
functions for each of the components!
10.1 Keil/LPC2148 Libraries
The following libraries are included in the Keil compiler, or are specific
to the LPC2148. SparkFun did not write these, nor do we want to take
credit/responsibility for them. However, they were necessary to use
to access some of the included functionality of our ARM processor.
Used to define the DisplayStruct and SongStruct
structures for the main code. This file also contains
the function prototypes for the main.c file.
This file assigns each of the pins of the ARM to a certain
name in order to make the code more readable. The file
also contains macros to turn the tri-color LED on and off.
This file is available to all of the other libraries included
in the firmware.
10.4 Peripheral Component Libraries
There are four libraries that control the main peripheral components
on the MP3 development board. LCD_driver.c contains the functions
to write to the LCD, MMA7260.c retrieves and controls the onboard
accelerometer, NS73.c is for the FM transmitter, and vs1002.c has
the communication functions for controlling the MP3 decoder.
10.4.1 LCD_driver.c
The LCD_driver library is used to write colors, text and strings to the
LCD (which may be either the Phillips or Epson LCD driver). To find
out more about the available commands for the LCD screen, one
should consult the datasheet of the screen which is available from the
product page of SparkFun’s website. Also, reading the Jim Lynch’s
tutorial on the screen will provide useful information (his tutorial was
used to create many of the existing functions).
stdio.h
LCDClear(char color)
Used for standard I/O
Used to clear the LCD screen with the specified color.
LPC2148.h
LCDCommand(char data)
Used to access standard LPC2148 definitions
Used to send a command to the LCD driver (static).
serial.h
LCDContrast(char setting)
Used for basic serial functions on the UART
Used to set the contrast of the LCD.
rprintf.h
LCDData(char data)
Used to write strings to the UART
10.2 GNU General Public License Code:
A good engineer knows how to use available sources, and isn’t afraid
to either! Several of the libraries used in the MP3 player were obtained
using the GNU General Public License. This code is free to use, and
easy to obtain online. We used this code for our bootloader, USB
communication, and SD card communication. The following libraries
are used under the terms of the GNU General Public License:
rootdir.h
Used to manipulate the root directory of the SD card
sd_raw.h
Used to access the SD card
fat16.h
Used for Fat16 formatting of the SD card
main_msc.h
Used for USB mass storage
MP3DevPlatformV1_UG_rev1_080701
Used to send the command data to the LCD driver(static).
LCDInit()
Used to initialize the LCD.
LCDPrintChar(…)
Used to print a character to the LCD(static).
LCDPrintLogo()
Used to display the sparkfun logo (logo defined at top
of file).
LCDPrintString(…)
Used to print a string to the LCD. Similar to rprintf()
LCDSetPixel(…)
Sets the color of a pixel on the screen (static).
LCDSetRowColor(…)
Sets the color of a row on the screen.
NOTE: Static functions can only be used within the file which they
are created. So these would not be available in the main code.
6/7
2008.07.01
MP3 Development Platform
10.4.2 MMA7260.c
10.4.4 VS1002.c
The driver for the accelerometer contains functions which are used
to read the value of each axis, as well as to set the mode of the
accelerometer.
This is the driver for the MP3 decoder. While many functions for
controlling this device have been included with this library, it is
recommended to read the VS1002 datasheet to find out more about
what can be done with this chip, as well as the different supported
file types for the decoder.
MMA_change_mode(char mode)
Sets the sensitivity of the accelerometer.
MMA_get_x()
Gets the acceleration of the X axis.
MMA_get_y()
Gets the acceleration of the Y axis.
MMA_get_z()
Gets the acceleration of the Z axis.
get_adc_1(int channel)
Reads the ADC value of “channel”(static)
10.4.3 NS73.c
The driver for the FM transmitter will allow the code to initialize and
configure the device. To find out more about the available commands
for the FM transmitter, one should consult the datasheet for the NS73
transmitter, available from the product page at Sparkfun.com.
ns73config()
Configures the ARM pins for comm. with the device.
ns73init()
Initializes the FM trans. and sets the channel to 97.3
ns73send(…)
Sends an address and command data to the FM
transmitter.
ns73SerialReset()
Used to send a software reset to the transmitter.
vs1002Config()
Configures the ARM pins for communication with the
decoder.
vs1002Finish()
Releases the pins used for decoder communication.
vs1002Init()
Sets the mode and clock frequency of the decoder before
playing.
vs1002Mute()
Mutes the output of the decoder.
vs1002Reset()
Performs a software reset on the decoder.
vs1002SCIRead()
Reads incoming data from the decoder.
vs1002SCIWrite(…)
Writes data to a specified address of the decoder.
vs1002SendMusic(…)
Sends song data to the decoder through the SDI bus.
vs1002SetVolume(…)
Increases or decreases the decoder output volume.
vs1002SineTest()
Performs a self test of the MP3 decoder by outputting a
sine wave.
ns73SetChannel(int radio_channel)
Sets the channel to broadcast the transmission.
© 2008 SparkFun Electronics, Inc. All Rights Reserved. Product features, specifications, system requirements and availability are subject to change without notice. MP3DevPlatform is a trademark of SparkFun Electronics, Inc. All
other trademarks contained herein are the property of their respective owners.
MP3DevPlatformV1_UG_rev1_080701
7/7