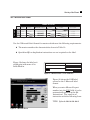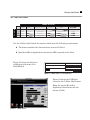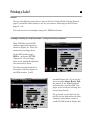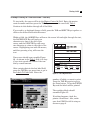
1
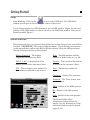
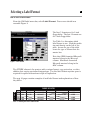
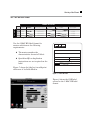
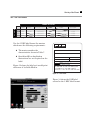
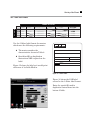
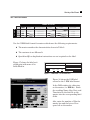
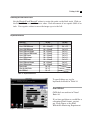
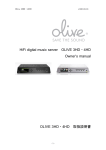
CADLabel User Manual
6
42
3
1
T
LAS
(
E
SIZ
E)
FIL
E
A
D T
23
SO
:
R A
: DI
NSTR
QA I
E
NAM
D
TL
14
:
LE
TIT
Sc
CK an
D
CA MA
D
Q
CA A
D
MA
:
MER
:
ATE
SO
#
CON
R
STE
ST
ER
C
E: QA ONT
SO
14
RO
O
A
PR
T
M
S
D
23
L
O
CU
P
n/
CE
:
6
#
a
E
K
c
E
N:
S
SS
FR
DIS
V
S
O
E
:
ER BY3T5
R
N
/
P
DE
CU : 3 198
:
MO
ST
.
0VER
QA
OM 0
00
&
E
I
3
DI
R:
NS
ES
D
L
AG
T
I
I
R: F
E
F
I
R
NO
TIM
MT NTE
A:
ST
D
L
WU NA
IC
IS
#
(
NI ME LA
S
DA K:
ST F0
NS
10
T
1
E
TL
/1
0
:
F
FI
IL
27
.E
5/
LE
E
XE
6/
8
S
SI )
95
67 ZE
58
4
D
4- ATE
52
699
95
20
TI
BY
6: ME
TE
19
S
p
FR
EE
#
FMT
L
TRO
MA
TI
6
Label imprinting program for floppy masters
Table of Contents
Introduction
What You Need to Know
What You Need to Have
Installation
Installing to Windows 3.x
Installing to Windows 95 or Windows NT 4.0
Configuring the COM Port
Getting Started
Startup
What Goes in the Boxes?
Selecting a Label Format
How to Select a Label Format
The 3 IBM Label Format
The 3 MAC DD Label Format
The 3 MAC HD Label Format
The 3 Microsoft Label Format
The 3 Microsoft DMF Label Format
The 3 NEC Label Format
The 3 Other Label Format
The 5 IBM Label Format
The 5 Microsoft Label Format
The 5 Other Label Format
Printing a Label
Overview
An Example: Printing the 3 IBM Label Format
Getting the Directory Information
Data Entry
Centering the Print on the Label
Keyboard Shortcuts
About CADLabel
1
1
1
2
2
2
2
3
3
3
4
4
5
6
7
8
9
10
11
12
13
14
15
15
15
16
17
17
17
Introduction
1
What You Need to Know
It is expected that users of CADLabel have experience running programs in Windows
and with the operation of Zebra label printers.
CADLabel is intended for use by personnel in the Mastering Department. It is
expected that the mastering personnel are familiar with the required mastering
procedures. This manual is not a substitute for the mastering procedures as detailed
in KAO’s ISO documentation.
To install the software, you must know how to set the speed of a COM Port in
Windows.
What You Need to Have
You need a computer with the following:
l Windows 3.x, Windows 95, Windows NT or a compatible operating system
l An unused COM Port #2, which can be set to 19,200 baud
You will also need a Zebra 140 printer or other ZPL compatible printer with a
resolution of 203 dots per inch (dpi). The cabling needed depends upon the
configuration of the printer. See the printer’s manual for details.
NOTE: This is NOT an ISO document. If you find any
instructions in this manual which conflict with KAO’s ISO
procedures, follow the ISO procedures instead of the
instructions in this manual.
Installation
2
Installing to Windows 3.x
1) Close any open Windows applications, with the exception of virus detection
programs.
2) Insert the CADLabel diskette into a 3 inch floppy drive.
3) In Windows Program Manager select File from the menu bar.
4) Under File select Run...
a:\cadstall
5) In the Run dialog box type:
(substitute the correct drive letter if your floppy drive is not named “a”)
6) Click the OK button.
Installing to Windows 95 or Windows NT 4.0
1) Close any open Windows applications, with the exception of virus detection
programs.
2) Insert the CADLabel diskette into a 3 inch floppy drive.
3) Click the Start button.
4) Select Run... from the Start menu.
a:\cadstall
5) In the Run dialog box type:
(substitute the correct drive letter if your floppy drive is not named “a”)
6) Click the OK button.
Configuring the COM Port
In the Windows Control Panel, set COM Port #2 as follows:
- Baud = 19,200
- Parity = none
- Flow Control = none
- Data Bits = 8
- Stop Bits = 1
Getting Started
3
Startup
Start Windows. Click on the
icon to start CADLabel. The CADLabel
window should open in the lower right corner of the screen.
If your floppy masters are DOS formatted, open a DOS window. Adjust the size and
position of the DOS window so that it fits above the CADLabel window. Your screen
should resemble Figure 1.
What Goes in the Boxes?
This section will give you a general idea of the type of data that goes into each field of
the label. REMEMBER! This is not an ISO document. If you find any instructions
in this manual that conflict with KAO’s ISO procedures, follow the ISO procedures
instead of the instructions in this manual.
Master Control # - The number
assigned to the master by KAO.
Disk: - The disk number and the
number of disks in the set, e.g. 2/6.
Title 1, 2, & 3 - A description of the
master based on the customer’s label.
Version: - The version of the master
as found on the customer’s label.
P/N: - The customer’s part number for
the software contained on the master.
Date: - The date you made the
master.
Customer: - Name of the customer.
Format # - The Trace format used
for the master.
DMA - Initials of the DMA operator.
QA - Initials of the QA operator.
Scan - Initials of the scan operator.
Figure 1: CADLabel and DOS window
The bottom fields reflect
information obtained from the
master. See the descriptions of the
individual label formats for details
(pages 5-14).
Selecting a Label Format
4
How to Select a Label Format
From the CADLabel menu bar, select Label Format. Your screen should now
resemble Figure 2.
The first 7 formats are for 3 inch
floppy disks. The last 3 formats are
for 5 inch floppy disks.
Use Table 1 to determine which
label format to use. Find the media
size and density on the left of the
table. Across the top of the table
locate the type of format that the
master has.
Note that, IBM formatted Microsoft
masters belong in the Microsoft
column. Macintosh formatted
Microsoft masters belong in the
MAC column.
Figure 2: Label Format
The OTHER column is for masters with a unique format, copy protection, or other
oddities that require specialized instructions. Use this label format anytime space is
required for special instructions to QA or Duplication.
The next 10 pages contain examples of each label format and explanations of how
they differ.
IBM
MAC
FORMAT OF MASTER
NEC
Microsoft (customer)
3 MAC DD
3 MICROSOFT
M 3DD 3 IBM
E 3HD 3 IBM
3 MAC HD
3 MICROSOFT
D
5DD
5
IBM
5 MICROSOFT
I
A 5HD 5 IBM
5 MICROSOFT
Table 1: Choosing the Correct Label Format
3 NEC
DMF
3 MICROSOFT DMF
OTHER
3 OTHER
3 OTHER
5 OTHER
5 OTHER
Selecting a Label Format 5
The 3 IBM Label Format
3 MICROSOFT
3 MICROSOFT
5 MICROSOFT
5 MICROSOFT
Use the 3 IBM label format for masters
that meet the following requirements:
l The master matches the
characteristics shown in Table 2.
l The customer is not Microsoft.
l Specialized QA or duplication
instructions are not required on the
label.
Figure 3 shows the label as it would print
with none of its fields filled in.
3 NEC
3 MICROSOFT DMF
QA
3 MAC DD
M 3DD 3 IBM
E 3HD 3 IBM
3 MAC HD
D
I 5DD 5 IBM
A 5HD 5 IBM
Table 2: Choosing 3 IBM
DMF
DMA
MAC
OTHER
3 OTHER
3 OTHER
5 OTHER
5 OTHER
Scan
IBM
FORMAT OF MASTER
Microsoft (customer)
NEC
MASTER CONTROL #
TITLE:
P/N:
VER:
CUSTOMER:
QA INSTR: FMT #
DIR A: (LAST FILE)
NAME
SIZE
FILES
DISK:
DATE:
DATE
TIME
BYTES FREE
Figure 3: 3 IBM Label
Figure 4 shows the CADLabel
screen for the 3 IBM label format.
In the DOS window, do a directory
on the master (i.e. DIR A:). Enter
the resulting Name, Size, Date, and
Time data for the last file on the
master into the corresponding label
fields.
Also, enter the number of files the
master has and the bytes of free
space left on the master.
Figure 4: 3 IBM Screen
Selecting a Label Format 6
The 3 MAC DD Label Format
3 MICROSOFT
3 MICROSOFT
5 MICROSOFT
5 MICROSOFT
Use the 3 MAC DD label format for
masters which meet the following
requirements:
l The master matches the
characteristics shown in Table 3.
l Specialized QA or duplication
instructions are not required on the
label.
Figure 5 shows the label as it would print
with none of its fields filled in.
3 NEC
3 MICROSOFT DMF
QA
3 MAC DD
M 3DD 3 IBM
E 3HD 3 IBM
3 MAC HD
D
I 5DD 5 IBM
A 5HD 5 IBM
Table 3: Choosing 3 MAC DD
DMF
DMA
MAC
OTHER
3 OTHER
3 OTHER
5 OTHER
5 OTHER
Scan
IBM
FORMAT OF MASTER
Microsoft (customer)
NEC
MASTER CONTROL #
TITLE:
P/N:
VER:
DISK:
DATE:
CUSTOMER:
QA INSTR: FMT # 10093.F
MACINTOSH VERIFY
TAG$
DATA$
Figure 5: 3 MAC DD Label
Figure 6 shows the CADLabel
screen for the 3 MAC DD label
format.
To obtain the information for the
TAG$ and DATA$ fields, load the
master into the Macintosh Verify
Program. This must be done on a
Macintosh QA station.
Figure 6: 3 MAC DD Screen
Selecting a Label Format 7
The 3 MAC HD Label Format
3 MICROSOFT
3 MICROSOFT
5 MICROSOFT
5 MICROSOFT
Use the 3 MAC HD label format for
masters which meet the following
requirements:
l The master matches the
characteristics shown in Table 4.
l Specialized QA or duplication
instructions are not required on the
label.
3 NEC
3 MICROSOFT DMF
QA
3 MAC DD
M 3DD 3 IBM
E 3HD 3 IBM
3 MAC HD
D
I 5DD 5 IBM
A 5HD 5 IBM
Table 4: Choosing 3 MAC HD
DMF
DMA
MAC
OTHER
3 OTHER
3 OTHER
5 OTHER
5 OTHER
Scan
IBM
FORMAT OF MASTER
Microsoft (customer)
NEC
MASTER CONTROL #
TITLE:
P/N:
VER:
DISK:
DATE:
CUSTOMER:
QA INSTR: FMT # F00278.f
MAC HD ---> Diskcomp
Figure 7 shows the label as it would print
with none of its fields filled in.
Figure 7: 3 MAC HD Label
Figure 8 shows the CADLabel
screen for the 3 MAC HD label
format.
Figure 8: 3 MAC HD Screen
Selecting a Label Format 8
The 3 Microsoft Label Format
3 MICROSOFT
3 MICROSOFT
5 MICROSOFT
5 MICROSOFT
Use the 3 Microsoft label format for
masters which meet the following
requirements:
3 NEC
3 MICROSOFT DMF
QA
3 MAC DD
M 3DD 3 IBM
E 3HD 3 IBM
3 MAC HD
D
I 5DD 5 IBM
A 5HD 5 IBM
Table 5: Choosing 3 Microsoft
DMF
DMA
MAC
TITLE:
l The master is not DMF format.
P/N:
VER:
Figure 9 shows the label as it would print
3 OTHER
3 OTHER
5 OTHER
5 OTHER
MASTER CONTROL #
l The master matches the
characteristics shown in Table 5.
l Specialized QA or duplication
instructions are not required on the
label.
OTHER
Scan
IBM
FORMAT OF MASTER
Microsoft (customer)
NEC
DISK:
DATE:
CUSTOMER: MICROSOFT
QA INSTR: FMT #
TYPE: Qcheck
Figure 9: 3 Microsoft Label
with none of its fields filled in.
Figure 10 shows the CADLabel
screen for the 3 Microsoft label
format.
When you enter Microsoft’s part
number into the P/N: field, it is also
automatically printed in the QA
Instructions. The result is an
instruction with the following form:
TYPE: Qcheck ###-###-###
Figure 10: 3 Microsoft Screen
Selecting a Label Format 9
The 3 Microsoft DMF Label Format
3 MICROSOFT
3 MICROSOFT
5 MICROSOFT
5 MICROSOFT
Use the 3 Microsoft DMF label format for
masters which meet the following
requirements:
l The master matches the
characteristics shown in Table 6.
l Specialized QA or duplication
instructions are not required on the
label.
Figure 11 shows the label as it would print
with none of its fields filled in.
3 NEC
3 MICROSOFT DMF
QA
3 MAC DD
M 3DD 3 IBM
E 3HD 3 IBM
3 MAC HD
D
I 5DD 5 IBM
A 5HD 5 IBM
Table 6: Choosing 3 Microsoft DMF
DMF
DMA
MAC
OTHER
3 OTHER
3 OTHER
5 OTHER
5 OTHER
Scan
IBM
FORMAT OF MASTER
Microsoft (customer)
NEC
MASTER CONTROL #
TITLE:
P/N:
VER:
DISK:
DATE:
CUSTOMER: MICROSOFT
QA INSTR: FMT # MSDMF.f
TYPE: Qcheck
For DiskDupe -> Set Disk to Custom
TRACE Format -> 3HD DMF (Turn Off Turbo)
Figure 11: 3 Microsoft DMF Label
Figure 12 shows the CADLabel
screen for the 3 Microsoft DMF
label format.
When you enter Microsoft’s part
number into the P/N: field, it is also
automatically printed in the QA
Instructions. The result is an
instruction with the following form:
TYPE: Qcheck ###-###-###
Figure 12: 3 Microsoft DMF Screen
Selecting a Label Format 10
The 3 NEC Label Format
3 MICROSOFT
3 MICROSOFT
5 MICROSOFT
5 MICROSOFT
Use the 3 NEC label format for masters
which meet the following requirements:
l The master matches the
characteristics shown in Table 7.
l Specialized QA or duplication
instructions are not required on the
label.
Figure 13 shows the label as it would print
with none of its fields filled in.
3 NEC
3 MICROSOFT DMF
QA
3 MAC DD
M 3DD 3 IBM
E 3HD 3 IBM
3 MAC HD
D
I 5DD 5 IBM
A 5HD 5 IBM
Table 7: Choosing 3 NEC
DMF
DMA
MAC
OTHER
3 OTHER
3 OTHER
5 OTHER
5 OTHER
Scan
IBM
FORMAT OF MASTER
Microsoft (customer)
NEC
MASTER CONTROL #
TITLE:
P/N:
VER:
DISK:
DATE:
CUSTOMER:
QA INSTR: FMT # 10139.f
VERIFY ON TRACE SYSTEM
Use READ DISK to load onto TRACE system
Turn TURBO Off on the TRACE Loaders!
NEC Format -> PC’s can not read this disk!
Figure 13: 3 NEC Label
Figure 14 shows the CADLabel
screen for the 3 NEC label format.
Figure 14: 3 NEC Screen
Selecting a Label Format 11
The 3 Other Label Format
3 MICROSOFT
3 MICROSOFT
5 MICROSOFT
5 MICROSOFT
Use the 3 Other label format for masters
which meet the following requirements:
l The master matches the
characteristics shown in Table 8.
l Specialized QA or duplication
instructions ARE required on the
label.
3 NEC
3 MICROSOFT DMF
QA
3 MAC DD
M 3DD 3 IBM
E 3HD 3 IBM
3 MAC HD
D
I 5DD 5 IBM
A 5HD 5 IBM
Table 8: Choosing 3 Other
DMF
DMA
MAC
OTHER
3 OTHER
3 OTHER
5 OTHER
5 OTHER
Scan
IBM
FORMAT OF MASTER
Microsoft (customer)
NEC
MASTER CONTROL #
TITLE:
P/N:
VER:
DISK:
DATE:
CUSTOMER:
QA INSTR: FMT #
Figure 15 shows the label as it would print
with none of its fields filled in.
Figure 15: 3 Other Label
Figure 16 shows the CADLabel
screen for the 3 Other label format.
Enter the special QA and/or
duplication instructions into the
bottom 3 fields.
Figure 16: 3 Other Screen
Selecting a Label Format 12
The 5 IBM Label Format
IBM
MAC
3 MAC DD
M 3DD 3 IBM
E 3HD 3 IBM
3 MAC HD
D
I 5DD 5 IBM
A 5HD 5 IBM
Table 9: Choosing 5 IBM
FORMAT OF MASTER
Microsoft (customer)
NEC
3 MICROSOFT
3 MICROSOFT
5 MICROSOFT
5 MICROSOFT
3 NEC
DMF
OTHER
3 MICROSOFT DMF
3 OTHER
3 OTHER
5 OTHER
5 OTHER
Use the 5 IBM label format for masters which meet the following requirements:
l The master matches the characteristics shown in Table 9.
l The customer is not Microsoft.
l Specialized QA or duplication instructions are not required on the label.
Figure 17 shows the label as it
would print with none of its
fields filled in.
MASTER CONTROL #
FMT #
TITLE:
CUSTOMER:
DISK:
P/N:
VER:
QA INSTR: DIR A: (LAST FILE)
NAME
SIZE
DATE
TIME
FILES
DATE:
Scan
DMA
QA
BYTES FREE
Figure 17: 5 IBM Label (75% of actual size)
Figure 18 shows the CADLabel
screen for the 5 IBM label format.
In the DOS window, do a directory
on the master (i.e. DIR A:). Enter
the resulting Name, Size, Date, and
Time data for the last file on the
master into the corresponding label
fields.
Also, enter the number of files the
master has and the bytes of free
space left on the master.
Figure 18: 5 IBM Screen
Selecting a Label Format 13
The 5 Microsoft Label Format
IBM
MAC
3 MAC DD
M 3DD 3 IBM
E 3HD 3 IBM
3 MAC HD
D
I 5DD 5 IBM
A 5HD 5 IBM
Table 10: Choosing 5 Microsoft
FORMAT OF MASTER
Microsoft (customer)
NEC
3 MICROSOFT
3 MICROSOFT
5 MICROSOFT
5 MICROSOFT
3 NEC
DMF
OTHER
3 MICROSOFT DMF
3 OTHER
3 OTHER
5 OTHER
5 OTHER
Use the 5 Microsoft label format for masters which meet the following requirements:
l The master matches the characteristics shown in Table 10.
l Specialized QA or duplication instructions are not required on the label.
Figure 19 shows the label as it
would print with none of its
fields filled in.
MASTER CONTROL #
FMT #
TITLE:
CUSTOMER: MICROSOFT
DISK:
DATE:
P/N:
VER:
Scan DMA
QA INSTR: TYPE: Qcheck
QA
Figure 19: 5 Microsoft Label (75% of actual size)
Figure 20 shows the CADLabel
screen for the 5 Microsoft label
format.
When you enter Microsoft’s part
number into the P/N: field, it is also
automatically printed in the QA
Instructions. The result is an
instruction with the following form:
TYPE: Qcheck ###-###-###
Figure 20: 5 Microsoft Screen
Selecting a Label Format 14
The 5 Other Label Format
IBM
MAC
3 MAC DD
M 3DD 3 IBM
E 3HD 3 IBM
3 MAC HD
D
I 5DD 5 IBM
A 5HD 5 IBM
Table 11: Choosing 5 Other
FORMAT OF MASTER
Microsoft (customer)
NEC
3 MICROSOFT
3 MICROSOFT
5 MICROSOFT
5 MICROSOFT
3 NEC
DMF
OTHER
3 MICROSOFT DMF
3 OTHER
3 OTHER
5 OTHER
5 OTHER
Use the 5 Other label format for masters which meet the following requirements:
l The master matches the characteristics shown in Table 11.
l Specialized QA or duplication instructions ARE required on the label.
Figure 21 shows the label as it
would print with none of its
fields filled in.
MASTER CONTROL #
FMT #
TITLE:
CUSTOMER:
DISK:
P/N:
VER:
QA INSTR:
DATE:
Scan
DMA
QA
Figure 21: 5 Other Label (75% of actual size)
Figure 22 shows the CADLabel
screen for the 5 Other label format.
Enter the special QA and/or
duplication instructions into the
bottom 3 fields.
Figure 22: 5 Other Screen
Printing a Label
15
Overview
Now you should know what data to put in the first 13 label fields (Getting Started
page 3) and which label format to use for your master (Selecting a Label Format
pages 4 - 14).
The next section is an example using the 3 IBM label format.
An Example: Printing the 3 IBM Label Format - Getting the Directory Information
Open CADLabel and a DOS
window and position them as
shown in Figure 23. Place the
master in your floppy drive.
In the DOS window type:
DIR A: and press ENTER
(Figure 23). If your floppy
drive is not named A substitute
the correct drive letter.
The directory information for
the master will then appear in
the DOS window. It will
Figure 23: The Directory Command
resemble Figure 24. If you get the
error message Abort, Retry, Fail,
the master is not IBM formatted
and can not be read by DOS. See
pages 4-14 for help in selecting the
correct label format.
If you cannot see the data for the
last file on the disk and/or the disk
summary information, resize or
scroll the DOS window (Figure 24).
Figure 24: Results of the Directory Command
Printing a Label 16
An Example: Printing the 3 IBM Label Format - Data Entry
To start with, the cursor will be in the Master Control # field. Enter the master
control number and then press the TAB Key to move to the next field, Title 1.
Continue in this fashion through all of the fields.
If you need to go back and change a field, press the TAB and SHIFT Keys together or
click on the desired field with the mouse.
Within a field, the ARROW Keys will move the cursor left and right through the text,
the BACKSPACE Key will erase one
character at a time to the left of the
cursor, and the DELETE Key will erase
one character at a time to the right of the
cursor. Highlighting text with the mouse,
SO14236
and then pressing a key, will erase the
MASTER CONTROL # SO14236
text.
TITLE: PROCESSOR DEMO & DIAGNOSTICS
Scan DMA
CK
CAD
QA
CAD
After entering data in the last label field,
press the TAB Key one more time to get to
the Labels To Print field. Enter the
SO14236
Your screen should now resemble Figure
26. As shown in the Title 1 field, it is okay
if your text exceeds the width of the text
box by a small amount.
P/N: 351980-003
DISK: 1/1
VER: 3.0
DATE: 5/6/95
CUSTOMER: INTEL
QA INSTR: FMT # F00278
DIR A: (LAST FILE)
NAME
SIZE
WUNINSTL.EXE 67584
10 FILES
DATE
4-6-95
TIME
6:19p
529920 BYTES FREE
Figure 25: The Completed Label
number of labels you want to print.
Press the TAB Key again to get to
the Print button. Press the ENTER
Key and the labels will be printed.
The resulting labels should
resemble Figure 25.
If nothing happens, check the
printer connections. Also, make
sure that COM Port #2 is setup as
shown on page 2.
Figure 26: CADLabel With Fields Filled In
Printing a Label 17
Centering the Print on the Label
Set the MarginX and MarginY values to center the print on the label stock. Click on
the field with the mouse and enter a value. Each increment of one equals 1/203 of an
inch. Use negative values to move the image up or to the left.
Keyboard Shortcuts
Function
select 3 IBM format
select 3 MAC DD format
select 3 MAC HD format
select 3 Microsoft format
select 3 Microsoft DMF format
select 3 NEC format
select 3 Other format
select 5 IBM format
select 5 Microsoft format
select 5 Other format
Print a label
Clear the label fields
Exit CADLabel
Table 12: Keyboard Shortcuts
Alt Key
Ctrl Key
Alt + L then I
Alt + L then M
Alt + L then H
Alt + L then S
Alt + L then D
Alt + L then N
Alt + L then O
Alt + L then B
Alt + L then T
Alt + L then R
Alt + P
Alt + C
Alt + X
Ctrl + I
Ctrl + M
Ctrl + H
Ctrl + S
Ctrl + D
Ctrl + N
Ctrl + O
Ctrl + B
Ctrl + T
Ctrl + R
To speed things up, try the
keyboard shortcuts in Table 12.
About CADLabel
CADLabel was written in Visual
Basic 2.0.
If you have problems or would like a
customized label format, contact
me, Clyde Dixon, at the KAO
Wilsonville Mastering Department.
Figure 27: Shameless Self Promotion