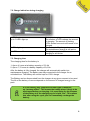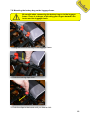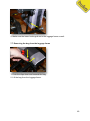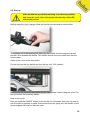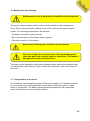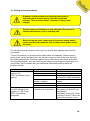
1
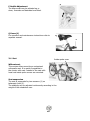
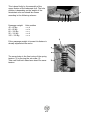
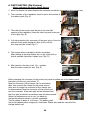
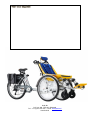
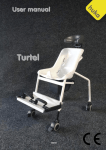
user manual Duet version 2012.1 Introduction page 1 – 2 Product description page. 3 – 5 Adjust and preparations page. 6 – 12 Usage page 13 – 15 Maintenance page 16 -17 Index 1. Introduction 1 2. Product description 2.1 Purpose of use 2.2 Safety and driving behavior 2.3 Prevention of theft 2.4 Drive 2.4.1 Duet with ‘Mountain’ drive 2.4.3 DUET with electrical drive 2.5 Technical 2.6 Dimension and Weight 2.7 Accessories 3 3 3 4 4 4 4 5 5 5 3. Adjust and preparations 3.1 Getting on and off 3.2 Brakes 3.3 Wheelchair and bike 3.4 Seat 3.5 The wheels 3.5.1 Pressure and valve 3.5.2 Spokes 3.5.3 Hubs 3.6 Crankshaft, crank and pedals 3.7 The chain 6 6 9 9 10 12 12 12 12 12 12 4. Usage 4.1 Riding the Duet 4.2 User environment 4.3 Familiar user errors 4.4 Brakes 4.4.2 Parking brake 4.5 The lighting 4.6 Safety lock 4.7 Lifting 4.8 Safety 13 13 14 14 14 14 14 15 15 15 5. Maintenance 5.1 Cleaning 5.2 Control 5.3 Tires 5.3.1 Tires pressure 5.4 Repair 5.4.1 Authorized dealers for repair 5.4.2 Spare parts 5.4.3 Self-execution of repairs 5.4.4 Disposal of the product 16 16 16 16 16 17 17 17 17 17 6. Duet Electro 18 Guarantee Huka BV gives two years of guarantee on the Duet. Your supplier will carry out this guarantee. The guarantee does not apply to damage or faults of the Duet caused by wrong or improper use. The evaluation of it is the privilege of Huka or a representative to be appointed by Huka. N.B. This guarantee does not apply to components susceptible to wear. Huka BV Huka is a Dutch company that manufactures appliances for the handicapped. If you have any questions about our products or their applications please contact your dealer. Huka BV Münsterstraat 13 7575 ED Oldenzaal The Netherlands tel: +31 (0)541 -572 472 fax: +31 (0)541 - 520 415 mail: [email protected] web: www.huka.nl Modifications Huka reserves the right to make modifications to the product described in this users manual without incurring liability. 1. INTRODUCTION Cycling should be a pleasant activity. That is clear. Every day millions of people mount their bicycles with pleasure. The bicycle is more than just of mean of transport. Cycling radiates freedom and adventure. By means of cycling we save our environment, we obtain somewhat more of the green feeling. But not everybody can make use of the ordinary bicycle. Huka has developed the Duet in order that everybody can enjoy all pleasant aspects of cycling. Aspects like ergonomics, sizes, quality and styling have all played an important role in the design. In general Your Huka Duet is a quality product. Every component of your Huka Duet has been tested and checked extensively. The finishing of the frame and the mounted components are of high quality. Therefore you are assured of an excellent product that provides carefree cycling pleasure. When supplying your new Huka Duet, in principle all described components are adjusted well and/or are tuned to you wishes. But no matter how modern, even a Huka Duet is not completely free of maintenance. There are some things that require attention from time to time. This small manual provides instructions for maintenance that you possible can do yourself and provides information about activities of your (Huka) dealer. To do a little maintenance can be quite fun, because it contributes to a greater cycle pleasure. Please pay particular attention to texts printed bold and in italics. 1 5. 1. 2. 6. 3. 7. 4. 10. 8. 9. 12. 13. 11. 14. Survey 1. Seat with safety belt 2. Armrests (optional) 3. Operating and parking brake 4. Additional parking brake 5. Headrest (optional) 6. Gear-Shift 7. Propulsion unit (bike) 8. Wheelchair 9. Jockey wheels 10. Footrest with optional raised footrest 11. Height adjustment for steering bar 12. Pushrims (optional) 13. Spoke shield (optional) 14. Double Stand Please take notice of the attached manuals for the gear system, braking system, optional motor units and accessories! 2 2. PRODUCT DESCRIPTION 2.1 Purpose of use • The DUET is a carefully engineered combination of an individually adapted wheelchair and a bike with multiple gears. • The maximum load for the detachable wheelchair is 275lbs. • The road traffic laws and all safety regulations must to be obeyed in all situations. • Every operation not described in this manual is forbidden. • The DUET may not be used by the wheelchair user or the bike user alone when both parts are connected. • Structural changes may not be detrimental to traffic safety. 2.2 Safety and driving behavior Before you take delivery of your new ready-to-drive Duet your dealer will have checked all components himself and, if necessary, will have adjusted these in order that you can cycle. If it is the first time that you are sitting on a bicycle this will be somewhat uneasy. No matter how sporty your Duet is, never get tempted into too much enthusiastic behavior on the roadway or riding on and off pavements. Your Duet can sustain visible or invisible damage, which involves additional risks. In order to use your Duet safely we advise you to (let) replace worn components like inner tubes, outer tubes, and brake block immediately. These components are obtained from any cycle shop or from your dealer. 1. The DUET biker must be at least 16 years old. 2. The DUET has to be checked for roadworthy condition before use. 3. All traffic laws are to be obeyed on all journeys on public roads. Every road user must act in such a way that no other person can be jeopardized, damaged or hindered. 4. The wheelchair user has to be fastened with his safety belt according to his/her disability. 5. Always wear ANSI or BSI or GS safety helmets - both: the wheelchair user and the biker. 6. Caution on journeys on wet, slanting, uneven and slippery road surfaces or on tram rails. 7. For journeys in darkness a lighting system has to be mounted on THE DUET. At night switch on the lights. Be visible; wear brightly colored clothing. 8. In pedestrian areas THE DUET may go at walking pace only. 3 2.3 Prevention of theft A safety lock is mounted on most versions of the Duet. If you want additional measures against theft than an additional cable lock is convenient to anchor you bicycle securely. These locks are available in many cycle shops. Always lock your bicycle, also when you leave it just for a short moment. 2.4 Drive 2.4.1 DUET with 'mountain-drive' With additional equipment like spoke cover, shoulder harness, stand and mountain drive gear box. The integrated planetary gear (can be switched on/off) with 1:2.5 reduction creates in combination with the 5-hub-gear a real 10 speed system. Mountain-drive gear Double stand Switch 2.4.2 DUET with electrical drive. Reference the 36V Power Support Manual 4 2.5 Technical • Seat, headrest (accessories) and footrest made from ABS composite, cushioning removable and cleanable (hand wash at 40°C) • Lap belt • Headrest removable (option) • Footrest removable, height and angle adjustable • Bike unit three times lacquered • Wheels 47-559 (26x1.75 inch) with integrated reflection stripes • SRAM Spectro S7-gear with back pedal brake (Plus Model Only) • Front chain rim 38 tooth, rear 24 tooth with chain guard • On twin drum brake effecting parking brake (independent from air pressure) • Battery Operated LED Lightning System • White front reflector • Signal bell • Air pump • Tool-kit with repair kit • bolt nut M4 and M5 2.6 Dimension and Weight Reference the US Brochure for US Measurements Wheelchair length width height height weight Bike Unit length width height weight Combined length weight 80 up to 140 cm (with/without footrest) 65 cm/69 cm (with/without grip wheels) 107 cm (with headrest) 78 cm for transportation (picture L) 27 kg 131 cm 36 cm 85 cm (with saddle) 12,5 kg 265 cm 39,5 kg 2.7 Accessories There is an extensive accessory program available that includes push rims, armrests, rain covers, a cycle computer, a mountain-drive, a rear wheel motor and a carrier for car transport. 5 3. ADJUST AND PREPARATIONS First the wheelchair has to be adapted to the requirements of its user. 3.1 Getting on and off A Lower the wheelchair Clip in parking brake loop ( open, brake position), open coupling (see point O) and lower wheelchair on jockey wheels. B Tilt forward the footrest Getting on and off the wheelchair can be eased by swinging the footrest sidewards. Pull split pin (1), swing away footrest. Plug in split pin to close footrest again. C Footrest height Adjustment The height of the footrest (2) can be adjusted on the foot rest holder or by moving the holdfast (3). D Footrest angle adjustment (no picture) 2 holdfasts are mounted by bolts underneath the footrest. Loosen the bolts, adjust the angle and tighten the bolts. E Move footrest (no picture) Loosen all bolts on the footrest and take them off. Take off footrest and mount it in the desired position. Tighten bolts. F 1 F Headrest adjustment Loosen the bolts (1), adjust angle and height and tighten bolts. 6 G Headrest position Loosen the bolts, move headrest forward or backward, tighten bolts. The headrest can also be used as neck rest, depending on body height and kind of handicap. G H Belt The wheelchair user has to be fastened according to his/her handicap. Foot and ankle straps Thigh harness Lap belt Shoulder harness Velcro straps Harness clip 4 3 5 6 I Assembling of seat Position the seat on the tube-frame as it fits on the two bars (1) and (2) with its guides underneath. Close the fastening clamp on the bottom-side. Check correct fixing of the seat. Quick release to remove seat (Option) Open the fastening clamp and remove seat. 7 1 I 2 J Seat angle Pull back snap (1) and turn by 90° to lock it. Loosen the second snap and fix it in the desired position (2). Fix the first snap after another 90° turn. You should hear the snap-in an it should rest against the hull. After loosen both snap-springs you can move the support forward for easy storage and transport. J 2 1 Wheelchair Centre of Gravity The wheelchair's center of gravity should be adjusted such that the rear end of the connected bicycle does not tip up if the passenger (wheelchair rider) leans forward, when the bicycle rider is not on board. This adjustment should be performed by an expert. K Adjustment Remove seat, loosen 2 mudguard supports, loosen 4 holdfasts and move tube frame (use rubber hammer if necessary). Tighten bolts and adjust both mudguards. L Height adjustment for steering bar Open holdfasts(1) on both sides, adjust height and tighten bolts. In the same way the steering bar can be fixed for transport in the low position height. Tools (2) on both sides. 2 L Caution! If the holdfasts (1) are opened too far, be sure that the security snap and all fixations are in place firmly, especially the holes fit in the fixation points of the lower tube. 8 1 3.2 Brakes M Operating Brake To brake pull lever (1) upward. M Parking Brake To brake pull lever (1) upward an push parking brake loop forward until leaver is fixed To open parking brake pull parking brake backwards N Brakes fine adjustment The brakes are adjusted by the manufacturer. A fine adjustment can be done if necessary. Adjust operating brakes equally on both sides. Take care, that while turning the wheels without operating the brake there is just no resistance. Make several test tries, ensure that there is equal brake effect on both sides! The full adjustment of the brakes should be done by an expert. WARNING: Improper operation of brakes may cause serious personal injury! N 3.3 Wheelchair and bike The wheelchair rider may stay in the wheelchair. The wheelchair can be used separately. Pull parking brake ! O O Connect wheelchair Locate the bike unit (1) into the fork (2) at the wheelchair, tip wheelchair carefully until the coupling is connected. Clip in and close shackle (3). 3 5 4 2 Disconnect wheelchair Open shackle, lower wheelchair carefully and hang off bike unit. The shackle should be adjusted in a way that it can be opened and closed by slight pressure. The force necessary to open or close the shackle can be adjusted by the nuts (5). 9 P P Saddle Adjustment The bikers seat may be adjusted up or down, forwards and backward and tilted. Q Gears (1) For operation and maintenance instructions refer to separate manual. 3.4 Seat Q 1 Inside spoke cover Without seat This version allows mounting a customized orthopedic seat. It is mainly compatible to the version with seat. Instead of the seat with head-rest inside spoke covers are mounted. Seat suspension The seat is suspended by two seesaws (1) on telescopic forks (2). The elasticity can be adjusted continuously according to the weight of the wheelchair user. 10 This is done firstly by the assembly of the upper fixation of the telescopic fork. The hole position is depending on the weight of the wheelchair user and should be chosen according to the following scheme: 1 a Passenger weight 45 – 65 Kg 60 – 85 Kg 80 – 100 Kg 95 – 110 Kg 105 – 120 Kg Hole position => a => b => c => d => e 1 If the passenger weight is known this feature is already adjusted at the works. 2 4 The second step is the fine tuning of the spring tension (3) by turning the set screw (4). Take care that both sides have about the same tension. 11 3 b c d e 3.5 The wheels The wheels are the most important components of the cycle, which is responsible for a light ride and a high cycle comfort. Many matters are important thereby, like well-inflated tires tightly tensioned spokes and a light running with absence of play. 3.5.1 Pressure and valve The correct tyre pressure is obtained for most tires when you can still push the tyre in a little bit. When your tires are too soft they will wear down faster. You will ride much more comfortable on quite hard tires and your bicycle responds better to the brake and movements of the handlebars. 3.5.2 Spokes The spokes take care of the stability of the wheel and thus of the bicycle. Therefore a correct pressure is important. Because new spokes always have to stabilize to some extent, the wheels of your bicycle have to be checked after a couple of weeks. Then your Huka-dealer adjusts the spokes to the correct tension. In case it happens that a spoke breaks or is getting loose your Huka-dealer will of course corrects this. 3.5.3 Hubs The hubs of the wheels should be adjusted accurately. There should not be any noticeable play. If you notice excessive play or the wheel is running heavily ask your Huka-dealer to correct this. 3.6 Crankshaft, crank and pedals Most crankshaft bearings mounted by Huka are completely free of maintenance and cannot be re-adjusted. If it does happen that play develops in the bearing then it is necessary to contact your Huka- dealer immediately. If play develops between the crank and the crankshafts then you can take off the dust cap and retighten the underlying bolt with a socket spanner. Most pedals are also free of maintenance. If the play is too large you can consult your Huka-dealer. When you are mounting the pedals yourself watch for the indications L (left) and R (right on the pedal axes. The left pedal is screwed in anti-clockwise, the right pedal clockwise. You can use an open-end spanner or a special (narrow) pedal spanner. Specially adapted pedals can also be provided as an option. See paragraph 2.5 Accessories for this purpose. 3.7 The chain When the chain pressure is correct your Duet pedals lightly and you will not hear the chain. When your bicycle is delivered the chain will be well adjusted by your Huka-dealer. If you notice that the chain is too slack have it re-adjusted by your Huka- dealer. This is very specified work that can be best left to your dealer. A plastic chain cover protects both the chain and the drive system. 12 4. USAGE 4.1 Riding the Duet • Check your DUET prior to riding on its safe and roadworthy condition. • As a three wheeled cycle the DUET has different performance characteristics than a regular two wheeler. Inexperienced riders should practice slowly first. • On a bicycle, you steer largely by leaning into corners. You cannot lean a three wheeler this way. The cyclist may improve the balance of the DUET on curves by leaning into the inner curve. You will notice that the DUET automatically leans the bicycle part into the curve. • The DUET has a wide turning circle so beware. Turning in a narrow situation can be eased if the cyclist gets off lifts the bike part a little and turns the whole machine on the spot. It is advised to ride the Duet with a passenger. The DUET is balanced for loaded operation, and actually it is less stable to ride without a passenger. . • Ride responsibly. • Safety before speed. • Always wear an approved safety helmet – both riders! • Caution on journeys on wet, slanting, uneven and slippery road surfaces or on tram rails. • It is not a racing machine. Moderately fast travel is possible where conditions are good - but slow down whenever there is danger or poorer road conditions. • Parking the DUET: - Push parking brake fully. • Protect your DUET by locking it up when you leave it, at home or away. • Do not neglect your legal responsibility towards the disabled. Warning! • Forbidden: the transport of objects of all kinds in the wheelchair. • Forbidden: the transport of more than one person in the wheelchair. • Forbidden: The DUET may not be towed or pushed by other vehicles. 13 4.2 User environment The Huka Duet is suitable for use on roads with firm underground. The Duet can be used into all weather, but avoid when possible contact with salt water because of the influence of the metal parts. 4.3 Familiar user errors The following user errors are possible and should be avoided. These errors can cause personal injuries or damage to the product. Respect the following situations: Always provide for the correct pressure of the tires. Avoid persons near the bicycle, particularly with the wheels, dangerous situations can occur. Check regularly the good functioning of the brakes and make sure they function perfect. Check regularly the good functioning of the lights and make sure they function perfect. Respect the traffic rules and regulations seriously and take caution in traffic. 4.4 Brakes 4.4.1 Parking brake All bicycles are equipped with a parking brake. This brake takes care that the bicycle stays firmly at its position when mounting or dismounting the bicycle. 4.5 The lighting Your Duet is provided with a safe and reliable lighting. Always check that all lights are working when you turn your lights on. It is highly dangerous when you ride in the dark, in the twilight or in the mist without lights. Check the following points if (part of) your lighting does not function: Check that the electric wires are connected to both lights and the dynamo and there is no formation of rust. Follow the electric wires and check that the insulation layer of the wires is still intact everywhere (check that there is no short circuit because of naked wires), Check that the lights in their fittings are free of oxidation, that contact is made and that the filaments are not broken, Check that the dynamo is adjusted well and is running on the middle of the tyre. Check that the electric wires are not broken and / or are not jammed anywhere. 14 4.6 Safety lock If you want to lock your Duet you should first turn the key clockwise and hold it before you can push the handle downward. If the lock is bolted the key releases and can be removed. 4.7 Lifting It is because of the weight, it is not possible to lift your Duet alone. Lifting with two persons is possible. Pay attention to lift the Duet only at firmest parts and not for example the accessories. 4.8 Safety 1. The Duet has to be checked for roadworthy condition before use. 2. The road traffic act and all traffic laws are to be obeyed on all trips on public roads. Every user must act in such a way that no other person can be jeopardized, damaged or hindered. 3. Please wear a helmet every time you are using the Duet. 4. Caution on journeys on wet, slanting, uneven and slippery road surfaces or on tram rails. 5. For journeys in darkness a lighting system has to be mounted on the Duet. At night switch on the lights. Be visible; wear brightly colored clothing. 6. Always ride with reasonable speed and adjust your speed when going through curves. 7. When parking the Duet, make sure that the parking brake is locked. 15 5. MAINTENANCE 5.1 Cleaning Clean the DUET with water and soap. Never use a high pressure cleaner! The metal parts, the plastic parts and the soft parts, like saddle, can be best cleaned with a soft, moist cloth. Here you can use soap. Use never aggressive or scratching cleaning agents. The different mechanisms should regularly controlled on impurities such as sand and etc. and when necessary be clean-brushed. Upholstery parts can be removed at wet weather or for washing (wash by hand, 40°C). Cleaning regularly aids the preservation of your tricycle. Never use a high-pressure cleaner for cleaning your cycle. This is because the pressure of the water is so forceful that you will spray the grease from the bearings. 5.2 Control To be checked regularly. These items/parts are subject to wear and tear: Chain – to be cleaned and greased Sprocket, chain rings and gear parts – to be cleaned and greased Brake cables – to be adjusted Tires – Check air pressure; low pressure can lead to more wear Lighting – check function – if necessary exchange bulb Handlebar cover – exchange eventually A bicycle shop must check regularly the spoke tension - the first time after approx. 300 mi. 5.3 Tires Tire size and maximum tire pressure are written on the tire wall. We recommend to use the maximum tire pressure written on the tire wall. Check the tire pressure at the fuel station. In case of emergency, use the inflator attached to the frame. The tires are available at a local bicycle dealer. In case of pressure loss, the inner tube of the front wheels can be changed without removing the whole wheel. The tire walls are fitted with reflector strips. 5.3.1 Tire pressure The wheels have car valves (vents). You can refill air at each gas station. An air pump is mounted on the bike unit. Big 47-559 (26x1,75 inch) Small 200x50 mm 3,5 bar 2,5 bar 16 5.4 Repair 5.4.1 Authorized dealers for repair The dealer, which sold or delivered you the Duet, is authorized by Huka BV to execute necessary repairs. If you need a dealer, you can contact us: Huka BV Tel: +31 (0)541 572 472 Fax: +31 (0)541 520 415 e-mail: [email protected] 5.4.2 Spare parts Tires and tubes are available at bicycle shops or dealers. Defect parts of the wheelchair may only be exchanged against original spare parts. Huka BV can supply these parts on request of your dealer. 5.4.3 Self-execution of repairs It is not recommended to execute repairs yourself. By doing so your warranty claim and the guarantee at the product will expire. Repairs must be accomplished at any time by an authorized dealer or bike shop. 5.4.4 Disposal of the product At the end of the life span, the product, as well as the accessories and the packing, can be disposed of as normal waste. You should separate the product to the disposal into the different materials and hand these over to a garbage waste disposal facility. Safety This product meets the requirements fo the European guideline 93/42/EWG on medical products In the interest of maximum safety the Duet was approved by the Rheinisch-Westfälischen TÜV, Germany. 17 6. DUET ELECTRO (Old Version) - Please reference 36V Power Supply Manual 1. After the bicycle has been attached the connectors must be connected in the correct way. 2. The connector of the regulation must be put in the contact of the battery pack (Fig. A). A. 3. The cable of the sensor must be put in the most left opening of the regulation, then the fuse ring must be turned to the right (Fig. B). B. 4. In third connection the connector of the gear grip or from the cabinet of the pedal assistance. Also of this one the fuse ring must be turned (Fig. C). C. 5. The engine cable is coupled to fourth connection. After putting in the plug slightly turn to the right until no further possible (less than a quart turn) (Fig. D) D. 6. After that turn the key in the „On – position. Now the duet is ready for use (Fig. E) E. Before charging the connector of the control-box must be pulled out of the battery-pack, therefore you have to push button “A”. Now the connector of the charger can be connected. After that connect the charger to the power source. After end of charge the connector of the charger can be disconnected. Now the connector of the control-box can be connected. If the back-part will be released from the front part all electric connections must be disconnected. When the batteries are not in use, it is better to charge the batteries once in a month completely. Time to charge is about 6 to 8 hours. The battery-pack has its full capacity after charging it a few times. Please also read the manual of the charger before use! 18 Your local supplier: Huka BV P.O. box 194, 7570 AD Oldenzaal Tel.: +31 (0)541 572 472 . e-mail: [email protected] www.huka.nl User manual 36 Volt power support Version 1-2010 1 Table 1. General ............................................................................................................................. 3 2. Manufacturer/supplier ..................................................................................................... 3 3. Models bicycles ............................................................................................................... 4 4. Uitvoeringen .................................................................................................................... 4 4.1 Pas-vario .................................................................................................................... 4 4.2 Auto-vario .................................................................................................................. 4 4.3 Pas-vario with 3 position switch instead of throttle. ............................................... 4 5. Safety guidelines ............................................................................................................. 5 6. Warranty........................................................................................................................... 6 7. Battery .............................................................................................................................. 6 7.1 Charging the battery .................................................................................................. 8 7.2 Charge indication in the battery during charging ................................................... 9 7.3 Charging time ............................................................................................................ 9 7.4 Connecting the battery .............................................................................................10 7.5 Double battery pack .................................................................................................11 7.6 Mounting the battery bag on the luggage frame 7.7 Removing the bag from the luggage frame ...........................................................13 8. Before the first use..........................................................................................................14 9. Riding the cycle................................................................................................................15 9.1 Safety guideline for riding the cycle ........................................................................15 9.2 Throttle........................................................................................................................16 9.3.1. Activiate the System .........................................................................................17 9.2.2. Deactiviate the System ......................................................................................17 9.2.3. Adjusting the brightness of the LED's ...........................................................17 9.2.4. Switching between eco & Standard Mode.......................................................17 9.3 Battery Indicator .......................................................................................................18 9.4 Error Codes..... ..........................................................................................................19 9.5 Start UP......................................................................................................................20 9.6 Riding ........................................................................................................................21 9.7 Ending the ride..........................................................................................................22 10. Maintenance and cleaning ...........................................................................................23 11. Transportation in a Vehicle .........................................................................................23 12. Solving technical problems.........................................................................................24 13. Disposal...... ..................................................................................................................27 14. Technical Details..........................................................................................................27 2 1. General Used symbols Important information is show in this manuals using colored text frames. Following these indications, warning and guidelines help you to use the product in a safe way. Warning for risk of possible material- or personal damage. Informs about tips and additional information. If the battery isn’t used for a certain time, the system will automatically switch into sleeping mode. To activate the battery pack, you need to push the buttons on the battery pack display. 2. Manufacturer/supplier This cycle power support is supplied by: Huka B.V. Munsterstraat 13 7575 ED Oldenzaal Nederland Tel. +31 (0) 541 572 472 Fax. +31 (0) 541 520 415 Mail. [email protected] Web. www.huka.nl 3 3. Different model of cycles This power support system can be used on the following Huka cycles: City Tri-cycles, (two wheels rear). Country Tri-cycles, (two wheels rear). Nostalgy Tri-cycles, (two wheels rear). AT Tri-cycles, (two wheels rear). Trike Tri-cycles, (two wheels front). Duet/Duet junior, wheelchair-cycle Copilot 24/26, two wheel tandem Copilot 3 24/26, three wheel tandem 4. Versions All cycles using the Heinzmann power support can be delivered in two different versions; You can have a powered cycle (moped) or as a cycle using power assist. Depending on the national regulations it could be that some versions are not allowed in your country. **4.1 Pas-vario The Pas-vario system is a powered pedal support. You have to pedal before the system will support you. This support is active to a maximum driving speed of 25km/15m per hour. The amount of support is regulated by a throttle on your handle bar. This PAS-vario system can additionally have a so called “acceleration support”. With this option it is possible to accelerate from standstill to a maximum speed of 6 kph/3mph without pedalling. For this acceleration support you control the acceleration by the throttle grip on the handle bar. If you pedal whilst using the throttle the system will support you up to a maximum speed of 25 km/15 miles per hour. 4.2 Auto-vario Using the Auto-vario system you actually drive the cycle by electric motor. Using this version, you don’t need to pedal yourself. The maximum speed of this version is set to 20km/12 miles per hour. The driving speed is controlled by the throttle on your handle bar. The Auto-vario system is restricted to Legal requirements. They may differ from country to country . We advise you to first check your national regulations before using a similar system. For this you can ask your local supplier. 4.3 Pas-vario using a 3 speed switch instead of a throttle. This system is identical to the PAS-vario system. The only difference is that instead of a throttle, a 3-position switch in used. The three step are set to a powered pedal support up to: 8 km/h, 12 km/h or 20 km/h. 4 5. Safety guidelines Before using the product, first read the user manual very carefully! Store the user manual in a spot where you can always find it if needed! Should the product change owner be sure the manual is supplied to the new owner as well. Neglecting the safety guidelines of this manual might lead to using the product the wrong way. This can result in material- or even personal damage. The manufacturer or supplier cannot be held responsible for the material- or personal damage as a result of neglecting the safety guidelines. Although it might not be a legal requirement of your country to wear a helmet, we strongly advise you to do so. A helmet can prevent serious head injury in case you might fall. Repair and maintenance on this product is only to be executed by Huka authorized persons/companies. Repairs and maintenance done by unauthorized persons might lead to material- or even personal damage. A broken motor could damage vital parts of the cycle it is mounted on. A broken motor should always be replaced. Damage on the wiring of the system can lead to a short circuit of the system and should therefore always be replaced. Batteries are classified as chemical waste. They need to be disposed according to the local legal regulations. 5 6. Warranty Huka BV supplies a limited warranty period of 2 years on the powered support system. The batteries and charger are covered by a one year limited warranty. Each component is labeled with a unique serial number. This number always needs to be mentioned in case of a warranty claim. You can find the serial number of the motor, electronics and throttle on the labels on that particular component. The serial number is a unique number which is registered at Huka BV. Always mention this serial number in case of a warranty claim. The broken part or component should always be send back to Huka BV for warranty evaluation. 7. Battery The power support system is powered by a Lithium-Ion battery pack. This battery pack has a low weight in relation to the stored energy. (compared to a lead acid battery). The battery is compact, relatively light weight and fits well in the storage bag supplied with the system. Li-Ion batteries are only to be charged by specific chargers! These chargers charge the batteries in exactly the right way. This results in a long life span of the battery. The battery cells are constantly monitored by a piece of electronics called BMS. This BMS system protects the battery against deep charge and overload. This system works closely together with the charger. For this reasons you should only use the charger delivered with the system. Only charge the battery with the original supplied charger. Other chargers can damage the battery. Check, before connecting the charger to the main AC plug, if the current of the charger is the same as the AC current supplied by your energy supplier. You can find the AC current of the charger on its technical label. Only use the charger indoors. The Li-Ion battery is only to be charged is dry areas. Avoid areas with a high risk of fire. 6 A charger with a damaged cable or connector should not be used anymore. Damaged cables are only to be replaced by authorized persons of an authorized Huka supplier. During charging of the Li-Ion batteries of the BMZ brand, the charger and battery can get warm. Make sure both charger and battery are kept in a clear area so they can radiate their heat. Avoid contact between charger and battery with water or other fluids. Should the charger or battery get in contact with water, the charger needs to be immediately unplugged. The charger needs to be checked by Huka authorized personnel before reusing it. At great temperature differences (going from outdoors to indoors) some condensation can take place on both items. Before charging both charger and battery need to adapt to the surrounding temperature. Condensed water can cause a short circuit while charging. The supplied charger is only to be used to charge the battery pack of the power support system. Charging other types of batteries can lead to damage of the charger. Manipulation or modification of the charger is not allowed! Damage on the charger and battery is to be avoided. If there is damage on the charger or the battery, they should first be checked by an authorized Huka supplier before using it. 7 7.1 Charging the battery When the system is delivered for use the battery is normally already charged. When stored over a longer period before using the product there can be some selfdischarge. (about 1% per day at normal temperature of 68 degrees) In that case the battery needs to be charged before using it. The battery can be charged if it is already fitted in the bag on the cycle. The charging situation can be checked in two places: on the display of the battery, and on the display of the throttle. (Throttle display only works if the battery is connected to the system). A Battery charge indication Push the button “A” on the battery display to activate the display. To charge the battery, take the next three steps: 1. Remove the cover of the charger plug on the battery by turning it aside. 2. Plug the main connector of the charger in the into the wall. 3. Plug in the charger plug into the battery. The indicator starts to flash. During charging, the BMZ Li-Ion battery and its charger can get warm. Make sure both charger and battery have some clear space to radiate their heat. 8 7.2 Charge indication during charging 1 LED flashes, up to 3 LED’s light up 4 LED‘s light up all LED’s are off Battery is charging. The number of LED’s shows the amount of charging. The amount of flashing LED’s shows how much still needs to be charged. The battery is fully charged. The maintenance charge is still active. Charging is completed, the maintenance charging is still active. 7.3 Charging time The charging time for the battery is: 1. Aprox. 4 hours at a battery capacity of 5,2 Ah 2. Aprox. 7,5 hours at a battery capacity of 9,6 Ah After the battery is fully charged, the charger will automatically switch into maintenance charging. The battery can stay connected to the charger for an unlimited time. The battery will now be kept on 100% charge. The Battery can be disconnected from the charger at any given moment to be used. The life of the battery of course depends on the amount of charged energy in the pack. A Li-Ion battery has, compared to other type of batteries, no “memory effect”. This means the battery doesn’t have to be discharged before re-charging. It is even better for the lifespan of the battery to if the charging cycle is held “flat”. This means that after using the cycle you can immediately recharge the battery. 9 The battery should be charged at a temperature between 50°F to 86°F. Charging at temperatures under or above the recommended temperature can have a negative influence on the charged energy in the battery. If the temperature outside or in the storage area is below 32°F. it is recommended to take be battery inside to charge. Avoid open fire or heaters. At a longer storage period like holidays or wintertime, the battery should be fully charged first. The battery should be stored in a dry area and at a temperature above 32°F. If you want to use the battery after a long storage period, the battery should be charged first. After long trips with the cycle under full load the battery and the electronic system can get hot. A overheating protection system inside the battery blocks the charging of the battery until the battery pack has cooled down. The battery can still be connected to the charger. As soon as the right temperature is reached the charging will start up automatically. The cool down period might take up to an hour. 7.4 Connecting the battery The battery is with a cable connected to the electronics. The connector has a locking device to prevent it from getting disconnected by accident. The battery cable should always come out of the battery bag facing down. This prevents from water leading along the cable into the battery when riding in rain. To fixate the cable you can use the Velcro strips on the battery bag. Always check if the key switch of the electronic is switched to “off” position before connecting or disconnecting the battery. If the battery isn’t used for a certain time, the system will automatically switch into sleeping mode. To activate the battery pack, you need to push the buttons on the battery pack display. 10 The battery cable should always lead down from the battery bag. This to prevent water leading across the cable into the battery. Fixate the cable using the Velcro strip on the battery bag. Connecting the battery: 1. Check if the key switch is in to “off” position. 2. Plug in the connector coming from the electronics into the battery. 3. Turn the connector clockwise until you hear a click. Disconnecting the battery: 1. Move the locking handle of the connector backwards. 2. Turn the connector counter clockwise until the stop. 3. Pull the connector out of the battery socket. 7.5 Double battery pack As an option you can put two batteries on the cycle. This can be two small batteries or two large batteries. 11 7.6 Mounting the battery bag on the luggage frame Be careful when connecting the battery bag on to the luggage frame. There is a danger of pinching your fingers between the hooks and the luggage frame. 1. Hang the hooks of the bag on the luggage frame. 2. Push the locking clips down. 3. Push the clips to the inside until you hear a click. 12 4. Make sure the lower hooks grab on to the luggage frame as well. 7.7 Removing the bag from the luggage frame 1. Push the clips down and towards the bag. 2. Lift the bag from the luggage frame. 13 8. Before the first use We strongly advise to have a check on the cycle every 300 mi. The check should be done by Huka BV authorized persons. Before every cycle trip you need to do some safety checks. This to prevent problem or malfunctioning of the system. Make sure you have this manual close to you for further information. 8.1 Check the following points on a regular basis: 1. Check the backlash on the front fork. 2. Check if the motor is well tightened, (spokes, nuts, connectors, etc.) 3. Check if the battery bag if fixed well on the luggage frame. 4. Check if the throttle works properly and if it returns back into zero position when released. 5. Check all cables on damage. 6. Check all bolts and nuts if they’re tightened. 7. Check the brakes. 8. Check the tire pressure and wear, (pressure aprox. 3-4 bar) 9. Check if all bearing rung smooth and silent. Always have the cycles checked by an Huka BV authorized person in care of technical problem or malfunction. If the battery isn’t used for a certain time, the system will automatically switch into sleeping mode. To activate the battery pack, you need to push the buttons on the battery pack display. 14 9. Riding the cycle. 9.1 Safety guidelines for riding the cycle. 1. The cycle needs to be in a proper technical condition to secure a safe ride. 2. We advise on the use of a mirror on the cycle to have a good rear view in traffic. 3. The weight of the battery and the motor will have some affect on the behavior of the cycle while riding it. Because of the added weight the braking distance might be longer. First practice in an empty place before using the cycle in traffic. 4. Check the brakes before you go for a ride. 5. Use both front and rear brakes when braking. This leads to a controlled deceleration. 6. Drive carefully on slippery and wet surfaces. Use the throttle gently to prevent the wheels from spinning. 7. Keep both hands on the handle bar when riding. 8. Use the lights of the cycle in dark surroundings or at night. Make sure you can see and you are seen by the other road users. 9. We strongly advise you to wear a helmet when riding the cycle. 10. In wintertime clear the cycle from dirt and salt after a cycle trip. Clean the cycle with some lukewarm water and soft soap. This prevents rust. Neglecting the safety guideline mentioned above might lead to dangerous situations and could result into material- or personal damage. If the battery isn’t used for a certain time, the system will automatically switch into sleeping mode. To activate the battery pack, you need to push the buttons on the battery pack display. 15 9.2 Throttle On the throttle there is a display with buttons and a LED indicator. Buttons: ON/OFF (red) ECO (green) LED: 1 (green) 2 (green) 3 (yellow) 4 (yellow) 5 (red) 6 (green) - ECO 9.3 Buttons The red buttons is used to switch the system on or off. The green button on the right side is used to switch the electronics between economic and standard mode. 16 9.3.1. Activate the system Push the „ON/OFF“ button for a few seconds. During this pushing the green LED will flash. Release the button when the indication has changed. This time interval is meant to prevent for unwanted switching. The system can only be switched on if the throttle is in its zero position. This is an additional safety device. Is the throttle not in the zero position, the red LED and green LED will start to flash after a second. After the throttle is set into its zero position LED 5 will switch off and the system will be activated. Never put the throttle into full throttle position when starting up the system. 9.2.2. Deactivate the system Push the „ON/OFF“ button until all LED’s went off. (aprox. 1 Second). 9.2.3. Adjusting the brightness of the LED’s. After activating the system the LED’s lighten up bright. The brightness of the LED’s can be adjusted to your personal requirements. To set the brightness take the next steps: Push the „ON/OFF“ button for 0.5 seconds (when the system is already switched on). While pushing, the LED 1 will flash. The setting will change after releasing the button. If you push the button shortly, there will no change in brightness. Push again and the brightness of the LED’s will change. 9.2.4. Switching between the eco and standard mode. The power support system has two modes of support. The standard- and eco-mode. (see table). In the eco-mode the motor current is limited. This results in a more economic use and longer battery life. The default setting after starting up is always the eco-mode, LED 6 lights up. To switch to the standard mode you need to push the eco-mode button. LED 6 will erase and the standard mode is active. By pushing the eco-mode button again, you can switch back to the eco-mode. Property Riding speed max. power motor Acceleration Battery Life standard-mode eco-mode equal higher stronger smaller lower weaker greater 17 9.3 Battery indicator. On the throttle you will find a battery indicator using 6 LED’s in different colours. These LED’s give you an indication about the amount of energy stored in the battery. LED 1 to LED 5 show the amount of energy stored in the battery (see label below). If LED 5 is flashing, it is a warning that the battery is almost empty. The electronic will go into sleep mode if it hasn’t been used for a certain period of time. This is to prevent the battery from discharging. LED-indication capacity battery 1 (green) on 2 (green) on 3 (yellow) on 4 (yellow) on 5 (red) on 5 (red) flashing 100 - 86% 85 - 71% 70 - 56% 55 - 41% 40 - 30% < 30% 18 9.4 Error codes (The error codes are also mentioned in the next chapter). LED-indication possible cause kind of error 1 (green) on, 4 (yellow) flashing - motor too hot - electronics too hot - motor not connected or bad contact self restoring if the problem is solved. 1 (green) and 5 (red) flashing alternately throttle not in 0-position at start up. self restoring if the problem is solved. LED indication WARNING: Never put throttle in max. throttle position when this error occurs!! 4 (yellow) flashing now communication between battery and electronics. not self restoring! remark: You can still run the motor in this situation. 4 (yellow) flashing, 5 (red) on general error not self restoring! all LED’s flashing in different alternately sequence no communication between throttle and electronics. not self restoring! If an error occurs, always switch the system off. Have the system checked by an Huka BV authorized person. 19 9.5 Start up If the throttle has a problem returning in to the zero position, don’t use the cycle. Have the system checked by a Huka BV authorized person. Before using the cycle, always check the throttle has returned to zero position. The system has to be switched off. Now turn the throttle into the maximum speed position. Now release the throttle. The throttle should now move itself back into the zero position. Open up the cover of the key switch. Put the key into the key switch and turn the key into “ON” position. Now put the key out of the key switch so you cannot lose it while riding the cycle. Put the cover back on to the key switch. Step on the cycle. Now you push the ON/OFF button on the throttle for 2 seconds. Now you can start to ride the cycle by starting to pedal. At the same time you gently turn the throttle so the power support will help you ride the cycle. 20 9.6 Riding Never block the auto-into-zero position of the throttle during the ride. This can lead to very dangerous situations! To increase the power support and to ride faster simply turn the throttle a bit more. At the same time you need to pedal faster to accelerate the cycle. To decrease the power support slowly move the throttle back to the zero position. If you accelerate your pedal frequency will increase as well. You now need to switch into a higher gear. If you pedal more slowly the power support will be deactivated. If your riding speed is slowing down,(because you ride uphill) you need to shift down in gear as well. If you don’t want any power support of the system while riding the bike, you should take the following steps: - Turn the throttle slowly into the zero position. - Push the „ON/OFF“ button on the throttle for min.1 second until all LED’s are off. **With a PAS-vario system using the acceleration option you can accelerate up to 6 km/h / 3mph without pedalling. With the Auto-vario system you can accelerate without pedalling up to 20 km/u. The power support will switch off automatically when: - the battery is empty. - motor or electronics are overheated. The overheating of the motor and/or Electronics can be a result of a heavy load on the cycle or a long trip on a slope. After a short cool down period, the system will activated automatically. (ca. 5-10 min). 21 9.7 Ending the ride. Return the throttle gently back into the zero position. Use the front and rear brakes to slow down and stop the cycle. Push the „ON/OFF“ button on the throttle for 1 second until the LED are off. Open up the cover of the key switch. Put the key inside the switch and turn the key into “OFF” position. If you want to stop riding the bike remove the key out of the key switch and put the cover back onto the key switch. Should you forget to switch the system off it will automatically shut down after 16 minutes. To reactivate the system, you need to switch the system back on using the key switch. 22 10. Maintenance and cleaning Maintenance is only to be done by a Huka BV authorized person. The power support system needs, under normal conditions, little maintenance. Every 300 mi there should be a safety check of the cycle and the power support system. The following items need to be checked: - All cables, connectors, bolts and nuts. - Run a functional test of the Power support system. - Check the condition of the battery. Before every cleaning job, first switch off the system! Don’t use a high pressure water hose. This might damage the seals and water can enter the motor or electronics. This leads to damage of the motor and electronics. The parts can be cleaned by using some lukewarm water and some detergent soap. For cleaning the cycle itself you need to follow the instruction in the user manual of the cycle. 11. Transportation in a vehicle. Dirt or salty air can damage the system of the power support. It is therefore advised to cover up the cycle and system with a cover when moving the cycle in a open trailer or pickup truck. The battery should be disconnected from the system and needs to be stored in a dry and warm location. 23 12. Solving technical problems. Diagnosis of the problem and repairing the system is only allowed to be executed by Huka BV authorized persons. This concerns motor, electronics, battery and charger. Several repairs and checks are only allowed if the system is switched off and the cycle is standing still. Before using the cycle, make sure all seals are closed and all covers are back into position. Run a safety check before using the cycle. For solving technical matters on the cycle you should also read the manual of the cycle itself. To solve a problem you should use the table below for diagnosis. Please check if some errors can be solved by the user himself or that it is only to be done by Huka BV authorized persons. Should a problem occur while riding. slow down and switch off the power support. You can use the cycle without power support to get back or to your dealer. Get in contact with you local Huka authorized dealer to have the problem solved. failure Power support cannot be switched on. LED’s on throttle do not light up. The motor doesn’t want to run after switching the system on. LED 1 and LED 5 are flashing alternately. possible cause key switch still on “OFF” Battery empty Broken battery Bad contact between throttle or battery Throttle defect Electronics defect Throttle not in 0-position (throttle stuck in position ) solution turn key to „ON“ position Charge the battery Have the battery replaced by a Huka BV authorized dealer Check connectors and cables Contact your dealer Contact your dealer If the throttle is stuck, switch the system off and call your local dealer. WARNING: Power OFF- Pedal manually. DO NOT USE Power Assist if this problem occurs 24 failure LED 4 flashes after switching the system on. possible cause No communication between electronics and battery LED 4 flashes and LED 5 is on after switching the system on. All LED’s are flashing (in different variations) after switching the system on. Power support shuts down while riding the cycle. General failure Short Battery Life No communication between electronics and throttle. Motor or electronics to hot LED 1 lights up, LED 4 flashes Battery empty Bad contact between connectors Electronics defect Battery empty Battery defect Cycle conditions not optimal or the way how you cycle is not optimal PAS-vario Motor is running when using the acceleration option, but the support while pedalling isn’t working properly. Pedal sensor is not working properly Sensor defect Bad contact connectors sensor Electronics defect solution Contact your local dealer; (you can use the motor but there is no indication on the throttle. Switch the system off and back on. If the error still occurs, contact your dealer. Switch the system off and back on. If the error still occurs, contact your dealer. Switch of the system and restart it after 5-10 minutes. Have some cool down time. Charge battery Check connectors Contact your local dealer Charge battery Have the battery checked/replaced by your local dealer - Check technical situation of the cycle.(tire pressure, - check if the cycle runs smooth). - Change your way of cycling (more pedalling yourself ) - Test distance sensor sensor disc. - Check position sensor / readjust sensor - Check holes in sensor disc. Have sensor replaced Check connectors Contact your dealer 25 failure Pas-vario A higher pedal force is needed to propel the cycle Reduced motor power, Motor just moving with very low torque. Strange motor sounds Motor runs but doesn’t propel the cycle Throttle doesn’t rotate smoothly and gets stuck when released. possible cause Wrong gear Slope to steep or the load on the cycle to heavy solution change in to lower gear - change to lower gear - use more pedal force, - More throttle Motor defect Contact your dealer Battery empty Charge battery Motor to hot Let the system cool down for 5-10 min. Try again. Bad contact connectors Check connectors Temperature sensor motor Contact dealer defect Electrical defect Contact dealer Battery has reached its life Have your dealer check the span. battery and replace it. Motor defect Don’t use the motor. Have it checked by your dealer. Defect in the gear of the Have the motor checked by motor your dealer. Throttle damaged, dirty or Have your dealer check the defect throttle. 26 13. Disposal Electrical- and electronic devices are not to be thrown away as normal garbage. These components need to be disposed according to the local regulations for chemical- or electrical waste. Batteries are chemical waste and need to be disposed of according to the local regulations for chemical waste. Contact your local supplier when you want to dispose of part or the whole system. They will advise you to do it the right way. 14. Technical details: Motor Type Voltage Power Max. revs (on horizontal plane) Max. torque Protection against overheating Diameter sensor disc Diameter holes in sensor disc Distance flange spokes inside Distance flange spokes outside Dimensions (Ø x W) Weight RN120 36 V Depending on the model 200 … 250 W S1 S2 Depending on the model 60 ... 330 1/min Depending on the model 35 - 60 Nm(nameplate) yes 164 mm 3,1 +0,1 mm 58 ±1 mm 66 mm 178 mm x 127 mm 3,5 kg Electronics Voltage Current max. Dimensions (L x W x H) Weight 36 V Depending on model 20 ... 33 A (nameplate) 115 × 100 × 45 mm 0,7 kg 27 Your supplier: 28