1
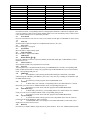
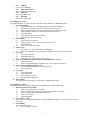
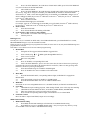
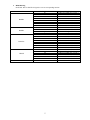
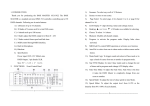
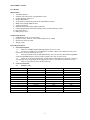
SM-192 DMX Controller
User Manual
Main Features
1. 192 DMX Channels
2. 30 Banks each composed or 8 programmable scenes
3. 8 Fades adjusting output level
4. Built-in Microphone
5. AUTO mode is controlled by TAP SYNC and SPEED controlled
6. MIDI control through MIDI interface
7. 4 digits LED display
8. Blackout master controlled by Manual or Remote
9. CHASE programming and CHASE running, manual control and remote control
10. Fade Time control
11. DMX polarity selects
Technical Specification
1. POWER INPUT: DC+9-12,300mA min
2. Output: AC230V~50Hz (AC 120V~60Hz) 300Ma, DC 9V 300Ma
3. Dimensions: 482x132x73mm
4. Weight: 2.5Kg
Operating Instructions
1. General Descriptions
1.1
There is a 192 DMX channel adjusting output level in every scene
1.2
8 scenes are available to be programmed for each bank. When scene running all scenes of one
bank will be executed continuously in a cycle
1.3
Select desired bank using UP and DOWN button, Also you can select desired bank using MIDI
signals through MIDI interface, there are totally 30 banks, once only one can be chose
1.4
Scenes can be executed automatically, and the duration is dependent on TAP SYNC, scenes are
executed under music triggering or NOTE triggering also press a scene buttons by hand to run scenes
1.5
There are total 6 chases, each contains 240 scenes
2. Controls & Functions
2.1
Scanners (1-12)
Scanners
1
2
3
4
5
6
7
8
9
10
11
12
Channel
1-16
17-32
33-48
49-64
65-80
81-96
97-112
113-128
129-144
145-160
161-176
177-192
Fade Control
OFF
OFF
OFF
OFF
OFF
OFF
OFF
OFF
OFF
OFF
OFF
OFF
1
LED
OFF
OFF
OFF
OFF
OFF
OFF
OFF
OFF
OFF
OFF
OFF
OFF
Scanners
1
2
3
4
5
6
7
8
9
10
11
12
Channel
1-16
17-32
33-48
49-64
65-80
81-96
97-112
113-128
129-144
145-160
161-176
177-192
Fade Control
ON
ON
ON
ON
ON
ON
ON
ON
ON
ON
ON
ON
LED
ON
ON
ON
ON
ON
ON
ON
ON
ON
ON
ON
ON
Press desired scanner, corresponding LED is lit, and appropriate channels is enabled to be adjusted, when
scenes are running, if fades control is OFF, channel output level is not controlled by fades, if fades control
is ON, channel 8-output level is controlled by the fades
2.2
Scene button
Press one scene button to run scene or to store scene, and the second digit of LCD DISPLAY shows scenes
1-8
2.3
Fade (18)
Slide the fades to adjust the output level or DMX channel from 0 to FF. (255)
2.4
Page Select
Press to select page A to page B
2.5
Speed Slider
Move the slider to adjust chasing speed
2.6
Fade Time Slider
Move the slider to adjust FADE TIME
2.7
LED Display
2.8
BANK Button ( or )
Press UP or DOWN to increase or decrease BANK, the third and fourth digit or LED DISPLAY shows
BANK NO (01-30)
2.9
Chase 1-Chase 6
Select desired CHASE to be programmed or run CHASE
2.10
Program
Turn the power on, it is in MANUAL RUN mode, press PROGRAM for 2 seconds, corresponding LED
blinks, SCENE and CHASE are ready to be programmed, press PROGRAM once more to return to RUN
mode. Corresponding LED goes out
2.11
MIDI/Add
a.
Press MIDI key when running the third and fourth digit of LED flash, select MIDI
channel using UP or DOWN, press MIDI key once more or any other key excluding UP or DOWN to end
the MIDI channel setting
b.
Press this key to make programs when in PROGRAM mode
2.12
Auto/Del
a.
In RUN mode, press Auto/Del, corresponding LED is ON which indicates it is AUTO
RUN mode, press once more to withdraw MUSIC mode, corresponding LED goes out
b.
Press this key to make Scene and chase program when in PROGRAM mode
2.13
Music/Bank Copy
a.
In RUN mode, press this key, corresponding LED is ON, which indicates it is in MUSIC
mode, press once more to withdraw MUSIC mode, corresponding LED goes out
b.
Press this key to make Scene and chase program when in PROGRAM mode
2.14
Tap Sync/Display
a.
In AUTO RUN mode, running speed of scene is dependent on the interval of last two
pressing of TAP SYNC/DISPLAY, Max. 10 minutes
b.
in PROGRAM mode, select display between STEP and BANK, in other mode, select
display between 00-225 and 0%-100%
2.15
Blackout
Press this key to disable channel, output, but not any other functions. Press once withdraw Blackout mode
2
2.16
MIDI In
Use to receive MIDI data
2.17
DMX Polarity Select
Select the polarity of DMX output
2.18
DMX Out
Use to output DMX data
2.19
DC Input
DC 9V-12V, 300mA Min
Programming for Scenes
Press PROGRAM for 3 second, appropriate LED blink, which indicates it in PROGRAM mode
1. Scene Programming
1.1
Press SCANNER key to select DMX channel composed of 8 channels
1.2
Select different channel to control several devices at the same time
1.3
Adjust appropriate fades to select desired output level, and then turn off fade
1.4
Select and adjust output level continuously until all devices are set
1.5
Press MIDI/ADD
1.6
Select desired bank using UP or DOWN
1.7
Press SCENE to store this SCENE
2. Scene Editing
2.1
Select desired scene of bank
2.2
Make program of scene to meet the requirement of device
2.3
Press MIDI/ADD
2.4
Press scene to store this scanner
3. Scanner Copy
3.1
If a scanner is set, press and hold the SCANNER first
3.2
Press the SCANNER to copy to, then the SCANNER is copied to another SCANNER
4. Scene Copy
4.1
Select desired SCENE
4.2
Press MIDI/ADD once
4.3
Select one bank. Then press the scene to copy to
5. Delete Scene (DMX channel incorporated with this SCENE are ser to 0)
5.1
Select desired scene
5.2
While pressing and holding AUTO/DEL, press scene required to be deleted
6. Clean all scene (all DMX channel are set 0)
6.1
Press PROGRAM+DOWN while turning power off
6.2
Turn the power on
7. Copy Bank
7.1
Select desired bank
7.2
Press MIDI/ADD
7.3
Select the bank to copy to
7.4
Press MUSIC/BANK COPY
8. Delete a Bank
Select the bank to be deleted, press AUTO/DEL + MUSIC/BANK COPY
Programming for Chases
Press PROGRAM. Corresponding LED flashes, which indicates it is in PROGRAM mode
1. Make Program of Scene in Chase
1.1
There are up to 240 scenes in a CHASE
1.2
Scenes are run in the programmed order First programming, first running
1.3
Select a CHASE who contains programmed scene
1.4
Select scene of bank
1.5
Press MIDI/ADD
2. Copy a Bank to Chase
Select a bank, press MUSIC/BANK COPY, and press MIDI/ADD, then the scenes of the bank are copied
to the chase
3. Chase Editing
Add a STEP IN CHASE
3.1
Select desired LCD display
3
4.
5.
3.2
Press TAP SYNC/DISPLAY, the LCD shows CHASE and its STEP, press TAP SYNC/DISPLAY
once, the LCD shows the SCENE and BANK
3.3
Add a STEP in CHASE
3.4
Press TAP SYNC/DISPLAY, the LCD shows the CHASE and its STEP if it has made program till
the 15th step. Select the 9th using UP or DOWN, press MIDI/ADD, the CHASE is maintained and the
STEP turns to 10th STEP. Select desired SCENE using UP or DOWN, press MIDI/REC, then the new 10th
STEP is added to SCENE, the previous 10th STEP turns to the new 11th STEP, the previous 11th STEP turns
to the new 12th STEP, and so on
3.4
Delete a STEP in CHASE
Select desired STEP and then press AUTO/DEL
For example, select the 10th STEP using UP or DOWN, press AUTO/DEL, then the 10th STEP is deleted,
the previous 11th STEP turns to the 10th STEP, the previous 12th STEP and so on
Delete a Chase
4.1
Select desired CHASE
4.2
Press desired CHASE while holding AUTO/DEL
Clean all Chase (ALL Scenes are still available)
5.1
Press DOWN +AUTO/DEL while turning power off
5.2
Turn the power on
Running Scenes
Turn the power on; it is in MANUAL RUN mode, when in PROGRAM mode, press PROGRAM for 2 seconds,
PROGRAMMED LED goes out, it enters MANUAL mode
If there are not any scenes having been programmed in a bank, the scene can't be run, only the SCENES having been
programmed are executed
If the fades is set to OFF Scene will execute channel program setting
1. Manual Run
1.1
Extinguish AUTO triggered LED and MUSIC triggered LED
2.
3.
4.
5.
6.
1.2
Select a bank (using
of , MIDI signals through MIDI interface)
1.3
Press scene to run scene
1.4
Run scene-using MIDI
Auto Run
2.1
Press AUTO/DEL, corresponding LED is ON
2.2
Press TAP SYNC/DISPLAY, press it once more some time, the interval between two pressing is
assigned to the speed of AUTO RUN, the maximum limit is 10 minutes, if there are many pressings more
then twice, the last two pressing are designated
2.3
Select desired bank using UP or DOWN via MIDI signals
2.4
Press AUTO/DEL once more to withdraw AUTO RUN mode
Music Run
3.1
Press MUSIC/BANK COPY, corresponding indicator lights, SCENE RUN is engaged into
MUSIC RUN
3.2
Select desired bank, using UP or DOWN or via MIDI signals
3.3
Press MUSIC/BANK COPY once more to withdraw MUSIC RUN
MIDI Run
Select bank to run scenes using MIDI whenever it is in MANUAL RUN, AUTO RUN or MUSIC RUN
Chase Run
5.1
CHASE RUN requires making programs, when running CHASE, scene will be step auto matching
5.2
CHASE RUN includes MANUAL RUN, AUTO RUN, AUDIO RUNS, and MIDI RUN
5.3
Either one CHASE more can be run in the order of selection
5.4
Press CHASE corresponding indicator lights, which indicates it is in CHASE RUN
Fade Time Control
Move the slider to adjust FADE TIME, output varies accordingly
MIDI Channel Setting
1. MIDI Channel Setting
1.1
Press MIDI, the third and fourth digits of LED blink, selects MIDI channel setting
1.2
Press MIDI one or more to end MIDI channel setting. Also you can press any other key except
UP or DOWN or move the fades to end MIDI channel setting
4
2.
MIDI Running
NOTE ON: Receive NOTE ON signals to execute corresponding function
BANK
BANK2
BANK2
BANK15
CHASE
NOTE NUMBER
00
01
02
03
04
05
06
07
08
09
10
"
112
113
114
115
116
117
118
119
120
121
122
123
124
125
126
5
FUNCTION
TURN ON TURN OFF SCENE 1
TURN ON TURN OFF SCENE 2
TURN ON TURN OFF SCENE 3
TURN ON TURN OFF SCENE 4
TURN ON TURN OFF SCENE 5
TURN ON TURN OFF SCENE 6
TURN ON TURN OFF SCENE 7
TURN ON TURN OFF SCENE 8
TURN ON TURN OFF SCENE 1
TURN ON TURN OFF SCENE 2
TURN ON TURN OFF SCENE 3
"
TURN ON TURN OFF SCENE 1
TURN ON TURN OFF SCENE 2
TURN ON TURN OFF SCENE 3
TURN ON TURN OFF SCENE 4
TURN ON TURN OFF SCENE 5
TURN ON TURN OFF SCENE 6
TURN ON TURN OFF SCENE 7
TURN ON TURN OFF SCENE 8
TURN ON TURN OFF CHASE 1
TURN ON TURN OFF CHASE 1
TURN ON TURN OFF CHASE 2
TURN ON TURN OFF CHASE 3
TURN ON TURN OFF CHASE 5
TURN ON TURN OFF CHASE 6
BLACKOUT