1
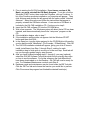
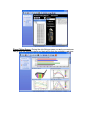
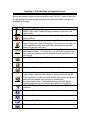
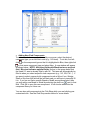
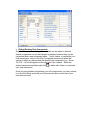
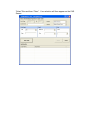
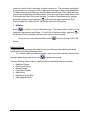
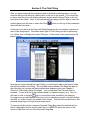
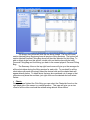
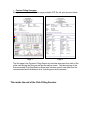
GolfAchiever
Club Analysis Software
User Manual
GA CAS version 1.10
Date: 07/05/2006 Rev. B
www.golfachiever.com
Table of Contents
CHAPTER 1: INSTALLATION ................................................................................................................................3
SECTION 1: S YSTEM R ECOMMENDATIONS ........................................................................ 3
SECTION 2: I NSTALLING GA CAS ..................................................................................... 3
SECTION 3: LAUNCHING GA CAS ..................................................................................... 5
SOFTWARE REGISTRATION/ACTIVATION .........................................................................................5
LOGIN & PASSWORD....................................................................................................................................5
CHAPTER 2: USER INTERFACE AND USER FLOW ...................................................................................6
SECTION 1: I NTRODUCTION TO THE GRAPHIC USER INTERFACE ........................................ 6
SECTION 2: USER F LOW ................................................................................................... 8
SECTION 3: I NTRODUCTION TO COMMON I CONS ................................................................ 9
CHAPTER 3: PRE-CLUB FITTING SETUP .....................................................................................................11
SECTION 1: S ETTING USER/CONTACT INFORMATION....................................................... 11
•
•
•
Admin Default Settings ....................................................................................................................11
Company Information .......................................................................................................................11
Adding/Editing/Deleting Users.....................................................................................................11
SECTION 2: CLUB L IBRARY S ETUP ................................................................................. 12
Component Library .......................................................................................................................................12
•
Adding New Club Components....................................................................................................13
•
Editing/Deleting Club Components............................................................................................14
Club Shop..........................................................................................................................................................15
•
Adding Clubs........................................................................................................................................15
•
Editing/Deleting Clubs in the Club Shop .................................................................................16
•
Quick Find ...........................................................................................................................................16
Fitting Cart ........................................................................................................................................................18
•
Adding New Carts. ..............................................................................................................................18
•
Editing/Deleting Clubs from Customized Carts....................................................................19
CHAPTER 4: STARTING THE CLUB FITTING..............................................................................................20
SECTION 1: ENTERING THE PLAYER DATA ...................................................................... 20
New Player ........................................................................................................................................................20
•
•
Fitting Baseline .................................................................................................................................. 20
Histories............................................................................................................................................... 21
Existing Players..............................................................................................................................................21
SECTION 2: T HE CLUB F ITTING ....................................................................................... 22
•
•
•
•
•
•
Start Play.................................................................................................................................................23
Charts .......................................................................................................................................................24
Club Comparison ................................................................................................................................25
Recommendation ................................................................................................................................26
Customizing Your Recommendation.........................................................................................26
Custom Fitting Summary ................................................................................................................28
APPENDIX 1: FREQUENTLY ASKED QUESTIONS ...................................................................................29
CHAPTER 1: INSTALLATION
Section 1: System Recommendations
The following are the Recommended System Requirements for the GolfAchiever
Club Analysis Software (GA CAS):
• Operating System: MS Windows 2000 (SP4) / XP Home/Professional
(SP2) or later
• CPU: Pentium 4, 800 MHz or above
• RAM: 256 MB+
• Hard Drive: Free Space 1 GB+
• Video Display:
o Resolution: at least 1024x768
o 256 colors
• Extra Requirements: Microsoft .Net Framework 1.1
Section 2: Installing GA CAS
GA Club Analysis Software Installation Screen:
1. Prior to starting the GA CAS installation, if you have a version of GA
Basic, you must uninstall the GA Basic program. To do this, click the
Windows START button, then under the Programs, click on Focaltron. A
list of the Focaltron products installed on you computer will appear. Then
click Achiever and another list will appear with the option called “Uninstall
Achiever”. Select this option and follow the instructions that appear to
properly uninstall the GA Basic software. A new version of GA Basic is
included in the GA CAS installation CD. Continue on to step 2.
2. Insert the GA CAS software CD into the CD-ROM drive
3. Wait a few moments. The Windows system will detect that a CD has been
inserted, and then automatically launch the “setup.exe” program on the
CD.
4. If the installation begins, skip to step 7
5. If the installation window does not appear click the Windows START
button and then click RUN…
6. In the Open box, type the letter assigned to the CD-ROM drive followed by
a colon and the word “MainSetup” (For Example, D:MainSetup). Click OK
7. The GA CAS installation window will appear, giving you a list of items to
install; install items from Step 1 through Step 6, waiting for each
installation step to finish prior to moving on to the next step. Each tab will
run you through a guided step by step process.
8. After you have fi nished installing steps 1 through 6, you may (optional)
select the GACAS Software Tutorial tab which will run step by step video
on how to use the software. For further reference the User Manual will
have been downloaded on to the Desktop. GA CAS will no w be ready for
use. For Database Maintenance continue onto Step 9.
9. Database repair and maintenance can be found under the DB Tools tab.
Click the DB Tool tab and choose the function you would like to perform.
Click Close once the program has finished the desired function(s).
Section 3: Launching GA CAS
the GA CAS software, double-click on the GA CAS icon found on the desktop.
Alternatively, click on the computer’s START button, then click PROGRAMS,
To open then Focaltron, and then GA CAS to open the program.
SOFTWARE REGISTRATION/ACTIVATION
When first installed, the GA CAS program comes with a 30 day trial version of
the software. GA CAS must be activated for a specific PC using the Site code
and MID Code. To do this, simply double click the GA CAS icon on the Desktop.
A message as seen below will appear. You may email a GolfAchiever/Focaltron
representative with all the information needed by simply clicking on the Order
Request button shown one the image below (all information will then be
automatically inputted into the email itself). Alternatively, you can manually email
[email protected], and give them both the eight digit Site Code and the
sixteen digit MID Code found on the top of the window. It is best to copy and
paste these codes into the email itself to prevent any errors. The GolfAchiever
Representative will email the Activation Code to fully activate the GA CAS
software on the specific PC within 48 hours. Select Unlock Application and
then copy and paste the given code in the space provided. Note that this code
will only work for the computer in which you retrieved the Site Code and MID
Code. For multiple computer use you will have to purchase multiple licenses of
the program.
LOGIN & PASSWORD
A login name and password is required to open GA CAS.
The default user is listed below:
Login Name: Admin
Password: achiever
CHAPTER 2: USER INTERFACE AND USER FLOW
Welcome to GolfAchiever Club Analysis Software (GA CAS)!
GA CAS works with the GA II to give you an organized, in-depth analysis of each
club swing including visuals of the face impact, lie angle fitting, optimal launch
angle ball speed, club head speed, and azimuth. With GA CAS, you can easily
save customer profiles, personalized virtual golf bags and club recommendation
reports.
Section 1: Introduction to the Graphic User Interface
The following is a general overview of the graphic user interfaces you will come
across when using GA CAS.
Opening Screen: The GA CAS introduction screen.
Personal Fitting Bag and Fitting Selection: In this screen, the club fitter will
add clubs from the club library into the customers personalized fitting bags. For
a quicker selection, you can customize club carts for easy access to specific
clubs.
Player Fitting Screen: During the club fitting process you and your customer
can go over the available charts and data points that are updated in real-time.
Section 2: User Flow
Section 3: Introduction to Common Icons
Below are common icons you will see and use with GA CAS. Some of the icons
will be grayed out during certain processes indicating that these icons are not
available at that time.
Icon
Description
Login/Log Off & User Management Icon: Contains the following:
Switch Login users; Update/C hange passwords; Add, edit, and
delete Users.
Enter Player Icon: Contains the following: Enter New Player; Select
Existing Player.
Club Library Icon: Contains the following: Component Library; Club
Shop; Fitting Carts; Player Fitting Bag. From this icon you can add
club components, build your own clubs, and organize your club
library into specific club carts.
Analysis Report Icon: Contains the following: Player List; and
Performance Report. From this icon, you can make reports from
your customer database, as well as performance reports from all
club fittings.
Open File Icon: Open saved files
Save Icon: Save changes made
Print Icon: Allows you to print selected customer information.
Tools Icon: Contains the following: Options; Store Information;
Import; Export; Backup Data; Restore. Freely customize the GA
CAS software to include your store’s name and contact information
which will then appear on any printout, including the
recommendation sheet. Other added features include, import,
exporting and backing up customer data and your club library.
About GA CAS Icon: Opens the User Manual as a PDF file for
reference
Back Icon: Select this icon to move back one step
Next Icon: Select this icon to move forward one step
New Icon: Select this icon to add a new item into a select field.
Delete Icon: Select this Icon to delete a given selection.
Edit Icon: Select this icon to ed a given selection.
Close Icon: Select this icon at any time to exit out of a process and
return to the Opening Screen.
Play Icon: During a Fitting, select this icon to open the GA Basic
software in a separate window, and continue with the fitting
process.
Quick Find: Select this icon as a convenient way to search for clubs
and/or narrow down your club to a specific category.
Add Icon: Select this icon to add to a given category (i.e.: adding a
brand, model…)
CHAPTER 3: PRE-CLUB FITTING SETUP
In order to insure that your club fitting runs smoothly and quickly, you should
customize GA CAS to suite your needs and to replicate your stock on hand.
Section 1: Setting User/Contact information
Customizing GA CAS to your specific needs should be done before any proper
club fitting is performed. Customize the software to accommodate multiple
users, club components, contact information, and customer profiles.
•
Admin Default Settings
It is highly recommended that you change the password from the
default “Admin” setting. To do this, make sure you are logged in as the
“Admin” and select the Login/Logout icon found on the upper left hand corner
of the GA CAS screen. Then select Change Password and customize your
own individual password. Click OK to confirm and save the new password.
•
Company Information
GA CAS allows you to customize the contact information for your specific
needs. Select the Tools icon and then Store Information. A window will
appear with several options including: Store Name, Contact Person, Address,
Phone, and Web Site. Click Ok to finalize the changes. This information will
appear on the printable Recommendation Specifications Sheet at the end of
the Club Fitting.
• Adding/Editing/Deleting Users
The Admin user can not be deleted as it is the default setting for the GA CAS
program. The Admin user as well as those chosen as Managers have the
ability to add new users and freely customize the GA CAS settings. To add,
edit or delete a user make sure you are logged on as the Admin or under
another Manger designated account.
o Adding Users
To add a new user, click on the Login/Logout icon found on the upper left
hand corner of the GA CAS screen, then select User Management.
Right-click on a blank row underneath the last user listed and click New.
A new window will appear with the options to customize that user. Fill out
the related fields and click OK to confirm and save the new user. When
adding users you will requested to enter in a group category, which
includes Managers and Fitters. Managers have full rights to customize,
edit and add features to the CAS; whereas Fitters only have rights to
perform a Club Fitting.
o Editing Users
To edit a current user, go to the User Management section found under
the Login/Logout icon. Right-click on the desired user name and select
Edit. Once you have finished editing, click OK to save the changes.
o Deleting Users
To delete a user, go to the User Management section found under the
Login/Logout icon. Right-click on the appropriate user name and select
Delete. A message will appear asking you to verify the deletion. Click OK
to completely delete that specific user.
Section 2: Club Library Setup
Although GA CAS has default and database components for many types of
clubs, you can add customized clubs to replicate that in your own club shop. It is
recommended that you setup your GA CAS Club Shop prior to performing a club
fitting, so as to save time during your session.
The Club Library icon shown at the left consists of: Component Library, Club
Shop, Fitting Carts and Player’s Fitting Bag. Before setting up your personalized
Club Shop you should review the list of default clubs available under the Club
Shop section.
Component Library
After selecting the Component Library under the Club Library icon, a new window
will appear as shown below. The Component Library consists of club heads,
shafts and grips. The components listed in the Component Library can then be
used in the Club Shop section to construct personalized clubs. On the left of the
window, you will find a list of components including Club head, shafts and grips.
Note: When adding and editing components, the Head, Shaft and Grip Code are
automatically derived based on your selections. To rename the Code, simply
select the rename button next to that field.
• Adding New Club Components
To add a new club component, first with your mouse, select the desired
component type you would like to add (e.g.: 1W Head). To do this, first leftclick
on the component type so that it is highlighted in Blue, then right-click
on that same component type and select New. A new window will appear
as shown below. NOTE: All subject fields with Black text are a required
field. Blue text indicates optional fields. Notice, in the image below that
the Head I.D. area is already filled in with IW. This area will automatically be
filled in when you select a specific club component (e.g.: 1W, 2W, PW…). If
you were to select a general club component such as Wood, Iron, Wedge,
Shaft or Grip then this field will be left blank and you will have to manually fill
it in. If you can not find a specific Brand or Model among those listed, then
you may add a new Brand or Model by selecting the plus icon
next to that
field. Click OK to save this new component. It will now be added into the
component library for future use.
You can also add components in the Club Shop while you are building your
customized club. See the Club Shop section below for more details.
• Editing/Deleting Club Components
Only club components which you have added can be edited or deleted;
default components can not be changed or deleted; however they can be
customized and a new component made. To edit, delete , or customize your
club components, return to the Club Component window and select the
section in which you have saved that specific club component (e.g.: Wood,
1W, PW…) A list will appear on the right side of the window. Select the
desired component and then right-click
your club component.
, to either edit, delete or customize
Once you have finished customizing your club components, you can continue
on to the Club Shop and build your customized clubs to mirror that of your
own clubs on hand.
Club Shop
After selecting Club Shop, a new window will open (see image below). On the
left will be a complete list of all the default and customized clubs available. To
see detail on a specific club group select the appropriate club (e.g.: 1W). A list of
clubs within that group will appear on the upper right half of the screen. Left-click
on a desired club to open the detail on the bottom half of the window. Notice
on the bottom half of the screen, the re are three (3) yellow highlighted sections
including Club Head Component, Club Shaft Component and Club Grip
Component. Click on the plus sign
to view the detail for that specific
component.
• Adding Clubs
To add a customized club, select a club type in the left hand section under
Club Shop. You can either select a general club type such as Wood, Iron, or
Wedge or you can select a specific club such as a 1W, 5W, PW… A list of
Clubs related to the type you selected will appear on the top right in the Club
List Items section. Right-click on a desired club type in either section and
then select New. A window will appear as shown below.
The Club Editor window shown above will allow you to add a customized club.
Fields with black text are mandatory; those with blue text are optional. On the
bottom half of this window you can customize the club head, club shaft and
club grip to your specifications. The components found in these sections are
retrieved from the Component Library. If you have not customized the
Component Library you may add new components individually in this widow.
Simply click the New tab on the bottom half of the Club Editor window
(available for club head, shaft and grip) and customize the club component to
your specifics. Click OK to save the changes and add your customized club to
the Club Shop.
• Editing/Deleting Clubs in the Club Shop
Only clubs which you have added can be edited or deleted; default clubs can
only be customized and a new club made. To edit or delete a club, return to
the Club Shop window and select the section in which you have saved that
specific club component (e.g.: Wood, 1W, PW…) A list will appear on the right
side of the window. Select the desired club and then right-click
Edit or Delete the desired club.
, to either
Once you have finished customizing your Club Shop, you can continue on to
the Fitting Cart and set up your customized club bags.
• Quick Find
To quickly find a specific club among those listed in the database, simply
select the Quick Find icon at the top left hand corner. A new screen will
appear as shown below. You may narrow down your search for a club by
selecting the Brand, Model, Club Name, Loft, Shaft Material and Grip. Once
you have selected the desired fields, select the “Find Clubs” button and a list
of clubs will appear in the bottom half of the window. Simply select the
desired club by checking the box next to the name and then clicking the
“Select” Box and then “Close”. Your selection will then appear on the CAS
Screen.
Fitting Cart
The Fitting Carts section, shown below, allows you to organize the clubs from
your Club Shop (shown on the left of the image below) into categorized carts
(shown on the right of the image below). Users have the ability to add fitting
carts to their needs and specifications. By using fitting carts you are essentially
organizing your club library for easier access and selection during a session.
• Adding New Carts.
The Customized Carts section can be found on the right side in the image
above. You will find two tabs in the carts section: Standard Carts and Custom
Carts. GA CAS has included some default cart categories. You may choose
to customize either category within those tabs o r add other categories to the
list. To add a new cart, just right-click anywhere in the white box on the
right of the Club Carts Management screen. Select New and fill in the
required information. Click OK to accept and save your new Cart.
• Adding Clubs to the Club Cart
To add a club(s) to any of the current carts, first select a cart category. In the
image above, the “0-69 MPH” category has been selected (indicated with a
blue highlight). In the club shop on the left of the screen, you will need to
click on the plus
sign to open up a desired club field. Select a desired club
and click ADD>>>, found in the middle of the screen to include the club in
your desired Cart category. Repeat this procedure to meet your desired
needs. For quick access to a specific club or clubs you can use the Quick
Find icon
to easily narrow down your search and find a specific club
faster. For instructions on how to use Quick Find, see the Club Shop in
Section 2.
• Editing/Deleting Clubs from Customized Carts
The default cart categories in GA CAS can not be deleted, but they can be
edited to meet your needs. Clubs and/or carts that you have been added by
users can be edited or deleted.
To edit a club in any desired category, first select the specific club so that
it is highlighted in blue. Then select the Remove button in the center of the
screen to remove that club from your customized cart category.
CHAPTER 4: STARTING THE CLUB FITTING
Section 1: Entering the Player Data
Prior to performing the actual club fitting you must first enter the player
information. To enter in a new player or select from a current list of players, use
the Club Fitting Task bar or the “Enter the Player Icon” shown below.
New Player
To enter in a new player select New Player in the Club Fitting Task bar. A ne w screen
will appear asking you to enter in the name and demographics of your customer. Fields
in black font are mandatory and therefore must be filled out. Those fields of which are
labeled in blue font are optional.
Once you have finished with the first page, click on the Next icon
found on
the top of the screen. A message, will appear asking you to save the current player.
Click yes to continue on to the next step.
The next page will allow you to customize the customers Physical Profile, Skill
Profile and their Fitting Baseline. Again, all areas labeled with black text are mandatory.
• Fitting Baseline
The Fitting Baseline is an optional but useful tool that is used as a reference point in
which the club fitter can get a general understanding on where the customer is
coming from in regards to their swinging abilities. Customers simply take several
shots using their own or similar Driver and Iron to get a good average of their club
head speed and ball speed.
The Fitting Baseline has two club options, Drivers and Irons. To start the fitting
baseline, click on the Set Baseline tab found underneath the Driver section and the
Iron section. A new window will appear. Click Play at the top of the screen to
continue and the GA Basic screen will open. Select the appropriate mode and then
select the correct club in the player’s bag to continue on. The customer should take
a decent amount of swings in order to get a good average of their swing capabilities.
To delete any odd shots that may skew the data, return to the CAS screen and right
click on the desired shot and select delete. Once you are finished select Stop on the
CAS screen and then OK to save the data. To enter a Fitting Baseline for a player
previously entered, simply right click on the customer name and select “Edit”.
Then on select the “Game Profile” tab on the right side of the screen.
•
Histories
Select
to continue on to the Histories screen. This screen offers a history of the
customers transactions and fittings. To Add, Edit or Delete an entry, right click
the Activity History area and customize your entry for that customer.
At any time you can select the Back b utton
screen.
in
found on the top of the CAS
Existing Players
Players that you have previously added in the past will have been saved and can be
found under the Existing Players section.
To continue a previous session or start a new one for the customer, simply select
the appropriate player and select next
to continue as normal.
From the Existing Players tab, by right clicking on a desired player you can also:
• Add New Players
• Edit Current Player
• Delete Players
• Print Player Details
• Add History
• Edit Player Fitting Bag
• Edit Swing Sessions
Section 2: The Club Fitting
After you have entered all the customers data or selected an existing player, you can
continue with the club fitting by clicking Next on the top of the screen. If you would like
to start a club fitting from an existing customer simply select Existing Player on the left
hand side of the screen. Note: if you had selected new player and but want to select an
existing player you will have to select the Close
then continue from there.
button on the top of the screen and
At this point you will be at the Personal Fitting Bag screen for your specific customer as
seen in the image below. First select which type of Club Fitting you will be performing
(i.e.: Wood, Iron or Wedge) the under “Fitting for:” in the center of the screen below the
player’s name.
Now that you have selected the type of fitting, you will need to add in the types of clubs
that will be included in the fitting. The left hand section labeled Club Shop includes all
the clubs that you input as well as the default and database clubs (see Chapter 3,
Section 2: Club Library Setup for details). Your customized Club Carts will also be
included. To view a full list of the clubs available in a specific category (e.g. 1W) you
will need to click on the plus
sign to un-scroll the clubs available in the category.
From here you can add desired clubs (up to six) by selecting a specific club and clicking
the ADD >>> button found in the middle of the screen. This club will now be listed in the
personal fitting bag on the right side as seen above.
To remove a club from the customers Personal Fitting Bag, select the desired club so
that it is highlighted in blue and the select the <<<REMOVE tab in the center of the
screen to take that club out of the Personal Fitting Bag.
At any time you may select the Quick Find icon
specific brand, model, name, loft, shaft or grip.
to narrow down your search to a
Additionally, if you have not found yo ur specific club, you may add a club or customize a
current club on this same screen. To add a club, simply select the club type (i.e.: 1W,
3W, 6I…) and then select the New Icon
. A new screen will appear allowing you to
input fields for the new club. Remember that fields in Black text are mandatory.
Alternatively you can customize a current club, by first selecting that club and then
selecting the “Customize…” button in the center of the screen.
• Start Play
Click Next to continue o n to the next screen and you will be ready for the club fitting
process. A message will appear reminding you to select Play when ready; click OK
to close this message. If you would like to start a new club fitting, you may select
the Play button
to continue; alternatively if you would like to continue from the
Fitting Baseline or a previously saved session, you may do so by selecting from the
list available on the top-left section labeled “Swing Sessions” and the select Play
button to continue. Once selecting the Play ball found on the top of the screen, the
GA Basic screen will appear as shown below.
From there you are ready to start fitting your customer for a club. On the GA
Basic screen the Player Bag will already have all the clubs you have previously
selected.
Simply select the current club you will be fitting and click play to continue.
To get a good average of each club you will likely want the customer to take a
decent amount of swings for each club . Once you have finished with one club just
select the next club in the Player Bag on the GA Basic screen and you are ready to
continue. In the background CAS will be automatically updated with the current
swing data. Once you have finished testing all the clubs, exit out of GA Basic and
return to the GA CAS Screen.
The screen that follows will look like the above image. The top left corner
section labeled Swing Sessions shows all previous fitting sessions. The bottom left
section labeled Personal Fitting Bag shows all the clubs selected for this fitting. To
add or delete clubs from this section, double click on the blue bar with the label
Personal Fitting Bag and it will bring you back to the current player’s Personal Fitting
Bag.
The Summary View on the top right hand corner will give yo u the averages for
all the shots taken during the fitting session for each club. To see detail for all the
shots taken with each club simply select the desired club and the related data will
appear directly below. To delete shots that may be considered o ut of range or that
otherwise may skew the end data, just right click over the desired shot and select
Delete.
• Charts
Once you have finished the Club fitting you can select the Charts tab found on the
right hand side of the screen in a vertical position. This page will give you a nice
visual of all the clubs used and the related swing data as shown below.
The graphs include Carry Distance, Face Impact, Face Impact Club Comparison,
Launch Angle, and Launch Angle Club Comparison.
The top bar graph labeled Carry Distance of Club Comparison allows you to
navigate through the statistics of each club. Select the bar that relates to the desired
club to receive visual images for the Face Impact and Launch Angle for that specific
club.
Click Next at the top of the screen to continue onto the next club comparison page.
• Club Comparison
This page offers comparison charts for Distance, Launch Angle, Ball Speed,
Clubhead Speed, Dispersion, Azimuth, Face Impact, and Lie Angle (for Irons only),
as seen below.
Although there is an availability of up to eight different data types there are only six
spots available on the page. The Settings Tab on the top right hand corner will allow
you to customize the charts you want to show the customer. In this settings tab you
can also remove clubs that you see as useless for further consideration. To see a
larger view of each graph, select the blue border right above the graph. Reselect
this same graph to minimize it to its original form.
• Recommendation
Now that you have had time to analyze the charts with your customer, you can now
recommend up to two (2) clubs. Found on the bottom of the screen will be
Recommendation #1 and #2. Select the desired recommendation (s) and select
next to continue.
• Customizing Your Recommendation
The following page will allow you to make any adjustments required to the Driver
Loft, shaft length, shaft flex, and grip size. It will also allow you to customize the
price you would like to quote for each recommended club. Comments as well as an
activity log can be recorded as well. Make sure that you have selected the Final
Recommendation as well as the Final Decision before moving on. If you have left
any areas blank a message will appear requesting that you fill out the missing areas.
See the image below for details.
When you are finished select Next and a message will appear asking if you
would like to save the report. Select yes and the Primo PDF screen will appear,
as seen below, with the option to customize the save location. It is
recommended that you provide a set folder in which to save these reports for
future uses. Click OK to continue.
• Custom Fitting Summary
After you have selected OK, a two page printable PDF file will open as seen below.
Page 1
Page 2
The first page is the Dynamic Fitting Report and includes averages from each of the
clubs used during the fitting as well as the relative charts. The second page is the
Recommended Club Specifications Sheet and includes specific club data from the
recommended and final decision club, including price and comments.
This marks the end of the Club Fitting Session.
APPENDIX 1: FREQUENTLY ASKED QUESTIONS
Questions
I receive the error, "Cannot open database
requested in login. GACAS.login fails.
Login failed for user "sa". Please fix"
I am unable to generate a .pdf report.
The swing data shows in the GABasic
program, but not the CAS program.
Do I need to install the GABasic software
found on the GACAS disk?
Answers/Solutions
1. Insert GACAS disk. Wait for auto run
feature to start.
2. If disk does not start automatically, go
to My Computer and double left-click the
GACAS icon.
3. Select the Tool icon in the lower right
hand corner.
4. Select the Reset GACAS Data to
default
5. Exit both the DB Tools and GACAS
setup screen.
6. Re-run GACAS software.
1. Need to install Primo PDF to create PDF
files (see installation CD for download)
2. Need to install Adobe Acrobat Reader to
view (see installation CD for download).
1. Make certain that the play button is green
in both the GACAS and the GABasic
program.
1. Yes. The new GABasic software is
required to connect the two program
databases together. However you must
uninstall your current GABasic Software and
then install the updated GABasic available on
the GACAS installation CD.
For Technical Support please email [email protected] or call 408-530-8588.
When contacting Technical Support, please have your GACAS version #, Phone
number and Contact name ready.