1
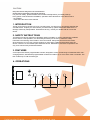
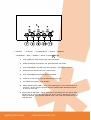
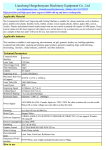
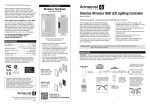
LED CONTROLLER 3CH
CAUTION!
Keep this device away from rain and moisture!
Unplug mains lead before opening the housing!
For your own safety, please read this user manual carefully before you initially start-up.
Every person involved with the installation, operation and maintenance of this device has to
- be qualified
- follow the instructions of this manual
1. INTRODUCTION
Thank you for having chosen LED 3CH CONTROLLER. You will see you acquired a powerful and
versatile device. Unpack your item. Before you initial start-up, please make sure that there is no
damage caused by transportation. Should there be any, consult your dealer and do not use the
device.
2. SAFETY INSTRUCTIONS
This device has left our premises in absolutely perfect condition. In order to maintain this condition
and to ensure a safe operation, it is absolutely necessary for the user to follow the safety
instructions and warning notes written in this user manual. Always disconnect from the mains,
when the device is not in use or before cleaning it. Keep away children and amateurs from the
device! There are no serviceable parts inside the device. Maintenance and service operations are
only to be carried out by authorized dealers.
3. FEATURES
A microprocessor-driven programmable console, designed to control a wide range of solid-state LED colorchanging fixtures, stand-alone programmable controller for loads of up to 3A in each of the 3 channels. The
item is table top or wall mounted type.
4. OPERATIONS
Powe r inp ut
AC 23050 H Z
RE D
GREEN
BLUE
COM
POWER SWI TC H
③
①
②
①: OUTPUT-
②:OUTPUT+ ③:POWER INPUT ④:START ⑤:MANUAL
⑥: PROGRAM ⑦:RED ⑧:GREEN ⑨:BLUE ⑩:FADE
: STEP
1)
Push "MANUAL" button and the sign LED should light.
2)
Select the desired color with the red, green and blue color levels.
3)
Push "PROGRAM", the LED of this knob will light – one step is completed.
4)
Select the next desired color with 3 colors levels.
5)
Push "PROGRAM" and second step is completed.
6)
Continue as step 4+5 as many as desired steps up to 30.
7)
To operate the program, push "START".
8)
Select desired "STEP TIME" – which is the staying time in each step. Minimum is
zero time – In this case, the program should constantly fade. Maximum is about
an hour for each step.
9) Select desired "fade time" – which is the time for the fading from one step to other,
passing via all colors that exist in the mix of the colors in between the steps. If
steps are desired, with soft fade between them, then step time should be bigger
than fade time.
10) If strobe effect is desired as part of program, the desired the desired color should be
programmed and then about 4 no color steps should be programmed. A second (same
as first or other) color should be programmed and then about 4 no color again. Pushing
START with very short STEP TIME will give amazing colored strobe effect.
11) After disconnecting from power, the last program is remembered. When connecting
power again, a default automatic demo program starts. The default program passes
via all possible colors. If the demo program is desired, it should be tuned with "STEP
TIME" and "FADE TIME". In order to play the last remembered program, push
START.
12) If only one constant color is desired, simply push "MANUAL", select the desired color
and let it stay.
5. CLEANING AND MAINTENANCE
Disconnect from mains before starting maintenance operation!
DANGER TO LIFE!
We recommend a frequent cleaning of the device. Please use a soft lint-free and moistened cloth.
Never use alcohol or solvents! There are no serviceable parts inside the device. Maintenance and
service operations are only to be carried out by authorized dealers.
6. TECHNICAL SPECIFICATIONS
Power supply: AC~220V, 50Hz,0.16A
Output voltage 24V, 3A total
Dimension; 170mm x 125mm x71mm
Weight: 1.50kgs
Please note: Any information is subject to change without prior notice.