1
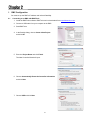
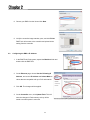
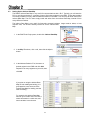
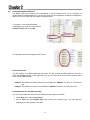
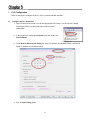
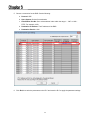
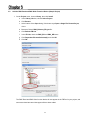
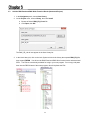
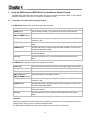
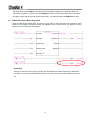
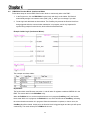
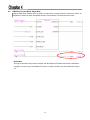
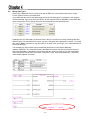
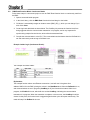
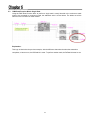
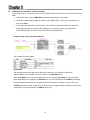
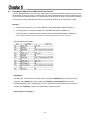
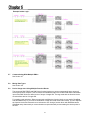
Using RMC75E and RMC150E
eth1000_large.jpgMotion Controllers with iQ
Hydraulic
and L CPUs’ Built-In Ethernet
V1.10
This book applies to the Mitsubishi Electric Corporation product components and to all subsequent releases
and modifications until otherwise indicated in new editions. Make sure you are using the correct edition for the
level of the product.
MITSUBISHI ELECTRIC CORPORATION PROVIDES THIS BOOK "AS IS," W ITHOUT WARRANTY OF ANY
KIND, EITHER EXPRESS OR IMPLIED, INCLUDING, BUT NOT LIMITED TO, THE IMPLIED W ARRANTIES
OF MERCHANTABILITY OR FITNESS FOR A PARTICULAR PURPOSE.
This book could contain technical inaccuracies or typographical errors. Changes are made periodically to the
information herein. Mitsubishi Electric Corporation may make improvements and changes at any time to the
product(s) and/or program(s) described in this book.
ii
R72-149-SLSASG-001
Contents
Contents .................................................................................................................................................................. iii
Mitsubishi – Further Reading Reference List .......................................................................................................... iv
Delta Computer Systems, Inc.– Further Reading Reference List ........................................................................... iv
Mitsubishi - Attachments ......................................................................................................................................... iv
Delta Computer Systems- Attachments .................................................................................................................. iv
1
Introduction .................................................................................................................................................. 1-1
2
1.1
Simple and Structured Projects ........................................................................................................ 1-1
RMC Configuration ...................................................................................................................................... 2-1
3
Connecting to an RMC with RMCTools............................................................................................ 2-1
2.1
2.2
Configuring the RMC’s IP Address................................................................................................... 2-2
2.3
Setting Up the Indirect Data Map ..................................................................................................... 2-3
2.4
Understanding RMC Addresses ....................................................................................................... 2-4
PLC Configuration ....................................................................................................................................... 3-1
4
3.1
Configure the PLC Parameters ........................................................................................................ 3-1
3.2
Add the RMC Read and RMC Write Function Blocks (Simple Project) ........................................... 3-3
3.3
Add the RMC Read and RMC Write Function Blocks (Structured Project)...................................... 3-4
Using the RMC Read and RMC Write Function Blocks (Simple Project) .................................................... 4-1
5
4.1
Description of Function Blocks (Simple Project) .............................................................................. 4-1
4.2
RMC Read Function Block: Continuous Reads ............................................................................... 4-2
4.3
RMC Read Function Block: Single Read ......................................................................................... 4-3
4.4
RMC Write Function Block: Continuous Writes ................................................................................ 4-4
4.5
RMC Write Function Block: Single Write .......................................................................................... 4-5
4.6
Using Multiple RMC Read and RMC Write Function Blocks ............................................................ 4-6
4.7
Communicating With Multiple RMC’s ............................................................................................... 4-8
4.8
Mixing Data Types .......................................................................................................................... 4-10
Using the RMC Read and RMC Write Function Blocks (Structured Project) .............................................. 5-1
6
5.1
Description of Function Blocks (Structured Project) ......................................................................... 5-1
5.2
RMC Read Function Block: Continuous Reads ............................................................................... 5-2
5.3
RMC Read Function Block: Single Read ......................................................................................... 5-3
5.4
RMC Write Function Block: Continuous Writes ................................................................................ 5-4
5.5
RMC Write Function Block: Single Write .......................................................................................... 5-5
5.6
Using Multiple RMC Read and RMC Write Function Blocks ............................................................ 5-6
5.7
Communicating With Multiple RMC’s ............................................................................................... 5-7
5.8
Mixing Data Types ............................................................................................................................ 5-7
5.9
Device Usage when Using Multiple Function Blocks ....................................................................... 5-7
Troubleshooting the Communications ......................................................................................................... 6-1
6.1
Event Log in RMCTools ................................................................................................................... 6-1
6.2
Advanced Troubleshooting ............................................................................................................... 6-2
Revisions ................................................................................................................................................................. 1
iii
R72-149-SLSASG-001
FURTHER READING REFERENCE LIST
Mitsubishi – Further Reading Reference List
QnUCPU User’s Manual Communication via Built-in Ethernet Port SH(NA)080811ENG
MELSEC L CPU Module User’s Manual (Built-In Ethernet Function) SH(NA)080891ENG
Delta Computer Systems, Inc.– Further Reading Reference List
RMCTools User Manual – DMCP Protocol (http://www.deltamotion.com/pdf/rmctools.pdf)
RMC70 Startup Guide
RMC150 Startup Guide
ATTACHMENTS
Mitsubishi - Attachments
RMC_FBs_Simple_UDP_MEAU.gxw - GX Works2 File
RMC_FBs_Structured_TCP_MEAU.gxw - GX Works2 File
RMC_Ethernet_FB.qxw – GX Works2 Function Block Library File (Simple Project)
RMC_FB_Lib.sul – GX Works2 Function Block Library File (Structured Project)
Delta Computer Systems- Attachments
RMC75MitsuDemo.rmcproj – RMC75E File
iv
R72-149-SLSASG-001
1
Introduction
This document describes how to set up a Mitsubishi iQ or L CPU with a built-in Ethernet port to
communicate with an RMC75E or RMC150E hydraulic motion controller from Delta Computer Systems, Inc.
Delta has created function blocks to make this process easy.
The iQ and L CPUs support up to 16 Ethernet connections and can therefore communicate with up to 16
RMCs, although typically, some of these connections will be needed for communications with other devices.
Other Mitsubishi modules, such as the QJ71E71-100 and QJ71MT91, also support Ethernet communication
with the RMC motion controllers. However, Delta recommends using the CPU’s built-in Ethernet port, along
with the provided RMC_Read and RMC_Write function blocks, because this requires much less effort.
Requirements
The RMC and PLC must be connected via an Ethernet network. The RMC can communicate with iQ
“Universal” CPUs or LCPUs, with built-in Ethernet. The Serial Number of the iQ “Universal” CPU hardware
must start with 11011 or later.
The PLC Programming software must be GX Works2 V1.31H or greater for iQ CPUs or V1.53F or greater
for LCPUs. Melsoft Navigator is not required.
It is assumed the user has basic knowledge of the RMC motion controllers and RMCTools software.
1.1
Simple and Structured Projects
This document includes instructions for a simple project with labels, and for a structured project with
structured ladder/FBD. Read the corresponding section for your project. The setup procedure in the RMC
setup is identical for either method.
1-1
2
RMC Configuration
You must set up the RMC’s IP address and Indirect Data Map.
2.1
Connecting to an RMC with RMCTools
1. Install the RMCTools software. RMCTools can be downloaded from www.deltamotion.com.
2. Connect a USB cable from your computer to the RMC.
3. Start RMCTools.
4. In the StartUp dialog, choose Create a New Project
and click OK.
5. Enter the Project Name and click Finish.
The New Controller Wizard will open.
6. Choose Automatically Detect the Controller Information
and click Next.
7. Choose USB and click Next.
2-1
8. Choose your RMC from the list and click Next.
9. Verify the controller image matches yours, and click Finish.
RMCTools will connect to the controller and upload all the
setting from the controller.
2.2
Configuring the RMC’s IP Address
1. In the RMCTools Project pane, expand the Modules folder and
double-click the RMC CPU.
2. On the Ethernet page, choose Use the Following IP
Address, and set the IP Address and Subnet Mask to
values that are compatible with your PLC and network.
3. Click OK. The changes will be applied.
4. On the Controller menu, click Update Flash. This will
save the changes in Flash memory so they will be
saved even when power is removed.
2-2
2.3
Setting Up the Indirect Data Map
The RMC’s Indirect Data Map is very useful for communications with a PLC. Typically, you will want the
PLC to read from and write to a number of items (32-bit data registers) in the RMC. These data registers
are usually scattered in many different address locations in the RMC. You can map all these items to the
Indirect Data Map. The PLC then simply reads and writes from the Indirect Data Map, instead of from
many different locations.
The Indirect Data Map is very useful for frequently accessed registers. Larger reads or writes, or less
frequent ones, can be done directly instead of via the Indirect Data
Map.
1. In the RMCTools Project pane, double-click Indirect Data Map.
2. In the Map To column, click a cell, then click the ellipsis
button.
3. In the Address Selection Tool, browse to a
desired register in the RMC and click Add.
Repeat for as many registers as you wish, then
click OK.
If you plan on using the Indirect Data
Map for both reading and writing, it is
good practice to set one area of the
Indirect Data Map for reading, and the
other for writing.
For example, this Indirect Data Map
was set up to include Axis 0 and Axis 1
status information in a read area, and
some variables in a write area.
2-3
2.4
Understanding RMC Addresses
The RMC’s 32-bit data registers can be addressed in several different forms. For the purposes of
communications with Mitsubishi PLC’s, you should use the IEC form. Wherever an address is displayed in
RMCTools, you can right-click and choose the desired format.
For example, in the Indirect Data Map,
in the Reg column, right-click a cell, point to
Address Format, and choose IEC.
The addresses will now be displayed in IEC format:
Files and Elements
The IEC address of an RMC register has two levels. The first is called the file number, the second is
called the element number. In the Mitsubishi PLC, you will use the file and element numbers when
communicating with the RMC.
Example: The address for Indirect Data Item 0 in the RMC75 is %MD18.0. The file is 18. The element
is 0.
Example: The address for variable 7 in the RMC75 is %MD56.7. The file is 56. The element is 7.
Finding Addresses in the RMCTools Help
You can use the RMCTools help to find the address for any register in the RMC:
1. On the Help menu, choose Help Topics.
2. On the Index tab, type Register Map, then choose your controller type. This topic lists the
addresses of all the registers in the RMC.
2-4
3
PLC Configuration
These are the steps to configure the iQ or L CPU to communicate with the RMC.
3.1
Configure the PLC Parameters
1. Open GX Works2 and create a new for the appropriate CPU module. You can choose a Simple
Project with Labels, or a Structured Project with Structured
Ladder/FBD.
2. In the Project tree, expand the Parameter node and double-click
PLC Parameter.
3. On the Built-on Ethernet Port Setting tab, set the IP Address, Subnet Mask Pattern, and Default
Router IP Address to your desired values.
4. Click the Open Setting button.
3-1
5. Choose a connection for the RMC. Set the following:
a. Protocol: UDP
b. Open System: Socket Communication
c.
Host Station Port No: Set to a hexadecimal value within the range 1 - 1387 or 1392 FFFE. For example, 1000.
d. Destination IP Address: The IP address of the RMC.
e. Destination Port No: 1324
6. Click End, then write the parameters to the PLC and reset the PLC to apply the parameter settings.
3-2
3.2
Add the RMC Read and RMC Write Function Blocks (Simple Project)
1. On the Project menu, choose Library, then click Install.
a. In the Library List box, choose Select Project.
b. Click Browse.
c.
At the bottom of the Open dialog, if the button says Open a Single File Format Project,
click it.
d. Browse to Delta’s RMC_Ethernet_FB.gxw file.
e. Click Refresh FB List.
f.
In the FB List, check the RMC_RD and RMC_WR items.
g. Click Dependent Element Selection(A) and click OK.
h. Click OK.
The RMC Read and RMC Write function blocks will now appear in the FB Pool in your project, and
some associated structured data types will have been added.
3-3
3.3
Add the RMC Read and RMC Write Function Blocks (Structured Project)
1. In the Navigation panel, choose User Library.
2. On the Project menu, choose Library, then click Install.
a. Browse to Delta’s RMC_FB_Lib.sul file.
b. Click Open, then OK.
The RMC_FB_Lib will now appear in the User Library list.
3. In the User Library list, click on the Lock Symbol to Unlock the Library then expand RMC_FB_Lib,
then expand FB/FUN. You will see the RMC Read and RMC Write function blocks and associated
SDTs. The FBs are now directly available for using in your user program. Do not copy and paste
them into the FB/FUN area of the users program, this will duplicate the FBs.
3-4
4
Using the RMC Read and RMC Write Function Blocks (Simple Project)
The RMC Read and RMC Write function blocks are used to communicate with the RMC. In this example
the RMC IP Address is 192.168.0.21, using PLC Connection #1 UDP.
4.1
Description of Function Blocks (Simple Project)
The RMC Read function block inputs and outputs are as follows:
START (Bit)
The function block will perform one read for each rising edge of the Start bit.
CONN (Word)
The connection number (1-16) as defined in the CPU’s Open Settings.
RMC_FILE (Word)
RMC_ELEMENT (Word)
Specify the address in the RMC to read from.
NUM_DW (Word):
The number of 32-bit registers that you wish to read from the RMC. The
maximum is 256.
DST_DEV (Word)
The destination device for the data in the PLC. Typically, this is a FLOAT
array.
ENABLED (Bit)
Set while the read is in progress. When the read completes, or has an error,
the Enabled bit will be cleared.
Done (Bit)
Set when the read successfully completes. This bit is cleared when the
function block starts.
Error (Bit)
Set if the read has an error. This bit is cleared when the function block
starts.
The RMC Write function block inputs and outputs are as follows:
START (Bit)
The function block will perform one write for each rising edge of the Start bit.
CONN (Word)
The connection number (1-16) as defined in the CPU’s Open Settings.
SRC_DEV (Word)
The source device of the data in the PLC. Typically, this is a FLOAT array.
RMC_FILE (Word)
RMC_ELEMENT (Word)
Specify the address in the RMC to write to.
NUM_DW (Word):
The number of 32-bit registers that you wish to write to the RMC. The
maximum is 256.
ENABLED (Bit)
Set while the write is in progress. When the write completes, or has an error,
the Enabled bit will be cleared.
Done (Bit)
Set when the write successfully completes. This bit is cleared when the
function block starts.
Error (Bit)
Set if the write has an error. This bit is cleared when the function block
starts.
Important!
When using multiple function blocks with the same Ethernet connection, it is very important that only one
function block is active at a time. Follow the examples below.
The RMC Read and RMC Write function blocks have a built-in timeout of 0.5 seconds.
4-1
4.2
RMC Read Function Block: Continuous Reads
Follow these steps to use the RMC Read function block to continuously read from the RMC:
1. Open a ladder logic program.
2. In the Project tree, click the RMC Read function block and drag it to the ladder.
3. GX Works 2 automatically assigns an instance name (RMC_RD_1), which you can change if you
wish. Click OK.
4. Create logic and add labels as shown below. The ReadData length should be the number of
registers to read. The ComBusy bit prevents the function block from being triggered while the
communication transaction is in progress, and is very important for synchronizing multiple function
blocks, which will be demonstrated later.
5. Compile the code and write it to the PLC. The communications should start when the DoRead bit is
set and continuously read as long as DoRead is set.
Example Ladder Logic (Continuous Reads):
The example uses these labels:
Explanation:
The function block uses Ethernet connection 1, and will read 5 registers from address %MD18.0 in the
RMC, placing the values in the ReadData label. When the DoRead bit is on, and communications are
not in progress (ComBusy is off), the function block starts. While it is in progress, the Enabled bit is set,
4-2
which will also set the ComBusy, indicating the communication transaction is in progress. When the
transaction completes, or has an error, the ComBusy bit will be cleared. At this point, the function block
is triggered again and the cycle will repeat continuously. The reads will stop if the DoRead bit is reset.
4.3
RMC Read Function Block: Single Read
Using the RMC Read function block to perform a single read is nearly identical to the continuous reads
method. As compared to continuous reads, the additional code is circled below. The labels are all the
same as for the continuous reads method.
Explanation:
This logic is identical to the previous example, with the difference that when the when the transaction
completes, or has an error, the DoRead bit is reset. To perform another read, the DoRead bit must be
set.
4-3
4.4
RMC Write Function Block: Continuous Writes
Follow these steps to use the RMC Write function block to continuously write to the RMC:
1. In the Project tree, click the RMC Write function block and drag it to the ladder. GX Works 2
automatically assigns it an instance name (RMC_WR_1), which you can change if you wish.
2. Create logic and add labels as shown below. The ComBusy bit prevents the function block from
being triggered while the communication transaction is in progress, and is very important for
synchronizing multiple function blocks, which will be demonstrated later.
Example Ladder Logic (Continuous Writes):
The example uses these labels:
Explanation:
The function block uses Ethernet connection 1, and will write 10 registers to address %MD56.10 in the
RMC. The source data is in the WriteData array.
When the DoWrite bit is on, and communications are not in progress (ComBusy is off), the function
block starts. While it is in progress, the Enabled bit is set, which will also set the ComBusy, indicating
the communication transaction is in progress. When the transaction completes, or has an error, the
ComBusy bit will be cleared. At this point, the function block is triggered again and the cycle will repeat
continuously. The reads will stop if the DoWrite bit is reset.
4-4
4.5
RMC Write Function Block: Single Write
Using the RMC Write function block to perform a single write is nearly identical to continuous writes. As
compared to continuous writes, the additional code is circled below. The labels are all the same.
Explanation:
This logic is identical to the previous example, with the difference that when the when the transaction
completes, or has an error, the DoWrite bit is reset. To perform another read, the DoWrite bit must be
set.
4-5
4.6
Using Multiple RMC Read and RMC Write Function Blocks
It is very important that for all the function blocks that use the same Ethernet connection, that only one
function block is active at a time. To achieve this, use a bit to indicate when the communications are busy.
Such a bit can be named ComBusy. This method uses the same logic as shown in the previous examples.
You may add as many reads and writes as you wish, and any of them can be continuous or single.
Example:
•
Continuously read items 0-9 from the RMC75E’s Indirect Data Map (address %MD18.0)
•
Do a single write on demand to variable 10 on the RMC75E (address %MD56.10)
•
Do a single write* on demand to Axis 0 Command area in the RMC75E (address %MD25.0)
*When writing commands, always use single writes. Commands are not intended to be sent continuously.
This example uses the labels:
Explanation:
The RMC_RD_1 function block will continuously read when the DoRead bit is set. After each read
completes, the ComBusy bit is reset, so that if the DoWrite or DoCommand bits are set, the
corresponding RMC_WR_1 or RMC_WR_2 function block will start. Once the write or command is
complete, the ComBusy is again reset, and the logic continues its cycle.
Ladder Logic on next page →
4-6
Example Ladder Logic:
4-7
4.7
Communicating With Multiple RMC’s
When communicating with multiple RMC’s, use a separate Ethernet connection (as defined in the Open
Connection settings) for each RMC. Each connection must use a unique Host Station Port No. In the
ladder logic, use a separate ComBusy bit for each connection.
Example:
An iQ CPU communicates with two RMC75E’s, called RMC1 and RMC2. RMC1 uses Ethernet
connection 1, and RMC2 uses Ethernet connection 2 (defined in the CPU’s Built-in Ethernet Open
Connection settings). The bits ComBusy1 and ComBusy2 apply to the respective connections.
This example does the following:
•
For RMC1, continuously read 8 items from item 0 of the Indirect Data Map (address %MD18.0)
•
For RMC1, do a single write on demand to variable 5 (address %MD56.10)
•
For RMC2, continuously read 8 items from item 0 of the Indirect Data Map (address %MD18.0)
•
For RMC2, do a single write on demand to variable 5 (address %MD56.10)
This example uses the labels:
Explanation:
In the ladder logic, the first two function blocks communicate with RMC1 and use the ComBsy1 bit. The
last two function blocks communicate with RMC2 and use the ComBsy1 bit.
Ladder Logic on next page →
4-8
Example Ladder Logic:
4-9
4.8
Mixing Data Types
When using a Mitsubishi PLC to communicate with an RMC, the communicated data can be of type
FLOAT (Single Precision) or Double Word.
It is possible that the read or write data contains items of both data types. For example, in the following
Indirect Data Map, the first two items are REALs, and the last two items are DWORDs. These RMC data
types correspond to FLOAT (Single Precision) and Double Word in the Mitsubishi CPU.
Reading these four values with one function block in the PLC will result in an array containing data with
different types. The data itself will be correct, but one of the types will be displayed incorrectly. To remedy
this, use the BMOV instruction to copy the values to an array of the correct type, or to a label defined by a
structured data type.
The example logic below shows logic that reads the shown above in the Indirect Data Map
(address %MD18.0). The circled item below is the BMOV that copies the third and fourth items to the
label array StatusBits, of type Double Word. Notice that the number of words to copy (K4 in the BMOV
instruction below) must be twice the number of registers to copy, because the BMOV is in 16-bit units,
and the RMC registers are 32 bits.
4-10
5
Using the RMC Read and RMC Write Function Blocks (Structured Project)
The RMC Read and RMC Write function blocks are used to communicate with the RMC.In this example the
RMC IP Address is 192.168.1.102, using PLC Connection #4 TCP
5.1
Description of Function Blocks (Structured Project)
The RMC Read function block inputs and outputs are as follows:
START (Bit)
The function block will perform one read for each rising edge of the Start bit.
CONN (Word)
The connection number (1-16) as defined in the CPU’s Open Settings.
RMC_FILE (Word)
RMC_ELEMENT (Word)
Specify the address in the RMC to read from.
NUM_DW (Word):
The number of 32-bit registers that you wish to read from the RMC. The
maximum is 1024.
DST_DEV
(FLOAT)(0..1023)
The destination for the data in the PLC.
ENABLED (Bit)
Set while the read is in progress. When the read completes, or has an error,
the Enabled bit will be cleared.
Done (Bit)
Set when the read successfully completes. This bit is cleared when the
function block starts.
Error (Bit)
Set if the read has an error. This bit is cleared when the function block
starts.
The RMC Write function block inputs and outputs are as follows:
START (Bit)
The function block will perform one write for each rising edge of the Start bit.
CONN (Word)
The connection number (1-16) as defined in the CPU’s Open Settings.
SRC_DEV
(FLOAT)(0..1023)
The source of the data in the PLC..
RMC_FILE (Word)
RMC_ELEMENT (Word)
Specify the address in the RMC to write to.
NUM_DW (Word):
The number of 32-bit registers that you wish to write to the RMC. The
maximum is 1024.
ENABLED (Bit)
Set while the write is in progress. When the write completes, or has an error,
the Enabled bit will be cleared.
Done (Bit)
Set when the write successfully completes. This bit is cleared when the
function block starts.
Error (Bit)
Set if the write has an error. This bit is cleared when the function block
starts.
Important!
When using multiple function blocks with the same Ethernet connection, it is very important that only one
function block is active at a time. Follow the examples below.
The RMC Read and RMC Write function blocks have a built-in timeout of 0.5 seconds.
5-1
5.2
RMC Read Function Block: Continuous Reads
Follow these steps in a structured project to use the RMC Read function block to continuously read from
the RMC:
1. Open a structured ladder program.
2. In the User Library, click the RMC Read function block and drag it to the ladder.
3. GX Works 2 automatically assigns an instance name (RMC_RD_1), which you can change if you
wish. Click Close.
4. Create logic and add labels as shown below. The ComBusy bit prevents the function block from
being triggered while the communication transaction is in progress, and is very important for
synchronizing multiple function blocks, which will be demonstrated later.
5. Compile the code and write it to the PLC. The communications should start when the DoRead bit is
set and continuously read as long as DoRead is set.
Example Ladder Logic (Continuous Reads):
The example uses these labels:
Explanation:
The example function above uses Ethernet connection 4, and will read 12 registers from
address %MD18.0 in the RMC, placing the values in the ReadData label. When the DoRead bit is on,
and communications are not in progress (ComBusy is off), the function block starts. While it is in
progress, the Enabled bit is set, which will also set the ComBusy, indicating the communication
transaction is in progress. When the transaction completes, or has an error, the ComBusy bit will be
cleared. At this point, the function block is triggered again and the cycle will repeat continuously. The
reads will stop if the DoRead bit is reset.
5-2
5.3
RMC Read Function Block: Single Read
Using the RMC Read function block to perform a single read is nearly identical to the continuous reads
method. As compared to continuous reads, the additional code is circled below. The labels are all the
same as for the continuous reads method.
Explanation:
This logic is identical to the previous example, with the difference that when the when the transaction
completes, or has an error, the DoRead bit is reset. To perform another read, the DoRead bit must be set.
5-3
5.4
RMC Write Function Block: Continuous Writes
Follow these steps in a structured project to use the RMC Write function block to continuously write to the
RMC:
1. In the User Library, click the RMC Read function block and drag it to the ladder.
2. GX Works 2 automatically assigns an instance name (RMC_RD_1), which you can change if you
wish. Click Close.
3. Create logic and add labels as shown below. The ComBusy bit prevents the function block from
being triggered while the communication transaction is in progress, and is very important for
synchronizing multiple function blocks, which will be demonstrated later.
Example Ladder Logic (Continuous Writes):
The example uses these labels:
Explanation:
The example function block above uses Ethernet connection 4, and will write 2 registers to
address %MD56.10 in the RMC. The source data is in the WriteData array.
When the DoWrite bit is on, and communications are not in progress (ComBusy is off), the function
block starts. While it is in progress, the Enabled bit is set, which will also set the ComBusy, indicating
the communication transaction is in progress. When the transaction completes, or has an error, the
ComBusy bit will be cleared. At this point, the function block is triggered again and the cycle will repeat
continuously. The reads will stop if the DoWrite bit is reset.
5-4
5.5
RMC Write Function Block: Single Write
Using the RMC Write function block to perform a single write is nearly identical to continuous writes. As
compared to continuous writes, the additional code is circled below. The labels are all the same.
Explanation:
This example logic is identical to the previous example, with the difference that when the when the
transaction completes, or has an error, the DoWrite bit is reset. To perform another read, the DoWrite bit
must be set.
5-5
5.6
Using Multiple RMC Read and RMC Write Function Blocks
It is very important that for all the function blocks that use the same Ethernet connection, that only one
function block is active at a time. To achieve this, use a bit to indicate when the communications are busy.
Such a bit can be named ComBusy. This method uses the same logic as shown in the previous examples.
You may add as many reads and writes as you wish, and any of them can be continuous or single.
Example:
•
Continuously read items 0-11 from the RMC75E’s Indirect Data Map (address %MD18.0)
•
Do a single write on demand to variable 10 on the RMC75E (address %MD56.10)
•
Do a single write* on demand to Axis 0 Command area in the RMC75E (address %MD25.0)
*When writing commands, always use single writes. Commands are not intended to be sent continuously.
This example uses the labels:
Explanation:
The RMC_RD_1 function block will continuously read when the DoRead bit is set. After each read
completes, the ComBusy bit is reset, so that if the DoWrite or DoCommand bits are set, the
corresponding RMC_WR_1 or RMC_WR_2 function block will start. Once the write or command is
complete, the ComBusy is again reset, and the logic continues its cycle.
Ladder Logic on next page →
5-6
Example Ladder Logic:
5.7
Communicating With Multiple RMC’s
See Section 4.7
5.8
Mixing Data Types
See Section 4.8
5.9
Device Usage when Using Multiple Function Blocks
The structured RMC READ and RMC Write function blocks may use an unnecessarily large amount of
device points when compiled. This is because the ReadData output of the RMC Read and the WriteData
input of the RMC Write are defined to be of arrays of length 256. The tags used with the function blocks
must therefore also be of length 256.
For smaller reads and writes, Delta recommends modifying the function blocks to use smaller ReadData
and WriteData arrays. If you need a combination of large and small reads and/or writes, you can duplicate
the function blocks and rename them to indicate the size. Using a function block with ReadData and/or
WriteData arrays that match you communications requirements will prevent wasting the device points in
the PLC.
5-7
6
Troubleshooting the Communications
This section provides some tips on troubleshooting the communications.
If an error occurs in the communications, check the following:
1. Are the PLC and RMC both connected to the network, with correct IP addresses?
2. Are the PLC’s Built-in Ethernet Open Settings correct?
3. Is the function block’s connection number (CONN) correct?
4. Are the function block’s RMC_FILE, RMC_ELEMENT, and NUM_DW inputs correct?
6.1
Event Log in RMCTools
In RMCTools, the primary troubleshooting tool for communications is the Event Log. You can view basic
information for each read or write that is performed via the communications. You need to first enable this
functionality in the Event Log as follows:
1. In RMCTools, in the Project pane, double-click Event Log.
2. In the Event Log toolbar, click the Properties
button.
3. Expand Communications and click 10/100 Ethernet.
4. Check the All Applications Transactions box, then click OK.
5. The Event Log will now show all the Ethernet communications with to the RMC. For each
transaction, the Event Log lists the source, the address, and the number of registers.
6. To pause the Event Log, in the Event Log toolbar, click the Pause
Resume
button.
6-1
button. To resume it, click the
6.2
Advanced Troubleshooting
6.2.1
SP.SOCSEND and SP.SOCRCV Errors
The RMC Read and RMC Write function blocks use the SP.SOCSEND and SP.SOCRCV instructions.
The SP.SOCSEND and SP.SOCRCV instructions may return an error code in the SND_S2 label or
RCV_S2 label in the function blocks. For more details, see the SP.SOCSEND and SP.SOCRCV
instructions in the QnUCPU User’s Manual Communication via Built-in Ethernet Port - SH(NA)-080811ENG.
To see the internal errors:
1. Open the function block program.
2. Register the SND_S2 label or RCV_S2 label to the Watch window. You will be able to see the
errors if there are any.
6.2.2
DMCP Errors
The RMC Read and RMC Write function blocks use the SP.SOCSEND and SP.SOCRCV instructions to
implement Delta’s DMCP protocol.
The DMCP protocol itself may return an error that appears in the RCV_S3.RESP_CODE label. For more
details, see the DMCP protocol (UDP) in the RMCTools help.
To see the internal errors:
1. Open the function block program.
2. Register the SND_S2 label or RCV_S2 label to the Watch window. You will be able to see the
errors if there are any.
6-2
Revisions
June 2014 – Document Created and Published V1.0
September 2014 – Verified and updated by MEAU V1.10
Rev-1