1
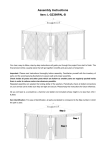
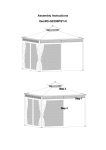
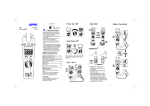
Content
1. BEFORE USING THE PHONE .................................................................................................... 3 1‐1.PACKAGE CONTENTS ........................................................................................................... 3 1‐2.INSTALLATION .................................................................................................................... 4 2. PHONE OPERATIONS .................................................................................................................... 6 2‐1. TO MAKE A CALL ................................................................................................................ 6 2‐2. PHONEBOOK MANAGEMENT ............................................................................................. 7 2‐3. HOLD, VOLUME ADJUSTMENT AND PICK UP NEW INCOMING CALL ..................................... 7 2‐4. REJECT A CALL .................................................................................................................... 7 2‐5. CALL TRANSFER .................................................................................................................. 8 2‐6. THREE PARTY CONFERENCE ................................................................................................ 9 3. CONFIGURATION THROUGH PHONE INTERFACE .......................................................................... 10 3‐1. IP DISTRIBUTION MODE SELECTION .................................................................................. 10 3‐2. CONFIGURATION WITH KEYPAD AND LCD DISPLAY ........................................................... 10 4. QUICK START FOR WEB CONFIGURATION .................................................................................... 11 4‐1. LOGON WEB .................................................................................................................... 11 4‐2. VOIP SETTINGS................................................................................................................. 11 5. RESET YOUR PHONE ................................................................................................................... 13 SAFETY NOTICES ............................................................................................................................. 14 3195IF VoIP Phone User Manual Short_V2.0
2
1. Before Using the Phone
1-1.Package Contents
• 3195IF VoIP phone base unit.
• Handset
• Coiled handset connecting cord
• One straight Ethernet cable
• One power supply
• User Guide
• 2 wall mount brackets
• 1 table bracket
3195IF VoIP Phone User Manual Short_V2.0
3
1-2.Installation
Connecting Network and Power Supply
Connect WAN port to router.
Connect LAN port of the phone to your PC with Ethernet cable
Plug in attached power adapter to the phone’s power jack -- ”DC”.
Connecting Handset and Headset(optional)
Connect the handset to the phone with attached coiled cord through handset jacks(one jack on the back
of the phone and another on the handset)
Connect headset to the headset jack on the back of the phone(Optional. Only if you have a headset and
need to use it).
Assembly Base and Brackets
You could choose one of below two ways to install 319fIF VoIP phone
• As a desktop
• As a wall mounting phone
Desktop installation
Assembly table bracket to base unit as shown below
Wall Mounting Installation
3195IF VoIP Phone User Manual Short_V2.0
4
To install the phone on the wall, you need to put two pothooks on the wall first. Then assemble two wall
mount brackets to the phone. In this way, the phone could be hung on the wall. The two supporting frames
could balance the bottom of the phone
.
Assembly the wedge
The wedge could be inserted as below two ways
Insert with narrow side down as Way No.1
Insert with narrow side up as Way No.2
Wedge
Way No.1
Way No.2
It is advisable to choose Way No.2 when you assemble the phone with wall mount brackets.
3195IF VoIP Phone User Manual Short_V2.0
5
2. Phone Operations
During phone interface operation, press 【
】to confirm operation, while press ESC/REC to escape
2-1. To Make a Call
In default, outgoing calls would be dialed out from SIP1 that you have configured
You could choose one of below ways to make a call
In on-hook,
Input the number, press 【
】to dial out. Then you could choose to pick up the handset or use Hands Free
function by not picking up the handset.
In off-hook
Pick up the handset, input number, press【
】to dial out.
Dial out a number from Memory Keys M1-M5
To dial out the stored number in M1 (or other memory key)s, press M1 (or other memory keys), then pick up the
handset, or press【
】 to dial out
Dial out a number from Phonebook
Press 【
】to enter phonebook, choose your desired number following LCD indication, then press 【
or pick up the handset to dial out
Dial out a number from CallLog
In on-hook, press 【
】 to enter CallLog, choose your desired number from Dialed/Received/Missed Call
following LCD indication, then press 【
】or pick up the handset to dial out
3195IF VoIP Phone User Manual Short_V2.0
6
】
2-2. Phonebook Management
To add new item
In on-hook, press【
】, then press 【
】to enter phonebook. Choose Add, input Name, Phone Number,
Ring type according to LCD indication, then press 【
】to save or 【ESC/REC 】 to quit
To edit saved number
In on-hook, press【
】, then press 【
】to enter phonebook. Choose Current
→ choose the number that you would like to edit
→ press 【PH No./Edit 】to enter editing menu
→ edit as you desired, following LCD indication
→ press 【
】 to save or 【ESC/REC 】 to quit
2-3. Hold, Volume Adjustment and Pick up New Incoming Call
During a call
Press【
Press 【
】to keep line, press it again to release
】or【
】to adjust speaker volume
When there is a new incoming call, press 【FL 】to pick up the new call, at the same time, previous call would be
held
2-4. Reject a Call
When there is an incoming call, you could press 【ESC/REC 】to reject. It would be forwarded to your voice mail
if you have configured voice mail
3195IF VoIP Phone User Manual Short_V2.0
7
2-5. Call Transfer
During a call, there are three ways to transfer
Blind Transfer
1). During a call, press 【
】
2). Do one of the following steps:
— Input the number which you would like to transfer to, end with # to finish transfer.
— Press transfer soft key, then press【
then press【
】 . Get access to your desired number as LCD indicates,
】 to transfer.
— Press transfer soft key, then press【
】 . Select the appropriate list, to get access to your desired
】.
number, then press【
3)After one of the above procedures, your phone would hang up automatically
Half Attended Transfer
1). During a call, press 【FL 】.
2). Do one of the following steps:
—
Input the number which you would like to transfer to, end with # to finish transfer.
—
Press transfer soft key, then press【
then press 【
—
】to transfer
Press transfer soft key, then press【
number, then press【
3). Press 【
】 . Get access to your desired number as LCD indicates,
】 . Select the appropriate list to get access to your desired
】.
】 after you hear the back ring. Then your phone would hang up automatically
Attended Transfer
1). During a call, press 【FL 】.
2). Do one of the following steps:
—
Input the number which you would like to transfer to, end with # to finish transfer.
3195IF VoIP Phone User Manual Short_V2.0
8
—
Press transfer soft key, then press【
then press 【
—
】 . Get access to your desired number as LCD indicates,
】to transfer
Press transfer soft key, then press【
number, then press【
】 . Select the appropriate list to get access to your desired
】.
3). Before completing the transfer, you could talk to the party you are transferring to, to see if he/she would
like to answer
4). Press 【
】 if you get the permission.
2-6. Three Party Conference
During conversation, press 【FL 】, then dial another number plus # button,
while line connected, press 【FL 】and 【
3195IF VoIP Phone User Manual Short_V2.0
】 to make conference call
9
3. Configuration through Phone Interface
3-1. IP distribution mode selection
Press and hold 【1】 button for 5s, the LCD displays “STATIC MODE”;
Press and hold 【2】 button for 5s, the LCD display “DHCP MODE”;
Press and hold 【3】 button for 5s, the LCD display “PPPOE MODE”.
3-2. Configuration with keypad and LCD display
In standby, press 【Menu】 button till LCD shows " Input Password: " input correct password (default is
123), press 【Menu】 key to enter the menu list. Then follow below menu list to set parameters
accordingly.
During configuration, operations as follows
-For browse and edit Configuration, press 【
】and 【
3195IF VoIP Phone User Manual Short_V2.0
】;
10
4. Quick Start for Web Configuration
4-1. Logon Web
IP Phone Web Configuration Menu can be accessed by URL: http://Phone-IP-Address.
Default LAN IP address is “192.168.10.1” while WAN IP address is DHCP.
If web login port of the phone is configured as non-80 standard port, you need to input
http://xxx.xxx.xxx.xxx:yyyy, otherwise the web will show that no server has been found.
After you input above IP address, below Logon Menu would pop up
There are two logon modes
-Logon as Guest Account
Default user name and password is guest. You could only have a browse of system with this account
-Logon as Administrator Account
Default user name and password is admin. You could configure your phone with this account
In this guide, only Logon as Administrator Account would be introduced
4-2. VoIP Settings
After you logon in successfully, web would show as below
3195IF VoIP Phone User Manual Short_V2.0
11
Choose VOIP on the left column to make VOIP configuration.
-SIP Line Select
Choose SIP 1 or SIP 2, click Load to load corresponding SIP settings
-Register Status
Indicate current registration status of the chosen SIP
-Server Name
Input your server name
You could leave the server name. If you choose to configure it, make it different between two SIPs.
Otherwise, one SIP would not be able to register and show time out.
-Server Address
Configure SIP register server IP address or Domain Name
-Server Port
Configure SIP register server signal port
-Account Name/Password/Phone Number
Configure Account Name/Password/Phone Number
-Enable Register
Choose to enable settings
-Apply
Click to apply above settings
3195IF VoIP Phone User Manual Short_V2.0
12
5. Reset Your Phone
To reset your phone
1. Power off
2. Long press # until power on
3. LCD would show POST MODE
4. Press *#168, LCD would display Conf Reset
5. Plug out power supply, then plug in again to accomplish reset
After above procedures, the phone settings would turn back to factory default
3195IF VoIP Phone User Manual Short_V2.0
13
Safety Notices
To care for your product, please keep it away from:
Liquids of any kind
Don’t expose your product to water, rain, extreme humidity,
sweat, or other moisture.
Dust and dirt
Don’t expose your product to dust, dirt, sand, food, or other
inappropriate materials.
Extreme heat or cold
Avoid temperatures below -10°C/14°F or above 45°C/113°F.
Cleaning solutions
To clean your product, use only a dry soft cloth.
Don’t use alcohol or other cleaning solutions.
Microwaves
Don’t try to dry your product in a microwave oven.
The ground
Don’t drop your product.
Vogtec Technology Co., Ltd
Office Add.:
5th Floor, Bldg. 1, Software Park,Keji Zong 2 Rd.,
High-Tech Zone, Nan Shan District,
Shenzhen, 518057, China
Tel: +86-755-86168442
Fax: +86-755-86168417
3195IF VoIP Phone User Manual Short_V2.0
14