1
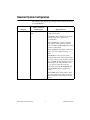
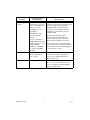
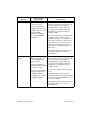
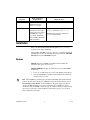
RELEASE NOTES
LABVIEW™
Version 6.1
These release notes introduce you to LabVIEW, describe the system
requirements for the LabVIEW software, and contain installation
instructions. The LabVIEW 6.1 Professional Development System
includes the LabVIEW Full Development System.
Contents
How to Proceed....................................................................................... 2
Required System Configuration.............................................................. 3
Installation............................................................................................... 6
Windows .......................................................................................... 6
Macintosh......................................................................................... 7
UNIX ............................................................................................... 7
Solaris 2 .................................................................................... 7
Linux......................................................................................... 8
Installing LabVIEW on a Network .................................................. 8
Hardware Installation and Configuration Notes ..................................... 9
Windows .......................................................................................... 9
Low-Level Register I/O............................................................ 9
Macintosh......................................................................................... 9
Sun ................................................................................................... 10
Where to Go from Here .......................................................................... 10
Common LabVIEW Launch Errors on UNIX ........................................ 11
Configuring Window Managers on UNIX.............................................. 11
Configuring LabVIEW with the Tab Window Manager ................. 11
Configuring LabVIEW with the Motif Window Manager .............. 11
Notice to Sun SPARCstation 5 Users ..................................................... 12
Known Issues with LabVIEW 6.1 .......................................................... 13
Documentation Clarifications and Additions.......................................... 13
LabVIEW ™, National Instruments™, NI™, NI-488.2™, ni.com™, and NI-DAQ™ are trademarks of National Instruments Corporation. Product and
company names mentioned herein are trademarks or trade names of their respective companies.
321778D-01
© 2001 National Instruments Corp. All rights reserved.
November 2001
How to Proceed
If you are upgrading from a previous version of LabVIEW, read the
LabVIEW Upgrade Notes included with your upgrade package before you
continue with this installation. You need to consider several issues before
you convert VIs to LabVIEW 6.1.
Read the Required System Configuration section and follow the
instructions in the Installation section. After you install LabVIEW, read the
Where to Go from Here section for information about getting started with
LabVIEW. Also read the Documentation Clarifications and Additions
section before you use LabVIEW 6.1.
LabVIEW Release Notes
2
ni.com
Required System Configuration
The following table describes the minimum system requirements needed
to run LabVIEW 6.1.
Platform
All Platforms
Media and System
Requirements
Important Notes
Distributed on CD-ROM
only.
LabVIEW and the LabVIEW Help contain
16-bit color graphics.
LabVIEW requires a minimum color palette
setting of 256 colors. 16-bit color is
recommended.
The LabVIEW Help requires a minimum
color palette setting of 256 colors with a
screen resolution of 800 × 600 pixels. 16-bit
color is recommended.
The LabVIEW Tutorial requires a sound card
and a video card capable of playing .avi
files.
LabVIEW uses a directory for storing
temporary files. Some of the temporary files
are large, so keep several megabytes of disk
space available for this temporary directory.
The default for the temporary directory is
/tmp. You can change the temporary
directory by selecting Tools»Options and
selecting Paths from the top pull-down
menu.
If LabVIEW aborts unexpectedly, it might
leave files behind in the temporary directory.
Remove old files occasionally to free disk
space.
© National Instruments Corporation
3
LabVIEW Release Notes
Platform
All Windows
Versions
Media and System
Requirements
Important Notes
Refer to the installation
instructions that appear on
your screen for information
about the size of the
LabVIEW system you
are installing.
LabVIEW runs on any
system that supports
Windows.
You need a minimum of
32 MB of RAM and at least
65 MB of disk space for the
typical LabVIEW
installation or 300 MB for
the complete LabVIEW
installation.
Windows NT
Windows XP
LabVIEW Release Notes
LabVIEW runs on
Windows NT 4.0 Service
Pack 3 or later.
You must have at least 32 MB of RAM. You
might need more memory, depending on the
size of the application you design in
LabVIEW and the amount of data that
your application manipulates. National
Instruments recommends that you have
64 MB of RAM.
To use the LabVIEW Help and the
Measurement & Automation Explorer
interactive help system, you must have
Microsoft Internet Explorer 5.0 or later.
To view and control a front panel remotely
using a Web browser, National Instruments
recommends that you have Internet Explorer
5.5 Service Pack 2 or later.
To use ActiveX functionality in LabVIEW,
you must have Windows NT 4.0 Service
Pack 3 or later and Microsoft Internet
Explorer 4.0 or later.
—
Refer to the National Instruments Web site
at ni.com/info and enter the info code
winxp for information about LabVIEW
support of Windows XP.
4
ni.com
Platform
Power Macintosh
Media and System
Requirements
Important Notes
LabVIEW requires
System 7.6.1 or later.
You need a minimum of
32 MB of RAM and at least
100 MB of disk space for the
typical LabVIEW
installation or 325 MB for
the complete LabVIEW
installation.
You must have at least 32 MB of RAM. You
might need more memory, depending on the
size of the application you design in
LabVIEW and the amount of data that
your application manipulates. National
Instruments recommends that you have
64 MB of RAM.
For more accurate timing, install the Apple
QuickTime extension. When you use
QuickTime, timing accuracy should increase
from 16.6 ms resolution to approximately
1 ms resolution. System response varies
depending on background applications,
other extensions, networking activity, and
disk caching.
National Instruments recommends that you
use Netscape 6.0 or later to view the
LabVIEW Help.
All UNIX
Versions
LabVIEW requires an
X Window System server,
such as OpenWindows,
CDE, or X11R6.
You need a minimum of
32 MB of RAM with 32 MB
of swap space storage.
You need at least 65 MB of
disk space for the typical
LabVIEW installation
or 150 MB for the complete
LabVIEW installation.
You must have at least 32 MB of RAM. You
might need more memory, depending on the
size of the application you design in
LabVIEW and the amount of data that
your application manipulates. National
Instruments recommends that you have
64 MB of RAM.
To save space, install only the VIs you plan
to use.
LabVIEW does not require a specific
graphical user interface (GUI) such as Motif
or OpenLook, because LabVIEW uses Xlib
to create its own GUI.
National Instruments recommends that you
use Netscape 6.0 or later to view the
LabVIEW Help.
© National Instruments Corporation
5
LabVIEW Release Notes
Platform
Media and System
Requirements
Important Notes
Sun
LabVIEW runs on
SPARCstations with
Solaris 2.5.1 or later.
—
Linux
LabVIEW runs on Linux for
Intel x86 processors with
kernel version 2.0.x or later.
LabVIEW runs on most
major Linux distributions,
such as RedHat, Mandrake,
SuSE, and Debian.
Requires GNU C Library Version 2.1.3
(glibc2, also known as libc.so.6).
RedHat Linux 5.0 or later includes the
glibc2 run-time library.
Installation
Refer to the National Instruments KnowledgeBase at ni.com if you
encounter errors during installation.
After installing LabVIEW, if you are a new user, you should complete the
LabVIEW Tutorial. Start the LabVIEW Tutorial by clicking the LabVIEW
Tutorial button in the LabVIEW dialog box.
Windows
(Windows) Insert the LabVIEW 6.1 installation CD and follow the
instructions that appear on your screen.
(Windows 2000/NT/XP) Complete the following steps to install LabVIEW
for Windows.
1.
Log on as an administrator or as a user with administrator privileges.
2.
Insert the LabVIEW 6.1 installation CD and follow the instructions
that appear on your screen.
Note The LabVIEW 6.1 installer program might install multiple National Instruments
products. Each product is listed in the Add/Remove Programs Control Panel located at
Start»Settings»Control Panel. Use the Add/Remove Programs applet to modify the
current LabVIEW installation or to remove it altogether. If you modify the current
installation, a list of LabVIEW components appears, similar to the list of components that
appeared if you selected a custom installation. In the list that appears, you can add or
remove individual components.
LabVIEW Release Notes
6
ni.com
Macintosh
Complete the following steps to install LabVIEW for Macintosh.
1.
Insert the LabVIEW installation CD.
2.
Run the Install LabVIEW program.
3.
Follow the instructions that appear on your screen.
UNIX
Solaris 2
1.
To enable superuser privileges, type su root and enter the root
password.
2.
Insert the LabVIEW installation CD. On Solaris 2.5.1 or later versions,
the CD automatically mounts when you insert the CD. If this feature is
disabled on your workstation, you must mount the CD by entering the
following command:
mount -o ro -F hsfs /dev/dsk/c0t6d0s2 /cdrom
3.
If your CD was mounted automatically, type the following command:
cd/cdrom/cdrom0/solaris2
or
If you used the mount command in step 2, enter the following
command:
cd/cdrom/solaris2
4.
Enter the following command:
./INSTALL
Note Refer to the README document in /cdrom/cdrom0/solaris2 or
/cdrom/solaris2 for custom installation instructions and other additional information.
5.
Follow the instructions on your screen.
Refer to the Common LabVIEW Launch Errors on UNIX section if
you encounter errors when you launch LabVIEW after installation.
© National Instruments Corporation
7
LabVIEW Release Notes
Linux
1.
Log in to your system as root.
2.
Use mount /mnt/cdrom to mount the CD.
3.
To change the current directory to the mounted CD, enter the following
command:
cd /mnt/cdrom
4.
To run the installation script, enter the following command:
./INSTALL
The INSTALL script prompts you to enter the directory where you
want to install LabVIEW, which is typically /usr/local or /opt.
The script uses rpm to install on systems that support the .rpm format,
or extracts the rpm archives directly on other systems.
Note Refer to the README document on the LabVIEW installation CD for custom
installation instructions and other information.
Refer to the Common LabVIEW Launch Errors on UNIX section if you
encounter errors when you launch LabVIEW after installation.
Installing LabVIEW on a Network
If you have a license for each LabVIEW client, complete the following
steps to install LabVIEW on a network.
1.
Install the LabVIEW Full or Professional Development System on the
server.
2.
Each local computer should use its own labview.ini file for
LabVIEW preferences. If a labview.ini file does not already exist
on a local computer, you can create this text document using a text
editor such as Notepad. The first line of labview.ini must be
[labview]. (Macintosh) The preference file is LabVIEW 6.1
Preferences. (UNIX) The preference file is .labviewrc.
3.
Modify the command line option of the LabVIEW icon in Program
Manager as follows:
W:\LABVIEW\LABVIEW.EXE -pref C:\LVWORK\labview.ini
where W:\LABVIEW\ is the path to labview.exe and C:\LVWORK\
is the path to labview.ini.
(Macintosh) Place the preference file in the System:Preferences folder.
(UNIX) You can specify a common preference file with the following
command-line option:
labview -pref/path/to/labviewrc
LabVIEW Release Notes
8
ni.com
Note pref must be lower case. Additionally, each local computer must have its own
LabVIEW temporary directory. You can specify this directory in LabVIEW by selecting
Tools»Options and selecting Paths from the top pull-down menu.
4.
On each computer that has National Instruments hardware, you must
install the driver for that device. Refer to the Hardware Installation
and Configuration Notes section for more info about driver versions.
Hardware Installation and Configuration Notes
All National Instruments devices include the drivers and other software you
need. LabVIEW also includes the drivers and other software you need to
use National Instruments hardware. Although the drivers are the same, the
version numbers might differ. Always use the latest available drivers. You
can find the version number of an installed driver by using Measurement &
Automation Explorer.
(Macintosh and UNIX) Run the Get Device Information VI.
You should configure your National Instruments hardware before you use
LabVIEW.
Windows
Use Measurement & Automation Explorer to configure your devices.
Launch Measurement & Automation Explorer by selecting
Start»Programs»National Instruments»Measurement & Automation
Explorer, or by double-clicking the Measurement & Automation
Explorer icon on your desktop.
Low-Level Register I/O
LabVIEW for Windows 98/95 has a set of VIs named In Port and Out Port
that you can use to read or write hardware registers. Windows 2000/NT
applications cannot manipulate hardware directly. If you need to
communicate with a hardware device in Windows NT, you must write
a Windows NT driver or refer to the National Instruments Web site at
ni.com for drivers that might provide a solution.
Macintosh
To configure your DAQ hardware, run the NI-DAQ Configuration Utility.
To configure channels on your devices, use the DAQ Channel Wizard.
© National Instruments Corporation
9
LabVIEW Release Notes
Sun
The LabVIEW installer prompts you to choose the NI-488.2 driver for
the GPIB hardware you are using. The installer then installs that driver
automatically.
Note LabVIEW does not work with the GPIB-1014 series (VME) devices or the original
GPIB-SCSI box. It does work with the GPIB-SCSI-A box.
The VXI device drivers for Solaris are included with your VXI controller
hardware.
Note National Instruments periodically updates device drivers. You can download the
latest drivers from the National Instruments Web site at ni.com.
Where to Go from Here
Refer to the LabVIEW User Manual and the LabVIEW Help for more
information about LabVIEW 6.1 features. Refer to the LabVIEW
Documentation Resources section of Chapter 1, Introduction to LabVIEW,
in the LabVIEW User Manual for more information about the LabVIEW
documentation resources available from National Instruments. Access a
PDF version of the LabVIEW User Manual and all other LabVIEW
manuals by selecting Help»Search the LabVIEW Bookshelf.
The printed LabVIEW manuals were not updated for LabVIEW 6.1. Refer
to the LabVIEW Bookshelf for updated PDFs of the LabVIEW manuals.
You must have Adobe Acrobat Reader 4.0 or later installed to view the
PDFs. Refer to the Adobe Systems Incorporated Web site at
www.adobe.com to download Acrobat Reader.
LabVIEW Release Notes
10
ni.com
Common LabVIEW Launch Errors on UNIX
The following table lists common errors that might occur when you launch
LabVIEW for UNIX. Refer to the Required System Configuration section
for more information about solving these and other installation problems.
Error Message/Description
Probable Cause/Solution
Xlib: connection to :0.0
refused by server
Probable Cause—Trying to run LabVIEW as a user who does
not have permission to open a window on the display server.
Typically seen after running the su command to temporarily
become a different user, such as root (superuser).
client is not authorized
to connect to server
internal error during
connection authorization
check
“Executable version
doesn’t match resource
file”
Solution—Exit the su command and launch LabVIEW as the
login user.
Probable Cause—Version of LabVIEW executable does not
match version of labview.rsc.
Solution—Verify that the appResFilePath parameter in the
configuration file correctly sets the path to the labview.rsc
file.
Configuring Window Managers on UNIX
This section describes procedures for configuring LabVIEW window
managers on UNIX operating systems.
Configuring LabVIEW with the Tab Window Manager
If you use the Tab Window Manger (twm), you can change environment
settings so twm interacts better with LabVIEW. With twm, you cannot close
the floating palette menus in LabVIEW if these windows do not have
titlebars. To correct this problem, add the following line to your .twmrc
file in your home directory:
DecorateTransients
This line adds titlebars to the floating windows so you can close them.
Configuring LabVIEW with the Motif Window Manager
If you use the Motif Window Manager (mwm), you can change environment
settings so that mwm interacts better with LabVIEW. By default, mwm does
not incorporate the window position requests of an application. This
behavior causes LabVIEW windows, such as the Panel, Block Diagram,
© National Instruments Corporation
11
LabVIEW Release Notes
Context Help, and File dialog boxes, to appear in inconsistent locations on
your screen. To change the mwm behavior, use the xrdb command to set the
following two mwm settings:
mwm.clientAutoPlace: False
mwm.positionIsFrame: False
To add the two entries, you also can edit the following file manually:
$HOME/.Xdefaults
Notice to Sun SPARCstation 5 Users
A bug exists in some early revisions of the SPARCstation 5. This bug can
cause LabVIEW and other programs to hang the system when executing
certain floating-point operations. When this condition occurs, you must
physically reset the computer to recover. The problem exists in the
firmware of the computer and can occur when running any version of
the operating system.
Note This bug has been reported only on early revisions of the 70 MHz and 85 MHz
SPARCstation 5.
To determine whether your SPARCstation 5 is affected, perform the
following steps.
Caution Following these steps temporarily interrupts the operation of your computer,
so you should warn anyone who might be using your computer remotely.
1.
From your SPARCstation 5 console, hold down the <Stop/L1> key,
located near the upper left corner of your keyboard, and press the
<A> key to break into the PROM monitor.
2.
One of the following two prompts might appear:
Type b (boot), c (continue), or n (new command mode)>
Type 'go' to resume ok
In the first case, select n to go to new command mode, where you see
an ok prompt. If you already have an ok prompt, skip to step 3.
3.
At the ok prompt, enter the following:
module-info
You then see information similar to the following lines:
CPU FMI,MB86904 Rev. 2.5 : 70.0 MHz
SBus (Divide By 3)
4.
LabVIEW Release Notes
: 23.3 MHz
Enter go to exit the monitor and resume operation of your system.
12
ni.com
If your CPU Revision number (2.5 in this example) is earlier than 3.2, and
your CPU clock speed (70.0 MHz in this example) is less than 110 MHz,
your computer has this problem. Contact Sun and ask to have your CPU
firmware upgraded to swift_pg 3.2 or later, where swift is the code name
used by Sun for the SPARCstation 5 firmware. The Sun Bug ID number for
this problem is 1151654.
If you have a SPARCstation 5 with this bug, National Instruments strongly
recommends upgrading your firmware.
Note This problem can affect programs other than LabVIEW. For example, the GNU C
compiler also can produce code that hangs your system in versions prior to 2.6.0.
Known Issues with LabVIEW 6.1
If you use TestStand to call shared libraries (DLLs) built in LabVIEW 6.1,
you must use TestStand 2.0.1. TestStand 2.0.1 is a free upgrade from
TestStand 2.0.
Refer to the readme.txt document for additional descriptions of known
issues with LabVIEW 6.1.
Documentation Clarifications and Additions
Refer to the readme.txt document for documentation clarifications
and additions. (Windows XP) Refer to the National Instruments Web site at
ni.com/info and enter the info code winxp for current information and
known issues when using LabVIEW in Windows XP.
© National Instruments Corporation
13
LabVIEW Release Notes