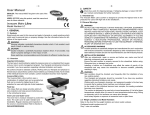
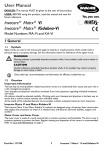
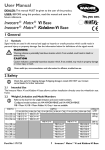
1
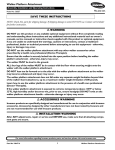
Every Matrx® Genera back is carefully inspected and tested to provide optimum performance. Each back is guaranteed to be free from defects for a period of 12 months from the date of purchase, provided normal use. Should a defect in materials or workmanship occur within 12 months of the original date of purchase, Motion Concepts will, at its option, repair or replace it free of charge. This warranty does not apply to punctures, tears or burns, nor to the removable cushion cover. The original back must be returned to the dealer and will become the property of Motion Concepts as a condition of processing the warranty claim. All warranty claims must be made through the dealer where the cushion was purchased. Except for express warranties made herein, all other warranties of fitness or use for a particular purpose are excluded. There are no warranties that extend beyond the warranties provided above. Remedies for breach of this warranty are limited to repair or replacement of goods. In no event shall damages for breach of any warranty include any consequential damages or exceed the original cost of the back. Invacare www.invacare.com USA One Invacare Way Elyria, Ohio 44036-2125 Tel: 440-329-6000 Tel: 800-333-6900 Canada 570 Matheson Blvd. E Unit 8 Mississauga, Ontario L4Z 4G4 Tel: 800-668-5324 Motion Concepts USA 700 Ensminger Rd. Suite 112 Tonawanda, NY 14150 Tel: 888.433.6818 Matrx® Genera Back www.motionconcepts.com Canada 84 Citation Drive Concord, Ontario L4K 3C1 Tel: 866.748.7943 Tel: 905.695.0134 TRD0257-08 IMPORTANT! The installation instructions contained in this manual should only be carried out by a qualified technician. INSTALLATION / USER MANUAL WARRANTY 6.0 Removing the Cover/Care Instructions The Matrx Genera back cover can be removed for laundering purposes if necessary. (note: the mounting brackets must be removed from back pan prior to cover removal). With all mounting plates removed, undo the zipper on the cover and carefully pull the cover off the foam and back pan. General Care and Cleaning: The cover may be easily wiped down with a damp cloth when necessary. Laundering Directions: (Zipper should be closed following removal from the cushion and prior to washing) Machine Wash Outer Cover in Warm Water on Delicate Cycle; Hang to Dry (or Tumble Dry on Low); Do Not Bleach; Do Not Iron; Do Not Dry Clean. 7.0 Installing Head/ Neck Supports (Optional) All Matrx Genera Backs come equipped with threaded mounting holes (t-nuts) which can be used for attaching optional Head and Neck Supports onto the back pan. Two sets of mounting holes are hidden beneath the outer fabric near the top of the back pan (see Figure 9 below). The hole patterns are designed to accommodate most standard types of headrest mounting clamps. Installation Instructions: 1. Determine the appropriate set of mounting holes (t-nuts) for the Headrest Clamp being installed. 2. Use your fingers to locate the mounting holes beneath the fabric and carefully punch an access hole through the fabric for each of the t-nuts. 3. Install the headrest clamp onto the back pan. Note: t-nuts will require screws with 1/4-20 threads. (Headrest mounting hardware not provided) Figure 99 1 1/4-20 T-Nuts Genera Back (rear view) 2 use finger tips to locate mounting holes (t-nuts) through the fabric (cover removed for illustration purposes) 10 5.0 Genera Back Installation & Adjustment 5.4 Depth and Angle Adjustments: 1 2 Table of Contents 1.0 Installation Overview 2.0 Tools Required 3.0 Before Installation Note: Depth & Angle adjustments should be made symmetrically on both mounting bracket assemblies. 4.0 Mounting Bracket Installation Verify that all Matrx Genera Back mounting hardware (all brackets, latches and plates) are fully and properly secured. 5.0 Genera Back Installation & Adjustments Determine the desired depth & angle settings for the Matrx Genera Back. To Adjust: Loosen the cane hook hardware (2 screws per side), and adjust the back to the desired depth and/or recline angle via the slots in the cane hook/mounting plate. Re-tighten all 4 screws to secure the back into position. Refer to Figure 8. below. Depth/ Angle Adjustment Figure 8. 5.1 Width Adjustment 5.2 Engaging/ Disengaging the Matrx Genera Back 5.3 Height Adjustment 5.4 Depth and Angle Adjustment 6.0 Removing the Cover/Care Instructions 7.0 Installing Head/ Neck Supports (Optional) depth adjustment angle adjustment 9 2 1.0 Installation Overview 5.0 Genera Back Installation & Adjustment ! PLEASE NOTE If any of the required hardware is missing or misplaced, please contact our Customer Service Department and arrangements will be made to send you the necessary replacements. Canada: 866-748-7943 USA: 888-433-6818 ¼-20 x1/2" BUTTON SOCKET CAP SCREW 5.3 Height Adjustment: The Matrx Genera Back uses offset mounting plates that can be adjusted along the height of the back shell allow for re-positioning the back shell relative to the back canes if necessary. Height adjustments are available in 1.5” (38mm) intervals (up to 3” (76mm)). Refer to Figure 6. below. Note: The left and right mounting plates may also be swapped and inverted to allow further height adjustment and greater clearance for rigidizer bars and/or bent back canes (if required). Refer to Figure 7. below. Height Adjustable Offset Mounting Plates Figure 6. Adjustable in 1.5” (38 mm) increments (up to 3” (76 mm)) ¼-20 x 3/8" BUTTON SOCKET CAP SCREW Back Lowered by 1.5” (38 mm) Note: Back height adjustments are illustrated relative to the cane hook position. 2.0 Tools Required Metric Hex Key (tool provided) Back Lowered by 3” (76 mm) Tape Measure/Ruler Figure 7. 3.0 Before Installation Inverted Offset Mounting Plate Option Important! Before beginning the installation process, please read through the entire user manual to understand the various steps and adjustments involved. If you have any questions or concerns during the installation process, please contact our Customer Service Department for assistance. Matrx Back Size/ Back Widths Genera Back Weight 16”, 18”, 20” Capacities: GB-wwhh 41, 48, 51cm 3 16" , 20" Weight Capacity 250 lbs 41"cm, 51cm 113 kg Back Height Left & right plates can be swapped & inverted to provide additional clearance/height adjustment(if req’d) 8 5.0 Genera Back Installation & Adjustment 4.0 Mounting Bracket Installation 5.2 Engaging/Disengaging the Matrx Genera Back: 1 Remove existing wheelchair back/ upholstery (if applicable). To Engage (Install): (Refer to Figure 4a and 5 below) 2 Verify the back cane diameter on the wheelchair. 3 Working on one back cane at a time, place the mounting bracket onto the back cane at the approximate mounting position. The upper and lower bracket assembly will be installed using the multi-cove blocks & mounting pins provided. To Install: Rotate the multi-cove block so that the correct back cane size (indicated on block) is adjacent to the back cane. 4 With the block in place, align the hole in the upper mounting bracket with the hole in the multi-cove block (1), then install the mounting pin (2). Ensure the pin passes completely through the block and out the opposite side of the mounting bracket. Refer to Figure 1. below. Install the Genera Back (on an angle) so that the lower edge of the left & right cane hooks slide inside the lower latch. With the upper latch mechanisms disengaged, position the Genera Back upright so that the cane hooks rests flush against the back canes. Slide the upper latch mechanisms down overtop of the cane hooks to hold the backrest in place. To Disengage: (Refer to Figure 4b and 5 below) Lift the latch slides (x2) upward to ‘unlock’ the cane hooks. Tilt the Genera Back forward and lift up to remove the backrest from the wheelchair (back canes). WARNING! Always ensure that the upper latch slides are fully engaged (and the mounting brackets are properly secured). Failure to do so may cause the backrest to disengage unexpectedly, which may result in serious injury. Mounting Bracket Installation Multi-Cove Blocks Rotate blocks to the fit/match the back cane diameter (right bracket assembly shown)) Multi-Cove Block 1 Latch Mechanism Engaged (Upper Assembly) Latch Mechanism Disengaged Latch Slide Mounting Pin 2 Imperial size indicators (3/4, 7/8, 1) Mounting Bracket cane hook cane hook (Lower Assembly) NT FRO Figure 4a HAIR of C Figure 1. Figure 4b Metric size indicators (19, 22, 25) (on opposite side) Cove Block Configuration for 1” (25mm) Back Canes Figure 5 2 cane hook The bottom of the cane hook is held in position by the lower latch (1) ; Use the upper latch slide to lock and/or release the Genera Back from the back canes (2) offset hole position Correct 1 Lower Latch 7 (note: right assembly shown)) Installation Important! X Incorrect Installation X The pin hole in the mutli-cove block is offset from center. When installing the mutli-cove blocks onto 1” (25mm) back canes, ensure the orientation of the blocks is such that the longer length of the block extends beyond the top and bottom of the mounting bracket (as indicated). 4 4.0 Mounting Bracket Installation 5.0 Genera Back Installation & Adjustment 5 5.1 Width Adjustment: Repeat step 3 & 4 to install the mounting bracket on the opposite back cane. (Note: At this stage of the installation, each mounting bracket assembly should be able to slide (up and down) along its respective back cane. If the assembly does not slide, loosen the mounting screws slightly). WARNING! Ensure all mounting pins are fully inserted. Improper pin installation may cause the hardware to come loose and may result in loss of back support and serious personal injury 6 Determine the appropriate mounting location/height of the mounting brackets on the back cane. (Note: Refer to section 5.3 for additional information on back height adjustments via the mounting plates). 7 Working on one back cane at a time, carefully slide the mounting bracket assembly to the desired position (height) along the back cane, and secure it in place by tightening the mounting screws at the upper and lower mounting pin/cove-block location. The mounting plates on the Matrx Genera Back can be adjusted across the width of the back shell to ensure proper alignment between the cane hooks and the back canes. The Genera Back can accommodate back canes widths up to 1” (25mm) wider than the indicated back size. 1 To adjust the back width, loosen the screws (x4) that secure each mounting plate onto the back shell. Adjust the mounting plates equally (via slots) inward or outward in order to align the cane hook with the back cane*- see Figure 3. below. *IMPORTANT! Make plate width adjustments equally to maintain back symmetry between the canes. Figure 3. WARNING! When installing the mounting brackets onto bent-style back canes, the mounting bracket must be installed on a straight section of the back cane (above or below the bend). 8 Matrx Genera Back Width Adjustments Secure the remaining mounting bracket assembly on the opposite back cane, making certain that both brackets are installed at the same heightsee Figure 2. below. 1” (25mm) cane hook Figure 2. Ensure the left and right mounting brackets are installed at the same height Mounting Bracket Assembly mounting plate back cane REAR VIEW Loosen screws on mounting plates and slide the plates in/out as needed to align the cane hook with the back cane Seat Cushion (NOTE: When setting the mounting bracket height, measure from a fixed point on the wheelchair (e.g. rigidizer bar) 5 6