1
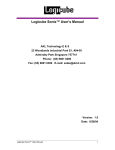
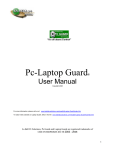
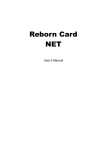
Index
P.02........Before Start
P.02........Declaration of limited liability
P.03........1.Introduction
P.03........2.Support Media Type
P.03........3.Features
P.03...........Support USB Card Reader
P.03...........Notice
P.04........4.Open BOX
P.04........5.Assembly & Attentions
P.04........6.Appearance
P.04...........6.1 LCD Display
P.05...........6.2 USD1100 The Vertical View
P.05...........6.3 USD1100 The Back View
P.05...........6.4 SDD1100 The Vertical View
P.05...........6.5 SDD1100 The Back View
P.05...........6.6 USD2100 The Vertical View
P.06...........6.7 USD2100 The Back View
P.06...........6.8 SDD2100 The Vertical View
P.06...........6.9 SDD2100 The Back View
P.06...........6.10 USD4300 The Vertical View
P.07...........6.11 USD4300 The Back View
P.07...........6.12 SDD4300 The Vertical View
P.07...........6.13 SDD4300 The Back View
P.07...........6.14 Start
P.10........7.Operation & Functions Introduction
P.10...........7.1 Function Tree
P.11...........7.2 Main function introduction
P.11.................7.2.1 SMART
P.11.................7.2.2 BRIEF
P.12.................7.2.3 RESIZE
P.12.................7.2.4 FULL
P.12.................7.2.5 VERIFY
P.12.................7.2.6 ERASE
P.12.................7.2.7 LOAD
P.13...........7.3 Setup function introduction
P.13.................7.3.1 SET TO DEFAULT
1
P.13.................7.3.2 UPDATE FIRMWARE
P.13.................7.3.3 [ * ] SET COPY
P.13.................7.3.4 [ * ] SET COMPARE
P.14.................7.3.5 [ * ] NO CAP. CHECK
P.14.................7.3.6 [ * ] MAX CAP. CHECK
P.14.................7.3.7 [ 100% ] TARGET MAX.
P.14.................7.3.8 [ * ] SHOW EXE TIME
P.14.................7.3.9 [ 5 ] MAX UDMA MODE
P.15.................7.3.10 TOTAL COPY COUNT
P.15.................7.3.11 [ * ] BURN IN
P.15...........7.4 Advanced Setup
P.15.................7.4.1 [ 1] SELECT SOURCE
P.15.................7.4.2 [ * ] SET LOCAL HD
P.16.................7.4.3 [ * ] SKIP READ ERR
P.16.................7.4.4 [ * ] BTN. SOUND
P.16.................7.4.5 [ * ] AUTO RUN
P.16.................7.4.6 [ * ] LOAD FULL IMG
P.17.................7.4.7 [ 5% ] MOST VAR. CAP
P.17.................7.4.8 [ * ] NEED RESIZE
P.17.................7.4.9 [000] SEL IMG FILE
P.18.................7.4.10 DEL IMG FILE [000]
P.18.................7.4.11 FORMAT SOURCE
P.18.................7.4.12 DEVICE INFO
P.18.................7.4.13 SYSTEM INFO.
P.19........8.Frequent Operation and Introduction
P.19...........8.1 Load Default Value Setting
P.19...........8.2 Duplication USB Disks
P.19...........8.3 Compare USB Stick
P.19...........8.4 Duplication & Compare USB Stick
P.20...........8.5 Make the Storage Center
P.20...........8.6 Load Image File
P.20...........8.7 Duplicate From The Image File
P.21...........8.8 Update Firmware
P.21........9.Specification
P.21...........9.1 USD1100/2100/4300
P.21...........9.2 SDD1100/2100/4300
P.22........10.Error Code List
P.22........11.USB / SDD series of dismantling
the installation disk graph
Before Start
An Chen Computer Co., Ltd. will not be responsible for any illegal use of this product nor any losses
created by this product. The user himself should take consideration on the copyright laws and if he/she
takes any illegal action, he/she will have to take full responsibility on his actions.
Declaration of limited liability
AN CHEN COMPUTER CO., LTD. (hereinafter "AN CHEN"), the licensor, hereby represents to
customers who purchased the licensed products that the products were provided on an "as is" basis.
Except otherwise expressly warranted by AN CHEN or required by relating compulsory laws of Taiwan,
AN CHEN makes no warranty with respect to the products of merchantability, zero defect or fitness for
any particular purpose, either express or implied. AN CHEN will not be responsible for any operational
risks or any other damages incurred by the customer due to any reason not attributable to AN CHEN. By
purchasing this product, customers accept and agree to be bound by the terms of this representation.
2
1.
Introduction
Welcome to purchase USD1100(2100/4300) combo duplicator.
This fast standalone duplicator is designed to duplicate 11/21/43 USB flash memory sticks and SD/SDHC
memory card at a time. Allows users to easily produce multiple copies of a master USB stick or SD in
minutes. Copy time is achieved in the fastest possible time.
The duplicator is able to install a hard drive(Option) inside. Simply Load your image to the hard drive then
insert 11/21/43 target USB sticks and after a short time it will produce 11/21/43 duplicates of your master.
Indicates passed or failed per slot through a Red or Green LED indicator.
2.
Support Media Type
3.
Features
1. The duplicator integrate USB and SD’s interface on one machine, it allows user either copy USB memory stick or copy SD memory card. 2. They are can be different media between the source port and the target port.
3. The bandwidth is up to 30 MB/Sec for each copy channel.
4. Smart Copy functions which copy only the used portions of a master hard drive to the target drives.
The Smart copy functions support a wide range of file systems including FAT, NTFS, HFS+, EXT2, and EXT3.
5. Support the hard disk to store the device’s image.
6. The duplicator is compatible with USB 1.0 & USB 2.0.
7. Support the most popular brand and capacity.
8. Support quality test functions.
9. Support various copy functions including Smart Copy, Disk Copy, Brief Copy and Resize Copy.
10. Easy to upgrade the firmware thru USB device.
Support USB Card Reader
The USB duplicator allow to support the specific USB card reader and then it can support the others type
flash media via the USB card reader.
Notice
The some models are able to support tow kind of the flash media, however they only can choice one type to
work at the same time.
3
4.
Open Box
Please check the accessory box as following.
● USD1100(2100/4300)
●
SDD1100(2100/4300)
●
Standard Accessories
HDD Adapter
●
Notice: USD/SDD-1100 models aren't applicable in standard accessories.
5.
●
●
●
Assembly & Attentions
Running the machine with a stable voltage, and avoid putting together with a large electronic device.
Place the machine where the air is circulation through the room, and avoids the machine work under the high temperature environment.
Read the user manual before start.
6.
●
SATA Cable
Appearance
6.1 LCD Display
4
5
●
6.2 USD1100 The Vertical View
●
6.3 USD1100 The Back View
●
6.4 SDD1100 The Vertical View
●
6.5 SDD1100 The Back View
●
6.6 USD2100 The Vertical View
●
6.7 USD2100 The Back View
●
6.8 SDD2100 The Vertical View
●
6.9 SDD2100 The Back View
●
6.10 USD4300 The Vertical View
6
●
6.11 USD4300 The Back View
●
6.12 SDD4300 The Vertical View
●
6.13 SDD4300 The Back View
●
6.14 Start
When you turn on the machine, you will see the information on the display as following.
7
The USD1100(2100/4300) consists of the main board and some slave boards. They are connecting each
other via IDE cables. If the main board cannot detect the slave boards, it will show an error on the display,
please check the IDE cables whether they are loose or ask technical support from your supplier.
Once start the machine successful, you will see the operation manual as below;
You can press the SET button to change the main function. In the meantime, you can insert your source
media and targets medium.
The first upper left port is a source port. You should to insert your source media when execute the related
copy functions or that to format a media as a storage center.
However, if you want to load an image to a storage center, the first port inserts the storage center and the
source media can insert to any target port.
Don’t remove any target or source during that the function is being processed.
If you want to interrupt it, you can press the RUN button any time, the LED will show red light, and in the
meantime, you can remove it.
If you insert the source, the system will show the related information on the display.
If the source is from the storage center, it will show the file number and the data information.
The system will be waiting all targets ready and show the targets total amount on the display. In the
meantime, it will show the information to remind user to execute it.
The system is allowed to set auto-execution when all targets and source ready.
Please, refer to the related setting.
When copy finished, the system will show a message to remind user to remove the targets.
8
Once the machine working finished, it will remind the user to remove the copied device on the LCD screen.
When copy finished, the successful port will show green light and the failed port will show red light. Once
you remove all targets, it will return main operation manual.
Hold the SET button for 3 seconds to enter setup manual.
9
7.
●
Operation and functions introduction
7.1 Function Tree
10
●
7.2 Main Function Introduction
The system will enter the main function screen after turn on the machine.
In the meantime, you can press the SET button to change the main function what you want to execute it.
If you want to enter the setup manual or return to the Main Operation manual, hold the SET button for 3
seconds.
The SMART,BRIEF,RESIZE and FULL; these main functions have to operate in coordination with SET
COPY and/or SET COMPARE; and therefore the user have go the setup manual to set these parameters
before run the main function.
The source media can be a USB stick or a storage center that is formatted and loaded via the system before.
The ERASE and VERIFY function; they don’t need a source to co-work, and therefore the source port can
also insert a USB stick for erase or verify.
However, if users run the ERASE or VERIFY; please make sure that you have removed the source media.
7.2.1 SMART
The SMART will detect the file system of the source. Once it cannot recognize the file system, the system
copy strategy will select FULL to copy whole media.
If the is able to recognize the file system of the source, it will compare the capacity between the source and
the target. If the source capacity is bigger or smaller than the target, the system copy strategy will select
RESIZE to copy the target media.
If the target capacity equals the source capacity, the system copy strategy will select BRIEF to copy the
target media.
The system will base on the NEED RESIZE parameter to decide whether need to execute RESIZE
function.
If the targets have one more different capacity than the other targets, the SMART function will refer to the
smallest capacity and select a suitable copy strategy to complete the job.
If there is a target media that the capacity is too bigger than others target, the SMART will kick it out and
stop to copy it. However, how many percentage bigger than the others will be kick out. User can go to
setup manual to set MOST VAR. CAP parameter.
Due to above, the SMART will make a suitable copy strategy via the artificial intelligence of the system.
In the most time, the user can select SMART function to complete the job except the result cannot to meet
your requirement.
7.2.2 BRIEF
In the BRIEF Mode, the system will analyses the source file structure and make a decision where is
effective data that they need to copy them or not.
Before execute the BRIEF, the user still need to go to the setup manual to select what functions need to be
executed. There are SET COPY, SET COMPARE.
For example:
Select SET COMPARE, it will check the data between the source and the targets.
11
In the BRIEF mode, It can support Microsoft Windows / Dos (FAT12、 FAT16、 FAT32、 NTFS)、
LINUX (EXT1、EXT2、EXT3、XFS、ReiserFS)、Apple Macintosh(HPFS).
Due to the BRIEF mode, it will copy the same file structure to the targets, so please make sure that the
source media capacity is same as the targets.
7.2.3 RESIZE
In the RESIZE mode, it will allow different capacity between the source media and the target media.
The RESIZE mode is able to copy from a large capacity to a small capacity or a small capacity to a large
capacity. However, if the target’s space is not enough, the system will report an error message. Because
the system will rebuild the target’s media file structure, and therefore the copy speed will be lower than the
other copy mode.
If the capacity is different between the each target, the stand size will be the smallest capacity of the target.
7.2.4 FULL
In the FULL mode, it will be not to analyses the file structure of the source, and therefore it will copy the
whole media to the targets via sector by sector.
The copy time will base on the source capacity, and have nothing with the data size. In other words, the
FULL mode can support any unknown file system.
Before execute the FULL, the user still need to go to the setup manual to select what functions need to be
executed. There are SET COPY, SET COMPARE.
For example:
Select SMART COMPARE, it will check the data between the source and the targets.
7.2.5 VERIFY
The function will check all medium and pick up unreadable medium.
Due to that execute this function that don’t need the source, so the source port can be as a verification port.
7.2.6 ERASE
The function will erase all medium data.
Due to that execute this function that don’t need the source, so the source port can be as a erase port.
When you execute the function, don’t forget to remove the source media.
7.2.7 LOAD
How to make an image file into the storage center.
1. Make a storage center. Insert a large USB stick or a external USB hard disk in the first upper left port,
and then go to the setup manual to execute FORMAT SOURCE. When you finished the job, they will
become a storage center.
How many files can be saved? The judgment will base on the storage center capacity.
2. You can go to the setup manual and execute SEL IMG FILE to assign a file number as image file name.
If you don’t set the file number, the system will use default number 000 as the image file name.
3. When you have prepared the storage center and assigned a file number already, now you can execute the
12
LOAD to load you image into the storage center.
4. If you don’t change the file number, next time, you load a new image; it will overwrite the previous
image file always.
5. If the source port is not a storage center (unformatted by the system), it will be not to load any image,
and then the system will report a error message.
The machine will not allow to do LOAD function when the source port’s device is not a Storage Center
format. The error message will show on the display.
●
7.3 Setup Manual Introduction
Hold the SET button for 3 seconds and then enter or exit the setup manual.
7.3.1 SET TO DEFAULT
Recover to the factory default value.
7.3.2 UPDATE FIRMWARE
Update the firmware to the latest.
How to upgrade the firmware to the latest?
1. Require the firmware from your vendor or supplier.
2. Copy the file to a USB stick.(the USB stick should be a FAT format)
3. Insert the USB stick into the source port (#1;the upper left)
4. Execute UPDATE FIRMWARE and follow the instruction on the display.
7.3.3 [ * ] SET COPY
In SMART, BRIEF and FULL mode. The user should be required to select a subsidiary function at the least
one. You can select SET COPY and SET COMPARE both at the same time or either one.
Push the RUN button to disable or enable the feature.
[ * ] Enable
[ * ] Disable
7.3.4 [ * ] SET COMPARE
Compare the data between the source and the targets in FULL, BRIEF or SMART mode.
13
Push the RUN button to disable or enable the feature.
[ * ] Enable
[ * ] Disable
7.3.5 [ * ] NO CAP. CHECK
The Capacity Check function allows the system to check the capacity between the MASTER and TARGET
hard drives to determine whether they are the same.
You can enable or disable the Capacity Check function. Capacity Check is disabled by default.
Disable : When the user executes a Disk Copy or a Brief Copy, the system will check the capacity between
the Master and Target hard drives to determine whether they are the same or not. If the capacity is different
between the Master and Target hard drives, the KanguruClone will cancel the cloning process.
Enable : When the user executes a Disk Copy of a Brief Copy, the KanguruClone will not check the
capacity between the Master and Target hard drives and the cloning process will begin normally.
7.3.6 [ * ] MAX CAP. CHECK
MAX CAP. CHECK should be working with TARGET MAX. at the same time.
MAX CAP. CHECK is able to sift the specific capacity base on the source capacity.
When the target's capacity bigger than the setting value[TARGET MAX], the machine will force to request
to remove these unqualified device and indicated with red light.
Otherwise, the machine will stop working until these unqualified device be removed.
7.3.7 [ 100% ]
TARGET MAX.
There are some device are difficult to judge that their real capacity from their similar appearance or simple
information on the label.
It's allow to set a specific percentage's rate to sift unqualified device.
When enable the feature, it will check the capacity between the source and targets before start to run copy
function.
TARGET MAX range is form 100% to 200%.
The Range List as below.
100%, 101%, 102%, 103%, 104%, 105%, 110%, 150%, 200%
For example :
● 100% : The source should be totally same with the targets.
● 101% : The target's capacity bigger than the source capacity within 1%.
If the target's capacity over the percentage range.
It will indicate with the red light and request to remove it.
7.3.8 [ * ] SHOW EXE TIME
Enable : Show total execution time.
Disable : Doesn’t show total execution time.
7.3.9 [ 5 ] MAX UDMA MODE
This is especially for SMART mode.
14
Before execute SMART mode, the system will compare the capacity between the each target. The system
will be able to set a range to tolerate the different capacity between the each target.
Push RUN button to change the percentage.
For example:
● 0% :All targets should be totally same capacity.
● 1% :After compare the each target, the target capacity bigger than the smallest target over 1% and the bigger one will be kicked it out when start to execute the SMART mode.
● 5% : After compare the each target, the target capacity bigger than the smallest target over 5% and the bigger one will be kicked it out when start to execute the SMART mode.
● 10% : After compare the each target, the target capacity bigger than the smallest target over 10% and the bigger one will be kicked it out when start to execute the SMART mode.
● 20% : After compare the each target, the target capacity bigger than the smallest target over 20% and the bigger one will be kicked it out when start to execute the SMART mode.
7.3.10 TOTAL COPY COUNT
Show all successes and failures devices.
Hold the SET button until the bee sound change, and then press SET button to select [TOTAL COPY
COUNT].
Press RUN button, the display will show all successes and failures number.
If want to delete these information, press RUN button again for 3 second, it will remove all records.
7.3.11 [ * ] BURN IN
It’s to enable this feature that allows the system to be simultaneously stress tested for endurance, reliability
and stability. Hold the RUN button one more second, it’s able to interrupt the BURN IN test.
[ * ] Enable
[ * ] Disable
●
7.4 Advanced Setup
It’s allowed to set more detail perimeter.
7.4.1 [ 1] SELECT SOURCE
This feature allows reassigning a source port.
The default value is the first port (#1).
Press RUN button to change the source port of position and indicated with the green light.
Press SET button to escape.
7.4.2 [ * ] SET LOCAL HD
The hard disc’s position is located on the top of right corner, and also indicates a green light with
15
intermission.
If the data source is from the hard disc, please make sure that the data image have been loaded before,
otherwise all the main function should be can not working properly.
About the LOAD Function, please refer to the page 12.
If the hard disc of the source is the first time to be a Storage Center, please don’t forget to run FORMAT
SOURCE command before load a data image into it, otherwise it will refuse to load and show a message
that the user whether want to format the hard disc as a storage center.
After formatted hard disc, hold SET button for one second and return to the main manual.
Press SET button to switch the function to LOAD.
Insert the source device on any target port and execute LOAD function. It will start to load image into the
storage center.
7.4.3 [ * ] SKIP READ ERR
This setting controls error skipping during source reading in the SMART, BRIEF, FULL, RESIZE mode.
When an error is detected during the source reading in process, the duplicator will skip the source's bad
sector and fill out the target with zero.
If this setting is disable, it will stop to read the source hdd when the source hdd has bad sector.
Press RUN button to enable or disable this feature.
7.4.4 [ * ] BTN. SOUND
Turn on/off button sound.
The default value : Enable.
Press RUN button to change the setting.
7.4.5 [ * ] AUTO RUN
The AUTO RUN option allows you to enable or disable whether the system will automatically execute a
function. If the all targets are full loading, it will execute the function immediately, if the targets are not full
loading, it will execute the function after 30 seconds. Tap the RUN button to change this option.
● [ * ]Enabled. : FULL, SMART, BRIEF, RESIZE, VERIFY, ERASE or LOAD modes will automatically execute.
● [ * ]Disabled[default] : The user needs to manually start functions.
7.4.6 [ * ] LOAD FULL IMG
This setting controls the loading image method.
Enable : The system will be not to analyze the source hdd’s file system, and force building image with
sector by sector.
Disable : The system will analyze the source hdd’s file system before build hdd’s image.
16
If the file system is FAT, NTFS , EXT1/2/3 , the system will base on the file system and data area to
build image.
If the system cannot recognize the file system, the system will build image with sector by sector.
7.4.7 [ 5% ]MOST VAR. CAP
This is especially for SMART mode.
Before execute SMART mode, the system will compare the capacity between the each target. The system
will be able to set a range to tolerate the different capacity between the each target.
Push RUN button to change the percentage.
For example:
● 0% : All targets should be totally same capacity.
● 1% : After compare the each target, the target capacity bigger than the smallest target over 1% and the bigger one will be kicked it out when start to execute the SMART mode.
● 5% : After compare the each target, the target capacity bigger than the smallest target over 5% and the bigger one will be kicked it out when start to execute the SMART mode.
● 10% : After compare the each target, the target capacity bigger than the smallest target over 10% and the bigger one will be kicked it out when start to execute the SMART mode.
● 20% : After compare the each target, the target capacity bigger than the smallest target over 20% and the bigger one will be kicked it out when start to execute the SMART mode.
7.4.8 [ * ] NEED RESIZE
This is especially for SMART mode.
Before execute SMART mode, the system will compare the capacity between the source and the targets. If
the capacity is different, it will depend on the parameter and decide it whether needs to run RESIZE copy.
Push RUN button to change the percentage.
For example:
● 0% : If the capacity is different between the source and the targets, the system always run RESIZE copy in the SMART mode.
● 1% : If the capacity is different between the source and the targets, but the difference is within 1%, the system will run BRIEF copy instead of the RESIZE copy in the SMART mode.
● 5% : If the capacity is different between the source and the targets, but the difference is within 5%, the system will run BRIEF copy instead of the RESIZE copy in the SMART mode.
● 10% : If the capacity is different between the source and the targets, but the difference is within 10%, the system will run BRIEF copy instead of the RESIZE copy in the SMART mode.
● 20% : If the capacity is different between the source and the targets, but the difference is within 20%, the system will run BRIEF copy instead of the RESIZE copy in the SMART mode.
7.4.9 [000] SEL IMG FILE
The user can select a file number, which have loaded image into the storage center and copy the file from
it. If the file doesn’t exist, the system shows an error message.
It can assign a file number as a file name when the user execute LOAD function.
How to set the file number?
1. Press RUN button to increase the number.
17
2. Press SET button to move the index.
3. Hold RUN button for 3 seconds and complete the setting.
4. Hold SET button for 3 seconds and abandon the setting.
7.4.10 DEL IMG FILE [000]
The user can select a file number to delete it.
How to delete a file number?
1. Press RUN button to increase the number.
2. Press SET button to move the index.
3. Hold RUN button for 3 seconds and delete the file number.
4. Hold SET button for 3 seconds and abandon to delete the file number.
7.4.11 FORMAT SOURCE
The user can make the storage center via FORMAT SOURCE, and then it can save the image into the
storage center.
How to make the storage center?
1. Insert a media on the first upper left port (#1).
2. Execute FORMAT SOURCE and follow the instruction.
7.4.12 DEVICE INFO
Show USB device information.
Follow the steps to show the USB devices info.
1. Insert the USB device to the USB slots.
2. Go to the setup manual and then select DEVICE INFO via SET button.
3. Press RUN button to execute the function and press SET button to show the next in sequence.
4. Hold SET button 3 seconds and return to previous manual.
7.4.13 SYSTEM INFO.
Show system information and firmware.
18
8.
Frequent Operation and Introduction
There are some very common functions, we make some easy steps; please follow the instruction to make
easy to operate it.
All operations are base on the default value.
●
8.1 Load Default Value Setting
1. Hold the SET button for 3 seconds and then go to the setup manual.
2. Press SET button to select SET TO DEFAULT function.
3. Press RUN button to load the default value.
4. Hold the SET button again for 3 seconds and then go back to the operation manual.
●
8.2 Duplication USB Stick
1. Press SET button to select SMART mode.
2. Insert the source media into the first upper left port (#1).
3. Insert the targets medium into the others copy port.
4. Wait the source and the targets ready.
5. Press RUN button to execute.
If the targets USB are working, they will blink the red light.
If the copy finished, they will show a green light, and then you can remove them and insert new one for
next.
[ * ] Enable
[ ] Disable
●
8.3 Compare USB Stick
1. Hold SET button for 3 seconds and then go to the setup manual.
2. Press SET button to select SMART COMPARE and then enable this feature via RUN button.
3. Press SET button to select SMART COPY and then disable this feature via RUN button.
4. Hold SET button fro 3 seconds and then go back the operation manual.
5. Press SET button to select SMART mode.
6. Insert the source media into the first upper left port (#1).
7. Insert the targets medium into the others copy port.
8. Press RUN button to execute.
If the targets USB are working, they will blink the red light.
If the compare finished, they will show a green light, and then you can remove them and insert new one for
next.
[ * ] Enable
[ ] Disable
●
8.4 Duplication & Compare USB Stick
1. Hold SET button for 3 seconds and then go to the setup manual.
2. Press SET button to select SMART COMPARE and then enable this feature via RUN button.
3. Hold SET button fro 3 seconds and then go back the operation manual.
4. Press SET button to select SMART mode.
19
5. Insert the source media into the first upper left port (#1).
6. Insert the targets medium into the others copy port.
7. Press RUN button to execute.
If the targets USB are working, they will blink the red light.
If the copy and compare finished, they will show a green light, and then you can remove them and insert
new one for next.
[ * ] Enable
[ ] Disable
●
8.5 Make the Storage Center
1. Insert a larger media in the first upper left port (#1).
2. Hold SET button for 3 seconds and the go to the setup manual.
3. Press SET button to select FORMAT SOURCE and press RUN button to execute it.
4. The media will become the storage center and you can save image file into it.
●
8.6 Load Image File
1. Prepare a media, which have formatted by the system.
2. Hold the SET button for 3 seconds and then go the setup manual.
3. Press SET button to select SEL IMG FILE to set a number or use existing number (overwrite the file) as
the file name. (Refer to page 12)
4. Hold the SET button for 3 seconds and then go back the operation manual.
5. Insert the formatted media in the first upper left port(#1) and the original source into the any copy port.
6. Press SET button to select LOAD and press RUN button to execute it.
7. When it load finished, the display will show you to remove the original source and/or the storage center.
●
8.7 Duplicate From The Image File
1. Insert the storage center in to the first upper left port(#1), which have loaded the image file before.
2. Hold the SET button for 3 seconds and then go the setup manual.
3. Press SET button to select SEL IMG FILE and select an image number, which want to copy it. (Refer to
page 17)
4. Hold the SET button for 3 seconds and then go back the operation manual.
5. Press SET button to select SMART mode and press RUN button to execute it.
6. When it copy finished, the display will show you to remove the targets.
20
●
8.8 Update Firmware
How to upgrade the firmware to the latest?
1. Require the firmware from your vendor or supplier.
2. Copy the file to a USB stick.(the USB stick should be a FAT format)
3. Insert the USB stick into the source port (#1;the first upper left port)
4. Execute UPDATE FIRMWARE and follow the instruction on the display.
9.
21
Specification
●
9.1 USD1100/2100/4300
●
9.2 SDD1100/2100/4300
10.
Error Code List
11.
USB / SDD series of dismantling the installation disk graph
Content :
Installation Steps :
(1) Remove the casing cover.
22
(2) Remove the screws from the first rack, and the
SATA cables &.power cable.
(3) Take out the first main board.
(4) Remove the screws for 11th USB port.
(5) Take out the 11th USB board.
23
(6) Prepare a black sticker.
(7) Using the black sticker to block the USB&SDD
holes, but do not cover the led holes.
(8) Prepare a SATA HDD converter board.
(9) Aim the right position and install the board.
24
(10) Fixed the board.
(11) Put back the rack to the right position.
(12) Prepare a hard disk.
(13) Follow the red arrow and take off the screws,
so as to take off the HD’s frame.
25
(14) Aim the right position between the hard disk and
the HD’s frame.
(15) Fixed the screws between the hard disk and the HD's frame.
(16) Install a SATA cable on the converter board.
(17) Install the HD's frame with the hard disk in to the
machine.
26
(18) Plug the SATA power cable into the hard disk.
27